T-Serie (TUS/TUT) Montageanleitung Istruzioni d'assemblaggio Assembly instructions Manuel d'assemblage
←
→
Transcription du contenu de la page
Si votre navigateur ne rend pas la page correctement, lisez s'il vous plaît le contenu de la page ci-dessous
DE     Montageanleitung
IT     Istruzioni d'assemblaggio
EN     Assembly instructions
FR     Manuel d'assemblage

        T-Serie (TUS/TUT)
    Bichler Türenwerk GmbH - Schreinerei & Ausstellung * Hauptstraße 34 * 86562 Berg im Gau
Tel.: 08433 / 9411-0 * Telefax: 08433 / 9411-25 * info@bichler-tueren.de * www.bichler-tueren.de
Montageanleitung TUS/TUT
Istruzioni d'assemblaggio TUS/TUT
Assembly instruction TUS/TUT
Manuel d'assemblage TUS/TUT

        Bei den Modellreihen TUS/TUT handelt es sich um Aluminiumprofile zur Fertigung von FRAMELESS Türen für den Massiv-
und Trockenbau. In die Aluminiumprofile TUS wird je nach der Wahl des Türblattes ein dazu passender Holzkern eingearbeitet, in welchem die
Ausfräsungen für die Schließbleche, Bänder und Dichtungen vorzunehmen sind. Je nach Türblatt kann die entsprechende Zarge in einer Stärke
von 44/45/50/56 und 59 mm verbaut werden.

Die Aluminiumprofile stehen als Stangenware in den Längen 1100 mm, 2200 mm und 2750 mm zur Verfügung und sind kurzfristig lieferbar.
Diese sind mit einer Schutzfolie versehen und werden im Set verpackt inkl. aller Montage- und Befestigungsteile angeliefert. Je nach
Türblattstärke sind die Profile in verschiedenen Breiten erhältlich.

Die Türprofile bestehen aus einer rohen unbehandelten Aluminiumlegierung. Zement und seine Derivate produzieren, bei Nässe, alkalische
Substanzen welche, wenn man diese auf der Oberfläche der Aluminiumlegierung arbeiten lässt, zu Korrosion führen kann. Deshalb wird
empfohlen die Profile immer frei von Zement, Kleber und Fugenmaterial zu halten. Die Korrosion wird durch die empfohlene bauseitige
Grundierung und Lackierung des Profils in Wandfarbe verhindert.

       I modelli TUS/TUT sono profili d'alluiminio per porte a filo muro del tipo FRAMELESS per strutture masicce e a secco. Nei profili modello
TUS/TUT viene inserito un'apposito inserto di legno nel quale devono essere fresati i fori per le cerniere, lo scontro e la guarnizione. Secondo il
modello scelto sono possibili ante da 44/45/50/56 e 59 mm.

I profili d'alluminio sono muniti di una pellicola di protezione e disponibili a magazzino nelle seguenti lunghezze: 1100 mm, 2200 mm e 2750
mm. I profili possono essere confezionati come kit inclusi tutti gli accesori per un semplice e rapido montaggio.

I nostri profili porta consistono d'alluminio grezzo, non lavorato. L'alta umidità del cemento e dei suoi derivati producono sostanze alcaline che
possono causare corrosioni. Per evitare questo consigliamo di tenere i profili sempre liberi di cemento, colle e altre sostanze corrosive. La
corrosione può essere evitata anche verniciando i profili con delle apposite lacche. Tuttavia l'alluminio non è resistente a tutte le composte
chimiche.

        The aluminium profiles TUS/TUT are used to create FRAMELESS doors for solid and dry constructions. A timber insert with a size of 45,
        50, 56 or 59 mm must be added to the TUS aluminium profile in order to be able to prepare the millings for hidden hinges, striking
panels and other hardware.

The TUS/TUT profiles are available as standard lengths of 1100 mm, 2200 mm and 2750 mm on stock ready to be shipped in a short time. All
profiles are covered by a protective film and packed/delivered in a kit including the mounting- and fixing accessoires.

The door profiles are made out of raw untreated aluminium. Cement and his derivatives produce alcaline substances when getting wet, which
can provocate corrosion if they have time to work on the surface of the aluminium alloy. We reccomend to keep the profiles clear from cement,
glue and joints material. The above mentioned corrosion will be prevented by the recommended priming and finishing of the profiles in wall
colours.

        La gamme de modèles TUS/TUT sont constituées de profils en aluminium pour la fabrication de portes FRAMELESS (sans cadre) à
       utiliser en construction massive et sèche. Selon le vantail choisi, un noyau de bois correspondant est inséré dans les profils d’aluminium
TUS/TUT. Les perçages pour les nappes de penne, les charnières et les joints doivent y être réalisés. Selon le vantail, le dormant correspondant
peut être choisi dans une épaisseur de 44/45/50/56 et 59 mm.

Les profils en aluminium sont livrés sous forme de barres et sont livrables rapidement dans des longueurs de 1100 mm, 2200 mm et 2750 mm.
Ils sont munis d'un film protecteur et sont livrés par lots, accompagnés de toutes les pièces de montage et de fixation. Selon l’épaisseur d’un
vantail, les profils sont disponibles dans différentes largeurs.

En cas d'humidité, le ciment et ses dérivés produisent des substances alcalines susceptibles d’engendrer de la corrosion si on les laisse agir à la
surface de l’alliage d’aluminium. C’est la raison pour laquelle il est recommandé de toujours veiller à ce que les profils soient exempts de
ciment, d’adhésif et de matériau de joint. Le maître d'ouvrage peut empêcher la corrosion par l’application recommandée sur le profil d'une
couche de fond et d'une couche de peinture dans la couleur des murs.

                                         Bichler Türenwerk GmbH - Schreinerei & Ausstellung * Hauptstraße 34 * 86562 Berg im Gau         Page 2 of 16
                                     Tel.: 08433 / 9411-0 * Telefax: 08433 / 9411-25 * info@bichler-tueren.de * www.bichler-tueren.de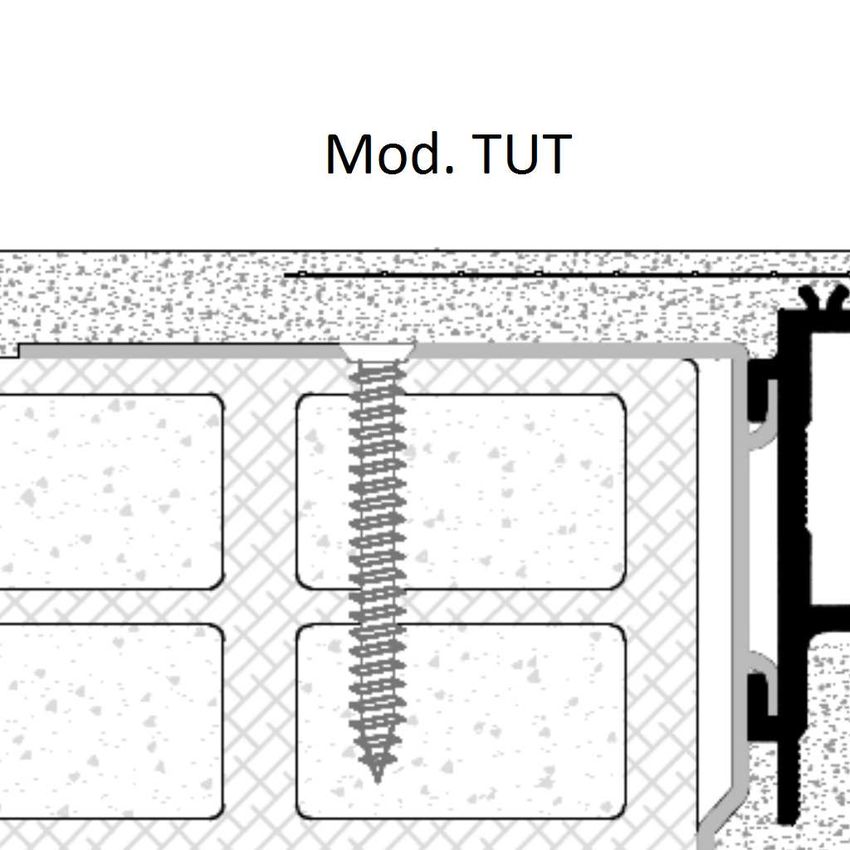
Montageanleitung TUS/TUT
Istruzioni d'assemblaggio TUS/TUT
Assembly instruction TUS/TUT
Manuel d'assemblage TUS/TUT

                                                                                                          DE Eckverbinder einschieben und Türzarge
                                                                                                             zusammensetzen (Detail A)

                                                                                              1
Detail/Dettaglio/Détail A
                                                                                                           IT Inserire gli angolari ed assemblare il telaio
                                                        DE 2,5 mm Sechskantschlüssel
                                                                                                              (dettaglio A)
                                                        IT 2,5 mm vite esagonale                          EN Insert the corner connector and assemble the
                                                                                                             door frame (detail A)
                                                        EN 2,5 mm hexagonal wrench                        FR Insérer les angles jusqu'à l'enclenchement et
                                                            2,5 mm clé hexagonal                             assemble les huisserie (détail A)

                                                                                                                      ca./approx./environ
                                                                                                                      300 mm

                                                                                                                                      Eckplatten eindrücken und leicht
                                                                                                                              DE
                                                                                                                                      anklopfen (Detail C)

                                       ca./approx./
                                       environ 300 mm                                                             2           IT

                                                                                                                              EN
                                                                                                                                      Inserire le piastre angolari e battere
                                                                                                                                      lievemente (dettaglio C)
                                                                                                                                      Push-in the angle desks (triangle) and
                                                                                                                                      lightly knock them in (detail C)

                                                                                                                              FR      Insérer les plaques d'angle et les
                                                                                                                                      enfoncer en tapotant légèrement
                                                                                                                                      dessus (détail C)

     DE Befestigungsbügel auf der
        Baustelle eindrehen (Detail C)

4     IT Inserire le staffe di fissaggio
         (dettaglio C)
      EN Screw-in the wall fixing
         brackets at site (detail C)
                                                                                                                     ca./approx./environ
                                                                                                                     300 mm

     FR Tourner l'étrier de fixation sur                                                                        DE Distanzschienen bis auf Anschlag einbringen und
        le site (détail C)                                                                                         mit Schraube + Flügelmutter auf entsprechende
                                                                                                                   Breite fixieren. Maximale Breite 1000 mm (Detail B)
                                                                                                                 IT Inserire i distanziali fino alla battuta e fissarli con
                                                                                                                    vite e dado ad alette alla larghezza adeguata
                                    ca./approx./environ
                                    300 mm
                                                                                                      3             (dettaglio B)
                                                                                                                EN Insert the bottom spreader bars to the limit top and
                                                                                                                   fix it with screws + wing nut on the appropriate
                                                                                                                   width. Maximum width 1000 mm (detail B)
                                                                                                                FR Insérer le rail d'écartement jusqu'à la butée et fixer
                                                                                                                   à la largeur souhaitée à l'aide d'une vis + écrou
                             Detail/Dettaglio/Détail C                                                             papillon. Largeur maximalle 1000 mm (détail B)
                   Eckplatten/Piastre angolari/Angle desks/Plaques d'angle
                   Art. Nr./Item no. 13014d-2 TCS/TCT
                                                                                                                  Detail/Dettaglio/Détail B
                                                                                            Distanzschienen/Distanziali/Bottom spreader bar/Barre d'ecartement
                                                                                            Art. Nr./Item no. 13013

                      TUS                                              TUT

                                            Bichler Türenwerk GmbH - Schreinerei & Ausstellung * Hauptstraße 34 * 86562 Berg im Gau                          Page 3 of 16
                                        Tel.: 08433 / 9411-0 * Telefax: 08433 / 9411-25 * info@bichler-tueren.de * www.bichler-tueren.de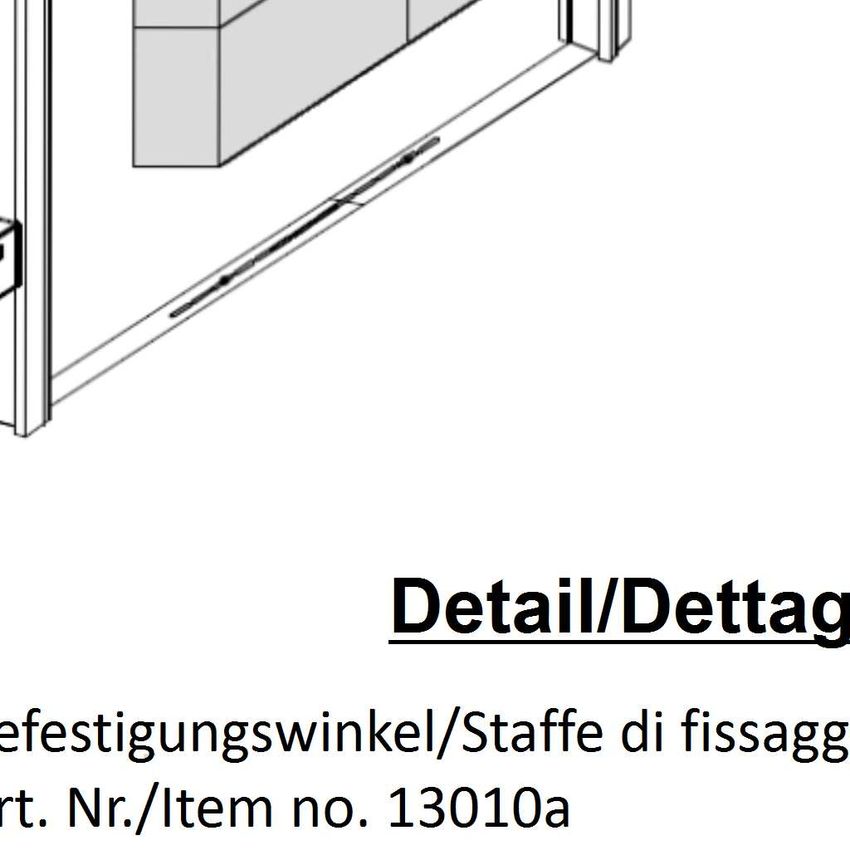
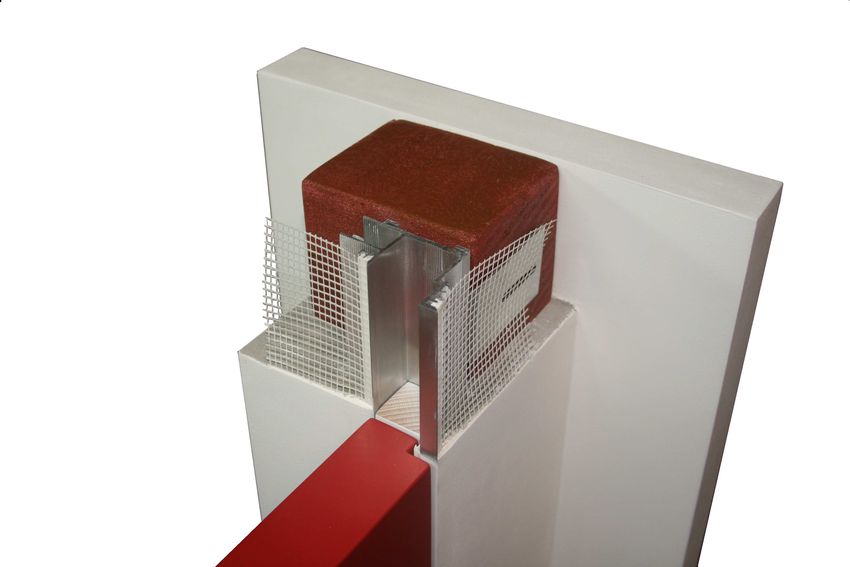
Montageanleitung TUS/TUT Mauerwerk
Istruzioni d'assemblaggio TUS/TUT per strutture massicce
Assembly instruction TUS/TUT for solid construction
Manuel d'assemblage TUS/TUT pour maçonnerie

                                                                  Detail/Dettaglio/Détail D

                     Mod. TUS                                                                                           Mod. TUT

                                         Bichler Türenwerk GmbH - Schreinerei & Ausstellung * Hauptstraße 34 * 86562 Berg im Gau        Page 4 of 16
                                     Tel.: 08433 / 9411-0 * Telefax: 08433 / 9411-25 * info@bichler-tueren.de * www.bichler-tueren.de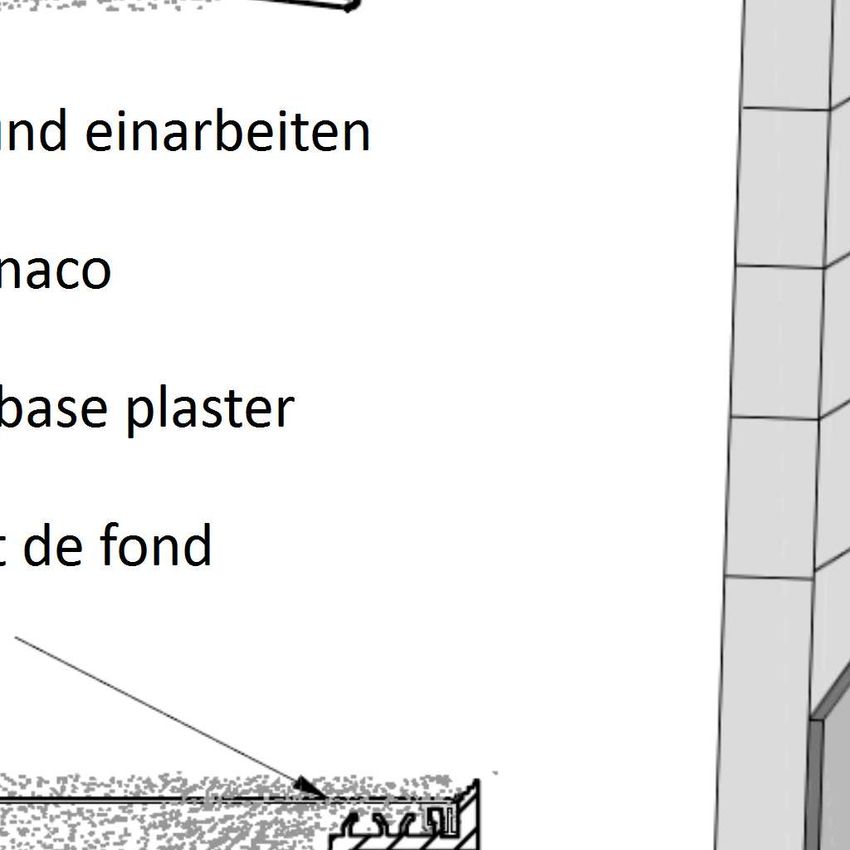
Montageanleitung TUS/TUT Mauerwerk
    Istruzioni d'assemblaggio TUS/TUT per strutture massicce
    Assembly instruction TUS/TUT for solid construction
    Manuel d'assemblage TUS/TUT pour maçonnerie

      DE Türzarge horizontal und vertikal ausrichten und an
         allen Befestigungsbügeln verschrauben. Zuerst
         wandseitig befestigen danach leibungsseitig

6        hinterfüttern und fixieren (Detail F)
       IT Regolare e spessorare il telaio a piombo ed avvitarlo
          alle staffe di fissaggio. (dettaglio F)
      EN Adjust the frame horizontally and vertically. Screw it
         together with the wall fixing brackets. At first install
         it at wall side and then fix and backfill it at the
         reveal side (detail F)
      FR Positionner le châssis horizontalement et
         verticalement. Fixer avec les étriers de fixation.
         D'abord l'installer du coté de mur et puis fixer et
         recouvre dans l'embrasure (détail F)

     DE Nach Befestigung die Zarge vollvolumig mit                                                                                         DE Plastiksteg beim Putznetz oben an
        handelsüblichen PU-Montagekleber
                                                                                                                                              der Zargengehrung 10 cm
        hinterfüllen
                                                                                                                                              entfernen, Putznetz einklicken

7     IT    Dopo il fissaggio riempire gli spazi rimanenti                                                                                    (Detail G) und an den Ecken
            con una colla poliuretanica                                                                                                       überlappen (Detail H)
            After fixation of the frame backfill it completely                                                                             IT Rimuovere 10 cm del profilo di
     EN

                                                                                                                              8
            with a commercial PU-mounting adhesive                                                                                            plastica della rete d'armatura ed
            Surmoussage le cadre avec une colle de                                                                                            incastrarla nel telaio. (dettaglio G)
     FR                                                                                                                                       Sovvraporre la rete negli angoli
            montage PU commerciale après l'assemblage
                                                                                                                                              (dettaglio H)
                                                                                                                                           EN Cut 10 cm of the plastic profile of
                                                                                                                                              the mesh at the mitre spot and
                                                                                                                                              click it in (detail G) and overlap the
                                                                         DE Nach Befestigung und Hinterfüllung der                            mesh on the angles (detail H)
                                                                            Zarge die Distanzschiene entfernen
                                                                                                                                           FR Détacher 10 cm de profil en
                                                                          IT Rimuovere il distanziale dopo aver                               plastique du filet support d'enduit

                                                               9
                                                                             fissato e riempito gli spazi vuoti del                           et encliqueter (détail G) et veiller à
                                                                             telaio                                                           ce que le filet se chevauce dans le
                                                                         EN After fixing and backfilling of the frame                         coins (détail H)
                                                                            remove the bottom spreader bar
                                                                                Retirer le rail d'écartement après
                                                                         FR
                                                                                l'assemblage et la soumoussage

                                                                                Detail/Dettaglio/Détail F
                                                        Dübel/Tassello/Dowel/Cheville                        Schrauben/Viti/Screws/Clés

                                                                 Rahmenschrauben/Viti per telai/Frame screws/Clés de cadre

                                                      Bichler Türenwerk GmbH - Schreinerei & Ausstellung * Hauptstraße 34 * 86562 Berg im Gau                        Page 5 of 16
                                                  Tel.: 08433 / 9411-0 * Telefax: 08433 / 9411-25 * info@bichler-tueren.de * www.bichler-tueren.de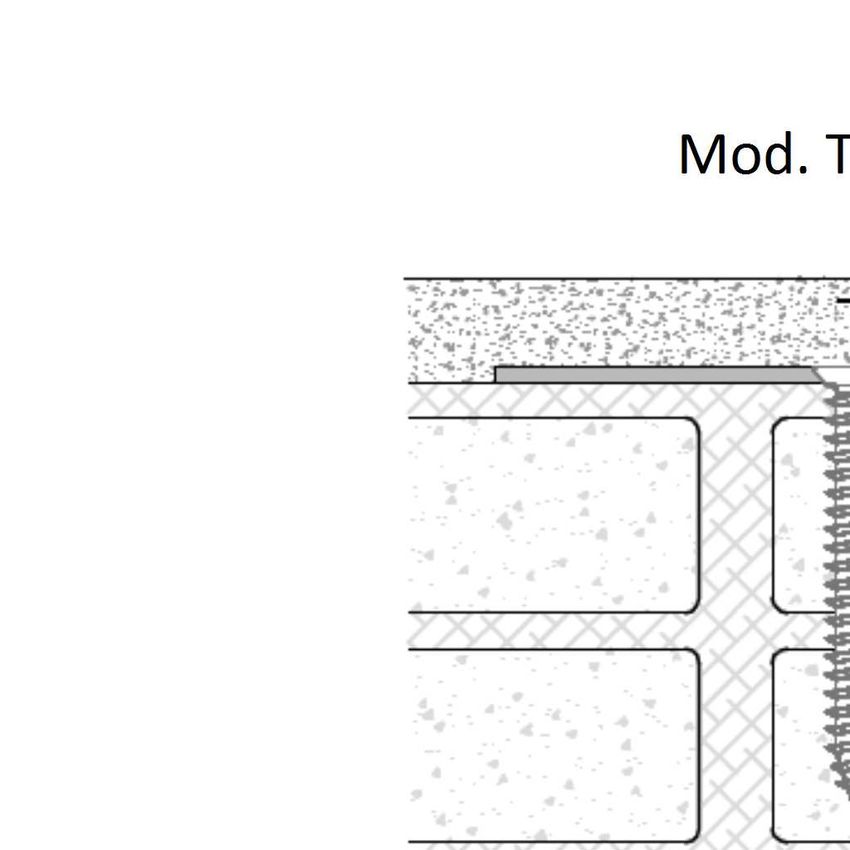
Montageanleitung TUS/TUT Mauerwerk
Istruzioni d'assemblaggio TUS/TUT per strutture massicce
Assembly instruction TUS/TUT for solid construction
Manuel d'assemblage TUS/TUT pour maçonnerie

                                                                 Detail/Dettaglio/Détail G

                                   Mod. TUS                                                                          Mod. TUT

                                 Detail/Dettaglio/Détail H

                                                 Bichler Türenwerk GmbH - Schreinerei & Ausstellung * Hauptstraße 34 * 86562 Berg im Gau        Page 6 of 16
                                             Tel.: 08433 / 9411-0 * Telefax: 08433 / 9411-25 * info@bichler-tueren.de * www.bichler-tueren.de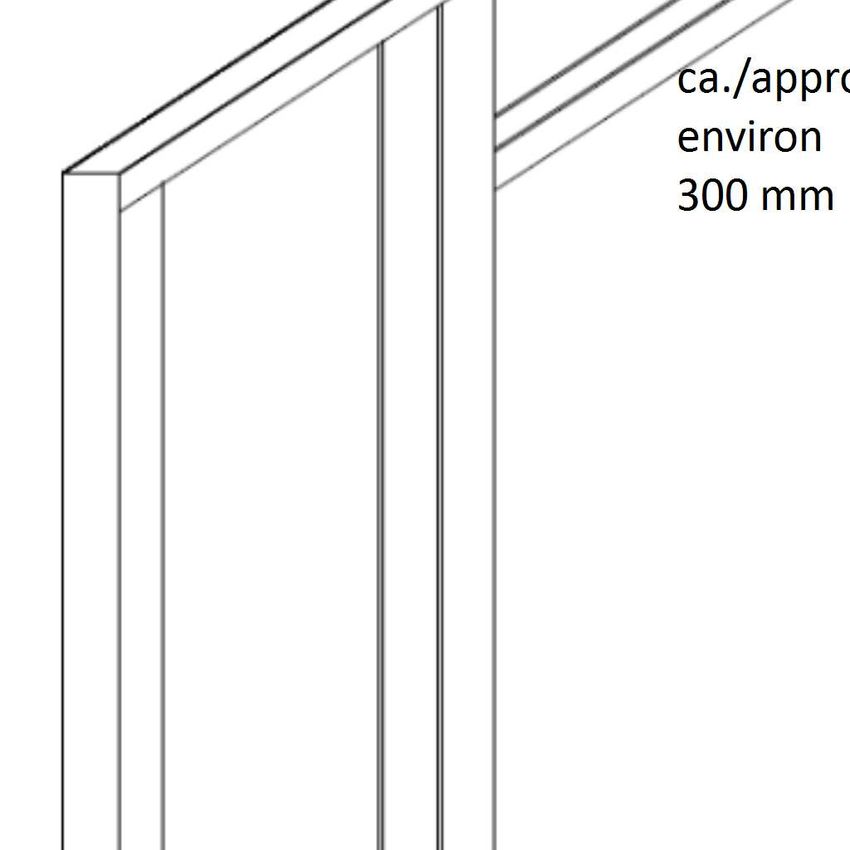
Montageanleitung TUS/TUT Mauerwerk - Putzarbeiten
Istruzioni d'assemblaggio TUS/TUT per strutture massicce – lavori d'intonacatura
Assembly instruction TUS/TUT for solid construction - plasterworks
Manuel d'assemblage TUS/TUT pour maçonnerie - travaux d'enduits

                                              Bichler Türenwerk GmbH - Schreinerei & Ausstellung * Hauptstraße 34 * 86562 Berg im Gau        Page 7 of 16
                                          Tel.: 08433 / 9411-0 * Telefax: 08433 / 9411-25 * info@bichler-tueren.de * www.bichler-tueren.de
Montageanleitung TUS/TUT Trockenbau
Istruzioni d'assemblaggio TUS/TUT per strutture a secco
Assembly instruction TUS/TUT for dry construction
Manuel d'assemblage TUS/TUT pour cloison sèche
Detail/Dettaglio/Détail D
Mod. TUS Mod. TUT
DE Siehe Montage Mauerwerk
IT Vedi montaggio su strutture massicce
EN Like installation on solid construction
FR Voir l'assemblage pour maçonnerie
Bichler Türenwerk GmbH - Schreinerei & Ausstellung * Hauptstraße 34 * 86562 Berg im Gau Page 8 of 16
Tel.: 08433 / 9411-0 * Telefax: 08433 / 9411-25 * info@bichler-tueren.de * www.bichler-tueren.deMontageanleitung TUS/TUT Trockenbau - Einfachbeplankung
Istruzioni d'assemblaggio TUS/TUT per strutture a secco – singola lastra
Assembly instruction TUS/TUT for dry construction – single layer
Manuel d'assemblage TUS/TUT pour cloison sèche – single plaque de plâtre
Ständerbau/Costruzione a secco/
Timber construction/Support en bois
Befestigungsbügel/Staffe di fissaggio/
Wall fixing brackets/Étrier de fixation
Putznetz/Rete d'armatura/
Mesh/Filet d'enduit
Beplankung/Lastra di cartongesso/
Planking/Plaque de plâtre
Verspachtelung/Stuccatura/
Skim coating/Enduit
DE Gipskartonplatten im Bereich der Befestigungsbügel
ausnehmen um einen ebenen Anschluss zu
gewährleisten (Detail K)
IT Sventrare le lastre di cartongesso sulla posizione
delle staffe di fissaggio per garantire una superficie
10 adeguata (dettaglio K)
EN To guarantee a flush connection cut off the gypsm
boards where the wall fixing brackets have been
installed (detail K)
FR Pour garantir la connexion à fleur couper la plaque
de plâtre où les étrier de fixation ont été installés
(détail K)
Detail/Dettaglio/Détail K
DE Gipsplatten im Bereich der Befestigungsbügel
ausnehmen, z.B. mit einem Gipshobel
IT Sventrare le lastre di cartongesso sulla
posizione delle lastra di fissaggio, p.e. usando
una pialla
EN Work off the gypsm board where the wall fixing
brackets have been installed, f.e. by using a
plane
FR Couper la plaque de plâtre où les étrier de
fixation ont été installés, p.e. avec un rabot
Bichler Türenwerk GmbH - Schreinerei & Ausstellung * Hauptstraße 34 * 86562 Berg im Gau Page 9 of 16
Tel.: 08433 / 9411-0 * Telefax: 08433 / 9411-25 * info@bichler-tueren.de * www.bichler-tueren.deMontageanleitung TUS/TUT Trockenbau - Doppelbeplankung
Istruzioni d'assemblaggio TUS/TUT per strutture a secco – doppia lastra
Assembly instruction TUS/TUT for dry construction – double layer
Manuel d'assemblage TUS/TUT pour cloison sèche – double plaque de plâtre
Ständerbau/Costruzione a secco/
Timber construction/Support en bois
1. Beplankung/1. lastra di cartongesso/
1st planking/1ère plaque de plâtre
Befestigungsbügel/Staffe di fissaggio/
Wall fixing brackets/Étrier de fixation
2. Beplankung/2. lastra di cartongesso/
2nd planking/2ème plaque de plâtre
Putznetz/Rete d'armatura/
Mesh/Filet d'enduit
Verspachtelung/Stuccatura/
Skim coating/Enduit
Detail/Dettaglio/Détail K
Bichler Türenwerk GmbH - Schreinerei & Ausstellung * Hauptstraße 34 * 86562 Berg im Gau Page 10 of 16
Tel.: 08433 / 9411-0 * Telefax: 08433 / 9411-25 * info@bichler-tueren.de * www.bichler-tueren.deMontageanleitung TUS/TUT Trockenbau
Istruzioni d'assemblaggio TUS/TUT per strutture a secco
Assembly instruction TUS/TUT for dry construction
Manuel d'assemblage TUS/TUT pour cloison sèche
Mod. TUS Mod. TUT
DE Einfachbeplankung DE Einfachbeplankung
IT Singola lastra IT Singola lastra
EN Single layer EN Single layer
FR Single plaque de plâtre FR Single plaque de plâtre
Mod. TUS Mod. TUT
DE Doppelbeplankung DE Doppelbeplankung
IT Doppia lastra IT Doppia lastra
EN Double layer EN Double layer
FR Double plaque de plâtre FR Double plaque de plâtre
Bichler Türenwerk GmbH - Schreinerei & Ausstellung * Hauptstraße 34 * 86562 Berg im Gau Page 11 of 16
Tel.: 08433 / 9411-0 * Telefax: 08433 / 9411-25 * info@bichler-tueren.de * www.bichler-tueren.deMontageanleitung TUS/TUT – Holzkern Modell TUS
Istruzioni d'assemblaggio TUS/TUT – inserto di legno modelli TUS
Assembly instruction TUS/TUT – timber insert TUS profiles
Manuel d'assemblage TUS/TUT - noyau en bois pour modèles TUS
DE Dichtungsmaß 5 mm DE Dichtungsmaß 5 mm
IT Dimensione guarnizione 5 mm IT Dimensione guarnizione 5 mm
TUS45 10445 EN Dimension seal/gasket 5 mm TUS50 10450 EN Dimension seal/gasket 5 mm
FR Dimension de joint 5 mm FR Dimension de joint 5 mm
DE Dichtungsmaß 5 mm DE Dichtungsmaß 5 mm
IT Dimensione guarnizione 5 mm IT Dimensione guarnizione 5 mm
EN Dimension seal/gasket 5 mm EN Dimension seal/gasket 5 mm
FR Dimension de joint 5 mm FR Dimension de joint 5 mm
TUS56 10456 TUS59 10459
DE Profil für Falzmaße 12 und 15 mm einsetzbar
IT Profilo per misura pieghe da 12 e 15 mm possibile da inserire
EN Profile for rebate dimension of 12 and 15 mm suitable
FR Profil pour dimension feuillure de 12 et 15 mm possible
Bichler Türenwerk GmbH - Schreinerei & Ausstellung * Hauptstraße 34 * 86562 Berg im Gau Page 12 of 16
Tel.: 08433 / 9411-0 * Telefax: 08433 / 9411-25 * info@bichler-tueren.de * www.bichler-tueren.deMontageanleitung TUS/TUT – Holzkern Modell TUT
Istruzioni d'assemblaggio TUS/TUT – inserto di legno modelli TUT
Assembly instruction TUS/TUT – timber insert TUT profiles
Manuel d'assemblage TUS/TUT - noyau en bois pour modèles TUT
TUT45 10345 TUT59 10359
DE Dichtungsmaß 5 mm DE Dichtungsmaß 5 mm
DE Falz Holzkern
9 x 4,5 mm IT Dimensione guarnizione 5 mm IT Dimensione guarnizione 5 mm
IT Pieghe inserto di legno
9 x 4,5 mm EN Dimension seal/gasket 5 mm EN Dimension seal/gasket 5 mm
EN Rebate timber insert FR Dimension de joint 5 mm FR Dimension de joint 5 mm
9 x 4,5 mm
FR Feuillure noyau en bois
9 x 4,5 mm
Bichler Türenwerk GmbH - Schreinerei & Ausstellung * Hauptstraße 34 * 86562 Berg im Gau Page 13 of 16
Tel.: 08433 / 9411-0 * Telefax: 08433 / 9411-25 * info@bichler-tueren.de * www.bichler-tueren.deMontageanleitung TUS/TUT - Montage Holzkern
Istruzioni d'assemblaggio TUS/TUT – montaggio inserto di legno
Assembly instruction TUS/TUT – timber insert mounting
Manuel d'assemblage TUS/TUT – montage de noyau en bois
DE Kleber auf der Oberseite des Holzkernes auftragen
und einlegen
1 IT Applicare la colla sul lato superiore dell'inserto di
legno ed inserirlo
EN Applicate the adhesive on the upper part of the
timber insert and fix it to the profile
FR Appliquer la colle sur la partie supèrieure du noyau
en bois avant de le poser
DE Kleber auf der Rückseite des Holzkernes auftragen
und einlegen
IT Applicare la colla sul lato posteriore dell'inserto di
2 legno ed inserirlo
EN Applicate the adhesive on the vertical part of the
timber insert and fix it to the profile
FR Appliquer la colle sur la partie supèrieure du noyau
en bois avant de le poser
DE Scharniere einsetzen und durch den Holzkern hindurch
mit dem Aluminiumprofil verschrauben. Ebenso auf
der gegenüberliegenden Seite durch das Schließblech
hindurch mit dem Aluminiumprofil verschrauben.
Modell TUS/TUT
3 IT Infilare le cerniere ed avvitarle tramite l'inserto di
legno al profilo d'alluminio. Allo stesso modo avvitare
lo scontro tramite l'inserto di legno al profilo
d'alluminio alla parte di fronte. Modelli TUS/TUT
EN Fix and screw hinges through the timber insert to the
alluminium profil. Likewise do the same for the closing
panels on the opposite part. TUS/TUT profiles.
Insérer la charnière et la visser au profil en aluminium
FR
à travers le noyau de bois. Du coté opposé faire de
même à travers la gâche. Les modèles TUS/TUT
Bichler Türenwerk GmbH - Schreinerei & Ausstellung * Hauptstraße 34 * 86562 Berg im Gau Page 14 of 16
Tel.: 08433 / 9411-0 * Telefax: 08433 / 9411-25 * info@bichler-tueren.de * www.bichler-tueren.deMontageanleitung TUS/TUT - Notizen
Istruzioni d'assemblaggio TUS/TUT – note
Assembly instruction TUS/TUT – note
Manuel d'assemblage TUS/TUT – note
…......................................................................................................
…......................................................................................................
…......................................................................................................
…......................................................................................................
…......................................................................................................
…......................................................................................................
…......................................................................................................
…......................................................................................................
…......................................................................................................
…......................................................................................................
…......................................................................................................
…......................................................................................................
~ your choice of modern living ~

             Thank you for having chosen our systems

    Bichler Türenwerk GmbH - Schreinerei & Ausstellung * Hauptstraße 34 * 86562 Berg im Gau
Tel.: 08433 / 9411-0 * Telefax: 08433 / 9411-25 * info@bichler-tueren.de * www.bichler-tueren.de~ your choice of modern living ~
Thank you for having chosen our systems
Bichler Türenwerk GmbH - Schreinerei & Ausstellung * Hauptstraße 34 * 86562 Berg im Gau
Tel.: 08433 / 9411-0 * Telefax: 08433 / 9411-25 * info@bichler-tueren.de * www.bichler-tueren.deVous pouvez aussi lire