Solarium Octogonal Dom. 12x18
←
→
Transcription du contenu de la page
Si votre navigateur ne rend pas la page correctement, lisez s'il vous plaît le contenu de la page ci-dessous
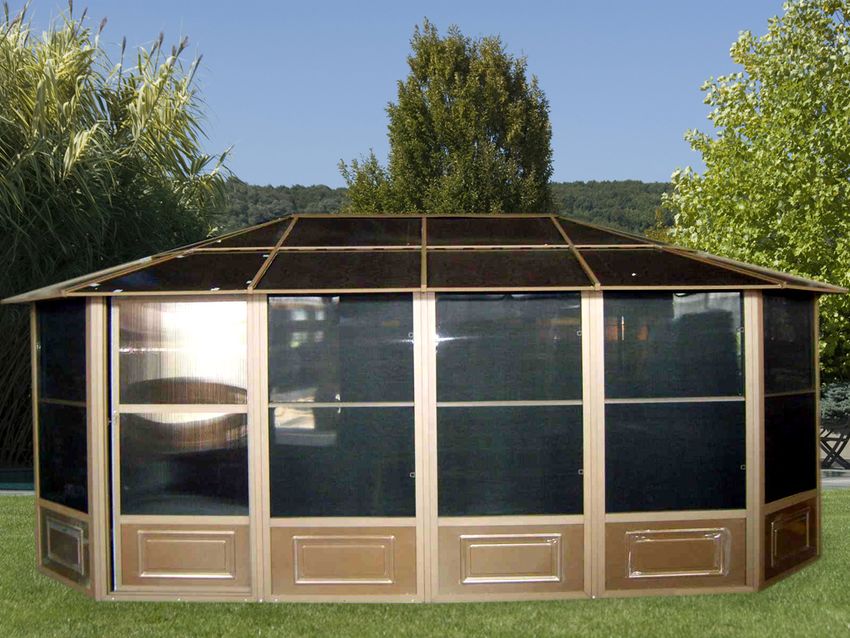
Solarium Octogonal Dom. 12x18
                                 Instructions d'assemblage - Solarium 4.05m x 6.15m
                                 Assembly Instruction - 12’ x 18’ Aluminum Solarium

Si vous avez de la difficulté à assembler ce produit, SVP ne pas le retourner chez le détaillant.
Contactez-nous par courriel : piece@sojag.ca
If you are having difficulty assembling this unit, please do not return to the store.
Contact us by email: piece@sojag.ca
Solarium Octogonal Dom. 12x18
Assembly Instruction / Instructions d'assemblage
Parts Listing Liste des pièces
A - Side panel A - Panneau de coté
A1 - Panel A1 - Panneau
B - Sliding door B - Porte coulissante
B1 - Frame B1 - Cadre
C, C1 & C2 - Panel connector C, C1 & C2 - Connecteur de panneaux
D - Upper door rail D - Rail de porte du haut
D1- Lower door rail D1 - Rail de porte du bas
D2 - Door stopper D2 - Arrêt de porte
E & E1 - Panel connector E & E1 - Connecteur de panneaux
F & G - Roof bar F & G - Barre de toit
H - Roof connector cover H - Connecteur de toit
I - Central connector I - Connecteur central
J, K, K1, L & L1 - Roof insertion bar J, K, K1, L & L1 - Barre d'insertion de toit
M - Roof Finishing ends M - Cache joint de toit
N, O & P - Finishing bar N, O & P - Barre de finition
N1,O1 & P1 - Inside finishing bar N1, O1 & P1- Barre de finition intérieur
Qa, Qb, Q1a & Q1b - Roof panel Qa, Qb, Q1a & Q1b - Panneau de toit
Sa & Sb - Roof panel Sa & Sb - Panneau de Toit
X, X1, Y & Y1 - Angle iron X, X1, Y & Y1 - Fer angle
Z - Door lock Z - Loquet de porte
ZZa & ZZb - Roof panel ZZa & ZZb - Panneau de toit
R,T,U,V,W,W1,Z1,Z2 & T1-Screws and nuts R,T,U,V,W,W1,Z1,Z2 & T1- Vis et écrousIMPORTANT : READ COMPLETLY THE INSTRUCTION MANUAL BEFORE ASSEMBLING.
(THE PICTURES ARE COMPLEMENTARY)
IMPORTANT : LIRE ATTENTIVEMENT LES INSTRUCTIONS AVANT L’ASSEMBLAGE.
(LES PHOTOS SONT COMPLÉMENTAIRES)
Assembly of the solarium will require the help L’assemblage du solarium nécessite l’aide
of another person. d’une autre personne.
Assembly Instruction Instructions d'assemblage
12’ x 15’ Aluminum Solarium Solarium 4.05m x 5.10m
Step 1: Assemble panels Étape 1 : Assemblage
1A: Join the doors 1A: Joindre les portes
• Place the door panel (B) in a way that the wheels of • Placer le panneau de porte (B) de façon à ce que les
panel (A1) slide in the panel (B) track). Take one of roues du panneau (A1) glissent dans la rail du
the panels (B1) and panels (A1 +B) and fix them panneau (B). Prendre un panneau (B1) ainsi que les
together sliding (from top to bottom) the bars (C) panneaux (A1 + B) et fixer ensemble en glissant (de
on the mosquito netting side (outside) and (C2) the haut en bas) les barres (C) du côté moustiquaire
mica side (inside). (extérieur) et (C2) du côté mica (intérieur).1B: Install the bottom of the door 1B: Installer le guide du bas de porte
• Install track (D1) in a way that the guides of the • Installer la rail (D1) de façon à ce que les guides de la
door (B) slide inside. Fix the track to the panels porte (B) glissent à l’intérieur. Fixer la rail aux
(A1 + B) with the screws and nuts (W1). panneaux (A1 + B) à l’aide des vis et écrous (W1).
1C: Install the top of the door 1C: Installer le guide du haut de porte
• Install track (D) and panels (B1 + A1) and fix them • Installer la rail (D) aux panneaux (B1 + A1) et fixer
with screws and nuts (W). avec les vis et écrous (W).
• Place the block (D2) on the track (D) and fix with • Placer le bloqueur (D2) sur la rail (D) et fixer avec
screw (J1). la vis (J1).
• Fix the lock (Z) with the screw (Z1) to the frame • Fixer la barrure (Z) à l’aide des vis (Z1) sur le
(B1) taking care that the hook is toward the bottom. cadre (B1) en prenant soin que le crochet soit vers
• Repeat for the 2nd door section. le bas.
• Répéter pour la 2ième section de porteStep 2: Assemble the structure Étape 2: Assembler la structure
• Join two sections (A) sliding (from top to bottom) the • Joignez deux sections (A) en glissant (de haut en bas)
bars (C) on the mosquito netting side and bars (C1) on les barres (C) côté moustiquaire et barres (C1) côté
the mica side. Use bars (E & E1) for the corner sections. mica. Utilisez les barres (E & E1) pour les sections en
These should enter easily without any effort. If not, you coins. Ces dernières devraient entrer facilement et sans
should move them because it means they are probably efforts. Si ce n’est pas le cas vous devez les bouger
not properly aligned. puisqu’elles ne sont probablement pas bien enlignées.
• Install the door section (B & A1) to the corner section • Installer la section de porte (B & A1) à la section (A) de
(A) with bars (E & E1). The door section can be coin à l’aide des barres (E & E1). La section de porte
installed inside at the moment the section (B) will be (on peut être installée a l’intérieur à ce moment la section
the illustration) at the right of (A1). Repeat until the (B) se retrouvera (sur le schéma) à la droite de (A1).
structure is completed. For the last section, it will be Répéter jusqu’au moment ou la structure est complétée.
necessary to use a rubber sledgehammer to insert the Pour la dernière section, il peut être nécessaire d’utiliser
bars. une masse de caoutchouc pour l’insertion des barres.
• Anchor the solarium to the ground. If your deck is made • Ancrer le solarium au sol. Si votre patio est en bois,
of wood, you can use screws (Z2) included in the box. vous pouvez utiliser les vis (Z2) incluses dans la boîte.
Make sure they are appropriate for your type of S’assurer qu’elles conviennent à votre type
installation. If not, you should use screws that are d’installation. Sinon, utiliser des vis qui seront bien
suitable for the surface of installation. adaptées à votre sol.
Concrete pad: Use Tapcon screws Patio en béton : Utiliser des clous Tapcon
Wood patio: Use wood screws Terrasse en bois : Utiliser des vis a boisStep 3 & 4: Assemble roof Étape 3 et 4 : Assembler le toit
• Insert 1 screw (T) in each roof bar (F), 1 screw • Insérer 1 vis (T) dans chaque rail des barres de
(T) in the 2 roof bars (G) that will be used on the toit (F), 1 vis (T) dans 2 des barres (G) qui seront
12’ sides and 2 screws (T) in the 6 remaining utilisées sur les côtés 12’ et 2 vis (T) dans les 6
bars (G) that will be used on the longest sides of barres (G) restantes, qui seront utilisées sur les
the roof (18’ sides), put away to use later. côtés les plus longs du toit (cotés 18’) et mettre
• Install parts (X) onto the bars (G) and the parts (Y) de coté pour utilisation future.
onto the bars (F), using screws (V). • Installer les pièces (X) sur les barres (G) et les
• Place screws and nuts (T) to the central connector pièces (Y) sur les barres (F), en utilisant les vis (V).
(I), don’t tighten too much to allow space to insert • Placer les vis et noix (T) au connecteur central (I)
the roof bars (F &G). ne pas trop les serrer afin de laisser de la place pour
• Insert, following the illustration, the bars (G) to the insérer les barres du toit (F & G).
central connector (I). Install each ones of the bars • Insérer, en suivant le schéma, les barres (G) au
(B) on the top of the structure (right section) and fix connecteur central (I). Installer chacune des barres
the iron angles (X) with the screws (R). (B) au dessus de la structure (section droite) et fixer
• Insert bars (F) in the central connector and fix the les fers angle (X) à l’aide des vis (R)
iron angles (Y) to the structure with screws (R). • Insérer les barres (F) au connecteur central et fixer
• Wait until all the roof panels are correctly installed les fers angles (Y) sur la structure à l’aide des vis
before tightening the screws (T) of the roof (R).
connector. • Attendre que tous les panneaux de toits soient bien
installée avant de serrez les vis (T) du connecteur
de toitStep 5 & 6: Assemble roof panels Étape 5 et 6 : Assembler les panneaux de toit
• Place the roof connector cover (H) on the top of the • Placer le couvre connecteur de toit (H) sur le dessus
solarium with screw (U) before installing the last du solarium à l’aide de la vis (U) avant d’installer le
roof panel, don’t tighten too much. dernier panneau de toit, ne pas trop serrer.
• Install roof panels (Qa, Qb, Sa & Sb) by referring to • Installer les panneaux de toit (Qa, Qb, Sa & Sb) en
the diagram to place them. vous référant au plan pour visualiser l’emplacement
• For each roof panel (Qa & Qb) installed, place the de ceux-ci.
appropriate support bar (J, K or L) according to the • Pour chacun des panneaux de toit (Qa & Sa)
angle of the adjacent roof bars. installé, placer la barre de soutien (J, K ou L)
• For each roof panels (Qb & Sb) installed, place the appropriée selon l’angle des barres de toit
appropriate support bar (N, O or P) according to the adjacentes.
angle of the adjacent roof bars. Fix with parts (M) • Pour chacun des panneaux de toit (Qb & Sb)
and screws (T1). installé, placer la barre de soutien (N, O ou P)
• Install the roof panels (Qa, Qb, Sa & Sb), referring appropriée selon l’angle des barres de toit
to the instructions to visualized the exact place to adjacentes. Fixer à l’aide des pièces (M) et des vis
put them. (T1).
• Fix solidly the screws and nuts (T) to the central • Fixer solidement les vis et noix (T) du connecteur
roof connector as well as the screw (U). central ainsi que la vis (U).
• From the inside, place the appropriate support bars • De l’intérieur, placer les barres de soutien (N1, O1
(N1, O1 or P1) according to the angle of the ou P1) appropriée selon l’angle des barres de toit
adjacent roof bars with screws and washers (T) adjacentes à l’aide des vis et rondelles (T)
installed in the roof bars track during step 3. préalablement installées dans les rails des barres de
toit à l’étape 3WARNING: This unit will be usable ATTENTION : Ce Solarium a été conçu pour throughout the year. This product will resist to être utilisé toute l’année mais en cas de chute some accumulation of snow but please make de neige abondante nous vous prions d’enlever sure that it is regularly removed so the roof will cette neige pour éviter que le trop grand poids not collapse. fasse écraser le toit.
Vous pouvez aussi lire