HANDLEIDING POWERCUBE 100 - Draagbare BT speaker met draadloze microfoon - Salora
←
→
Transcription du contenu de la page
Si votre navigateur ne rend pas la page correctement, lisez s'il vous plaît le contenu de la page ci-dessous
HANDLEIDING
              POWERCUBE 100
Draagbare BT speaker met draadloze microfoon
PROBLEMEN OPLOSSEN
Probleem Mogelijke oorzaak Oplossing
1. Geen ingang geluidsbron 1. Gebruik een beter muzieksignaal
Geen geluid
2. Volume is te laag 2. Pas het volume aan
1. Volume is te hoog 1. Zet het volume lager
Geluid storing
2. Speaker is misschien beschadigd 2. Repareer of vervang de speaker
1. Microfoon stekker zit er niet helemaal in 1. Doe de stekker goed in ingang
2. Microfoon schakelaar staat niet aan 2. Zet de schakelaar om
Karaoke werkt
3. Volumeknop van microfoon staat op z’n
niet 3. Pas het volume aan
laagst
4. Batterij draadloze microfoon is leeg 4. Vervang de batterij
1. Formaat van liedje is onjuist 1. Converteer het formaat naar MP3
2. Onjuist gebruik heeft een fout
MP3 werkt 2. Herstart het apparaat
veroorzaakt
niet
3. USB stick/TF kaart maken geen 3. Plaats de USB stick/TF kaart om
verbinding een juiste manier
TECHNISCHE SPECIFICATIES
Uitgang vermogen……………………………………………………………………………. ≤ 30W
Ingangsgevoeligheid…………………………………………………………………………. 550±30mV
SNR (Signaal/Ruis verhouding)…………………………………………………………. ≥ 71dB
Frequentieweergave ……………………………………………………………………….. 20Hz-20kHz
Stroomvoorziening ………………………………………………………………………….. AC100V-AC240V, 60Hz/50Hz
*** Bovenstaande specificaties zijn gebaseerd op een proef apparaat en dient uitsluitend ter
indicatie.
*** Door continue productontwikkelingen kunnen sommige specificaties, zonder berichtgeving
vooraf, wijzigen.
ALGEMENE FUNCTIES
• VOL: aanpassen van het volume
• TREBLE: aanpassen van de treble voor optimaliseren van het geluid
• BASS: aanpassen van de bass
• MIC.VOL: aanpassen naar wens van het volume van de microfoon
• ECHO: aanpassen van de echo om deze te versterken/verzwakken
• MIC: gebruik deze om de microfoon aan te sluiten
KENMERKEN VAN HET APPARAAT
Dit apparaat kan worden aangesloten op een computer, mobiele telefoon, DVD, VCD, CD, LD, TV,
MP3, radio, elektrische piano en ieder ander apparaat dat beschikt over een audio uitgang.
De versterkerschakeling levert High Performance en heeft een High Fidelity ontwerp, gekoppeld aan
hoge kwaliteit geluidsspreker, ontstaat er een breed geluidsveld voor een optimaal geluidseffect.
Het geluidsysteem is uitzonderlijk met een diepe en krachtige bas en een sterk treble effect met
duidelijke en heldere tonen.De professionele elektronische frequentie deler schakeling zorgt voor een verbeterd crossover point
effect.
Dit apparaat is voorzien van een professioneel ontwerp en batterijen met een hoge capaciteit, tevens
voorzien van speciaal ontworpen krachtige audio condensatoren, zodat het reservevermogen van de
speaker groter en stabieler wordt met een betere dynamiek en een hoger signaal voor
ruisonderdrukking.
OPLADEN VAN DE SPEAKER
Voor het opladen dient u het apparaat aan te sluiten op een adapter AC100V-AC240V. De oplaadtijd
is ongeveer 5 tot 8 uur. Zodra de batterij volledig is opgeladen dient u de stekker uit het stopcontact
te halen, indien u dit niet doet kan dit de reeds opgeladen batterij beschadigen.
Indicator Opladen Batterij: De LED display toont de status van het vermogen van de batterij door
middel van een indicator lampje. De batterij op de display toont vier horizontale lijnen, iedere lijn
staat voor 25% vermogen. Indien er geen lijnen worden weergegeven of indien het
icoon van de batterij knippert, dient u het apparaat uit te schakelen en de batterij
direct op te laden om schade aan de batterij te voorkomen. Tijdens het opladen
knipperen de horizontale lijnen in de weergave van de batterij. Zodra de batterij
volledig is opgeladen zullen de lijnen stoppen met knipperen.
Waarschuwing: Onder spanning dient u de batterij binnen 48 uur op te laden. Indien
u de speaker gedurende langere tijd niet gebruikt zorgt u er dan voor dat de batterij volledig is
opgeladen. De batterij zal anders beschadigen!
Tijdens het gebruik van het apparaat dient u ervoor te zorgen dat u deze niet plaatst in een omgeving
met hoge temperaturen, in de buurt van sterke magnetische velden of hoge frequenties. Indien het
apparaat niet meer werkt, schakelt u dan de stroomvoorziening uit of verwijder de USB/TF (Micro
SD) kaart en plaats daarna de kaart weer, het apparaat zal nu weer werken.
AFSTANDSBEDIENING
1. Mute
2. Muzieknummer
3. AUX Ingang
4. Ingang keuze
5. USB Ingang
6. Volgende
7. Effect van het geluidsveld
8. Volume verlagen
9. Afspelen van de opname
10. Vorige
11. Opnemen
12. Volume verhogen
13. Herhaal
*** Deze afbeelding dient uitsluitend ter indicatie.1. Onder normale omstandigheden, dient u de
afstandsbediening direct te richten op het
ontvangstvenster van het apparaat op een afstand van
niet meer dan 6 meter en in een hoek binnen 30°.
2. Bij het gebruik en richten van de afstandsbediening op het
apparaat dient u ervoor te zorgen dat er geen objecten
het veld blokkeren.
3. Indien bij gebruik van de afstandsbediening het licht
reflecteert, kan het voorkomen dat deze niet goed werkt.
Wij adviseren u het apparaat uit het directe zonlicht te
halen en te verplaatsen.
4. Gebruik nooit oude en nieuwe batterijen tegelijk. Vervang
de batterijen van de afstandsbediening regelmatig.
FUNCTIES
1. Microfoon ingang
2. Microfoon Voorrangsschakelaar
3. Mic Volume
4. Mic Echo
5. Bass
6. Treble
7. DC15V oplaad Interface
8. Aan/Uit schakelaar
9. Ingangselectie
10. Opnemen
11. Afspelen van opname
12. Vorige/CH-
13. Afspelen/Pauze/Scan
14. Volgende/CH+
15. Audio Ingang
16. USB Aansluiting
17. TF (Micro SD) kaart Sleuf
AANSLUITINGEN
*** Deze afbeelding dient uitsluitend ter indicatieUSB EN TF (MICRO SD) KAART
• De USB stick, TF kaart (Micro SD) dient te worden geformatteerd in het bestandssysteem
FAT32 op uw computer.
• De volgorde van afspelen hangt af van de bestandnaam en de extensie. Indien een bestand
achter de bestandnaam een extensie heeft 01, 02, 03…. Dan zal als eerste de extensie 01
worden afgespeeld.
• Kopieer MP3 of WMA muziekbestanden (download) naar de hoofdmap van de USB stick of
de TF kaart (Micro SD). Wij adviseren u overbodige bestanden te verwijderen om leesfouten
tijdens het afspelen te voorkomen.
DRAADLOZE MICROFOON
*** Deze afbeelding dient uitsluitend ter indicatie.
• Open het batterij compartiment, plaats de batterijen rekening houdend met de juiste
polariteit.
• Zet de schakelaar op ON om de microfoon of zender aan te zetten. Indien de indicator niet
gaat branden, controleer dan of de batterij goed in het compartiment zit.
• Pas het volume van de microfoon aan door middel van de knop van de stereo.
• Indien u, tijdens het zingen, de microfoon tijdelijk wilt uitschakelen, zet u de schakelaar op de
mute stand in het midden van de microfoon. Indien u de microfoon helemaal wilt uitzetten,
zet u de schakelaar op OFF.
OPNAME FUNCTIE
• Druk op RECORD om uw stem op een externe geheugenopslag, zoals een USB stick of een
geheugenkaart (Micro SD), op te slaan. Indien het externe geheugen voor de eerste keer
wordt gebruikt, zal het systeem automatisch een map RECORD aanmaken, de bestanden
zullen dan worden opgeslagen onder de naam REC01, REC02 enz.
• In de Opname modus, drukt u op de RECORD/INPUT/REC.PLAY knop om het opnemen te
stoppen.
• Druk op de REC.PLAY knop om de opgeslagen bestanden van het externe geheugen af te
spelen, druk op PREV of NEXT om het vorige of volgende bestand af te spelen.
MP3, WMA EN WAV
• USB stick ingang: USB poort, Plug&Play.
• TF (Micro SD) ingang: TF (Micro SD) kaart sleuf, Plug&Play.• Ondersteunt muziekformaten MP3, WMA en WAV van uitstekende kwaliteit, waardoor u een
superieure en geheel nieuwe luisterervaring wordt geboden.
• Invoer selectie knop (INPUT): deze wordt gebruikt voor een extern Audio/MP3 of Bluetooth
apparaat (aangeduid aan de achterzijde van het apparaat als LINE die verbinding maakt met
een extern RCA geluidbron zoals een DVD).
• PLAY/PAUSE knop: Tijdens het afspelen kunt u hiermee het afspelen pauzeren. Druk
nogmaals om het afspelen te hervatten.
INGEBOUWDE BT FUNCTIE
• Bij het aanzetten van het apparaat zet u de invoerbron op BT.
• Controleer of uw BT apparaat is geactiveerd. Scan en verbind de speaker met het apparaat.
Zodra de verbinding is gemaakt hoort u een tik geluid. Indien het niet lukt een verbinding te
maken, herstart u het apparaat en/of de speaker en probeer het nogmaals.
• Nadat u een succesvolle verbinding heeft gemaakt met uw mobiele telefoon, kunt u de
nummers afspelen. Om zeker te zijn van een stabiel muzieksignaal, houdt u de BT en uw
mobiele telefoon op elkaar gericht.
• Dit apparaat ondersteunt iPad, iPhone, Samsung, HTC, MOTOROL, Nokia en andere draadloze
BT mobiele apparaten met geluidbestanden. Het apparaat ondersteunt A2DP.
• De BT van het apparaat kan worden gebruikt op maximaal 10 meter indien er geen blokkades
zijn.MANUAL
POWERCUBE 100
Portable BT speaker with wireless MICTROUBLESHOOTING
Fault Possible cause Solution
1. No input sound source 1. Use a better audio signal
No sound
2. Volume is too low 2. Adjust the volume
1. Volume is too high 1. Lower the volume
Distortion of
2. If damaged, repair or replace the
sound 2. Speaker may be damaged
speaker
1. Microphone plug is not completely 1. Insert the plug completeley into
inserted the socket
Karaoke does
2. Microphone switch is not on 2. Turn on the microphone switch
not work
3. Volume control is to the lowest position 3. Adjust the volume
4. Wireless microphone has a low battery 4. Replace the battery
1. The song format on the USB device is
1. Convert the song format into MP3
invalid
MP3 does not
2. Incorrect us has caused a system error 2. Reboot the device
play
3. Insert the USB Flashdrive/TF card
3. USB Flashdrive/TF card is not connected
correctly
MAIN TECHNICAL SPECIFICATIONS
Output power ...................................................................................... ≤ 30W
Input sensitivity ................................................................................... 550±30mV
SNR ...................................................................................................... ≥ 71dB
Frequency response ............................................................................. 20Hz-20kHz
Power supply ....................................................................................... AC100V-AC240V, 60Hz/50Hz
*** the above specifications are based on the specifications of an example device and are for
reference purposes only.
***due to continuous product development, specifications may be subject to change without prior
notice.
GENERAL FUNCTIONS
• VOL: Adjust the volume high or low
• TREBLE: adjust the treble to change the levels of the treble notes
• BASS: adjust the bass to change the levels of the bass notes
• MIC.VOL: adjust the volume of the microphone to your liking
• ECHO: adjust the echo to increase/decrease the echo effect
• MIC: socket to connect the microphone
PRODUCT FEATURES
This device can be used with a personal computer, mobile phone, DVD, VCD, CD, LD, TV, MP3, radio,
electronic piano and any other device with an audio output.
This high performance amplifier circuit with high fidelity design, combined with a high quality
speaker, produces an extremely clear sound field with distinct level effects.
This outstanding sound system offers a deep and powerful bass and strong treble effects with a clear
and bright sound.
The professional electronic frequency division improves the crossover point effect.The device with professional design is equipped with high capacity batteries, as well as high quality
audio capacitors to increase the speaker’s power reserve margin, to make it more stable, to have
better dynamics and to obtain a higher signal to noise ratio.
CHARGING OF THE SPEAKER
When you have to charge the device, connect the power adaptor to a AC100V – AC240V electric
socket. The charging time is approximately 5-8 hours. Once the battery is completely charged, unplug
the power supply, as leaving a fully charged battery plugged in, could cause damage to the battery.
Battery Charge Indicator: The LED panel has a battery status indicator. In the icon of
the battery appear four horizontal lines, each one representing 25 % of electricity
remaining. When there are no lines visible or if the icon itself flashes, please
disconnect the device and charge the battery to avoid damage. During recharge, the
horizontal lines will flash. Once the battery is completely charged, the lines will stop
flashing.
Warning: if the battery is plugged in, recharge it completely within 48 hours. If the device will not be
used for an extended period, please leave the fully charged battery, otherwise this could damage the
battery!
During playing the device, keep this unit away from environments with high temperatures, high
magnetic fields and high frequencies. If the system does not function properly, turn of the power
source or pull out the USB Flash Drive or TF card, reinsert it and the device will start to play.
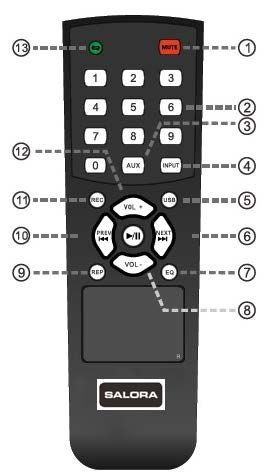
REMOTE CONTROL FUNCTIONS
1. Mute
2. Track number
3. AUX input
4. Input selection
5. USB input
6. Next
7. Effect of sound field
8. Decrease volume
9. Play the recording
10. Previous
11. Record
12. Increase the volume
13. Repeat
*** This image is for reference purposes only1. Under normal circumstances, aim the remote control
directly at the receiver within a distance of approximately 6
meters and at an angle of 30°.
2. While aiming the remote control at the receiver make sure
that there are no obstacles in between the device and the
remote control.
3. If the receiver is placed in the direct sunlight, so that that it
reflects on to the receiver, it may not function properly. In
that case move the speaker out of the sunlight.
4. Avoid mixing old and new batteries. Replace the batteries
of the remote control regularly.
FUNCTIONS
1. Mic slot
2. Microphone priority switch
3. Mic volume
4. Mic echo
5. Bass
6. Treble
7. DC15V charging interface
8. Power switch
9. Input selection
10. Record
11. Play the recording
12. Previous/CH-
13. Play/Pause/Scan
14. Next/CH+
15. Audio input
16. USB port
17. TF (micro SD) card slot
CONNECTIONS
*** This image is for reference
purposes onlyUSB AND TF (MICRO SD) CARD
• You have to format the USB stick or your TF card (micro SD) on your computer.
• The playing sequence of the speaker is based upon the file generating sequence. If the file
name has an extension 01, 02, 03.... the speaker will start playing from the 01 file.
• You have to copy your MP3 of WMA format music files into the root directory of the USB or
TF (micro SD) card. It is advisable to remove unnecessary files and catalogue in order to
improve the speed and reduce the reading errors during reading.
WIRELESS MICROPHONE
*** This image is for reference purposes only
• Open the battery compartment, insert the batteries and ensure that the polarities are
correct.
• Switch ON the power switch on the microphone or ear microphone transmitters. If the
power indicator light does not light up, check if the batteries have been inserted correctly.
• Adjust the volume of the microphone on the stereo.
• During singing, if you would like to interrupt the microphone, place the switch in the middle
(mute status) on the microphone. If you would like to stop, place the switch to OFF.
RECORDING FUNCTION
• Press RECORD to start the recording of the voice onto an external memory device, such as a
USB stick or TF (micro SD) card in the speaker. If the external memory device is used for the
first time, the system will automatically make a new folder named RECORD. All the
recordings will be memorised as REC01, REC02, and so on.
• In record mode, press RECORD/INPUT/REC.PLAY to stop recording.
• Press REC.PLAY to play the recording from your external memory device, press PREV or NEXT
to choose the recording you would like to hear.
MP3, MA AND WAV
• USB flashdrive jack: USB port, Plug&Play.
• TF (micro SD) jack: TF (micro SD) card slot, Plug&Play.
• Supports MP3, WMA and WAV music formats with an outstanding quality, giving you a
superior and brand new listening experience.
• Input selector Key(INPUT): use this to choose your external source (marked on the rear panel
as “LINE” ) you can connect an RCA sound source such as a DVD/Audio/MP3/Bluetooth
device.
• PLAY/PAUSE button: in Play mode, press to suspend playing the song. Press again to
continue.BUILT IN BT FUNCTION
• Select the input signal source BT when you turn on the device.
• Please ensure that the BT of the device that you wish to connect to is enabled. Scan and
connect the speaker with your device. When the connection is successful you will hear a
“tick” sound. If the speaker can’t establish a connection, please restart the speaker or the
device and try again.
• After the mobile phone and the BT are successfully connected, you can play your music. For a
constant stability of the signal, please check that the device and the speaker are directed at
each other.
• This unit supports iPad, iPhone, Samsung, HTC, MOTOROLA, Nokia and other BT mobile
devices with wireless audio transmission. It supports the BT A2DP profile.
• The BT of the unit can be used within a distance of 10 meters without any obstacles.INSTRUCTIONS D’UTILISATION
POWERCUBE 100
Enceinte portable BT avec un microphone sans filDÉPANNAGE
Problème Cause possible Solution
1. Pas de source sonore d’entrée 1. Utilisez un meilleur signal d’entrée
Pas de son
2. Volume est trop faible 2. Réglez le volume
Distorsion 1. Volume est trop élevé 1. Baissez le volume
sonore 2. L’enceinte pourrait être endommagée 2. Réparez ou remplacez l’enceinte
1. La prise du micro n’est pas
1. insérez bien le câble du micro.
complètement insérée
Karaoké ne 2. L’interrupteur du micro n’est pas mis en
2. Tournez l’interrupteur du micro
fonctionne ON
pas 3. Le bouton du volume du micro est en
3. Réglez le volume
position trop bas
4. La pile du micro sans fil est faible 4. Remplacez la pile
1. Le format de la chanson n’est pas 1. Convertissez le chanson au format
correcte MP3
MP3 ne
2. Une fonctionnement incorrecte a causé
fonctionne 2. Redémarrez l’appareil
une erreur.
pas
3. La clé USB / Carte Tf (Micro SD) n’est pas 3. Insérez bien la clé USB ou Carte TF
connectée (Micro SD)
SPÉCIFICATIONS TECHNIQUES IMPORTANTES
Puissance de sortie………………………………………………………………………… ≤ 30W
Sensibilité d’entrée ………………………………………………………………………. 550±30mV
SNR (rapport signal sur bruit) ……………………………………………………….. ≥71dB
Réponse en fréquence ………………………………………………………………….. 20Hz – 20kHz
Alimentation Électrique ………………………………………………………………… AC100v – AC240V, 60Hz/50Hz
*** Les spécifications indiquées ci-dessus sont celles d’un appareil d’échantillonnage et
exclusivement à titre indicatif.
*** Comme nous améliorons constamment nos produits, les spécifications peuvent être modifiées
sans préavis.
FONCTIONS
• VOL : réglage du volume en haut ou en bas.
• TREBLE : réglage de l’aigus pour ajuster les sons aigus.
• BASS : réglage des basses pour ajuster les sons basses.
• MIC.VOL : réglage du volume du micro à votre choix.
• ECHO : réglage de l’écho pour augmenter ou diminuer les effets d’écho
• MIC : utiliser pour connecter le microphone.
CARACTÉRISTIQUES DE L’APPAREIL
Cet appareil peut être utilisé avec un ordinateur personnel, téléphone portable, lecteur DVD, VCD,
CD, LD, TV, MP3, radio, piano électrique et tous autre dispositifs avec une sortie audio.
Le circuit amplificateur à haute performance et avec un design haute fidélité, combiné avec un haut-
parleur d’une qualité supérieure professionnelle, vous donne un champ sonore claire pour les
niveaux d’effets correctes.Le système sonore est formidable, avec des basses profondes et puissantes et les effets d’aigus sont
forts avec un son claire et net.
Le circuit de division de fréquence professionnel électronique améliore l’effet de la fréquence de
croisement.
Cet appareil est doté d’un design professionnel et des piles d’haute capacité, en plus ce produit
dispose des condensateurs audio pour obtenir une puissance de réserve plus grande, plus stable, des
dynamiques meilleures et un signal plus fort pour la réduction de bruit.
CHARGEMENT DE L’ENCEINTE
Pour charger l’enceinte, connectez l’adaptateur à la prise courant AC100V-AC240V. La durée de
charge est environs 5 à 8 heures. Après le chargement déconnectez l’adaptateur pour éviter de
dommage à la pile.
Le témoin de charge batterie : l’écran LED dispose d’un indicateur de niveau de charge
de la batterie. Au centre du contour de batterie, il y a quatre lignes horizontales, chaque
ligne représente 25% d’électricité restant. S’il n’y ont plus de lignes affichés dans le
contour de batterie ou le contour clignote, éteignez l’appareil et chargez-le pour éviter
de dommage. Lorsque l’appareil est en train de se charger, les lignes clignotent. Les
lignes ne clignoteront plus, lorsque le chargement soit complet.
Avertissement : lorsque la pile est sous tension, veuillez la charger complètement entre 48 heures. En
cas d’une longue période de non utilisation, laissez la pile complètement chargée, si non, causera de
dommage à la batterie !
Pendant l’utilisation, veuillez tenir l’appareille à l’écart des endroits à température élevée, des
champs magnétiques et fréquences très élevées. Lorsque l’appareil ne fonctionne plus, mettez-le
hors de tension ou retirez la clé USB ou carte TF (Micro SD). Après insérez-la et l’appareil reprendra la
lecture.
FONCTIONS DE LA TÉLÉCOMMANDE
1. Découpage son
2. Numéro de la piste
3. Entrée AUX
4. Sélection d’entrée
5. Entrée USB
6. Suivant
7. Effet champ sonore
8. Diminuer volume
9. Lecture enregistrement
10. Précédent
11. Enregistrement
12. Augmenter volume
13. Répéter
*** Cette image est exclusivement à titre indicatif1. Dans des conditions normales, diriger la télécommande
directement vers le récepteur de télécommande dans un
rayon de 6 mètres et un angle de 30°.
2. En utilisant la télécommande, assurez-vous qu’il n’y a pas
d’obstructions entre l’émetteur et le récepteur de la
télécommande.
3. Lorsque le récepteur est positionné dans un endroit avec une
lumière éblouissante, il peut ne pas fonctionner. Dans ce cas
ci, déplacez l’enceinte pour éviter la lumière du soleil directe.
4. Ne jamais mélanger des piles usées et nouvelles. Remplacez
les piles régulièrement.
FONCTIONS
1. Fente micro
2. Interrupteur priorité micro
3. Micro Volume
4. Micro Écho
5. Basse
6. Aigus
7. DC 15V interface chargement
8. Interrupteur tension
9. Sélection d’entrée
10. Enregistrement
11. Lecture enregistrement
12. Précédent/CH-
13. Lecture/pause/balayage
14. Suivant/CH+
15. Entrée audio
16. Port USB
17. Fente carte TF (Micro SD)
CONNEXIONS
*** Cette image est exclusivement à
titre indicatifCLÉ USB ET CARTE TF (MICRO SD)
• La clé USB ou la carte TF (Micro SD) doit être formatée sur votre ordinateur.
• La séquence de la lecture des pistes est basé sur la séquence de génération des fichiers. Si le
fichier dispose d’une extension 01, 02, 03…. l’enceinte commencera la lecture avec le fichier
avec l’extension 01.
• Copiez les fichiers format MP3 ou WMA dans le répertoire racine de votre clé USB ou carte
TF (Micro SD). Nous vous conseillons de supprimer les fichiers superflues et le catalogue pour
une lecture plus rapide et une réduction d’erreurs pendant la lecture des pistes.
MICROPHONE SANS FIL
*** Cette image est exclusivement à titre indicatif
• Ouvrir le compartiment des piles, assurez-vous que la polarité soit correcte.
• Activer le micro avec l’interrupteur. Lorsque le témoin ne s’allume pas, contrôlez bien si les
piles soient correctement insérées.
• Ajuster le volume du micro avec le bouton du stéréo.
• En chantant, si vous voulez interrompre les micros sans fil, mettez l’interrupteur découpage
de son au centre du micro, si vous voulez arrêter l’utilisation du micro, mettez l’interrupteur
en position OFF (désactiver).
FONCTION ENREGISTREMENT
• Appuyer sur le bouton RECORD pour enregistrer votre voix sur la mémoire externe telle
qu’une clé USB ou une carte TF (Micro SD) dans votre enceinte. Si vous utilisez la mémoire
externe pour la première fois, le système créera un dossier nouveau avec le nom RECORD,
les fichiers stockés auront le nom REC01, REC02, etc.
• En mode enregistrement, appuyez sur RECORD/INPUT/REC.PLAY pour arrêter
l’enregistrement.
• Appuyez sur REC.PLAY pour lire les enregistrements dans la mémoire externe, appuyez sur
PREV ou NEXT pour choisir la lecture de l’enregistrement de votre choix.
MP3, WMA ET WAV
• Port clé USB : port USB, Plug&Play.
• Carte TF (Micro SD) : fente pour votre carte TF (Micro SD), Plug&Play.
• Prend en charge musique formats MP3, WMA et WAV avec une qualité superbe, pour
obtenir une écoute supérieure et nouvelle.
• Bouton sélecteur d’entrée (INPUT) : pour une source externe (indiqué come LINE à l’arrière
du panneau, pour connecter une source audio RCA externe, telle comme un lecteur DVD)
Audio/MP3/Bluetooth.
• Bouton Lecture/Pause : en mode lecture, appuyer pour interrompre la lecture de la chanson.
Appuyer une autre fois, pour continuer la lecture.FONCTION BT INTÉGRÉE
• Sélectionner la source d’entrée BT lorsque vous mettez en marche l’appareil.
• Veuillez contrôler si le dispositif BT soit activé. Une recherche automatique sera effectuée et
une connexion sera établie entre l’enceinte et le dispositif. Lorsque la connexion soit réussie,
vous entendez un signal sonore de clic. Si l’appareil ne peut pas établir une connexion,
redémarrez l’enceinte ou le dispositif et réessayez.
• Après une connexion réussie entre le téléphone portable et l’enceinte, vous pouvez lire les
chansons. Pour une stabilité permanente du signal audio, assurez-vous que l’enceinte et le
dispositif BT soient dirigés l’un vers l’autre.
• Cet appareil prend en charge iPad, iPhone, Samsung, HTC, MOTOROLA, Nokia et autre
dispositifs portables BT sans fil de transmission d’audio. Cet appareil prend en charge le profil
A2DP.
• Le BT de cet appareil fonctionne à une distance maximum de 10 mètres sans obstacles.Vous pouvez aussi lire