CA99 / CA79 Owner's Manual - Important Information Preparation Basic Operation Adjustments & Settings
←
→
Transcription du contenu de la page
Si votre navigateur ne rend pas la page correctement, lisez s'il vous plaît le contenu de la page ci-dessous
Important Information

                            Preparation

CA99 / CA79             Basic Operation
Owner’s Manual

                 Adjustments & Settings

                             Appendix
Important Safety Instructions
                          SAVE THESE INSTRUCTIONS
       INSTRUCTIONS PERTAINING TO A RISK OF FIRE, ELECTRIC SHOCK, OR INJURY TO PERSONS

                                                                                                     WARNING
                                   CAUTION                                                           TO REDUCE THE RISK OF FIRE
                                                                                                     OR ELECTRIC SHOCK, DO
                                  RISK OF ELECTRIC SHOCK                                             NOT EXPOSE THIS PRODUCT
                                       DO NOT OPEN                                                   TO RAIN OR MOISTURE.

                AVIS : RISQUE DE CHOC ELECTRIQUE - NE PAS OUVRIR.
      TO REDUCE THE RISK OF ELECTRIC SHOCK, DO NOT REMOVE COVER (OR BACK).
      NO USER-SERVICEABLE PARTS INSIDE. REFER SERVICING TO QUALIFIED SERVICE PERSONNEL.

                       The lighting flash with arrowhead symbol, within
                       an equilateral triangle, is intended to alert the                       The exclamation point within an equilateral
                       user to the presence of uninsulated "dangerous                          triangle is intended to alert the user to the
                       voltage" within the product's enclosure that may                        presence of important operating and
                       be of sufficient magnitude to constitute a risk of                      maintenance (servicing) instructions in the
                       electric shock to persons.                                              leterature accompanying the product.

Examples of Picture Symbols
                    Denotes that care should be taken.
                    The example instructs the user to take care not to allow fingers to be trapped.

                    Denotes a prohibited operation.
                    The example instructs that disassembly of the product is prohibited.

                    Denotes an operation that should be carried out.
                    The example instructs the user to remove the power cord plug from the AC outlet.

Read all the instructions before using the product.
  1) Read these instructions.                                               10) Protect the power cord from being walked on or
  2) Keep these instructions.                                                   pinched particularly at plugs, convenience
                                                                                receptacles, and the point where they exit from the
  3) Heed all warnings.                                                         apparatus.
  4) Follow all instructions.                                               11) Only use attachments/accessories specified by the
  5) Do not use this apparatus near water.                                      manufacturer.
  6) Clean only with dry cloth.                                             12) Use only with the cart, stand, tripod, bracket, or table
                                                                                specified by the manufacturer, or
  7) Do not block any ventilation openings. Install in                          sold with the apparatus. When a cart is used,
     accordance with the manufacturer's instructions.                           use caution when moving the cart/apparatus
  8) Do not install near any heat sources such as radiators,                    combination to avoid injury from tip-over.
     heat registers, stoves, or other apparatus (including                  13) Unplug this apparatus during lightning storms or
     amplifiers) that produce heat.                                             when unused for long periods of time.
  9) Do not defeat the safety purpose of the polarized or                   14) Refer all servicing to qualified service personnel.
     grounding-type plug. A polarized plug has two                              Servicing is required when the apparatus has been
     blades with one wider than the other. A grounding                          damaged in any way, such as power-supply cord or
     type plug has two blades and a third grounding                             plug is damaged, liquid has been spilled or objects
     prong. The wide blade or the third prong are                               have fallen into the apparatus, the apparatus has
     provided for your safety. If the provided plug does                        been exposed to rain or moisture, does not operate
     not fit into your outlet, consult an electrician for                       normally, or has been dropped.
     replacement of the obsolete outlet.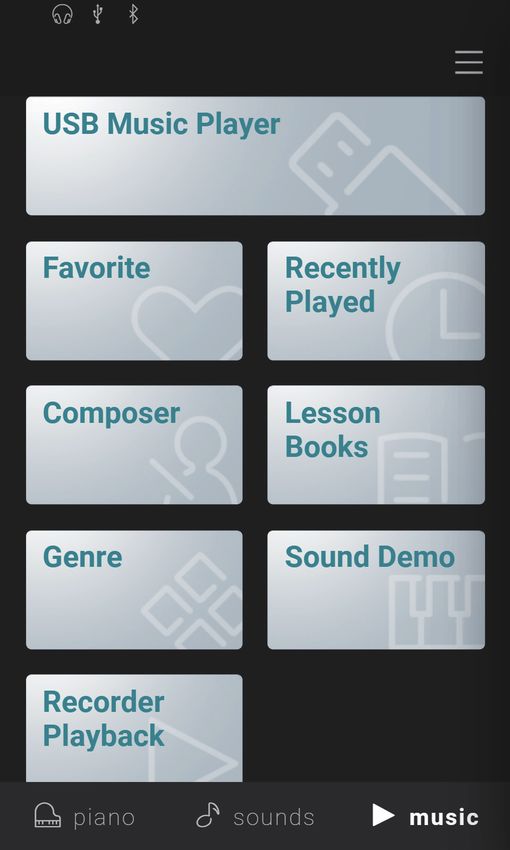
Règles de sécurité                                                           (Supplémentairespour le Canada)

                              CONSERVEZ CES INSTRUCTIONS
                                                                                                               AVERTISSEMENT
                                        CAUTION                                                                POUR REDUIRE LES RISQUES
                                                                                                               D’INCENDIE OU D’ELECTROCUTION,
                                       RISK OF ELECTRIC SHOCK                                                  PROTEGEZ CET APPAREIL DE LA
                                            DO NOT OPEN                                                        PLUIE OU DE L’HUMIDITE.

            AVIS : RISQUE DE CHOC ELECTRIQUE                                                                         - NE PAS OUVRIR.
            POUR REDUIRE LES RISQUES D’INCENDIE OU D’ELECTROCUTION, NE DEMONTEZ PAS LE COUVERCLE
            (OU L’ARRIERE). A L’INTERIEUR, AUCUNE PARTIE N’EST REPARABLE PAR L’UTILISATEUR.
            POUR LA MAINTENANCE, ADRESSEZ-VOUS A DU PERSONNEL QUALIFIE.
                           Le symbole de l’éclair avec une pointe de flèche à
                           l’intérieur d’un triangle équilatéral met en garde                           Le point d’exclamation à l’intérieur d’un triangle
                           l’utilisateur contre la présence de tension                                  équilatéral alerte l’utilisateur de la présence de règles

                                                                                                                                                                        Important Information
                           dangereuse, non isolée, à l’intérieur de l’appareil,                         d’utilisation et d’entretien importantes dans la notice
                           dont l’amplitude peut être suffisante pour induire un                        qui accompagne l’appareil.
                           risque d’électrocution d’une personne.

Exemples de symboles graphiques
                         Indique que des précautions doivent être prises.
                         L’exemple indique à l’utilisateur qu’il doit faire attention à ne pas se faire coincer les doigts.

                         Indique une manipulation interdite.
                         L’exemple indique que le démontage de l’appareil est interdit.

                         Indique qu’une manipulation doit être effectuée.
                         L’exemple indique à l’utilisateur qu’il doit débrancher le câble d’alimentation de la prise secteur.

                                                                                      Indique un risque potentiel qui peut entraîner
                             AVERTISSEMENT                                            la mort, ou de graves lésions, si l’appareil
                                                                                      n’est pas manipulé correctement.

  Faite attention de ne pas introduire un                                                        L’introduction d’eau, d’aiguilles ou d’épingles à
  produit étranger à l’intérieur                                                                 cheveux, peut provoquer une panne ou un
  de l’appareil.                                                                                 court-circuit. Ce produit doit être mis à l’abri des
                                                                                                 écoulements ou projections d’eau. Ne jamais
                                                                                                 placer sur le produit des objets contenant des
                                                                                                 liquides, tels que des vases ou autres récipients.

  Ce produit n’est pas totalement déconnecté du circuit électrique                                     Si vous ne le faisiez pas la foudre pourrait
  lorsqu’il est mis hors tension par le bouton d’arrêt. Si l’appareil                                  provoquer un incendie.
  ne doit pas être utilisé pendant une longue période, débranchez                                      Si vous ne le faisiez pas, la surchauffe de
  le câble d’alimentation de la prise secteur.                                                         l’appareil pourrait provoquer un incendie.

  Il est recommandé de placer l’instrument à proximité de la prise de courant et de positionner le câble d’alimentation
  secteur de sorte qu’il puisse être débranché rapidement en cas d’urgence, le courant électrique étant toujours
  présent tant que la prise est branchée même si le bouton de mise en marche est en position Arrêt.

[Seuls les produits avec 3P fiche]

  INSTRUCTIONS DE MISE À LA TERRE
  Ce produit doit être mis à la terre. En cas de défaillance matérielle ou de panne, la mise à la terre fournit un chemin de moindre
  résistance au courant électrique afin de réduire le risque d’électrocution. Ce produit est équipé d’un câble avec un conducteur de
  protection et une fiche de mise à la terre. La fiche doit être branchée dans une prise appropriée correctement installée et mise à la
  terre conformément à tous les codes et règlements locaux.
  DANGER - La connexion incorrecte du conducteur de protection peut présenter un risque d’électrocution.
  Consultez un électricien ou un réparateur qualifié si vous avez des doutes en ce qui concerne la mise à la terre du produit. Ne
  modifiez pas la fiche fournie avec le produit – si elle n’est pas adaptée à la prise, faites installer une prise correcte par un électricien
  qualifié.

                                                                          Indique un risque potentiel qui peut entraîner la détérioration,
                            PRECAUTION                                    ou des dommages, pour l’appareil ou ses propriétés, si celui-ci
                                                                          n’est pas manipulé correctement.

  Description de la l'emplacement de la reference (Le cas échéant):
  Anglais phrase: The nameplate label is located on the underside of the instruments, as indicated below.
  Français phrase: La reference commerciale est inscrite sur une etiquette en dessous de votre instrument, conformement
  a l’indication ci-dessous.

  Votre piano doit être placé à un endroit tel que sa position n’altère pas sa propre ventilation. Gardez une
  distance minimum de 5 cm autour de l’instrument pour une aération suffisante.

                                                                                                                                                                    3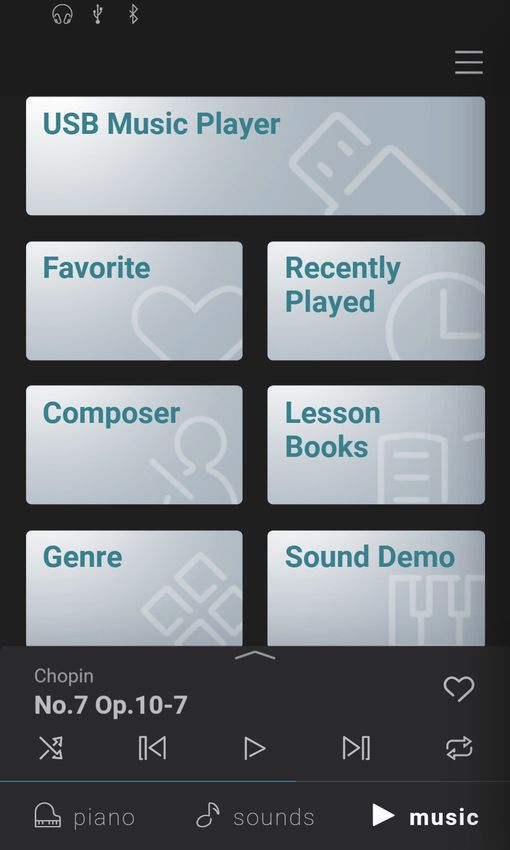
WARNING - When using electric products, basic precautions should always be followed, including the following.

                                                     WARNING                  Indicates a potential hazard that could result in death or
                                                                              serious injury if the product is handled incorrectly.

                            The product should be connected to             120V      230V      240V     • If you are going to use an AC power cord,
                            an AC outlet of the specified voltage.                                        make sure that its has the correct plug shape
                                                                                                          and conforms to the specified power voltage.
                                                                                                        • Failure to do so may result in fire.

                            Do not insert or disconnect the power                                       Doing so may cause electric shock.
                            cord plug with wet hands.

                            Take care not to allow any foreign matter                                   Entry of water, needles or hair pins may result
                            to enter the product.                                                       in breakdown or short-circuit.
                                                                                                        The product shall not be exposed to dripping or
Important Information

                                                                                                        splashing. No objects filled with liquids, such as
                                                                                                        vases, shall be placed on the product.

                            The chair must be used properly (it must be                                 Doing so may cause the chair to fall over or your
                            used only when playing the product).                                        fingers to be trapped, resulting in injury.
                            • Do not play with it or stand on it.
                            • Only one person is allowed to sit on it.
                            • Do not sit on it when opening the lid.
                            • Re-tighten the bolts occasionally.

                            When using the headphones, do not                                           Doing so may result in hearing problems.
                            listen for long periods of
                            time at high volume levels.

                            Do not lean against the keyboard.                                           Doing so may cause the product to fall over,
                                                                                                        resulting in injury.

                            Do not disassemble, repair or modify                                        Doing so may result in product breakdown, electric
                            the product.                                                                shock or short-circuit.

                            When disconnecting the AC power cord's                                      Pulling the AC power cord itself may damage
                            plug, always hold the plug                                                  the cord, causing a fire, electric shock or short-circuit.
                            and pull it to remove it.

                            The product is not completely disconnected from the                         • Failure to do so may cause fire in case of lightning.
                            power supply even when the power switch is turned                           • Failure to do so may over-heat the product,
                            off. If the product will not be used for a long time,                         resulting in fire.
                            unplug the AC power cord from the AC outlet.

                            This product may be equipped with a polarized line plug (one blade wider
                            than the other). This is a safety feature.
                            If you are unable to insert the plug into the outlet, contact an electrician to
                            replace your obsolete outlet.
                            Do not defeat the safety purpose of the plug.

                            This product shall be near the AC outlet and the power cord plug in a position so that it can readily be
                            disconnected in an emergency because electricity is always charging while the plug is in the AC outlet even in a
                            power switch off condition.

                        4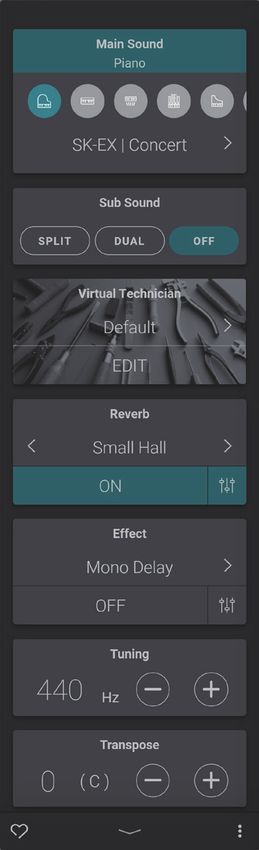
Indicates a potential hazard that could result in injury or
                            CAUTION                   damage to the product or other property if the product
                                                      is handled incorrectly.
Do not use the product in the following areas.                                  Using the product in such areas may result in
• Areas, such as those near windows, where the product is                       product breakdown.
  exposed to direct sunlight                                                    Use the product only in moderate climates (not
• Extremely hot areas, such as near a heater                                    in tropical climates).
• Extremely cold areas, such as outside
• Extremely humid areas
• Areas where a large amount of sand or dust is present
• Areas where the product is exposed to excessive
  vibrations

When you close the keyboard cover,                                              Closing it roughly may trap your fingers,
close it gently.                                                                resulting in injury.

Before connecting cords, make sure                                     OFF      Failure to do so may cause breakdown of this

                                                                                                                                            Important Information
that the power to this product                                                  product and other devices.
and other devices is turned OFF.

Do not drag the product on the floor.                                           Please lift up the product when moving it.
Take care not to drop the product.                                              Please note that the product is heavy and must
                                                                                be carried by more than two persons.
                                                                                Dropping the product may result in breakdown.

Do not place the product near electrical                                        • Doing so may cause the product to generate noise.
appliances such as TVs and radios.                                              • If the product generates noise, move the
                                                                                  product sufficiently away from the electrical
                                                                                  appliance or connect it to another AC outlet.

When connecting the AC power cord                                               Failure to do so may damage them, resulting in
and other cords, take care                                                      fire, electric shock or short-circuit.
not to get them tangled.

Do not wipe the product with benzene                                            • Doing so may result in discoloration or deformation
or thinner.                                                                       of the product.
                                                                                • When cleaning the product, put a soft cloth in
                                                                                  lukewarm water, squeeze it well, then wipe the
                                                                                  product.

Do not stand on the product or exert                                            Doing so may cause the product to become
excessive force.                                                                deformed or fall over, resulting in breakdown
                                                                                or injury.

Do not place naked flame, such as lighted                                       Doing so may cause the illumination to fall over,
candles on the product.                                                         resulting in fire.

Ensure that the ventilation is not                                              Failure to do so may over-heat the product,
impeded by covering the ventilation                                             resulting in fire.
openings with items, such as newspaper,
table-cloths, curtains, etc.

The product should be located so that its location or position does not interfere with its proper ventilation. Ensure a
minimum distance of 5cm around the product for sufficient ventilation.

                                                                                                                                        5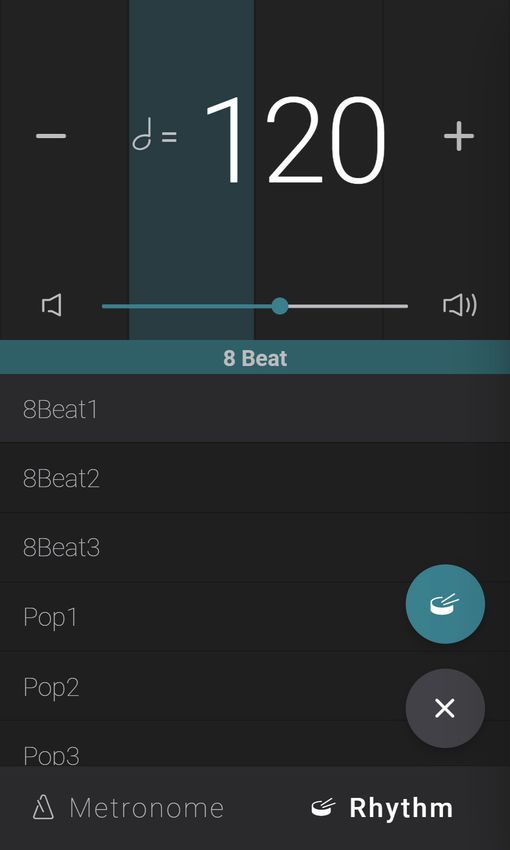
The product should be serviced by qualified service personnel when:
                             • The power supply cord or the plug has been damaged.
                             • Objects have fallen, or liquid has been spilled into the product.
                             • The product has been exposed to rain.
                             • The product does not appear to operate normally or exhibits a marked change in performance.
                             • The product has been dropped, or the enclosure damaged.
                            Notes on Repair
                            Should an abnormality occur in the product, immediately turn the power OFF, disconnect the power cord plug, and then contact the shop from which
                            the product was purchased.
                            CAUTION:
                            To prevent electric shock, match wide blade of plug to wide slot, fully insert.
                            ATTENTION:
                            Pour éviter les chocs électriques, introduire la lame la plus large de la fiche dans la borne correspondante de la prise et pousser jusqu'au fond.
                                           An information on Disposal for users
                                           If your product is marked with this recycling symbol it means that, at the end of its life, you must dispose of it separately by taking it to an
                                           appropriate collection point.
                                           You should not mix it with general household waste. Disposing of this product correctly will prevent potential negative effects on the environment
                                           and human health which could otherwise arise due to inappropriate waste handling.
                                           For further details, please contact your local authority.
                                           (European Union only)
Important Information

                        Instruction for AC power cord (U.K.)
                            IMPORTANT
                            THE WIRES IN THIS MAINS LEAD ARE COLOURED IN ACCORDANCE WITH THE FOLLOWING CODE.
                                          BLUE :         NEUTRAL
                                          BROWN :        LIVE
                            As the colours of the wires in the mains lead of this apparatus may not correspond with the coloured markings identifying the terminals in your plug,
                            proceed as follows:
                            The wire which is coloured BLUE must be connected to the terminal which is marked with the letter N or coloured BLACK.
                            The wire which is coloured BROWN must be connected to the terminal which is marked with the letter L or coloured RED.
                            Do not plug either terminal of the power cord to the the ground od AC outlet on the wall.

                        FCC Information (U.S.A)
                        CAUTION : Changes or modifications not expressly approved by the party responsible for compliance could void the user’s authority to operate the
                        equipment.
                        NOTE : This equipment has been tested and found to comply with the limits for a Class B digital device, pursuant to Part 15 of the FCC Rules. These limits are
                        designed to provide reasonable protection against harmful interference in a residential installation. This equipment generates, uses and can radiate radio
                        frequency energy and, if not installed and used in accordance with the instructions, may cause harmful interference to radio communications. However, there
                        is no guarantee that interference will not occur in a particular installation. If this equipment does cause harmful interference to radio or television reception,
                        which can be determined by turning the equipment off and on, the user is encouraged to try to correct the interference by one or more of the following
                        measures:
                            • Reorient or relocate the receiving antenna.
                            • Increase the separation between the equipment and receiver.
                            • Connect the equipment into an outlet on a circuit different from that to which the receiver is connected.
                            • Consult the dealer or an experienced radio/TV technician for help.

                                                                                                                                           The nameplate label is located on
                                               Declaration of Conformity                                                                   the underside of the instrument, as
                                                                                                                                           indicated below.
                                                 Products :                         Electronic Piano
                                                 Model Number :                     CA99/CA79
                                                 Responsible Party Name :           Kawai America Corporation
                                                 Address :                          2055 East University Drive Rancho
                                                                                    Dominguez, CA 90220
                                                 Telephone                          310-631-1771
                                                                                                                                                 Nameplate
                             This device complies with Part 15 of the FCC Rules.
                             Operation is subject to the following two conditions:
                               (1) this device may not cause harmful interference, and
                               (2) this device must accept any interference received,
                                   including interference that may cause undesired operation.

                               This applies only to products distributed by Kawai America Corporation.

                        6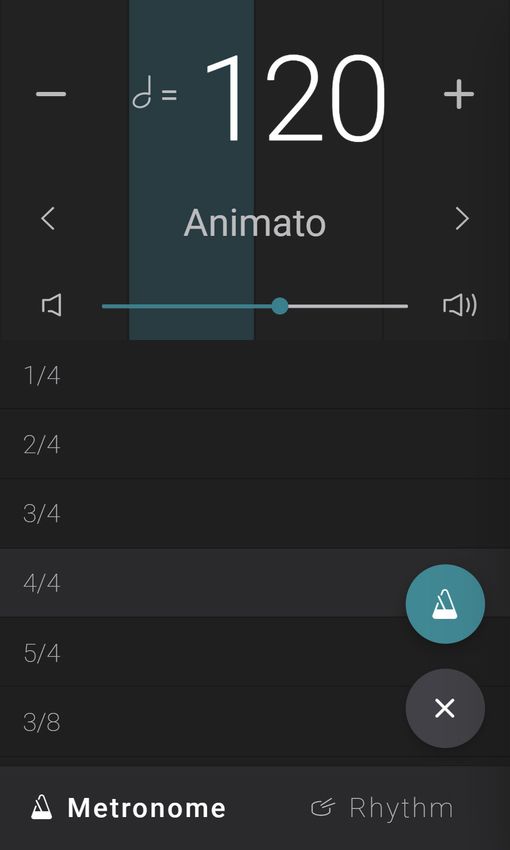
Introduction
Thank you for purchasing this Kawai Concert Artist CA99/CA79 digital piano.
This owner’s manual contains important information regarding the instrument’s usage and operation.
Please read all sections carefully, keeping this manual handy for future reference.
About this owner’s manual
This owner’s manual provides information for customers to enjoy using this instrument immediately after purchase, and explanations
about the various functions of this instrument.
Display illustrations shown in this manual may differ from the actual displays of the product depending on its version.
Nameplate
The model name and serial number of the product are indicated on the nameplate label located on the underside of the instrument.
Important Information
Cleaning
Make sure to unplug the power cord before cleaning.
Clean the product body with a dry, soft cloth.
If the surface of the pedals becomes dirty, clean the pedals using a dry dish-washing sponge. Note that cleaning the gold pedals
using a cloth may cause the pedals to become dull.
Do not attempt to clean the pedals using rust-removing solvents, abrasives or files.
Do not clean the product using benzine or thinner which may cause discoloring or deformation.
Intellectual property rights
“Windows” is a registered trademark of Microsoft Corporation.
“Mac” is a registered trademark of Apple Computer, Inc.
Some samples © PREMIER Engineering Inc.
The Bluetooth® word mark and logos are registered trademarks owned by the Bluetooth SIG, Inc. and any use of such marks by
Kawai Musical Instruments Mfg. Co., Ltd. is under license.
Qualcomm aptX is a product of Qualcomm Technologies, Inc. and/or its subsidiaries.
Qualcomm is a trademark of Qualcomm Incorporated, registered in the United States and other countries.
aptX is a trademark of Qualcomm Technologies International, Ltd., registered in the United States and other countries.
Other company names and product names mentioned or referenced herein are registered trademarks or trademarks of respective
owners.
Kawai Musical Instruments Mfg. Co., Ltd. shall have no liability for any acts in violation of the Copyright Act made by any users of this
product.
7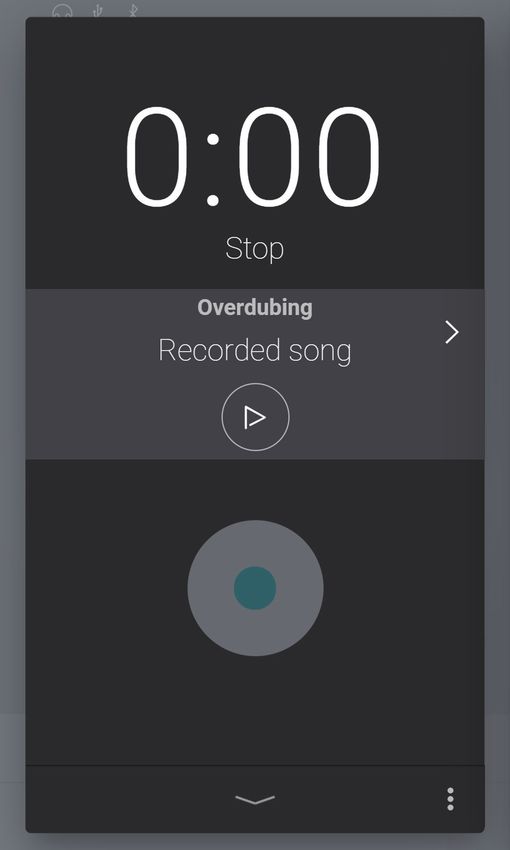
Table of Contents
Table of Contents
(5) Effect. . . . . . . . . . . . . . . . . . . . . . . . . . . . . . . . . . . . . . . . 32
Important Information
(6) Tuning. . . . . . . . . . . . . . . . . . . . . . . . . . . . . . . . . . . . . . . 34
Important Safety Instructions . . . . . . . . . . . . . . . . . . . . . . . . 2 (7) Transpose. . . . . . . . . . . . . . . . . . . . . . . . . . . . . . . . . . . . 34
Introduction. . . . . . . . . . . . . . . . . . . . . . . . . . . . . . . . . . . . . . . . . . . 7 (8) Other sound settings . . . . . . . . . . . . . . . . . . . . . . . . . 34
Table of Contents. . . . . . . . . . . . . . . . . . . . . . . . . . . . . . . . . . . . . 8 (9) Favorite. . . . . . . . . . . . . . . . . . . . . . . . . . . . . . . . . . . . . . 34
Part Names and Functions. . . . . . . . . . . . . . . . . . . . . . . . . . . 10 (10) Menu. . . . . . . . . . . . . . . . . . . . . . . . . . . . . . . . . . . . . . . 35
Music Tab. . . . . . . . . . . . . . . . . . . . . . . . . . . . . . . . . . . . . . . . . . . . . 36
Preparation 1. Music tab home screen overview . . . . . . . . . . . . . . . . . . . 36
Opening/Closing the Key Cover . . . . . . . . . . . . . . . . . . . . . 12 2. Player screen overview. . . . . . . . . . . . . . . . . . . . . . . . . . . . . 38
Important Information
Using the Music Rest. . . . . . . . . . . . . . . . . . . . . . . . . . . . . . . . . 12 3. Player screen functions. . . . . . . . . . . . . . . . . . . . . . . . . . . . . 40
(1) Player. . . . . . . . . . . . . . . . . . . . . . . . . . . . . . . . . . . . . . . . 40
Turning on the Power. . . . . . . . . . . . . . . . . . . . . . . . . . . . . . . . 13
(2) Lesson. . . . . . . . . . . . . . . . . . . . . . . . . . . . . . . . . . . . . . . 40
Adjusting the Volume. . . . . . . . . . . . . . . . . . . . . . . . . . . . . . . . 14
(3) Concert Magic. . . . . . . . . . . . . . . . . . . . . . . . . . . . . . . . 42
Using Headphones. . . . . . . . . . . . . . . . . . . . . . . . . . . . . . . . . . . 14
Using the Metronome. . . . . . . . . . . . . . . . . . . . . . . . . . . . . . . . 44
Using Pedals. . . . . . . . . . . . . . . . . . . . . . . . . . . . . . . . . . . . . . . . . . 15
Recorder. . . . . . . . . . . . . . . . . . . . . . . . . . . . . . . . . . . . . . . . . . . . . . 46
Part Names and Functions. . . . . . . . . . . . . . . . . . . . . . . . . . . 16
(1) Recording. . . . . . . . . . . . . . . . . . . . . . . . . . . . . . . . . . . . 48
1. Home screen structure. . . . . . . . . . . . . . . . . . . . . . . . . . . . . 16
(2) Recorder menu. . . . . . . . . . . . . . . . . . . . . . . . . . . . . . . 52
2. Touchscreen Operations. . . . . . . . . . . . . . . . . . . . . . . . . . . . 17
Adjustments & Settings
Basic Operation
Virtual Technician. . . . . . . . . . . . . . . . . . . . . . . . . . . . . . . . . . . . 54
Piano Tab. . . . . . . . . . . . . . . . . . . . . . . . . . . . . . . . . . . . . . . . . . . . . 18
(1) Touch Curve. . . . . . . . . . . . . . . . . . . . . . . . . . . . . . . . . . 55
1. Piano tab home screen overview. . . . . . . . . . . . . . . . . . . . 18
(2) Voicing . . . . . . . . . . . . . . . . . . . . . . . . . . . . . . . . . . . . . . 56
2. Piano Editor window. . . . . . . . . . . . . . . . . . . . . . . . . . . . . . . 20
(3) Resonance Depth. . . . . . . . . . . . . . . . . . . . . . . . . . . . . 56
(1) Piano Variation . . . . . . . . . . . . . . . . . . . . . . . . . . . . . . . 20
(4) Damper Resonance. . . . . . . . . . . . . . . . . . . . . . . . . . . 57
(2) Virtual Technician. . . . . . . . . . . . . . . . . . . . . . . . . . . . . 22
(5) Damper Noise. . . . . . . . . . . . . . . . . . . . . . . . . . . . . . . . 57
(3) Ambience. . . . . . . . . . . . . . . . . . . . . . . . . . . . . . . . . . . . 23
(6) String Resonance. . . . . . . . . . . . . . . . . . . . . . . . . . . . . 57
(4) Reverb. . . . . . . . . . . . . . . . . . . . . . . . . . . . . . . . . . . . . . . 24
(7) Undamped String Resonance. . . . . . . . . . . . . . . . . . 58
(5) Tuning. . . . . . . . . . . . . . . . . . . . . . . . . . . . . . . . . . . . . . . 25
(8) Cabinet Resonance . . . . . . . . . . . . . . . . . . . . . . . . . . . 59
(6) Transpose. . . . . . . . . . . . . . . . . . . . . . . . . . . . . . . . . . . . 25
(9) Key-off Effect. . . . . . . . . . . . . . . . . . . . . . . . . . . . . . . . . 59
(7) Favorite. . . . . . . . . . . . . . . . . . . . . . . . . . . . . . . . . . . . . . 25
(10) Fall-Back Noise. . . . . . . . . . . . . . . . . . . . . . . . . . . . . . 59
(8) Menu. . . . . . . . . . . . . . . . . . . . . . . . . . . . . . . . . . . . . . . . 25
(11) Hammer Noise. . . . . . . . . . . . . . . . . . . . . . . . . . . . . . 60
Sound Tab. . . . . . . . . . . . . . . . . . . . . . . . . . . . . . . . . . . . . . . . . . . . 26
(12) Hammer Delay. . . . . . . . . . . . . . . . . . . . . . . . . . . . . . 60
1. Sound tab home screen overview. . . . . . . . . . . . . . . . . . . 26
(13) Topboard . . . . . . . . . . . . . . . . . . . . . . . . . . . . . . . . . . . 60
2. Sound Editor . . . . . . . . . . . . . . . . . . . . . . . . . . . . . . . . . . . . . . 28
(14) Decay Time . . . . . . . . . . . . . . . . . . . . . . . . . . . . . . . . . 61
(1) Main Sound. . . . . . . . . . . . . . . . . . . . . . . . . . . . . . . . . . 28
(15) Release Time. . . . . . . . . . . . . . . . . . . . . . . . . . . . . . . . 61
(2) Sub Sound. . . . . . . . . . . . . . . . . . . . . . . . . . . . . . . . . . . 29
(16) Minimum Touch. . . . . . . . . . . . . . . . . . . . . . . . . . . . . 61
(3) Virtual Technician (Piano sounds only). . . . . . . . . . 31
(17) Stretch Tuning . . . . . . . . . . . . . . . . . . . . . . . . . . . . . . 61
(4) Reverb. . . . . . . . . . . . . . . . . . . . . . . . . . . . . . . . . . . . . . . 31
(18) Temperament. . . . . . . . . . . . . . . . . . . . . . . . . . . . . . . 62
8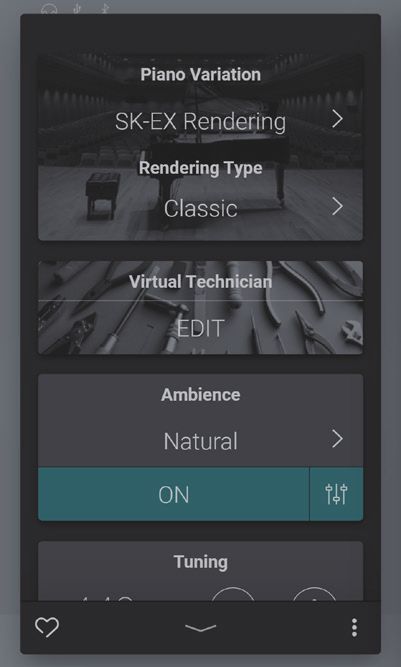
(19) Temperament Key.  .  .  .  .  .  .  .  .  .  .  .  .  .  .  .  .  .  .  .  .  .  .  .  .  .  . 63                                                       (7) Language.  .  .  .  .  .  .  .  .  .  .  .  .  .  .  .  .  .  .  .  .  .  .  .  .  .  .  .  .  .  .  .  .  .  .  . 74

                 (20) Key Volume.  .  .  .  .  .  .  .  .  .  .  .  .  .  .  .  .  .  .  .  .  .  .  .  .  .  .  .  .  .  .  .  . 63                                          (8) Information.  .  .  .  .  .  .  .  .  .  .  .  .  .  .  .  .  .  .  .  .  .  .  .  .  .  .  .  .  .  .  .  .  . 74

                 (21) Half-Pedal Adjust.  .  .  .  .  .  .  .  .  .  .  .  .  .  .  .  .  .  .  .  .  .  .  .  .  .  .  . 63

                 (22) Soft Pedal Depth .  .  .  .  .  .  .  .  .  .  .  .  .  .  .  .  .  .  .  .  .  .  .  .  .  .  .  . 64                                Appendix
                 (23) Damper Hold .  .  .  .  .  .  .  .  .  .  .  .  .  .  .  .  .  .  .  .  .  .  .  .  .  .  .  .  .  .  . 64                            Troubleshooting .  .  .  .  .  .  .  .  .  .  .  .  .  .  .  .  .  .  .  .  .  .  .  .  .  .  .  .  .  .  .  .  .  .  .  .  . 76
Settings Menu. .  .  .  .  .  .  .  .  .  .  .  .  .  .  .  .  .  .  .  .  .  .  .  .  .  .  .  .  .  .  .  .  .  .  .  .  .  .  . 65                       Sound List.  .  .  .  .  .  .  .  .  .  .  .  .  .  .  .  .  .  .  .  .  .  .  .  .  .  .  .  .  .  .  .  .  .  .  .  .  .  .  .  .  .  .  . 79
      1. Speaker/Headphone.  .  .  .  .  .  .  .  .  .  .  .  .  .  .  .  .  .  .  .  .  .  .  .  .  .  .  .  .  .  . 65
                                                                                                                                                            Drum Rhythm List.  .  .  .  .  .  .  .  .  .  .  .  .  .  .  .  .  .  .  .  .  .  .  .  .  .  .  .  .  .  .  .  .  .  .  . 80
                 (1) Tone Control .  .  .  .  .  .  .  .  .  .  .  .  .  .  .  .  .  .  .  .  .  .  .  .  .  .  .  .  .  .  .  .  . 65
                                                                                                                                                            Sound Demo Song List. .  .  .  .  .  .  .  .  .  .  .  .  .  .  .  .  .  .  .  .  .  .  .  .  .  .  .  .  .  . 81
                 (2) Wall EQ (CA99 only).  .  .  .  .  .  .  .  .  .  .  .  .  .  .  .  .  .  .  .  .  .  .  .  .  .  . 66
                                                                                                                                                            Connecting to Other Devices.  .  .  .  .  .  .  .  .  .  .  .  .  .  .  .  .  .  .  .  .  .  .  . 82

                                                                                                                                                                                                                                                                                                                      Important Information
                 (3) Low Volume Balance.  .  .  .  .  .  .  .  .  .  .  .  .  .  .  .  .  .  .  .  .  .  .  .  .  . 66
                                                                                                                                                                   Jack Panel.  .  .  .  .  .  .  .  .  .  .  .  .  .  .  .  .  .  .  .  .  .  .  .  .  .  .  .  .  .  .  .  .  .  .  .  .  .  .  .  .  .  . 83
                 (4) Speaker Volume.  .  .  .  .  .  .  .  .  .  .  .  .  .  .  .  .  .  .  .  .  .  .  .  .  .  .  .  .  . 66
                                                                                                                                                                   Headphone Panel. .  .  .  .  .  .  .  .  .  .  .  .  .  .  .  .  .  .  .  .  .  .  .  .  .  .  .  .  .  .  .  .  .  .  . 83
                 (5) Spatial Headphone Sound. . . . . . . . . . . . . . . . . . . . 67
                                                                                                                                                            USB MIDI (USB to Host Connector) .  .  .  .  .  .  .  .  .  .  .  .  .  .  .  .  .  . 84
                 (6) Headphone Type .  .  .  .  .  .  .  .  .  .  .  .  .  .  .  .  .  .  .  .  .  .  .  .  .  .  .  .  . 67
                                                                                                                                                            Information about Bluetooth®.  .  .  .  .  .  .  .  .  .  .  .  .  .  .  .  .  .  .  .  .  .  . 85
                 (7) Headphone Volume .  .  .  .  .  .  .  .  .  .  .  .  .  .  .  .  .  .  .  .  .  .  .  .  .  . 67
                                                                                                                                                            Assembly Instructions (CA79 only).  .  .  .  .  .  .  .  .  .  .  .  .  .  .  .  .  . 86
                 (8) Line In Volume .  .  .  .  .  .  .  .  .  .  .  .  .  .  .  .  .  .  .  .  .  .  .  .  .  .  .  .  .  .  . 68

      2. 4 Hands Mode.  .  .  .  .  .  .  .  .  .  .  .  .  .  .  .  .  .  .  .  .  .  .  .  .  .  .  .  .  .  .  .  .  .  .  .  . 69
                                                                                                                                                            EU DECLARATION OF CONFORMITY.  .  .  .  .  .  .  .  .  .  .  .  .  .  .  .  . 90

      3. Bluetooth.  .  .  .  .  .  .  .  .  .  .  .  .  .  .  .  .  .  .  .  .  .  .  .  .  .  .  .  .  .  .  .  .  .  .  .  .  .  .  .  . 70              Specifications .  .  .  .  .  .  .  .  .  .  .  .  .  .  .  .  .  .  .  .  .  .  .  .  .  .  .  .  .  .  .  .  .  .  .  .  .  .  .  . 91

                 (1) Bluetooth MIDI.  .  .  .  .  .  .  .  .  .  .  .  .  .  .  .  .  .  .  .  .  .  .  .  .  .  .  .  .  .  . 70

                 (2) Bluetooth MIDI Device Name.  .  .  .  .  .  .  .  .  .  .  .  .  .  .  .  .  . 70

                 (3) Bluetooth Audio.  .  .  .  .  .  .  .  .  .  .  .  .  .  .  .  .  .  .  .  .  .  .  .  .  .  .  .  .  . 71

                 (4) Bluetooth Audio Volume.  .  .  .  .  .  .  .  .  .  .  .  .  .  .  .  .  .  .  .  .  . 71

      4. USB Memory .  .  .  .  .  .  .  .  .  .  .  .  .  .  .  .  .  .  .  .  .  .  .  .  .  .  .  .  .  .  .  .  .  .  .  .  .  . 72

      5. MIDI .  .  .  .  .  .  .  .  .  .  .  .  .  .  .  .  .  .  .  .  .  .  .  .  .  .  .  .  .  .  .  .  .  .  .  .  .  .  .  .  .  .  .  .  .  . 72

      6. User Data .  .  .  .  .  .  .  .  .  .  .  .  .  .  .  .  .  .  .  .  .  .  .  .  .  .  .  .  .  .  .  .  .  .  .  .  .  .  .  .  . 72

                 (1) Sounds | Favorite .  .  .  .  .  .  .  .  .  .  .  .  .  .  .  .  .  .  .  .  .  .  .  .  .  .  .  .  . 72

                 (2) Sounds | Recently Played.  .  .  .  .  .  .  .  .  .  .  .  .  .  .  .  .  .  .  .  .  . 72

                 (3) Sounds | User. .  .  .  .  .  .  .  .  .  .  .  .  .  .  .  .  .  .  .  .  .  .  .  .  .  .  .  .  .  .  .  . 72

                 (4) Music | Favorite. .  .  .  .  .  .  .  .  .  .  .  .  .  .  .  .  .  .  .  .  .  .  .  .  .  .  .  .  .  . 72

                 (5) Music | Recently Played .  .  .  .  .  .  .  .  .  .  .  .  .  .  .  .  .  .  .  .  .  .  . 72

                 (6) Music | Recorder.  .  .  .  .  .  .  .  .  .  .  .  .  .  .  .  .  .  .  .  .  .  .  .  .  .  .  .  .  . 72

                 (7) Factory Reset. .  .  .  .  .  .  .  .  .  .  .  .  .  .  .  .  .  .  .  .  .  .  .  .  .  .  .  .  .  .  .  . 72

      7. System. .  .  .  .  .  .  .  .  .  .  .  .  .  .  .  .  .  .  .  .  .  .  .  .  .  .  .  .  .  .  .  .  .  .  .  .  .  .  .  .  .  .  . 73

                 (1) LCD Brightness.  .  .  .  .  .  .  .  .  .  .  .  .  .  .  .  .  .  .  .  .  .  .  .  .  .  .  .  .  .  . 73

                 (2) Display Scale.  .  .  .  .  .  .  .  .  .  .  .  .  .  .  .  .  .  .  .  .  .  .  .  .  .  .  .  .  .  .  .  . 73

                 (3) Auto Display Off.  .  .  .  .  .  .  .  .  .  .  .  .  .  .  .  .  .  .  .  .  .  .  .  .  .  .  .  .  . 73

                 (4) Auto Power Off.  .  .  .  .  .  .  .  .  .  .  .  .  .  .  .  .  .  .  .  .  .  .  .  .  .  .  .  .  .  . 73

                 (5) Startup Screen .  .  .  .  .  .  .  .  .  .  .  .  .  .  .  .  .  .  .  .  .  .  .  .  .  .  .  .  .  .  . 74

                 (6) Startup Settings.  .  .  .  .  .  .  .  .  .  .  .  .  .  .  .  .  .  .  .  .  .  .  .  .  .  .  .  .  . 74

                                                                                                                                                                                                                                                                                                                  9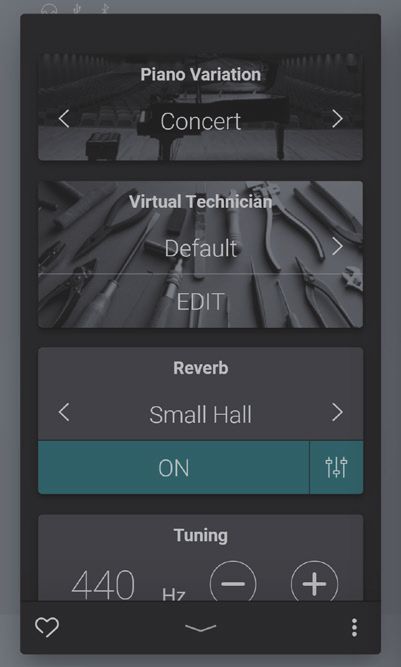
Part   Names
                        Part Names      and Functions
                                   and Functions

                                                                               [ CA99 ]

                                                                          c
                                                                                                                      a

                                                                                                                      b
Important Information

                                                                                                                          k

                               d                  e                       f

                                       LINE IN             LINE OUT           USB to HOST        MIDI
                                   LEVEL     STEREO   L / MONO        R                     IN          OUT
                               Max     Min

                                       g                    h                   i                j

                                                                                                                  l

                                     [ CA79 ]

                               c                                                            ab
                             def                                                            ghij
                               k                                                                              l

                        10
a POWER button f Headphone hook
This button is used to turn the instrument on/off. This hook can be used to hang headphones when not in use.
Important Information
b MASTER VOLUME slider g LINE IN STEREO jack
This slider controls the master volume level of the instrument’s This jack is used to connect the 1/8” stereo output from
built-in speakers or headphones, if connected. smart phones, tablets, computers, or other electronic audio
equipment to the CA99/CA79 digital piano’s amplifier and
CHECK speakers.
The input level can be adjusted by using the LEVEL knob.
The MASTER VOLUME slider will also affect the volume
level of the LINE OUT connectors.
h LINE OUT STEREO jack
These jacks are used to connect the stereo output (Left/Right
1/4” phone plug) of the CA99/CA79 digital piano to external
c TOUCHSCREEN display
amplifiers, mixers, recording devices, and similar equipment.
The touchscreen display provides useful information such as
the currently selected mode, sound name, settings values,
and the status of various functions. The touchscreen is also
i USB to HOST port
This port is used to connect the CA99/CA79 digital piano to
used to interact with the instrument by gently tapping on
a computer using a USB “B to A” type cable in order to send
buttons and icons that appear, or by swiping left and right,
and receive MIDI data.
or up and down.
CHECK j MIDI IN / OUT jacks
These jacks are used to connect the CA99/CA79 digital piano
A protective plastic film is attached to the display during to external MIDI devices such as other musical instruments
production. Please remove this film before attempting to or a computer in order to send and receive MIDI data.
play the instrument.
Ref. “Connecting to Other Devices” P. 82.
The display can be set to turn off automatically after a
period of inactivity.
k USB for UPDATE port
Ref. “Auto Display Off” P. 73. This port is used to connect a USB memory device to the
touchscreen display in order to update the touchscreen
software.
d USB to DEVICE port
This port is used to connect a USB memory device to the l AC IN socket
instrument. This socket is used to connect the power cable.
e PHONES jacks
These jacks are used to connect stereo headphones to the
CA99/CA79 digital piano.
1/4” and 1/8” connectors are provided for convenience, and
both can be used simultaneously, allowing two pairs of
headphones to be connected at the same time.
11Opening/Closing the Key Cover
[ CA99 ] [ CA79 ]
Opening the key cover Opening the key cover
Gently lift the key cover with both hands. Gently lift the key cover with both hands, then slowly push it
back, into the instrument’s body.
Closing the key cover
To close the key cover, slowly push or pull it forwards. The Soft Closing the key cover
Fall system will gently lower the key cover naturally. To close the key cover, slowly pull the handle with both hands,
then gently lower it downward.
When opening the key cover, ensure that there are no items placed on to top of the key cover. If any items
placed on top of the key cover fall inside the instrument, it may cause an electric shock, short circuit, fire or
failure of the instrument.
Be careful to ensure that hands or fingers do not get caught between the key cover and the instrument.
[ CA99 ]
Preparation
Ensure that the music rest is folded-up before closing the key cover. If the key cover is closed while the music
rest is folded down, the music rest and/or keyboard may be damaged.
The CA99 key cover is designed to close slowly using the Soft Fall mechanism. However, the Soft Fall
mechanism may not work effectively if the key cover is only partially opened. Therefore, when opening the
key cover, be careful not to release your hands from the key cover until fully open.
Using the Music Rest
[ CA99 ]
Gently fold down the music rest into position.
[ CA79 ]
Setting up the music rest Folding down the music rest
Lift the music rest, then lower the metal prop (rear side) into To lower the music rest, gently lift the prop from the recessed
the recessed holder to set the desired music rest angle. holder, then lower the music rest.
(The music rest can be set to one of six different angle
positions.)
Prop and holder
12Turning on the Power
1. Connecting the power cable to the instrument
[ CA99 ] [ CA79 ]
Connect the included power cable to the “AC IN” socket located Connect the included power cable to the “AC IN” socket located
on the back side of the instrument, in the bottom left corner. on the right hand side, towards the back of the instrument.
Preparation
2. Connecting the power cable to an outlet
Connect the instrument’s power cable to an AC outlet.
3. Turning on the power
Press the POWER button located on the right hand side of the
instrument.
The instrument will turn on and the KAWAI logo will appear in
the touchscreen display. After a short period, the Piano screen
will appear, indicating that the instrument is ready to be played.
Do not turn the power off until the startup process is completed.
To turn off the power, press and hold the POWER button again
for 1~2 seconds.
13Adjusting the Volume
The MASTER VOLUME slider controls the volume level of the
instrument’s speakers, or headphones if connected.
Move the slider up to increase the volume, and down to decrease
the volume.
Use this slider to set the volume to a comfortable listening level Increase Volume
– the middle is often a good starting point.
CHECK
Decrease Volume
The MASTER VOLUME slider will also affect the volume level
of the LINE OUT connectors.
The maximum volume level of the speakers can be reduced
by using the “Speaker Volume” setting.
Ref. “Speaker Volume” P. 66.
Using Headphones
Preparation
Using headphones
Use the jacks located beneath the keyboard on the left hand side
to connect stereo headphones to the CA99/CA79 digital piano.
1/4” and 1/8” connectors are provided for convenience.
Two pairs of headphones can be connected and used
simultaneously.
Checking the connection of the headphones
The headphones icon will appear in the status bar of the
touchscreen display.
Headphones icon
Attaching the headphone hook (optional)
A headphone hook is included with the CA99/CA79 digital piano
and can be used to hang headphones when not in use.
If desired, attach the headphone hook to the underside of the
keyboard as shown in the illustration.
Do not attempt to place heavy items onto the
headphone hook.
Doing so may damage the headphone hook.
14Using Pedals
As with a grand piano, the CA99/CA79 digital piano features three pedals: damper, sostenuto, and soft.
Damper pedal (right pedal)
Depressing this pedal sustains the sound after one’s hands have
been lifted from the keyboard – greatly enriching the piano
sound, while also assisting smooth “legato” passages.
Soft pedal
The damper pedal is capable of responding to half pedaling.
Sostenuto pedal
Damper pedal
Soft pedal (left pedal) Sostenuto pedal (centre pedal)
Depressing this pedal softens the sound, reducing its volume. Depressing this pedal after playing the keyboard and before
releasing the keys, sustains the sound of only those notes that
When the rotary speaker effect is selected, the soft pedal is also have been played. Any keys that are subsequently played after
used to alternate the speed of the rotary simulation between the sostenuto pedal is depressed will not be sustained.
“Slow” and “Fast” effect modes.
Pedal support bolt
Preparation
A pedal support bolt is attached to the base of the pedal board
to aid stability when the pedals are pushed.
Turn the bolt anti-clockwise until it makes contact with the floor
and supports the pedals firmly. If the pedal support bolt does
not make proper contact with the floor, the pedal board may
become damaged.
Pedal support bolt
When moving the instrument, always adjust or remove the pedal support bolt,
then readjust when the instrument is in its new position.
Caring for the pedals
If the surface of the pedals becomes dirty, clean the pedals using a dry dish-washing sponge.
Do not attempt to clean the pedals using rust-removing solvents, abrasives or files.
Grand Feel Pedal System
The CA99/CA79 digital piano features the Grand Feel Pedal System, which replicates the position and individual weighting of the
damper, soft, and sostenuto pedals of a Shigeru Kawai SK Concert Grand piano. It is also possible to adjust the sensitivity of the
damper pedal, and the effectiveness of the soft pedal using the “Half-Pedal Adjust” and “Soft Pedal Depth” settings.
Ref. “ Half-Pedal Adjust” P. 63
“Soft Pedal Depth” P. 64.
15Part Names
Part Names and Functions
and Functions
1. Home screen structure
The CA99/CA79 digital piano’s user interface is arranged into three different “home” screens, which are selected by
tapping the corresponding Piano, Sound, and Music tabs shown at the bottom of the touchscreen display.
Functions that are common to each home screen are explained below.
Status bar
This area indicates the status of connected devices (headphones,
USB, Bluetooth), and important functions (transpose, effects, reverb).
Icon Description
This icon is displayed when headphones
are connected.
(Headphones icon)
This icon is displayed when a USB
memory device is connected to the [USB
to DEVICE] port.
Preparation
(USB icon)
This icon is displayed when the Bluetooth
MIDI or Bluetooth Audio functions are
turned on.
(Bluetooth icon)
Selection bar
This area displays the name of the currently selected sound/
variation or piece of music.
Tap this area to display information about the current sound/
piece of music, make adjustments, or show additional options.
Piano tab Ref. P. 18
This tab is used to access all of the available acoustic piano
sounds.
This tab is recommend for acoustic piano performance.
Sound tab Ref. P. 26 Music tab Ref. P. 36
This tab is used to access all of the available sounds, This tab is used to access a wide range of music
including acoustic pianos, electric pianos, organs, strings, built into the instrument.
etc. This tab is also used to play music stored on a
This tab also allows two sounds to be played simultaneously, USB memory device, or recorded to the internal
and for additional effects to be applied. memory.
162. Touchscreen Operations
The explanations below outline the different methods
of interacting with the touchscreen, and how these
Menu button Ref. P. 65
operations are referenced in this owner’s manual.
This button is used to display the menu, which provides access
to various settings that control the digital piano. Tap
Touch an area of the screen (e.g. an icon or
Selection area button) and release it immediately.
This area is used to select the desired sound (Piano tab, Sound In this owner’s manual, this operation is
tab) or piece of music (Music tab). indicated by:
MEMO Tap
The selection area will change depending on the current
“home” screen. Swipe
By default, the CA99/CA79 digital piano will always start-up
Touch and hold an area of the screen, slide
with the Piano screen, however this behaviour can be
your finger left or right, then release.
changed via the System settings menu.
Ref. “Startup Screen” P. 74
In this owner’s manual, this operation is
Preparation
Piano screen Sound screen Music screen indicated by:
Swipe
Scroll
Touch and hold an area of the screen, slide
your finger up or down, then release.
In this owner’s manual, this operation is
indicated by:
Scroll
Drag
Metronome button Ref. P. 44
Touch and hold an icon or button, slide your
This button is used to start/stop the Metronome, finger to another position, then release.
and open the metronome settings window.
In this owner’s manual, this operation is
: The Metronome is counting.
indicated by:
: The Metronome is stopped.
Drag
Double tap
Recorder button Ref. P. 46
Touch an area of the screen twice quickly.
This button is used to change the state of the Recorder.
(Inactive): The Recorder is not in use. In this owner’s manual, this operation is
indicated by:
(Standby): The Recorder is in standby, and will start with
the next key press. Double
tap
(Recording): The Recorder is recording.
17Piano TabTab
Piano
1. Piano tab home screen overview
Piano Selection area
The name and picture of the currently selected piano is shown in this area. The piano can be changed by swiping
left and right.
Piano name Characteristics
SK-EX Concert Grand A concert grand piano with a clear tonal color and rich powerful bass.
A concert grand piano with an elegant detailed tone and exceptionally broad
EX Concert Grand
dynamic range.
SK-5 Grand Piano A medium-sized grand piano with a polished brilliant tone.
Upright Piano A full-bodied traditional upright piano.
Selection bar
This area displays the name of the currently selected piano sound. Tap this bar to open the Piano Editor window, which allows various
aspects of the sound to be adjusted.
Basic Operation
Piano Editor window
The Piano Editor window allows various aspects of the sound to be adjusted.
Function Description Ref.
Piano Variation Change the sound variation of the current piano. P. 20
Change the overall tonal character of the current piano sound, or
Virtual Technician P. 22
adjust the various parameters individually.
Adjust the type and amount of ambience applied to the
Ambience
current sound, in order to simulate various different virtual P. 23
(SK-EX Rendering only)
environments.
Reverb Adjust the type and amount of reverb applied to the
(All except current sound, in order to simulate various different virtual P. 24
SK-EX Rendering) environments.
Adjust the overall pitch of the current sound in 0.5 Hz steps. This
Tuning setting may be useful when playing with other instruments/ P. 25
sound sources.
Adjust the overall pitch of the current sound in semi-tone steps.
Transpose This setting may be useful when playing with other instruments P. 25
tuned for different keys.
Store the current sound to memory, or display the Metronome
Menu area P. 25
and Recorder functions.
18Menu button Ref. P. 65
This button is used to display the menu,
which provides access to various settings
that control the digital piano.
Metronome button Ref. P. 44
This button is used to start/stop the Metronome,
and open the metronome settings window.
Basic Operation
: The Metronome is counting.
: The Metronome is stopped.
Recorder button Ref. P. 46
This button is used to change the state of the Recorder.
(Inactive): The Recorder is not in use.
(Standby): The Recorder is in standby, and will start with
the next key press.
(Recording): The Recorder is recording.
19Piano Tab
2. Piano Editor window
This window allows various aspects of the current piano sound to be adjusted.
Tap the Selection bar on the Piano tab screen to open the Piano Editor window.
To close the Piano Editor window, tap the button at the bottom of the window.
Tap
(1) Piano Variation
In the Piano Variation area, tap the buttons to change the piano sound variation.
Tap Tap
CHECK
Rendering Type will only be displayed when the “SK-EX
Rendering” piano sound variation is selected.
Basic Operation
SK-EX Concert Grand
Piano Variation Rendering Type Description
Classic A standard grand piano sound with a broad dynamic range.
Classic2 A Lustrous and brilliant grand piano sound.
Romantic A mellow grand piano sound with soft hammers.
Full A big grand piano sound with a strong bass and bright character.
Jazz A clean grand piano sound that is suitable for jazz.
SK-EX Rendering
Brilliant A bright grand piano sound with emphasised treble.
Rich A rich grand piano sound with emphasised resonances.
Ballad A clear, light grand piano sound that is suitable for ballads.
Vintage A soft grand piano sound with a vintage character.
Boogie A small grand piano with a detuned character.
Concert — A standard grand piano sound with a broad dynamic range.
Jazz Clean — A grand piano sound with a thick and clear character.
Warm — A soft and warm grand piano sound.
MEMO About SK-EX Rendering
The SK-EX Rendering piano sound variation combines high resolution multi-channel sampling with advanced modelling algorithms,
reproducing 10 different acoustic piano characters that are suitable for a variety of musical genres.
20 EX Concert Grand
Piano Variation Description
Concert A luxurious and fluent grand piano sound.
Warm A soft and warm sound grand piano sound.
Standard A distinctive and bright grand piano sound.
Pop Grand A bright and powerful grand piano sound.
Pop Piano A bright and exciting grand piano sound with a characteristic attack.
New Age A clear and transparent grand piano sound.
Modern A transparent grand piano sound that is suitable for performing modern music.
SK-5 Grand Piano
Piano Variation Description
Classical A lustrous grand piano sound that is crisp and distinctive.
Jazz Old School A thick and vintage grand piano sound.
Pop A strong and distinctive grand piano sound that is suitable for pop music.
Upright Piano
Piano Variation Description
Classical A deep upright piano sound that produces a feeling of nostalgia.
Boogie A thick and vintage upright piano sound.
Basic Operation
Honky Tonk A bright upright piano sound with a detuned character.
21Piano Tab
(2) Virtual Technician
In the Virtual Technician area, tap the buttons to change the Virtual Technician preset.
Tap Tap
CHECK
Virtual Technician presets will not be displayed when the “SK-EX Rendering” piano sound variation
is selected.
Virtual Technician preset
Preset Description
Default The default piano sound without additional adjustments.
Noiseless A piano adjusted to minimise additional damper and string resonances, and mechanism noises.
Deep Resonance A piano adjusted to emphasise damper and string resonances.
Ligth Resonance A piano adjusted to reduce damper and string resonances.
A piano adjusted by softening the hammers and increasing the touch weight of the keyboard in order to
Soft
produce a softer tone that is suitable for slow, quiet pieces.
Brilliant A piano adjusted by hardening the hammers in order to produce a brighter tone for modern pieces.
Clean A piano adjusted by hardening the hammers and reducing the damper and string resonances.
A piano adjusted to emphasise dynamics with a lightened keyboard touch and powerful damper and string
Basic Operation
Full
resonances.
A piano adjusted by hardening the hammers and increasing the touch weight of the keyboard, in order to
Dark
produce a dark, gloomy tone.
A piano adjusted by lightening the touch weight of the keyboard and increasing damper and string
Rich
resonances.
Historical A piano adjusted for romantic, classical music, with a bright, open tone.
User This preset will be selected automatically after adjusting a Virtual Technician preset using the edit screen.
Tap the [Edit] button to show the Virtual Technician edit screen, allowing various parameters to
be adjusted individually.
Ref. “Virtual Technician” P. 54
Tap
22(3) Ambience
1. In the Ambience area, tap the [On/Off ] buttons to turn Ambience simulation on/off.
Tap
2. In the Ambience area, tap the buttons to change the Ambience type.
Tap Tap
3. In the Ambience area, tap the button to show additional options
for controlling the Depth.
Drag the Depth slider right/left to increase/decrease the depth of the
Ambience simulation.
Basic Operation
Tap
Drag
CHECK
Ambience will only be displayed when the “SK-EX Rendering” piano
sound variation is selected.
Ambience types
Type Description
Natural Simulates the ambience of a natural environment.
Small Room Simulates the ambience/reverberation of a small room.
Midium Room Simulates the ambience/reverberation of a medium-sized room.
Large Room Simulates the ambience/reverberation of a large room.
Mellow Lounge Simulates the ambience/reverberation of a recording studio.
Bright Lounge Simulates the ambience/reverberation of a wooden recording studio.
Studio Simulates the soft ambience/reverberation of a lounge.
Wood Studio Simulates the bright ambience/reverberation of a lounge.
Live Stage Simulates the ambience/reverberation of a live stage.
Echo Simulates the ambience/reverberation of an echo chamber.
23Piano Tab
(4) Reverb
1. In the Reverb area, tap the [On/Off ] buttons to turn Reverb simulation on/off.
Tap
2. In the Reverb area, tap the buttons to change the Reverb type.
Tap Tap
3. In the Reverb area, tap the button to show additional options for
Basic Operation
controlling Time and Depth.
Drag the Time slider right/left to increase/decrease the decay length
of the Reverb simulation.
Drag the Depth slider right/left to increase/decrease the depth of the
Reverb simulation.
Tap
CHECK
Drag
Reverb will not be displayed when the “SK-EX Rendering” piano sound
variation is selected.
Reverb types
Type Description
Room Simulates the ambience of a small rehearsal room.
Lounge Simulates the ambience of piano lounge.
Small Hall Simulates the ambience of a small hall.
Concert Hall Simulates the ambience of a concert hall or theatre.
Live Hall Simulates the ambience of a live hall or stage.
Cathedral Simulates the ambience of a large cathedral.
24(5) Tuning
In the Tuning area, tap the [–] and [+] buttons to change the Tuning value.
The Tuning value can be adjusted in 0.5 Hz increments within the range of 427.0~453.0 Hz.
Tap
(6) Transpose
In the Transpose area, tap the [–] and [+] buttons to change the Transpose value.
The Transpose value can be adjusted in semi-tone increments within the range of -12~+12.
Tap
(7) Favorite
Tap the button to add the current sound to the Favorites category of the Sound tab.
Tap the button again to remove the sound from the Favorites category.
Basic Operation
Tap
(8) Menu
Tap the button to open the menu.
The following options will be displayed:
Save this sound
This option will save the current sound settings as a User Sound to the
“User” category of the Sound tab.
Follow the steps according to the dialog that appears in the display.
Open Recorder
This option will display the Recorder screen.
Use this option to display the Recorder screen while the Recorder is
stopped.
Ref. “Recorder screen” P. 47
Tap
Open Metronome
This option will display the Metronome screen.
Use this option to display the Metronome screen while the Metronome
is stopped.
Ref. “Using the Metronome” P. 44
Tap the button again, or an area outside of the options to close the menu and return to the Editor window.
25Sound TabTab
Sound
1. Sound tab home screen overview
Category Selection area
The name and picture of the currently selected sound category is shown in this area. The sound category can be changed by swiping
left and right.
Category list Description
All Sounds All of the sounds available, organised by instrument type.
User Sounds that have been adjusted and stored using the Piano Editor/Sound Editor.
Favorite Sounds that have been specified as a Favorite using the Piano Editor/Sound Editor.
Recently Played Sounds that have been selected previously.
Recommended Sounds that are recommended by Kawai.
Classic Sounds that are suitable for playing Classical music.
Jazz Sounds that are suitable for playing Jazz music.
Pop Sounds that are suitable for playing Pop music.
CHECK
The “User” and “Favorite” categories will only be displayed if a User sound has been stored or a sound has been specified as a Favorite.
The “Recently Played” category will only be displayed after selecting a sound.
Selection bar
This area displays the name of the currently selected sound. Tap this bar to open the Sound Editor window, which allows various
aspects of the sound to be adjusted.
Basic Operation
Sound Editor
The Sound Editor window allows various aspects of the sound to be adjusted.
Function Description Ref.
Main Sound Change the instrument type and sound of the Main sound. P. 28
Change the status, and then the instrument type and sound of the Sub sound.
Split: Split the keyboard into two sections and use the Sub sound for the left
Sub Sound P. 29
section.
Dual: Combine the Main sound and Sub sound together.
Virtual Change the overall tonal character of the current piano sound, or adjust the
P. 31
Technician various parameters individually.
Adjust the type and amount of reverb applied to the current sound, in order
Reverb P. 31
to simulate various different virtual environments.
Adjust the type and amount of effects applied to the current sound, in order
Effect P. 32
to simulate various different digital and analogue effects.
Adjust the overall pitch of the current sound in 0.5 Hz steps. This setting may
Tuning P. 34
be useful when playing with other instruments/sound sources.
Adjust the overall pitch of the current sound in semi-tone steps. This setting
Transpose P. 34
may be useful when playing with other instruments tuned for different keys.
Other sound
Adjust other settings related to the current sound. P. 34
settings
Store the current sound to memory, or display the Metronome and Recorder
Menu P. 35
functions.
26Menu button Ref. P. 65
This button is used to display the menu,
which provides access to various settings
that control the digital piano.
Sound list Ref. P. 79
This area lists the available sounds in each category.
Swipe up/down to scroll through the list, then tap the
desired sound to select it.
Metronome button Ref. P. 44
Basic Operation
This button is used to start/stop the Metronome,
and open the metronome settings window.
: The Metronome is counting.
: The Metronome is stopped.
Recorder button Ref. P. 46
This button is used to change the state of the Recorder.
(Inactive): The Recorder is not in use.
(Standby): The Recorder is in standby, and will start with
the next key press.
(Recording): The Recorder is recording.
Instrument type (“All Sounds” category only)
When the “All Sounds” category is selected, this area lists the available instrument
types (piano, organ, strings, etc.).
Swipe up/down to scroll through the list, then tap the desired instrument type to
select it.
27Sound Tab
2. Sound Editor
This window allows various aspects of the current sound to be adjusted.
Tap the Selection bar on the Sound tab screen to open the Sound Editor window.
To close the Sound Editor window, tap the button at the bottom of the window.
Tap
(1) Main Sound
1. In the Main Sound area, swipe the icons left/right to scroll through the available instrument
types, then tap the desired icon to select it.
Swipe Tap
Basic Operation
2. Tap the buttons to change the selected sound.
Ref. “Sound List” P. 79
Tap Tap
CHECK
If “Split” is select in the Sub Sound area, the Main Sound will be used for the right section of the
keyboard.
28(2) Sub Sound
The Sub Sound area is used to enable/disable the “Split” and “Dual” playing modes, and change the instrument type and sound of the
Sub Sound.
Dual mode
The Dual playing mode allows two sounds to be layered together, creating a more complex sound. For example, a piano sound layered
with strings, or a church organ combined with a choir, etc.
1. In the Sub Sound area, tap the [Dual] button to enable Dual playing mode.
Tap
2. In the Sub Sound area, swipe the icons left/right to scroll through the available instrument
types, then tap the desired icon to select it.
Swipe Tap
Basic Operation
3. Tap the buttons to change the selected sound.
Tap Tap
When Dual playing mode is selected, the following settings will be displayed.
Balance
This setting is used to adjust the volume balance between the Main and Sub sounds.
Drag the Balance slider right/left to increase the volume of the Main/Sub sounds.
Octave Shift
This setting is used to lower/raise the pitch of the Sub sound in octave steps.
Tap the [–] and [+] buttons to change the Octave Shift value.
The Octave Shift value can be adjusted within the range of -2~+2.
Dynamics
This setting is used to adjust the dynamic sensitivity of the Sub sound relative to the Main
sound.
Drag the Dynamics slider right/left to increase/increase the dynamic sensitivity of the Sub
sound.
29Sound Tab
Split mode
The Split playing mode divides the keyboard into two sections, allowing each section to be played with a different sound. For example,
a bass sound in the left section, and a piano sound in the right section.
1. In the Sub Sound area, tap the [Split] button to enable Split playing mode.
Tap
2. In the Sub Sound area, swipe the icons left/right to scroll through the available instrument
types, then tap the desired icon to select it.
Swipe Tap
3. Tap the buttons to change the selected sound.
Tap Tap
Basic Operation
When Split playing mode is selected, the following settings will be displayed.
Balance
This setting is used to adjust the volume balance between the Main (right section) and Sub
(left section) sounds.
Drag the Balance slider right/left to increase the volume of the Main/Sub sounds.
Split Point
This setting is used set the point on the keyboard that divides the Main (right section) and
Sub (left section) sounds.
Tap the [–] and [+] buttons to change the Split Point.
Octave Shift
This setting is used to lower/raise the pitch of the Sub sound in octave steps.
Tap the [–] and [+] buttons to change the Octave Shift value.
The Octave Shift value can be adjusted within the range of 0~+3.
Lower Pedal
This setting is used to enable/disable pedal functions for the Sub (left section) sound.
When turned off, the pedals will only affect the Main (right section) sound, and not the Sub
(left section) sound.
CHECK
The pedal functions will always affect the Main (right section) sound.
30Vous pouvez aussi lire