MANUEL UTLISATEUR USER GUIDE - Ski Mojo
←
→
Transcription du contenu de la page
Si votre navigateur ne rend pas la page correctement, lisez s'il vous plaît le contenu de la page ci-dessous
MANUEL       ENREGISTREZ VOTRE SKI-MOJO SUR
UTLISATEUR     REGISTER YOUR SKI-MOJO ON
              http://www.ski-mojo.fr/garantie
USER GUIDE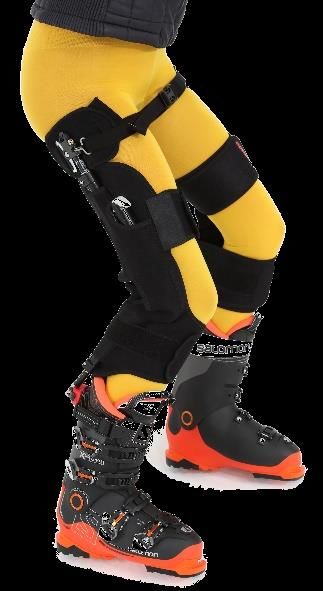
Bienvenue dans la communauté           Congratulations on your
Ski-Mojo, premier exosquelette         new Ski-Mojo. It should
pour la pratique du ski. Nous          provide you with many
espérons       que     ce    nouvel    years of skiing enjoyment.
équipement vous apportera pleine       We strongly recommend
satisfaction.    Merci    de    lire   you register your product
attentivement cette notice et de       at       http://www.ski-
respecter        les      consignes    mojo.fr/guarantee      to
d’utilisation.                         benefit     from      the
Nous      vous     recommandons        guarantee,      to     be
vivement d’enregistrer votre           informed about future
produit    sur    http://www.ski-      innovations     and    to
mojo.fr/garantie       afin    de      benefit from the best
bénéficier de la garantie, d’être      possible service for your
informé des innovations à venir et     Ski-Mojo.
de bénéficier du meilleur service
possible pour votre Ski-Mojo.

                                               Harnais sous fessier et connecteurs
                                               harnais
                                               Harness + harness connector

                                               Bouton d’activation
                                               Activation switch

                                               Système Ski-Mojo protégé par du
                                               néoprène
                                               Knee-supports with the mojo
                                               hinges in them

                                               Connection chaussure temporaire
                                               Clamp-on Ball-Studs

                                               Connection chaussure définitive
                                               Ball-studs
                                                                                 2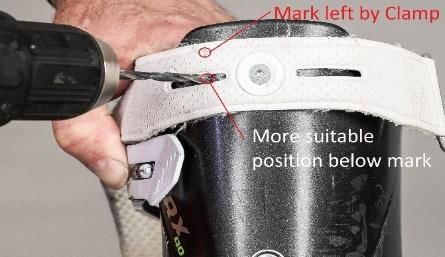
CONTENU DU SAC A DOS - CONTENT

                           ❶                   ❷              ❸                   ❹                  ❺

           ❻                   ❼                 ❽                         ❾                      ❿

 ❶ Manuel d’Utilisation - User guide       ❻ Sachet contenant :
 ❷ Jambe gauche – Left leg                  ▪ 2 connecteurs temporaires (Clamp-On Ball-studs) ❼
 ❸ Jambe droite - Right leg                 ▪ 2 connecteurs définitifs (Ball-studs) ❽
 ❹ Harnais - Harness                         ▪ 4 bloque tiges (Rod blockers)❾
 ❺ Ceinture (utilisation optionnelle)        ▪ clé BTR (Allen key) ❿
   Elastic belt (optional)

 AVANT D’INSTALLER POUR LA PREMIERE FOIS VOTRE SKI-MOJO, MUNISSEZ-VOUS
 DES ACCESSOIRES SUIVANTS :
 Before fitting the first time prepare the following parts :
➢   Les deux supports de genoux en Néoprène          la plus fréquente. Une fois que votre Ski-Mojo
    (gauche ❷ et droit ❸) incluant                   sera réglé à votre corpulence et que vous aurez
    l’exosquelette                                   installé les connecteurs chaussures, il sera facile à
    Two Neoprene Knee-Supports                       mettre et à enlever chaque jour.
➢   Le harnais ❹ composé d’une sangle large
    équipée de deux attaches de chaque coté
                                                     Upon purchasing your Ski-Mojo is adjusted to the
    The harness composed of a wide belt and
                                                     minimum spring setting of the mojo hinges and
    with a clip on each side
                                                     the switches in the “off” position, so that the
➢   Les deux connecteurs temporaires ❼               springs are not engaged. The initial fitting should
    Two clamp-on ball-studs                          be done with the switches in the “off” position.
➢   La clé BTR ❿ de 2,5 mm (forme                    The Posture-Strap of the Harness will be set to the
    hexagonale)                                      most commonly used length. Once your Ski-Mojo
    The 2,5 mm Allen key                             has been set to your size and weight and you
                                                     have attached the Ball-Studs to your ski boots; it
Votre Ski-Mojo est livré avec les ressorts réglés    is easily put on and taken off day-to-day with
au minimum de compression et les gâchettes en        Velcro and snap-fittings.
position « off » (ressorts désactivés). Le réglage
initial doit être effectué avec ces gâchettes
désactivées. Le harnais est réglé sur la taille la
                                                                                                        3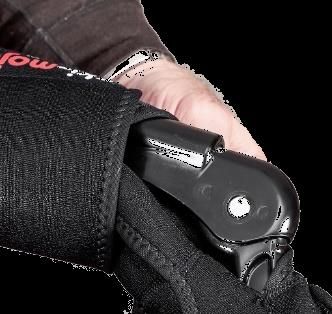
PREMIERE INSTALLATION – First fitting

 ① ADAPTER LES RESSORTS DE COMPRESSION À VOTRE POIDS
   Set the Ski-Mojo to your weight
 D'abord, vous devez regarder quel type de           First, check which spring is installed in your Ski-
 ressort est monté dans votre système :              Mojo :
 ➢    Un Ski-Mojo avec un ressort Gold est           ➢ Ski-Mojo with Gold spring comes with black
      fourni avec des boutons d’activation noirs.          switches.
 ➢ Un Ski-Mojo avec un ressort Silver est            ➢ Ski-Mojo with Silver spring comes with grey
      fourni avec des boutons d’activation gris.           switches.
 ➢ Un Ski-Mojo avec ressorts bleus est fourni        ➢ Ski-Mojo with Blue spring comes with red
      avec des boutons d’activation rouges.                switches.
 ❶ Notez votre poids sur le tableau de               ❶ Look your weight up on the chart and
 correspondance ci-contre, pour votre modèle         establish how many Movements you need to
 de ressort. Notez alors le nombre de                turn the adjuster.
 mouvements correspondant à votre poids.             ❷ For each leg (right and left), undo the Velcro
 ❷ Pour chaque jambe (droite et gauche),             on the ends of the Knee-Support straps, then
 détachez les velcros et repliez-les sur leurs       unwrap the straps and fold the Velcro ends of
 extrémités (pour qu’ils ne s’accrochent pas         the straps back on themselves (just so they don’t
 partout durant les réglages). Dégagez ensuite le    stick to everything while doing the fitting). Pull
 néoprène sur le coté, en pliant chaque jambe        the Neoprene to one side to expose the Power
 du Ski-Mojo afin de faire apparaître la bague de    Adjuster and Indicator.
 réglage (en inox) et le curseur d’indication du     ❸ Insert the end of the Allen key in to the hole
 réglage juste au-dessus de la bague.                on the right of the two visible holes in the Barrel
 ❸ Assurez-vous que le réglage est positionné        Adjuster (when looking at it with the “Spring
 au minimum (curseur le plus bas possible).          Adjuster Indicator Slot” above it) and using the
 Insérez alors l’extrémité de la clé BTR dans l’un   Allen key as a lever (do not turn the Allen key - it
 des tous de la bague de réglage et utilisez cette   won’t do anything). Rotate the Power Adjuster
 clé comme levier pour faire tourner la bague de     until the hole on the right (that the Allen key is
 réglage d’un quart de tour (1 mouvement) vers       in) is now the hole on the left. Take the Allen key
 la gauche. Un nouveau trou apparaît alors du        out of the hole and repeat as many times as
 coté droit. Sortez la clé du trou et répétez ce     indicated on the chart.
 mouvement autant de fois qu’indiqué sur le
 tableau de correspondance.                                  Curseur
                                                             Indicator pin

                                                             Bague de réglage
                                                             Barrel Adjuster

                                                                                                      4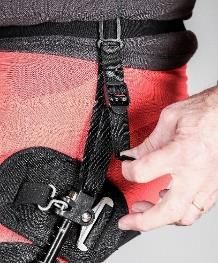
PREMIERE INSTALLATION – First fitting

 TABLEAU DE REGLAGE – WEIGHT AND POWER CHART

                               Insérez la clé BTR dans le trou de droite et utilisez la clé comme
                               levier pour tourner la bague vers la gauche du nombre de
                               mouvements indiqués dans le tableau. Les étapes 1 à 4 ci-dessus
                               représentent 1 mouvement.
                               Insert the end of the Allen key in to the hole on the right and use
                               the Allen key as a lever to rotate the Power Adjuster until the hole
                               on the right has moved to the left. Repeat for each movement.
                               Steps 1 to 4 above represent 1 movement.

Exemple :
Pour un poids de 63 kg,
réglez le ressort Silver en
effectuant 6 mouvements
vers la gauche. Le curseur
montera au niveau de la
2eme marque.

Example:
For a weight of 63 kg, set
the Silver spring with 6
movements to the left. The
indicator pin will go to the
2nd mark.

                                                                                                5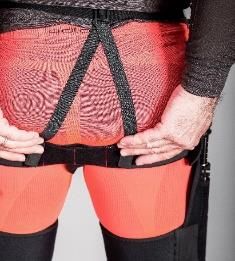
PREMIERE INSTALLATION – First fitting

  ②     FIXER LES CONNECTEURS TEMPORAIRES À VOS CHAUSSURES DE SKI
        Put the clamp-on ball-studs on to your ski boots
Les deux connecteurs temporaires livrés avec         The two Clamp-on Ball-studs allow you:
votre Ski-Mojo ont trois fonctions :                 ➢ To test the Ski-Mojo
➢ Faire un essai du Ski-Mojo                         ➢ To use Ski-Mojo with rental boots
➢ Permettre l'utilisation avec des chaussures        ➢ To properly establish the position of the
     de location                                          final Ball-studs
➢ Etablir le positionnement correct des              ❶ Turn the locking disc a fraction Clockwise to
     connecteurs définitifs                          unlock.
❶ Desserrez le disque de blocage en le               ❷ Hook the attachment on to the back of your
tournant dans le sens des aiguilles d’une            ski boot (edge of attachment 20mm to outside
montre.                                              of boot). You can use the other clamp (which is
❷ Accrochez le connecteur temporaire à               20mm wide) as a guide.
l’arrière de votre chaussure (sur la coque en        ❸ Do up the screw with the Allen Key until it is
plastique dur) en le décalant de 20mm vers           gripping firmly (while holding the locking disc),
l’extérieur du milieu de la chaussure.               Then turn the locking disc anti-clockwise to lock.
❸ Serrez la vis avec la clé BTR jusqu'à ce que
l’ensemble soit bien fixé (tout en maintenant le
disque de verrouillage), puis tournez le disque
de verrouillage dans le sens contraire des
aiguilles d'une montre pour verrouiller une
dernière fois.
Snowboardeurs : regardez page 12                             20 mm
See page 12 for snowboard boots

  ③ METTRE LE HARNAIS – Install the harness
Nous vous recommandons de porter le Ski-Mojo         We recommend to use your Ski-Mojo under your
sous votre pantalon de ski, sauf lors de la          pants, except for the first day, in order to
première utilisation afin de faciliter la prise en   facilitate handling.
main.                                                With the elastic straps at the bottom of the main
Le harnais est composé d’une sangle large qui        strap, step into the loops of the harness. Pull the
vient se placer à la pliure de des fesses et des     Harness up so that the main strap is UNDER your
cuisses. Les sangles élastiques viennent             buttocks. Pull the Harness up so that the main
entourer les cuisses et se fixent avec un            strap is under your buttocks.
mousqueton sur l’avant.
                                                     Check the position of the Harness connectors. The
Une fois le harnais installé, vérifiez la position   hole at the bottom should be in line with the
des connecteurs latéraux. Le trou placé sous ce      outside of your thigh. If the Harness connectors
connecteur doit être aligné avec l’extérieur de      need to be moved, then peel off the Velcro and
la cuisse. Si les connecteurs doivent être           re-position in the correct place (there are lines of
déplacés, décrochez alors le plus gros velcro à      red stitching every 5cm as a guide). You may be
l’arrière du harnais et replacez-le à la bonne       helped by a friend.
position.                                                                                              6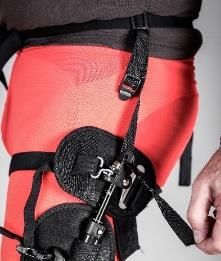
PREMIERE INSTALLATION – First fitting
Des repères rouges placés tous les 5 cm vous aideront à positionner             Once the harness is
ces velcros de manière symétrique. Eventuellement, faites-vous aider            installed, you can put
par une autre personne.                                                         your ski-boots on.
Une fois le harnais installé et réglé, chaussez et serrez vos chaussures
de ski.
                                                        Positionnez-le
  Enfilez le
                                                        sous les
  harnais
                                                        fesses
  Step into
                                                        The main
  the loops
                                                        strap should
  of the
                                                        be under you
  harness
                                                        buttocks

  Vérifiez la position des connecteurs latéraux -     Si besoin, ajustez leur position à l’aide des Velcros
   Check the position of the Harness connectors      If needed, adjust their position thanks to the velcro
                 Le réglage du harnais est une étape importante. Ne la sautez pas !
                   Adjustment of the harness is an important step. Do not skip it!

 ④ INSTALLER LES DEUX JAMBES DU SKI-MOJO– Fitting you Mojo legs
Votre Ski-Mojo est équipé d’une jambe droite et      Your Ski-Mojo is equipped with a left leg and a
d’une jambe gauche («L» et «R» indiqués sur le       right leg (“L” and “R” indicated on the neoprene).
néoprène). Pour chaque jambe, suivez cette           For each leg, please follow this procedure:
procédure :
❶ Ouvrez le clip de blocage de chacune des
deux tiges (haut et bas) puis faites-les coulisser
vers l’extérieur. Des graduations vont alors
apparaître.
▪ préréglez sur 4 si vous faites plus d’1m80
▪ préréglez sur 2 si vous faites moins d’1m80
Open the clamp of each telescopic rod (upper
one and lower one) and slide them out.
Graduations will then appear.
▪ preset to 4 if you are over 1m80 tall
▪ preset to 2 if you are less than 1m80 tall

                                                                                                        7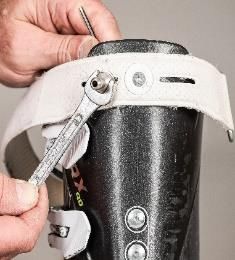
PREMIERE INSTALLATION – First fitting
❷ Faites glisser vers le haut la douille en inox de la
tige inférieure pour découvrir le trou de fixation.
Placez ce trou en face du connecteur chaussure,
rapprochez le tout et libérez la douille.
Slide up the sleeve on the end of the lower telescopic
rod to expose the socket. Place the socket on to the
ball stud on the boot and release the sleeve.

❸ Ouvrez le clip de réglage de la tige inférieure et
ajustez la longueur jusqu’à ce que le point
d’articulation du Ski-Mojo soit à la hauteur de votre
genou, et fermez ensuite le clip.
Undo (open) the clamp holding the lower Telescopic
rod. Slide the pivot of the mojo up until it is alongside
your knee and then close (do-up) the clamp.

❹ Faites glisser la tige télescopique du haut dans le
trou situé au bas du connecteur harnais jusqu’à ce que
ce dernier soit fixé. Si vous voulez par la suite détacher
la jambe du harnais, appuyez sur le bouton doré du
connecteur et soulevez le harnais.
Slide the top of the telescopic rod into the hole in the
bottom of the Harness connector. If you want to
disconnect a leg from the harness, just press the
golden button placed on the harness connector and
pull-up the harness.
❺ Vous pouvez maintenant installer les velcros, sans
les serrer excessivement.
Do up the Velcro shin-strap as tightly as is comfortably
possible. Do up the thigh strap.

❻ Levez-vous et ouvrez le clip de réglage de la tige de
la cuisse et ajustez la longueur jusqu’à ce que le
connecteur du harnais se place 5 à 7 cm sous la partie
la plus large de la taille, et fermez ensuite le clip.
                                                                       5 à 7 cm
Stand up and open the clamp holding the upper
Telescopic rod. Then adjust the length until the harness
connector is 5 to 7 cm below the widest part of the
waist. Close the clamp
Conseil : Une fois que vous avez réglé la longueur des tiges de la première jambe, vous pouvez
simplement régler les tiges de l’autre jambe à la même longueur avant de les fixer à votre chaussure
de ski.
Tip: Once you’ve set the telescopic rods to length on the first leg you can simply set the telescopic
rod of the other leg to the same length before attaching it to your ski boot.                        8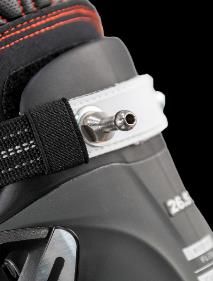
PREMIERE INSTALLATION – First fitting

 ⑤      ACTIVATION / DESACTIVATION – Engage / Dis-engage
Activation : pressez et bloquez les deux boutons d’activation (droit et
gauche) vers le bas puis, en position debout, tendez les jambes. Vous
devez légèrement exagérer l’extension de vos jambes pour enclencher
les ressorts.
To switch on (engage) the mojos push the switches down - then
straighten your legs.
Désactivation : soulevez et débloquez les deux boutons d’activation
puis, en position debout, tendez les jambes. Vous devez légèrement
exagérer l’extension de vos jambes pour désengager les ressorts.
To switch off (dis-engage) the mojos flip the switches up - then
straighten your legs.
     VOUS POUVEZ MAINTENANT
    RESSENTIR L’EFFET DU SKI-MOJO

   YOU CAN NOW ENJOY THE EFFECT
         OF YOUR SKI-MOJO

Conseils - Advice :
▪ Désactivez votre Ski-Mojo avant de déchausser vos skis, pour marcher, pour conduire ou au
  restaurant.
  Dis-engage the Ski-Mojo when not skiing, to walk or drive or in a restaurant.
▪ Si l’activation ou la désactivation est difficile au début, ou si vous n’arrivez pas à tendre
  suffisamment la jambe, ne forcez surtout pas l’articulation du genou vers l’arrière. Vous pourriez
  endommager votre Ski-Mojo. Dans ce cas, après avoir actionné le bouton d’activation, saisissez
  d’une main la tige du haut et, en tendant la jambe au maximum, tirez doucement cette tige vers
  le haut. Le système devrait alors s’enclencher. Il ne doit jamais être nécessaire d’utiliser la force.
  If activation is difficult during the first days or if you cannot raise your leg enough, don’t force the
  system. Just engage the activation switch, stretch your leg as much as you can and pull up the
  upper part of your Ski-Mojo with your hand.

 ⑥ UN DERNIER TEST AVANT D’ALLER SKIER – A quick test before skiing
Avec le Ski-Mojo activé, fléchissez les genoux à environ 45 degrés (l’idéal est alors de s’assoir sur une
chaise), puis soulevez légèrement le bout des pieds tout en gardant les talons au sol. Si vous ne
sentez pas vos pieds partir vers l'intérieur ou l'extérieur, alors le réglage est vraiment terminé.
Cependant, si vos pieds partent vers l’extérieur, alors déplacez les connecteurs chaussures de 1 à 2
mm vers l’extérieur de celles-ci. A l’inverse, si vos pieds partent vers l’intérieur, rapprochez les
connecteurs chaussures vers le centre. Attention : ce test n’est pas nécessaire pour les
snowboardeurs
Une fois que vous êtes satisfait des réglages, nous vous recommandons de les noter à la fin de cette
brochure.
                                                                                                         9
PREMIERE INSTALLATION – First fitting
With the mojos engaged, flex your knees to around 45 degrees (you may want to hold on to a chair or
table for balance) then lift the toes of your ski boots a fraction off the ground so that you are balanced
on your heels. If you do not feel your feet being turned in or turned out – fitting is complete,
However, if your feet turn-out when doing this test you will need to move the Clamp-on boot fittings a
little further towards the outside of your boots (1 or 2 mm). If your feet turn-in when doing this test
you will need to move the Clamp-on boot fittings a little further towards the centre of your boots.
Please note that this test is not necessary for snowboarders.
Once you are happy with the
settings – we recommend that
you make a note of them on the
end of this booklet

  QUAND ACTIVER SON SKI-MOJO ? When to have your Ski-Mojo switched on or off
En dehors des phases de ski, cela devient             While out skiing – It soon becomes second
bientôt une seconde nature d’activer ou de            nature to switch on and switch off feeling for
désactiver votre Ski-Mojo à travers votre             the switches through your ski trousers with your
pantalon, même avec vos gants de ski.                 ski gloves on.
En principe, votre Ski-Mojo sera désactivé            As a general rule you have the Ski-Mojo
quand vous n'avez pas vos skis (y compris             switched off whenever you do not have your skis
lorsque vous chaussez et déchaussez vos skis) et      on and switched on whenever you do have your
activé quand vous avez vos skis aux pieds.            skis on.
La seule exception est quand vous prenez le           The one exception is when riding a chair lift. You
télésiège. Vous devez vous assurer que le Ski-        should ensure that the springs are dis-engaged
Mojo est désactivé avant de monter sur un             Before you get on to a chair lift. If you forget –
télésiège. Si vous oubliez – nous le faisons tous !   we all do ! don’t panic – simply put the switches
ne paniquez pas - déconnectez seulement et            into the off position and then swing your legs
balancez vos jambes pour désengager les               forwards and up to disengage the springs. Once
ressorts. Une fois que vous êtes sur le télésiège,    you are on the chair lift you may want to put
vous pouvez activer en appuyant sur le bouton         the switches in to the On position in preparation
d’activation, en préparation de la sortie. Vous       for when you get off. You can either get off the
pouvez aussi quitter le télésiège, comme vous le      lift as you would normally and the springs will
feriez    normalement        et    les    ressorts    engage once you straighten your legs OR just
s'enclencheront lorsque vous tendrez vos              before you get off the chair, swing your legs up
jambes OU juste avant de quitter le télésiège,        to engage the springs, then as the chair arrives
balancez vos jambes pour engager les ressorts,        the tails of your skis will contact the ground first
puis lorsque vous arrivez, les talons de vos skis     and the skis will be pushed back under the chair
toucheront le sol en premier, les skis                so that you can easily stand up and ski off
reculeront, vous pourrez alors facilement vous        already powered up.
lever et vos ressorts seront déjà mis sous
tension.                                                                                                10
APRES QUELQUES JOURS DE SKI

 ⑦ FIXER LES CONNECTEURS DEFINITIFS A VOS CHAUSSURES DE SKI
   Install the final ball studs on your ski boots
Maintenant que l’emplacement des connecteurs           Once you are completely happy with the
vous convient, et si vous avez vos propres             position of the Clap-on Ball-Studs, and if you
chaussures de ski, nous vous recommandons              have your own ski boots, we strongly
d’installer les connecteurs définitifs sur la coque    recommend that you fit ball studs directly on to
de vos chaussures de ski. Ceux-ci sont plus            your ski boots rather than using the clamps.
faciles à utiliser, surtout lorsque les doigts sont
froids.                                                Using the mark left by the clamp as a guide
Il faut percer un trou de 4 mm pour fixer les          make a 4mm hole in your ski boot. The actual
connecteurs définitifs. Faites le trou aussi près      hole can be above or below the mark if that is
que possible de la position qu'avait le                a more suitable place to make the hole. For the
connecteur temporaire positionné sur la                vast majority of ski boots that have two fixings
chaussure (en terme de distance par rapport au         holding the power strap in place, the outside
centre de celle-ci). Avant de percer, sortez le        fixing is usually the ideal. Don’t forget to take
chausson de la chaussure afin de ne pas                the liner out of the boots before drilling to
l'endommager et pour rendre le travail plus            ensure you don’t damage them.
facile.
                                                       If you use a higher or lower fitting point –
La hauteur est moins importante, de préférence         remember to adjust the length of your
à 2 ou 5 cm du haut de la chaussure. Si le             telescopic rods (and rod blockers) by the
connecteur chaussure est fixé plus haut ou plus        corresponding amount.
bas par rapport au connecteur provisoire,
n'oubliez pas de changer les réglages des tiges        Push the 4 mm screw with the washer on
télescopiques basses.                                  through the hole from the inside of the ski
Introduisez le boulon de 4 mm avec sa rondelle,        boot. Tighten the Ball-Stud and screw using the
depuis l'intérieur de la chaussure, à travers le       Allen key and either a 10mm spanner, an
trou et mettez une goutte de super-glue ou de          adjustable spanner, mole grips or pliers to hold
frein filet (loctite) et une rondelle à l'extrémité    the stud.
du boulon avant de visser. Serrez et vissez en
utilisant la clé BTR et un autre outil (clé de 10 ou
pince).

                                                                                                      11
APRES QUELQUES JOURS DE SKI
Snowboard
Contrairement au ski alpin, les connecteurs Unlike alpine skiing, snowboard Clamp-on Ball-
chaussures de snowboard peuvent se placer à studs can be placed anywhere on the boots,
n’importe quel endroit de la chaussure, et especially on the outside of these boots so as
notamment sur le coté extérieur de celles-ci not to hinder the attachment of the boots to
afin de ne pas gêner la fixation de la chaussure snowboarding.
au snowboard. If your boots are too soft, the weight transfer
Si vos chaussures sont trop souples, le transfert that the Ski-Mojo makes towards your boots
de poids qu’opère le Ski-Mojo vers votre may deform it. We can supply you with a
chaussure risque de la déformer. Nous pouvons specific snowboard connector. Or you can use a
alors vous proposer un connecteur spécifique piece of curved plastic such as guttering or
snowboard. Ou sinon, vous pouvez utiliser une drain pipe cut to approx . 100mm square with a
pièce en plastique rigide qui viendra rigidifier 4mm hole drilled in the middle (see sample
votre chaussure (voir exemple ci-dessous). below) and sliding this between the inner and
outer of the boot
CEINTURE DE SOUTIEN OPTIONNELLE– Optional suspending belt
Une fois installé, votre Ski-Mojo est fixé aux If you spend a lot of time with your Ski-Mojo on
chaussures et ne peut plus glisser vers le bas. but without your ski boots on (if you get dressed
Mais si vous gardez longtemps votre Ski-Mojo for skiing but don’t put your ski boots until
sans vos chaussures de ski (si vous êtes habillé you’ve travelled to the slopes), the neoprene
pour skier mais n'êtes pas sur les pistes, en train knee supports may start to slide down your legs
de conduire par exemple), le Ski-Mojo peut after a while.
glisser vers le bas. Pour soulager votre baudrier, To help hold the Ski-Mojo up, put the elastic belt
vous pouvez alors rajouter la ceinture élastique around your waist and attach the suspender
optionnelle autour de votre taille et l’attacher hooks to the harness.
aux clips latéraux de votre baudrier.
12FAQ
ACCROCHE VELCRO DE LA CUISSE – Thigh Velcro
Cette fixation n’est pas obligatoire et vous This support is not mandatory and you will even
remarquerez d’ailleurs que ce velcro est notice that this velcro is removable, which is a
amovible, ce qui est une option agréable au nice option during spring. If you remove this
printemps. Si vous enlevez ce velcro de votre Velcro from your Ski-Mojo:
Ski-Mojo : ▪ When dis-engaged, the Ski-Mojo will tend to
▪ En position désactivé, le Ski-Mojo aura move away from the thigh, which is not a
tendance à s’éloigner de la cuisse, ce qui n’est problem if worn under the ski pants .
pas gênant s’il est porté sous le pantalon de ▪ As soon as the Ski-Mojo is engaged, it will
ski. automatically stick to the thigh again.
▪ Dès que le Ski-Mojo sera activé, il viendra
automatiquement se coller à nouveau à la
cuisse.
ALLER AUX TOILETTES – When using the WC
Avec les commutateurs désactivés, décrocher When using the WC you may only need to undo
chaque jambe du harnais en pressant sur le petit the buckle at the front of the harness (and the
bouton dorés situé au niveau des connecteurs buckle on belt or any other arrangement you may
du harnais. Vous pouvez alors descendre be using) or you may also need to disconnect the
facilement le harnais après avoir ouvert le mojos from the Harness Clips by pressing the
mousqueton ventral. brass release buttons so that you can disconnect
the harness from the mojos and lower it.
SERRAGE DES CLIPS – Tighten Rod camps
Le poids exercé sur le Ski-Mojo peur modifier le réglage des tiges. Ceci peut
arriver si les vis de fixation des clips ne sont pas suffisamment serrées. Utilisez
alors la clé BTR pour les resserrer (le clip doit être en position fermée). En
général, un demi-tour suffit.
If you need to tighten the telescopic clamps using the Allen key, make sure that
you only ever do this with the cam-levers in the closed position – to avoid over
tightening, as they can fail if overtightened. If you use the optional rod blockers
(see bellow) the clamps do not need to be done up tightly
13DIVERS
BLOQUEURS DE TIGES - Rod-blockers
En raison des nombreux impacts subis par les tiges de réglage du Ski-
Mojo, celles-ci peuvent parfois se dérégler au cours d’une journée de
ski. Pour éviter cela, notez le réglage des tiges télescopiques et ajustez
ensuite la position des deux écrous sur le bloqueur de tiges de manière
à ce que la distance entre l’extrémité ronde et les écrous soit
identique à celle du réglage de la tige. Retirez ensuite la tige
télescopique du Ski-Mojo puis insérez l'extrémité sans embout du
bloqueur de tiges dans la tige télescopique, puis réinsérez la tige
télescopique et le bloqueur de tiges dans le Ski-Mojo. La tige
télescopique ne peut alors plus se dérégler et les clips n’ont plus
besoin d’être fortement serrés.
If they are subjected to a lot of dynamic impacts the lower telescopic
rods can sometimes “collapse” slightly during the course of a days’
skiing. To prevent this happening, we recommend that you use the 4
Rod blockers. Lock the two flanged nuts on the threaded rod together
(hand tight is sufficient) at the desired position/length. Undo the
telescopic rod cam-clamp. Slide out the telescopic rod. Slide the rod
blocker into the open end of the telescopic rod then. Slide the
telescopic rod back in to the Ski-Mojo..
PIECES DETACHEES – Spare parts
Toutes les pièces détachées du Ski-Mojo peut être commandées sur www.ski-mojo.fr.
All Ski-Mojo spare parts can be ordered from www.ski-mojo.fr
Clip de serrage connecteur chaussures jambe « Mojo » Néoprène Tiges de réglages
Rod clamp Ball-Studs « Mojo » leg Neopren telescopic rod
RETENEZ VOS REGLAGES – Remember your settings
Votre Ski-Mojo – Your Ski-Mojo : SILVER – GOLD – BLUE (Rayez en fonction - delete as appropriate)
Réglage du harnais – Posture strap setting : Réglage des ressorts / Power setting : ____________
Nombre de mouvements / number of movements
Longueur des tiges/ Lengh setting :
Tiges du haut / upper telescopic rod : _________ cm
Indiquez la position des velcros Tiges du haut / lower telescopic rod : _________ cm
Mark position of ends of velcro 14Garantie JaKSports SARL, importateur et distributeur JaKSports SARL, importer and exclusive distributor exclusif du Ski-Mojo, assure au nom du of Ski-Mojo, warrants on behalf of the fabriquant - Kinetic Innovation Ltd - la garantie de manufacturer - Kinetic Innovation Ltd - your votre produit contre tout défaut (matériel et product to be free from defects in material and main-d'œuvre) pour une période de deux ans, à workmanship for a period of two years from the partir de la date d’achat. Si vous trouvez un original date of purchase. If you discover a defect défaut dans le produit couvert par la garantie, in a product covered by this warranty, we will nous vous le réparerons, soit en le remettant en repair at our option using new or refurbished état, soit en changeant des composants. Si la components, or if repair is not possible, replace réparation n'est pas possible, nous vous the item. remplacerons les pièces. Exclusions: This warranty covers defects in Exclusions : la garantie couvre les défauts de manufacturing discovered while using the product fabrication découverts en utilisant le produit as recommended by this user guide. The warranty comme recommandé dans ce manuel. La garantie does not cover loss or theft, nor does coverage ne couvre pas la perte ou le vol ainsi que les extend to damage caused by misuse, abuse, dommages causés par une mauvaise utilisation, unauthorized modification, improper storage une collision, une chute, un abus, une conditions, lightning, or natural disasters. The modification non autorisée ou des conditions de warranty does not cover parts that are subject to stockage inappropriées. La garantie ne couvre normal wear and tear such as telescopic rods, pas non plus l'usure normale des pièces, et cables and neoprene. notamment les tiges tibiales, les câbles et le Limits of Liability: Should the product fail, your néoprène. sole recourse shall be repair or replacement, as Limites de responsabilités : si le produit tombe described in the preceding paragraphs. We will en panne, votre seul recours est de le faire not be held liable to you or any other party for réparer ou de le faire changer, comme décrit ci- any damages or injury that result from the failure dessus. Nous ne pouvons pas être responsables, of this product. Damages excluded include, but vis-à-vis de vous ou de quelqu'un d'autre, pour are not limited to, the following; lost profits, lost les dommages et blessures directs ou indirects savings, lost data, damage to other equipment or résultant d'une défaillance du produit. persons, and incidental or consequential damages En aucun cas, la responsabilité de JaKSports SARL arising from the use, or inability to use this ou Kinetic Innivation Ltd. ne peut être engagée product. In no event will JaKSports SARL or Kinetic au-delà du prix de vente du produit et ne peut Innovations Limited be liable for more than the dépasser le prix catalogue du produit, excluant amount of your purchase price, not to exceed the les taxes et les charges d'expédition et de current list price of the product, and excluding manutention. tax, shipping and handling charges. JaKSports SARL et Kinetic Innovation Ltd rejettent JaKSports SARL and Kinetic Innovations Limited toutes autres garanties expresses ou implicites. disclaims any other warranties, express or Comment procéder : contactez-nous à l'aide implied. By installing or using the product, the d'une des méthodes suivantes : envoyer un mail à user accepts all terms described herein info@ski-mojo.fr ou Téléphoner au +33 (0)6 20 26 How to obtain service under this warranty: 96 63 contact us at info@ski-mojo.fr or +33 (0)6 20 26 Les coûts d'envoi à JaKSports SARL ou à un centre 96 63, Return shipping costs to be paid for by de réparation agréé, les frais de douane ou JaKSports. The cost of shipping to JaKSports SARL, autres charges sont à la charge de l'utilisateur. or an authorised repair centre or payment of any Les coûts d'expédition en retour sont payés par Customs clearance fees or duties are the JaKSports SARL. responsibility of the user. 15
RETROUVEZ NOUS SUR / FIND US ON
                                                                www.facebook.com/skimojomania
                                                                www.youtube.com/c/SkiMojoFrance

                                                                                                      DONNEZ

                                                                                            DU PEPS
              Hervé Gouy – Moniteur – Les Arcs

                                                                                             A VOTRE SKI !
                                                                                                    PERFORMANCE
                                                                                                      ENDURANCE
                                                                                                           PLAISIR
                                                                                                         SECURITE

                                                                 www.ski-mojo.fr

                                                                                             +33 (0)6 20 26 96 63
                                                                                              info@ski-mojo.fr

                                                    JaKSports SARL / Ski-Mojo France         +33 (0)6 25 25 50 57
                                                 657, route des Riondes - 74220 La Clusaz    gabriel@ski-mojo.fr
PARTENAIRES
Vous pouvez aussi lire