Prêt à rejoindre l'aventure ? Ready to join the adventure ? - safety guide
←
→
Transcription du contenu de la page
Si votre navigateur ne rend pas la page correctement, lisez s'il vous plaît le contenu de la page ci-dessous
&

 Prêt à rejoindre l'aventure ?
Ready to join the adventure ?
Conditions d'utilisation
Avertissements .......................2
Vocabulaire .............................3
Montage .......................... .......4
Avant de tirer ..........................5
Pendant le tir ...........................6
Après le tir ..............................7         Using condition
Plan de tir ...............................8   Shooting plan ..........................8
                                               Warning ...................................9
                                               Vocabulary ..............................10
                                               Assembly instructions .............11
                                               Before shooting .......................12
                                               Shooting plan ..........................13
                                               During shooting .......................14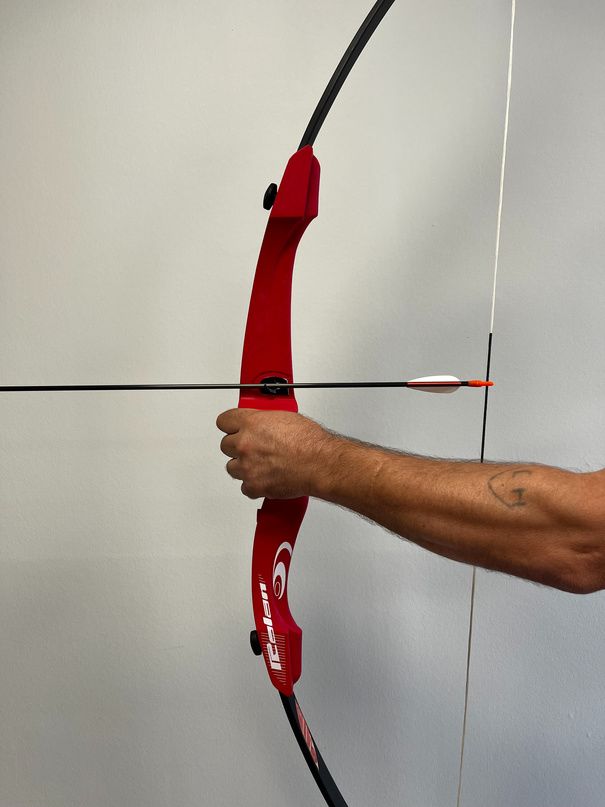
AVERTISSEMENTS                    Informations à tous les
                                            utilisateurs
                                                  Une
                                  mauvaise manipulation d'un arc
                                  risque d'entraîner des blessures
                                voire la mort si une flèche frappe un
Nos arcs ne sont pas conçus              endroit vulnérable.
  pour être utilisés dans des
 conditions météorologiques              CET ARC N'EST
          extrêmes.                      PAS UN JOUET.
(températures positives et/ou
         négatives)             Propriétaire de ce matériel, veillez à
                                respecter les conditions d'utilisation.
                                   Pour les plus jeunes archers, la
                                pratique de l'activité doit se dérouler
                                  sous la surveillance d'un adulte.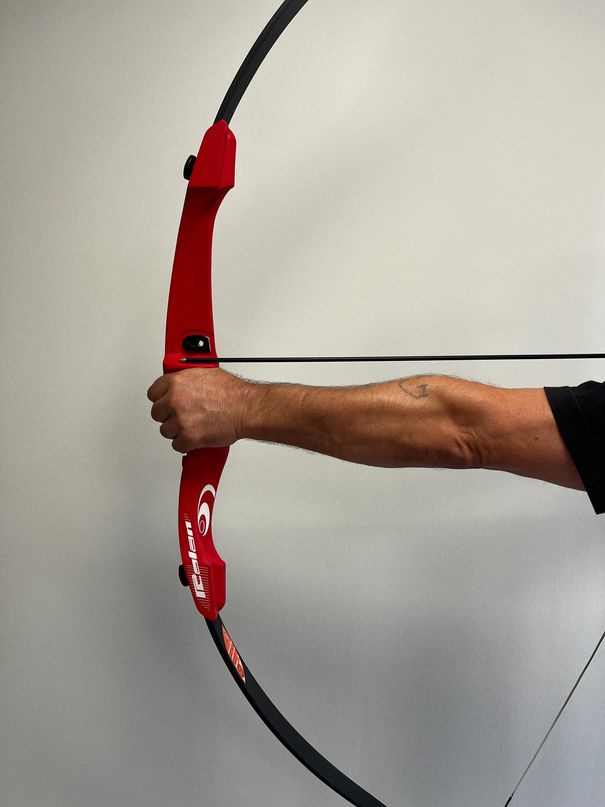
Vocabulaire
QUELQUES MOTS POUR VOUS AIDER À MIEUX COMPRENDRE ....

ALLONGE DE L'ARC : distance entre la poignée de l'arc et la corde lorsque l'arc est bandé
ARMER : action qui consiste à amener la corde et la flèche au visage pour prendre la visée
ATTACHE D'INITIATION : emplacement sur la poignée pour installer les branches initiation
BAND : distance entre la poignée et la corde lorsque l'arc est au repos
BANDER L'ARC : action qui consiste à mettre l'arc et la corde en tension
BRAS DE L'ARC : il s'agit du bras qui tient la poignée de l'arc
DÉCOCHER : action qui consiste à lâcher la corde de l'arc pour propulser la flèche
FAUSSE CORDE : corde permettant le montage de l'arc
INSERT DE BUTTON BERGER : emplacement sur l'arc permettant d'jouter un button berger
INSERT DE STABILISATEUR : emplacement sur l'arc permettant d'ajouter un stabilisateur
INSERT DE VISEUR : emplacement sur l'arc permettant d'ajouter un viseur
INSERT DE REPOSE-FLÈCHE : emplacement sur l'arc permettant d'ajouter un repose-flèche
MAIN DE CORDE : il s'agit de la main qui tire sur la corde
MAIN DE L'ARC : il s'agit de la main qui tient la poignée de l'arc
NO GLOW : partie qui combine à la fois point d'encochage et protection de tir, à enfiler sur la
corde et à placer au grès de vos réglage
POINT D'ANCRAGE : repère au visage vers lequel l'archer doit amener la corde et la flèche
avant de décocher
POUPÉES : extrémités de l'arc où s'insèrent les boucles de la corde

Montage
Repérer d'abord la branche du haut et celle du bas.La branche à visser sur
la partie inférieur de l'arc est celle qui présente le marquage indiquant la
taille et la force.
Visser les 2 branches dans leur logement respectif et placer le repose-
flèche adhésif
Utiliser toujours une fausse corde pour bander votre arc
Faire glisser la boucle la plus large de la fausse corde dans la branche du
haut et donner 10 tours à la corde.
Attacher la boucle la plus petite à la poupée inférieure de l'arc.
Placer ensuite la fausse corde comme sur la photo, capuchon en bas et la
partie anti-dérapante en haut                                                  Regardez la vidéo sur
Bander l'arc et insérer la partie haute de la corde dans la poupée de la            Youtube :
branche                                                                         JLK France Rolan
S'assurer que la corde est bien placée dans les poupées avant d'armer
l'arc
Poupée
Avant de tirer
Toujours vérifier l'état de votre arc, de votre corde et de vos
flèches.
Branche composite
Ne jamais utiliser un arc ou des flèches qui présenteraient des
signes d'usure telles que des fissures ou des cassures.
Corde
Assurez-vous que la corde est en place dans les gorges des
Vis de branche
poupées.
Toujours porter un protège bras.
Insert de viseur
Placer la flèche du bon côté, à gauche pour un droitier, à droite
Insert de repose flèche
pour un gaucher.
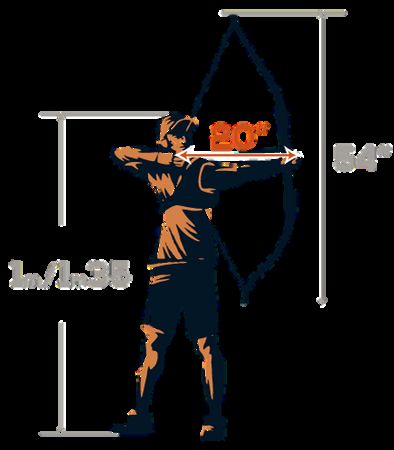
Vérifiez que la longueur de la flèche est adaptée à votre allonge. Insert de stabilisateur
Vérifiez le bon positionnement de la plume coq et des plumes
poules. Vis de branche
Vérifier l'état d'usure de la butte de tir de votre cible. Toutes les
buttes de tir s'usent avec le temps et finissent par ne plus bloquer
les flèches. Branche composite
Remplacez la butte de tir de votre cible si la surface est usée ou
endommagée.
Assurez-vous de toujours connaître les lois et règlements locaux. Poupée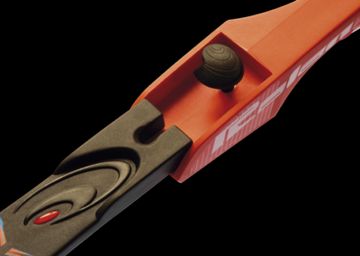
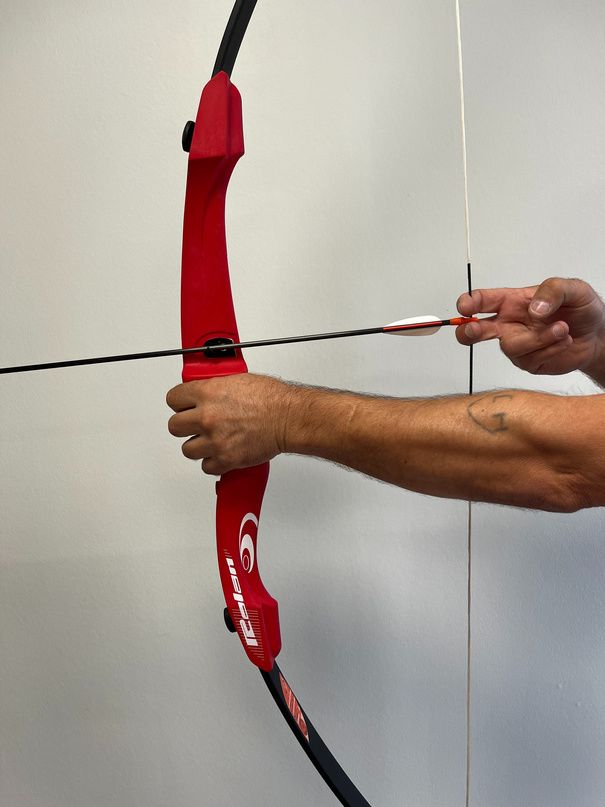
Pendant le tir
Assurez-vous d'avoir une cible adaptée à votre matériel.
Toujours porter des lunettes de sécurité avec tout type de tir à l'arc.
Ne jamais décocher sans flèche, cela pourrait endommager votre arc et
provoquer des blessures.
Ne jamais tirer à la verticale et en direction des personnes, animaux, routes
et habitations.
Ne jamais utiliser de flèches d'un poids insuffisant. Cela aura le même effet
que de tirer à vide et peut provoquer des blessures graves.
Ne jamais bander votre arc au-delà de son allonge maximale, cela pourrait
endommager l'arc.                                                               Junior
Inspecter régulièrement vos flèches et encoches pendant votre session de
tir.
Des flèches et encoches endommagées peuvent créer des blessures
graves.
Toute flèche abimée ou fendillée ne doit plus être utilisée.
Inspecter votre arc après chaque utilisation.
Inspectez votre corde pour détecter tout signe d'usure ou de détérioration.
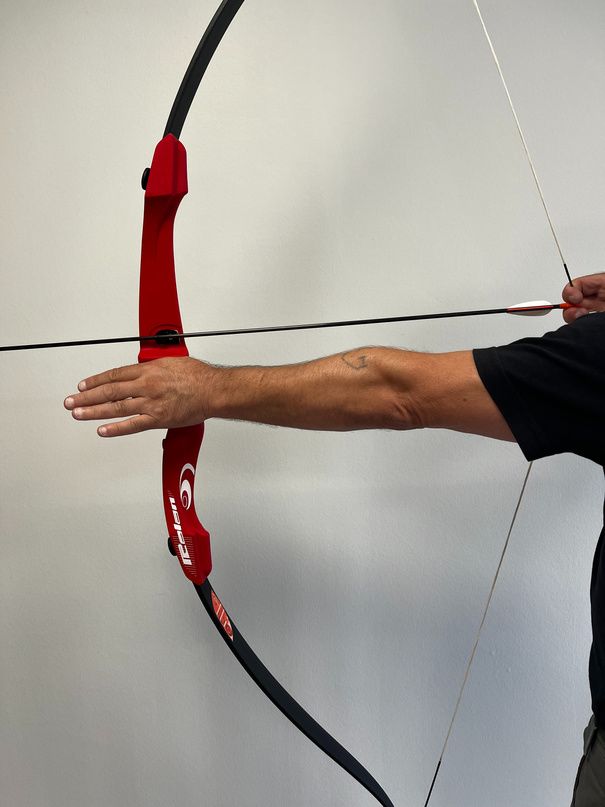
Après le tir
Vérifier l'état de votre arc après chaque séance de tir                    Attention à l'extra course due
Vérifiez l'état de vos accessoires également après chaque session de tir     à une longueur de flèche
Ne laissez pas votre arc exposé à une forte chaleur                           inadaptée (trop courte) .
Pensez à placer votre arc en position de repos                                  Cela peut causer des
Vérifier l'état d'usure de la butte de tir de votre cible                            blessures.
WARNING                   Message to all users
                                                      A
                                        improper handling of a bow
                                               risk of injury
Our bows are not made to be           even death if an arrow strikes at
   used in extreme weather                  a vulnerable place.
            conditions.
In negative temperature, the                     This bow is
  arc will lose flexibility, gain                 not a toy.
    rigidity and lose power
 In positive temperature, the                   Therefore, if you
arc will retain its flexibility, or     buy this bow, be sure to follow
        even gain some.                        the terms of use. *
                                       For younger archers, make sure
                                        that the practice of the activity
                                      takes place under the supervision
                                                   of an adult.
Vocabulary A FEW WORDS TO HELP YOU BETTER UNDERSTAND ... ANCHOR POINT: mark on the face towards which the archer must bring the string and the arrow before shooting ARMING: action which consists in bringing the rope and the arrow to the face to take aim ARROW REST INSERT: location on the bow to add an arrow rest BAND: distance between the handle and the string when the bow is at rest BEND THE BOW: action which consists of putting the bow and the string under tension BOW ARM: This is the arm that holds the bow handle BOW HAND: This is the hand that holds the hilt of the bow BOW LENGTH: distance between the bow handle and the string when the bow is drawn BOW STRINGER: Fake string to help the assembly DOLLS : parts of the arch into which the ends of the string fit INITIATION ATTACHEMENT : location on the handle to install the initiation limbs NO GLOW : also know as roller finger, part that combines both notching point and shooting protection, to thread on the rope and to place at the sandstone of your settings PLUNGER BUTTON INSERT : Location on the bow to add a plunger button RELEASE: action which consists of letting go of the bowstring to propel the arrow SIGHT INSERT : Location on the bow to add a sight STABILIZER INSERT: location on the bow to add a stabilizer STRING HAND: this is the hand that pulls the string
Assembly instructions
First locate the upper branch and the lower branch.The branch to screw on
the lower part of the arch is the one with the marking indicating the size and
strength.
Screw the 2 branches into their respective housing and place the adhesive
arrow rest
Always use a false string to bend your bow
Slide the wider loop of the false rope into the top branch and give the rope
10 turns.
Tie the smaller loop to the lower headstock of the bow.
Then place the false rope as in the photo, cap at the bottom and the non-        Watch the video on
slip part at the top                                                                 Youtube :
Bend the bow and insert the upper part of the string into the branch doll        JLK France Rolan
Make sure the string is properly placed in the dolls before cocking the bow
Doll

Before shooting
Always check the condition of your bow, string and arrows.
Never use a bow or arrows that show signs of wear such as                     Composite limb
cracks or breaks.
Make sure the rope is in place in the grooves of the dolls.               String
Always wear an arm guard.                                          Limb screw
Always place the arrow on the correct side : to the left for a
right-hander, to the right for a left-hander.                       Sight insert
Check the correct positioning of the cog feather and hen         Arrow rest insert
feathers.
Check that the length of the arrow is correct for your height.   Stabilizer insert

Always check your target's shooting butt for wear before and
after each use.                                                     Limb screw

All shooting butts wear out over time and eventually stop
working.
                                                                                     Composite limb
Replace your target's shooting butt if the surface is worn or
damaged.
Make sure you ALWAYS know the local laws and regulations
                                                                              Doll
During shooting
Make sure you always be sure of your target and beyond it.
Always wear safety glasses with any type of archery.
Never shoot without an arrow, it could damage your bow and cause injury.
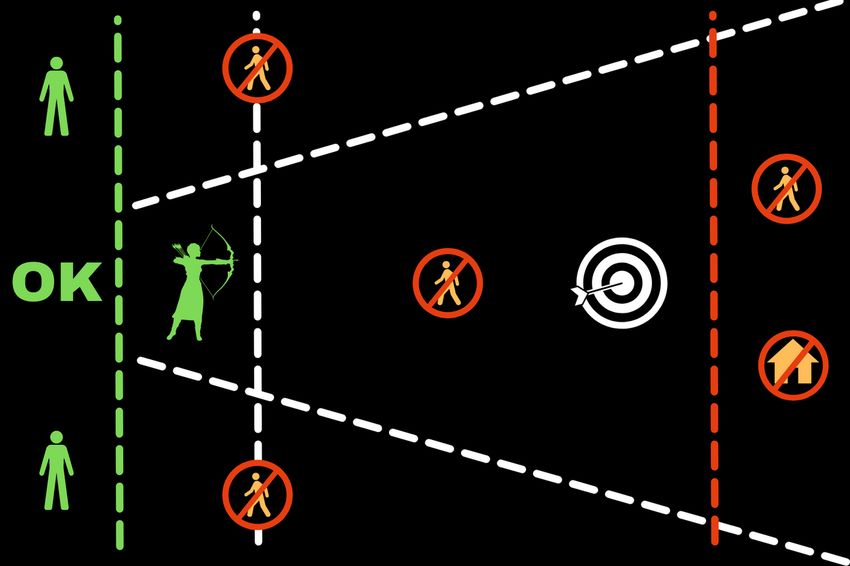
Never shoot vertically and in the direction of people, animals, roads or
homes.
Never use arrows that are underweight. This will have the same effect as
empty firing and may cause serious injury.
Never bend your bow beyond its maximum draw, as this could damage the
limbs and string.
Junior
Always inspect your arrows and notches regularly. Damaged arrows and
notches can cause serious injury. Any damaged, split or cracked arrow must
be immediately discarded.
ALWAYS inspect your bow after each use.
Make sure all parts and accessories are securely attached.
Inspect your rope for any signs of wear or deterioration.
Make sure accessories are ALWAYS properly installed before firing.After shooting Check the condition of your bow after each shooting session Pay attention to the extra Check the condition of your accessories also after each shooting session stroke due to an unsuitable Do not leave your bow exposed to high heat arrow length (too short). Remember to place your bow in the rest position It can cause injury. Check the wear condition of your target's backstop
Vous pouvez aussi lire