VERANDA AWNINGS IS A MASTERPIECE - EVERY PIECE
←
→
Transcription du contenu de la page
Si votre navigateur ne rend pas la page correctement, lisez s'il vous plaît le contenu de la page ci-dessous

VERANDA AWNINGS

     EVERY PIECE
  IS A MASTERPIECE
tenda                   sporgenza max cm      numero pagina
                                 awning              maximum projection cm           page no.
                                 store               maximale Ausladung cm           Seite Nr.
                                 markise             avancée maximale cm              page n°
                                 toldo                       salida máx cm   número de página
                                 toldo                saliência máxima cm      página número

GIANT                            DA VINCI                     600 cm                    184
for projections up to 6 meters
                                 DA VINCI PL                  600 cm                    188
                                 DA VINCI COVER               600 cm                    192
                                 DA VINCI COVER PL            600 cm                    192
                                 BRUNELLESCHI                 600 cm                    196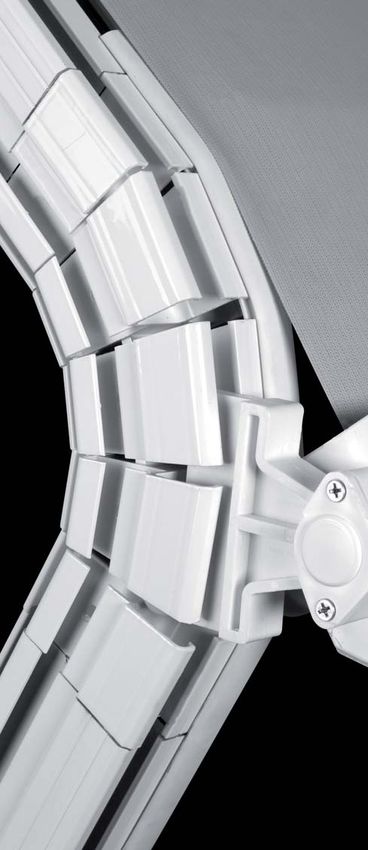
DA VINCI                       sporgenza max | max projection | maximale Ausladung
                                                                                        avancée maximale | salida máx | saliência máxima

                                                                                                                       600 cm
                                                            600   250 cm   600 cm
                                                                                                      AVAILABLE COLOURS
                                                            cm                                                           RAL    9010

 Uomo vitruviano, Gallerie dell’Accademia, Venezia
 Leonardo Da Vinci, 1490 circa

184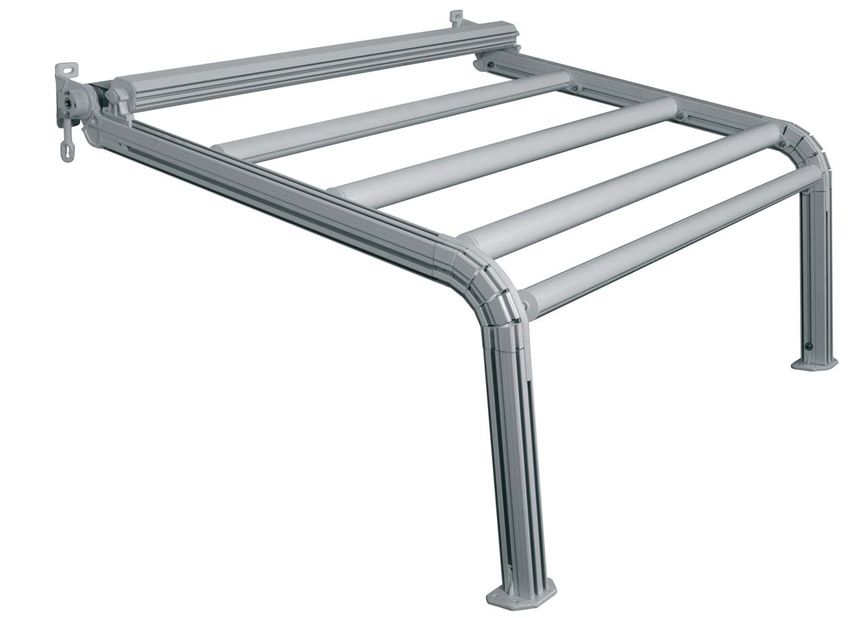
DA VINCI

Struttura in alluminio a staffe indipendenti. Ha un sistema di scorrimento a
cinghia. La tensione del telo è assicurata da molle a gas. Il tessuto è sostenuto
da profili di alluminio paralleli alle guide che permettendo un efficiente scolo
dell’acqua. Le dimensioni massime sono di 6 m x 6 cm x 2,5 di altezza.

Aluminum structure with independent brackets. It is provided with a belt
sliding system. The fabric is always perfectly tensioned thanks to gas springs.
The textile is also supported by profiles which allow an efficient rainwater
drainage. The maximum dimensions are 600cm x 600cm x 250cm of height.

Massiver Aluminiumrahmen mit unabhängige Stütze. Es verfügt über ein
System von Gleiten. Die Tuchspannung wird durch Gasfedern sichergestellt.
Das Tuchf wird auch durch Profilen, die ein effizienter Wasserablauf
ermöglichen, unterstützt. Die Maximalgröße, ist 600 x 600 x 250 cm Höhe.

Structure massive en aluminium avec supports indépendants. Dispose d’un
système de ceinture coulissante. La tension de la toile est fixée par des
ressorts à gaz. Le tissu est soutenu par profils qui permettent une évacuation
efficace de l’eau. La taille maximale est de 600 cm x 600 cm x 250 de hauteur.

Estructura masiva en aluminio con ataque a soportes independientes. Tiene
un sistema de cinturón de deslizamiento. La tensión de la tela está asegurada
por resortes de gas. La tela es apoyada por una serie de perfiles que permiten
un drenaje eficiente del agua. El tamaño máximo es de 600 cm x 600 cm x
250 de altura.

Estrutura em alumínio maciço com instalação em suportes independentes.
Possui um sistema de de deslizamento por correias. A tensão do tecido é
garantida por molas a gás. O tecido é sustentado por perfis que permiten um
escoamento eficiente de água. As dimensões máximas são 600 cm x 600
cm x 250 de altura.

                                                                               185
DA VINCI
                                                                                          DA VINCI - INSTALLATION INSTRUCTIONS

              lateral bend                     central bend

            lateral bracket              da vinci front band profile

 da vinci guide and terminal profile   da vinci transverse windbreake
                                                                        LATERAL BRACKET

      da vinci vertical windbreake
186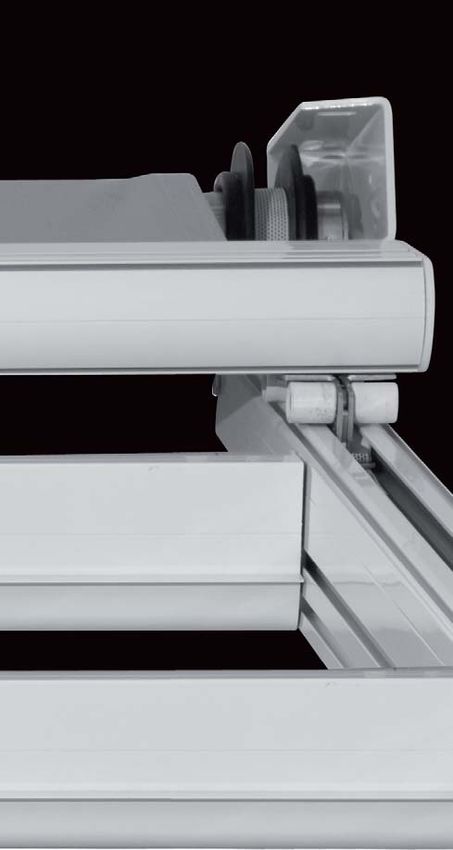
DA VINCI
           ISTRUZIONI PER L’INSTALLAZIONE                                                             INSTALLATION INSTRUCTIONS                                                            INSTRUCTIONS D’INSTALLATION
PRIMA DI INIZIARE L’INSTALLAZIONE LEGGERE ATTENTAMENTE LE ISTRUZIONI                   BEFORE YOU START INSTALLATION, PLEASE READ THE INSTRUCTION                            AVANT DE COMMENCER L’INSTALLATION, PRIÈRE DE LIRE ATTENTIVEMENT LES
ED ANALIZZARE IL DISEGNO                                                               CAREFULLY AND ANALYZE THE DRAWING                                                     INSTRUCTIONS ET D’ANALYSER LE DESSIN TECHNIQUE

1. Con un capo della cinghia effettuare il percorso (A) prima di inserire il sistema   1. With an end part of the belt, effect path (A) before you insert the gas spring     1. Avec une extrémité de la sangle effectuer le parcours (A) avant d’insérer le
    della molla a gas Part 4 nella gamba (il percorso “A” è quello all’interno della       system Part 4 into the leg (path ‘A’ is the one inside the leg).                      système de ressort à gaz, voire Partie 4, dans la jambe (le parcours “A” est celui
    gamba).                                                                            2. Make the belt pass through the spools (B) of the curve.                                à l’intérieur de la jambe).
2. Far passare la cinghia sui rocchetti (B) della curva.                               3. Plug the bend into the leg, making sure not to pinch the belt.                     2. Faire passer la sangle sur les bobines (B) de la courbe.
3. Innestare la curva nella gamba facendo molta attenzione a non pizzicare la          4. Once fabric is almost fully wrapped up (-30 cm), insert the belt in the sliding    3. Engager le coude dans la jambe, en Vous assurant de ne pas pincer la
    cinghia.                                                                               channel of the trolley and pass it under the spool (C).                               sangle.
4. A telo quasi tutto avvolto (-30 cm), inserire la cinghia nel canale di              5. Fasten the belt as in Part 1 giving a couple of idle spins and be careful not to   4. Lorsque le tissu est presque tout enroulé, (-30 cm), insérez la sangle dans
    scorrimento del carrello e passarlo sotto il rocchetto (C).                            twist the belt.                                                                       le canal d’écoulement du chariot et le passer sous la bobine (C).
5. Agganciare la cinghia come Part 1 dando un paio di giri morti e facendo             6. Unroll the fabric until mid of its complete length.                                5. Fixer la sangle comme montré dans la Partie 1 en donnant quelques tours à
    attenzione a non attorcigliare la cinghia.                                         7. Roll out the belt in the upper section (the other belt end) without                    vide et en faisant attention à ne pas tordre la sangle.
6. Srotolare il telo fino a metà del suo sviluppo totale.                                  compressing the gas spring and passing over the spools (D), mark the point        6. Déployer le tissu jusqu’à la moitié de son développement complet.
7. Stendere la cinghia nella sezione superiore (l’altro capo della cinghia) senza          of contact between the two elements (trolley and belt) with a felt-tip pen.       7. Étendre la sangle dans la section supérieure (l’autre extrémité de la sangle)
    comprimere la molla a gas passando sopra i rocchetti (D) e contrassegnare          8. Pull back the position of the belt of 30 cm and apply the hooking belt as in           sans comprimer les ressorts à gaz et passez sur les bobines (D). Avec un
    con un pennarello il punto di contatto tra i due elementi (carrello e cinghia).        Part 2. Do not cut the belt prior to the verification of proper functioning of        feutre marquer le point de contact entre les deux éléments (chariot et sangle).
8. Arretrare la posizione della cinghia di 30 cm ed applicare l’aggancio cinghia           the awning.                                                                       8. Reculer la position de la sangle de 30 cm et appliquer l’attaque de la sangle
    Part. 2. Non tagliare la cinghia se prima non si è fatta la verifica di buon       9. Pull the belt to compress the gas spring and attach the ‘belt hooking’ to the          comme montré en Partie 2. Ne pas couper la sangle si avant Vous n’avez
    funzionamento della tenda.                                                             trolley as shown in Part 3. Release slowly and make sure that the hook is in          pas bien vérifié le bon fonctionnement de la tente.
9. Tirare la cinghia per comprimere la molla a gas e attaccare l’ “aggancio                the correct position.                                                             9. Tirer la sangle pour comprimer le ressort de gaz et fixer ‘’ l’attaque de la
    cinghia” al carrello come mostra Part 3. Rilasciare lentamente verificando         10. During testing, by making the awning open and close, check that the gas               sangle “ à votre chariot, comme indiqué dans Partie 3. Relâcher lentement
    che il gancio sia in posizione corretta.                                               spring never reaches its limit switch (fully open or fully closed).                   en Vous assurant que le crochet soit dans la bonne position.
10. In fase di collaudo, facendo aprire e chiudere la tenda, controllare che la        11. Cutting the exceeding belt part shall be carried out only after all the checks    10. Pendant le test, en ouvrant et en fermant le store , vérifier que le ressort à
    molla a gas non raggiunga mai il suo fine corsa (tutta aperta o tutta chiusa).         of proper functioning of the awning.                                                  gaz n’atteigne jamais sa position finale (complètement ouvert ou fermé).
11. Il taglio della cinghia eccedente deve essere eseguito solo dopo aver              12. Adjust the motor’s limit switches.                                                11. Vous pourrez couper l’excès de la sangle, uniquement après que tous les
    effettuato tutti i controlli di buon funzionamento della tenda.                                                                                                              contrôles du bon fonctionnement du store auraient été effectués.
12. Regolare i fine corsa del motore.                                                                                                                                        12. Régler les interrupteurs limiteurs du moteur.

N.B. – FARE ATTENZIONE A:                                                              PLEASE NOTE – PAY ATTENTION:                                                          REMARQUE - FAIRE ATTENTION:
Le operazioni 1-2-3-4 devono essere eseguite prima di assemblare: il fascione          Operations 1-2-3-4 have to be performed prior to assembling: the front border,        Les opérations 1-2-3-4 doivent être effectuées avant le montage: de la
anteriore, il profilo trasversale e i profili frangitratta.                            the transversal and the windbreak profiles.                                           protection frontale, du profil transversal et des profils brise-vent.
Installare l’intera struttura inserendo anche i carrelli nelle guide.                  Install the whole structure by inserting the trolleys into the guides, too.           Installer la structure entière en intégrant les chariots dans les guides.
Affinché la tenda abbia un perfetto funzionamento le guide devono essere               For a proper functioning of the awning, the guides have to be perpendicular to        Pour avoir un fonctionnement parfait les guides doivent être perpendiculaires au tube
perpendicolari al rullo avvolgitore e parallele tra loro. Il senso di avvolgimento     the roller tube, and parallel to each other.                                          enrouleur et parallèles les unes aux autres.
della cinghia deve essere opposto al senso di avvolgimento del telo.                   The belt winding direction must be opposite to the fabric winding direction.          Le sens d’enroulement de la sangle doit être opposé au sens
                                                                                                                                                                             d’enroulement du tissu.
È conveniente effettuare la sostituzione delle cinghie vecchie prima che si            We suggest to effect replacement of the old belts before they break, since by         Il est convenant de remplacer les vieilles sangles avant qu’elles ne cassent car
rompano poiché unendo a caldo un capo della vecchia con un capo della nuova            warm joining one end of the old with a end of the new belt, you can make it slide     en joignant à chaud une extrémité de la vieille sangle avec une extrémité de la
cinghia, si può farla scorrere con una discreta facilità senza dover smontare la       with a relative ease without disassembling the structure.                             nouvelle sangle, Vous pouvez la faire glisser avec une facilité suffisante sans
struttura.                                                                                                                                                                   avoir à démonter la structure.

                                                                                                                                                                                                                                                                187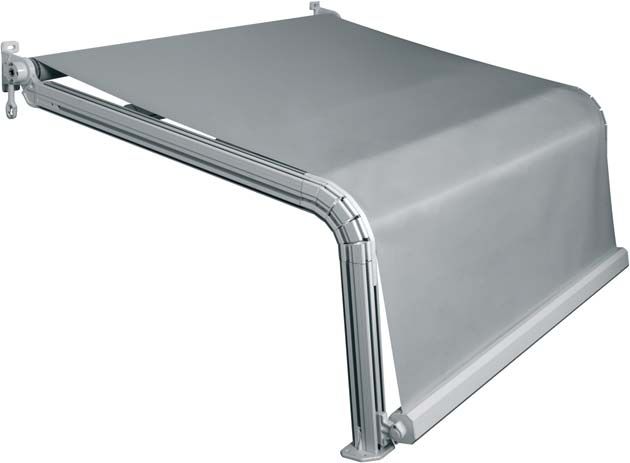
DA VINCI PL                       sporgenza max | max projection | maximale Ausladung
                                                                                           avancée maximale | salida máx | saliência máxima

                                                                                                                          600 cm
                                                              1100   250 cm   600 cm
                                                                                                         AVAILABLE COLOURS
                                                               cm                                                           RAL    9010

 Uomo vitruviano, Gallerie dell’Accademia, Venezia
 Leonardo Da Vinci, 1490 circa

188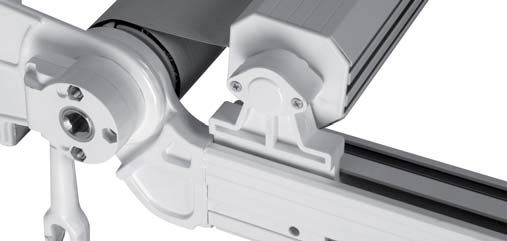
DA VINCI PL

Struttura in alluminio con attacco a staffe indipendenti. Ha un sistema di
scorrimento a cinghia. La tensione del telo è assicurata da un tubo svolge il
tessuto mentre un altro tubo lo avvolge. Il tessuto è sostenuto da profili che
scorrono paralleli alle guide dando un efficiente scolo dell’acqua. Le dimensioni
massime sono di 1100 cm x 600 cm x 250 di altezza con un unico telo!

Heavy aluminium structure with independent brackets. It is provided with a
belt sliding system. The tension in the fabric is guaranteed by two tubes: one
which unrolls the textile while another rolls it up. The textile is supported by
profiles parallel to the guides and allow an efficient rainwater drainage. The
maximum: 1100cm x 600cm x 250cm of height with a single fabric!

Aluminiumrahmen mit unabhängige Befestigungs-Haltern. Es verfügt über ein
System von Gleiten. Die Tuchspannung wird durch ein Rohr sichergestellt, der
das Tuch führt, während einen anderen Rohr es umgibt. Das Tuch wird durch
Profile unterstützt, die parallel zu den Führungen laufen,
und eine effiziente Wasserableitung ermöglichen. Die Maximalgröße ist von
1100 x 600 cm x 250 cm Höhe mit einem einzelnen Tuch!

Structure en aluminium avec une attaque sur des supports indépendants. Dispose d’un
système de ceinture coulissante. La tension du tissu est assurée par deux tubes: un
tube porte le tissu tandis que l’autre entoure le tube. Le tissu est soutenu par une série
de profilés parallèles aux guides qui permettant une evacuation efficace de l’eau. La
taille maximale: 1,1 x 6 m x 2,5 cm de hauteur avec une seule toile!

Estructura en aluminio con ataque a soportes independientes. Tiene un sistema
de cinturón de deslizamiento. La tensión de la tela está garantizada dos tubos: un
tubo lleva la tela mientras otro tubo la rodea. La tela está apoyada sobre perfiles
paralelos a las guías que permiten un drenaje eficiente del agua. El tamaño
máximo es 1100 x 600 cm x 250 cm de altura con una sola lona!

Estrutura maciço com instalação em suportes independentes. Possui um
sistema de de deslizamento por correias. A tensão do tecido é garantida pelo
sistema dois tubos: um tubo desenrola o tecido enquanto um outro o enrola.
O tecido é sustentado por uma série de perfils paralelos às guias, permitindo
um escoamento eficiente de água. As dimensões máximas são 1100 cm x
600 cm x 250 de altura com um único tecido!

                                                                                       189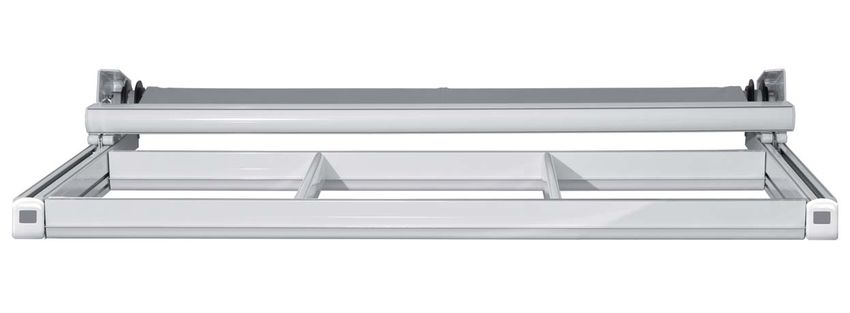
DA VINCI PL
                                                                                          DA VINCI PL - INSTALLATION INSTRUCTIONS

              lateral bend                     central bend

      multi-module lateral bracket       da vinci front band profile

 da vinci guide and terminal profile   da vinci transverse windbreake
                                                                        LATERAL BRACKET              CENTRAL BRACKET

      multi-module central support      da vinci vertical windbreake
190
DA VINCI PL
            ISTRUZIONI PER L’INSTALLAZIONE                                                               INSTALLATION INSTRUCTIONS                                                           INSTRUCTIONS D’INSTALLATION
PRIMA DI INIZIARE L’INSTALLAZIONE LEGGERE ATTENTAMENTE LE ISTRUZIONI                      BEFORE YOU START INSTALLATION, READ INSTRUCTIONS CAREFULLY AND                       AVANT DE COMMENCER L’INSTALLATION SVP LIRE ATTENTIVEMENT LES
ED ANALIZZARE IL DISEGNO                                                                  ANALYZE THE DRAWING                                                                  INSTRUCTIONS ET ANALYSER LE DESSIN TECHNIQUE

1. Passare la cinghia dietro al rullo motore PART 1 tra le due flange guida               1. Pass behind the motor roller PART 1 between the two flanges of belt guide,        1. Passer derrière le galet d’entraînement montré dans PARTIE 1 entre les deux
   cinghia, e sopra al rocchetto fissato sulla staffa “A”. La cinghia va inserita            and above the spool fixed on the “A” bracket, the belt must be inserted into         single guides, et au-dessus de la bobine sur le support fixe “A”, la sangle
   all’interno del profilo guida, lungo il canale di scorrimento del carrello.               the guide profile, along the sliding channel of the trolley.                         doit être insérée dans le profil de la guide, le long du canal d’écoulement du
2. Passare la cinghia in curva sopra i rocchetti “B” e “C” farla scendere lungo           2. Push the belt in curve above spools “B” and “C” bring it down along the leg          chariot.
   la gamba attraverso il canale interno fino al piedino.                                    through the inner channel up to presser foot.                                     2. Passer la sangle en courbe au-dessus des bobines “B” et “C” et la faire
3. La cinghia viene rinviata dai rocchetti “D” del piedino e risale la gamba              3. The belt is returned by spools “D” of the presser foot and goes back on the          descendre vers le bas le long de la jambe à travers le conduit interne de la
   all’interno del canale di scorrimento del carrello.                                       leg inside the sliding channel of the trolley.                                       jambe.
4. La cinghia ripassa la curva, sopra i rocchetti “E” e “F”.                              4. The belt passes back over the curve, above spools “E” and “F”.                    3. La sangle est reportée par les bobines “D” de la jambe et remonte la
5. Agganciare la cinghia al carrello come PART 2.                                         5. Attach the belt to the trolley as per in PART 2.                                     jambe à l’intérieur du conduit d’écoulement du chariot.
6. Il fissaggio della cinghia al “Rullo motore 2” va effettuato con il telo tutto         6. Fastening of the belt to engine “2” must be carried out by wrapping the           4. La sangle passe au-dessus de la courbe, au-dessus des bobines “E” et “F”.
   avvolto tenendo la cinghia più lunga di 60 cm come vedi PART 1; fissare                   fabric around and keeping the belt 60 cm longer as shown in PART 1; and           5. Fixez la sangle au chariot comme montré dans PARTIE 2.
   la cinghia al tubo come PART 3. La cinghia eccedente viene recuperata                     then you fasten the belt to the tube as in PART 3. The belt in excess is          6. La fixation de la ceinture au moteur “2” doit être faite avec le tissu enroulé
   automaticamente dal “Rullo motore 2” non appena si dà tensione.                           automatically retrieved from engine “2” as soon as you give tension.                 tout autour laissant la sangle excéder 60 cm voire PARTIE 1 ; la fixer au tube
7. Il taglio della cinghia eccedente deve essere eseguito solo dopo aver                  7. Cutting the exceeding belt has to be carried out only after effecting all the        comme montré dans PARTIE 3. La sangle en excès est automatiquement
   effettuato tutti i controlli di buon funzionamento della tenda.                           checks of good functioning of the awning.                                            récupéré par le moteur “2” dès que Vous donnez tension.
8. Regolare i fine corsa del motore.                                                      8. Adjust the engine’s limit switches.                                               7. La coupe de l’excès de la ceinture doit être effectuée uniquement après
                                                                                                                                                                                  tous les contrôles du bon fonctionnement du store.
                                                                                                                                                                               8. Réglez le moteur de commutation.

N.B. – FARE ATTENZIONE A:                                                                 PLEASE NOTE – PAY ATTENTION:                                                         REMARQUES – FAIRE ATTENTION:
Le cinghie di ogni singola guida devono avere la stessa lunghezza con una                 Belts into every single guide must have the same length with ± 1 cm maximum          Les sangles de chaque guide doivent avoir la même longueur avec une tolérance
tolleranza massima di ± 1 cm.                                                             tolerance.                                                                           maximale de ± 1 cm.
Installare l’intera struttura inserendo anche i carrelli nelle guide.                     Install the complete structure including the trolleys into the guides.               Installer la structure entière en intégrant les chariots dans les guides.
Affinché la tenda abbia un perfetto funzionamento le guide devono essere                  To maintain a perfect functioning of the awning, guides must be perpendicular and    Pour obtenir un parfait fonctionnement, les guides doivent être perpendiculaires au tube
perpendicolari al rullo avvolgitore e parallele tra loro.                                 parallel to the roller tube and to each other.                                       enrouleur et parallèles les unes aux autres.
L’operazione di fissaggio della cinghia dal lato motore va effettuata con grande          The fixing operation of the belt to the engine side has to be carried out with       L’opération de fixation de la sangle au côté du moteur doit être effectuée avec
cautela per evitare di forare il motore.                                                  utmost care to avoid engine’s piercing.                                              beaucoup de prudence pour éviter la perforation du moteur.
Verificare sempre il collegamento dei motori se destri o sinistri e attenersi alle        Always verify the connections of the engines, whether left or rights, and please     Toujours vérifier la connexion des moteurs si droits ou à gauches, et suivez les
istruzioni fornite dall’azienda costruttrice dei motori; le istruzioni vanne allegate a   apply to the instructions supplied by engine’s manufacturer.                         instructions fournies par le constructeur; les instructions doivent s’attacher aux
i motori.                                                                                                                                                                      moteurs.
L’operazione di regolazione fine corsa discesa telo va effettuata sul “Rullo              Please effect the operation of adjusting the down fabric limit switch must be        Le fonctionnement du règlement de l’interrupteur limiteur de descente tissu doit
motore 2 cinghia” (che comanda le cinghie); il fine corsa di avvolgimento telo va         carried out on the “engine belt 2” (which controls the belts); the fabric wrapping   être effectué sur le “moteur 2 sangle” (qui contrôle les sangles); l’interrupteur
effettuato sul “Rullo motore 1 telo” che comanda il tubo col tessuto.                     limit switch is carried out on “engine 1 fabric” which controls the tube with        limiteur d’enroulement tissu doit être effectué sur le “moteur 1 tissu” qui
                                                                                          fabric.                                                                              contrôle le tube du tissu. Il est convenant de remplacer les vieilles sangles avant
È conveniente effettuare la sostituzione delle cinghie vecchie prima che si               We suggest to replace the old belts before they break, since by warm joining         qu’elles ne cassent car en joignant à chaud une extrémité de la vieille sangle
rompano poiché unendo a caldo un capo della vecchia con un capo della nuova               one end of the old with a end of the new belt, you can make them slide easily        avec une extrémité de la nouvelle sangle, Vous pouvez la faire glisser avec une
cinghia, si può farla scorrere con una discreta facilità senza dover smontare la          without having to dismantle the structure.                                           facilité suffisante sans avoir à démonter la structure.
struttura.

                                                                                                                                                                                                                                                                    191
DA VINCI COVER sporgenza max | max projection | maximale Ausladung
avancée maximale | salida máx | saliência máxima
600 cm
DA VINCI COVER PL
1100 600 cm
AVAILABLE COLOURS
cm RAL 9010
Uomo vitruviano, Gallerie dell’Accademia, Venezia
Leonardo Da Vinci, 1490 circa
192DA VINCI COVER
DA VINCI COVER PL
Struttura in alluminio con attacco a staffe indipendenti per la copertura
solo verticale di verande. Ha un sistema di trazione del tessuto a cinghia. Il
tessuto è sostenuto da una serie di profili che scorrono paralleli alle guide
permettendo un efficiente scolo dell’acqua. Le dimensioni massime sono di
1100 cm x 600 cm con un unico telo!
Aluminum frame with independent mounting brackets for vertical patio-
awnings. The fabric is stretched through a strap , and its tension is allowed
by a series of profiles that run parallel to the guides and allow easy water
draining. Maximum size is 1100 cm x 600 cm with a single fabric!
Aluminium-Rahmen mit unabhängige Befestigungshaltern für nur vertikale
Abdeckung von Veranden. Das Tuch wird durch Riemen gespannt. Es wird mit
einer Reihen von Profilen festgehalten, die, parallel zur Führungen laufen und
eine effiziente Wasserableitung erlauben. Die Maximalgröße beträgt 1100 x
600 cm mit einem einzigen Tuch!
Store en aluminium avec équerres de fixation indépendants pour vérandas
verticales. Le tissu est étiré par courroie. Il est tendu par une série de profils
qui sont parallèles aux guides et permettent un drainage facile de l’eau. La
taille maximale est de 1 100 cm x 600 cm avec un seul tissu!
Estructura de aluminio con soportes de montaje independientes para terrazas
verticales. La tela se estira por la correa. La tela es retenida en tensiòn con
una serie de perfiles que corren paralelas a las guías y permiten un fácil
drenaje del agua. El tamaño máximo es de 1.100 cm x 600 cm con un solo
paño!
Estrutura de alumínio con suportes de montagem independiente para
terraços verticais. O tecido é esticado con una correia y é realizado em
tensão com uma série de perfis que correm paralelas às guias e permiten
um fácil escoamento da água. O tamanho máximo é de 1.100 cm x 600
centímetros, com um único tecido!
193DA VINCI COVER - DA VINCI COVER PL
DA VINCI COVER - DA VINCI COVER PL - INSTALLATION INSTRUCTIONS
multi-module lateral bracket lateral bracket
rope return cart da vinci guide and terminal profile
da vinci transverse windbreake da vinci vertical windbreake
LATERAL BRACKET LATERAL BRACKET
DA VINCI DA VINCI
COVER COVER PL
194DA VINCI COVER - DA VINCI COVER PL
ISTRUZIONI PER L’INSTALLAZIONE INSTALLATION INSTRUCTIONS INSTRUCTIONS D’INSTALLATION
PRIMA DI INIZIARE L’INSTALLAZIONE LEGGERE ATTENTAMENTE LE ISTRUZIONI BEFORE YOU START INSTALLATION, PLEASE READ THE INSTRUCTION AVANT DE COMMENCER L’INSTALLATION, PRIÈRE DE LIRE ATTENTIVEMENT LES
ED ANALIZZARE IL DISEGNO CAREFULLY AND ANALYZE THE DRAWING. INSTRUCTIONS ET D’ANALYSER LE DESSIN TECHNIQUE
1. Con un capo della cinghia effettuare il percorso (A) prima di inserire il sistema 1. With one end of the belt perform path (A) before inserting the gas spring 1. Avec une extrémité de la sangle faire le chemin (A) avant d’inserer le
della molla a gas Part 4 nella trave (il percorso “A” è quello all’interno della system - see Part 4 - into the supporting girder (path ‘A’ is the one inside the système de ressort à gaz - voire Partie 4 - dans la poutre (le chemin «A» est
trave). beam) “A” is within the beam). celui à l’intérieur de la poutre).
2. Innestare la testata trave nel profilo che funge da trave facendo molta 2. Insert the headboard into the beam profile that serves as a girder, being very 2. Insérez le profil entête du faisceau qui sert comme une poutre, en faisant
attenzione a non pizzicare la cinghia careful not to pinch the belt. très attention à ne pas pincer la sangle.
3. Inserire la cinghia nel canale inferiore del profilo e passarlo sotto il rocchetto 3. Insert the belt into the lower channel of the profile and pass it under the 3. Insérer la sangle dans le canal inférieur du profil et le faire passer sous la
(B) spool (B). bobine (B).
4. Agganciare la cinghia come Part 1 dando un giro morto, con il telo 4. Attach the belt as shown in Part 1 giving an idle tour, with the fabric 4. Fixer la sangle comme montré en Partie 1 en donnant un tour à vide, avec le
completamente avvolto. completely wrapped up. tissu complètement enroulé.
5. Srotolare il telo fino a metà del suo sviluppo totale. 5. Unroll the fabric up to half of its total development. 5. Dérouler le tissu jusqu’à la moitié de son développement complet.
6. Stendere la cinghia nella sezione superiore (l’altro capo della cinghia) senza 6. Spread the belt in the upper section (the other end of the strap) without 6. Étendre la sangle dans la section supérieure (l’autre extrémité de la sangle)
comprimere la molla a gas e contrassegnare con un pennarello il punto di compressing the gas spring, and mark with a felt-tip pen the point of sans comprimer le ressort à gaz et marquer le point de contact avec un
contatto tra i due elementi (carrello e cinghia). contact between the two elements (trolley and belt). feutre entre les deux éléments (chariot et sangle).
7. Arretrare la posizione della cinghia di 70 cm ed applicare l’aggancio cinghia 7. Move back the position of the belt 70 cm and apply the belt hooking as in 7. Reculer la position de la sangle 70 cm et appliquer l’accrochage de la
Part. 2. Non tagliare la cinghia se prima non si è fatta la verifica di buon Part. 2. Do not cut the belt prior to the verification of proper functioning of sangle . Ne pas couper la sangle si avant Vous n’avez pas bien vérifié le bon
funzionamento della tenda. the awning. fonctionnement du store.
8. Tirare la cinghia per comprimere la molla a gas e attaccare l’ “aggancio 8. Pull the strap to compress the gas spring and attack the ‘’ belt hook “to 8. Tirer la sangle pour comprimer le ressort de gaz et fixer ‘’ l’accroche-sangle
cinghia” al carrello come mostra Part 3. Rilasciare lentamente verificando the trolley as shown in Part 3. Slowly release make sure the hook is in the “dans le chariot, comme indiqué dans Partie 3. Relâcher lentement en Vous
che il gancio sia in posizione corretta. correct position. assurant que le crochet est dans la bonne position.
9. In fase di collaudo, facendo aprire e chiudere la tenda, controllare che la 9. During the test phase, by opening and closing the awning, check that the 9. Pendant la phase des tests, en ouvrant et refermant le store, vérifier que le
molla a gas non raggiunga mai il suo fine corsa (tutta aperta o tutta chiusa). gas spring never reaches its limit switch (fully open or fully closed). ressort à gaz ne jamais atteint sa position extrême (complètement ouvert
10. Il taglio della cinghia eccedente deve essere eseguito solo dopo aver 10. Cutting of the belt in excess shall be performed only after all the checks of ou complètement fermé).
effettuato tutti i controlli di buon funzionamento della tenda. proper functioning of the awning are carried out. 10. La coupe de la sangle en excès doit être effectué uniquement après tous
11. Regolare i fine corsa del motore. 11. Adjust the engine’s limit switches. les contrôles de bon fonctionnement du store.
11. Réglez le moteur de commutation.
N.B. – FARE ATTENZIONE A: PLEASE NOTE: REMARQUE - FAIRE ATTENTION:
Installare l’intera struttura inserendo anche i carrelli nelle guide. Affinché la tenda Install the entire structure by including the trolleys in the guides. For a perfect Installer la structure entière en incluant les chariots dans les guides. Pour avoir
abbia un perfetto funzionamento le guide devono essere perpendicolari al rullo functioning of the awning, guides must be perpendicular to the roller tube and un fonctionnement parfait les guides doivent être perpendiculaires au l’tube
avvolgitore e parallele tra loro. parallel to each other. enrouleur et parallèles les unes aux autres.
Il senso di avvolgimento della cinghia deve essere opposto al senso di The direction of belt winding must be opposite to that of fabric winding. Le sens d’enroulement de la sangle doit être opposé au sens
avvolgimento del telo. d’enroulement du tissu.
We suggest to effect replacement of the old belts before they break since by
È conveniente effettuare la sostituzione delle cinghie vecchie prima che si warm joining one end of the old belt with an end of the new belt, you can make Il est convenant de remplacer les vieilles sangles avant qu’elles ne cassent car
rompano poiché unendo a caldo un capo della vecchia con un capo della nuova it slide easily without having to dismantle the structure. en joignant à chaud une une extrémité de la vieille sangle avec une extrémité de
cinghia, si può farla scorrere con una discreta facilità senza dover smontare la la nouvelle sangle, Vous pouvez la faire glisser avec une facilité suffisante sans
struttura. avoir à démonter la structure.
195BRUNELLESCHI sporgenza max | max projection | maximale Ausladung
avancée maximale | salida máx | saliência máxima
600 cm
600 230 cm 600 cm
AVAILABLE COLOURS
cm RAL 9010
Cupola del Duomo di Firenze - Firenze
Filippo Brunelleschi, 1420 - 1436
196BRUNELLESCHI
Struttura per la copertura di verande con attacco a staffe indipendenti. Ha un
sistema di scorrimento del telo a caduta e con cinghia. Dimensioni massime
modulo singolo: larghezza 600 cm sporgenza 600 cm.
Structure for installation over verandas with anchorage by means of separate
brackets. It has a system by which the canvas slides down by force of gravity,
controlled by a belt. Maximum dimensions of single module: width 600 cm,
projection 600 cm.
Rahmen zur Abdeckung von Veranden mit Anschlag auf unabhängigen
Haltern. Verfügt über ein Gleitsystem der herabhängenden Tuch, mit Riemen.
Maximalgröße je einzelnes Moduls: Breite 600 cm; Ausladung 600 cm.
Structure pour la couverture des vérandas avec raccord et étriers
indépendants. Equipée d’un système de déroulement de la toile par gravité
et à l’aide de courroies. Dimensions maximum de chaque module: largeur
600 cm saillie 600 cm.
Estructura para copertura de terrazas con enganche a soportes
independientes. Tiene un sistema de desplazamiento de la lona por caída y
con correa. Dimensiones máximas módulo individual: ancho 600 cm y salida
600 cm.
Estrutura para a cobertura de varandas com ancoragem em estribos
independentes. Há um sistema de escorrimento da tela enroscável e com
correia. Dimensões máximas modulo singular: largura 600 cm e saliência
600 cm.
197BRUNELLESCHI
BRUNELLESCHI - INSTALLATION INSTRUCTIONS
brunelleschi guide profile trolley for terminal bar
bracket cap
brunelleschi bend brunelleschi foot
brunelleschi terminal bar windbreaker tube
198BRUNELLESCHI
AWNING SIZES SUPPORT SUPPORT PL
150
199Vous pouvez aussi lire