All-in-One Kitchen Machine Robot de cozinha completo Robot ménager tout-en-un
←
→
Transcription du contenu de la page
Si votre navigateur ne rend pas la page correctement, lisez s'il vous plaît le contenu de la page ci-dessous
All-in-One Kitchen Machine
Robot de cozinha completo
Robot ménager tout-en-un
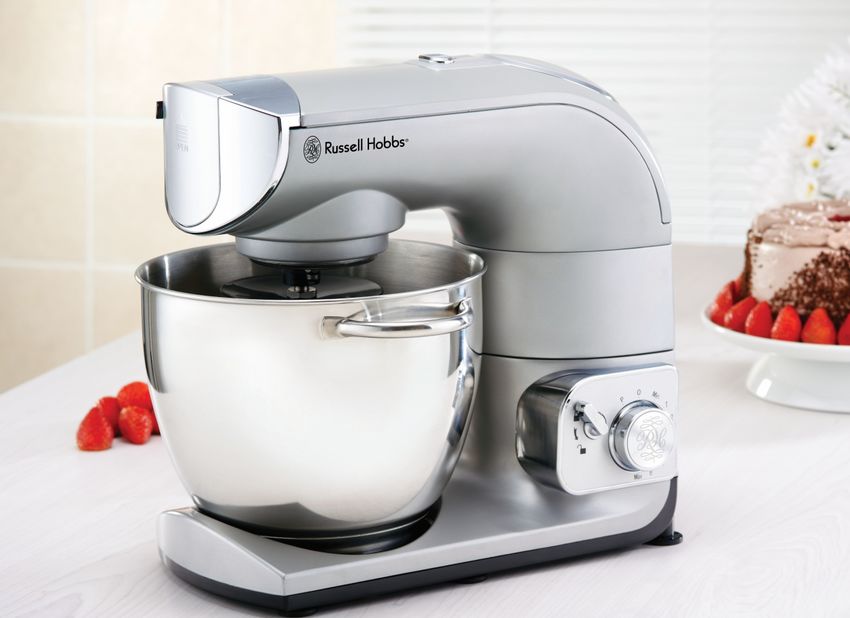
Creamer-Beater Dough Hook Balloon Whisk 1.4L Glass Variable speed Splash guard
Blender control with with easy
pulse function pour chute
Congratulations on the purchase of your new Russell Hobbs Pro-Mix
All-in-One Kitchen Machine. Each unit is manufactured to ensure safety
 and reliability. Before using the Pro-Mix for the first time, please read
    this instruction booklet carefully and keep it for future reference.

                                                   Index
                                                                                                  Page
       Important Safeguards . . . . . . . . . . . . . . . . . . . . . . . . . . . . . . . . . 1
       Parts Drawing A (Pro Mix and Mixing Accessories). . . . . . . . . . . 2
       Drive Outlet For Optional Extra Accessories . . . . . . . . . . . . . . . . 3
       Mixing Accessories . . . . . . . . . . . . . . . . . . . . . . . . . . . . . . . . . . . 5
       Parts Drawing B (Pro Mix and Blender Accessory) . . . . . . . . . . . 8
       Processing Guide . . . . . . . . . . . . . . . . . . . . . . . . . . . . . . . . . . . 11
       Care and Maintenance . . . . . . . . . . . . . . . . . . . . . . . . . . . . . . . 12
       Warranty . . . . . . . . . . . . . . . . . . . . . . . . . . . . . . . . . . . . . . . . . . 13

       Pro-Mix Optional Extra Accessories
       Parts Drawing C (Optional Extra Accessories) . . . . . . . . . . . . . 15
       The Pasta Accessories . . . . . . . . . . . . . . . . . . . . . . . . . . . . . . . 16
       5-in-1 Mincer Accessory . . . . . . . . . . . . . . . . . . . . . . . . . . . . . . 18
       Making Kibbe. . . . . . . . . . . . . . . . . . . . . . . . . . . . . . . . . . . . . . . 19
       Making Home Made Sausages . . . . . . . . . . . . . . . . . . . . . . . . . 20
       Cutter Accessories . . . . . . . . . . . . . . . . . . . . . . . . . . . . . . . . . . 21

       Portuguese . . . . . . . . . . . . . . . . . . . . . . . . . . . . . . . . . . . . . . . . 22

       French        . . . . . . . . . . . . . . . . . . . . . . . . . . . . . . . . . . . . . . . . . . 43

                                                                                     displayed in

                                          www.russellhobbs.co.za
Parabéns pela sua escolha da nova batedeira profissional e robot de
   cozinha completo (Pro-Mix All-in-One Kitchen Machine) da Russell
   Hobbs. Cada unidade é fabricada de forma a garantir segurança e
fiabilidade. Antes de utilizar a Batedeira Pro-Mix pela primeira vez, leia
     este manual de instruções atentamente e guarde-o para futura
                                 referência.

                                                        Índice
                                                                                                       Página
               Salvaguardas importantes. . . . . . . . . . . . . . . . . . . . . . . . . . . . . 22
               Desenho das peças A (Acessórios de mistura
               da batedeira Pro-Mix) . . . . . . . . . . . . . . . . . . . . . . . . . . . . . . . . 23
               Saída da unidade para acessórios extra opcionais. . . . . . . . . . 24
               Acessórios de mistura . . . . . . . . . . . . . . . . . . . . . . . . . . . . . . . . 26
               Desenho das peças B (Acessório da liquidificadora
               da batedeira Pro-Mix) . . . . . . . . . . . . . . . . . . . . . . . . . . . . . . . . 29
               Guia de processamento . . . . . . . . . . . . . . . . . . . . . . . . . . . . . . 32
               Cuidados e manutenção . . . . . . . . . . . . . . . . . . . . . . . . . . . . . . 33
               Garantia . . . . . . . . . . . . . . . . . . . . . . . . . . . . . . . . . . . . . . . . . . 34

               Acessórios extra opcionais da batedeira Pro-Mix
               Desenho das peças C (Acessórios extra opcionais). . . . . . . . . 35
               Os acessórios da máquina de massa . . . . . . . . . . . . . . . . . . . . 36
               Acessório - máquina de picar 5-em-1 . . . . . . . . . . . . . . . . . . . . 38
               Como fazer Kibbe . . . . . . . . . . . . . . . . . . . . . . . . . . . . . . . . . . . 39
               Como Fazer Salsichas Caseiras . . . . . . . . . . . . . . . . . . . . . . . . 40
               Acessórios do Cortador. . . . . . . . . . . . . . . . . . . . . . . . . . . . . . . 41
          DE GARA
       OS
                NT
2 AN

                  IA

                       Russell Hobbs: a plenitude na cozinha
              A Russell Hobbs é sinónima de vida na cozinha há mais de 50
                 anos. conhecida, adquirida e orgulhosamente exibida em
                 milhões de lares em todo o país. Permita à Russell Hobbs
              estabelecer uma reputação de electrodomésticos intemporais e
                                   elegantes no seu lar.

                    A gama completa dos produtos Russell Hobbs encontra-se
                                        disponível em

                                             www.russellhobbs.co.za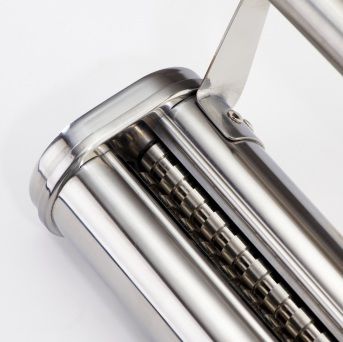
Félicitations pour l'achat de votre nouveau robot ménager tout-en-un
Russell Hobbs. Chaque unité est fabriquée afin de d'assurer la sécurité
   et la fiabilité. Avant d'utiliser le mixeur-pro pour la première fois,
 veuillez lire le mode d'emploi et le conserver comme référence pour
                                    l'avenir.

                                                          Índex
                                                                                                         Page
             Précautions importantes . . . . . . . . . . . . . . . . . . . . . . . . . . . . . . . 42
             Schéma A des pièces (Accessoires de mélange du mixeur-pro). 43
             Sortie d'entrainement pour les accessoires supplémentaires
             optionnels . . . . . . . . . . . . . . . . . . . . . . . . . . . . . . . . . . . . . . . . . . 44
             Accessoires de mélange . . . . . . . . . . . . . . . . . . . . . . . . . . . . . . . 46
             Schéma B des pièces (Mixeur-pro et accessoire mixeur) . . . . . . 49
             Guide d'utilisation. . . . . . . . . . . . . . . . . . . . . . . . . . . . . . . . . . . . . 52
             Entretien et maintenance. . . . . . . . . . . . . . . . . . . . . . . . . . . . . . . 53
             Garantie . . . . . . . . . . . . . . . . . . . . . . . . . . . . . . . . . . . . . . . . . . . 54

             Accessoires supplémentaires optionnels du mixeur-pro
             Schéma C des pièces (Accessoires supplémentaires
             optionnels) . . . . . . . . . . . . . . . . . . . . . . . . . . . . . . . . . . . . . . . . . . 55
             Les accessoires pour fabriquer des pates . . . . . . . . . . . . . . . . . . 56
             Hachoir 5-en-1 . . . . . . . . . . . . . . . . . . . . . . . . . . . . . . . . . . . . . . . 58
             Faire du Kibbe . . . . . . . . . . . . . . . . . . . . . . . . . . . . . . . . . . . . . . . 59
             Faire des saucisses maison . . . . . . . . . . . . . . . . . . . . . . . . . . . . 60
             Accessoires du couteau. . . . . . . . . . . . . . . . . . . . . . . . . . . . . . . . 61
        E GARA
      SD      N
  N

              TIE
2A

                    Russell Hobbs: « une vraie affaire »
           Russell Hobbs a été le synonyme de vie dans la cuisine depuis
           plus de 50 ans. Connu, appartenant à et fièrement présent dans
           des millions de domiciles à travers le pays. Permettez à Russell
                Hobbs de se forger une réputation pour des appareils
                           intemporels de style chez vous.

           La gamme complète de produits Russell Hobbs est disponible sur

                                            www.russellhobbs.co.za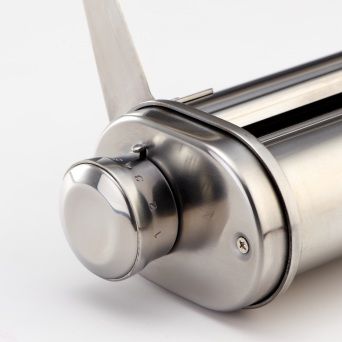
IMPORTANT SAFEGUARDS

When using any electrical appliance, basic safety precautions should always be followed including the
following:

1.    Please read the instructions carefully before using any appliance.
2.    Always ensure that the voltage on the rating label corresponds to the mains voltage in your home.
3.    Incorrect operation and improper use can damage the appliance and cause injury to the user.
4.    The appliance is intended for household use only. Commercial use invalids the warranty and the
      supplier can not be held responsible for injury or damage caused when using the appliance for
      any other purpose than that intended.
5.    Avoid any contact with moving parts.
6.    This appliance is not intended for use by persons (including children) with reduced physical,
      sensory or mental capabilities, or lack of experience and knowledge, unless they have been given
      supervision or instruction concerning use of the appliance by a person responsible for their safety.
7.    Children should be supervised to ensure that they do not play with the appliance.
8.    Check the power cord and plug regularly for any damage. If the cord or the plug is damaged, it
      must be replaced by the manufacturer or a qualified person in order to avoid an electrical hazard.
9.    Do not use the appliance if it has been dropped or damaged in any way. In case of damage, take
      the unit in for examination and/or repair by an authorised service agent
10.   To reduce the risk of electric shock, do not immerse or expose the motor assembly, plug or the
      power cord to water or any other liquid.
11.   Never immerse the unit in water or any other liquid for cleaning purposes.
12.   Remove the plug from the socket by gripping the plug. Do not pull on the cord to disconnect the
      appliance from the mains. Always unplug the unit when not in use, before cleaning or when adding
      or removing parts.
13.   The use of accessories that are not recommended or supplied by the manufacturer may result in
      injuries, fire or electric shock.
14.   A short cord is provided to reduce the hazards resulting from becoming entangled in or tripping
      over a longer cord.
15.   Do not let the cord hang over the edge of a table or counter. Ensure that the cord is not in a position
      where it can be pulled on inadvertently.
16.   Do not allow the cord to touch hot surfaces and do not place on or near a hot gas or electric burner
      or in a heated oven.
17.   Do not use the appliance on a gas or electric cooking top or over or near an open flame.
18.   Use of an extension cord with this appliance is not recommended. However, if it is necessary to
      use an extension lead, ensure that the lead is suited to the power consumption of the appliance to
      avoid overheating of the extension cord, appliance or plug point. Do not place the extension cord
      in a position where it can be pulled on by children or animals or tripped over.
19.   This appliance is not suitable for outdoor use. Do not use this appliance for anything other than its
      intended use.
20.   DO NOT carry the appliance by the power cord.
21.   Do not leave this appliance unattended during use. Always unplug the unit when not in use or
      before cleaning.
22.   Always operate the appliance on a smooth, even, stable surface. Do not place the unit on a hot
      surface.
23.   Ensure that the switch is in the “Off” position after each use.
24.   The manufacturer does not accept responsibility for any damage or injury caused by improper or
      incorrect use, or for repairs carried out by unauthorised personnel.
25.   In case of technical problems, switch off the machine and do not attempt to repair it yourself.
      Return the appliance to an authorised service facility for examination, adjustment or repair.
      Always insist on the use of original spare parts. Failure to comply with the above mentioned pre-
      cautions and instructions, could affect the safe operation of this machine.

                  THIS APPLIANCE IS FOR HOUSEHOLD USE ONLY
                                                                                                                1
PARTS DRAWING A - Pro-Mix and mixing accessories
1. Splash guard 8. Speed control switch:
2. Latches P Pulse, 0 Off, Min, 1-6, Max
3. Easy-pour feeding chute 9. Head release lever:
4. Chute cover Lock, Unlock
5. Machine head 10. Base
6. Motor unit 11. Stainless Steel bowl with
7. Head pivoting area handles
212. Mixing accessories drive 16. Balloon Whisk
13. Notch 17. Creamer-Beater
14. Mixing accessories drive shaft 18. Dough hook
15. Bayonet fitting
DRIVE OUTLET FOR OPTIONAL
EXTRA ACCESSORIES
Available accessories:
Small cutter
Large cutter
5-in-1 Mincer
Flat Pasta Maker
Tagliatelle Pasta Maker
Trenette Pasta Maker
www.russellhobbs.co.za
or contact your nearest Home of Living Brands
Customer Service Department
3BEFORE FIRST USE
All parts of the Pro-Mix need to be thoroughly cleaned before being used for the first
time. (See “Care and maintenance” section).
POSITIONING
• Place the Pro-Mix on a firm, stable, level surface.
• Position the power cord away from the edge of tables or countertops so it cannot be
tripped over or caught.
RAISING THE HEAD
Note: Accessories such as the blender should not be attached when raising the
head.
• Ensure the Pro-Mix is switched off and unplugged.
• Turn the head release lever anti-clockwise to the unlock position.
• The head will lift, with your assistance, allowing removal/replacement of the stainless
steel bowl and/or mixing accessories.
• At its uppermost position the head will lock into place and the head release lever will
return to the lock position.
LOWERING THE HEAD
Caution: Keep hands and items clear of the head pivoting
area to avoid injury or damage to the appliance.
• Ensure the required mixing accessory is correctly fitted and
the mixing bowl is in position. (See “Bowl” and “Mixing
Accessories” section)
• Turn the head release lever anti-clockwise to the
unlock position.
• Gently lower the head by pressing down on the top of the
Pro-Mix until it locks into position.
• The head release lever will return to the lock position.
SPLASH GUARD
The mixing bowl can be used with or without the splash guard. It is recommended to
use the mixing bowl with the splash guard and chute cover fitted to avoid spatter.
• Ensure the Pro-Mix is switched off and unplugged.
• Raise the head. (See “Raising the head” section)
• Remove any mixing accessories from the mixing accessory drive.
• The splash guard fits onto the underside of the head, above the mixing accessory
drive.
4FITTING THE SPLASH GUARD
Hold the splash guard by the feeding chute.
Fit the first latch on the splashguard (the latch nearest to the feeding chute) over the
notch on the head.
Push the opposite side of the splash guard upwards until the second latch clicks into
place onto the notch at the rear of the head.
REMOVING THE SPLASH GUARD
Carefully pull down the rear of the splashguard to release the rear latch from the
notch on the rear of the head
With the rear latch now disengaged, the splashguard can be lowered and removed
from the head.
CHUTE COVER
Caution: Do not insert fingers or utensils into the feeding chute at any time.
To avoid spatter, ensure the chute cover is fitted when the Pro-Mix is in use.
The chute cover sits on top of the feeding chute on the splash guard.
Lift the chute cover off to add ingredients
BOWL
Caution: Only use the bowl supplied - do NOT attempt to use any other bowl.
The head must be raised to allow for fitting or removing the bowl (See “Raising the
Head” Section).
Note: It is much easier to fit and remove the bowl without the mixing accessories
fitted.
FITTING THE BOWL
Fit the bowl in the space provided in the Pro-Mix Base.
Turn the bowl clockwise to lock it in place. The two handles will be facing to the front
and rear when the bowl is correctly locked into place.
REMOVING THE BOWL
Turn the bowl anti-clockwise to release it from its fittings.
Lift it out of the Pro-Mix base.
MIXING ACCESSORIES
Caution: Fit and remove the mixing accessories with the Pro-Mix head raised and
ensure the unit is switched off and unplugged.
FITTING ACCESSORIES
Ensure the Pro-Mix is switched off and unplugged.
Raise the head (See “Raising the Head” section)
Select the appropriate accessory.
Push the top of the accessory into the mixing accessories drive and turn it anti-
clockwise to lock it into place.
5ADJUSTING THE HEIGHT OF YOUR MIXING ACCESSORIES
Your mixing accessories are equipped with a system for adjusting their height in
relation to the mixing bowl for optimum results
Press the head release lever to lift the machine head and
insert the creamer-beater, dough hook or whisk. Adjust
here
Hold it in position.
Now lower the head of the appliance by pressing the head
release lever and lower down until a click sound is heard.
This means that the machine head has safely returned to
the correct position.
To adjust the height, use a spanner to loosen the nut
located on the mixing tool. Lift the shaft a little and then
tighten the nut. This will allow you to move your mixing
accessory closer to the bowl bottom.
REMOVING ACCESORIES
Press the accessory up into the mixing accessory drive and turn it clockwise.
Pull it down and out of the mixing accessory drive.
POWER UP
Caution: - If the speed control is not set to ‘0' (off position), the Pro-Mix will
start when the power supply is connected
- Please fit accessories correctly to avoid damaging the machine.
Check that the speed control is set to "0".
Put the plug into the wall power outlet and switch it on.
SPEED CONTROL
Turn the speed control clockwise to the speed you want.
Turn the speed control back to "0" to turn the motor off.
Turning the speed control anti-clockwise to "P" will give you a pulse at high speed.
Caution: Do not run the motor continuously for more than 10 minutes, it may
overheat. After 10 minutes, switch off for at least 10 minutes to let the motor cool.
PULSE FUNCTION ("P")
Turning the speed control anti-clockwise to "P" will give you a short burst at high
speed.
Use "P" as a "pulse" function, for greater control over the mixing process.
6ACCESSORY SPEED USE
ACCESSORY SPEED USE
Whisk P, 3 - MAX Whisking/aerating cream, egg whites, batter
light mixes.
Beater P, 3 - 4 Creaming butter and sugar, medium mixes.
Dough Hook MIN - 1 Heavy mixes, dough, pastry.
Caution: do not use "P’"pulse function with the dough hook accessory, you may
overload the motor.
Note: the contents of the bowl will rise when you start the motor – the higher the
speed, the more they will rise. It is recommended to fill the bowl to half its
capacity.
HOT LIQUIDS
Caution: Take extreme care if mixing hot liquids. The mixing accessories may
splash liquids creating a scalding hazard. Ideally, you should not try mixing
liquids that are hotter than you can comfortably handle i.e. temperatures below
40°C. If your recipe calls for mixing liquids hotter than 40°C, ensure you take
steps to prevent scalding from possible splatter.
POWER DOWN
Turn the speed control to ‘0’ (off position) and wait until the mixing accessory stops
moving before placing hands or utensils in the bowl or raising the head.
7PARTS DRAWING B - Pro-Mix and Blender Accessory
1. Jug 8. Tab
2. Blades 9. Grips
3. Blade unit 10. Blender drive cover release
4. Spout button
5. Lid 11. Blender drive cover
6. Max mark (1.4L) 12. Blender drive outlet
7. Latch
8BLENDER JUG
Use the Blender Jug for blending soups, sauces and smoothies; and for chopping small
ingredients like herbs, spices and nuts.
BEFORE USE
All parts of the Pro-Mix including the Blender Jug need to be thoroughly cleaned before
being used for the first time. (See the “Care and Maintenance” section)
POSITIONING
Place the Pro-Mix on a firm, stable, level surface.
Position the power cord away from the edge of tables or countertops so it cannot be
tripped over or caught.
Fit the bowl and splash guard cover to the Pro-Mix. The Pro-Mix drive operates when
the motor is running.
Caution: Do not operate the blender accessory empty for more than 1 (one)
minute. Never fill the glass jug with boiling liquid. Allow liquids to cool down to
ambient room temperature. By not following this caution, the appliance could
overheat and the glass of the jug could crack.
USING THE JUG
Caution: The cutting blades are very sharp. Handle the Blender with extreme care
and caution.
Press the blender drive cover release to open the cover and expose the drive for the
jug.
Align the jug so the spout points along the head of the Pro-Mix.
Lower the jug onto the drive.
Push the handle towards the rear of the Pro-Mix to turn the jug anti-clockwise and
lock it into place.
FILLING THE JUG
Caution: Do not use the jug without fitting the lid.
Place the ingredients into the jug.
Do not fill past the MAX mark (1.4 litres) as the contents may force their way past the
lid when you start the motor.
Fit the lid on the jug and press it down fully to secure it.
POWER UP
Caution: - If the speed control is not set to ‘0’ (off position) the Pro-Mix will start
when the power supply is connected.
- If accessories are not fitted correctly you may damage the machine.
• Check that the speed control is set to “0”.
• Put the plug into the wall power outlet and switch it on.
9SPEED CONTROL
• Turn the speed control clockwise to the speed you want.
• Turning the speed control anti-clockwise to ‘P’ will give you a pulse at high speed.
• Turn the speed control back to “0” to turn the motor off.
CAUTION: Do not run the motor continuously for more than 10 minutes, it may
overheat. After 10 minutes, switch off for at least 10 minutes to let the motor cool.
PULSE FUNCTION (‘P’)
• Turning the speed control anti-clockwise to ‘P’ will give you a short burst at high speed.
• Use ‘P’ as a “pulse” function, for greater control over the mixing process.
ADDING INGREDIENTS
If you need to add ingredients after you have started blending:
Turn the speed control to “0” (off position)
Wait until the blades stop moving.
Remove the lid.
Add the ingredients.
Replace the lid.
Start the motor.
Caution: Check that the added ingredients do not push the volume over the MAX
mark.
POWER DOWN
Turn the speed control to ‘0’ (off position) and wait until the blades stop moving
before removing the lid from the jug or removing the jug from the motor unit.
To remove the jug, turn it clockwise until the spout points along the head of the Pro-
Mix.
Lift the jug off the drive.
HOT LIQUIDS
Caution: Pouring hot liquids into a cold blender jug could cause the jug to break.
Before pouring into the jug, let the liquid cool down to a temperature you can
comfortably handle – i.e. keep the liquid temperature below 40°C.
THE BLADE UNIT
REMOVING THE BLADE UNIT
Remove the lid and turn the jug upside down.
Use the grips to turn the blade unit anti-clockwise to release the latches on the blade
unit from the tabs on the inside of the jug.
Lift the blade unit out of the jug.
Caution: The cutting blades are very sharp. Handle the blade unit with extreme
care and caution.
FITTING THE BLADE UNIT
Lower the blade unit into the upturned jug.
Use the grips to turn the blade unit clockwise to engage the latches on the blade
unit with the tabs on the inside of the jug.
10PROCESSING GUIDE
Accessory Operation
Food Maximum Speeds Preparation
time
Balloon Cream 250ml 10minutes 5-6
Whisk
Egg white 12pcs 3minutes 5-6
Flour 1700g
Salt 20g
Dough Yeast 10g
10minutes 5-6
Hook Sugar 10g
Water 1100g
Lard 20g
Flour 100g
Castor
Creamer 100g
sugar 5minutes 1-4
-beater
Margarine 100g
Egg 2pcs
Carrot 560g 15×15×15 mm
Blender 3minutes P/6
Water 840g
Beef 2000g 3minute
5-in-1 3-6 20×20×60 mm
Mincer Pork 2000g 3minute
11CARE AND MAINTENANCE
General
Ensure the Pro-Mix is switched off and unplugged before cleaning.
Clean the Pro-Mix as soon after use as possible to prevent residues setting.
Wash the bowl and accessories in warm soapy water, rinse well.
Leave them to drain and air dry.
You may put the bowl and mixing accessories in a dishwasher.
NOTE: the harsh environment inside the dishwasher may affect the surface
finishes. The damage is cosmetic only and should not affect the operation of the
appliance.
Wipe the external surfaces of the Pro-Mix with a clean damp cloth and immediately
buff with a soft dry cloth.
Do not immerse the motor unit in water or any other liquid.
Do not use harsh or abrasive cleaning agents or solvents.
Blender
Wash the jug and lid in warm soapy water and rinse well. Leave them to drain and air
dry.
You may put the jug and lid in a dishwasher.
Remove the blade unit, (See ‘Removing the blade unit’ section) and wash it in warm
soapy water using a nylon brush to clean the blades.
Optional Accessories
1. Wash, rinse and wipe the accessories. Note that they can be put in the dishwasher
except for the pasta maker accessories and the metal components of the mincer
accessory. These components include the fine mincing disc, medium mincing disc, the
worm shaft, cutter blade, coarse mincing disc and the screw ring.
2. The mincing discs and the cutter blade must be kept lubricated. Carefully wipe them
with cooking oil after each use.
3. If you find that your accessories have become discoloured by food such as carrots,
oranges etc. - rub them gently with a kitchen towel dipped in cooking oil and then clean
them in warm soapy water.
4. You can either wipe the pasta accessories clean with a damp cloth or simply sprinkle
with flour and wipe with a dry cloth before storing.
CAUTION:
Do not wash the pasta maker accessories and the metal components of the mincer
accessory in the dishwasher. Do not immerse the pasta maker accesories in water.
12PLEASE AFFIX YOUR PROOF OF PURCHASE/RECEIPT HERE IN THE EVENT OF A
CLAIM UNDER WARRANTY THIS RECEIPT MUST BE PRODUCED.
WARRANTY
1. Home of Living Brands (Pty) Limited warrants to the original purchaser of this product
(“the customer”) that this product will be free of defects in quality and workmanship
which under normal personal, family or household use and purpose may manifest within
a period of 1 (one) year from the date of purchase (“warranty period”).
2. Where the customer has purchased a product and it breaks, is defective or does not
work properly for the intended purpose, the customer must notify the supplier from
whom the customer bought the product (“the supplier”) thereof within the warranty
period. Any claim in terms of this warranty must be supported by a proof of purchase. If
proof of purchase is not available, then repair, and/or service charges may be payable
by the customer to the supplier.
3. The faulty product must be taken to the supplier's service centre to exercise the
warranty.
4. The supplier will refund, repair or exchange the product in terms of this warranty subject
to legislative requirements. This warranty shall be valid only where the customer has not
broken the product himself, or used the product for something that it is not supposed to
be used for. The warranty does not include and will not be construed to cover products
damaged as a result of disaster, misuse, tamper, abuse or any unauthorised
modification or repair of the product.
5. This warranty will extend only to the product provided at the date of the purchase and not
to any expendables attached or installed by the customer.
6. If the customer requests that the supplier repairs the product and the product breaks or
fails to work properly within 3 (three) months of the repair and not as a result of misuse,
tampering or modification by or on behalf of the customer, then the supplier may replace
the product or pay a refund to the customer.
7. The customer may be responsible for certain costs where products returned are not in
the original packaging, or if the packaging is damaged. This will be deducted from any
refund paid to the customer.
HOME OF LIVING BRANDS (PTY) LTD
JOHANNESBURG TEL NO. (011) 490-9600
CAPE TOWN TEL NO. (021) 552-5161
DURBAN TEL NO. (031) 792-6000
www.homeoflivingbrands.co.za
13All-in-One Kitchen Machine
OPTIONAL EXTRA ACCESSORIES
5-in-1 Mincer Small Cutter Large Cutter Flat Pasta Trenette Tagliatelle
Maker Pasta Maker Pasta MakerPARTS DRAWING C - Optional Extra Accessories
01. Fine mincing disc
02. Medium mincing disc
03. Worm shaft
04. Cutter blade
05. Coarse mincing disc
07 06. Screw ring
07. Mincer safety pusher
01 08 08. Tray
09. Mincer housing
10. Large cutter's safety pusher
02 cover
11. Large cutter's safety pusher
03 09 12 . Large cutter's housing
13. Separator
04 14. Sausage horn
05 15. Kibbe former
16. Kibbe cone
06 17. Large cutter's slicing drum
18. Large cutter's coarse grating
drum
13 19. Large cutter's fine grating drum
20. Small cutter's safety pusher
10 14 cover
21. Small cutter's safety pusher
22. Small cutter's housing
11 15 23. Small cutter's slicing drum
24. Small cutter's coarse grating
drum
16 25. Small cutter's fine grating drum
12
17
18
19
20
21
23
22
24
25
15THE PASTA ACCESSORIES
FITTING THE ACCESSORIES
Flat Tagliatelle
Pasta Maker Pasta Maker
Trenette
Pasta Maker
CAUTION: The unit operates with a single motor. We therefore recommend that
you remove the stainless steel mixing bowl, mixing accessory and splash guard
for your safety when wanting to use the blender, mincer, cutter or pasta
accessories.
NOTE: If you would like to use either the Tagliatelle or Trenette Pasta accessory,
kindly ensure that you have used the flat pasta accessory first. This is to ensure
that the dough is rolled out evenly and thin-enough to be processed properly by
the other pasta accessories.
Remove the removable cover from the drive outlet located on the front of the head.
Simply slide the catch then pull off.
Now hold your chosen accessory in one hand and press the release button with the
other hand. Then insert the accessory into the drive outlet and turn it until the drive
clicks into place. [You may have to turn it both ways. When the drive is engaged,
rotate the accessory so that the pin is in a vertical position, then position the pin into
the slot.]
Release the 'release' button.
16THE PASTA ACCESSORIES
USING THE FLAT PASTA MAKER ACCESSORY
Set the adjustable knob on the side of the pasta accessory to number 1 (thickest setting)
by pulling the knob out and turning.
Flatten a piece of dough and sprinkle some flour between the rollers.
Turn the Pro Mix to speed “1” (notice that the rollers begin turning).
Now pass the piece of dough through the rollers, repeating until you get a smooth
surface. (tip: folding the dough in half across its width or length between rolling will help
achieve this).
Adjust the knob progressively, 2 settings at a time from 1 to 9, each time re-feeding the
dough through the accessory to achieve the desired thickness. Finishing off on pasta
thickness settings of between 5 and 7 is recommended.
Switch the speed control to “0” (off position) and wait for the rollers to stop moving before
disassembly.
Now cut the flat rolled pasta into desired /manageable pieces and continue on to the
next pasta accessory for pasta cutting variations (thickness between 5 and 7 is
recommended) or cook as desired.
USING THE TAGLIATELLE OR TRENETTE PASTA ACCESSORIES
NOTE: If you would like to make either the Tagliatelle or Trenette Pasta, kindly
ensure that you have used the Flat pasta accessory first. This is to ensure that
the dough is rolled out evenly and thin-enough to be processed properly by the
other accessories.
CAUTION: Do not place hands or any objects near blades as they are sharp and
may cause harm or injury.
Turn the Pro Mix to speed “1” (notice that the rollers begin turning). You may increase the
speed depending on the thickness of the pasta preparation.
Feed the rolled out pasta through the Tagliatelle or Trenette Pasta Accessory.
Notice that the different cutters will slice the pasta to create different pasta variations.
Pasta can be left uncooked for up to 4 hours before cooking.
REMOVING THE ACCESSORY
Hold the accessory in one hand and press the release button with the other hand. Turn
the accessory until it is released from the outlet drive for cleaning and storage. [You may
have to turn it both ways.]
Now release the 'release' button.
Place the removable cover back on to the drive outlet.
175-IN-1 MINCER ACCESSORY
FITTING THE MINCER ACCESSORY
1. Take the mincer housing by the feeding tube with the largest opening facing
upwards.
2. Now insert the worm shaft (drive pins first) into the mincer housing.
3. Next, fit the cutter blade onto the shaft with the cutting edges upwards.
4. Place the selected mincing disc over the cutter blade ensuring that the two lugs fit in
the two cut-outs in the mincer housing.
5. Fasten the screw ring tightly to the mincer housing.
6. Check the assembly. The shaft should have no play nor be able to turn on itself.
7. Lift the assembled mincer accessory so that it is titled towards you then to the drive
outlet and engage it fully. Return the feeding tube to a vertical position by turning to
the rear until it stops.
8. Place the removable tray on top of the feeding tube and place a collection bowl at
the receiving end so that it can catch your minced ingredients.
USING THE MINCER ACCESSORY
Select your desired speed control. Notice that the cutter blade begins to turn.
Now you're ready to place the food pieces on to the tray and slowly slide the
pieces into the feeding tube. Ensure that they go in piece-by-piece using the
pusher for your safety. Never push the food pieces with your finger or any
other utensil.
Once done, switch the speed control back to speed “0” (off position). Wait until
the cutter blade has stopped turning.
Use a spatula to remove any remaining preparation from the mincing disc.
Now press the release button for the mincer housing so as to begin
disassembly.
NOTE: Keep the mincing discs and blade lubricated. Simply wipe them over with
cooking oil after each use.
REMOVING THE MINCER ACCESSORY
Lift and remove the removable tray off the top of the feeding tube.
Tilt the assembled mincer accessory in the drive outlet so that it is titled away
from you and disengage it fully. The feeding tube must be returned to its
horizontal starting position to remove it from the drive outlet.
Loosen the screw ring on the mincer housing.
Remove the mincing disc from the cutter blade in the mincer housing.
Next, remove the cutter blade from the shaft. Be careful of the cutting edges as
they are sharp and can cause injury.
Now remove the worm shaft from the mincer housing.
The accessory is now ready for cleaning and storage.
Place the removable cover back on to the drive outlet.
185-IN-1 MINCER ACCESSORY
MAKING KIBBE WITH THE 5-IN-1 MINCER ACCESSORY
Kibbe is a traditional Middle Eastern dish made primarily of lamb and bulgur wheat.
FITTING THE ACCESSORY
Insert the worm shaft into the mincer housing, plastic end first.
Place the Kibbe cone into the mincer housing.
Place the former on the mincer housing.
Now fasten the screw ring on the mincer housing. (Make sure the notches of the
separator fit onto the marking located on the mincer head.)
Attach the mincer housing to the drive outlet located closest to the machine head.
Now place the tray on the upright part of the mincer housing.
The appliance is now ready for making Kibbe.
USING THE ACCESSORY
Feed the prepared Kibbe mixture through the Kibbe maker.
Cut the continuous hollow tube into the desired lengths.
The tubes must then be stuffed with the minced meat mixture, the ends pinched
together and deep fried before serving.
REMOVING THE ACCESSORY
Lift and remove the removable tray from the mincer housing.
Detach the mincer housing from the drive outlet.
Now loosen the screw ring on the mincer housing.
Remove the former from the mincer housing.
Remove the Kibbe cone from the mincer housing.
Remove the worm shaft from the mincer housing.
The accessory is now ready for cleaning and storage.
Place the removable cover back on to the drive outlet.
195-IN-1 MINCER ACCESSORY
MAKING HOME-MADE SAUSAGES OR BOEREWORS WITH THE 5-
IN-1 MINCER ACCESSORY
FITTING THE ACCESSORY
Insert the worm shaft into the mincer housing, plastic end first.
Place the separator into the mincer housing.
Place the sausage horn on the mincer housing and fasten the screw ring. (Make sure
that the notches of the separator fit onto the markings found on the mincer housing.)
Attach the mincer housing to the drive outlet.
Place the tray on the upright part of the mincer housing.
USING THE ACCESSORY
Now you are ready to make your home-made sausage or boerewors.
NOTE: Sausage casings are available and can be purchased from your local
butchery.
Simply put the sausage casing in lukewarm water for 10 minutes.
When ready, slide the wet skin onto the sausage horn.
Ensure that your chosen meat has previously been minced and seasoned.
Now put the seasoned minced meat in the tray and use the pusher to gently push the
meat into the mincer housing. [if the skin gets stuck on the sausage horn, wet it with
some water.]
Fill the casing until full.
Twist if sections are desired.
Then cut the casing in the desired overall length
Now tie a knot to finish off the sausage or boerewors preparation.
REMOVING THE ACCESSORY
Lift and remove the removable tray from the mincer housing.
Detach the mincer housing from the drive outlet.
Now remove the sausage horn from the mincer housing and loosen the screw ring.
Remove the separator from the mincer housing.
Remove the worm shaft from the mincer housing.
The accessory is now ready for cleaning and storage.
Place the removable cover back on to the drive outlet.
20CUTTER ACCESSORIES
FITTING THE ACCESSORY
Start assembly of the cutter accessory by inserting the desired slicing/grating drum
into the cutter housing. When using the large cutter accessory, ensure the screw ring
is fastened securely.
Attach the cutter housing to the drive outlet located towards the front of the machine
head.
USING THE ACCESSORY
Before you start, place your collection bowl on the receiving end and ensure that you
have cut large vegetables or foods into small-to-medium sized pieces for easier
processing.
Now select your desired speed and notice that the drum begins spinning.
Simply put the food pieces into the cutter housing and push them through the feeding
tube for processing by using the pusher provided for your safety.
When finished, select speed control “0” (off position) and wait until the drum has
stopped spinning before disassembly and storage.
REMOVING THE ACCESSORY
Detach the cutter housing from the drive outlet.
Start disassembly of the cutter accessory by removing the slicing/grating drum from
the cutter housing.
The accessory is now ready for cleaning and storage.
Place the removable cover back on to the drive outlet.
21SALVAGUARDAS IMPORTANTES
Quando utilizar qualquer aparelho elétrico, deve seguir sempre as precauções de segurança básicas,
incluindo o seguinte:
1. Leia atentamente as instruções antes de utilizar qualquer aparelho.
2. Certifique-se sempre de que a tensão na etiqueta de classificação corresponde à tensão da corrente
elétrica na sua residência.
3. A operação incorreta e utilização imprópria podem danificar o aparelho e causar lesões no utilizador.
4. O aparelho destina-se apenas a utilização doméstica. A utilização comercial invalida a garantia e o
fornecedor não pode ser responsabilizado por lesões ou danos causados quando o aparelho for
utilizado para qualquer outra finalidade diferente da prevista.
5. Evite qualquer contacto com as peças em movimento.
6. Este aparelho não se destina a ser utilizado por pessoas (incluindo crianças) com capacidades físicas,
sensoriais ou mentais reduzidas, ou com falta de experiência e conhecimentos, a não ser que tenham
sido supervisionados ou ensinados a utilizar o aparelho por uma pessoa responsável pela sua
segurança.
7. As crianças devem ser supervisionadas para garantir que não brincam com o aparelho.
8. Verifique o cabo de alimentação e a ficha regularmente para verificar a existência de quaisquer danos.
Se o cabo ou a ficha estiverem danificados, devem ser substituídos pelo fabricante ou por uma pessoa
qualificada de forma a evitar um perigo elétrico.
9. Não utilize o aparelho se este tiver sido deixado cair ou estiver danificado de qualquer forma. Em caso
de danos, devolva a unidade para verificação e/ou reparação por parte de um agente de assistência
autorizado
10. Para reduzir o risco de choque elétrico, não mergulhe ou exponha o conjunto do motor, ficha ou cabo de
alimentação em água ou em qualquer outro líquido.
11. Nunca coloque a unidade dentro de água ou qualquer outro líquido para fins de limpeza.
12. Remova a ficha da tomada ao agarrar na ficha. Não puxe pelo cabo para desligar o aparelho da corrente
elétrica. Desligue sempre a unidade quando esta não estiver a ser utilizada, antes de limpar ou quando
adicionar ou remover peças.
13. A utilização de acessórios não recomendados ou fornecidos pelo fabricante pode resultar em lesões,
incêndios ou choque elétrico.
14. É fornecido um cabo pequeno para reduzir os riscos resultantes de ficar preso ou de tropeçar num cabo
maior.
15. Não deixe o cabo suspenso pela extremidade de uma mesa ou balcão. Certifique-se de que o cabo não
se encontra numa posição em que possa ser puxado inadvertidamente.
16. Não permita que o cabo toque em superfícies quentes e não o coloque sobre ou perto de uma caldeira
elétrica ou a gás quente ou num forno aquecido.
17. Não utilize o aparelho sobre uma superfície de cozimento a gás ou elétrica ou sobre ou perto de uma
chama.
18. A utilização de uma extensão com este aparelho não é recomendada. No entanto, caso seja necessário
utilizar uma ficha de extensão, certifique-se de que a ficha é adequada para o consumo de energia do
aparelho para evitar o sobreaquecimento do cabo da extensão, aparelho ou tomada. Não coloque o
cabo da extensão numa posição em que possa ser puxada por crianças ou animais ou que possibilite o
tropeçamento.
19. Este aparelho não é adequado para ser utilizado no exterior. Não utilize este aparelho para outra
finalidade diferente da prevista.
20. NÃO transporte o aparelho pelo cabo de alimentação.
21. Não deixar este aparelho não supervisionado durante a utilização. Desligue sempre a unidade quando
não estiver a ser utilizada ou antes de limpar.
22. Utilize sempre o aparelho numa superfície suave, uniforme e estável. Não coloque a unidade numa
superfície quente.
23. Certifique-se de que o interruptor está na posição "Off" (desligado) após cada utilização.
24. O fabricante não aceita responsabilidade por qualquer dano ou lesão causados devido a uma utilização
imprópria ou incorreta ou a reparações realizadas por pessoal não autorizado.
25. Em caso de problemas técnicos, desligue a máquina e não tente repará-la você próprio. Devolva o
aparelho a um agente de assistência autorizado para verificação, ajuste ou reparação. Insista sempre
em utilizar peças sobresselentes originais. O não cumprimento das precauções e instruções acima
poderá afetar o funcionamento seguro desta máquina.
ESTE APARELHO DESTINA-SE APENAS A UTILIZAÇÃO DOMÉSTICA 22DESENHO DAS PEÇAS A
Acessórios de mistura da batedeira Pro-Mix
1. Tampa anti-projecções 8. Interruptor de controlo da
2. Engates velocidade:
3. Distribuidor P Pulse, 0 Desligado, Mín, 1-6, Máx
4. Tampa do distribuidor 9. Alavanca de libertação da cabeça:
5. Cabeça do robot de cozinha Bloquear , Desbloquear
6. Unidade do motor 10. Base
7. Área pivotante da cabeça 11. Taça de aço inoxidável com pegas
2312. Unidade dos acessórios de 15. Encaixe da baioneta
mistura 16. Batedor de claras
13. Entalhe 17. Batedor plano
14. Eixo da unidade dos 18. Gancho de amassar
acessórios de mistura
SAÍDA DA UNIDADE PARA
ACESSÓRIOS EXTRA OPCIONAIS
Acessórios disponíveis:
Cortador pequeno
Cortador grande
Máquina de picar 5-em-1
Máquina de massa plana
Máquina de massa tipo
tagliatelle
Máquina de massa tipo
trenette
Para mais informações sobre os acessórios
opcionais, visite:
www.russellhobbs.co.za
ou contacte o Departamento de Apoio ao
Cliente Home of Living Brands mais próximo
24ANTES DA PRIMEIRA UTILIZAÇÃO
Todas as peças da batedeira Pro-Mix devem ser cuidadosamente limpas antes de
utilizar o equipamento pela primeira vez. (Consultar a secção “Cuidados e
manutenção”).
POSICIONAMENTO
Coloque a batedeira Pro-Mix numa superfície estável e plana.
Posicione o cabo de alimentação longe do rebordo da mesa ou do balcão para que
ninguém tropece ou fique preso nele.
ELEVAR A CABEÇA
Nota: Acessórios, como a liquidificadora, não devem estar encaixados quando
elevar a cabeça.
Certifique-se de que a batedeira Pro-Mix está desligada e a ficha não está ligada à
corrente.
Rode a alavanca de libertação da cabeça no sentido contrário ao dos ponteiros do
relógio para a posição de desbloqueio
A cabeça sobe, com a sua ajuda, permitindo a remoção/substituição da taça de aço
inoxidável e/ou dos acessórios de mistura.
Quando na sua posição mais elevada, a cabeça tranca e a alavanca de libertação
da cabeça regressa à posição de bloqueio
BAIXAR A CABEÇA
Atenção: Mantenha as mãos e itens longe da área
pivotante da cabeça para evitar a ocorrência de lesões
ou danos no electrodoméstico.
Certifique-se de que o acessório de mistura necessário
está correctamente encaixado e a taça de mistura se
encontra na sua devida posição. (consultar a secção
Taça” e “Acessórios de mistura”)
Rode a alavanca de libertação da cabeça no sentido
contrário ao dos ponteiros do relógio para a posição de
desbloqueio
Baixe a cabeça suavemente premindo a parte superior da
batedeira Pro-Mix até ela trancar na sua devida posição.
A alavanca de libertação da cabeça regressará à posição de bloqueio
TAMPA ANTI-PROJECÇÕES
A taça de mistura pode ser usada com ou sem a tampa anti-projecções.
Recomendamos o uso da taça de mistura com a tampa anti-projecções e a tampa do
distribuidor encaixados para evitar salpicos.
Certifique-se de que a batedeira Pro-Mix está desligada e a ficha não está ligada à
corrente.
Eleve a cabeça. (Consultar a secção “Elevar a cabeça”)
Remova quaisquer acessórios de mistura da unidade dos acessórios de mistura.
A tampa anti-projecções encaixa-se no lado inferior da cabeça, em cima da unidade
dos acessórios de mistura. 25INSTALAR A TAMPA ANTI-PROJECÇÕES
Segure a tampa anti-projecções pelo distribuidor.
Encaixe o primeiro ponto de engate na tampa anti-projecções (o engate mais
próximo do distribuidor) sobre o entalhe situado na cabeça.
Empurre o lado oposto da tampa anti-projecções para cima até o segundo engate
encaixar na sua devida posição no entalhe na traseira da cabeça.
REMOVER A TAMPA ANTI-PROJECÇÕES
Puxe a traseira da tampa anti-projecções cuidadosamente para libertar o engate
traseiro do entalhe situado na traseira da cabeça.
Após libertar o engate traseiro pode baixar a tampa anti-projecções e removê-la da
cabeça.
TAMPA DO DISTRIBUIDOR
Atenção: Não insira em momento algum os dedos ou quaisquer utensílios no
distribuidor.
Para evitar salpicos, certifique-se de que a tampa do distribuidor está encaixada
quando a batedeira Pro-Mix estiver em uso.
A tampa do distribuidor fica situada no topo do distribuidor na tampa anti-projecções.
Levante a tampa do distribuidor para adicionar ingredientes.
TAÇA
Atenção: Use apenas a taça fornecida - NÃO tente usar qualquer outra taça.
Tem de elevar a cabeça para poder instalar ou remover a taça (Consultar a secção
“Elevar a cabeça”).
Nota: É mais fácil instalar e remover a taça sem os acessórios de mistura
instalados.
INSTALAR A TAÇA
Coloque a taça no espaço fornecido na base da batedeira Pro-Mix.
Rode a taça no sentido horário para a fixar na sua devida posição. As duas pegas
ficarão viradas para a frente e traseira quando a taça estiver fixa na sua devida
posição.
REMOVER A TAÇA
Rode a taça no sentido contrário ao dos ponteiros do relógio para a soltar dos seus
encaixes.
Levante-a da base da batedeira Pro-Mix para a remover.
ACESSÓRIOS DE MISTURA
Atenção: Instale e remova os acessórios de mistura com a cabeça da batedeira
Pro-Mix levantada e certifique-se de que a unidade está desligada e a ficha não
está ligada à corrente.
INSTALAR ACESSÓRIOS
Certifique-se de que a batedeira Pro-Mix está desligada e a ficha não está ligada à
corrente.
Eleve a cabeça (Consultar a secção “Elevar a cabeça”).
Seleccione o acessório apropriado.
Encaixe a parte superior do acessório na unidade dos acessórios de mistura e rode-
a no sentido contrário ao dos ponteiros do relógio para a fixar na sua devida
posição.
26AJUSTAR A ALTURA DOS SEUS ACESSÓRIOS DE MISTURA
Os acessórios de mistura estão equipados com um sistema para ajustar a sua
altura em relação à taça de mistura para os melhores resultados.
Prima a alavanca de libertação da cabeça para elevar a
cabeça da batedeira e inserir o batedor plano, o gancho
Ajuste
de amassar ou o batedor de claras. aqui
Fixe-o na sua devida posição.
Em seguida, baixe a cabeça da batedeira premindo a
alavanca de libertação da cabeça e baixe-a até ouvir um
clique. Isto significa que a cabeça da batedeira regressou
devidamente à sua posição correcta.
Para ajustar a altura, use uma chave fixa para desapertar
a porca situada na ferramenta de mistura. Levante o eixo
um pouco e aperte depois a porca. Isto permite mover o
acessório de mistura para uma posição mais próxima do
fundo da taça.
REMOVER ACESSÓRIOS
Empurre o acessório para cima, para dentro da unidade dos acessórios de mistura e
rode-o no sentido horário.
Puxe-o para baixo e remova-o da unidade dos acessórios de mistura.
LIGAR
Atenção: - Se o controlo de velocidade não estiver definido para '0' (posição
Desligado), a batedeira Pro-Mix começará a funcionar quando a ficha
for ligada à corrente.
- Instalar os acessórios correctamente para evitar danificar a batedeira.
Certifique-se de que o controlo de velocidade está na posição “0”.
Ligue a ficha à corrente e ligue a batedeira.
CONTROLO DE VELOCIDADE
Rode o botão de controlo de velocidade no sentido dos ponteiros do relógio para a
velocidade que pretende.
Coloque o controlo da velocidade na posição "0" para desligar o motor.
Rode o controlo da velocidade no sentido contrário ao dos ponteiros do relógio para
a posição "P" para obter um impulso a alta velocidade.
Atenção: Não permita que o motor funcione continuamente durante mais de 10
minutos, ou pode aquecer em excesso. Após 10 minutos de utilização, desligue
durante, pelo menos, 10 minutos, para arrefecer.
FUNÇÃO “PULSE” ("P")
Rode o controlo da velocidade no sentido contrário ao dos ponteiros do relógio para
a posição "P" para obter um breve impulso a alta velocidade.
Use a posição "P" como uma função "pulse" para um maior controlo do processo de
mistura. 27USO DO CONTROLO DA VELOCIDADE COM OS ACESSÓRIOS
ACESSÓRIO VELOCIDADE UTILIZAÇAO
Batedor P, 3 - MAX Bater/Arejar misturas de cremes, claras,
misturas de massa leves.
Batedor P, 3 - 4 Misturar misturas de manteiga e açúcar até
estarem em creme e misturas médias.
Gancho de Misturas fortes, massa em geral, massa
MIN - 1
amassar para bolos.
Atenção: Não use a função "pulse" ("P") com o acessório do gancho de amassar
visto que isso pode sobreaquecer o motor.
Nota: O conteúdo da taça sobe quando ligar o motor - quanto mais rápida for a
velocidade, mais ele subirá. Recomendamos que encha a taça apenas até metade
da sua capacidade.
LÍQUIDOS QUENTES
Atenção: Tenha cuidado ao misturar líquidos quentes. Os acessórios de mistura
podem provocar salpicos dos líquidos originando um risco de queimadura.
Recomendamos que não tente misturar líquidos com uma temperatura superior a
algo que lhe seja confortável manusear, ou seja temperaturas abaixo de 40°C. Se
a receita solicitar a mistura de líquidos com uma temperatura superior a 40°C,
certifique-se de que toma medidas para prevenir a ocorrência de queimaduras
devido a possíveis salpicos.
DESLIGAR
Coloque o controlo da velocidade na posição '0' (posição Desligado) e aguarde até o
acessório de mistura parar de se mover antes de colocar as suas mãos ou quaisquer
utensílios na taça ou elevar a cabeça da batedeira.
28DESENHO DAS PEÇAS B - Acessório da
liquidificadora da batedeira Pro-M ix
JARRO
(LADO INFERIOR)
1. Jarro 9. Saliências
2. Lâminas 10. Botão de libertação da
3. Unidade da lâmina tampa da unidade da
4. Bocal liquidificadora
5. Tampa 11. Tampa da unidade da
6. Marca máx. (1,4 L) liquidificadora
7. Engate 12. Saída da unidade da
8. Aba liquidificadora 29JARRO DA LIQUIDIFICADORA
Use o jarro da liquidificadora para misturar sopas, molhos e batidos; e para cortar
pequenos ingredientes, como ervas, especiarias e frutos secos.
ANTES DA UTILIZAÇÃO
Todas as peças da batedeira Pro-Mix, incluindo o jarro da liquidificadora, devem ser
cuidadosamente limpas antes de utilizar o equipamento pela primeira vez. (Consultar a
secção “Cuidados e manutenção”).
POSICIONAMENTO
Coloque a batedeira Pro-Mix numa superfície estável e plana.
Posicione o cabo de alimentação longe do rebordo da mesa ou do balcão para que
ninguém tropece ou fique preso nele.
Encaixe a taça e a tampa anti-projecções na batedeira Pro-Mix. A unidade da
batedeira Pro-Mix funciona quando o motor está a funcionar.
Cuidado: Não opere o acessório da liquidificadora vazio durante mais de 1 (um)
minuto. Nuna encha o jarro de vidro com líquidos a ferver. Deixe os líquidos
arrefeçerem até à temperatura ambiente. Se não cumprir esta advertência, o
electrodoméstico pode sobreaquecer e o vidro do jarro pode partir.
USAR O JARRO
Atenção: As lâminas de corte são muito afiadas. Manuseie o jarro com o máximo
cuidado e atenção.
Prima a tampa da unidade da liquidificadora para abrir a tampa e expor a unidade
do jarro.
Alinhe o jarro de maneira a que o bocal fique apontado ao longo da cabeça da
batedeira Pro-Mix.
Instale o jarro na unidade.
Empurre a pega em direcção à traseira da batedeira Pro-Mix para rodar o jarro no
sentido contrário ao dos ponteiros do relógio e fixá-lo na sua devida posição.
ENCHER O JARRO
Atenção: Não use o jarro sem a sua respectiva tampa instalada.
Coloque os ingredientes no jarro.
Não encha o jarro além da marca MÁX (1,4 litros) visto que o conteúdo pode forçar
a tampa quando ligar o motor.
Instale a tampa no jarro e prima-a para baixo para a fixar devidamente.
LIGAR
Atenção: - Se o controlo de velocidade não estiver definido para '0' (posição
Desligado), a batedeira Pro-Mix começará a funcionar quando a ficha for ligada à
corrente.
- Se os acessórios não estiverem instalados correctamente pode danificar a
batedeira.
Certifique-se de que o controlo de velocidade está na posição “0”.
Ligue a ficha à corrente e ligue a batedeira.
30CONTROLO DE VELOCIDADE
Rode o botão de controlo de velocidade no sentido dos ponteiros do relógio para a
velocidade que pretende.
Rode o controlo da velocidade no sentido contrário ao dos ponteiros do relógio para
a posição "P" para obter um impulso a alta velocidade.
Rode o controlo da velocidade na posição "0" para desligar o motor.
ATENÇÃO: Não permita que o motor funcione continuamente durante mais de 10
minutos, ou pode aquecer em excesso. Após 10 minutos de utilização, desligue
durante, pelo menos, 10 minutos, para arrefecer.
FUNÇÃO “PULSE” ("P")
Rode o controlo da velocidade no sentido contrário ao dos ponteiros do relógio para
a posição "P" para obter um breve impulso a alta velocidade.
Use a posição "P" como uma função "pulse" para um maior controlo do processo de
mistura.
ADICIONAR INGREDIENTES
Se precisar de adicionar ingredientes após iniciar a liquidificação:
Rode o controlo da velocidade para a posição "0" (posição Desligado).
Aguarde até o movimento das lâminas parar.
Remova a tampa.
Adicione os ingredientes.
Reinstale a tampa.
Inicie o motor.
Atenção: Certifique-se de que os ingredientes adicionados não colocam o volume
acima da marca MÁX.
DESLIGAR
Rode o controlo da velocidade para a posição "0" (posição Desligado) e aguarde até
o movimento das lâminas parar antes de mover a tampa do jarro ou remover o jarro
da unidade do motor.
Para remover o jarro, rode-o no sentido horário até o bocal apontar ao longo da
cabeça da batedeira Pro-Mix.
Retire o jarro da unidade.
LÍQUIDOS QUENTES
Atenção: O jarro da liquidificadora frio pode partir se colocar nele líquidos
quentes.
Aguarde até o líquido arrefecer até uma temperatura que consiga manusear antes
de o despejar no jarro - ou seja, tenho o líquido a uma temperatura inferior a 40°C.
A UNIDADE DA LÂMINA
REMOVER A UNIDADE DA LÂMINA
Remova a tampa e vire o jarro ao contrário.
Use as saliências para rodar a unidade da lâmina no sentido contrário ao dos
ponteiros do relógio para libertar os engates na unidade da lâmina das abas no
interior do jarro.
Levante a unidade da lâmina para a remover do jarro.
Cuidado: As lâminas de corte são muito afiadas. Manuseie a unidade da lâmina
com o máximo cuidado e atenção. 31Vous pouvez aussi lire