Flush-mount in-wall for Concrete and plasterboard - Specifications - Incasso filo muro e cartongesso - CASAIO
←
→
Transcription du contenu de la page
Si votre navigateur ne rend pas la page correctement, lisez s'il vous plaît le contenu de la page ci-dessous
flush-mount
                 in-wall for
         Concrete and
          plasterboard
 Incasso filo muro e cartongesso

     Enceintes encastrables au ras des
urs en brique et des plaques de plâtre

      Flächenbündiger Einbau für
           Mauer und Gipskarton

                Specifications
m ounting instructions for speakers in plasterboard walls Istruzioni di montaggio per cartongesso - Instructions de montage pour cloison sèche - Montageanleitungen für Gipskarton
1 2 3 4 5 6
Magnet Screw M3
Magnete Vite M3
Aimant Vis M3
Magnet Schraube M3
*Make a hole in the plaster- *Make a hole in the plaster- *Block the frame with self- Apply several coats of Electrically connect the Overlapping front cover.
board wall (the dimensions of the board wall (the dimensions of the drilling screws 1,5 cm away from plaster depending on the de- loudspeaker and fix it to the Insert the magnets into the external thre-
hole are indicated in the product speci- hole are indicated in the product speci- the hole. The screws must be located sired decorative solution. frame with the supplied screws. aded holes and adjust their height to suit the
fications) and insert the frame into the hole fications) and insert the frame into the hole max. 10 cm away from each other. front cover used. Insert the locking screw into the
(rounded version). (squared version). Collegare elettricamente l’altopar- innermost hole.
*Bloccare il telaio con viti autoperforanti Applicare più mani di stucco a se-
lante e fissarlo al telaio con le viti in
*Creare un’apertura nel cartongesso pari *Creare un’apertura nel cartongesso pari a 1,5 cm dal foro nel cartongesso. Le viti conda della soluzione decorativa Versione con estetica a sbordo.
dotazione.
alle dimensioni indicate nelle specifiche alle dimensioni indicate nelle specifiche del devono essere distanziate massimo 10 desiderata. Inserire i magneti nei fori filettati esterni, regolandoli
del prodotto e inserire il telaio nel foro (ver- prodotto e inserire il telaio nel foro (versione cm l’una dall’altra. Connecter électriquement l’encein- in altezza in relazione all’estetica utilizzata. Nel foro
sione rotonda). quadrata). Passer l’enduit de finition selon le te et la fixer au cadre avec les vis più interno inserire la vite di chiusura.
*Fixer le cadre avec des vis auto-
* Créer une ouverture dans la plaque de perceuses à 1,5 cm du trou dans la résultat souhaité. fournies. Version avec l’élément esthétique débordant.
* Créer une ouverture dans la plaque de
plâtre aux dimensions indiquées dans les plaque de plâtre. Les vis doivent être Insérez les aimants dans les trous filetés extérieurs, et
plâtre aux dimensions indiquées dans les
spécifications du produit et y installer le ca- espacées de 10 cm au maximum l’une Spachteln Sie je nach gewünschter Schließen Sie den Lautsprecher ajuster la hauteur par rapport à l’élément esthétique
spécifications du produit et y installer le ca-
dre (version carrée). de l’autre. Ausführung. elektrisch an und befestigen Sie ihn utilisé. Dans le trou intérieur, installer la vis de fixation.
dre (version ronde).
mit den mitgelieferten Schrauben
*Blockieren Sie den Rahmen mit Modell mit vorstehender Frontabdeckung.
*Stellen Sie eine Öffnung im Gipskarton *Stellen Sie eine Öffnung im Gipskarton mit am Rahmen.
selbstbohrenden Schrauben, die 1,5 cm Setzen Sie die Magnete in die äußeren Gewin-
mit den in den Produktspezifikationen den in den Produktspezifikationen aufgeführ-
von der Bohrung im Gipskarton ausgehen. delöcher ein und regulieren Sie sie in der Höhe je
aufgeführten Abmessungen her und setzen ten Abmessungen her und setzen Sie den
Die Schrauben müssen ungefähr 10 cm nach verwendeter Frontabdeckung. Führen Sie eine
Sie den Rahmen ein (rundes Modell). Rahmen ein (quadratisches Modell).
voneinander entfernt sein. Abschlußschraube in das innerste Loch ein.
7 8 9
Front cover
Cover estetica
Esthétique
de couverture
Frontabdeckung
31AXX1
Frame
Telaio
Vite M3 Magnete Cadre
Screw M3 Magnet Rahmen
Vis M3 Aimant CC1928
Schraube M3 Magnet
Loudspeaker
Flush mount front cover. Mount the safety hook and Apply the front cover sup- Altoparlante
Insert magnets into internal threaded put the eyelet in one of the flan- ported by magnets (the picture Haut-parleur
holes, adjust height to suit front cover. Insert ge’s fixing screws. shows the standard cover 11AXX1). Lautsprecher
locking screw into outermost hole.
SIC216
Montare il gancio di sicurezza e applicare Applicare la flangia estetica sostenuta
Estetica raso. l’occhiello nella vite di fissaggio della flangia dalle calamite (la foto illustra quella stan- Installation video
Inserire i magneti nei fori filettati interni, regolare altoparlante. dard 11AXX1). Neodymium magnets
l‘altezza secondo l’estetica. Nel foro più esterno Video istruzioni di montaggio
Magneti in neodimio Vidéo des instructions de montage
inserire la vite di chiusura. Monter le crochet de sécurité et appli- Appliquer la couverture esthétique soute- Aimants en néodyme
quer l’œillet à une vis de fixation de la nue par les aimants (la photo montre la Video Montageanleitungen
Élément esthétique au ras du mur. Neodym-Magnete
Insérez les aimants dans les trous filetés intérieurs, bride du haut-parleur. version 11AXX1 standard).
ajuster la hauteur selon l’élément esthétique. Plasterboard wall
Dans le trou extérieur, installer la vis de fixation. Montieren Sie den Sicherheitshaken
und befestigen Sie die Öse in einer
Bringen Sie den ästhetischen Flansch
mit dem Magnet an (im Foto ist das Cartongesso Video link
Flächenbündige Frontabdeckung. Abschlußschraube des Lautsprecherflan- Standardmodell 11AXX1 abgebildet). Plaques de plâtre www.garvan.it/gac
Setzen Sie die Magnete in die inneren Gewinde- sches. Gipskarton
löcher ein und regulieren in der Höhe je nach
Frontabdeckung. Führen Sie eine Abschluß-
schraube in das äußerste Loch ein.a
Exploded view
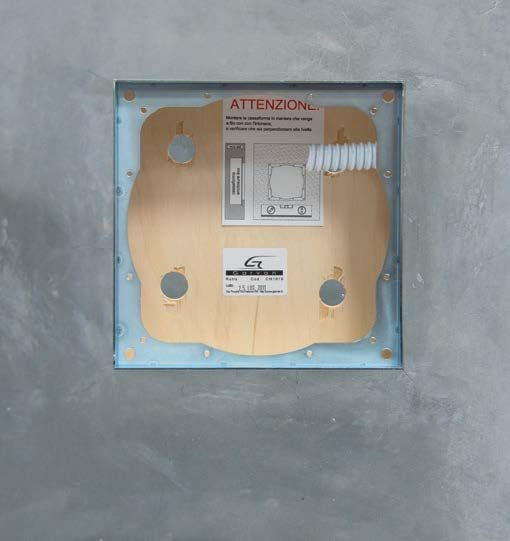
* Enclosures CC1920, CR2828 and CR1980 must be installed into the plasterboard panel before they are attached to the structure.
* Le casseforme CC1920, CR2828 e CR1980 vanno installate nella lastra di cartongesso prima che essa sia montata alla struttura.
* Les coffrages CC1920, CR2828 et CR1980 doivent être installés dans la plaque de plâtre avant qu’elle ne soit fixée à la structure.
* Das Gehäuse CC1920, CR2828 und CR1980 wird in die Gipskartonplatte installiert, bevor es an die Struktur montiert wird.
MADE IN ITALY
3-YEAR WARRANTY
3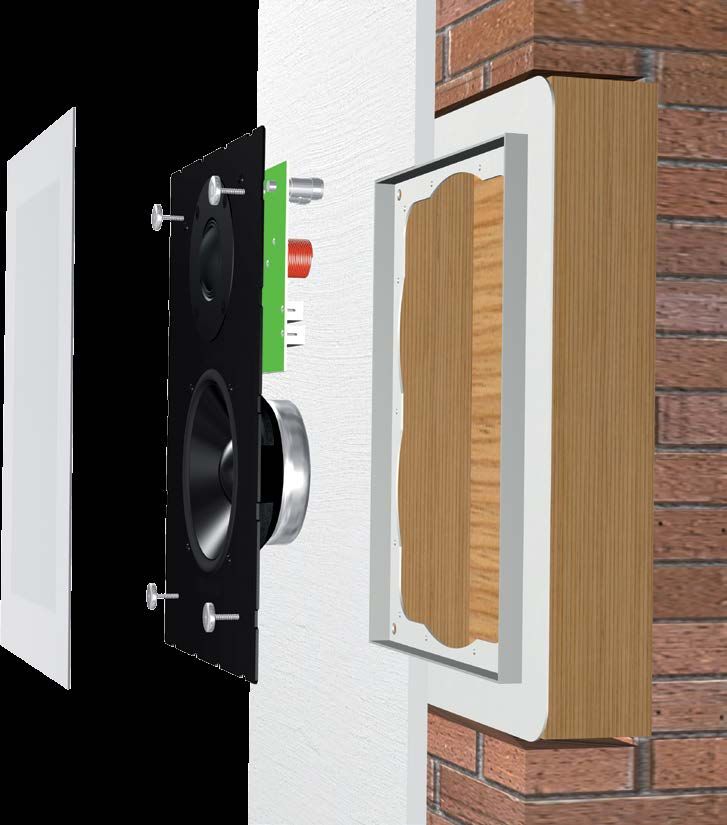
m ounting instructions for speakers in concrete walls Istruzioni di montaggio per muratura - Instructions de montage pour murs en brique - Montageanleitungen für Wandeinbau
1 2 3 4 5 6
Magnete Vite M3
Magnet Screw M3
Aimant Vis M3
Magnet Schraube M3
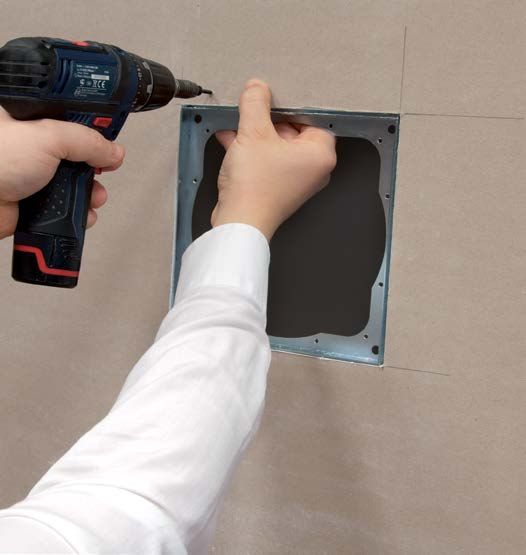
Make a hole in the wall Make a hole in the box Apply concrete in the hole, Plaster, smooth the sur- Electrically connect the Overlapping front cover.
(the dimensions of the hole are where the corrugated pipe insert the enclosure and install the face and paint. loudspeaker and fix it to the frame Insert the magnets into the external thre-
indicated in the product specifica- carr ying the cables is supposed plaster reinforcement mesh. Make sure with the supplied screws. aded holes and adjust their height to suit the
tions). to go through. the enclosure is in the right position. Intonacare, rasare la cassaforma e front cover used. Insert the locking screw into the
pitturare. Collegare elettricamente l’altoparlante e innermost hole.
Creare un’apertura nel muro pari alle Forare il box in prossimità del pas- Applicare il cemento nella nicchia, inseri- fissarlo al telaio con le viti in dotazione.
dimensioni indicate nelle specifiche saggio del tubo corrugato per l’inse- re la cassaforma, installare la rete portain- Versione con estetica a sbordo.
Appliquer l’enduit puis peindre. Inserire i magneti nei fori filettati esterni, regolandoli
del prodotto. rimento dei cavi. tonaco. Assicurarsi che la cassaforma sia Connecter électriquement le haut-parleur et
nella posizione desiderata. le fixer au coffret avec les vis fournies. in altezza in relazione all’estetica utilizzata. Nel foro
Créer une ouverture dans le mur se- Percer le coffret en correspondance Verputzen, das Gehäuse glätten und più interno inserire la vite di chiusura.
lon les dimensions indiquées dans les du passage du tube ondulé pour l’in- Appliquer du béton, insérer le coffrage et in- anstreichen. Schließen Sie den Lautsprecher an das Version avec l’élément esthétique débordant.
spécifications du produit. sertion des câbles. staller le treillis pour enduit. Assurez-vous que Stromnetz an und befestigen Sie ihn mit den Insérez les aimants dans les trous filetés extérieurs, et
le coffrage est dans la position souhaitée. mitgelieferten Schrauben am Rahmen. ajuster la hauteur par rapport à l’élément esthétique
Stellen Sie eine Öffnung in der Mauer Bohren Sie ein Loch am Gehäuse ne- utilisé. Dans le trou intérieur, installer la vis de fixation.
mit denselben Abmessungen, die in ben dem Durchgang des Wellrohrs Bringen Sie den Zement in die Nische ein,
Modell mit vorstehender Frontabdeckung.
den Produktspezifikationen aufgeführt für die Einführung der Kabel. setzen Sie das Gehäuse ein und mon-
Setzen Sie die Magnete in die äußeren Gewin-
sind, her. tieren Sie das Betonhaltenetz. Stellen
delöcher ein und regulieren Sie sie in der Höhe je
Sie sicher, dass sich das Gehäuse in der
nach verwendeter Frontabdeckung. Führen Sie eine
gewünschten Stellung befindet.
Abschlußschraube in das innerste Loch ein.
7 8 9
Front cover
Cover estetica
Esthétique
de couverture
Frontabdeckung
31AXX1
Enclosure
Cassaforma
Vite M3 Magnete Coffrage
Screw M3 Magnet Gehäuse
Vis M3 Aimant CM1928
Schraube M3 Magnet
Flush mount front cover. Mount the safety hook and Apply the front cover sup- Loudspeaker
Insert magnets into internal threaded put the eyelet in one of the flan- ported by magnets (the picture Altoparlante
holes, adjust height to suit front cover. Insert ge’s fixing screws. shows the standard cover 11AXX1). Haut-parleur
locking screw into outermost hole. Lautsprecher
Montare il gancio di sicurezza e applica- Applicare la flangia estetica sostenuta SIM213
Estetica raso. re l’occhiello in una vite di fissaggio della dalle calamite (la foto illustra quella stan- Installation video
Inserire i magneti nei fori filettati interni, regolare flangia altoparlante. dard 11AXX1). Neodymium magnets Video istruzioni di montaggio
l‘altezza secondo l’estetica. Nel foro più esterno
Magneti in neodimio Vidéo des instructions de montage
inserire la vite di chiusura. Monter le crochet de sécurité et appli- Appliquer la couverture esthétique soute- Aimants en néodyme
quer l’œillet à une vis de fixation de la nue par les aimants (la photo montre la Video Montageanleitungen
Élément esthétique au ras du mur. Neodym-Magnete
Insérez les aimants dans les trous filetés intérieurs, bride du haut-parleur. version 11AXX1 standard).
ajuster la hauteur selon l’élément esthétique.
Montieren Sie den Sicherheitshaken Bringen Sie den ästhetischen Flansch Plaster Wall
Dans le trou extérieur, installer la vis de fixation.
und befestigen Sie die Öse in einer mit dem Magnet an (im Foto ist das Intonaco Muro Video link
Flächenbündige Frontabdeckung. Abschlußschraube des Lautsprecherflan- Standardmodell 11AXX1 abgebildet). Enduit Mur www.garvan.it/gam
Setzen Sie die Magnete in die inneren Gewinde- sches. Putz Wand
löcher ein und regulieren in der Höhe je nach
Frontabdeckung. Führen Sie eine Abschluß-
schraube in das äußerste Loch ein.a
Exploded view
MADE IN ITALY
3-YEAR WARRANTY
5
i n-wall speakers for concrete flush mount & plasterboard 12,5 mm Incasso filo muro e cartongesso 12,5 mm - Encastrement ras du mur et plaques de plâtre 12,5 mm - Einbau wandbündig und für Gipskarton 12,5 mm
Indoor speakers: coax - Per interni: coassiali - Pour l’intérieur: coaxiales - Für Innenbereiche: koaxial Indoor speakers: coax - Per interni: coassiali - Pour l’intérieur: coaxiales - Für Innenbereiche: koaxial
12,5 mm
D1 , D2
Loudspeaker Minimum depth recommended
Altoparlante Profondità minima consigliata
Haut-parleur Profondeur minimale recommandée
Empfohlene Mindesttiefe
Lautsprecher
D1 D2
For plasterboard - Per cartongesso En plaques de plâtre - Für Gipskarton √ √ √ √ √ √
For concrete - Per muro Pour le mur - Für die Wand √ √ √ √
Code - Codice (8 Ω) Code - Code (8 Ω) SIC111 SIM111 SIC11S SIM11S SIC118 SIC112 SIM112 SIC12S SIM12S SIC117
Code - Codice (70V / 100V) Code - Code (70V / 100V) SIC11V SIM11V SIC18V SIC12V SIM12V SIC17V
Type - Tipo Type - Typ 2 way coax 2 way coax Stereo coax Stereo coax 2 way coax 2 way coax 2 way coax Stereo coax Stereo coax 2 way coax
Neodymium Tw, Neodymium Tw, Neodymium Tw, Neodymium Tw, Neodymium Tw, Neodymium Tw, Neodymium Tw, Neodymium Tw, Neodymium Tw, Neodymium Tw,
Components - Componenti Composants - Komponenten
doped paper Wf doped paper Wf doped paper Wf doped paper Wf doped paper Wf doped paper Wf doped paper Wf doped paper Wf doped paper Wf doped paper Wf
Power RMS / Max - Potenza RMS / Max W (8 Ω) Puissance RMS / Max - Leistung RMS / Max W (8 Ω) 50 / 100 60 / 120 30 + 30 / 60 + 60 35 + 35 / 70 + 70 50 / 100 50 / 100 60 / 120 30 + 30 / 60 + 60 35 + 35 / 70 + 70 50 / 100
Power RMS - Potenza RMS W (70V / 100V) Puissance RMS - Leistung RMS W (70V / 100V) 50,0 - 37,5 - 25,0 50,0 - 37,5 - 25,0 50,0 - 37,5 - 25,0 50,0 - 37,5 - 25,0 50,0 - 37,5 - 25,0 50,0 - 37,5 - 25,0
Freq. resp. - Risp. in freq. (Hz) Rép. en fréq. - Frequenzgang (Hz) 78 - 20k 83 - 20k 78 - 20k 83 - 20k 65 - 20k 78 - 20k 83 - 20k 78 - 20k 83 - 20k 65 - 20k
Sensitivity - Sensibilità dB (2,83V/1m) Sensibilité - Empfindlichkeit dB (2,83V/1m) 91 89 85 + 85 / 91 83 + 83 / 89 91,5 91 89 85 + 85 / 91 83 + 83 / 89 91,5
Nom. impedance - Imp. nominale (Ω) Impédance nominale - Nennimpedanz (Ω) 8 8 8+8 8+8 8 8 8 8+8 8+8 8
Woofer Ø (cm) / Tweeter voice coil Ø (cm) Woofer Ø (cm) / Tweeter voice coil Ø (cm) 13,0 / 1,4 13,0 / 1,4 13,0 / 2 x 1,4 13,0 / 2 x 1,4 16,0 / 1,4 13,0 / 1,4 13,0 / 1,4 13,0 / 2 x 1,4 13,0 / 2 x 1,4 16,0 / 1,4
Dimensions HxWxD - Dimensioni AxLxP (cm) Dimensions HxLxP - Abmessungen HxBxD (cm) 19,3 x 19,3 x 5,6 19,3 x 19,3 x 5,8 19,3 x 19,3 x 6,1 19,3 x 19,3 x 6,3 19,3 x 19,3 x 7,0 19,0 x 19,0 x 5,6 19,0 x 19,0 x 5,8 19,0 x 19,0 x 6,1 19,0 x 19,0 x 6,3 19,0 x 19,0 x 7,0
Weight - Peso Kg (8 Ω) / (70V / 100V) Poids - Gewicht Kg (8 Ω) / (70V / 100V) 0,87 / 1,27 1,13 / 1,53 0,94 1,20 1,04 / 1,44 0,87 / 1,27 1,13 / 1,53 0,94 1,20 1,04 / 1,44
White front cover Couverture esthétique blanche
(Standard) (standard)
Cover estetica bianca Weiße Frontabdeckung
(Standard) (Standard)
Code - Codice Code - Code 81AXX1 81AXX1 81AXX1 81AXX1 81AXX1 11AXX1 11AXX1 11AXX1 11AXX1 11AXX1
Dimensions HxWxD - Dimensioni AxLxP (cm) Dimensions HxLxP - Abmessungen HxBxD (cm) 19,3 x 19,3 x 0,3 19,3 x 19,3 x 0,3 19,3 x 19,3 x 0,3 19,3 x 19,3 x 0,3 19,3 x 19,3 x 0,3 19,0 x 19,0 x 0,3 19,0 x 19,0 x 0,3 19,0 x 19,0 x 0,3 19,0 x 19,0 x 0,3 19,0 x 19,0 x 0,3
Weight - Peso (Kg) Poids - Gewicht (Kg) 0,17 0,17 0,17 0,17 0,17 0,19 0,19 0,19 0,19 0,19
Finishes - Rifinitura Finition - Verzierungen White fabric - Panno bianco - Tissu blanc - Weißes Tuch White fabric - Panno bianco - Tissu blanc - Weißes Tuch
Frame and backbox Cadre et coffrage
Telaio e casseforma Rahmen und Gehäuse
Code - Codice Code - Code CC2020 CM2020 CC2020 CM2020 CC2020 CC1919* CM1919 CC1919* CM1919 CC1919*
Dimensions HxWxD - Dimensioni AxLxP (cm) Dimensions HxLxP - Abmessungen HxBxD (cm) 26,0 x 20,0 x 1,5 26,0 x 20,0 x 7,6 26,0 x 20,0 x 1,5 26,0 x 20,0 x 7,6 26,0 x 20,0 x 1,5 25,0 x 25,0 x 1,5 25,0 x 25,0 x 7,6 25,0 x 25,0 x 1,5 25,0 x 25,0 x 7,6 25,0 x 25,0 x 1,5
Installation hole plasterboard HxWxD (cm) Trou de montage plaques de plâtre HxLxP (cm)
20,5 x 20,5 x 6,8 D1 20,5 x 20,5 x 7,5 D1 20,5 x 20,5 x 8,3 D1 19,5 x 19,5 x 6,8 D1 19,5 x 19,5 x 7,5 D1 19,5 x 19,5 x 8,3 D1
Foro montaggio cartongesso AxLxP (cm) Montagebohrung Gipskarton HxBxD (cm)
Installation hole wall HxW (cm) Trou de montage mur HxL (cm)
26,5 x 20,5 x 7,6 D2 26,5 x 20,5 x 7,6 D2 25,5 x 25,5 x 7,6 D2 25,5 x 25,5 x 7,6 D2
Foro montaggio muro AxL (cm) Montagebohrung Wand HxB (cm)
Weight - Peso (Kg) Poids - Gewicht (Kg) 0,51 0,93 0,51 0,93 0,51 0,54 0,98 0,54 0,98 0,54
Materials - Materiali Matériel - Materialien Steel + wood - Acciaio + legno - Acier + bois - Stahl + Holz Steel + wood - Acciaio + legno - Acier + bois - Stahl + Holz
* This backbox must be installed at least 23 cm deep in the wall, otherwise it is necessary to make a deeper hole than the one indicated in the mounting instructions. Specifications Solutions configurator
L’installazione di questa cassaforma necessita di una profondità di inserimento di almeno 23 cm altrimenti è necessario effettuare un foro più grande rispetto a quello indicato nelle istruzioni di montaggio. Specifiche Configuratore di soluzioni
L’installation de ce coffrage nécessite une profondeur d’insertion d’au moins 23 cm. Au cas où cela ne serait pas possible, il faudra effectuer un trou plus grand que celui indiqué dans les instructions de montage.
Caractéristiques Configurateur des produits
Spezifikationen Konfigurator der Produkte
Für die Installation dieses Gehäuses wird eine Tiefe von mindestens 23 cm benötigt, sonst muss ein größeres Loch als in den Montageanleitungen angegeben gemacht werden.
Link: www.garvan.it/gat Link: www.garvan.it/gaa
MADE IN ITALY
3-YEAR WARRANTY
7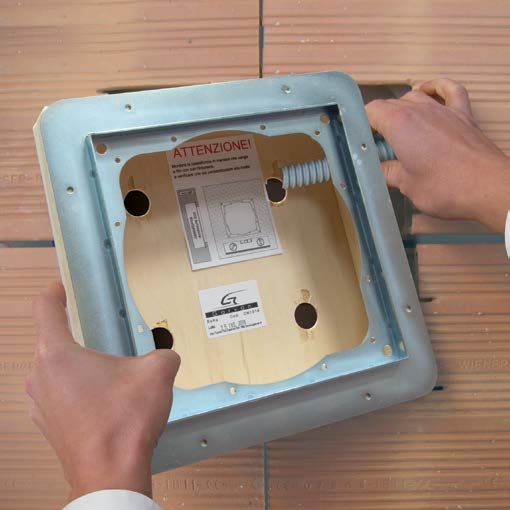
i n-wall speakers for concrete flush mount & plasterboard 12,5 mm Incasso filo muro e cartongesso 12,5 mm - Encastrement ras du mur et plaques de plâtre 12,5 mm - Einbau wandbündig und für Gipskarton 12,5 mm
Indoor speakers: two way, LCR - Per interni: due vie, LCR Indoor speakers: two way, LCR - Per interni: due vie, LCR Tilted speakers - Diffusori inclinati
Pour l’intérieur: deux voies, LCR - Für Innenbereiche: 2-Wege, LCR Pour l’intérieur: deux voies, LCR - Für Innenbereiche: 2-Wege, LCR Enceintes inclinées - Geneigte Lautsprecher
12,5 mm
D1 , D2
Loudspeaker Minimum depth recommended
Altoparlante Profondità minima consigliata
Haut-parleur Profondeur minimale recommandée
Empfohlene Mindesttiefe
Lautsprecher
D1 D2
For plasterboard - Per cartongesso En plaques de plâtre - Für Gipskarton √ √ √ √ √
For concrete - Per muro Pour le mur - Für die Wand √ √ √ √ √ √ √
Code - Codice (8 Ω) Code - Code (8 Ω) SIC216 SIM213 SIM218 SIC316 SIM316 SIM313 SIR513 SIR16N SIR17N
Code - Codice (70V / 100V) Code - Code (70V / 100V)
2 way passive 2-way, tilted 30° Left, center, right
Type - Tipo Type - Typ 2 way 2 way 2 way Left, center, right Left, center, right Left, center, right
radiator turnable 360° tilted 30°
Silk dome Tw, Silk dome Tw, Silk dome Tw, Silk dome Tw, Silk dome Tw, Silk dome Tw, Silk dome Tw, Silk dome Tw, Silk dome Tw,
Components - Componenti Composants - Komponenten
doped paper Wf doped paper Wf neodymium Wf doped paper Wf neodymium Wf doped paper Wf doped paper Wf neodymium Wf doped paper Wf
Power RMS / Max - Potenza RMS / Max W (8 Ω) Puissance RMS / Max - Leistung RMS / Max W (8 Ω) 75 / 150 75 / 150 75 / 150 150 / 300 75 / 150 150 / 300 300 / 600 75 / 150 150 / 300
Power RMS - Potenza RMS W (70V / 100V) Puissance RMS - Leistung RMS W (70V / 100V)
Freq. resp. - Risp. in freq. (Hz) Rép. en fréq. - Frequenzgang (Hz) 54 - 20k 78 - 20k 62 - 20k 54 - 20k 62 - 20k 78 - 20k 55 - 20k 62 - 20k 74 - 20k
Sensitivity - Sensibilità dB (2,83V/1m) Sensibilité - Empfindlichkeit dB (2,83V/1m) 90 89 90 93 91 92 93 90 92
Nom. impedance - Imp. nominale (Ω) Impédance nominale - Nennimpedanz (Ω) 8 8 8 8 8 8 8 8 8
Woofer Ø (cm) / Tweeter voice coil Ø (cm) Woofer Ø (cm) / Tweeter voice coil Ø (cm) 16,0 / 2,5 13,0 / 2,5 16,0 / 2,5 2 x 16,0 / 2,5 16,0 + PS / 2,5 2 x 13,0 / 2,5 4 x 13,0 / 2,8 16,0 / 2,5 2 x 13,0 / 2,5
Dimensions HxWxD - Dimensioni AxLxP (cm) Dimensions HxLxP - Abmessungen HxBxD (cm) 28,0 x 19,0 x 7,7 28,0 x 19,0 x 6,0 28,0 x 19,0 x 5,8 44,0 x 19,0 x 7,7 44,0 x 19,0 x 5,8 44,0 x 19,0 x 6,0 80,0 x 19,0 x 6,0 28,0 x 28,0 x 12,5 44,0 x 28,0 x 12,5
Weight - Peso Kg (8 Ω) / (70V / 100V) Poids - Gewicht Kg (8 Ω) / (70V / 100V) 2,20 2,20 1,62 3,50 1,92 3,20 7,10 2,20 4,00
White front cover Couverture esthétique blanche
(Standard) (standard)
Cover estetica bianca Weiße Frontabdeckung
(Standard) (Standard)
Code - Codice Code - Code 31AXX1 31AXX1 31AXX1 41AXX1 41AXX1 41AXX1 71AXX1 51AXX1 61AXX1
Dimensions HxWxD - Dimensioni AxLxP (cm) Dimensions HxLxP - Abmessungen HxBxD (cm) 28,0 x 19,0 x 0,3 28,0 x 19,0 x 0,3 28,0 x 19,0 x 0,3 44,0 x 19,0 x 0,3 44,0 x 19,0 x 0,3 44,0 x 19,0 x 0,3 80,0 x 19,0 x 0,4 28,0 x 28,0 x 0,3 44,0 x 28,0 x 0,3
Weight - Peso (Kg) Poids - Gewicht (Kg) 0,25 0,25 0,25 0,50 0,50 0,50 0,90 0,47 0,73
Finishes - Rifinitura Finition - Verzierungen White fabric - Panno bianco - Tissu blanc - Weißes Tuch White fabric - Panno bianco - Tissu blanc - Weißes Tuch
Frame and backbox Cadre et coffrage
Telaio e casseforma Rahmen und Gehäuse
Code - Codice Code - Code CC1928 CM1928 CM1931 CC1944 CM1944 CM1944 CR1981 *2 CR2828 *2 CR2844 *3
Dimensions HxWxD - Dimensioni AxLxP (cm) Dimensions HxLxP - Abmessungen HxBxD (cm) 34,0 x 25,0 x 1,5 34,0 x 25,0 x 7,6 50,0 x 35,0 x 7,6 50,0 x 25,0 x 1,5 50,0 x 25,0 x 7,6 50,0 x 25,0 x 7,6 86,0 x 25,0 x 10,0 34,0 x 34,0 x 16,0 50,0 x 34,0 x 16,0
Installation hole plasterboard HxW (cm) Trou de montage plaques de plâtre HxL (cm)
28,5 x 19,5 x 9,5 D1 44,5 x 19,5 x 9,5 D1 80,5 x 19,5 x 10,0 D2 28,5 x 28,5 x 16,0 D2 44,5 x 28,5 x 16,0 D2
Foro montaggio cartongesso AxL (cm) Montagebohrung Gipskarton HxB (cm)
Installation hole wall HxW (cm) Trou de montage mur HxL (cm)
34,5 x 25,5 x 7,6 D2 50,5 x 35,5 x 7,6 D2 50,5 x 25,5 x 7,6 D2 50,5 x 25,5 x 7,6 D2 86,5 x 25,5 x 10,0 D2 34,5 x 34,5 x 16,0 D2 50,5 x 34,5 x 16,0 D2
Foro montaggio muro AxL (cm) Montagebohrung Wand HxB (cm)
Weight - Peso (Kg) Poids - Gewicht (Kg) 0,64 1,20 1,50 0,83 1,56 1,56 6,60 2,40 3,40
Materials - Materiali Matériel - Materialien Steel + Wood - Acciaio + legno - Acier + bois - Stahl + Holz Steel + Wood - Acciaio + legno - Acier + bois - Stahl + Holz
Specifications Solutions configurator
*2 This backbox must be installed into the plasterboard panel before it is attached to the structure. - Questa cassaforma va installata nella lastra di cartongesso prima che essa sia montata alla struttura.
Ce coffrage doit être installé dans la plaque de plâtre avant qu’elle ne soit fixée à la structure. - Dieses Gehäuse muss in einer Gipskartonplatte installiert werden, bevor es an die Struktur montiert wird.
Specifiche Configuratore di soluzioni
Caractéristiques Configurateur des produits
*3 It is suggested to install this back box in the plasterboard panel before attaching it to the structure. - Questa cassaforma si consiglia d’installarla nella lastra di cartongesso prima che essa sia montata alla struttura.
Il est conseillé d’installer ce coffrage dans la plaque de plâtre avant qu’elle ne soit fixée à la structure. - Am besten könnten Sie das Gehäuse in einer Gipskartonplatte installieren, bevor es an die Struktur montiert wird.
Spezifikationen Konfigurator der Produkte
Link: www.garvan.it/gat Link: www.garvan.it/gaa
MADE IN ITALY
3-YEAR WARRANTY
9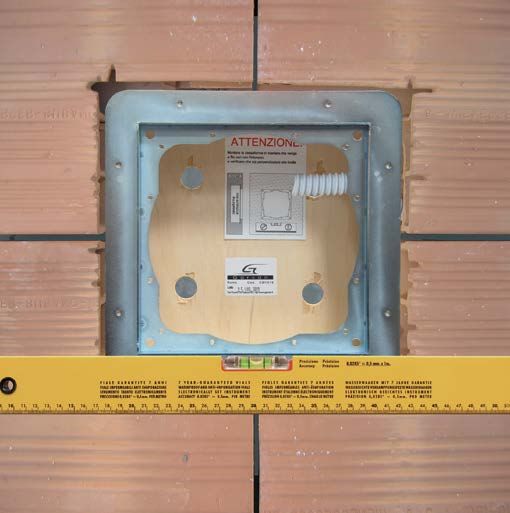
i n-wall speakers for concrete flush mount & plasterboard 12,5 mm Incasso filo muro e cartongesso 12,5 mm - Encastrement ras du mur et plaques de plâtre 12,5 mm - Einbau wandbündig und für Gipskarton 12,5 mm
Subwoofer Subwoofer IP66 - Outdoor/marine loudspeaker - Per esterno/marino
Caissons de basses Caissons de basses Extérieur/Nautique - Für Außen/Marinebereiche
12,5 mm
Loudspeaker D1 , D2
Altoparlante Minimum depth recommended
Profondità minima consigliata
Haut-parleur Profondeur minimale recommandée
Empfohlene Mindesttiefe
Lautsprecher
D1 D2
For plasterboard - Per cartongesso En plaques de plâtre - Für Gipskarton √ √ √ √ √ √ √ √
For concrete - Per muro Pour le mur - Für die Wand √ √ √ √ √ √ √
Code - Codice (8 Ω) Code - Code (8 Ω) WIC125 WIR220 WIR116 WIR216 (2 x WIR116) WIR416 (4 x WIR116) SIR12M SIR12M SIR22M SIR16M
Code - Codice (70V / 100V) Code - Code (70V / 100V) SIR12V SIR12V SIR22V SIR16V
Type - Tipo Type - Typ Subwoofer (AW440 amplifier - page 75) Subwoofer (AW440 amplifier - page 75) Double-cone Double-cone Stereo / Mono 2 way
Doped paper cone, Neodymium magnet, Neodymium magnet, Glass fiber Glass fiber Glass fiber Dome Tw, rubber
Components - Componenti Composants - Komponenten
fabric suspension aluminum basket aluminum basket double-cone double-cone double-cone suspension Wf
Stereo= 50+50 / 100+100
Power RMS / Max - Potenza RMS / Max W (8 Ω) Puissance RMS / Max - Leistung RMS / Max W (8 Ω) 80 + 80 / 160 + 160 120 + 120 / 240 + 240 150 / 300 2 x (150 / 300) 4 x (150 / 300) 50 / 100 50 / 100 75 / 150
Mono= 100 / 200
Power RMS - Potenza RMS W (70V / 100V) Puissance RMS - Leistung RMS W (70V / 100V) 50,0 - 37,5 - 25,0 50,0 - 37,5 - 25,0 (50,0 - 37,5 - 25,0) x 2 50,0 - 37,5 - 25,0
Freq. resp. - Risp. in freq. (Hz) Rép. en fréq. - Frequenzgang (Hz) 34 - 200 33 - 200 33 - 200 31 - 200 29 - 200 85 - 20k 85 - 20k 85 - 20k 70 - 20k
Sensitivity - Sensibilità dB (2,83V/1m) Sensibilité - Empfindlichkeit dB (2,83V/1m) 94 90 90 93 96 88 88 88 + 88 / 94 90
Nom. impedance - Imp. nominale (Ω) Impédance nominale - Nennimpedanz (Ω) 4+4 4+4 8 8+8 8+8+8+8 8 8 8+8/4 8
Woofer Ø (cm) / Tweeter voice coil Ø (cm) Woofer Ø (cm) / Tweeter voice coil Ø (cm) 25,0 2 x 20,0 16,0 2 x 16,0 4 x 16,0 13,0 13,0 2 x 13,0 16,0 / 2,0
Dimensions HxWxD - Dimensioni AxLxP (cm) Dimensions HxLxP - Abmessungen HxBxD (cm) 28,0 x 28,0 x 12,0 44,0 x 28,0 x 7,7 18,0 x 18,0 x 9,0 2 x (18,0 x 18,0 x 9,0) 4 x (18,0 x 18,0 x 9,0) 19,0 x 19,0 x 6,3 19,0 x 19,0 x 6,3 44,0 x 19,0 x 6,3 44,0 x 19,0 x 7,8
Weight - Peso Kg (8 Ω) / (70V / 100V) Poids - Gewicht Kg (8 Ω) / (70V / 100V) 3,10 3,60 1,80 2 x 1,80 4 x 1,80 0,78 / 1,18 0,78 / 1,18 1,81 / 2,61 2,31 / 2,71
White front cover Couverture esthétique blanche
(Standard) (standard)
Cover estetica bianca Weiße Frontabdeckung
(Standard) (Standard) Marine paint Marine paint
Microperforated metal grille only Marine paint Marine paint
Code - Codice Code - Code 51AXX1 61AXX1 11BXXF 41BXXF 71BXXF 11BXMF 11BXMF 41BXMF 41BXMF
Dimensions HxWxD - Dimensioni AxLxP (cm) Dimensions HxLxP - Abmessungen HxBxD (cm) 28,0 x 28,0 x 0,3 44,0 x 28,0 x 0,3 19,0 x 19,0 x 0,8 44,0 x 19,0 x 0,8 80,0 x 19,0 x 0,8 19,0 x 19,0 x 0,8 19,0 x 19,0 x 0,8 44,0 x 19,0 x 0,8 44,0 x 19,0 x 0,8
Weight - Peso (Kg) Poids - Gewicht (Kg) 0,47 0,73 0,18 0,45 1,00 0,18 0,18 0,45 0,45
White fabric - Panno bianc White microperforated grille - Griglia microforata bianca White microperforated grille - Griglia microforata bianca
Finishes - Rifinitura Finition - Verzierungen
Tissu blanc - Weißes Tuch Micro-grille blanche - Weißes fein gelochtes Gitter Micro-grille blanche - Weißes fein gelochtes Gitter
Frame and backbox Cadre et coffrage
Telaio e casseforma Rahmen und Gehäuse
Code - Codice Code - Code CC2828 * 1 CR2845 * 2 CR1921* 2 CR1942 * 2 CR1984* 2 CC1920 * 2 CM1920 CR1944 * 3 CR1944 * 3
Dimensions HxWxD - Dimensioni AxLxP (cm) Dimensions HxLxP - Abmessungen HxBxD (cm) 34,0 x 34,0 x 1,5 50,0 x 70,0 x 12,0 80,0 x 27,0 x 12,0 80,0 x 52,0 x 12,0 80,0 x 88,0 x 12,0 25,0 x 25,0 x 8,4 25,0 x 25,0 x 7,6 50,0 x 25,0 x 10,0 50,0 x 25,0 x 10,0
Installation hole plasterboard HxW (cm) Trou de montage plaques de plâtre HxL (cm)
28,5 x 28,5 x 13,3 D1 44,5 x 28,5 x 12,0 D2 19,5 x 19,5 x 12,0 D2 44,5 x 19,5 x 12,0 D2 80,5 x 19,5 x 12,0 D2 19,5 x 19,5 x 8,4 D2 44,5 x 19,5 x 10,0 D2 44,5 x 19,5 x 10,0 D2
Foro montaggio cartongesso AxL (cm) Montagebohrung Gipskarton HxB (cm)
Installation hole wall HxW (cm) Trou de montage mur HxL (cm)
50,5 x 70,5 x 12,0 D2 80,5 x 27,5 x 12,0 D2 80,5 x 52,5 x 12,0 D2 80,5 x 88,5 x 12,0 D2 25,5 x 25,5 x 7,6 D2 50,5 x 25,5 x 10,0 D2 50,5 x 25,5 x 10,0 D2
Foro montaggio muro AxL (cm) Montagebohrung Wand HxB (cm)
Weight - Peso (Kg) Poids - Gewicht (Kg) 0,79 7,70 7,70 13,90 26,10 1,05 0,98 1,76 1,76
Steel + Wood - Acciaio + legno Stainless steel + wood - Acciaio inox + legno
Materials - Materiali Matériel - Materialien Steel + Wood - Acciaio + legno - Acier + bois - Stahl + Holz
Acier + bois - Stahl + Holz Acier inoxydable + bois - Edelstahl + Holz
*1 This backbox must be installed at least 32 cm deep in the wall, otherwise it is necessary to make a deeper hole than the one indicated in the mounting instructions.
L’installazione di questa cassaforma necessita di una profondità di inserimento di almeno 32 cm altrimenti è necessario effettuare un foro più grande rispetto a quello indicato nelle istruzioni di montaggio.
L’installation de ce coffrage nécessite une profondeur d’insertion d’au moins 32 cm. Au cas où cela ne serait pas possible, il faudra effectuer un trou plus grand que celui indiqué dans les instructions de montage.
Specifications Solutions configurator
Für die Installation dieses Gehäuses wird eine Tiefe von mindestens 32 cm benötigt, sonst muss ein größeres Loch als in den Montageanleitungen angegeben gemacht werden. Specifiche Configuratore di soluzioni
Caractéristiques Configurateur des produits
*2 This backbox must be installed into the plasterboard panel before it is attached to the structure. - Questa cassaforma va installata nella lastra di cartongesso prima che essa sia montata alla struttura.
Ce coffrage doit être installé dans la plaque de plâtre avant qu’elle ne soit fixée à la structure. - Dieses Gehäuse muss in einer Gipskartonplatte installiert werden, bevor es an die Struktur montiert wird.
Spezifikationen Konfigurator der Produkte
It is suggested to install this back box in the plasterboard panel before attaching it to the structure. - Questa cassaforma si consiglia d’installarla nella lastra di cartongesso prima che essa sia montata alla struttura..
Link: www.garvan.it/gat Link: www.garvan.it/gaa
*3 Il est conseillé d’installer ce coffrage dans la plaque de plâtre avant qu’elle ne soit fixée à la structure. - Am besten könnten Sie das Gehäuse in einer Gipskartonplatte installieren, bevor es an die Struktur montiert wird.
MADE IN ITALY
3-YEAR WARRANTY
11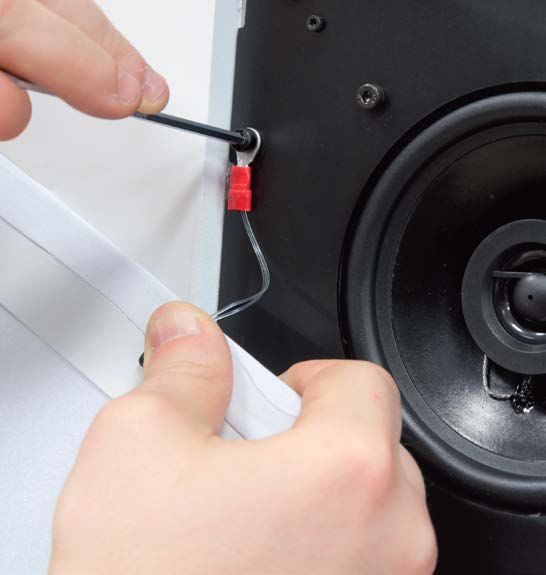
Via Vittori, 21/1-2
48018 Faenza (Ra) Italy
Tel. +39 (0546) 682097
gar van@gar vanacoustic.com

OFFICIAL 3-YEAR WARRANTY

© Copyright 2017
Garvan All Rights Reserved

Flash-mount in-wall for concrete
and plasterboard
                                              corporate video
specifications 2017/2018
                                             www.garvan.it/gav

                                                  MADE IN ITALY
w w w. g a r v a n a c o u s t i c . c o m        3-YEAR WARRANTY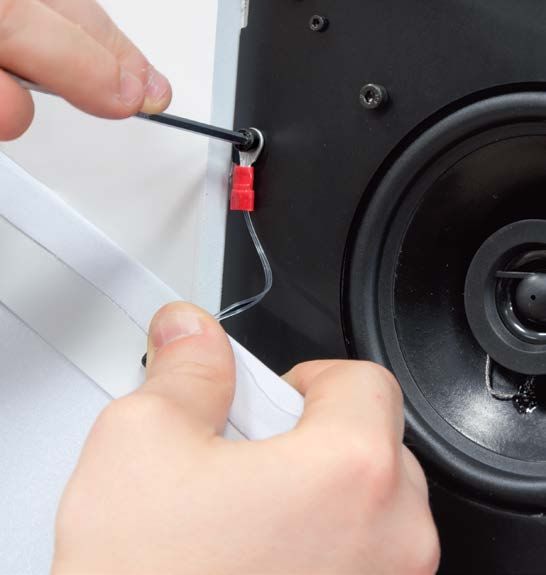
Vous pouvez aussi lire