Guide d'utilisation User guide - parsec.cloud
←
→
Transcription du contenu de la page
Si votre navigateur ne rend pas la page correctement, lisez s'il vous plaît le contenu de la page ci-dessous

Guide d’utilisation
User guide

Sommaire
Summury
Partie 1: Français (p.1à 17°                 Part 2:English (p.18 to 33)

                                               1)           PARSEC presentation
1)    Présentation PARSEC

2)    Définitions                              2)           Definitions

3)    Installation de PARSEC                   3)           PARSEC Installation

4)    Création d’une nouvelle organisation     4)           Creation of a new organization

5)    Gestion des documents                    5)           Document management

6)    Gestion des utilisateurs                 6)           Users management

7)    Connexion d’un nouvel utilisateur        7)           Connection of a new user

8)    Connexion d’un nouvel appareil           8)           Connection of a new device

9)    Fonctionnalités                          9)           Functionalities
10)   Création compte sur le site marchand     10)          Merchant account creation

11)   Comment changer d’abonnement ? 11)                    How to change offer ?
      Aide et support Help and support
Partie 1: Français
1) PARSEC, Trust the cloud
Le premier navigateur de données dans le cloud public
Contrôle exclusif des données par clés personnelles et locales
PARSEC sécurise fortement le partage des fichiers sensibles exclusivement par des
clés personnelles, autogénérées depuis le terminal de l’utilisateur ou générées par
une Infrastructure de Gestion de Clés ou PKI.

Protection des identités utilisateurs
PARSEC est l’unique solution de partage de données qui intègre des algorithmes et
protocoles de sécurité, permettant un enrôlement et une révocation simples des
utilisateurs sans aucune infrastructure lourde et coûteuse.

Résilience multi cloud
Les fichiers enregistrés dans PARSEC sont segmentés et distribués de manière
redondante sur plusieurs clouds différents, selon la politique de sécurité de l’entreprise.

Chiffrement depuis le terminal
Les données sont chiffrées par des clés symétriques. Ces clés sont signées par la clé
privée du terminal et chiffrées par la clé privée de l’utilisateur, autogénérées par le
terminal de confiance.
PARSEC est la seule solution à assurer la sécurité intégrale du partage des données
sensibles en terme de confidentialité et d'intégrité.
                                                                                              1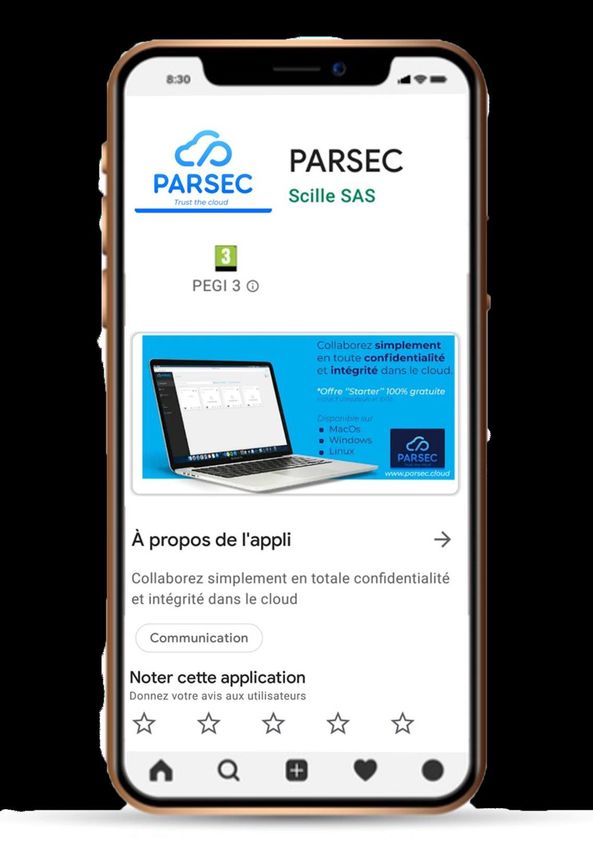
2) Définitions
Mots et Expressions

•   Organisation                                •   Espace de travail ou workspace           •   Révoquer un utilisateur

Elle représente une structure organisée         Espace dans lequel les documents             Il s’agit de la suppression d’un utilisateur de
(holding, société, agence, Business Unit,       sont enregistrés.                            l’organisation.    Cette    action      est   suivie    du
équipe,..) matérialisée par son premier                                                      rechiffrement des métadonnées pour rendre
                                                •   Lien de fichier
administrateur, il s’agit d’une entité qui                                                   impossible        un     accès        ultérieur    à     la
                                                A   chaque     fichier   enregistré   dans
désigne un ensemble d’utilisateurs.                                                          documentation.
                                                PARSEC       est attribué un lien qui
•   Administrateur                              permet de l’identifier dans le logiciel.     •   Jeton
Il s’agit de l’utilisateur qui a créé une
                                                Ce lien vous permet aussi de le retrouver    Code secret à usage unique à communiquer
organisation,et enrôlé les membres.             et                                           au moment de l’enrôlement à l’invité.
                                                l’ouvrir rapidement.
•   Utilisateur                                                                              •   URL
Personne     physique    en    capacité     à   •   Enrôler un utilisateur
                                                                                             Lien permettant de communiquer avec le
s'authentifier sur le système et à gérer        Il s’agit d’inviter une personne à           serveur de métadonnées de PARSEC lors de
des Workspace de partages.                      rejoindre une organisation.                  l'enrôlement        ou     de    la    recherche       d'un
                                                                                             document.
                                                                                                                                                           2
3) Installation de PARSEC
Installez P ARSEC sur votre terminal

Rendez-vous sur le site ww.p arsec.cloud.
Pour télécharger et installer le logiciel, cliquer sur le
bouton « Essayer gratuitement » et suivre les instructions
de la page suivante.
Le logiciel PARSEC est disponible en version
•   Windows 64bits
•   MacOS
•   Linux (code open source

                                                             3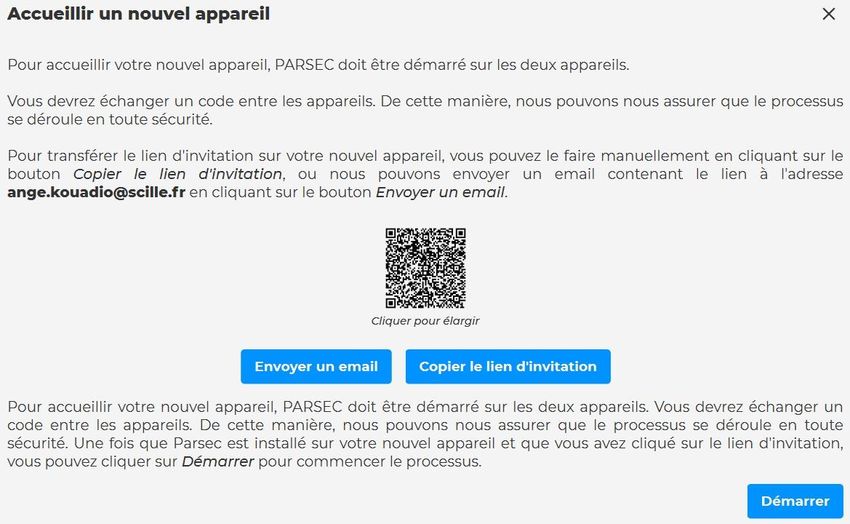
3) Installation de PARSEC
Installez P ARSEC sur Android

Rendez-vous sur Google Play Store en scannant le QR
Code ci-dessous

NB: Pour utiliser parsec
sur Android, il faut au
préalable avoir installé le
logiciel sur PC. Ensuite,
vous devez enrôler votre
smartphone dans votre
organisation (P .1), et vous
pourrez ainsi accéder à
vos fichiers.

                                Téléchargez P arsec Android
                                                              4
4) Création d’une nouvelle organisation
Créez votre organisation en 3étapes

Etape 1:Démarrez le logiciel sur le poste utilisateur, suivre la procédure
d’installation.

Etape 2:Créez votre nouvelle organisation

Cette étape se fait directement dans le logiciel Parsec.

Suivre le process de création d’organisation.

Etape 3 :Vérifiez dans votre boîte mail la réception du mail de
confirmation pour la création de votre organisation.

Si vous êtes l’administrateur de votre structure, après la création de
votre première organisation, vous pouvez immédiatement créer votre
compte entreprise à partir duquel vous pourrez gérer vos abonnements.

Référez-vous au mail de confirmation de création d’organisation ou
rendez-vous directement sur https://my.parsec.cloud .

Si vous ne souhaitez pas créer votre compte dans l’immédiat, vous
pouvez aussi profiter de l’offre gratuite de 14 jours qui s’active d’office à la   Si vous disposezd’un serveurprivé
création de votre organisation.                                                    cocher la case adéquate et entrer
                                                                                   le lien correspondant au serveur.
                                                                                   Dans le cas contraire ne pas
Au terme de ce délais , il vous faudra absolument créer un compte                  cocher.
entreprise et choisir une formule afin de continuer votre utilisation de
PARSEC .
                                                                                                                       5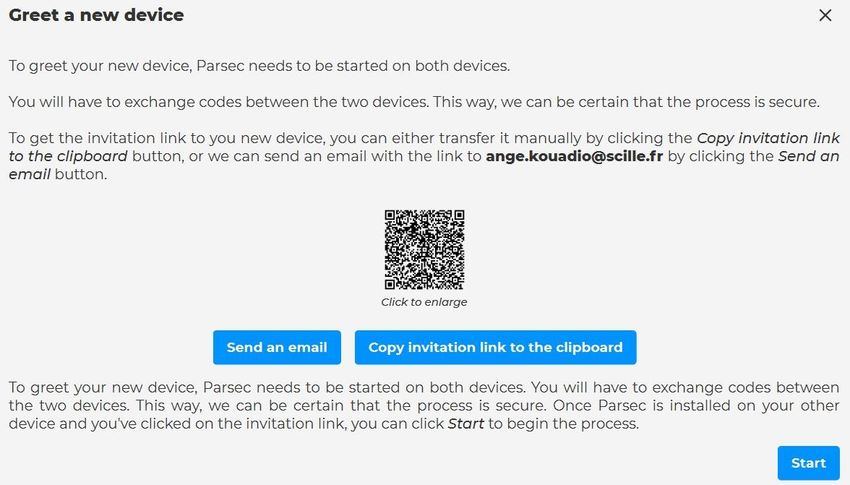
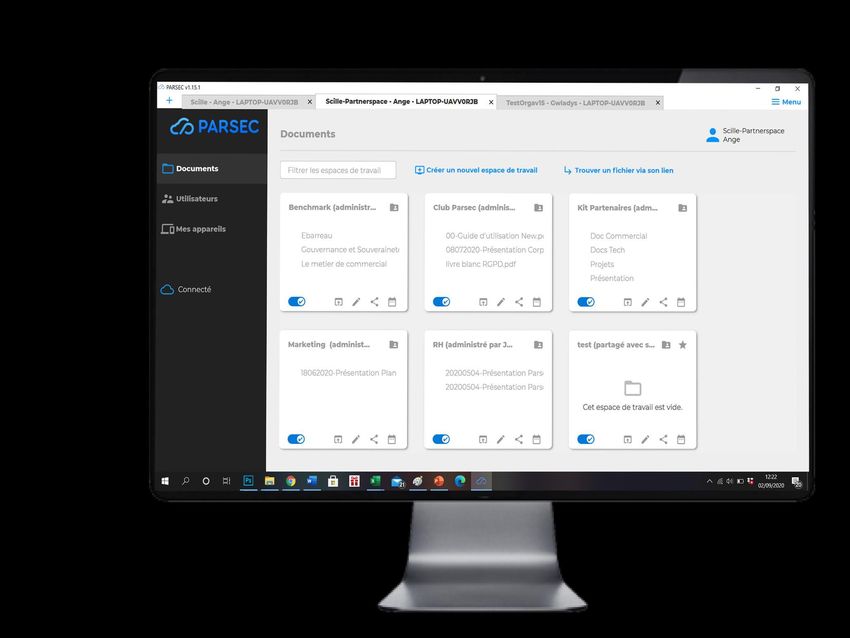
5) Gestion des documents
Créez votre workspace

Pour créer votre premier workspace,cliquez
sur l’icône :

Vous pouvez créer autant de workspaces que
vous le souhaitez.

                                             6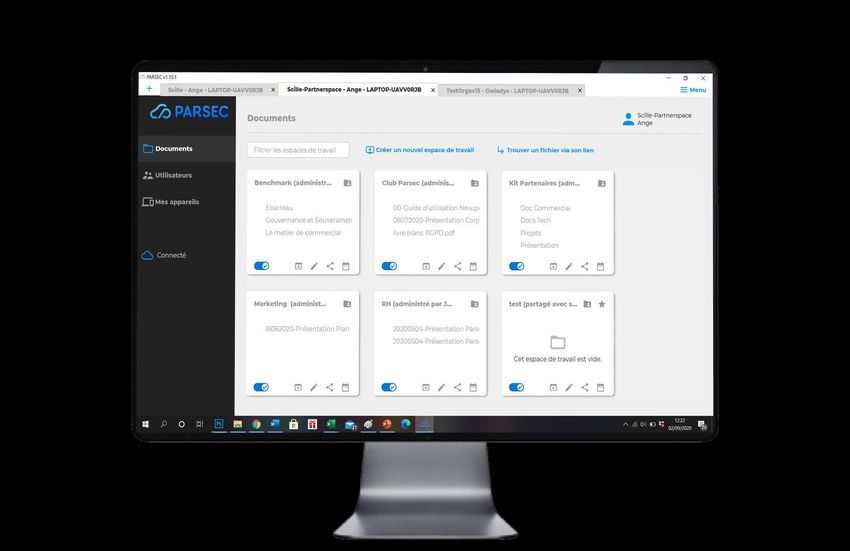
5) Gestion des documents
Importez vos fichiers dans PARSEC

•   Via le point de montage                                   •   Via l’interface logiciel
D’un simple copier-coller vous pouvez importer vos fichiers   Dans votre workspace, vous avez à disposition une série de boutons
dans PARSEC                                                   qui permettent de gérer vos fichiers

                                                                                                                                   7
5) Gestion des documents
P artagez votre espace de travail
• Partagez en un clic • Gestion des droits d’accès
Vous avez la possibilité de limiter les actions de vos collaborateurs sur la
En cliquant sur le bouton au bas de votre totalité de l’espace de travail, en leur attribuant des droits qui varient
espace de travail, vous pouvez partager son selon le titre choisi:
contenu avec les personnes de votre choix.
NB:le partage de l’espace de travail donne accès à l’intégralité des fichiers ❑ Lecteur
à l’intérieur.
Offre uniquement le
Pour partager un espace de travail avec un utilisateur il faut qu’il ait été droit de lire les
enrôlé au préalable au sein de l’organisation par un administrateur de documents dans
l’organisation.
l’espace de travail.
❑ Contributeur
Offre les droits du lecteur
auxquels s’ajoutent le
droit d’enregistrer des
documents dans l’espace
de travail.
❑ Gérant
❑ Propriétaire
Offre les droits du contributeur auxquels
Offre les droits du gérant auxquels
s’ajoutent le droit d’inviter des utilisateurs
s’ajoutent la possibilité de rechiffrer
à partager l’espace de travail. Le gérant
l’espace de travail. Un espace de
peut également annuler le partage avec
travail peut avoir plusieurs
les utilisateurs dont les droits sont
propriétaires.
inférieurs au sien 86) Gestion des utilisateurs
Invitez un utilisateur au sein d’une organisation
Haut de page, cliquez sur le
bouton ‘Inviterun
utilisateur’
Dans la barre de menu à
gauche, onglet utilisateur 2
1
Seul un administrateur peut
inviter un autre utilisateur
au sein d’une organisation
3
96) Gestion des utilisateurs
Invitez un nouvel utilisateur au sein d’une organisation
Une fois l’adresse mail de
l’invité entrée,celui-ci reçoit L’administrateur doit
un email d’activation de confirmer l’invitation en
l’enrôlement. cliquant ici
En suivant les instructions des différentes étapes, l’administrateur et l’invité sont amenés à échanger, par un moyen sécurisé, les informations
d’enrôlement tels que les codes sécurisés et les identifiants.
107) Connexion d’un nouvel utilisateur
Rejoignez une organisation dans Si cela n’estpas encore fait, il doit télécharger
P ARSEC et installer P ARSEC.Au démarrage du logiciel,
il doit cliquer sur rejoindre une nouvelle
Le nouvel utilisateur reçoit un mail organisation, etinsérer l’url d’invitation qui se
d’activation de la phase d’enrôlement. trouve dans le mail d’activation.
Si PARSEC estau préalable installé sur le poste
utilisateur,il peut directement lancer la phase
d’enrôlement en cliquant ici.
En suivant les instructions des différentes étapes, l’administrateur et l’invité sont amenés à échanger, par un moyen sécurisé, les informations d’enrôlement
tels que les codes sécuriséset les identifiants.
118) Connexion d’un nouvel appareil
Multi-devices
Vouas avez la possibilité d’enregistrer plusieurs terminaux à partir desquels vous pourrez accéder à vos données dans PARSEC. Il est très
recommandé d’enregistrer au minimum un second terminal de connexion en cas de perte ou d’inaccessibilité d’un appareil.
Suivez les instructions pour l’enregistrement d’un nouvel appareil. 129) Fonctionnalités
Traçabilité et Historisation
Ces fonctionnalités vous permettent de retrouver les précédentes versions d’un espace
de travail et de tout son contenu à une date donnée.
139) Fonctionnalités
Autres fonctionnalités
Annulation du partage d’un espace de travail Révocation d’un utilisateur de l’organisation
Seul un administrateur a la possibilité de révoquer un
utilisateur d’une organisation.
Il suffit simplement de faire un clic droit sur le nom de
l’utilisateur à révoquer.
NB: Après la révocation d’un utilisateur ou l’annulation du partage d’un
espace de travail, vous êtes invité en tant qu’administrateur de
l’organisation ou propriétaire de l’espace de travail, à procéder au
rechiffrement des espaces de travail afin de maintenir la sécurité des
données et l’inaccessibilité par l’utilisateur révoqué.
Cliquer surl’icône
pour rechiffrervotre
espace de travail
149) Fonctionnalités
Autres fonctionnalités
Ejecter Renommer
Permet de ne plus affichercet espace Permet de renommer cet espace
de travail dans le navigateurde votre de travail.
ordinateur.Vous pouvez ainsi mieux La modification n’est priseen
organiserla liste de vos espacesdans le compte que sur votre poste de
navigateuret gagner du temps. travail;les autres utilisateursne
Cette action n’est active que sur votre seront pas impactés.
poste,elle n’impacterapas les autres
utilisateursavec lesquels vous partagez
cet espace.
Naviguer Partager
Permet d’accéder directementà cet
espace de travail depuis le navigateur Permet de partager un espacede
de votre poste de travail travail avec d’autres utilisateurs
1510) Créer un compte sur le site marchand
Ce compte vous permettra d'avoir une visibilité globale sur vos organisations pour un suivi détaillé de
votre consommation et une gestion centralisée de vos factures.
Lorsque vous créez votre organisation, vous recevez un mail contenant un lien activation de votre compte sur
le site marchand.Ce lien a une durée limitée pour des raisons de sécurité.
Si votre lien a expiré, rendez-vous sur le site internet www.parsec.cloud cliquez sur le bouton
qui renvoi au site marchand My.Parsec.Cloud .
Cliquez ensuite sur ce bouton
Et suivez les instructions
1611) Comment changer d’abonnement ?
Le passage de l’abonnement gratuit « Starter » à l’abonnement payant « Business » se fait de façon
automatique si toute fois vous avez au préalable créé votre compte marchand et inséré un numéro de
carte bancaire.
Dans ce cas, il vous suffit de dépasser la limite gratuite de 3 utilisateurs inclus dans toutes les offres et
vous serez automatiquement facturé à partir du 4ème utilisateur ajouté dans votre organisation, pour
un montant de 5€ HT /user/mois .
Il en est de même pour le volume de stockage, il vous suffit de dépasser la limite de 10 Go offert et
vous serez automatiquement facturé par tranche de 100 Go à 5€ HT.
Vous recevrez un email de signalement pour changement d’offre et la facturation de façon mensuelle.
NB: Il est impératif d’avoir un compte marchand pour pouvoir changer d’abonnement, si vous ne
l’avez pas encore fait, veuillez suivre les instructions de la page 16 pour la création d’un compte
marchand.
17Part 2 : English
1)PARSEC, Trust the cloud
The first data browser in the public cloud

Exclusive control of data by personal and local keys

PARSEC strongly secures the sharing of sensitive files exclusively by personal keys, auto-
generated from the user’s terminal or generated by a Key Management Infrastructure or
PKI.

Protection of user identities

PARSEC is the unique data sharing solution that integrates security algorithms and
protocols, allowing simple enrollment and revocation of users without any heavy and
costly insfrastructure.

Resilience multi cloud

The files saved in PARSEC are segmented and distributed redundantly on several
different clouds, depending on the company’s security policy.

Encryption from the terminal

Data are encrypted by symmetrical keys. These keys are signed by the teminal’s private
key and encrypted by the user’s private key, auto-generated by the trusted terminal.

PARSEC is the only solution to ensure the complete security of your data and
its sharing,both in terms of confidentiality and integrity.

                                                                                             18
2) Definitions
Words and Expressions
• Organization • Workspace • Revoke a user
It represents an organized structure Space in which documents are saved. It is the removal of a user from the organization.
(holding, company, agency, Business Unit, This action is followed by the metadata re-
• File link
team,..) materialized by its first encryption to make impossible a later access to
administrator, it refers to an entity that Each file saved in PARSEC is assigned a link the documentation.
designates a group of users. that allows it to be identified in the
• Token
software.
• Administrator
Single-use secret code to be communicated at the
This link also allows you to find it and open
It refers to the user who created an time of enrollment to the guest.
it quickly.
organization, and enrolled members.
• URL
• Enroll a user
• User
Link to communicate with the PARSEC
It consists of inviting a person to join an
An individual with the ability to metadata server when enrolling or searching for a
organization.
authenticate to the system and manage document.
workspace shares.
193) PARSEC Installation
Install P ARSEC on your terminal
Visit the website ww.p arsec.cloud.
To download and install the software, click on the "Try for
free" button and follow the instructions on the next page.
PARSEC software is available for
• Windows 64bits
• MacOs
• Linux
203) PARSEC installation
Install P ARSEC on Android
Go to Google P lay by scanning this QR code
NB: To use parsec on
Android, you must first
have installed the
software on a PC. Next,
you need to enroll your
smartphone in your
organization (P .1),
then you will be ablean
to
d
access your files.
Download P arsec
Android 214) Creation of a new organization
Create your organization in 3 steps
Step 1: Start the software on the user workstation, follow the installation
procedure.
Step 2:Create your new organization
This step is done directly in the Parsec software.
Follow the organization creation process.
Step 3 :Check in your mail box the reception of the confirmation email
for the creation of your organization.
If you are the administrator of your structure, after the creation of your
first organization, you can immediately create your company account
from which you will be able to manage your subscriptions..
Refer to the organization creation confirmation email or go directly to
https://my.parsec.cloud.
If you don't want to create your account right away, you can also take
advantage of the 14-day free offer that is automatically activated when
you create your organization. If you have a private servercheck
the appropriate box and enterthe
At the end of this period, you will need to create a company account and corresponding link to the server.
Otherwise do not check.
choose a formula to continue your PARSEC utilisation.
225) Document management
Create your workspace
To create your first workspace,click on the
icon :
You can create as many workspaces as you
want.
235) Document management
Import your files into PARSEC
• Via the mounting point • Via the software interface
With a simple copy and paste you can import your files into In your workspace, you have at your disposal a series of buttons that
PARSEC. allow you to manage your files
245) Document management
Share your workspace
• Share in one click • Management of access rights
You have the possibility to limit the actions of your collaborators on the
By clicking on the button at the bottom of your entire workspace, by assigning them rights that vary according to the
workspace,you can share its content with the chosen title:
people of your choice.
NB:sharing the workspace givesaccess to all the files inside. ❑ Reader
To share a workspace with a user, the user must have been previously
Offers only the right to
enrolled in the organization by an administrator of the organization. read documents in
the workspace.
❑ Contributor
Offers the reader's rights
plus the right to save
documents in the
workspace.
❑ Manager
❑ Owners
Offers the rights of the contributorplus the
Offers the rights of the manager
right to invite users to share the workspace.
plus the possibility to re-crypt the
The manager can also cancel sharing with
workspace.A workspace can have
users whose rights are lower than his own.
several owners.
256) Users management
Invite a user to an organization
At the top of the page, click
on the 'Invite a user' button.
In the menu bar on the left,
user tab 2
1
Only an administratorcan
invite another user within
an organization.
3
266) Users management
Invite a user to an organization
The administrator must
Once the guest'semail confirm the invitation by
address is registered,the clicking here
guest will receive an email
to activate the enrollment.
By following the instructions of the different steps, the administrator and the guest are led to exchange, by a secure way, the enrollment
information such as secure codes and login credentials.
277) Connexion of a new user
Join an organization in P ARSEC Iftheyhaven’talready done so,theyneed to
download and install P ARSEC.When
starting the software, he should click on
The new user receives an activation email for join a new organization, and insert the
the enrollment phase. invitation url found in the activation email.
IfP ARSEC has already been installed on the
user workstation, it can directly start the
enrolment phase by clicking here.
By following the instructions of the different steps, the administrator and the guest are led to exchange, by a secure way, the enrollment
information such as secure codes and login credentials.
288) Connexion of a new device
Multi-devices
You can register several terminals from which you can access your data in PARSEC. It is highly recommended to register at
least a second connection terminal in case a device is lost or inaccessible.
❖ Follow the instructions for registering a new device.
299) Functionalities
Traceability and Historization
These functionalities allow you to recover previous versions of a workspace and all its
contents at a given date.
309) Functionalities
Other functionalities
Cancellation of workspace sharing Revocation of a user from the organization
Only an administrator has the ability to revoke a user from
an organization.
Simply right-click on the name of the user to be revoked.
Users
Invite a user
NB: After the revocation of a user or the cancellation of the sharing of a workspace,
you are invited as administrator of the organization or owner of the workspace,to
proceed to the re-encryptionof the workspace in order to maintain data security
and inaccessibilitybythe revoked user.
(you) Revoke
Clickon the icon to re-
encrypt your Administrator Administrator
workspace
319) Functionalities
Other functionalities
Eject Rename
Allows you to stop displaying this Allows you to rename
workspace in your computer's this workspace.
browser. You can therefore better The modification is only taken
organize the list of your spacesin the into account on your
browser and save time. workstation; otherusers will not
This action is only active on your be impacted.
workstation, it will not impact other
users with whom you share this
space.
Browse Share
Allows direct access to this Allows you to share a
workspace from your workstation's workspace with other
browser users
3210) Créer un compte sur le site marchand
This account will allow you to have a global visibility on your organizations for a detailed follow-up of your
consumption and a centralized management of your invoices.
When you create your organization, you will receive an email containing a link to activate your account on the
merchant site. This link has a limited duration for security reasons.
Ifyour link has expired, go to the website www.parsec.cloud click on the button
which refers to the merchant site M y.Parsec.Cloud.
Then click on this button
And follow the instructions
3311) How to change subscription ?
The transition from the free "Starter" subscription to the paid "Business" subscription is
done automatically if you have previously created your merchant account and inserted a
credit card number.
In this case, you just have to exceed the free limit of 3 users included in all the offers and
you will be automatically invoiced from the 4th user added in your organization, for an
amount of 5€ HT /user/month.
It is the same for the storage volume, you just have to exceed the limit of 10 GB offered
and you will be automatically billed in increments of 100 GB at €5 excluding tax. You will
receive a notification email for change of offer and billing on a monthly basis.
NB: It is imperative to have a merchant account to be able to change subscription, if you
have not done so, please follow the instructions on page 16 for the creation of a merchant
account.
33Aide et Assistance
Help and support
Mail : parsec@scille.fr
Tel : +33 06 98 43 08 62
34Une interface ergonomique et intuitive
An intuitive and ergonomic interfaceVous pouvez aussi lire