Klick & Show Quick Start Guide
←
→
Transcription du contenu de la page
Si votre navigateur ne rend pas la page correctement, lisez s'il vous plaît le contenu de la page ci-dessous

Klick & Show
K-10S Kit
Art.-Nr. 7488 000 300

Quick Start Guide

 D    Schnellstartanleitung                       NL   Quick Start handleiding
 GB   Quick Start Guide                           ES   Guía de inicio rápido
 F    Guide de démarrage rapide                   TR   Hızlı Kurulum Rehberi
 I    Guida Rapida

                                  www.klickandshow.com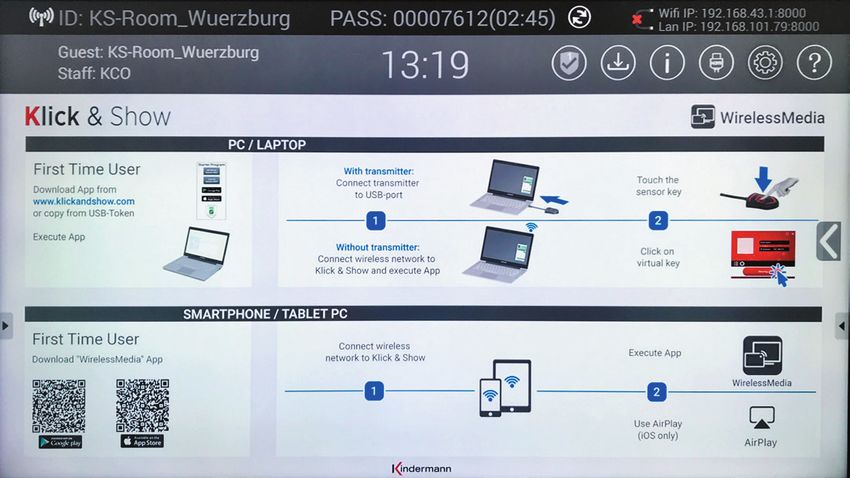
2
D     Inhaltsverzeichnis                        GB       Table of contents
     F     Table des matières                         I       Indice            NL      Inhoudsopgaaf
     ES    Índice       TR    Içindekiler

1.        D   Bestimmungsgemäße Verwendung                                    GB Intended use
          F   Utilisation conforme                    I       Utilizzo         NL Voorgenomen gebruik
          ES Uso previsto         TR Kurulum amaci ................................................................................................................................ 4

2.        D   Lieferumfang           GB Package contents
          F   Étendue de livraison                    I       Contenuto della confezione                          NL Inhoud
          ES Suministro        TR Kutu içeriği .................................................................................................................................... 5 - 6

3.        D   Sicherheitshinweise                   GB Safety instructions
          F   Consignes de sécurité                       I    Norme di sicurezza                     NL Veiligheidsinstructies
          ES Instrucciones de seguridad                         TR Güvenlik talimatları ...................................................................................... 7 - 8

4.        D   Installation      GB Installation
          F   Installation       I            Installazione              NL Installatie
          ES Instalación       TR Kurulum ......................................................................................................................................... 9 - 12

5.        D   Informationen              GB Information
          F   Information            I        Informazioni                NL Informatie
          ES Información         TR Bilgi ..................................................................................................................................................... 12

6.        D   Setup      GB Setup
          F   Configuration               I        Impostazione                NL Systeeminstellingen
          ES Configuración del sistema                         TR Sistem Kurulumu ................................................................................................. 13

7.        D   Startbildschirm                 GB Home screen
          F   Écran d´accueil                  I    Schermata iniziale                    NL Beginscherm
          ES Pantalla de inicio                TR Ana ekran ....................................................................................................................... 13 - 20

8.        D   CE Erklärung           GB CE certificate
          F   CE certificat          I         CE certificato               NL CE certificaat
          ES CE certificado              TR CE sertifika .................................................................................................................................. 21

9.        D   Frequenzband               GB Frequency band
          F   Bande de fréquence                      I       Banda di frequenza                    NL Frequentieband
          ES Banda de frecuencia                     TR Frekans bandı ................................................................................................................. 22

                                                                                                                                                                                                 3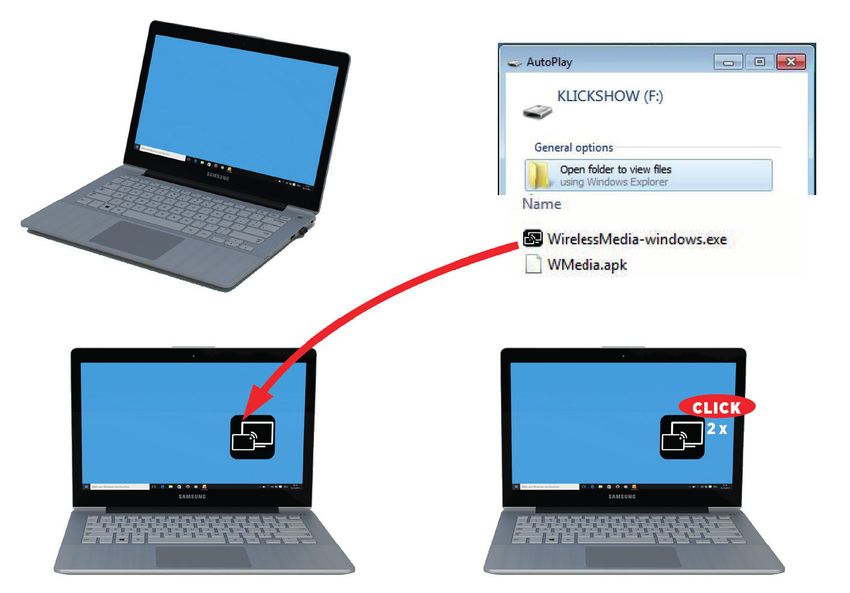
1.       D    Bestimmungsgemäße Verwendung                  GB   Intended use
         F    Utilisation conforme       I   Utilizzo     NL   Voorgenomen gebruik
         ES   Uso previsto      TR   Kurulum amaci

    D    Bestimmungsgemäße Verwendung
Klick & Show ist ein Drahtlos-Präsentationssystem zur Verarbeitung audiovisueller Inhalte verschiedenster
Plattform-Geräte (Windows/Mac/iOS/Android) ausschließlich für den Einsatz in geschlossenen Räumen.

 GB Intended use
Klick & Show is a wireless presentation system for processing audio-visual content from different platforms
(Windows/Mac/iOS/Android) for use in closed rooms only.

    F    Utilisation conforme
Klick & Show est un système de présentation sans fil pour le traitement de contenus audio-visuels d’appareils
de plateforme les plus diversifiés (Windows/Mac/iOS/Android) et est uniquement conçu pour l’emploi dans
des pièces fermées.

     I   Utilizzo
Klick & Show è un sistema di presentazione wireless per elaborare contenuti audio-video da piattaforme
differenti (Windows/Mac/iOS/Android) da utilizzare solamente in spazi chiusi.

 NL Voorgenomen gebruik
De Klick & Show K-10S is een draadloos presentatie systeem voor het verwerken van audiovisuele content
van verschillende platformen (Windows/Mac/iOS/Android), bestemd voor binnenshuis gebruik.

 ES Uso previsto
Klick & Show es un sistema de presentación inalámbrico para el procesamiento de contenidos audiovisuales
de varias plataformas (Windows/Mac/iOS/Android) y está diseñado exclusivamente para su uso en
espacios cerrados.

 TR Kurulum amaci
Klick & Show, sadece kapalı ortamlarda kullanılmak üzere farklı platformlardan (Windows/Mac/iOS/Android)
görsel-işitsel içeriği işleyen bir kablosuz sunum sistemidirs.

4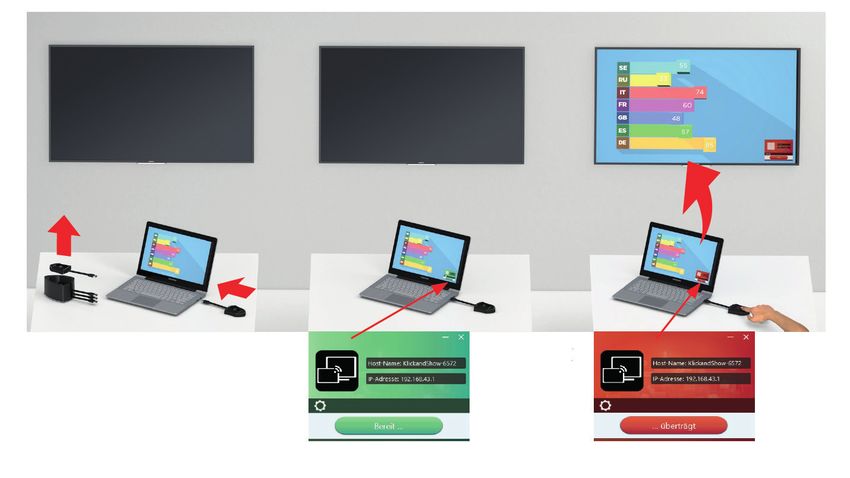
2.    D   Lieferumfang          GB   Package contents
      F   Étendue de livraison           I    Contenuto della confezione           NL   Inhoud
      ES Suministro        TR Kutu içeriği

 D    Lieferumfang                                           GB Package contents

 1   1 x Kindermann Klick & Show Basis-Gerät                 1       1 x Kindermann Klick & Show Base-unit
2 2 x Antennen                                               2 2 x Antenna
3 2 x Mobile Sensor-Taster Klick & Show TOUCH                3 2 x Wireless Klick & Show Sensor-buttons TOUCH
  (*nur 7488000300)                                            (*only 7488000300)
4 2 x USB-Token mit Windows-, MAC-Treiber,                   4 2 x USB-token with Windows-, MAC-driver,
  Benutzerhandbuch (PDF)                                       User manual (PDF)
5 2 x Verschlussklappen, verschraubbar, für                  5 2 x Closing flaps with screws, for USB-token
  USB-Token im TOUCH Transmitter                               in Sensor-button TOUCH
6 1 x Universal-Netzteil für Netzspannung                    6 1 x Universal power-supply 100 – 240 VAC,
  100 – 240 VAC 12 VDC/2A, mit verschiedenen                   12 VDC/2A, with different regional adapters
  regionalen Adapter-Aufsätzen                               7 1 x Set of mounting brackets for on-wall installation
7 1 x Befestigungssatz für Wand-Montage                      8 1 x Quick Start Guide
8 1 x Schnellstartanleitung

                                                                 I    Contenuto della confezione
 F    Étendue de livraison
                                                             1       1 x Unità Base Kindermann Klick & Show
 1   1 x Appareil de base Klick & Show de Kindermann         2 2 x Antenne
2 2 x Antennes                                               3 2 xTrasmettitori Wireless Klick & Show TOUCH
3 2 x Boutons de capteur mobiles Klick & Show TOUCH            (*solo 7488000300)
  (*seulment 7488 000300)                                    4 2 x token USB con Windows, driver MAC,
4 2 x clé USB avec Windwos, pilote MAC, manuel                 manuale utente (PDF)
  d‘utilisation (PDF)                                        5 2 alette di chiusura con viti, per gettone USB
5 2 x clapets de fermeture avec vis, pour clé USB              nel pulsante sensore TOUCH
  dans le bouton-poussoir Capteur TOUCH                      6 1 x Alimentatore Universale 100 – 200 VAC,
6 1 x Alimentation électrique universelle pour tension         12 VDC/2A con adattatori per regioni differenti
  de réseau 100 – 240 VAC, 12 VDC/2A, avec différents        7 1 x Set di supporti per installazione a muro
  embouts adaptateurs régionaux
                                                             8 1 x Guida Rapida
7 1 x Jeu de fixation pour le montage au mur
8 1 x Guide de démarrage rapide
                                                             ES Suministro

 NL Inhoud                                                   1       1 x Dispositivo básico Klick & Show de Kindermann
                                                             2 2 x Antenas
 1   1 x Kindermann Klick & Show basis unit
                                                             3 2 x Botones sensor móvil Klick & Show TOUCH
2 2 x Antennes                                                 (*solo 7488000300)
3 2 x Draadloze Klick & Show Sensor-buttons TOUCH            4 2 x token USB con Windows, controlador MAC,
  (*alleen 7488 000300)                                        manual del usuario (PDF)
4 2 x USB-token met Windows-, MAC-stuurprogramma,            5 2 x tapas, atornilladas, para tokens USB
  gebruikershandleidig (PDF)                                   en transmisor TOUCH
5 2 x covers, geschroefd, voor USB-tokens in                 6 1 x Fuente de alimentación universal para tensión
  TOUCH-zender                                                 de red 100 – 240 VAC, 12 VDC/2A, con diferentes
6 1 x Universele voeding 100 – 240 VAC, 12 VDC/2A,             accesorios de adaptador regional
  incl. verschillende regionale adapters                     7 1 x Kit de montaje para el montaje en pared
7 1 x Muurbevestiging                                        8 1 x Guía de inicio rápido
8 1 x Quick Start handleiding
                                                                                                                 5
TR Kutu içeriği

1   1 x Kindermann Klick & Show Ünitesi
2 2 x Anten
3 2 x Kablosuz TOUCH Sensör düğmesi (*sadece 7488000300)
4 2 x Windows, MAC sürücüsü olan USB token, Kullanim kilavuzu (PDF)
5 Vidali, 2 x kapak, TOUCH Vericideki USB belirteçleri için
6 1 x Üniversal 100 – 240 VAC, 12 VDC/2A güç kaynağı, farklı bölgesel adaptörler ile beraber
7 1 x adet Duvar kurulumu için aparat seti
8 1 x Hızlı kurulum rehberi

                                                                                                             4

                                                                                                                 5
           1                                                                                   2   3 *

                                                       6                                                 7

     8
               Klick & Show
               K-10S Kit
               Art.-Nr. 7488000300

               K-10L Lite
               Art.-Nr. 7488000305

               Quick Start Guide

                D   Schnellstartanleitung                       NL   Quick Start handleiding
               GB   Quick Start Guide                           ES   Guía de inicio rápido
                F   Guide de démarrage rapide                   TR   Hızlı Kurulum Rehberi
                I   Guida Rapida

                                                www.klickandshow.com

6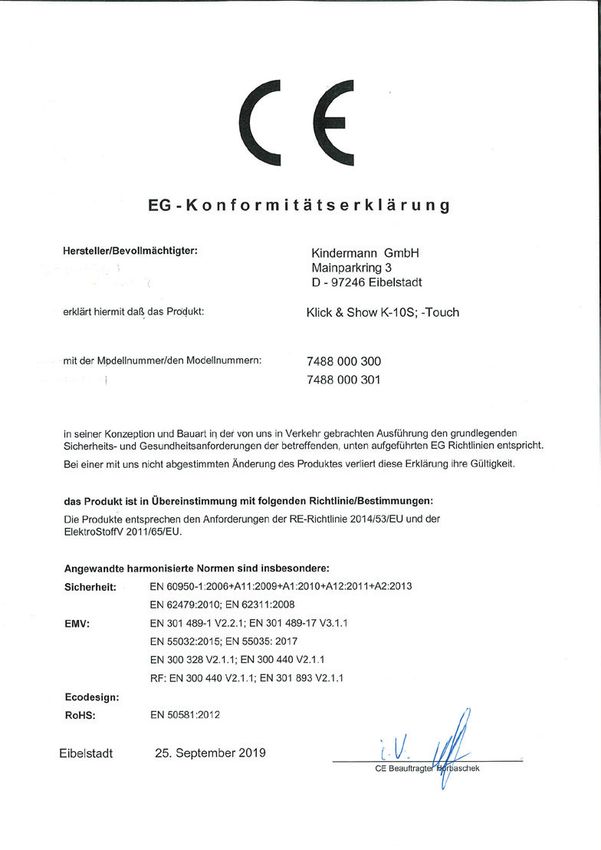
3. !         D    Sicherheitshinweise            GB     Safety instructions
              F   Consignes de sécurité             I   Norme di sicurezza           NL   Veiligheidsinstructies
             ES Instrucciones de seguridad              TR Güvenlik talimatları

    D      ! Sicherheitshinweise
•        Bitte die Anleitung sorgfältig durchlesen und aufbewahren
•        Das Kindermann Klick & Show Basis-Gerät darf nur mit Sicherheitskleinspannung über das
         zugehörige Netzteil betrieben werden
•        Das Gerät darf nur in trockenen, geschlossenen Räumen gelagert und eingesetzt werden,
         ohne mechanische Belastungen
•        Stellen Sie das Gerät an einem Ort mit ausreichender Belüftung auf
•        Zum Reinigen keine Flüssigkeiten oder Verdünner verwenden (Stromversorgung vorher entfernen!)
•        Entfernen Sie die Stromversorgung bei längerem Nichtgebrauch
•        Die Verwendung nicht geeigneter Zubehörteile kann zur Beschädigung oder Fehlfunktion führen

    GB     ! Safety instructions
•        Please read the instructions carefully and store them
•        The Kindermann Klick & Show base unit can only be operated with a safety low voltage via the
         associated power supply unit
•        The device must only be stored and used in a dry, closed environment without mechanical stress
•        Install the unit in a place with adequate ventilation
•        Do not use any liquids or thinners for cleaning (remove the power supply beforehand!)
•        Remove the power supply for long periods of non-use
•        The use of unsuitable accessories may result in damage or malfunction
•        Please observe the safety instructions of the devices to be connected

    F      ! Consignes de sécurité
•        Prière de lire et de conserver soigneusement le manuel
•        L’appareil de base Klick & Show de Kindermann peut uniquement être exploité avec une tension basse
         de sécurité, à l’aide de l’alimentation électrique correspondante
•        L’appareil peut uniquement être stocké et employé dans des pièces sèches et fermées, sans contraintes
         mécaniques
•        Installer l’appareil dans un lieu, disposant d’une ventilation suffisante
•        Pour le nettoyage, ne pas utiliser de liquides ou de diluants (Auparavant, retirer l’alimentation en courant!)
•        Lors d’un non-usage prolongé, retirer l’alimentation en courant
•        L’utilisation d’accessoires non appropriés peut provoquer des dommages ou des dysfonctionnements

    I      ! Norme di sicurezza
•        Si prega di leggere con attenzione le istruzioni e di conservarle
•        Kindermann Klick & Show può essere alimentato in sicurezza solamente dall’alimentatore a basso voltaggio
         incluso nella confezione
•        Il dispositivo deve essere conservato ed usato solamente in ambienti interni asciutti e in assenza di
         possibili stress meccanici
•        Installare l’unità solamente in luoghi che permettano un’adeguata ventilazione
•        Non usare prodotti liquidi odiluenti per la pulizia (per la pulizia, rimuovere prima l’alimentazione!)
•        Rimuovere l’alimentazione in caso di prolungati periodi di inutilizzo
•        L’uso di accessori non originali potrebbe causare danni e malfunzionamenti

                                                                                                                          7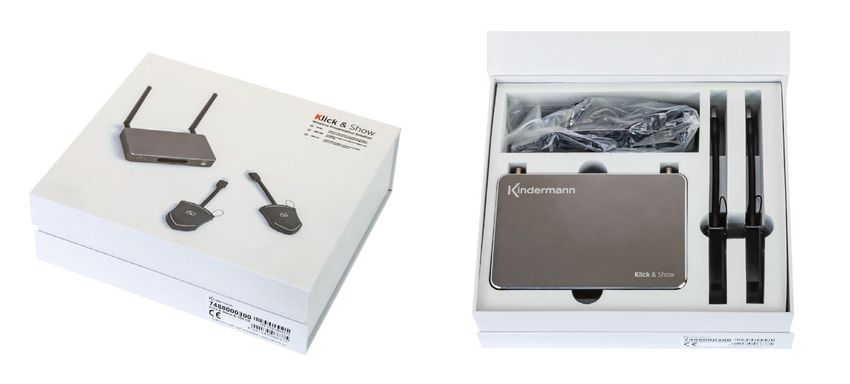
NL     ! Veiligheidsinstructies
•        Lees de instructies voor gebruik nauwkeurig door en bewaar deze
•        De Kindermann Klick & Show mag alleen worden gebruikt met de meegeleverde universele voeding
•        De Kindermann Klick & Show mag alleen gebruikt en bewaard worden in een droge afgesloten ruimtezonder
         mechanische spanning
•        Installeer het apparaat alleen in een voldoende geventileerde omgeving
•        Gebruik geen vloeistoffen of thinner om het apparaat te reinigen (koppel de voeding los voor het reinigen)
•        Koppel de voeding los als het apparaat voor een langere periode niet gebruikt zal worden
•        Het gebruik van niet geschikte accessoires kan resulteren in schade of slecht functioneren

    ES     ! Instrucciones de seguridad
•        Lea las instrucciones cuidadosamente y consérvelas
•        El dispositivo básico Klick & Show de Kindermann solo se puede utilizar con una tensión de seguridad
         muy baja a través de la correspondiente unidad de alimentación
•        El dispositivo solo se puede almacenar y usar en espacios secos y cerrados sin tensión mecánica
•        Instale el dispositivo en un lugar con ventilación adecuada
•        No use líquidos o diluyentes para la limpieza (¡separe antes la fuente de alimentación!)
•        Retire la fuente de alimentación cuando no lo utilice durante mucho tiempo
•        El uso de accesorios inadecuados puede provocar daños o un mal funcionamiento

    TR     ! Güvenlik talimatları
•        Lütfen talimatları dikkatlice okuyun ve saklayın
•        Kindermann Klick & Show sadece ilgili güç kaynağı ünitesi üzerinden emniyetli düşük voltajla çalıştırılabilir
•        Cihaz sadece kuru ve kapalı bir ortamda saklanmalı ve kullanılmalıdır
•        Üniteyi yeterli havalandırmaya sahip bir yere kurun
•        Temizlik için herhangi bir sıvı veya tiner kullanmayın (güç kaynağını öncesinde çıkarın!)
•        Uzun süre kullanılmayacaksa güç kaynağından çıkarmış olduğunuza emin olun
•        Uygun olmayan aksesuarların kullanılması hasara veya arızaya neden olabilir

8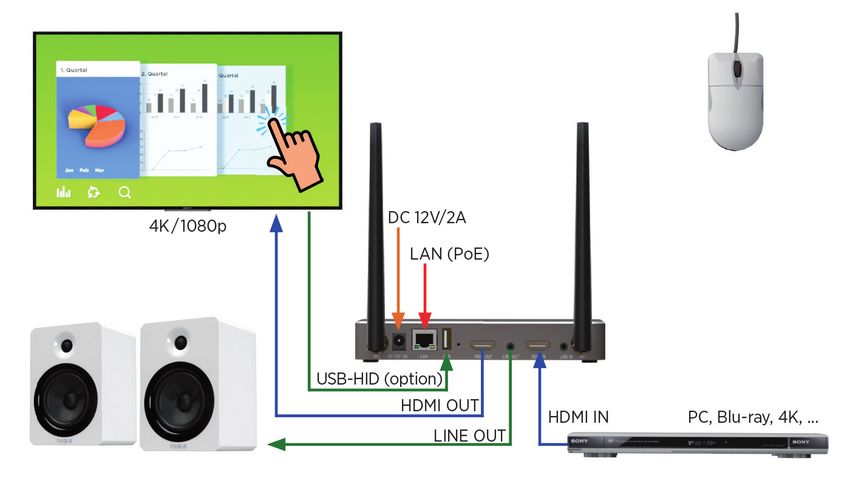
4.      D       Installation       GB    Installation
        F       Installation       I     Installazione      NL   Installatie
        ES Instalación         TR Kurulum

4.1.1       D    Verkabelung            GB    Connections
            F    Câblage       I       Cablaggio    NL     Bekabeling
         ES      Cableado      TR       Kablolama

                                                                               USB (option)

4.1.2       D     Kopplung         GB     Pairing
            F     Jumelage         I    Pairing     NL   Pairing
            ES    Acoplamiento           TR   Eşleştirme


                                                                                              9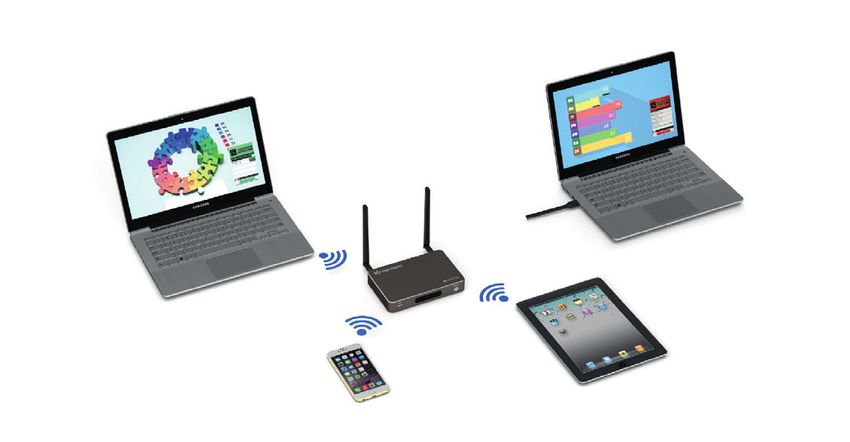
4.2 D Erste Schritte GB Getting Started
F Premières étapes I Inizializzazione NL Eerste stappen
ES Primeros pasos TR Başlamak
1 2
3 4
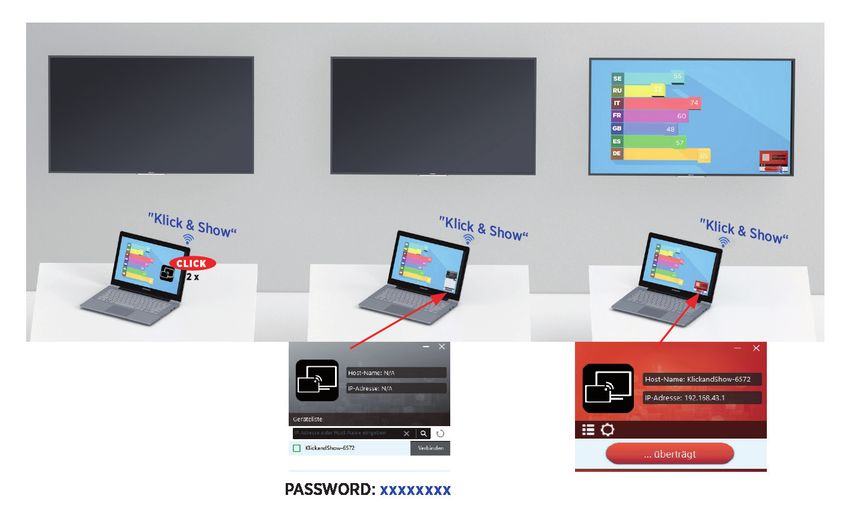
4.3.1 D Präsentation mit Transmitter GB Presentation with transmitter
F Présentation avec émetteur I Presentazione con trasmettitore
NL Presentatie met zender ES Presentación con transmisor TR Verici ile sunum
1 2
104.3.2 D Präsentation ohne Transmitter GB Presentation without transmitter
F Présentation sans émetteur I Presentazione senza trasmettitore
NL Presentatie zonder zender ES Presentación sin transmisor TR Vericisiz sunum
1 2
4.4.1 D AirPlay GB AirPlay
F AirPlay I AirPlay NL AirPlay
ES AirPlay TR AirPlay
1 3
2
114.4.2 D App GB App
F Application I App NL App
ES App TR Uygulaması
iOS 1 Android 2
3 4
WirelessMedia
SSID: „Klick & Show“
PASS: xxxxxxxx
. Informationen 2. Information
5. D4. Informazioni
. Information Informationen5. Informatie
GB Information
. Información F7. Bilgi
Information I Informazioni NL Informatie
ES Información TR Bilgi
https://www.klickandshow.com
?
Password = admin
Default
126. D Setup GB Setup
F Configuration I Impostazione NL Systeeminstellingen
ES Confi guración del sistema TR Sistem Kurulumu
7. D Startbildschirm GB Home screen
F Écran d´accueil I Schermata iniziale NL Beginscherm
ES Pantalla de inicio TR Ana ekran
D Verbinden Sie ein Eingabegerät (Maus, Touch, ...) mit einem der USB Anschhlüsse, um im Startbildschrim
zu navigieren.
GB Connect an input device (mouse, touch, ...) to either USB port to navigate in the menu.
1 2 3 4 5 6 7
8 9
10 11 12 13 14 15
16
17 20
18
19
13D
Nr. Name Beschreibung
1 WLAN-Indikator WLAN Direct Modus: Interner Access-Point ist ativiert
WLAN Infrastructure Modus:
„Client-Mode“
WLAN-Verbindung zum Router aktiv, Symbol zeigt die aktuell
empfangene Signalstärke an
! Eine WLAN-Verbindung wird hergestellt oder es konnte keine
Verbindung zm Router hergestellt werden
WLAN ist nicht verfügbar
LAN Infrastructure Modus: ✖ Access-Point ist deaktiviert
2 ID WLAN-Netzwerkname oder Gerätename des Basis-Geräts
3 PASS WLAN-Passwort des Basis-Geräts
4 Passwort-Timer Zeit bis zur automatischen Änderung des WLAN-Passwortes
5 WLAN-Passwort ändern Neues Passwort manuell erstellen, z. B. am Ende eines Meetings
6 Status Dual Netzwerk : Verbundenes Dual Netzwerk (WLAN + LAN)
(WLAN + LAN) : Segmentiertes Dual Netzwerk (WLAN x LAN)
7 WiFi IP • WLAN IP-Adresse des Basis-Geräts im WLAN
LAN IP • Zugewiesene IP-Adresse des Basis-Geräts im LAN;
„N/A“ = Keine Verbindung mit Netzwerk
8 Guest: KlickandShow-9100 Name des WLAN-Netzwerkes für Gäste bzw. Mitarbeiter, mit dem
Staff: Staff SSID sich Mobilgeräte (ohne Taster TOUCH) mit dem Basis-Gerät verbinden
können
9 TIME Uhrzeit anzeigen
10 Sicherheitsstufe Sicherheitsstufe 1-3 nur anzeigen
11 Starter-Programm erstellen USB-Stick mit Starter-Progr. „WirelessMedia“ für Windows /Mac
erstellen
12 Info Statusleiste (1) - (8) im Startbildschirm ein-/ausblenden
13 HDMI-Eingang Externen HDMI-Eingang am Basis-Gerät aktivieren
14 Hauptmenü Klick & Show System konfigurieren, passwortgeschützt
15 Hilfe (?) Benutzerhandbuch im PDF-Format
16 Schnellstart-Anleitung Erstanwender müssen zuerst das Starter-Programm von der Website
Erstanwender https://klickandshow.com/ oder vom USB-Stick einmalig installieren
17 Schnellstart-Anleitung Bedienhinweise für Betrieb mit Laptop/Mac, mit und ohne Transmitter
Windows / MacOS TOUCH; Erstanwender müssen zuerst Starter-Programm installieren (16)
18 „WirelessMedia“-App Entsprechenden QR-Code für iOS- bzw. Android-Geräte scannen und
vom Store laden die App aus dem Store herunterladen
19 Schnellstart-Anleitung Bedienhinweise für Betrieb mit mobilen iOS- oder Android-Endgerä-
Android/ iOs Erstanwender ten; Erstanwender müssen zuerst die App vom entsprechenden Store
herunterladen (16)
20 Vorschaufunktion der Optionale Vorschaufunktion der Bildschirminhalte aller verbundenen
Bildschirminhalte der Teilnehmer Sensor-Taster TOUCH einschalten bzw. ausschalten
14GB
No. Name Description
1 WLAN-Indicator WLAN Direct Modus: Internal access point is enabled
WLAN infrastructure mode:
„Client-Mode“
WiFi connection to router is retablished, icon displays the current
signal strength
! A WiFi connction is establishing or connection to a router failed
WiFi is not available
LAN infrastructure mode: ✖ Access point is disabled
2 ID WiFi name or device name of the base unit access point
3 PASS WiFi password of the base unit
4 Password timer Time until the password is changed automatically
5 Change WiFi password Generate new password manually for securing your WiFi network
6 Status Dual Netzwerk : Connected dual network (WiFi + LAN)
(WiFi + LAN) : Segmented dual network (WiFi x LAN)
7 WiFi IP • WiFi IP address of the base unit in wireless LAN
LAN IP • Assigned IP address of the base unit in LAN
„N/A“ = No connection to network
8 Guest: KlickandShow-9100 Name of WiFi network for Guest and Staff, which allows mobile devices
Staff: Staff SSID to connect with the base unit
9 TIME Show time
10 Security level Security level 1-3 display only
11 Create starter program Copy start program „WirelessMedia.exe“ for Windows /Mac to USB
stick
12 Info Show status bar (1) - (8) in home screen showing /hiding
13 HDMI input Switch to the external HDMI output
14 Setting Klick & Show system configuration
15 Help (?) User manual in PDF format
16 Quick Start Guide First-time-user first have to install the starter program from the website
first-time-user https://klickandshow.com/ or from the USB stick once
17 Quick Start Guide Operating instructions for operation with laptop/Mac, with and without
Windows / MacOS transmitter TOUCH; first-time-user have to install the starter program
once (16)
18 Load „WirelessMedia“-App Scan corresponding QR code for iOS or Android device and download
from Store the app from the store
19 Quick Start Guide Steps to instruct how to transmit smart mobile devices either powered
Android/ iOs first-time-user by Android or iOS onto the main screen
20 Preview funct. of the screen Switch on or off the optional preview function of the screen contents of
comtents of the participants all connected TOUCH sensors
15F
Nr. Nom Description
1 Indicateur Wi-Fi Wi-Fi Mode Directe: Point d’accès interne activé
Wi-Fi Mode Infrastructure:
„Mode Client“
Connexion Wi-Fi au routeur active, le symbole indique la puissance du
signal actuelle
! Connexion Wi-Fi en cours ou aucune connexion n’a pu être établie
avec le routeur
Wi-Fi non disponible
Mode Infrastructure LAN: ✖ Point d’accès désactivé
2 ID Identifiant du réseau Wi-Fi ou de l’unité de base
3 PASS Mot de passe Wi-Fi de l’unité de base
4 Minuteur mot de passe Temps restant jusqu’à la modification automatique du mot de passe Wi-Fi
5 Modifier mot de passe Wi-Fi Modifier le mot de passe en mode manuel, par ex. à la fin d’une réunion
6 Statut double réseau : Double réseau relié (WiFi + LAN)
(WiFi + LAN) : Double réseau segmenté (WiFi x LAN)
7 WiFi IP • Adresse IP Wi-Fi de l’unité de base du réseau Wi-Fi
LAN IP • Adresse IP affectée de l’unité de base du réseau LAN
„N/A“ = Aucune connexion au réseau
8 Invité: KlickandShow-9100 Nom du réseau Wi-Fi pour les invités ou les employés, avec lequel les
Employé: Staff SSID appareils mobiles (sans bouton TOUCH) peuvent se connecter à l’unité
de base
9 TIME Indiquer l’heure
10 Niveau de sécurité Niveau de sécurité 1-3 à indiquer uniquement
11 Installer programme Installer le programme de démarrage „WirelessMedia.exe“ pour
de démarrage Windows /Mac sur la clé USB
12 Info Afficher/masquer l’indicateur de statut (1) - (8) sur l’écran de démarrage
13 Port HDMI Activer le port HDMI externe de l’unité de base
14 Menu principal Configurer le système Klick & Show System, protégé par un mot de passe
15 Aide (?) Notice utilisateur au format PDF
16 Notice de démarrage rapide Pour une première utilisation installer une seule fois le programme de
première utilisation démarrage à partir du site https://klickandshow.com/ ou de la clé USB
17 Notice de démarrage rapide Instructions de commande pour utilisation avec un PC portable/Mac,
Windows / MacOS avec et sans transmetteur TOUCH; pour une première utilisation installer
d’abord le programme de démarrage (16)
18 Télécharger l’appli „WirelessMe- Scanner le code QR correspondant pour appareils iOS ou Android et
dia“ à partir du Store télécharger l’application à partir du Store
19 Notice de démarrage rapide Instructions de commande pour utilisation des appareils mobiles iOS ou
Première utilisation Android/iOs Android ; pour une première utilisation, télécharger d’abord l’application
à partir du Store correspondant (16)
20 Fonction prévisualisation Activer ou désactiver la fonction de prévisualisation des contenus des
des écrans des participants écrans des capteurs sensoriels TOUCH reliés.
16I
Nr. Nome Descrizione
1 Indicatore Wi-Fi WiFi modalità diretta: Il punto di accesso interno è attivo
WiFi modalità infrastruttura:
„Mode Client“
Connessione WiFi al router attiva, il simbolo indica l’attuale potenza
del segnale ricevuto
! La connessione WiFi viene stabilita o non è stato possibile stabilire
una connessione al router
WiFi non disponibile
Modalità infrastruttura LAN: ✖ Access-Point ist deaktiviert
2 ID Identificativo della rete WiFi o del dispositivo dell’unità di base
3 PASS Password del WiFi dell’unità di base
4 Timer password Tempo restante alla modifica automatica della password del WiFi
5 Modifica password WiFi Creare nuova password manualmente, ad es. alla fine di una riunione
6 Stato della rete duale : Rete duale connessa (WLAN + LAN)
(WiFi + LAN) : Rete duale segmentata (WLAN x LAN)
7 WiFi IP • Indirizzo IP WiFi dell’unità di base della rete in WiFi
LAN IP • Indirizzo IP assegnato dell’unità di base in LAN;
„N/A“ = Nessuna connessione alla rete
8 Guest: KlickandShow-9100 Nome della rete WiFi per l’ospite o per lo staff con la quale i dispositivi
Staff: Staff SSID mobili (senza pulsante TOUCH) possono connettersi all’unità di base
9 TIME Indicare l’ora
10 Livello di sicurezza Livello di sicurezza 1-3 solo indicare
11 Installare il programma di inizio Installare il programma di inizio “WirelessMedia” per Windows/Mac
sulla chiavetta USB
12 Info Visualizzare/nascondere la barra dello stato (1) - (8) sullo schermo di inizio
13 Porta HDMI Attivare la porta HDMI dell’unità di base
14 Menu principale Configurare il sistema Klick & Show, protetto da password
15 Aiuto (?) Guida utente in formato PDF
16 Guida all’inizio rapido Per il primo utilizzo installare per prima cosa il programma di inizio dal
Primo utilizzo sito https://klickandshow.com/ o dalla chiavetta USB
17 Guida all’inizio rapido Istruzioni di comando per l’utilizzo con un PC portatile/Mac, con e senza
Windows / MacOS trasmettitore TOUCH; per il primo utilizzo, installare per prima cosa il
programma di inizio (16)
18 Scaricare l’app “WirelessMedia” Scannerizzare il codice QR corrispondente per dispositivi iOS o Android
dallo store e scaricare l’app dallo store
19 Guida all’inizio rapido Istruzioni di comando per l’utilizzo di dispositivi mobili iOS o Android;
Primo utilizzo Android/iOs per il primo utilizzo, scaricare per prima cosa l’applicazione dallo store
corrispondente (16)
20 Funzione anteprima dei Attivare o disattivare la funzione di anteprima dei contenuti dello
contenuti schermo dell’utente schermo di tutti i pulsanti sensoriali TOUCH collegati
17NL
Nr. Naam Beschrijving
1 WLAN-Indikator Directe WLAN-modus: Intern toegangspunt is geactiveerd
WLAN-infrastructuurmodus:
„Client-Modus“
WLAN-verbinding met de router actief; symbool toont de actueel
ontvangen signaalsterkte
! Er wordt een WLAN-verbinding gemaakt of er kon geen verbinding
met de router gemaakt worden
WLAN is niet beschikbaar
LAN-infrastructuurmodus: ✖ Access point is gedeactiveerd
2 ID WLAN-netwerknaam of toestelnaam van het basistoestel
3 PASS WLAN-wachtwoord van het basistoestel
4 Wachtwoordtimer Tijd tot automatische wijziging van het WLAN-wachtwoord
5 WLAN-wachtwoord wijzigen Nieuw wachtwoord handmatig instellen, bv. aan het eind van een meeting
6 Status duaal netwerk : Verbonden duaal netwerk (WLAN + LAN)
(WLAN + LAN) : Gesegmenteerd duaal netwerk (WLAN x LAN)
7 WiFi IP • WLAN-IP-adres van het basistoestel in het WLAN
LAN IP • Toegewezen IP-adres van het basistoestel in het LAN;
„N/A“ = geen verbinding met het netwerk
8 Guest: KlickandShow-9100 Naam van het WLAN-netwerk voor gast of medewerker, waarmee mobiele
Staff: Staff SSID toestellen (zonder toets TOUCH) zich met het basistoestel kunnen verbinden
9 TIME Tijd weergeven
10 Veiligheidsniveau Veiligheidsniveau 1-3 alleen weergeven
11 Starterprogramma aanmaken USB-stick met starterprogramma „WirelessMedia“ voor Windows /Mac
aanmaken
12 Info Statusbalk (1) - (8) op het startscherm tonen/verbergen
13 HDMI-ingang Externe HDMI-ingang op het basistoestel activeren
14 Hoofdmenu Klick & Show-systeem configureren, wachtwoordbeveiligd
15 Hulp (?) Gebruikershandleiding in pdf-formaat
16 Handleiding snelle start Eerste gebruikers moeten eerst eenmalig het starterprogramma van de
eerste gebruiker website https://klickandshow.com/ of van de USB-stick installeren
17 Handleiding snelle start Bedieningsinstructies voor gebruik met laptop/Mac, met en zonder
Windows / MacOS transmitter TOUCH; eerste gebruikers moeten eerst starterprogramma
installeren (16)
18 „WirelessMedia“-App Dienovereenkomstige QR-code voor iOS- of Android-toestellen scannen
uit de store downloaden en de app uit de store downloaden
19 Handleiding snelle start Bedieningsinstructies voor gebruik met mobiele iOS- of Android-
Android/ iOs eerste gebruiker eindapparaten; eerste gebruikers moeten eerst de app van de dienover-
eenkomstige store downloaden (16)
20 Voorvertoning van de Optionele voorvertoningsfunctie van de beeldscherminhouden van alle
beeldscherminhouden verbonden sensortoetsen TOUCH inschakelen of uitschakelen
van de deelnemersr
18ES
Nr. Nombre Descripción
1 WLAN-Indikator WLAN Direct Modo: El punto de acceso interno está activado
Modo de la infraestructura wifi:
„Modo cliente“
Conexión wifi al enrutador activa, el símbolo muestra la intensidad
de la señal recibida actualmente
! Se establece una conexión wifi, o bien no se ha podido establecer
una conexión con el enrutador
Wifi no disponible
Modo de la infraestructura LAN: ✖ Punto de acceso desactivado
2 ID Nombre de la red wifi o del dispositivo de la unidad base
3 PASS Contraseña wifi de la unidad base
4 Temporizador de la contraseña Tiempo hasta el cambio automático de la contraseña wifi
5 Modificar la contraseña wifi Crear una nueva contraseña manualmente, por ejemplo, al final de una reunión
6 Estado de la red dual : Red dual conectada (wifi + LAN)
(wifi + LAN) : Red dual segmentada (wifi x LAN)
7 WiFi IP • Dirección IP de la wifi de la unidad base en la wifi
LAN IP • Dirección IP asignada de la unidad base en LAN;
„N/A“ = Sin conexión con la red
8 Invitados: KlickandShow-9100 Nombre de la red wifi para invitados o empleados con la que pueden
Staff: Staff SSID conectarse terminales móviles (sin tecla TOUCH) con la unidad base
9 TIME Visualizar la hora
10 Nivel de seguridad Nivel de seguridad 1-3 solo visualizar
11 Crear programa de inicio Preparar un lápiz USB con el programa de inicio „WirelessMedia“ para
Windows /Mac
12 Info Mostrar/ocultar la barra de estado (1) - (8) en la pantalla de inicio
13 Entrada HDMI Activar la entrada HDMI externa en la unidad base
14 Menú principal Haga clic para visualizar la configuración del sistema, protegido por contraseña
15 Ayuda (?) Manual de usuario en formato PDF
16 Guía de inicio rápido Para el primer uso, se debe instalar antes una sola vez el programa de
para el primer uso inicio a través del sitio web https://klickandshow.com/ o desde un lápiz USB
17 Guía de inicio rápido Indicaciones de uso para la operación con un ordenador portátil/Mac,
Windows / MacOS con y sin transmisor TOUCH; para el primer uso, deberá instalarse prime-
ro el programa de inicio (16)
18 Cargar la app „WirelessMedia“ Escanee el código QR correspondiente para los dispositivos iOS o
desde la tienda Android y descárguese la app desde la tienda
19 Guía de inicio rápido para el Indicaciones de uso para la operación con terminales móviles iOS o An-
primer uso Android/ iOs droid: para el primer uso deberá descargarse primero la app de la tienda
correspondiente (16)
20 Función de vista previa de los Conecta o desconecta la función opcional de vista previa de los
contenidos de la pantalla de los contenidos de las pantallas de todas las teclas de sensores TOUCH
participantes conectadas
19TR
Nr. İsim Tanım
1 WLAN indikatörü WLAN Direct Modu: Interner Access-Point ist ativiert
WLAN Altyapı Modu:
„İstemci Modu“
Yönlendiriciye WLAN bağlantısı aktüel, sembol aktüel sinyal gücünü
gösteriyor
! WLAN bağlantısı kuruluyor veya yönlendirici ile bağlantı kurulamadı
WLAN yok
LAN Altyapı Modu: ✖ Erişim Noktası etkin değil
2 ID WLAN ağ adı veya ana cihazın cihaz adı
3 ŞİFRE Ana cihazın WLAN şifresi
4 Şifre zamanlayıcı WLAN şifresinin otomatik olarak değişmesine kadar olan süre
5 WLAN şifresinin değiştirilmesi Yeni şifrenin manüel olarak oluşturulması, örneğin bir toplantının sonunda
6 Çift ağ durumu : Bağlı çift ağ (WLAN + LAN)
(WLAN + LAN) : Parçalı çift ağ (WLAN x LAN)
7 WiFi IP • WLAN‘da ana cihazın WLAN IP adresi
LAN IP • LAN‘da ana cihaza sınıflandırılmış IP adresi;
„N/A“ = Ağ bağlantısı yok
8 Konuk: KlickandShow-9100 Konuk veya Çalişan için mobil cihazların (TOUCH tuşu olmaksızın) ana
Çalışan: Staff SSID cihazla bağlanabilecekleri WLAN ağının adı
9 ZAMAN Saatin gösterilmesi
10 Güvenlik kademesi Güvenlik kademesi 1-3 sadece göster
11 Başlangıç programının Windows/Mac için „WirelessMedia“ başlangıç programı ile USB çubuğu
oluşturulması oluşturulması
12 Bilgi Başlangıç ekranında (1) - (8) durum çubuğunun gösterilmesi/gösterilmemesi
13 HDMI girişi Ana cihazda harici HDMI girişinin etkinleştirilmesi
14 Ana menü Klick & Show sisteminin ayarlanması, şifre korumalı
15 Yardım (?) PDF formatında kullanıcı kılavuzu
16 Hızlı başlatma kılavuzu İlk kullanıcıların önce başlangıç programını https://klickandshow.com/
İlk kullanıcı web sitesinden veya USB çubuğundan bir kereye mahsus olmak üzere
yüklemeleri gerekmektedir
17 Hızlı başlatma kılavuzu TOUCH verici ile ve vericisiz dizüstü bilgisayar/Mac ile işletim için
Windows / MacOS kullanım bilgileri; İlk kullanıcıların önce başlangıç programını yüklemeleri
gerekmektedir (16)
18 Uygulama mağazasından iOS veya Android cihazları için QR kodunun taranması ve uygulama
„WirelessMedia“ uygulamasının mağazasından uygulamanın indirilmesi
indirilmesi
19 Hızlı başlatma kılavuzu Mobil iOS veya Android cihazlarıyla işletim için kullanım bilgileri; İlk
Android/iOs İlk kullanıcılar kullanıcıların önce uygulamayı uygulama mağazasından indirmeleri
gerekmektedir (16)
20 Katılımcıların ekran içeriklerini Tüm bağlı TOUCH sensör tuşlarının ekran içeriklerini önizleme
önizleme fonksiyonu fonksiyonunun açılması veya kapatılması
208. D CE Erklärung GB CE certificate
F CE certificat I CE certificato NL CE certificaat
ES CE certificado TR CE sertifika
D Hiermit erklärt die Kindermann GmbH, dass der Funkanlagentyp Klick&Show der Richtlinie 2014/53/EU
entspricht. Die jeweils aktuelle EU-Konformitätserklärung ist unter der folgenden Internetadresse verfügbar:
GB Hereby, Kindermann GmbH declares that the radio equipment type Klick&Show is in compliance with
Directive 2014/53/EU. The full text of the EU declaration of conformity is available at the following internet address:
F Le soussigné, Kindermann GmbH, déclare que l‘équipement radioélectrique du type Klick&Show est confor-
me à la irective 2014/53/EU. Le texte complet de la déclaration EU de conformité est disponible à l‘adresse internet
suivante:
I Il fabbricante, Kindermann GmbH, dichiara che il tipo di apparecchiatura radio Klick&Show è conforme alla
direttiva 2014/53/EU. Il testo completo della dichiarazione di conformità U EU E è disponibile al seguente indirizzo
Internet:
NL Hierbij verklaar ik, Kindermann GmbH, dat het type radioapparatuur Klick&Show conform is met Richtlijn
2014/53/EU. De volledige tekst van de EU-conformiteitsverklaring kan worden geraadpleegd op het volgende
internetadres:
ES Por la presente, Kindermann GmbH, declara que el tipo de equipo radioeléctrico Klick&Show es conforme
con la Directiva 2014/53/EU. El texto completo de la declaración EU de conformidad está disponible en la dirección
Internet siguiente:
TR İş bu belge ile Kindermann GmbH kablosuz sistem tipin Klick&Show 2014/53/AB sayılı direktife uygun
olduğunu beyan eder. AB Uygunluk Beyanının tam metni aşağıdaki internet adresinde incelenebilir:
https://shop.kindermann.de/erp/KCO/avs/7/7488/7488000300/12_Zertifizierungen/CE748800030x.pdf
219. D Frequenzband GB Frequency band
F Bande de fréquence I Banda di frequenza NL Frequentieband
ES Banda de frecuencia TR Frekans bandı
D Wenn die Kanäle 36-48 mit dem 5 GHz-Band verwendet werden, ist eine Benutzung dieses Produktes nur in
geschlossenen Räumen erlaubt.
Frequenzband: 2.4 GHz: Kanäle 1, 2, 3, 4, 5, 6, 7, 8, 9, 10, 11 / 5 GHz: Kanäle 36, 40, 44, 48
Bandbreite: 20 MHz
Abgestrahlte maximale Sendeleistung: max. 20 dBm (100 mW), dynamisch gesteuert
GB When the channels 36-48 are used with the 5 GHz band, this product is restricted only for indoor usage.
Frequency band: 2.4 GHz: Channels 1, 2, 3, 4, 5, 6, 7, 8, 9, 10, 11 / 5 GHz: Channels 36, 40, 44, 48
Bandwidth: 20 MHz
Transmission power: max. 20 dBm (100 mW), controlled dynamically
F Si les canaux 36-48 sont employés dans le réseau Wi-Fi 5GHz, ce produit ne doit être utilisé que dans des
espaces fermés.
Bande de fréquence: 2.4 GHz: Canaux 1, 2, 3, 4, 5, 6, 7, 8, 9, 10, 11 / 5 GHz: Canaux 36, 40, 44, 48
Bande passante: 20 MHz
Puissance de transmission: max. 20 dBm (100 mW), contrôlé dynamiquement
I Se si utilizzano i canali 36-48 con WiFi 5GHz, il prodotto può solo essere utilizzato in locali chiusi.
Banda di frequenza: 2.4 GHz: Canali 1, 2, 3, 4, 5, 6, 7, 8, 9, 10, 11 / 5 GHz: Canali 36, 40, 44, 48
La larghezza di banda: 20 MHz
Potenza di trasmissione: max. 20 dBm (100 mW), controllato dinamicamente
NL Indien de kanalen 36-48 in een 5GHz WLAN worden gebruikt, dan mag het product alleen in gesloten
ruimtes worden gebruikt.
Frequentieband: 2.4 GHz: Kanalen 1, 2, 3, 4, 5, 6, 7, 8, 9, 10, 11 / 5 GHz: Kanalen 36, 40, 44, 48
Bandbreedte: 20 MHz
Zendvermogen: max. 20 dBm (100 mW), dynamisch geregeld
ES Si se emplean los canales 36-48 en la red WLAN de 5 GHz, el product solo deberá utilizarse en espacios
cerrados.
Banda de frecuencia: 2.4 GHz: Canales 1, 2, 3, 4, 5, 6, 7, 8, 9, 10, 11 / 5 GHz: Canales 36, 40, 44, 48
Ancho de banda: 20 MHz
Poder de transmision: max. 20 dBm (100 mW), controlado dinámicamente
TR 5GHz WLAN ağında 36-48 kanalları kullanıldığında, ürün yalnızca kapalı mekanlar içerisinde kullanılmalıdır.
Frekans bandı: 2.4 GHz: Kanalları 1, 2, 3, 4, 5, 6, 7, 8, 9, 10, 11 / 5 GHz: Kanalları 36, 40, 44, 48
Bant genişliği: 20 MHz
Iletim gücü: max. 20 dBm (100 mW), dinamik olarak kontrol edilir
AT BE BG CH CY CZ DE
DK EE EL ES FI FR HR
HU IE IS IT LI LT LU
LV MT NL NO PL PT RO
SE SI SK TR UK
2223
7488000300/ 7488000305 D 2019-09 / 844 008               Änderungen vorbehalten         Printed in Germany

Kindermann GmbH • Mainparkring 3 • D-97246 Eibelstadt • E-Mail: info@kindermann.de • www.kindermann.com
Vous pouvez aussi lire