Lift and Shift Guide - Migrating Workloads from Oracle Solaris 10 SPARC Systems to Oracle Solaris 10 Branded Zones - Migrating Workloads from ...
←
→
Transcription du contenu de la page
Si votre navigateur ne rend pas la page correctement, lisez s'il vous plaît le contenu de la page ci-dessous
Lift and Shift Guide - Migrating
Workloads from Oracle Solaris 10 SPARC
Systems to Oracle Solaris 10 Branded
Zones

Part No: F10607-01
April 2019
Lift and Shift Guide - Migrating Workloads from Oracle Solaris 10 SPARC Systems to Oracle Solaris 10 Branded Zones
Part No: F10607-01
Copyright © 2019, Oracle and/or its affiliates. All rights reserved.
This software and related documentation are provided under a license agreement containing restrictions on use and disclosure and are protected by intellectual property laws. Except
as expressly permitted in your license agreement or allowed by law, you may not use, copy, reproduce, translate, broadcast, modify, license, transmit, distribute, exhibit, perform,
publish, or display any part, in any form, or by any means. Reverse engineering, disassembly, or decompilation of this software, unless required by law for interoperability, is
prohibited.
The information contained herein is subject to change without notice and is not warranted to be error-free. If you find any errors, please report them to us in writing.
If this is software or related documentation that is delivered to the U.S. Government or anyone licensing it on behalf of the U.S. Government, then the following notice is applicable:
U.S. GOVERNMENT END USERS: Oracle programs, including any operating system, integrated software, any programs installed on the hardware, and/or documentation,
delivered to U.S. Government end users are "commercial computer software" pursuant to the applicable Federal Acquisition Regulation and agency-specific supplemental
regulations. As such, use, duplication, disclosure, modification, and adaptation of the programs, including any operating system, integrated software, any programs installed on the
hardware, and/or documentation, shall be subject to license terms and license restrictions applicable to the programs. No other rights are granted to the U.S. Government.
This software or hardware is developed for general use in a variety of information management applications. It is not developed or intended for use in any inherently dangerous
applications, including applications that may create a risk of personal injury. If you use this software or hardware in dangerous applications, then you shall be responsible to take all
appropriate fail-safe, backup, redundancy, and other measures to ensure its safe use. Oracle Corporation and its affiliates disclaim any liability for any damages caused by use of this
software or hardware in dangerous applications.
Oracle and Java are registered trademarks of Oracle and/or its affiliates. Other names may be trademarks of their respective owners.
Intel and Intel Xeon are trademarks or registered trademarks of Intel Corporation. All SPARC trademarks are used under license and are trademarks or registered trademarks of
SPARC International, Inc. AMD, Opteron, the AMD logo, and the AMD Opteron logo are trademarks or registered trademarks of Advanced Micro Devices. UNIX is a registered
trademark of The Open Group.
This software or hardware and documentation may provide access to or information about content, products, and services from third parties. Oracle Corporation and its affiliates are
not responsible for and expressly disclaim all warranties of any kind with respect to third-party content, products, and services unless otherwise set forth in an applicable agreement
between you and Oracle. Oracle Corporation and its affiliates will not be responsible for any loss, costs, or damages incurred due to your access to or use of third-party content,
products, or services, except as set forth in an applicable agreement between you and Oracle.
Access to Oracle Support

Oracle customers that have purchased support have access to electronic support through My Oracle Support. For information, visit http://www.oracle.com/pls/topic/lookup?
ctx=acc&id=info or visit http://www.oracle.com/pls/topic/lookup?ctx=acc&id=trs if you are hearing impaired.
Référence: F10607-01
Copyright © 2019, Oracle et/ou ses affiliés. Tous droits réservés.
Ce logiciel et la documentation qui l'accompagne sont protégés par les lois sur la propriété intellectuelle. Ils sont concédés sous licence et soumis à des restrictions d'utilisation et
de divulgation. Sauf stipulation expresse de votre contrat de licence ou de la loi, vous ne pouvez pas copier, reproduire, traduire, diffuser, modifier, accorder de licence, transmettre,
distribuer, exposer, exécuter, publier ou afficher le logiciel, même partiellement, sous quelque forme et par quelque procédé que ce soit. Par ailleurs, il est interdit de procéder à toute
ingénierie inverse du logiciel, de le désassembler ou de le décompiler, excepté à des fins d'interopérabilité avec des logiciels tiers ou tel que prescrit par la loi.
Les informations fournies dans ce document sont susceptibles de modification sans préavis. Par ailleurs, Oracle Corporation ne garantit pas qu'elles soient exemptes d'erreurs et vous
invite, le cas échéant, à lui en faire part par écrit.
Si ce logiciel, ou la documentation qui l'accompagne, est livré sous licence au Gouvernement des Etats-Unis, ou à quiconque qui aurait souscrit la licence de ce logiciel pour le
compte du Gouvernement des Etats-Unis, la notice suivante s'applique :
U.S. GOVERNMENT END USERS: Oracle programs, including any operating system, integrated software, any programs installed on the hardware, and/or documentation,
delivered to U.S. Government end users are "commercial computer software" pursuant to the applicable Federal Acquisition Regulation and agency-specific supplemental
regulations. As such, use, duplication, disclosure, modification, and adaptation of the programs, including any operating system, integrated software, any programs installed on the
hardware, and/or documentation, shall be subject to license terms and license restrictions applicable to the programs. No other rights are granted to the U.S. Government.
Ce logiciel ou matériel a été développé pour un usage général dans le cadre d'applications de gestion des informations. Ce logiciel ou matériel n'est pas conçu ni n'est destiné à être
utilisé dans des applications à risque, notamment dans des applications pouvant causer un risque de dommages corporels. Si vous utilisez ce logiciel ou ce matériel dans le cadre
d'applications dangereuses, il est de votre responsabilité de prendre toutes les mesures de secours, de sauvegarde, de redondance et autres mesures nécessaires à son utilisation dans
des conditions optimales de sécurité. Oracle Corporation et ses affiliés déclinent toute responsabilité quant aux dommages causés par l'utilisation de ce logiciel ou matériel pour des
applications dangereuses.
Oracle et Java sont des marques déposées d'Oracle Corporation et/ou de ses affiliés. Tout autre nom mentionné peut correspondre à des marques appartenant à d'autres propriétaires
qu'Oracle.
Intel et Intel Xeon sont des marques ou des marques déposées d'Intel Corporation. Toutes les marques SPARC sont utilisées sous licence et sont des marques ou des marques
déposées de SPARC International, Inc. AMD, Opteron, le logo AMD et le logo AMD Opteron sont des marques ou des marques déposées d'Advanced Micro Devices. UNIX est une
marque déposée de The Open Group.
Ce logiciel ou matériel et la documentation qui l'accompagne peuvent fournir des informations ou des liens donnant accès à des contenus, des produits et des services émanant de
tiers. Oracle Corporation et ses affiliés déclinent toute responsabilité ou garantie expresse quant aux contenus, produits ou services émanant de tiers, sauf mention contraire stipulée
dans un contrat entre vous et Oracle. En aucun cas, Oracle Corporation et ses affiliés ne sauraient être tenus pour responsables des pertes subies, des coûts occasionnés ou des
dommages causés par l'accès à des contenus, produits ou services tiers, ou à leur utilisation, sauf mention contraire stipulée dans un contrat entre vous et Oracle.
Accès aux services de support Oracle

Les clients Oracle qui ont souscrit un contrat de support ont accès au support électronique via My Oracle Support. Pour plus d'informations, visitez le site http://www.oracle.com/
pls/topic/lookup?ctx=acc&id=info ou le site http://www.oracle.com/pls/topic/lookup?ctx=acc&id=trs si vous êtes malentendant.
Contents

Using This Documentation ................................................................................. 7
    Product Documentation Library ......................................................................... 7
    Feedback ....................................................................................................... 7

Understanding the Lift and Shift Process .......................................................... 9
    Lift and Shift Overview ................................................................................... 9
          Lift and Shift Process ............................................................................. 11
    Requirements ................................................................................................ 13
    Example Configuration and Prompts ................................................................. 14

Preparing the Lift and Shift Systems ................................................................                  17
    ▼ Check the Source System's Suitability for Migration .......................................                      17
    ▼ Review the Source System Configuration .....................................................                     19
    ▼ Prepare the Shared Storage ........................................................................              28
    ▼ Prepare the Target System .........................................................................              29
    ▼ Configure an Oracle Solaris 10 Branded Zone on the Target System ...................                             38

Lifting and Shifting the Workloads ................................................................... 43
      ▼ Lift the Workloads to the Shared Storage ...................................................... 43
      ▼ Shift the Workloads to the Target ................................................................ 45

Verifying the New Zone and Workloads ............................................................                      47
     ▼ Verify the Solaris 10 Branded Zone Configuration ..........................................                     47
     ▼ Start and Verify the Migrated Database ........................................................                 50
     ▼ Perform Assurance Tests and Release the Workloads into Production .................                             53

Index .................................................................................................................. 55

                                                                                                                         5
6 Lift and Shift Guide - Migrating Workloads from Oracle Solaris 10 SPARC Systems to Oracle Solaris 10 Branded
Zones • April 2019Using This Documentation
■ Overview – This document provides instructions for lifting and shifting workloads running
on Oracle Solaris 10 with UFS root file systems to Oracle Solaris 10 branded zone in Oracle
Solaris 11.3 (or later) running on more modern sun4v hardware.
■ Audience – Experienced Oracle Solaris system administrators
■ Required knowledge – Experience administering Oracle Solaris computer systems.
Product Documentation Library
Documentation and resources for this product and related products are available at https://
docs.oracle.com/cd/E94980_01.
Feedback
Provide feedback about this documentation at http://www.oracle.com/goto/docfeedback.
Using This Documentation 78 Lift and Shift Guide - Migrating Workloads from Oracle Solaris 10 SPARC Systems to Oracle Solaris 10 Branded
Zones • April 2019Understanding the Lift and Shift Process
These topics describe the lift and shift process:
■ “Lift and Shift Overview” on page 9
■ “Requirements” on page 13
■ “Example Configuration and Prompts” on page 14
For additional lift and shift guides, visit the Oracle Solaris on SPARC - Lift and Shift
Documentation Library at https://docs.oracle.com/cd/E94980_01/
Lift and Shift Overview
This document provides instructions for performing a physical to virtual lift and shift. The
techniques are specifically aimed at migrating workloads running on Oracle Solaris 10 with
UFS root file systems on SPARC systems to Oracle Solaris 10 branded zones in an Oracle
Solaris 11.3 (or later) global zone.
Understanding the Lift and Shift Process 9Lift and Shift Overview
Oracle Solaris 10 branded zones, also known as solaris10 branded non-global zones, run
Oracle Solaris 10 applications in a virtualized Oracle Solaris 10 environment on top of the
Oracle Solaris 11 operating system. Applications run unmodified in the secure environment
provided by the non-global zone, and can take advantage of the enhancements made to the
kernel and utilize some of the innovative technologies that are only available in Oracle Solaris
11 releases.
For additional information about Oracle Solaris zones, refer to the zone documentation in the
Oracle Solaris Information Library for your specific release:
■ Oracle Solaris 11.4 Information Library
■ Oracle Solaris 11.3 Information Library
■ Access to other Oracle Solaris Libraries
With a higher number of compute resources on newer SPARC systems, a single global zone can
host a higher number of non-global zones, consolidating compute workloads. This lift and shift
procedure can be used for each Oracle Solaris 10 single system that you plan to move to the
newer SPARC system.
10 Lift and Shift Guide - Migrating Workloads from Oracle Solaris 10 SPARC Systems to Oracle Solaris 10 Branded
Zones • April 2019Lift and Shift Overview
Lift and Shift Process
The lift and shift process uses a variety of Oracle Solaris utilities to migrate the entire source
configuration, including all associated applications and data, to a solaris10 branded non-
global zone on target system's Oracle Solaris 11 global zone. To accomplish this migration, the
following activities are performed, although not necessarily in this exact order. The procedures
in subsequent chapters order the activities to minimize the amount of time when services are
unavailable.
Note - This procedure does not take down the source machine during the archive creation,
therefore, the source system is available for use. However, to maintain the integrity of the
application (Oracle Database in this case), it is a best practice to shutdown services during the
lift and shift activities.
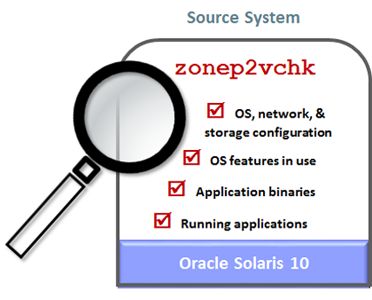
■ Analyze the source system to ensure migration suitability –One way to analyze the
source system is to run the Oracle Solaris zonep2vchk utility. This utility evaluates a global
zone or physical instance for potential migration issues. The utility can detect issues with
the OS, network, and storage configuration, identify some OS features, application binaries,
and applications that might not be supported in a non-global zone,
Understanding the Lift and Shift Process 11Lift and Shift Overview
■ Assess the source system resources and workloads – Determine the amount of resources
used to support the workloads. Gain an understanding of the configuration so that you
can replicate the configuration on the target system. Collect information about the CPU,
memory, storage, network, and workload resources.
■ Select a target system – Select a target system that has sufficient, or additional resources
to support the workloads. The target system is usually a more modern system that provides
security and performance improvements, and possible cost savings such as lower power,
cooling, and support costs.
■ Prepare shared storage – Storage on the target system is exported as a network file system
and mounted on the source system, for the efficiency of the lift and shift process.
■ Prepare the target system – CPU, memory, networking and storage resources are
configured to accommodate the incoming Oracle Solaris 10 environment.
■ Configure a solaris10 branded non-global zone on the target system – A new
solaris10 branded non-global zone is configured, but not yet installed, on the target's
global zone.
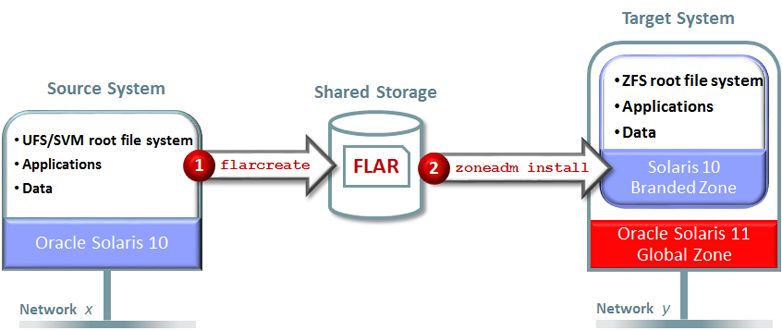
■ Lift – The flarcreate command is used to capture the source system's UFS/SVM file
systems, including the OS, applications, and data, and compressing those items into a flash
archive (FLAR) on shared storage.
■ Shift – The zoneadm install command uses the FLAR to restore the source OS root file
system to a ZFS root file system in the Solaris 10 branded zone.
12 Lift and Shift Guide - Migrating Workloads from Oracle Solaris 10 SPARC Systems to Oracle Solaris 10 Branded
Zones • April 2019Requirements
■ Reconfigure – The shifted environment might require post-migration configuration
adjustments to function in the new environment. For example, if the network configuration
is carried over from the source environment, the network parameters might need to be
changed to function in the new environment.
■ Verify functionality – Verify the functionality of the workloads. If possible, take
performance measurements and adjust resources to run optimally in the new environment.
Requirements
The lift and shift process described in this document has the following requirements:
Source system
■ Must be a bare metal or logical domain running the Oracle Solaris 10 OS. The example in
this document uses a bare metal system running the Oracle Solaris 10 1/13 OS.
■ Must have these patches installed, at minimum: 119254-75, 119534-24, and 140914-02
(instructions in this document describe how to check and install the patches).
These patches ensure that the package and patch tools work properly within the solaris10
branded zone.
Target system
Must be running Oracle Solaris 11.3 or later. The examples in this document assume that the
target system's OS was freshly installed and non-global zones have not yet been created.
Understanding the Lift and Shift Process 13Example Configuration and Prompts
Shared storage
You must provide sufficient shared storage space to temporarily store data that is used to
perform the lift and shift. The storage must be accessible to the source and target systems. For
instructions about determining the space requirements and preparing the storage, see “Prepare
the Shared Storage” on page 28.
Example Configuration and Prompts
The lift and shift process in this document is based on a real in-house lift and shift activity. The
examples provided in this document are excerpts from that activity. Command line prompts
identify on which system the commands are performed.
The following systems are used in the examples:
■ Source system – A SPARC Enterprise M9000 (sun4u) system running the Oracle Solaris 10
OS and Oracle Database 12.1.0.2.
■ Target system – A SPARC S7-2 (sun4v) system, running the Oracle Solaris 11 OS. During
the lift and shift procedures, this system is prepared with a Solaris 10 branded zone that
hosts the OS and workloads from the source system.
The following diagram shows the source and target configurations that are used in the examples
in this guide.
14 Lift and Shift Guide - Migrating Workloads from Oracle Solaris 10 SPARC Systems to Oracle Solaris 10 Branded
Zones • April 2019Example Configuration and Prompts
In the screen output examples, the command line prompt indicates on which system (target
or source), and which zone (global or non-global) a command is executed. This table lists the
prompts.
TABLE 1 System Identification Prompts
System Component Host Name in the Prompt
Source System Oracle Solaris 10 SourceSystem
physical instance
Target System Oracle Solaris 11 global TargetGlobal
zone
Solaris 10 branded non- TargetS10bz
global zone
Other Systems A client system on the client-sys
network for testing client
access.
Understanding the Lift and Shift Process 1516 Lift and Shift Guide - Migrating Workloads from Oracle Solaris 10 SPARC Systems to Oracle Solaris 10 Branded
Zones • April 2019Preparing the Lift and Shift Systems
These topics describe how to prepare the source system, the target system, and the shared
storage for the lift and shift process:
■ “Check the Source System's Suitability for Migration” on page 17
■ “Review the Source System Configuration” on page 19
■ “Prepare the Shared Storage” on page 28
■ “Prepare the Target System” on page 29
■ “Configure an Oracle Solaris 10 Branded Zone on the Target System” on page 38
Check the Source System's Suitability for Migration
This section describes how to run the zonep2vchk(1M) command. This command evaluates a
global zone's suitability for a physical-to-virtual migration into an Oracle Solaris 10 branded
zone. The command reports these types of issues that might prevent a successful migration:
■ Issues that can be addressed with a specific zone configuration or with configuration
changes in the global zone
■ Identification of functions that do not work inside a zone
Note - The /usr/sbin/zonep2vchk command is provided by the SUNWzoneu package. If your
source system doesn't have the zonep2vchk command, you can either copy the command from
a system that has it, such as the target system, or install the SUNWzoneu package on the source
system.
1. Log into the source global zone as superuser.
2. Run the zonep2vchk command.
root@SourceSystem# zonep2vchk
--Executing Version: 5.10.1.1
- Source System: SourceSystem
Solaris Version: Oracle Solaris 10 1/13 s10s_u11wos_24a SPARC
Preparing the Lift and Shift Systems 17Check the Source System's Suitability for Migration
Solaris Kernel: 5.10 Generic_150400-61
Platform: sun4u SUNW,SPARC-Enterprise
- Target System:
Solaris Version: Solaris 10
Zone Brand: native (default)
IP type: shared
--Executing basic checks
- The following /etc/system tunables exist. These tunables will not
function inside a zone. The /etc/system tunable may be transfered to
the target global zone, but it will affect the entire system,
including all zones and the global zone. If there is an
alternate tunable that can be configured from within the zone,
this tunable is described:
rootdev:/pseudo/md@0:0,10,blk
zonep2vchk has no information on tunable
set md:mirrored_root_flag = 1
zonep2vchk has no information on tunable
- The system is configured with the following ISCSI initiators. A zone
cannot access ISCSI targets. ISCSI targets must be discovered and
configured from the global zone. See iscsiadm(1M) for details:
iqn.1986-03.com.sun:02:3e10566b-4e39-e82f-b866-ec2d56d14278
- The following SMF services will not work in a zone:
svc:/network/iscsi/initiator:default
svc:/system/iscsitgt:default
- The following SMF services require ip-type "exclusive" to work in
a zone. If they are needed to support communication after migrating
to a shared-IP zone, configure them in the destination system's global
zone instead:
svc:/network/ipsec/ipsecalgs:default
svc:/network/ipsec/policy:default
svc:/network/routing-setup:default
- The system is configured with SVM metadevices.
A zone cannot configure SVM metadevices, but a zone can be configured
to use existing metadevices. See metastat(1M) for details
- If needed, the following non-standard vfstab entries will impact
the zone configuration:
Device
/dev/md/dsk/d30 /dev/md/rdsk/d30 /u01 ufs 2 yes
forcedirectio,logging /dev/md/dsk/d30
/dev/md/dsk/d40 /dev/md/rdsk/d40 /oradata ufs 2 yes
forcedirectio,logging /dev/md/dsk/d40
- When migrating to an exclusive-IP zone, the target system must have an
available physical interface for each of the following source system
interfaces:
bge0
bge2
18 Lift and Shift Guide - Migrating Workloads from Oracle Solaris 10 SPARC Systems to Oracle Solaris 10 Branded
Zones • April 2019Review the Source System Configuration
- When migrating to an exclusive-IP zone, interface name changes may
impact the following configuration files:
/etc/hostname.bge0
/etc/hostname.bge2
- When migrating to a shared-IP zone, the following network features must
be configured in the global zone if needed to support communication.
They will not be configured automatically during migration. Nothing
needs to be done for these features when migrating to an exclusive-IP
zone where the configuration inside the migrated system image will be
used:
IP Multipath group ipmp0
Basic checks complete. Issue(s) detected: 16
--Total issue(s) detected: 16
3. Examine this report line by line before proceeding with the migration.
In this example, there are no critical issues, and the few reported issues are addressed later
in “Prepare the Target System” on page 29 and “Verify the Solaris 10 Branded Zone
Configuration” on page 47.
Review the Source System Configuration
1. Backup any critical data before the start of this process, so that you can fall
back to this system if anything goes wrong.
2. (Optional) On the source system, start a process that captures the output that is
collected in this task.
Capturing the commands and output provides a means to refer back to the data that is collected.
There are a variety of methods to capture output. You can run the script(1M) command to make
a record of a terminal session, or use a terminal window with command and output collection
capabilities.
Example:
root@SourceSystem# script /tmp/source_zones_output.txt
Note – When you want to stop capturing output, type Ctr-D.
3. Check the version of the operating system.
This lift and shift process is specifically for a source system running Oracle Solaris 10.
root@SourceSystem# cat /etc/release
Oracle Solaris 10 1/13 s10s_u11wos_24a SPARC
Preparing the Lift and Shift Systems 19Review the Source System Configuration
Copyright (c) 1983, 2013, Oracle and/or its affiliates. All rights reserved.
Assembled 17 January 2013
4. List the source system architecture and the kernel patch version.
root@SourceSystem# uname -a
SunOS SourceSystem 5.10 Generic_150400-61 sun4u sparc SUNW,SPARC-Enterprise
5. Ensure that the required patches are installed.
a. Determine if the patches are installed and at or above the minimum
versions.
Minimum versions:
119254-75
119534-24
140914-02 or 148027-03 (The latter patch obsoletes the former patch. Either patch is
sufficient for this migration.)
root@SourceSystem# showrev -p | egrep "Patch: 119254|Patch: 119534|Patch: 140914|
Patch: 148027"
Patch: 119254-88 Obsoletes: 119015-03 Requires: 121133-02 Incompatibles: Packages:
SUNWinstall-patch-utils-root, SUNWpkgcmdsr, SUNWpkgcmdsu, SUNWswmt
Patch: 119534-33 Obsoletes: Requires: 119252-18, 120199-09, 126677-02
Incompatibles: Packages: SUNWinst
Patch: 148027-03 Obsoletes: 121002-04, 126316-01, 126651-02, 127920-01, 127922-04,
128330-02, 137088-01, 138275-01, 138621-02, 138623-05, 140914-02,
142009-01, 142336-01, 143588-01, 144300-01, 144876-01, 146578-06 Requires: 118833-
36, 120011-14, 127127-11, 137137-09, 139555-08, 142909-17
b. For any missing or below-version patches, download and install the latest
versions offered from My Oracle Support (http://support.oracle.com)
For patch details, refer to the patch README.
Use the patchadd command to install each patch. For example:
root@SourceSystem# patchadd ./119254-93
6. List the amount of memory.
root@SourceSystem# prtdiag|grep "Memory size"
Memory size: 65536 Megabytes
7. List the source system processors.
In this example, the source system has 4 sockets.
20 Lift and Shift Guide - Migrating Workloads from Oracle Solaris 10 SPARC Systems to Oracle Solaris 10 Branded
Zones • April 2019Review the Source System Configuration
root@SourceSystem# psrinfo -pv
The physical processor has 8 virtual processors (0-7)
SPARC64-VII+ (portid 1024 impl 0x7 ver 0xc0 clock 3000 MHz)
The physical processor has 8 virtual processors (40-47)
SPARC64-VII+ (portid 1064 impl 0x7 ver 0xc0 clock 3000 MHz)
The physical processor has 8 virtual processors (80-87)
SPARC64-VII+ (portid 1104 impl 0x7 ver 0xc0 clock 3000 MHz)
The physical processor has 8 virtual processors (120-127)
SPARC64-VII+ (portid 1144 impl 0x7 ver 0xc0 clock 3000 MHz)
8. Display network configuration information.
root@SourceSystem# ifconfig -a
lo0: flags=2001000849 mtu 8232 index 1
inet 127.0.0.1 netmask ff000000
bge0: flags=1000843 mtu 1500 index 2
inet 198.51.100.69 netmask ffffff00 broadcast 198.51.100.255
groupname ipmp0
ether 0:b:5d:dc:2:40
bge2: flags=1000843 mtu 1500 index 3
inet 0.0.0.0 netmask ff000000 broadcast 0.255.255.255
groupname ipmp0
ether 0:b:5d:dc:2:40
sppp0: flags=10010008d1 mtu 1500
index 4
inet 203.0.113.3 --> 203.0.113.1 netmask ffffff00
ether 0:0:0:0:0:0
root@SourceSystem# netstat -rn
Routing Table: IPv4
Destination Gateway Flags Ref Use Interface
-------------------- -------------------- ----- ----- ---------- ---------
default 198.51.100.1 UG 1 1135000
198.51.100.0 198.51.100.69 U 1 13 bge0
203.0.113.1 203.0.113.3 UH 1 1 sppp0
224.0.0.0 198.51.100.69 U 1 0 bge0
127.0.0.1 127.0.0.1 UH 5 4116 lo0
root@SourceSystem# ls -l /etc/hostname*
-rw-r--r-- 1 root root 46 Apr 19 16:18 /etc/hostname.bge0
-rw-r--r-- 1 root root 15 Apr 19 16:18 /etc/hostname.bge2
root@SourceSystem# cat /etc/hostname.bge0
SourceSystem netmask + broadcast + group ipmp0 up
root@SourceSystem# cat /etc/hostname.bge2
Preparing the Lift and Shift Systems 21Review the Source System Configuration
group ipmp0 up
root@SourceSystem# cat /etc/inet/hosts
# Internet host table
::1 localhost
127.0.0.1 localhost
198.51.100.69 SourceSystem loghost
9. Identify the source system disks and what is stored in them.
While performing the following substeps, make note of the amount of storage used by the
various software components. In the last substep, storage values are tallied to determine the
amount of storage space that is needed in shared storage and on the target system.
a. Use the format utility to list the disks.
The list of disks provides information about the disks on the source system.
In this example, disks number 0, 1, and 2 are physical internal disks. Disks 3 - 6 (where
each disk is identified by a WWN) are LUNS.
root@SourceSystem# echo|format
Searching for disks...done
AVAILABLE DISK SELECTIONS:
0. c0t0d0
/pci@0,600000/pci@0/scsi@1/sd@0,0
1. c0t1d0
/pci@0,600000/pci@0/scsi@1/sd@1,0
2. c1t0d0
/pci@24,600000/pci@0/scsi@1/sd@0,0
3. c2t600144F0E635D8C700005AC804B80019d0
/scsi_vhci/ssd@g600144f0e635d8c700005ac804b80019
4. c2t600144F0E635D8C700005AC804D4001Ad0
/scsi_vhci/ssd@g600144f0e635d8c700005ac804d4001a
5. c2t600144F0E635D8C700005AC804F4001Bd0
/scsi_vhci/ssd@g600144f0e635d8c700005ac804f4001b
6. c2t600144F0E635D8C700005AC8050C001Cd0
/scsi_vhci/ssd@g600144f0e635d8c700005ac8050c001c
Specify disk (enter its number): Specify disk (enter its number):
b. List the root file system.
In this example, the root file system is on an SVM root encapsulated mirror.
22 Lift and Shift Guide - Migrating Workloads from Oracle Solaris 10 SPARC Systems to Oracle Solaris 10 Branded
Zones • April 2019Review the Source System Configuration
root@SourceSystem# df -h /
Filesystem size used avail capacity Mounted on
/dev/md/dsk/d10 487G 4.9G 477G 2% /
root@SourceSystem# metastat -p d10
d10 -m d11 d12 1
d11 1 1 c0t1d0s0
d12 1 1 c1t0d0s0
c. List information about the swap configuration.
In this example, swap is on the SVM root encapsulated mirror.
root@SourceSystem# swap -l
swapfile dev swaplo blocks free
/dev/md/dsk/d20 85,20 16 133123696 133123696
root@SourceSystem# metastat -p d20
d20 -m d21 d22 1
d21 1 1 c0t1d0s1
d22 1 1 c1t0d0s1
Note - The swap -l command displays the swap space in 512-byte blocks. To convert the value
to gigabytes, use the bc command. For example:
# bc
133123696*512/1024/1024/1024
63
d. Display information about the database binaries.
In this example, the binaries are on a UFS file system (/u01) on top of an SVM metadevice
using two mirrored 150GB disks.
root@SourceSystem# df -h /u01
Filesystem size used avail capacity Mounted on
/dev/md/dsk/d30 148G 2.3G 144G 2% /u01
root@SourceSystem# metastat -p d30
d30 -m d31 d32 1
d31 1 1 /dev/dsk/c2t600144F0E635D8C700005AC804B80019d0s0
d32 1 1 /dev/dsk/c2t600144F0E635D8C700005AC804D4001Ad0s0
root@SourceSystem# grep u01 /etc/mnttab
/dev/md/dsk/d30 /u01 ufs
rw,intr,forcedirectio,largefiles,logging,xattr,onerror=panic,dev=154001e
1528711266
Preparing the Lift and Shift Systems 23Review the Source System Configuration
root@SourceSystem# egrep "mount|u01" /etc/vfstab
#device device mount FS fsck mount mount
#to mount to fsck point type pass at boot options
/dev/md/dsk/d30 /dev/md/rdsk/d30 /u01 ufs 2 yes
forcedirectio,logging
e. List the Solaris Volume Manager (SVM) metadevice state database (metadb)
configuration.
The metadb is not migrated to the target system. Instead, metadb is recreated when
preparing the target system (see “Prepare the Target System” on page 29).
root@SourceSystem# metadb
flags first blk block count
a m p luo 16 8192 /dev/dsk/c0t1d0s4
a p luo 8208 8192 /dev/dsk/c0t1d0s4
a p luo 16400 8192 /dev/dsk/c0t1d0s4
a p luo 16 8192 /dev/dsk/c1t0d0s4
a p luo 8208 8192 /dev/dsk/c1t0d0s4
a p luo 16400 8192 /dev/dsk/c1t0d0s4
f. Display information about the database files.
In this example, the Oracle database data files, and redo and archive log files are on a UFS
file system on top of an SVM metadevice using two mirrored 200 GB disks.
root@SourceSystem# df -h /oradata
Filesystem size used avail capacity Mounted on
/dev/md/dsk/d40 197G 12G 182G 7% /oradata
root@SourceSystem# metastat -p d40
d40 -m d41 d42 1
d41 1 1 /dev/dsk/c2t600144F0E635D8C700005AC804F4001Bd0s0
d42 1 1 /dev/dsk/c2t600144F0E635D8C700005AC8050C001Cd0s0
root@SourceSystem# grep oradata /etc/mnttab
/dev/md/dsk/d40 /oradata ufs
rw,intr,forcedirectio,largefiles,logging,xattr,onerror=panic,dev=1540028
1528711266
root@SourceSystem# egrep "mount|oradata" /etc/vfstab
#device device mount FS fsck mount mount
#to mount to fsck point type pass at boot options
/dev/md/dsk/d40 /dev/md/rdsk/d40 /oradata ufs 2 yes forcedirectio,logging
g. Determine the total amount of storage used.
24 Lift and Shift Guide - Migrating Workloads from Oracle Solaris 10 SPARC Systems to Oracle Solaris 10 Branded
Zones • April 2019Review the Source System Configuration
The disk capacity information is used to configure the target system storage that is needed
for the migration. See “Prepare the Target System” on page 29.
The total amount of used storage is used to calculate the amount of space needed in the
shared storage in “Prepare the Shared Storage” on page 28.
This table lists the disk calculation for this example.
No. of Total Storage Used Storage Data Mgt. Contents
LUNs Capacity
2 2 x 487 = 974 4.9 GB (root) UFS, SVM Root file system and swap space
GB mirror Note - The swap space is not captured in shared
+ storage, and not migrated to the target system.
Eventually it is recreated on the target system, so the
64 GB (swap) space must be accounted for.
= 69 GB
2 2 x 150 = 300 2.3 GB UFS on SVM Database binaries (/u01)
GB metaset
2 2 x 200 = 400 12 GB UFS on SVM Database files (/oradata)
GB metaset
1 n/a n/a SVM metadb
Note - Not captured in shared storage, and not
migrated to the target system. Eventually recreated on
the target system.
1.6 TB 19.2 GB Totals (rounded)
(Minimum (Used to
amount of space calculate the
required on the amount of
target system to required shared
host the source.) storage.)
10. Obtain the encrypted password for the source system's root user.
This encrypted password is later used to access the root user on the target solaris10 branded
zone when it is configured in “Configure an Oracle Solaris 10 Branded Zone on the Target
System” on page 38.
root@SourceSystem# grep root /etc/shadow | nawk -F':' '{print $2}'
6Vq4iXheX6nm
11. Check the status of the Database and listener.
In this example, the source system is installed with Oracle 10.2.0.5.0.
Note – The second and third commands must be performed by the oracle user.
Preparing the Lift and Shift Systems 25Review the Source System Configuration
root@SourceSystem# cat /var/opt/oracle/oratab
md1:/u01/oracle/product/10.2.0/db_1:N
oracle1@SourceSystem $ /u01/oracle/product/10.2.0/db_1/bin/lsnrctl status
LSNRCTL for Solaris: Version 10.2.0.5.0 - Production on 25-JUL-2018 16:28:48
Copyright (c) 1991, 2010, Oracle. All rights reserved.
Connecting to (ADDRESS=(PROTOCOL=tcp)(HOST=)(PORT=1521))
STATUS of the LISTENER
------------------------
Alias LISTENER
Version TNSLSNR for Solaris: Version 10.2.0.5.0 - Production
Start Date 25-JUL-2018 10:51:40
Uptime 0 days 5 hr. 37 min. 8 sec
Trace Level off
Security ON: Local OS Authentication
SNMP OFF
Listener Log File /u01/oracle/product/10.2.0/db_1/network/log/listener.log
Listening Endpoints Summary...
(DESCRIPTION=(ADDRESS=(PROTOCOL=tcp)(HOST=SourceSystem)(PORT=1521)))
Services Summary...
Service "md1" has 1 instance(s).
Instance "md1", status READY, has 1 handler(s) for this service...
Service "md1XDB" has 1 instance(s).
Instance "md1", status READY, has 1 handler(s) for this service...
Service "md1_XPT" has 1 instance(s).
Instance "md1", status READY, has 1 handler(s) for this service...
The command completed successfully
oracle1@SourceSystem $ ptree|grep ora_|grep -v grep
11221 ora_pmon_md1
11223 ora_psp0_md1
11225 ora_mman_md1
11227 ora_dbw0_md1
11229 ora_dbw1_md1
11231 ora_dbw2_md1
...
12. Sample one table in the application schema (SOE).
As a sanity check, the same table is sampled again after the migration (in “Start and Verify the
Migrated Database” on page 50 to confirm data integrity.
SQL> select count(*) from soe.orders ;
COUNT(*)
----------
1429790
26 Lift and Shift Guide - Migrating Workloads from Oracle Solaris 10 SPARC Systems to Oracle Solaris 10 Branded
Zones • April 2019Review the Source System Configuration
13. From a database client system, check the functionality of the database
environment.
For example, issue a few SQL statements from the client to ensure connectivity and the
contents.
oracle@client-sys: $ sqlplus system/welcome1@//SourceSystem.us.example.com:1521/md1
SQL*Plus: Release 12.2.0.1.0 Production on Wed Jul 25 11:00:53 2018
Copyright (c) 1982, 2016, Oracle. All rights reserved.
Connected to:
Oracle Database 10g Enterprise Edition Release 10.2.0.5.0 - 64bit Production
With the Partitioning, OLAP, Data Mining and Real Application Testing options
SQL> select name,log_mode,open_mode from v$database ;
NAME LOG_MODE OPEN_MODE
--------- ------------ ----------
MD1 ARCHIVELOG READ WRITE
SQL> select * from v$recover_file;
no rows selected
SQL> select name from v$datafile union select name from v$controlfile union select
member from v$logfile union select name from v$archived_log ;
NAME
--------------------------------------------------------------------------------
/oradata/md1/archivelog/MD1/archivelog/2018_05_25/o1_mf_1_2_fjhkyx3w_.arc
/oradata/md1/archivelog/MD1/archivelog/2018_07_26/o1_mf_1_3_fomnzzjk_.arc
/oradata/md1/archivelog/MD1/archivelog/2018_07_27/o1_mf_1_4_foqy2qjs_.arc
/oradata/md1/archivelog/MD1/archivelog/2018_07_29/o1_mf_1_5_fovgmd0x_.arc
/oradata/md1/archivelog/MD1/archivelog/2018_07_30/o1_mf_1_6_fozv6z9k_.arc
/oradata/md1/control01.ctl
/oradata/md1/control02.ctl
/oradata/md1/control03.ctl
/oradata/md1/redo01.log
/oradata/md1/redo02.log
/oradata/md1/redo03.log
/oradata/md1/sysaux01.dbf
/oradata/md1/system01.dbf
/oradata/md1/undotbs01.dbf
/oradata/md1/users01.dbf
16 rows selected.
Preparing the Lift and Shift Systems 27Prepare the Shared Storage
Prepare the Shared Storage
In this procedure, a network file system (NFS) is exported from the target system and mounted
by the source system. During the lift process, the file system archive file (FLAR) is created on
the shared storage where it is accessible to both the source and target systems.
Requirements
■ Shared storage – The location must be accessible to the source system and the target
system.
■ Sufficient storage space – The shared storage must have enough available storage space to
temporarily store the FLAR.
For more information about networked file systems, refer to these resources:
■ Oracle Solaris 10, Managing File Systems at: https://docs.oracle.com/cd/E23823_01/
html/816-4555/rfsintro-2.html
■ Oracle Solaris 11, Managing Network File Systems at: https://docs.oracle.com/cd/
E23824_01/html/821-1454/rfsintro-2.html
1. Ensure that there is enough available storage capacity on the planned shared
storage.
Use the storage information gathered in “Review the Source System
Configuration” on page 19.
a. Calculate the space needed to store the source system FLAR.
Take the source system's total used storage (obtained in “Review the Source System
Configuration” on page 19) and divide by two. This calculation takes into account
that the various data captured items will be compressed in the shared storage, yet is
conservative enough to ensure adequate storage space for all the items.
Item Calculation Total
Source system's total used storage, divided by 2 19.2 ÷ 2 9.6 GB
(To account for a conservative compression ratio)
Add 30% 9.6 + 3.2 12.8 GB
(To provide additional headroom for the creation of
temporary files, uncompressing files, and so on.)
28 Lift and Shift Guide - Migrating Workloads from Oracle Solaris 10 SPARC Systems to Oracle Solaris 10 Branded
Zones • April 2019Prepare the Target System
For this example scenario, a minimum of 12.8 GB of available space is required on the
shared storage.
b. Identify available storage in the target system.
The command output shows that there is approximately 1.09 TB available storage capacity,
which is sufficient space to contain the capture of source system for this example scenario.
root@TargetGlobal# zpool list vpool
NAME SIZE ALLOC FREE CAP DEDUP HEALTH ALTROOT
vpool 1.09T 24M 1006G 1% 1.00x ONLINE -
c. (If needed) Add storage space to accommodate the storage space
requirements.
2. On the target global zone, create and export a file system.
root@TargetGlobal# zfs create -o mountpoint=/ovas vpool/ovas
root@TargetGlobal# zfs set share.nfs=on vpool/ovas
root@TargetGlobal# zfs set share.nfs.root=\* vpool/ovas
root@TargetGlobal# zfs set share.nfs.rw=\* vpool/ovas
root@TargetGlobal# exportfs
vpool_ovas /ovas sec=sys,root,rw
3. As superuser on the source system, create a mount point and mount the shared
storage.
In this example, TargetGlobal:/ovas is an NFS share exported from the target system.
root@SourceSystem# mkdir /ovas
root@SourceSystem# mount -F nfs TargetGlobal:/ovas /ovas
Prepare the Target System
Use this procedure to ensure that the target system is configured to provide CPU, memory,
networking, and storage resources for the incoming source environment.
■ CPU Resources – During the shift, you can assign any amount of CPU resources to the
solaris10 branded zone that are appropriate for the workload. However, prior to the lift
and shift, you must ensure that those CPU resources are available as described in this
procedure.
If you are uncertain about the CPU utilization of the workload on the target system, then the
target system should provide at minimum the same available CPU and memory resources
Preparing the Lift and Shift Systems 29Prepare the Target System
that the solaris10 branded zone had on the source system. This conservative approach
helps maintain the same or better performance level of the workload after the migration. On
the other hand, if the CPU utilization is estimated to be significantly lower for the branded
zone on the target system, for example, if the target system has faster CPUs, then the target
system can provide fewer CPU resources to the branded zone. In some cases, using fewer
CPU cores reduces software licensing costs.
■ Memory Resources – By default, the target solaris10 branded zone is allocated the same
amount of memory that it had on the source system. Ensure that there is at least the same
amount of memory available on the target system, as described in this procedure.
■ Storage Resources – The number of virtual disks and sizes on the target must match the
source system's disk configuration, as described in this procedure.
■ Network Resources – A network data link created from the global zone to be used by
the solaris10 branded zone as its network interface. Redundancy of links can leverage
aggregations available from the global zone.
1. List the target system processors.
In this example, the target system has 16 cores.
root@TargetGlobal# psrinfo -pv
The physical processor has 8 cores and 64 virtual processors (0-63)
The core has 8 virtual processors (0-7)
The core has 8 virtual processors (8-15)
The core has 8 virtual processors (16-23)
The core has 8 virtual processors (24-31)
The core has 8 virtual processors (32-39)
The core has 8 virtual processors (40-47)
The core has 8 virtual processors (48-55)
The core has 8 virtual processors (56-63)
SPARC-S7 (chipid 0, clock 4267 MHz)
The physical processor has 8 cores and 64 virtual processors (64-127)
The core has 8 virtual processors (64-71)
The core has 8 virtual processors (72-79)
The core has 8 virtual processors (80-87)
The core has 8 virtual processors (88-95)
The core has 8 virtual processors (96-103)
The core has 8 virtual processors (104-111)
The core has 8 virtual processors (112-119)
The core has 8 virtual processors (120-127)
SPARC-S7 (chipid 1, clock 4267 MHz)
2. List the amount of memory.
root@TargetGlobal# prtconf | grep Mem
Memory size: 260096 Megabytes
30 Lift and Shift Guide - Migrating Workloads from Oracle Solaris 10 SPARC Systems to Oracle Solaris 10 Branded
Zones • April 2019Prepare the Target System
3. List the amount of swap space.
root@TargetGlobal# swap -hl
swapfile dev swaplo blocks free
/dev/zvol/dsk/rpool/swap 288,1 8K 128G 128G
4. Display the target system's network configuration.
root@TargetGlobal# dladm show-aggr -x
LINK PORT SPEED DUPLEX STATE ADDRESS PORTSTATE
aggr0 -- 10000Mb full up 0:10:e0:d5:22:c2 --
net0 10000Mb full up 0:10:e0:d5:22:c2 attached
net2 10000Mb full up 0:10:e0:d5:22:c4 attached
root@TargetGlobal# dladm show-aggr
LINK MODE POLICY ADDRPOLICY LACPACTIVITY LACPTIMER
aggr0 trunk L3,L4 auto active short
root@TargetGlobal# ipadm
NAME CLASS/TYPE STATE UNDER ADDR
aggr0 ip ok -- --
aggr0/v4 static ok -- 192.0.2.45/23
lo0 loopback ok -- --
lo0/v4 static ok -- 127.0.0.1/8
lo0/v6 static ok -- ::1/128
net4 ip ok -- --
net4/v4 static ok -- 203.0.113.77/24
root@TargetGlobal# netstat -rn
Routing Table: IPv4
Destination Gateway Flags Ref Use Interface
-------------------- -------------------- ----- ----- ---------- ---------
default 192.0.2.1 UG 4 26860570
192.0.2.0 192.0.2.45 U 8 25427791 aggr0
127.0.0.1 127.0.0.1 UH 4 576 lo0
203.0.113.0 203.0.113.77 U 3 2759126 net4
Routing Table: IPv6
Destination/Mask Gateway Flags Ref Use If
--------------------------- --------------------------- ----- --- ------- -----
::1 ::1 UH 2 2 lo0
root@TargetGlobal# cat /etc/resolv.conf
#
# _AUTOGENERATED_FROM_SMF_V1_
#
# WARNING: THIS FILE GENERATED FROM SMF DATA.
Preparing the Lift and Shift Systems 31Prepare the Target System
# DO NOT EDIT THIS FILE. EDITS WILL BE LOST.
# See resolv.conf(4) for details.
search us.example.com examplecorp.com example.com
nameserver 198.51.100.198
nameserver 198.51.100.197
nameserver 198.51.100.132
5. Create a VNIC on top of the trunk aggregation.
root@TargetGlobal# dladm create-vnic -l aggr0 vnic0
root@TargetGlobal# dladm show-vnic
LINK OVER SPEED MACADDRESS MACADDRTYPE IDS
vnic0 aggr0 10000 2:8:20:df:e0:73 random VID:0
6. Display information about the target's global zone root file system.
root@TargetGlobal# zpool status rpool
pool: rpool
state: ONLINE
scan: none requested
config:
NAME STATE READ WRITE CKSUM
rpool ONLINE 0 0 0
mirror-0 ONLINE 0 0 0
c0t5000CCA08040A058d0 ONLINE 0 0 0
c0t5000CCA080416934d0 ONLINE 0 0 0
errors: No known data error
7. Use the format utility to partition devices that will be used for the UFS/SVM file
systems in the solaris10 branded zone.
This table shows the storage configuration that is created on the target system to support
the incoming source system OS and workloads (determined in “Review the Source System
Configuration” on page 19).
No. of Total Storage Data Mgt. Contents
LUNs Capacity
2 2 x 1 TB = 2 TB ZFS mirror Global zone rpool
2 2 x 487 GB = ZFS mirror Oracle Solaris 10 branded zone zonepath
974 GB
2 2 x 150 GB = UFS/SVM mirror Database binaries (/u01)
300 GB
2 2 x 200 GB = UFS/SVM mirror Database files (/oradata)
400 GB
32 Lift and Shift Guide - Migrating Workloads from Oracle Solaris 10 SPARC Systems to Oracle Solaris 10 Branded
Zones • April 2019Prepare the Target System
No. of Total Storage Data Mgt. Contents
LUNs Capacity
1 2 x 1 GB = 2 SVM metadb in global zone
GB Note - Recreated on the target system.
Totals (rounded)
3.7 TB
8. Ensure that disk slices are configured to support all the storage items.
a. Use the prtvtoc command to check the slices for metadb.
In this example, two local disk slices (1 GB each) are used for the metadb disks:
c0t5000CCA08040B3BCd0s4
c0t5000CCA08040AB24d0s4.
root@TargetGlobal# prtvtoc /dev/dsk/c0t5000CCA08040B3BCd0s2|tail -3
* Partition Tag Flags Sector Count Sector Mount Directory
2 5 01 0 2344108410 2344108409
4 0 00 48195 2120580 2168774
root@TargetGlobal# prtvtoc /dev/dsk/c0t5000CCA08040AB24d0s2|tail -3
* Partition Tag Flags Sector Count Sector Mount Directory
2 5 01 0 2344108410 2344108409
4 0 00 48195 2120580 2168774
b. Use the prtvtoc command to check the slices for the database binaries.
In this example, the database binaries require two 150 GB iSCSI devices:
c0t600144F09F2C0BFD00005B36D6910058d0s0
c0t600144F09F2C0BFD00005B36D6A70059d0s0
root@TargetGlobal# prtvtoc /dev/rdsk/c0t600144F09F2C0BFD00005B36D6910058d0s2|tail -3
* Partition Tag Flags Sector Count Sector Mount Directory
0 2 00 0 314386468 314386467
2 5 01 0 314386468 314386467
root@TargetGlobal# prtvtoc /dev/rdsk/c0t600144F09F2C0BFD00005B36D6A70059d0s2|tail -3
* Partition Tag Flags Sector Count Sector Mount Directory
0 2 00 0 314386468 314386467
2 5 01 0 314386468 314386467
c. Use the prtvtoc command to check the slices for the database REDO and
archive logs.
Preparing the Lift and Shift Systems 33Prepare the Target System
In this example, the database REDO and archive logs require two 200 GB iSCSI devices:
c0t600144F09F2C0BFD00005B36D6C3005Ad0s0
c0t600144F09F2C0BFD00005B36D6D5005Bd0s0
root@TargetGlobal# prtvtoc /dev/rdsk/c0t600144F09F2C0BFD00005B36D6C3005Ad0s2|tail -3
* Partition Tag Flags Sector Count Sector Mount Directory
0 2 00 0 419289484 419289483
2 5 01 0 419289484 419289483
root@TargetGlobal# prtvtoc /dev/rdsk/c0t600144F09F2C0BFD00005B36D6D5005Bd0s2|tail -3
* Partition Tag Flags Sector Count Sector Mount Directory
0 2 00 0 419289484 419289483
2 5 01 0 419289484 419289483
d. Use the format command to review the disks.
root@TargetGlobal# echo|format
Searching for disks...done
AVAILABLE DISK SELECTIONS:
0. c0t5000CCA08040A058d0
/scsi_vhci/disk@g5000cca08040a058
/dev/chassis/SYS/HDD0/disk
1. c0t5000CCA080416934d0
/scsi_vhci/disk@g5000cca080416934
/dev/chassis/SYS/HDD1/disk
2. c0t5000CCA08040B3BCd0
/scsi_vhci/disk@g5000cca08040b3bc
/dev/chassis/SYS/HDD2/disk
3. c0t5000CCA08040AB24d0
/scsi_vhci/disk@g5000cca08040ab24
/dev/chassis/SYS/HDD3/disk
4. c1t0d0
/pci@300/pci@1/pci@0/pci@2/usb@0/storage@1/disk@0,0
/dev/chassis/SYS/MB/EUSB_DISK/disk
5. c0t600144F09F2C0BFD00005B36D6A70059d0
/scsi_vhci/ssd@g600144f09f2c0bfd00005b36d6a70059
6. c0t600144F09F2C0BFD00005B36D6C3005Ad0
/scsi_vhci/ssd@g600144f09f2c0bfd00005b36d6c3005a
7. c0t600144F09F2C0BFD00005B36D6D5005Bd0
/scsi_vhci/ssd@g600144f09f2c0bfd00005b36d6d5005b
34 Lift and Shift Guide - Migrating Workloads from Oracle Solaris 10 SPARC Systems to Oracle Solaris 10 Branded
Zones • April 2019Prepare the Target System
8. c0t600144F09F2C0BFD00005B36D6910058d0
/scsi_vhci/ssd@g600144f09f2c0bfd00005b36d6910058
9. c0t600144F09F2C0BFD00005B9195D80079d0
/scsi_vhci/ssd@g600144f09f2c0bfd00005b9195d80079
10. c0t600144F09F2C0BFD00005B9195EF007Ad0
/scsi_vhci/ssd@g600144f09f2c0bfd00005b9195ef007a
11. c0t600144F09F2C0BFD00005B9020260078d0
/scsi_vhci/ssd@g600144f09f2c0bfd00005b9020260078
Specify disk (enter its number): Specify disk (enter its number):
9. Install the Solaris Volume Manager package and reboot the system.
The Solaris Volume Manager package is needed for the metadb. In Oracle Solaris 11.3 and later,
the package is not installed by default.
root@TargetGlobal# pkg install storage/svm
root@TargetGlobal# reboot
10. Create a mirrored zpool for the solaris10 branded zone ZFS root file system.
Note - Only ZFS is supported for zone root file systems in Oracle Solaris 11.3.
root@TargetGlobal# zpool create -m /zones/TargetS10bz TargetS10bz mirror
c0t600144F09F2C0BFD00005B9195D80079d0 c0t600144F09F2C0BFD00005B9195EF007Ad0
root@TargetGlobal# zpool status TargetS10bz
pool: TargetS10bz
state: ONLINE
scan: resilvered 73K in 1s with 0 errors on Fri Sep 7 10:15:54 2018
config:
NAME STATE READ WRITE CKSUM
TargetS10bz ONLINE 0 0 0
mirror-0 ONLINE 0 0 0
c0t600144F09F2C0BFD00005B9195D80079d0 ONLINE 0 0 0
c0t600144F09F2C0BFD00005B9195EF007Ad0 ONLINE 0 0 0
errors: No known data errors
11. Configure the Solaris Volume manager (SVM) metadevices.
a. Create the SVM metadevice database using redundant local disks.
Preparing the Lift and Shift Systems 35Prepare the Target System
root@TargetGlobal# metadb -a -c 3 -f /dev/dsk/c0t5000CCA08040B3BCd0s4
root@TargetGlobal# metadb -a -c 3 -f /dev/dsk/c0t5000CCA08040AB24d0s4
root@TargetGlobal# metadb
flags first blk block count
a u 16 8192 /dev/dsk/
c0t5000CCA08040B3BCd0s4
a u 8208 8192 /dev/dsk/
c0t5000CCA08040B3BCd0s4
a u 16400 8192 /dev/dsk/
c0t5000CCA08040B3BCd0s4
a u 16 8192 /dev/dsk/
c0t5000CCA08040AB24d0s4
a u 8208 8192 /dev/dsk/
c0t5000CCA08040AB24d0s4
a u 16400 8192 /dev/dsk/
c0t5000CCA08040AB24d0s4
b. Create a 150 GB mirrored SVM metadevice.
root@TargetGlobal# metainit d31 1 1 c0t600144F09F2C0BFD00005B36D6910058d0s0
root@TargetGlobal# metainit -f d32 1 1 c0t600144F09F2C0BFD00005B36D6A70059d0s0
root@TargetGlobal# metainit d30 -m d31 d32
root@TargetGlobal# metastat d30
d30: Mirror
Submirror 0: d31
State: Okay
Submirror 1: d32
State: Okay
Pass: 1
Read option: roundrobin (default)
Write option: parallel (default)
Size: 314386468 blocks (149 GB)
d31: Submirror of d30
State: Okay
Size: 314386468 blocks (149 GB)
Stripe 0:
Device Start Block Dbase
State Reloc Hot Spare
/dev/dsk/c0t600144F09F2C0BFD00005B36D6910058d0s0 0 No
Okay Yes
d32: Submirror of d30
State: Okay
36 Lift and Shift Guide - Migrating Workloads from Oracle Solaris 10 SPARC Systems to Oracle Solaris 10 Branded
Zones • April 2019Prepare the Target System
Size: 314386468 blocks (149 GB)
Stripe 0:
Device Start Block Dbase
State Reloc Hot Spare
/dev/dsk/c0t600144F09F2C0BFD00005B36D6A70059d0s0 0 No
Okay Yes
Device Relocation Information:
Device Reloc Device ID
/dev/dsk/c0t600144F09F2C0BFD00005B36D6910058d0 Yes
id1,ssd@n600144f09f2c0bfd00005b36d6910058
/dev/dsk/c0t600144F09F2C0BFD00005B36D6A70059d0 Yes
id1,ssd@n600144f09f2c0bfd00005b36d6a70059
c. Create a mirrored SVM metadevice for /oradata.
root@TargetGlobal# metainit d41 1 1 c0t600144F09F2C0BFD00005B36D6C3005Ad0s0
root@TargetGlobal# metainit -f d42 1 1 c0t600144F09F2C0BFD00005B36D6D5005Bd0s0
root@TargetGlobal# metainit d40 -m d41 d42
root@TargetGlobal# metastat d40
d40: Mirror
Submirror 0: d41
State: Okay
Submirror 1: d42
State: Okay
Pass: 1
Read option: roundrobin (default)
Write option: parallel (default)
Size: 419289484 blocks (199 GB)
d41: Submirror of d40
State: Okay
Size: 419289484 blocks (199 GB)
Stripe 0:
Device Start Block Dbase
State Reloc Hot Spare
/dev/dsk/c0t600144F09F2C0BFD00005B36D6C3005Ad0s0 0 No
Okay Yes
d42: Submirror of d40
State: Okay
Size: 419289484 blocks (199 GB)
Stripe 0:
Device Start Block Dbase
State Reloc Hot Spare
/dev/dsk/c0t600144F09F2C0BFD00005B36D6D5005Bd0s0 0 No
Okay Yes
Device Relocation Information:
Preparing the Lift and Shift Systems 37Vous pouvez aussi lire