OPTIMO STYLE 25-250 PACKAGE : OPTIMO 42-420 A2S - spherical kit USER'S MANUAL MANUEL UTILISATEUR - Angénieux
←
→
Transcription du contenu de la page
Si votre navigateur ne rend pas la page correctement, lisez s'il vous plaît le contenu de la page ci-dessous
PACKAGE :
OPTIMO 42-420 A2S
     & spherical kit   USER’S MANUAL
                       MANUEL UTILISATEUR
OPTIMO 42-420 A2S
OPTIMO STYLE 25-250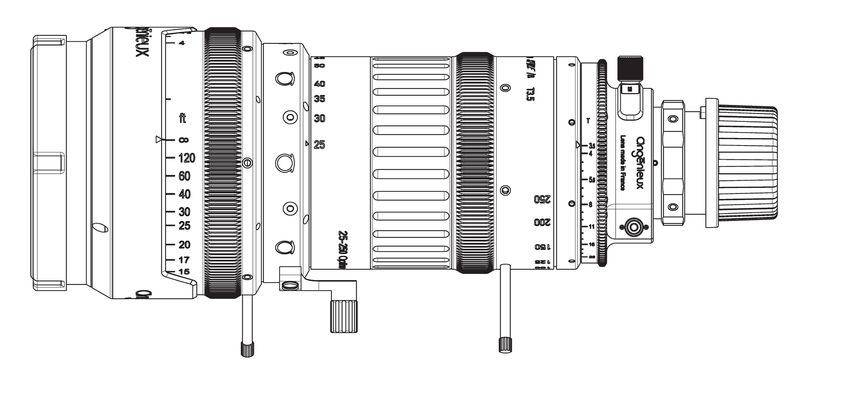
PACKAGE :
OPTIMO 42-420 A2S
     & spherical kit
OPTIMO 42-420 A2S
OPTIMO STYLE 25-250
OPTIMO 42-420 A2S

OPTIMO STYLE 25-250

                      +
                                  PACKAGE :
                          OPTIMO 42-420 A2S
                               & spherical kit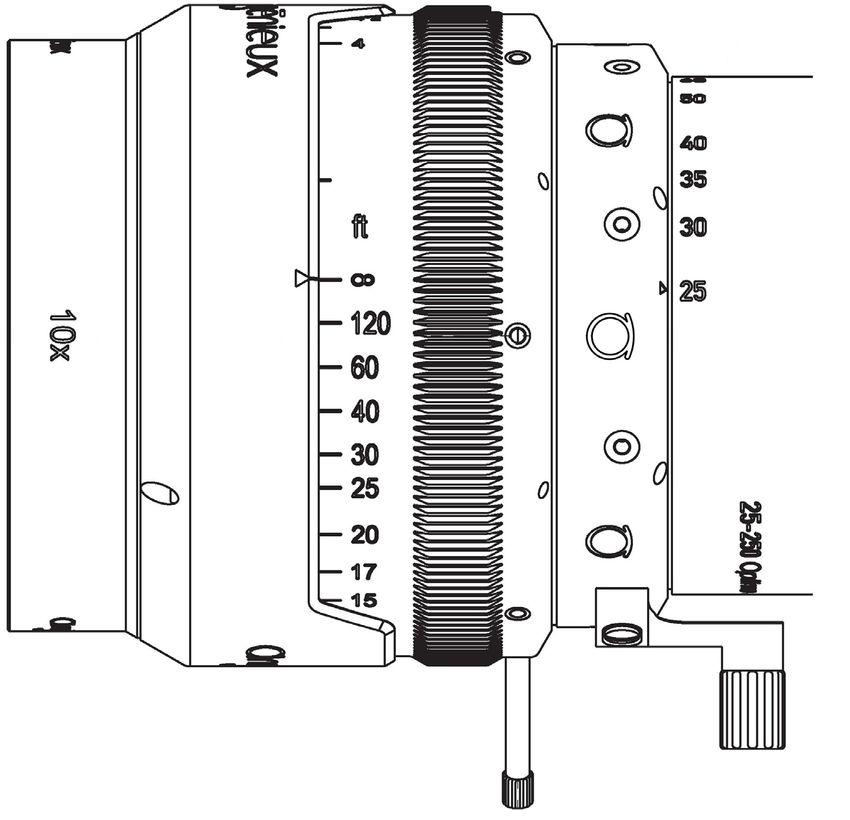
PACKAGE : OPTIMO 42-420 A2S & spherical kit
                      OPTIMO 42-420 A2S
                      OPTIMO STYLE 25-250
                                         USER’S MANUAL
                                     MANUEL UTILISATEUR

                     Référence : 0323431-A   Edition : Septembre 2018
September 2018: © THALES ANGENIEUX. Photos and drawings are
                not contractually binding. The data is given for information. THALES
                ANGENIEUX reserves the right to change the performances of its products
                without notice.
                CONFIDENTIAL / ALL RIGHT RESERVED
                This document is the full and sole property of THALES ANGENIEUX. Any
                reproduction, rights of reproduction, translation, modification, publication
                on material or digital medium in whole or in part of the document, is
                strictly forbidden.

                Septembre 2018: © THALES ANGENIEUX. Photos et illustrations non
                contractuelles. Ces données ne sont fournies qu’à titre informatif. THALES
                ANGENIEUX se réserve le droit de modifier les performances de ses
                produits sans avis préalable.
                CONFIDENTIEL / TOUS DROITS RESERVES
                Ce document est la propriété exclusive et intégrale de THALES
                ANGENIEUX. Toute reproduction, autorisation de reproduction, traduction,
                modification, publication sur un support matériel ou numérique, partielle
                ou intégrale du document, sont strictement interdites.

6   PACKAGE : OPTIMO 42-420 A2S / OPTIMO 42-420 A2S + SPHERICAL KIT / OPTIMO STYLE
SAFETY INFORMATION
Read this manual carefully.
Warnings
- Do not look at high intensity light directly through the lens.
- Handle the zoom with care.
- Do not put the zoom in contact with water.
- Avoid electric discharges.
Storage conditions
Store the zoom in a dry place where the temperature does not exceed -40°C and +70°C.
Temperature
- The zoom is designed to be used between -20°C and +45°C.
- A temperature change can result in a small shift of the focus plan. (See readjusting the focus ring p.47)
Advanced maintenance
These zooms require a certain level of maintenance that only Thales Angénieux can provide. We recommend you to contact us to take care of
your zoom. (See Advanced maintenance p.65)
Recycling and environment
The zooms contain none of the chemical substances covered by European Union RoHS directive, concerning the restriction of use of
hazardous substances in the electrical and electronic appliances within the European Union.
The zooms contain non of the chemical substances covered by European Regulation REACH in excess of the thresholds set out.
In the frame of the WEEE regulation, when your zoom are out of order, bring it back to your Thales Angénieux retailer.
For the other countries, get information from the local authorities.
PACKAGE : OPTIMO 42-420A2S / OPTIMO 42-420 A2S + SPHERICAL KIT / OPTIMO STYLE 7PRÉCAUTIONS D’USAGE
Lisez attentivement ce manuel.
Avertissements
- Ne regardez pas une source de lumière directement à travers les lentilles.
- Manipulez le zoom avec précaution.
- Ne mettez pas le zoom en contact avec l’eau.
- Evitez les décharges électriques.
Conditions de stockage
Rangez le zoom dans un endroit sec où la température ne dépasse pas -40°C ou +70°C.
Température
- Le zoom est conçu pour être utilisé entre -20°C et +45°C.
- Un changement de température peut entraîner un léger décalage de la mise au point. (Voir recalage de la bague fixe de MAP p.47)
Advanced maintenance
La maintenance complète de ce type de zoom ne peut être effectuée que par des personnes hautement qualifiées. Nous vous recommandons
de nous contacter pour faire effectuer la maintenance de votre zoom. (voir Maintenance avancée p.65)
Recyclage et environnement
Les zooms ne contiennent aucune substance visée par la directive RoHS de l’Union Européenne, relative à la limitation de l’utilisation de
substances dangereuses dans les équipements électriques et électroniques au sein de l’Union Européenne.
Les zooms ne contiennent aucune substance chimique visée par le Réglement Européen REACH dans des proportions supérieures aux seuils
définis. En vertu de la réglementation applicable en France et notamment du Code de l’Environnement, Thales Angénieux procède à la reprise
des Déchets d’Equipements Electriques et Electroniques professionnels.
Pour les autres pays, il convient de se renseigner auprès des autorités locales compétentes.
8 PACKAGE : OPTIMO 42-420 A2S / OPTIMO 42-420 A2S + SPHERICAL KIT / OPTIMO STYLECONTENTS / SOMMAIRE 1- PRODUCT CONFIGURATIONS 11
CONFIGURATIONS PRODUIT 11
2 - TECHNICAL SPECIFICATIONS 15
SPECIFICATIONS TECHNIQUES 15
3 - ZOOM INSTALLATION ON CAMERA AND ACCESSORIZING 25
INSTALLATION DU ZOOM SUR LA CAMERA ET ACCESSORISATION 25
4 - ADJUSTMENTS 33
REGLAGES 33
5 - TRANSFORMATION 51
TRANSFORMATION 51
6 - MAINTENANCE 61
ENTRETIEN 61
7 - OUTLINE DRAWING 67
PLAN D’ENCOMBREMENT 67
CONTENTS / SOMMAIRE PACKAGE : OPTIMO 42-420A2S / OPTIMO 42-420 A2S + SPHERICAL KIT / OPTIMO STYLE 9OPTIMO STYLE 25-250
PRODUCT CONFIGURATIONS
 CONFIGURATIONS PRODUIT

                          11
This user manual describes the following products: Ce manuel utilisateur décrit les produits suivants :
• The Optimo Style 25-250 zoom : Spherical version, • Le zoom Optimo Style 25-250 : version sphérique,
• The Optimo 42-420 A-2S zoom : anamorphic version, • Le zoom Optimo 42-420 A-2S : version anamorphique,
• The package Optimo 42-420 A-2S + spherical transformation KIT. • Le pack Optimo 42-420 A-2S + KIT de transformation sphérique.
The package allows via spherical rear sub-assembly and cosmetic ring La configuration en pack permet, via un changement du sous
to switch between Optimo 42-420 A-2S and Optimo Style 25-250 or ensemble arrière et de bagues d’habillage, de passer d’un zoom
vice versa. Optimo 42-420 A-2S à un zoom Optimo Style 25-250 et inversement.
The package Optimo 42-420 A2S + spherical KIT includes: Le pack Optimo 42-420 A2S + kit sphérique contient :
• An Optimo 42-420 A2S zoom and its documentation • Un zoom Optimo 42-420 A2S et sa documentation
• A spherical transformation KIT including : • Un KIT de transformation sphérique comprenant :
- A spherical rear sub-assembly, - Un sous ensemble arrière sphérique,
- A focal length control ring and a focus ring for Optimo Style - Une bague focale et une bague MAP en version Optimo Style
25-250, 25-250,
- A depth of field table for Optimo Style 25-250. - Une table de profondeur de champ en version Optimo Style
25-250.
12 PACKAGE : OPTIMO 42-420 A2S / OPTIMO 42-420 A2S + SPHERICAL KIT / OPTIMO STYLE 1 - PRODUCT CONFIGURATIONS I CONFIGURATIONS PRODUITSOPTIMO 42-420 A2S
TECHNICAL SPECIFICATIONS
SPECIFICATIONS TECHNIQUES

                            15
2 - TECHNICAL SPECIFICATIONS
ANGENIEUX OPTIMO STYLE 25-250
Zoom ratio 10x
Focal Length 25-250 mm
Maximum aperture f/3.2 - T3.5
Minimum Object Distance (MOD) 4 feet
Image coverage S35+ : 31.4 mm diagonal
Weight 7.25 kg - 16 lbs
Front diameter 136 mm
Max diameter < 152 mm
Length (front to mount) 377.4 mm (PL) - 372.3 mm (Panavision)
Mounts PL or Panavision (Canon & Nikon options available)
Internal focus Yes
Iris scales 2 opposite scales
Angular rotation of iris ring 80°
Iris gear drive 144 teeth, pitch 32
Zoom scales 2 opposite scales
Angular rotation of zoom ring 170°
Zoom gear drive 154 teeth, pitch 32
Focus scales 2 opposite scales, metric or footage marked
Angular rotation of focus ring 339°/305°
Focus gear drive 189 teeth, pitch 32
Angular field of view (for film size 22x16mm)
Focal Length 25 mm 250 mm
Horizontal angular FOV 47.6° 5°
Object size at MOD 789x565 mm 78.9x58.1 mm
16 PACKAGE : OPTIMO 42-420 A2S / OPTIMO 42-420 A2S + SPHERICAL KIT / OPTIMO STYLE 2 - TECHNICAL SPECIFICATIONS I SPECIFICATIONS TECHNIQUES2 - SPÉCIFICATIONS TECHNIQUES ANGENIEUX OPTIMO STYLE 25-250 Zoom ratio 10x Focale 25-250 mm Ouverture f/3.2 - T3.5 Distance Minimum de mise au point 1.22 m Format image couvert S35+ : 31.4 mm diagonal Poids 7.25 kg - 16 lbs Diamètre avant 136 mm Diamètre maximal
2 - TECHNICAL SPECIFICATIONS

                   ANGENIEUX OPTIMO 42-420 A2S
                   Zoom ratio                                                                             10x
                   Focal Length                                                                           42-420 mm
                   Maximum aperture                                                                       f/3.9 - T4.5
                   Minimum Object Distance (MOD)                                                          4 feet 1 inch
                   Image coverage                                                                         22x18.6 mm
                   Weight                                                                                 7.6 kg - 16.7 lbs
                   Front diameter                                                                         136 mm
                   Max diameter                                                                           < 152 mm
                   Length (front to mount)                                                                414 mm (PL)
                   Mounts                                                                                 PL
                   Internal focus                                                                         Yes

                   Iris scales                                                                            2 opposite scales
                   Angular rotation of iris ring                                                          80°
                   Iris gear drive                                                                        144 teeth, pitch 32

                   Zoom scales                                                                            2 opposite scales
                   Angular rotation of zoom ring                                                          170°
                   Zoom gear drive                                                                        154 teeth, pitch 32

                   Focus scales                                                                           2 opposite scales, metric or footage marked
                   Angular rotation of focus ring                                                         339°/305°
                   Focus gear drive                                                                       189 teeth, pitch 32

                   Angular field of view (for film size 22x18.6mm)
                   Horizontal Focal Length                                                                21 mm                                  210 mm
                   Vertical Focal Length                                                                  42 mm                                  420 mm
                   Horizontal angular FOV                                                                 56.80°                                 6.00°
                   Vertical angular FOV                                                                   24.80°                                 2.60°
                   Object size at MOD                                                                     970x394 mm                             95x41 mm

18   PACKAGE : OPTIMO 42-420 A2S / OPTIMO 42-420 A2S + SPHERICAL KIT / OPTIMO STYLE   2 - TECHNICAL SPECIFICATIONS I SPECIFICATIONS TECHNIQUES
2 - SPÉCIFICATIONS TECHNIQUES ANGENIEUX OPTIMO 42-420 A2S Zoom ratio 10x Focale 42-420 mm Ouverture f/3.9 - T4.5 Distance Minimum de mise au point 1.24 m Format image couvert 22x18.6 mm Poids 7.6 kg - 16.7 lbs Diamètre avant 136 mm Diamètre maximal
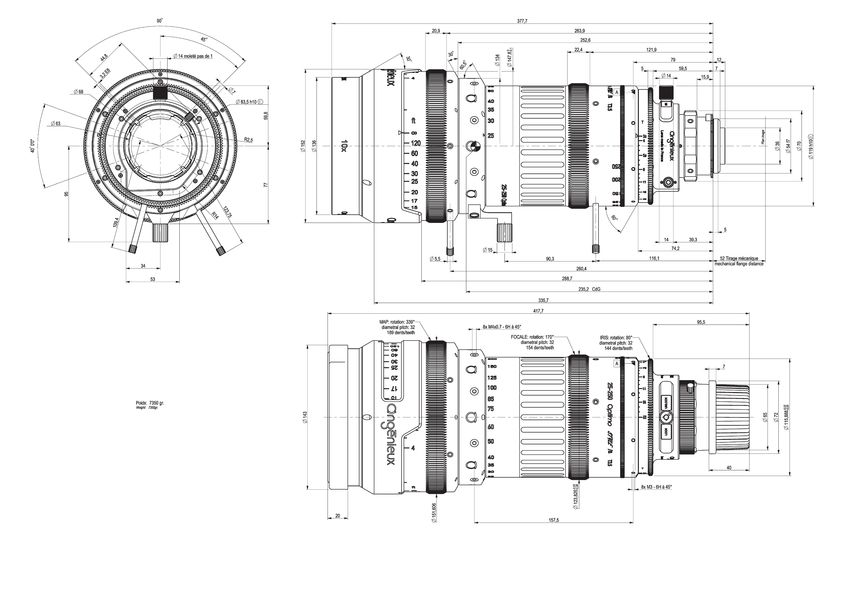
Figure 1

       25-250

                             1            2              3            4                         9                  10       15 11             12   13   14

                                                                                                                                                             5 6 7   8

 42-420 A2S

20     PACKAGE : OPTIMO 42-420 A2S / OPTIMO 42-420 A2S + SPHERICAL KIT / OPTIMO STYLE   2 - TECHNICAL SPECIFICATIONS I SPECIFICATIONS TECHNIQUES
Figure 2
16
2 - TECHNICAL SPECIFICATIONS I SPECIFICATIONS TECHNIQUES PACKAGE : OPTIMO 42-420A2S / OPTIMO 42-420 A2S + SPHERICAL KIT / OPTIMO STYLE 21GENERAL VIEW
Reference Description Quantity (in zoom alone configuration)
1 Front cap 1
2 Focus witness mark ring 1
3 Engraved focus ring feet / meters 1
4 Focus lever 1
5 Screws for bracket 2
6 Washer for bracket 2
7 Bracket 1
8 Bracket extension 1
9 Focal length control ring 1
10 Zoom lever 1
11 Filter holder (for 25-250 only) 1
12 External connection 1
13 PL mount assembly 1
14 Rear cap 1
15 Lock/Unlock button (for 25-250 only) 1
16 Camera connector 1
VUE GENERALE
Référence Désignation Quantité (en configuration zoom seul)
1 Bouchon avant 1
2 Bague de repère fixe MAP 1
3 Bague de mise au point gravée en pieds / mètres 1
4 Levier de commande MAP 1
5 Vis de support 2
6 Rondelle de support 2
7 Support 1
8 Rallonge de support 1
9 Bague de commande focale 1
10 Levier de commande zoom 1
11 Porte-filtre (sur 25-250 uniquement) 1
12 Connecteur accessoires 1
13 Sous-ensemble monture PL 1
14 Bouchon arrière 1
15 Bouton de verrouillage Lock/Unlock(sur 25-250 uniquement) 1
16 Connecteur caméra 1
22 PACKAGE : OPTIMO 42-420 A2S / OPTIMO 42-420 A2S + SPHERICAL KIT / OPTIMO STYLE 2 - TECHNICAL SPECIFICATIONS I SPECIFICATIONS TECHNIQUESELECTRONICS SPECIFICATIONS
The zoom is compatible with the Cooke * protocol (version 3.0, June 2012).
Updates of the embedded software can be found at www.angenieux.com or by contacting your distributor. Implement the updates using the cable
(ref. 0318006) available by contacting your distributor.
Voltage Consumption
Camera connector (16) PL mount with 4 pins 9-35 V About 10 mA / 12V
External connection (12) Standard LEMO connector EGB00304 CLL with 4 pins 9-35 V About 10 mA / 12V
If you encounter issues with electronics, see Electronic troubleshooting p. 62.
SPECIFICATIONS ELECTRONIQUES
Le zoom est compatible avec le protocoke Cooke * (version 3.0, juin 2012).
Les mises à jour du logiciel embarqué sont disponibles sur le site Angénieux www.angénieux.com ou auprès de votre distributeur. Effectuez les
mises à jour avec le câble (réf. 0318006) disponible auprès de votre distributeur.
Tension Consommation
Connecteur caméra (16) Monture PL avec 4 contacts 9-35 V Environ 10 mA / 12V
Connecteur accessoires (12) Connecteur standard LEMO EGB00304CLL avec 4 contacts 9-35 V Environ 10 mA / 12V
Si vous rencontrez des problèmes avec l’électronique, référez-vous à la serction Résolution des problèmes électroniques p.62.
* is a registered trademark of Cooke Optics Limited used with permission. / est une marque déposée de Cooke Optics Limited utilisée avec autorisation.
2 - TECHNICAL SPECIFICATIONS I SPECIFICATIONS TECHNIQUES PACKAGE : OPTIMO 42-420A2S / OPTIMO 42-420 A2S + SPHERICAL KIT / OPTIMO STYLE 23LENS POLISHING / POLISSAGE D’UNE LENTILLE
ZOOM INSTALLATION ON CAMERA AND ACCESSORIZING
INSTALLATION DU ZOOM SUR LA CAMERA ET ACCESSORISATION

                                                        25
3.1 - INSTALLATING THE ZOOM ON THE CAMERA 3.1 - INSTALLER LE ZOOM SUR LA CAMERA
1. Remove the rear cap (14). 1. Retirez le bouchon arrière (14).
2. Make sure the rear element is clean. 2. Assurez-vous que l’élément arrière soit propre.
3. Install the bracket (7) with a standard lens support unit. The 3. Montez le zoom sur pied (7) avec un support standard.
bracket (7) direction can be adjusted before tightening the screws L’orientation du pied (7) sur le zoom peut être ajustée avant
for bracket (5). blocage des vis du pied (6).
4. Make sure the mounts on the zoom (13) and on the camera are 4. Assurez-vous que la monture sur la caméra et la monture sur le
perfectly clean. zoom (13) soient propres.
5. Place the zoom mount (13) in the camera mount with the electronic 5. Placez la monture du zoom (13) sur la monture de la caméra avec
pins of the zoom positioned on the top. les contacts du zoom en haut.
6. Tighten the camera mount. 6. Serrez la monture de la caméra.
7. Remove the front cap (1). 7. Retirez le bouchon avant (1).
8. Install the other optional accessories. 8. Installez les autres accessoires optionnels.
26 PACKAGE : OPTIMO 42-420 A2S / OPTIMO 42-420 A2S + SPHERICAL KIT / OPTIMO STYLE 3 - ZOOM INSTALLATION ON CAMERA AND ACCESSORIZING I INSTALLATION DU ZOOM SUR LA CAMERA ET ACCESSORISATION3.2 - FILTER-HOLDER AND INTERNAL FILTER 3.2 - PORTE-FILTRE ET FILTRE INTERNE
(for 25-250 only) (sur 25-250 uniquement)
There are two models of filter-holders: the filter holder for M40.5 Il existe deux modèles du porte-filtre : le porte filtre pour les filtres M40.5
filters and the filter holder for M46 filters. et le porte-filtre pour les filtres M46.
Delivered with the zoom Available on demand (See Livré avec le zoom Disponible sur commande
- Filter holder for M40.5 filters parts available on demand - Porte filtre filtres M40.5 (Voir pièces disponibles sur
- M40.5 neutral filter p.63) - Filtre neutre M40.5 commande P.64)
- M40.5 washer adapter - Filter holder for M46 filters - Rondelle filtre M40.5 - Porte filtre pour filtres M46
- M46 washer adapter - Rondelle filtre M46
Most of the B+W, TIFFEN and HOYA filters (except circular polarizers) La plupart des filtres B+W, TIFFEN et HOYA sont compatibles (sauf filtres
are compatibles. polarisants circulaires).
See the table and the diagram opposite to know when you need the Reportez-vous au tableau et schéma ci-contre pour savoir si la rondelle
adapter ring according to the selected filter-holder and filter. est nécessaire selon le porte-filtre et le filtre choisi.
To change the filter, see p. 43. Pour changer le filtre voir p. 43.
3 - ZOOM INSTALLATION ON CAMERA AND ACCESSORIZING I INSTALLATION DU ZOOM SUR LA CAMERA ET ACCESSORISATION PACKAGE : OPTIMO 42-420A2S / OPTIMO 42-420 A2S + SPHERICAL KIT / OPTIMO STYLE 27Figure 3
F
Reference Filter alone if : Filter with washer if :
Cote Filtre seul si : Filtre avec rondelle si :
A M40.5 M46 M40.5 M46
F > 5.3 and < 5.9 mm < 5.3 mm
G < 8 mm < 8mm
G-F < 2.1 mm > 2.1 and < 2.7 mm
G
Filter / Filtre
28 PACKAGE : OPTIMO 42-420 A2S / OPTIMO 42-420 A2S + SPHERICAL KIT / OPTIMO STYLE 3 - ZOOM INSTALLATION ON CAMERA AND ACCESSORIZING I INSTALLATION DU ZOOM SUR LA CAMERA ET ACCESSORISATION3.3 - FRONT PROTECTIVE GLASS (optional) 3.3 - HUBLOT (optionnel)
The front protective glass (132 x 0.75 mm) protects the zoom lens from Le hublot (132 x 0.75 mm) protège la lentille du zoom des rayures.
scratches. La présence du hublot ne produit pas de vignettage et le zoom avec le
The front protective glass does not cause vignetting and the zoom hublot reste compatible avec les “matte boxes”.
with the front protective glass remains compatible with “matte boxes”. Le hublot est disponible sur commande (Voir Pièces disponibles sur
The front protective glass is available on demand (See Parts available commande p. 64).
on demand p. 63).
3 - ZOOM INSTALLATION ON CAMERA AND ACCESSORIZING I INSTALLATION DU ZOOM SUR LA CAMERA ET ACCESSORISATION PACKAGE : OPTIMO 42-420A2S / OPTIMO 42-420 A2S + SPHERICAL KIT / OPTIMO STYLE 293.4 - FOLLOW FOCUS COMPATIBILITY 3.4 - COMPATIBILITE FOLLOW FOCUS
In addition to the bracket (7), each product is delivered with one En supplément du pied (7), chaque produit est livré avec une réhausse
spacer (17) and 2 screws (18). These parts allow 2 different assembly (17) et 2 vis (18) qui permettent d’assurer une compatibilité maximale
configurations to ensure a compatibility with different follow focus avec différents types de follow focus.
versions.
17
18
Configuration 1 Configuration 2
Figure 4 Figure 5
7 5-6 8 17 18 7 5-6
Position of the follow focus Position of the follow focus
Emplacement du follow focus Emplacement du follow focus
Configuration compatible with ARRI FF5 follow focus Configuration compatible with ARRI FF3 & FF4 follow focus
Configuration compatible avec ARRRI FF5 follow focus Configuration compatible avec ARRRI FF3 & FF4 follow focus
30 PACKAGE : OPTIMO 42-420 A2S / OPTIMO 42-420 A2S + SPHERICAL KIT / OPTIMO STYLE 3 - ZOOM INSTALLATION ON CAMERA AND ACCESSORIZING I INSTALLATION DU ZOOM SUR LA CAMERA ET ACCESSORISATION3.5 - OTHER ACCESSORIES
You can also install the following accessories:
Accessories Example of accessory
Matte box A matte box with an internal diameter of 136 mm or larger
Controlled lens motor compatible with the zoom gear drive pitch 32
3.5 - AUTRES ACCESSOIRES
Vous pouvez également installer les accessoires suivants :
Accessoires Exemple d’accessoire
Matte box Un matte box d’un diamètre intérieur de 136 mm ou plus
Moteur de contrôle compatible avec pignon d’engrenage pitch 32
3 - ZOOM INSTALLATION ON CAMERA AND ACCESSORIZING I INSTALLATION DU ZOOM SUR LA CAMERA ET ACCESSORISATION PACKAGE : OPTIMO 42-420A2S / OPTIMO 42-420 A2S + SPHERICAL KIT / OPTIMO STYLE 31MAINTENANCE OPERATION / OPÉRATION DE MAINTENANCE
ADJUSTMENTS
   REGLAGES

              33
TOOLS FOR THE ADJUSTMENTS
Note: All the adjustments shown are made with a PL mount. The adjustments are identical for the other mount types.
Description Spanner reference Retaining ring or screws Locking torque
Allen key for tracking adjustment screws Allen key 1.5 mm 0986907 (20) -
Screwdriver for flange shim retaining screw Philips screwdriver 0982097 (23) 0.04 N.m
Screwdriver for rear ring screws Screwdriver 0990297 (25) 0.12 N.m
Allen key for witness mark focus ring screws Allen key 2 mm 0986357 (28) 0.25 N.m
Screwdriver for engraved focus ring screws Philips screwdriver 0982347 (29) 0.12 N.m
Allen key for rotation adjustment screws Allen key 1.3 mm 0987368 (30) -
Allen key for rotation locking screws Allen key 1.5 mm 0987287 (31) 0.12 N.m
OUTILS POUR LES REGLAGES
Remarque : Tous les réglages sont réalisées sur une monture PL. Les réglages sont identiques pour les autres types de montures.
Description Référence de la clé Référence de l’écrou ou de la vis Couple de serrage
Clé pour vis de réglage tracking Clé six pans 1.5 mm 0986907 (20) -
Tournevis pour vis de la cale pelable Tournevis cruciforme 0982097 (23) 0.04 N.m
Tournevis pour vis cache arrière Tournevis plat 0990297 (25) 0.12 N.m
Clé pour vis bague de repère fix MAP Clé six pans 2 mm 0986357 (28) 0.25 N.m
Clé pour vis de fixation bague gravée de MAP Tournevis cruciforme 0982347 (29) 0.12 N.m
Clé pour vis de réglage d’orientation Clé six pans 1.3 mm 0987368 (30) -
Clé pour vis de réglage d’orientation Clé six pans 1.5 mm 0987287 (31) 0.12 N.m
34 PACKAGE : OPTIMO 42-420 A2S / OPTIMO 42-420 A2S + SPHERICAL KIT / OPTIMO STYLE 4 - ADJUSMENTS I REGLAGESFigure 6
20 25 26 21 22 20 26 21 22
42-420 A2S 25-250
24 20 23 19 20 23
4 - ADJUSMENTS I REGLAGES PACKAGE : OPTIMO 42-420A2S / OPTIMO 42-420 A2S + SPHERICAL KIT / OPTIMO STYLE 35REAR GROUP VIEW VIEW
Reference Description Quantity (in zoom alone
configuration)
19 Filter (for 25-250 only) 1
20 Tracking adjustment screws 4
21 Flange shim 2
22 Mount attaching ring 1
23 Flange shim retaining screw 1
24 Rear ring (for 42-420 A2S only) 1
25 Rear ring screws (for 42-420 A2S only) 3
26 Tightening lever 1
VUE ARRIERE
Référence Désignation Quantité (en configuration
zoom seul)
19 Filtre (sur 25-250 seulement) 1
20 Vis de tracking 4
21 Cale pelable 2
22 Ecrou d’accrochage 1
23 Vis de la cale pelable 1
24 Bague arrière (sur 42-420 A2S uniquement) 1
25 Vis bague arrière (sur 42-420 A2S uniquement) 3
26 Levier de serrage 1
36 PACKAGE : OPTIMO 42-420 A2S / OPTIMO 42-420 A2S + SPHERICAL KIT / OPTIMO STYLE 4 - ADJUSMENTS I REGLAGES4.1 - REPLACING THE MOUNT 4.1 - CHANGER LA MONTURE
Note: Place the zoom on the front cap (1; fig 1). Remarque : Posez le zoom à plat sur le bouchon avant (1; fig 1).
1. Unscrew the mount attaching ring (22; fig 7) to take off the current 1. Dévissez l’écrou d’accrochage (22; fig 7) pour enlever la monture
mount (13; fig 1). actuelle (13; fig 1).
2. Screw the mount back on aligning firstly the pin with the notch 2. Vissez la nouvelle monture en alignant préalablement la goupille
of the PL mount. Do not turn the PL mount when it is in contact avec le cran de la monture. Ne pas tourner la monture lorsqu’elle
with the front part of the product to avoid damaging electrical se trouve en contact avec la partie avant du zoom pour ne pas
connectors. dégrader les connecteurs électriques
3. Adjust the tightening with the lever (26; fig 7). 3. Réglez le serrage à l’aide du levier (26; fig 7).
4 - ADJUSMENTS I REGLAGES PACKAGE : OPTIMO 42-420A2S / OPTIMO 42-420 A2S + SPHERICAL KIT / OPTIMO STYLE 37Figure 7
22 26
38 PACKAGE : OPTIMO 42-420 A2S / OPTIMO 42-420 A2S + SPHERICAL KIT / OPTIMO STYLE 4 - ADJUSMENTS I REGLAGES4.2 - ADJUSTING THE FLANGE/BACK-FOCUS 4.2 - REGLAGE DU TIRAGE
Checking the back-focus Vérifier le tirage
1. Mount the zoom with a PL mount checker on a projector. 1. Montez le zoom avec un vérificateur PL sur un projecteur.
2. Position the projector at about 6 feet from the screen and make 2. Positionnez le projecteur à environ 2 mètres de l’écran et effectuez
the best focus at long focal length. For Optimo 42-420 A-2S, choose la meilleure mise au point possible en longue focale. Pour le Optimo
the best focus by performing the best compromise between the 42-420 A-2S, choisissez la meilleure mise au point en réalisant le
resolution of horizontal lines and the resolution of vertical lines. Pay meilleur compromis entre la résolution des traits horizontaux et la
attention to keep this focus for the following steps. résolution des traits verticaux. Veiller à conserver cette position de
3. Switch to short focal length. If the best focus is: mise au point pour la suite des opérations.
- Between the screen and the zoom, you have to decrease the flange 3. Passez en courte focale, si la meilleure mise au point est :
shim thickness (21; fig 9). - Entre l’écran et le zoom, vous devez diminuer l’épaisseur de la cale
- Behind the screen, you have to increase the flange shim thickness pelable (21; fig 9).
(21; fig 9).
- Derrière l’écran, vous devez augmenter l’épaisseur de la cale
4. After adjusting the shim thickness, check at long focal length that pelable (21; fig 9).
the focus is still optimum. If not, repeat steps of focus optimization
4. Après modification de la cale pelable, se mettre à la longue focale
and shim thickness adjustment.
et vérifier que le réglage de la MAP est toujours optimal. Si ce n’est
Adjusting the thickness of the flange shim pas le cas, répéter les opérations de choix de meilleure MAP et de
To adjust the flange, you need to change the thickness of the flange réglage de la cale.
shim (21; fig 9). Modifier l’épaisseur de la cale de tirage
1. Remove the mount (13; fig 1) (see Replacing the mount paragraph 1). Le réglage du tirage s’effectue par modification de l’épaisseur de la cale
2. Remove the flange shim retaining screw (23; fig 9). pelable (21; fig 9).
3. Modify the thickness of the flange shim: 1. Retirez la monture (13; fig 1) (voir Remplacer la monture paragraphe
- Take off one or several shims to decrease the thickness. 1).
- Add one or several shims to increase the thickness. 2. Retirez la vis de la cale pelable (23; fig 9).
4. Screw the flange shim retaining screw (23; fig 9) back on. 3. Modifiez l’épaisseur de la cale pelable :
5. Screw the mount (13; fig 1) back on aligning firstly the pin with the - Enlevez une ou plusieurs rondelles pour diminuer l’épaisseur.
notch of the PL mount. Do not turn the PL mount when it is in contact - Ajoutez une ou plusieurs rondelles pour augmenter l’épaisseur.
with the front part of the product to avoid damaging electrical 4. Revissez la vis de la cale pelable (23; fig 9).
connectors.
5. Revissez la nouvelle monture en alignant préalablement la goupille
avec le cran de la monture. Ne pas tourner la monture lorsqu’elle
se trouve en contact avec la partie avant du zoom pour ne pas
dégrader les connecteurs électriques.
4 - ADJUSMENTS I REGLAGES PACKAGE : OPTIMO 42-420A2S / OPTIMO 42-420 A2S + SPHERICAL KIT / OPTIMO STYLE 39Figure 8 Figure 9
21 23
40 PACKAGE : OPTIMO 42-420 A2S / OPTIMO 42-420 A2S + SPHERICAL KIT / OPTIMO STYLE 4 - ADJUSMENTS I REGLAGES4.3 - ADJUSTING THE TRACKING 4.3 - REGLAGE DU TRACKING
Measuring the tracking Mesurer le tracking
1. Remove the rear cap (14; fig 1). 1. Retirez le bouchon arrière (14; fig 1).
2. Mount the zoom with a checker on a projector. 2. Montez le zoom avec un vérificateur sur un projecteur.
3. Remove the front cap (1; fig 1). 3. Retirez le bouchon avant (1; fig 1).
4. Position the zoom at about 6 feet at long focal length and put a 4. Positionnez le zoom à environ 2 mètres en longue focale et faites
mark on the screen. une marque sur l’écran.
5. Switch to short focal length. 5. Passez en courte focale.
6. Measure the tracking (T) which is the distance between the long 6. Mesurez le tracking (T), c’est-à-dire la distance entre la longue focale
focal length and the short focal length (figure 10).
et la courte focale (figure 10).
Adjusting the tracking Régler le tracking
You can adjust the tracking with the four tracking adjustment screws
Le réglage du tracking est accessible par les quatre vis de tracking
(20; fig 6) located at the rear of the zoom.
(20; fig 6) à l’arrière du zoom.
- Adjust the horizontal axis with the two vertical screws. - Ajustez l’axe horizontal avec les deux vis verticales.
- Adjust the vertical axis with the two horizontal screws. - Ajustez l’axe vertical avec les deux vis horizontales.
1. For 42-420 A2S, remove the rear cover ring (24; fig 6) by unscrewing 1. Sur le 42-420 A-S, retirer la bague arrière (24; fig 6) en dévissant
the 3 screws (25; fig 6). les 3 vis (25; fig 6)
2. With an Allen key, untighten one screw while tightening the other 2. Avec une clé Allen, desserrez une vis tout en serrant l’autre
(figure 11). (figure 11).
3. To check the modified shift, measure again. 3. Pour vérifier le décalage modifié, mesurez de nouveau.
4. If necessary, repeat until you get the correct shift. 4. Si nécessaire, renouvelez jusqu’à obtenir le bon décalage.
5. For the 42-420 A2S, reinstall the rear cover ring (24; fig 6) and 5. Sur le 42-420 A2S, remettre en place la bague arrière (24; fig 6) et
tighten the 3 screws (25; fig 6) serrer les 3 vis (25; fig 6)
4 - ADJUSMENTS I REGLAGES PACKAGE : OPTIMO 42-420A2S / OPTIMO 42-420 A2S + SPHERICAL KIT / OPTIMO STYLE 41Figure 10 Figure 11
For 25-250 I pour 25-250 : For 42-420 A2S I pour 42-420 A2S :
Tx & Ty specification : 0.08mm Tx specification : 0.08mm
Ty specification : 0.04mm
42 PACKAGE : OPTIMO 42-420 A2S / OPTIMO 42-420 A2S + SPHERICAL KIT / OPTIMO STYLE 4 - ADJUSMENTS I REGLAGES4.4 - REPLACING THE FILTER (for 25-250 only) 4.4 - CHANGER LE FILTRE (pour 25-250 uniquement)
1. Push and turn the lock button to UNLOCK (15) (figure 12). 1. Poussez et tournez le bouton de verrouillage sur UNLOCK (15)
2. Pull up the filter holder (11) (figure 13). (figure 12).
3. Unscrew the current filter (figure 14). 2. Tirez le porte-filtre (11) vers le haut (figure 13).
3. Dévissez le filtre existant (figure 14).
Note: If necessary, add the ring adapter (27) (See Filter holder and
internal filter paragraph 3.2). Remarque : Si nécessaire, ajoutez la rondelle filtre (27) (voir Porte-filtre
et filtre interne paragraphe 3.2).
4. Screw in the new filter.
5. Slide the filter holder in its location. 4. Vissez le nouveau filtre.
6. Once in place, push and turn the lock button to LOCK (15). 5. Glissez le porte-filtre dans son emplacement.
6. Une fois en place, poussez et tournez le bouton de verrouillage sur
LOCK (15).
15 11 11 27 19
Figure 12 Figure 13 Figure 14
4 - ADJUSMENTS I REGLAGES PACKAGE : OPTIMO 42-420A2S / OPTIMO 42-420 A2S + SPHERICAL KIT / OPTIMO STYLE 43Figure 15
28 29 28 29
25-250 42-420 A2S
44 PACKAGE : OPTIMO 42-420 A2S / OPTIMO 42-420 A2S + SPHERICAL KIT / OPTIMO STYLE 4 - ADJUSMENTS I REGLAGESFRONT VIEW
Reference Description Quantity
(in zoom alone configuration)
28 Witness mark focus ring screw 3
29 Engraved focus ring screw 6
VUE AVANT
Référence Désignation Quantité
(en configuration zoom seul)
28 Vis bague de repère fixe de MAP 3
29 Vis de fixation de la bague gravée de MAP 6
4 - ADJUSMENTS I REGLAGES PACKAGE : OPTIMO 42-420A2S / OPTIMO 42-420 A2S + SPHERICAL KIT / OPTIMO STYLE 454.5 - REPLACING THE ENGRAVED FOCUS RING 4.5 - REMPLACER LA BAGUE GRAVEE DE MAP
Notes: During the process, take care to ensure dust or metallic particles Remarques : Pendant l’opération, veillez à ce qu’aucune poussière ou
do not get inside the focus mechanism. particule mécanique ne pénètre dans le mécanisme de mise au point.
To get a new focus ring in feet or in meters, contact THALES ANGÉNIEUX. Pour obtenir une nouvelle bague MAP en pieds ou mètres, contactez
1. Unscrew the control levers (4, 10; fig 16) and the bracket (7; fig 16).
THALES ANGÉNIEUX.
1. Dévissez les deux leviers de commande (4, 10; fig 16) et le support
2. Place the engraved focus ring at the infinity mechanical stop.
zoom (7; fig 16).
3. With a Phillips screwdriver, remove the 6 engraved focus ring screws
2. Positionnez la bague MAP gravée en position de butée infini
(29; fig 17).
3. Avec un tournevis cruciforme, retirez les 6 vis de fixation de la
4. Remove the engraved focus ring (3; fig 1).
bague de MAP gravée (29; fig 17).
5. Place the new engraved focus ring and align it with the infinity stop.
4. Retirez la bague MAP gravée (3; fig 1).
6. Screw the 6 screws back on (29; Fig 18).
5. Positionnez la nouvelle bague MAP gravée en position de butée
7. Screw the bracket (7) and the control levers (4, 10) back on. infini.
6. Revissez les 6 vis (29; Fig 18).
7. Revissez le support zoom (7) et les deux leviers d’entraînement
(4, 10).
Figure 16 Figure 17 Figure 18
7 4 10 29 29
46 PACKAGE : OPTIMO 42-420 A2S / OPTIMO 42-420 A2S + SPHERICAL KIT / OPTIMO STYLE 4 - ADJUSMENTS I REGLAGES4.6 - READJUSTING THE FOCUS RING 4.6 - RECALAGE DE LA BAGUE FIXE DE MAP
The zoom has been adjusted at room temperature (20°C). Depending Le zoom a été réglé à température ambiante (20°C). Selon la température
on the zoom operating temperature, it can be necessary to rotate the d’utilisation, il peut être nécessaire de déplacer la bague de repère fixe
witness mark focus ring (2; fig 1) to compensate for the offset of focus (2; fig 1) pour compenser le décalage de la position de la mise au point.
position.
Vérifier le décalage
Check the focus shift 1. Réglez le zoom sur l’une des distances indiquées sur la bague MAP
1. Set the zoom at one of the distances marked on the engraved focus (par exemple 12 pieds ou 4 mètres).
ring (for example 12 feet or 4 meters). 2. Effectuez la meilleure mise au point sur l’objet.
2. Make the best focus on the object. 3. Vérifiez le décalage entre la marque sur la bague MAP fixe (2; fig 1)
3. Check the offset between the witness mark on the witness mark et la distance indiquée sur la bague gravée MAP (3; fig 1).
focus ring (2; fig 1) and the mark on the engraved focus ring (3; fig 1). 4. Si possible, vérifiez plusieurs distances et établissez une moyenne
4. If possible, check for several distances and take an average of the du décalage.
offset.
S’il y a un décalage :
If there is an offset: 1. Desserrez les 3 vis (28; fig 15) de la bague de repère fixe de MAP.
1. Unscrew the 3 witness mark focus ring screws (28; fig 15). 2. Déplacez le repère de la distance du décalage et resserrez les 3 vis
2. Rotate the witness mark by the required offset and lock the 3 (28; fig 15).
witness mark focus ring screws (28; fig 15).
A titre indicatif :
For information purpose: • Pour 5 degrés au-dessus de la température ambiante, décalez la
• For every 5 degrees above the room temperature, rotate the witness bague MAP fixe de :
mark focus ring : - 0.8 mm vers le repère de l’infini pour le 25-250.
- 0.8 mm towards the infinity mark for 25-250 - 0.9mm vers le repère de l’infini pour le 42-420 AS2
- 0.9 mm towards the infinity mark for 42-420 A2S • Pour 5 degrés en dessous de la température ambiante, décalez la
• For every 5 degrees below the room temperature, rotate the witness bague MAP fixe de :
mark focus ring - 0.8 mm dans le sens opposé au repère de l’infini pour le 25-250.
- 0.8 mm in the opposite direction to the infinity mark for 25-250. - 0.9 mm dans le sens opposé au repère de l’infini pour le 42-420
- 0.9 mm in the opposite direction to the infinity mark for 42-420 A2S.
A2S.
4 - ADJUSMENTS I REGLAGES PACKAGE : OPTIMO 42-420A2S / OPTIMO 42-420 A2S + SPHERICAL KIT / OPTIMO STYLE 4731
Figure 19
30
ZOOM ROTATION ADJUSTMENT VIEW
Reference Description Quantity
30 Rotation adjustment screw 2
31 Rotation locking screw 6
VUE REGLAGE D’ORIENTATION
Référence Désignation Quantité
30 Vis de réglage d’orientation 2
31 vis de blocage d’orientation 6
48 PACKAGE : OPTIMO 42-420 A2S / OPTIMO 42-420 A2S + SPHERICAL KIT / OPTIMO STYLE 4 - ADJUSMENTS I REGLAGES4.6 - ZOOM ROTATION ADJUSTMENT 4.6 - REGLAGE D’ORIENTATION
(for Optimo 42-420 A2S only) (pour Optimo 42-420 A2S uniquement)
That adjustment allows aligning the axis of the zoom anamorphic group Ce réglage permet d’aligner l’axe du groupe anamorphique du zoom
with the axis of the sensor or film gate of the camera. avec l’axe du capteur de la caméra.
To perform that adjustment, proceed as follows: Pour réaliser ce réglage, suivre les étapes suivantes :
- Unscrew the lever (26; fig 7) and remove the rear cover ring - Dévissez le levier (26; fig 7) puis retirez la bague arrière
(24; fig 6) by removing the 3 locking screws (25; fig 6) with a small (24; fig 6) en retirant les 3 vis de fixation (25; fig 6) avec un petit
screwdriver (figure 20) tournevis (figure 20)
- Put the lens on a camera and shoot at an object with a rectangular - Placer le zoom sur une caméra et filmer un objet de forme
shape rectangulaire
- Unlock the 6 locking screws (31; fig 19) with a 1.5mm Allen key - Desserrer les 6 vis de blocage d’orientation (31; fig 19) avec une clé
- Turn the left rotation adjustment screw (30; fig 19) in one direction six pans 1,5mm
and the other rotation screw (30; fig 19) in the opposite direction with - Tourner la vis de réglage d’orientation (30; fig 19) gauche dans
two 1.5mm Allen keys (Picture 21) until you reach a good rectangular un sens et la seconde vis de réglage d’orientation (30; fig 19) dans
shape on the camera view finder l’autre sens avec deux clés six pans 1,5mm (Figure 21) jusqu’à obtenir
- Lock the 6 locking screws (31; fig 19) une image rectangulaire de l’objet sur la caméra
- Install the rear cover ring (24; fig 6) with the 3 locking screws - Serrer les 6 vis de blocage d’orientation (31; fig 19) avec une clé six
(25; fig 6) pans 1,5mm
- Remettre en place la bague arrière (24; fig 6) avec les 3 vis de
fixation (25; fig 6).
Figure 20 Figure 21
4 - ADJUSMENTS I REGLAGES PACKAGE : OPTIMO 42-420A2S / OPTIMO 42-420 A2S + SPHERICAL KIT / OPTIMO STYLE 49HIGH PRECISION THREE DIMENSIONAL MEASUREMENT / MESURE TRIDIMENTIONNELLE DE PRECISION
TRANFORMATION
TRANSFORMATION

                 51
5.1 - TRANSFORMATION 5.1 - TRANSFORMATION
The transformation’s procedure described in the following paragraphs La procédure de transformation décrite dans les paragraphes
provides the necessary informations to switch between an Optimo Style suivants fourni les informations nécessaires à la transformation d’un
42-420 A2S from an Optimo Style 25-250 or vice versa (the procedure zoom anamorphique 42-420 A2S vers un zoom sphérique 25-250
is identical for both ways of transformation). et inversement (la procédure est identique pour les deux sens de
transformation).
This procedure is only applicable for a products sold in pack configuration
(Optimo 42-420 A2S + spherical kit). Cette procédure n’est applicable qu’aux produits vendus en configuration
pack (Optimo 42-420 A2S + kit sphérique).
52 PACKAGE : OPTIMO 42-420 A2S / OPTIMO 42-420 A2S + SPHERICAL KIT / OPTIMO STYLE 5 - TRANSFORMATION I TRANSFORMATION5.2 - CAUTIONS 5.2 - PRECAUTIONS
• Perform the transformation in a clean area to avoid dust entering • Réaliser la transformation dans un lieu propre afin d’éviter l’entrée
in the product. de poussières dans le produit.
• Do not perform rear sub-assembly fitting when the electronic • Ne pas réaliser un changement d’arrière lorsque le système
system is supplied. électronique est alimenté .
• During the transformation, avoid electrical discharges on the • Lors de la transformation, éviter les décharges électriques sur les
internal electronic interfaces of the product. interfaces électroniques internes du produit.
• Pay attention on the internal optical, mechanical and electrical • Faire attention aux éléments optiques, mécaniques et électroniques
elements during the transformation to avoid any deterioration. internes lors de la transformation pour éviter toute dégradation.
5 - TRANSFORMATION I TRANSFORMATION PACKAGE : OPTIMO 42-420A2S / OPTIMO 42-420 A2S + SPHERICAL KIT / OPTIMO STYLE 535.3 - PACK COMPONENTS IDENTIFICATION 5.3 - IDENTIFICATION DES COMPOSANTS DU PACK
In the package configuration, to ensure optimum performance, the rear Dans le cas des packs, pour garantir des performances optimales, les
spherical and anamorphic sub-assemblies are paired and inseparable. sous-ensembles arrière sphérique et anamorphique sont appairés et
The sub-assemblies identification is done with a label indicating indissociables. L’identification des sous-ensembles arrière est réalisée
the serial number (figure 22) follow to /A for Anamorphic and S/ for par l’intermédiaire d’une étiquette sur laquelle figure le n° de série
Spherical. du produit (figure 22) suivi de /A pour Anamorphique et de /S pour
Sphérique.
The focus ring are also calibrated for each product, the identification is
done in the same way. The label is glued inside the ring (see figure 23). Les bagues de MAP étant également étalonnées sur chaque produit,
The informations /A and /S allow to differ anamorphic and spherical elles sont identifiées de la même manière: l’étiquette d’identification
focus rings. est collée à l’intérieur de la bague (voir figure 23). Les informations
/A et /S permettent de distinguer la bague gravée de MAP version
anamorphique de la bague gravée de MAP version sphérique.
54 PACKAGE : OPTIMO 42-420 A2S / OPTIMO 42-420 A2S + SPHERICAL KIT / OPTIMO STYLE 5 - TRANSFORMATION I TRANSFORMATIONFigure 22
Product serial number Version identification
Numéro de série du produit A : anamorphic version
S : spheric version
Identification de la version
A : version anamorphique
S : version sphérique
Figure 23
Identification stickers
Etiquettes d’identification
5 - TRANSFORMATION I TRANSFORMATION PACKAGE : OPTIMO 42-420A2S / OPTIMO 42-420 A2S + SPHERICAL KIT / OPTIMO STYLE 55TRANSFORMATION TOOLS
Description Spanner reference Retaining ring or screws Locking torque
Screwdriver for engraved focus ring screws Philips screwdriver 0982347 (29) 0.12 N.m
Allen key for rear assembly screws Allen key 2 mm 0986357 (34) 0.25 N.m
Screwdriver for rear assembly screws Philips screwdriver 0982397 (35) 0.12 N.m
OUTILS POUR LA TRANSFORMATION
Description Référence de la clé Référence de l’écrou ou de la vis Couple de serrage
Clé pour vis de fixation bague gravée de MAP Tournevis cruciforme 0982347 (29) 0.12 N.m
Clé pour vis de fixation S/E arrière Clé six pans 2 mm 0986357 (34) 0.25 N.m
Tournevis pour vis bague de commande focale Tournevis cruciforme 0982397 (35) 0.12 N.m
56 PACKAGE : OPTIMO 42-420 A2S / OPTIMO 42-420 A2S + SPHERICAL KIT / OPTIMO STYLE 5 - TRANSFORMATION I TRANSFORMATIONFigure 24
32 33 34 35
REAR VIEW FOR TRANSFORMATION
Reference Description Quantity
32 Front cap for rear kit 1
33 Rear cap for rear kit 1
34 Rear assembly screws 5
35 Focal length control ring screws 6
VUE ARRIERE POUR LA TRANSFORMATION
Référence Désignation Quantité
32 Bouchon avant pour kit arrière 1
33 Bouchon arrière pour kit arrière 1
34 Vis de fixation S/E arrière 5
35 Vis bague de commande focale 6
5 - TRANSFORMATION I TRANSFORMATION PACKAGE : OPTIMO 42-420A2S / OPTIMO 42-420 A2S + SPHERICAL KIT / OPTIMO STYLE 575.4 - TRANSFORMATION PROCEDURE 5.4 - PROCEDURE DE TRANSFORMATION
• Remove the bracket (7; fig 16) and the levers (4, 10; fig 16) • Retirer le support (7; fig 16) et les leviers (4, 10; fig 16)
• Remove the PL mount (13; fig 1), see paragraph 4.1 • Retirer la monture PL (13; fig 1) (voir paragraphe 4.1)
• Untighten the 5 screws (34; fig 25) and removed the rear sub- • Dévisser les 5 vis de fixation (34; fig 25) et retirer le S/E arrière
assembly • Positionner la bague de commande focale (9; fig 1) en position courte
• Move the zoom ring (9; fig 1), to wide angle position focale
• Untighten the 6 screws of the zoom ring (35; fig 26) and remove the • Dévisser les 6 vis de la bague focale (35; fig 26) et retirer la bague de
zoom ring (9; fig 26) commande focale (9; fig 26)
• Fit the new zoom ring by aligning the wide angle with the fix mark • Monter la nouvelle bague focale en alignant la gravure courte focale
and tighten the 6 screws with respected the order of assembling sur le repère fixe en s’assurant que les 6 trous de la bague Focale
step 1 to 6 (35; fig 26) sont alignés avec les 6 trous du corps et serrer les 6 vis en respectant
• Remove the cap of the new rear sub-assembly and fit it on the rear l’ordre de montage de 1 à 6 (35; fig 26)
sub-assembly removed • Retirer les bouchons du S/E arrière à installer et les installer sur le
• Check the cleanness of the external lenses and the mechanic parts S/E démonté
• Fit the new rear sub-assembly on the lens by aligning the pin • Vérifier la propreté des dioptres externes et des interfaces mécaniques
(dimmer side) with the groove (rear sub-assembly side) • Installer le S/E arrière sur l’objectif en alignant la goupille coté
• Fit the PL mount on the new rear sub-assembly according to the variateur avec la rainure coté S/E arrière
paragraph 4.1 • Remonter la monture PL sur le nouveau S/E selon paragraphe 4.1
• Fit the engraved focus ring according to the paragraph 4.5 • Remplacer la bague gravée de MAP selon procédure paragraphe 4.5
• Fit the bracket (7; fig 16) and the levers (4, 10; fig 16) • Remonter le support (7; fig 16) et les leviers (4, 10; fig 16)
• Check the tracking and the flange/back-focus adjustment and • Vérifier les réglages de tirage et tracking et les réajuster si nécessaire
adjust if necessary (see paragraph 4.2 and 4.3) (voir paragraphes 4.2 et 4.3)
58 PACKAGE : OPTIMO 42-420 A2S / OPTIMO 42-420 A2S + SPHERICAL KIT / OPTIMO STYLE 5 - TRANSFORMATION I TRANSFORMATIONFigure 25
34
Figure 26
3
1
9
5
6 35
2
4
5 - TRANSFORMATION I TRANSFORMATION PACKAGE : OPTIMO 42-420A2S / OPTIMO 42-420 A2S + SPHERICAL KIT / OPTIMO STYLE 59LONG DISTANCE (131 FT) PROJECTION ROOM / SALLE DE PROJECTION LONGUE DISTANCE (40m)
MAINTENANCE
   ENTRETIEN

               61
ELECTRONIQUE TROUBLE SHOOTING RESOLUTION DES PROBLEMES ELECTRONIQUES
In case of communication problems between the camera and the zoom: Si vous rencontrez un problème de communication entre la caméra et le
1. Switch off the camera or the external viewer. zoom :
2. Disconnect the zoom. 1. Eteignez la caméra ou l’afficheur externe.
3. Reconnect the zoom with the camera or the external device. 2. Déconnectez le zoom.
4. Switch the camera or the external device back on. 3. Reconnectez le zoom avec la caméra ou le dispositif externe.
If the problem continues, contact your distributor. 4. Remettre sous tension la caméra ou le dispositif externe.
Si le problème persiste, contactez votre distributeur.
CLEANING THE LENSES NETTOYAGE DES LENTILLES
• For an optimum image quality, make sure the lenses are clean every • Pour une qualité d’image maximale, vérifiez régulièrement la
time you use the zoom. propreté des lentilles.
• To clean the optics, use an optical cleaning solution. • Utilisez une solution de nettoyage approprié aux optiques.
• To remove fingerprints, use a soft cloth. • Pour enlever les empreintes de doigts sur les lentilles, utilisez un
chiffon doux.
CLEANING THE FILTER NETTOYAGE DU FILTRE
• Use an optical cleaning solution and a soft cloth. • Utilisez une solution de nettoyage appropriée aux optiques et un
• Use dry air’s to clean the inside of the filter compartment. chiffon doux.
• Utilisez de l’air sec pour nettoyer l’intérieur du compartiment du
filtre.
LUBRICATION GRAISSAGE
The zoom, focus and iris mechanism are factory lubricated. Les mécanismes de focale, mise au point et d’iris sont graissés en usine.
• If you stored the zoom for a long time or if you are going to use it • Si le zoom a été rangé pendant une longue période ou si vous allez
in a cold environment, manipulate the mechanism several times l’utiliser dans le froid, manipulez plusieurs fois les mécanismes avant
before using it. de l’utiliser.
• If you used the zoom frequently or in extreme conditions, make • Si vous avez fait un usage intensif du zoom ou si vous l’avez
sure the mechanism works properly. If necessary, clean and utilisé dans des conditions extrêmes, vérifiez que les mécanismes
lubricate the mechanism. fonctionnent correctement. Si nécessaire, nettoyez et graissez de
nouveau les éléments.
62 PACKAGE : OPTIMO 42-420 A2S / OPTIMO 42-420 A2S + SPHERICAL KIT / OPTIMO STYLE 6 - MAINTENANCE I ENTRETIENPARTS AVAILABLE ON DEMAND
Items Description P/N Avaiability Figure Quantity
25-250 42-420 Pack
Rear cap 0311816 X X X 14 ; fig 1 1
PL mount assembly 0318587 X X X 13 ; fig 1 1
Nikon mount 0315818 X - X 1
Canon mount 0315817 X - X 1
Filter-holder M40.5 0316830 X - X 11 ; fig 1 1
Filter ring M40.5 0316853 X - X 27 ; fig 14 1
Standard neutral filter M40.5 0315700 X - X 19 ; fig 14 1
Filter holder M46 0316776 X - X 1
Filter ring M46 0316852 X - X 1
Tracking adjustment screws 0986907 X X X 20 ; fig 6 4
Flange shim 0315272 X X X 21 ; fig 6 2
Flange shim retaining screw 0982097 X X X 23 ; fig 6 1
Focus lever 0212926 X X X 4 ; fig 1 1
Screws for bracket 0319092 X X X 5 ; fig 1 2
Washer for bracket 0314464 X X X 6 ; fig 1 2
Bracket 0319292 X X X 7 ; fig 1 1
Bracket extension 0217190 X X X 8 ; fig 1 1
Zoom lever 0212926 X X X 10; fig 1 1
Front cap 0178458 X X X 1 ; fig 1 1
Cable for embedded software updates 0318006 X X X 1
Front protective glass 0317329 X X X 1
Spacer 0318980 X X X 17 ; fig 5 1
Screws for spacer 0993757 X X X 18 ; fig 5 2
Engraved focus ring feet 25-250 0315771 X - X 3 ; fig 1 1
Engraved focus ring meters 25-250 0315772 X - X 3 ; fig 1 1
Engraved focus ring feet 42-420 0323508 - X X 3; fig 1 1
Engraved focus ring meters 42-420 0323509 - X X 3 ; fig 1 1
Screws for engraved focus ring 0982347 X X X 29; fig 15 6
Front cap for rear kit 0319421 - - X 32; fig 24 1
Rear cap for rear kit 0319422 - - X 33; fig 24 1
6 - MAINTENANCE I ENTRETIEN PACKAGE : OPTIMO 42-420A2S / OPTIMO 42-420 A2S + SPHERICAL KIT / OPTIMO STYLE 63PIECES DISPONIBLES SUR COMMANDE
Nom de la pièce P/N Disponibilité Figure Quantité
25-250 42420 Pack
Bouchon arrière 0311816 X X X 14 ; fig 1 1
Sous-ensemble monture PL 0318587 X X X 13 ; fig 1 1
Monture Nikon 0315818 X - X 1
Monture Canon 0315817 X - X 1
Porte-filtre M40.5 0316830 X - X 11 ; fig 1 1
Rondelle filtre M40.5 0316853 X - X 27 ; fig 14 1
Filtre standard neutre M40.5 0315700 X - X 19 ; fig 14 1
Porte-filtre M46 0316776 X - X 1
Rondelle filtre M46 0316852 X - X 1
Vis de tracking 0986907 X X X 20 ; fig 6 4
Cale pelable 0315272 X X X 21 ; fig 6 2
Vis de la cale pelable 0982097 X X X 23 ; fig 6 1
Levier de commande MAP 0212926 X X X 4 ; fig 1 1
Vis de support 0319092 X X X 5 ; fig 1 2
Rondelle de support 0314464 X X X 6 ; fig 1 2
Support 0319292 X X X 7 ; fig 1 1
Rallonge de support 0217190 X X X 8 ; fig 1 1
Levier de commande zoom 0212926 X X X 10; fig 1 1
Bouchon avant 0178458 X X X 1 ; fig 1 1
Câble pour mises à jour logiciel embarqué 0318006 X X X 1
Hublot 0317329 X X X 1
Réhausse 0318980 X X X 17 ; fig 5 1
Vis pour réhausse 0993757 X X X 18 ; fig 5 2
Bague de MAP gravée en pieds 25-250 0315771 X - X 3 ; fig 1 1
Bague de MAP gravée en mètres 25-250 0315772 X - X 3 ; fig 1 1
Bague de MAP gravée en pieds 42-420 0323508 - X X 3; fig 1 1
Bague de MAP gravée en mètres 42-420 0323509 - X X 3 ; fig 1 1
Vis bague de MAP gravée 0982347 X X X 29; fig 15 6
Bouchon avant kit arrière 0319421 - - X 32; fig 24 1
Bouchon arrière kit arrière 0319422 - - X 33; fig 24 1
64 PACKAGE : OPTIMO 42-420 A2S / OPTIMO 42-420 A2S + SPHERICAL KIT / OPTIMO STYLE 6 - MAINTENANCE I ENTRETIENADVANCED MAINTENANCE MAINTENANCE AVANCEE
The complete maintenance of this type of lens should only be La maintenance complète de ce type de zoom ne peut être effectuée
performed by highly qualified people or factory trained technicians. que par des personnes hautement qualifiées et formées par THALES
If you are uncertain of your capacity to do the repair, send the lens to ANGENIEUX. Si vous avez un doute sur votre capacité à effectuer une
our THALES ANGENIEUX After Sales Service. Our qualified technicians réparation, n’hésitez pas à confier votre produit au Service Après-Vente
will ensure you proper handling of all maintenance and repair related de THALES ANGENIEUX, qui vous garantira une parfaite réparation.
items.
De plus, THALES ANGENIEUX vous propose des opérations de
Moreover, THALES ANGENIEUX can offer preventive maintenance
maintenance préventives pour maintenir votre produit à son meilleur
operations to keep your lens, always in perfect conditions. niveau.
Contact us: Contactez-nous à : angenieuxservice@fr.thalesgroup.com
• France and international customer support at:
angenieuxservice@fr.thalesgroup.com
• America customer support at : jbouchut@tccus.com
6 - MAINTENANCE I ENTRETIEN PACKAGE : OPTIMO 42-420A2S / OPTIMO 42-420 A2S + SPHERICAL KIT / OPTIMO STYLE 65MECHANICAL CONCEPTION / CONCEPTION MECANIQUE
OUTLINE DRAWINGS
PLAN D’ENCOMBREMENTS

                        67
68 PACKAGE : OPTIMO 42-420 A2S / OPTIMO 42-420 A2S + SPHERICAL KIT / OPTIMO STYLE 7 - OUTLINE DRAWINGS I PLANS D’ENCOMBREMENT
7 - OUTLINE DRAWINGS I PLANS D’ENCOMBREMENT PACKAGE : OPTIMO 42-420A2S / OPTIMO 42-420 A2S + SPHERICAL KIT / OPTIMO STYLE 69
PL mount / Monture PL

70   PACKAGE : OPTIMO 42-420 A2S / OPTIMO 42-420 A2S + SPHERICAL KIT / OPTIMO STYLE   7 - OUTLINE DRAWINGS I PLANS D’ENCOMBREMENT
CANON mount / Monture CANON                                                    NIKON mount / Monture NIKON
For 25-250 only / pour 25-250 uniquement                                       For 25-250 only / pour 25-250 uniquement

                                           7 - OUTLINE DRAWINGS I PLANS D’ENCOMBREMENT   PACKAGE : OPTIMO 42-420A2S / OPTIMO 42-420 A2S + SPHERICAL KIT / OPTIMO STYLE   71
Thales Angenieux USA Thales Angenieux Headquarters Thales Angenieux in ASIA www.angenieux.com
40G Commerce Way Boulevard Ravel de Malval 10C Jalan Ampas #08-02
Totowa NJ 07512 - USA 42570 Saint Héand - FRANCE Ho Seng Lee Flatted Warehouse
Phone: 1 973 812 3858 Phone: +33 (0)4 77 90 78 00 Singapore 329513
Fax: 1 973 812 9049 Fax: +33 (0)4 77 90 78 03 Phone: +65 63 56 81 98
angenieux@tccus.com angenieux@fr.thalesgroup.com Fax: +65 62 50 60 85
angenieux@fr.thalesgroup.comVous pouvez aussi lire