QUICK START GUIDE IOT SOLUTION - EALLOORA
←
→
Transcription du contenu de la page
Si votre navigateur ne rend pas la page correctement, lisez s'il vous plaît le contenu de la page ci-dessous
Quick start guide

      IoT Solution

    Badge reader
    Wireless IoT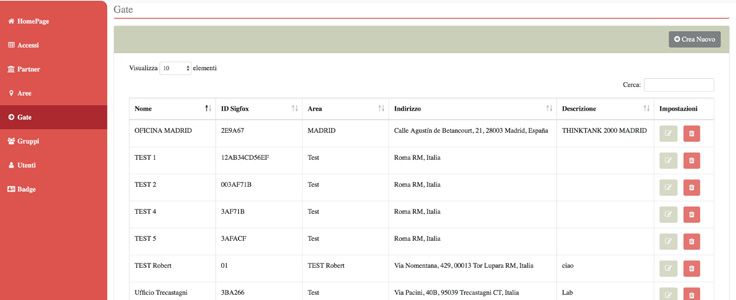
ENGLISH

User registration
Once the device has been purchased, the user must register on the web page:
www.ealloora.com/pass

You will receive a user name and a password to access the management platform:
http://pass.ealloora.net/dashboard/#/

                                             3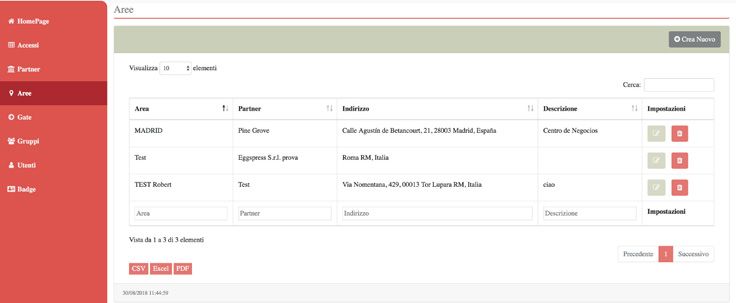
Web app configuration
Step 1. Register the device.
• Create the area (if the area has already been created, proceed with the next step).
• Create the gate where you are installing the device.
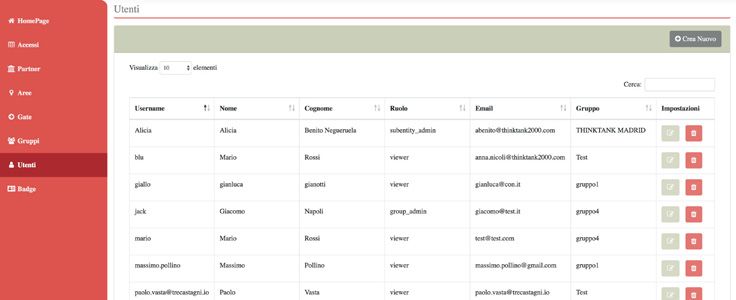
Step 2. Users register.
• Create the user group (if the group has already been created, proceed with the next step).
• Create users.
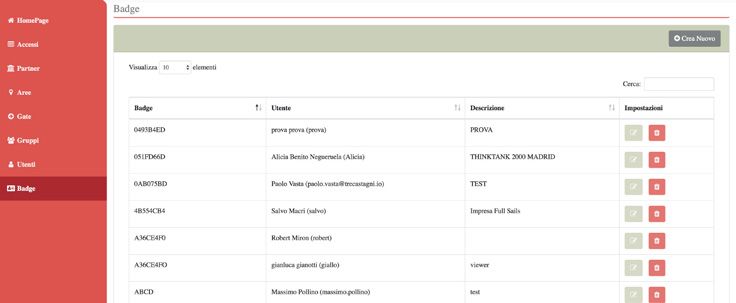
Step 3. Associate a badge with a user.
• Create a badge and associate it with the user already created.
4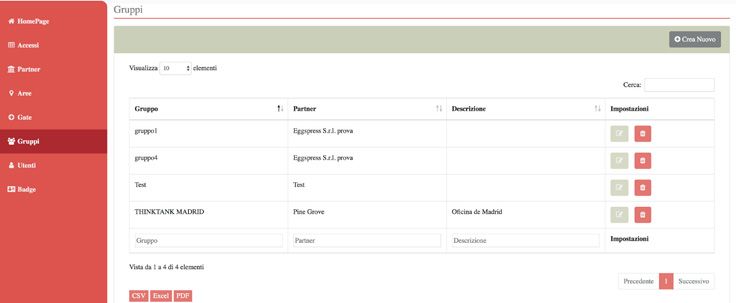
Step 1.
Register the device
1. Create an area                                     2. Create the gate
Create the area where the device will be placed       Create the gate where the device will be installed
(Name, Address, Description).                         (Name, ID Sigfox, select Area, Address,
Ex. Milan.                                            Description).
                                                      Ex. Ufficio Milano Pza Garibaldi 1...

                                                      The Sigfox ID is located in the back of the
                                                      device.
                                                                            PASS by

                                                                           002E9A67

                                                  5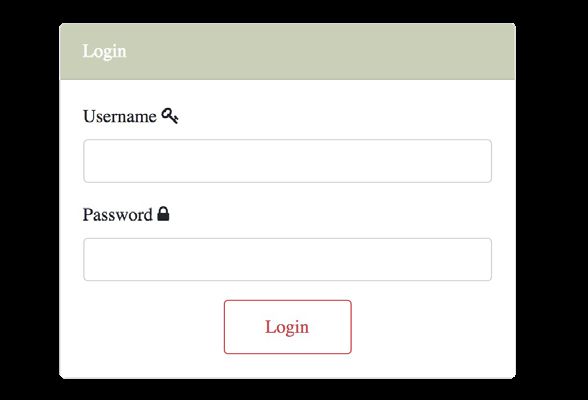
Step 2.
Registering users
1. Create the users group                  2. Create users
Create users group                         Create the user
(Name, Description, Select Partner).       (Username, Password, Name, Surname, select
                                           the group, select the Role, E-mail).

                                       6
Step 3. Activation
Associate a badge to an user • Activate the battery
1. Create badge and associate it
to the user already created PASS by
002E9A67
Create badges and assign them
(Badge code, select the User and the
Description).
The badge code is located on the back of the
badge.
CARD by
051FD66D
7Coverage check
1. Place yourself in the area where you want to install the device.
2. Press the power button on the top of the device.
3. A blue LED will light up around the button to indicate that the device is transmitting correctly.
4. Bring the badge close to the device (if the badge has been read correctly you will feel a slight
one beep), the blue LED will light up again, indicating the correct transmission.
5. In 2 or 3 minutes the registration of a new badge will be displayed in the home of the web app.
6. If you do not see the registration, choose another area with more coverage and repeat steps
4 and 5. This will allow you to choose the best location for the device.
7. Once the coverage has been verified, install the device in its final location.
8FRANÇAIS
Enregistrement de l’utilisateur
Une fois acheté l’appareil, l’utilisateur doit s’inscrire sur la page web:
www.ealloora.com/pass
Vous recevrez les données, nom d’utilisateur et un mot de passe, pour accéder à la plate-forme
de gestion:
http://pass.ealloora.net/dashboard/#/
9Configuration de l’application web
Étape 1. Enregistrez l’appareil.
• Créez une zone (si la zone a déjà été créée, passez à l’étape suivante).
• Créez le gate sur lequel vous installez l’appareil.
Étape 2. Enregistrez les utilisateurs.
• Créez le groupe d’utilisateurs (si le groupe a déjà été créé, passez à l’étape suivante).
• Créez les utilisateurs.
Étape 3. Associez un badge à un utilisateur.
• Créez un badge et associez-le à l’utilisateur déjà créé.
10Étape 1.
Enregistrez l’appareil
1. Créez une zone 2. Créez le gate
Créez la zone où l’appareil sera placé Créez le gate où l’appareil sera installé
(Nom, Adresse, Description). (Nom, ID Sigfox, sélectionnez la Zone, Adresse,
Ex. Milano. Description).
Ex. Ufficio Milano Pza Garibaldi 1...
Le code d’identification Sigfox est situé à
l’arrière de l’appareil.
PASS by
002E9A67
11Étape 2.
Enregistrez les utilisateurs
1. Créez le groupe 2. Créer les utilisateurs
d’utilisateurs Créer l’utilisateur
Créer un groupe d’utilisateurs (Nom d’utilisateur, Mot de passe, Prénom,
(Nom, Description, Choisir partenaire). Nom, sélectionnez le Groupe, sélectionnez le
Rôle, E-mail).
12Étape 3. Activation
Associez un badge à un utilisateur • Activez les batteries
1. Créez un badge et associez-le à
l’utilisateur déjà créé PASS by
002E9A67
Créez des badges et assignez-les
(Code du badge, sélectionnez l’utilisateur et la
description).
Le code du badge est situé au dos du badge.
CARD by
051FD66D
13Vérification de la couverture
1. Placez-vous dans la zone où vous souhaitez installer l’appareil.
2. Appuyez sur le bouton d’alimentation situé en haut de l’appareil.
3. Une LED bleu s’allume autour du bouton pour indiquer que l’appareil transmet correctement.
4. Approchez le badge à l’appareil (si le badge a été lu correctement, vous entendrez un léger
bip), la LED bleu s’allume à nouveau pour indiquer que la transmission est correcte.
5. En 2 ou 3 minutes, l’enregistrement d’un nouveau badge sera affiché dans la home page de
l’application web.
6. Si l’enregistrement ne s’affiche pas, choisissez une zone avec une meilleure converture et ré-
pétez les étapes 4 et 5. Cela vous permettra de choisir le meilleur emplacement pour l’appareil.
7. Une fois vérifiée la couverture, installez l’appareil à son emplacement final.
14ITALIANO
Registrazione utente
Una volta acquistato il dispositivo, l’utente deve registrarsi nella pagina web:
www.ealloora.com/pass
Riceverà un nome d’usuario e una password per accedere ala piattaforma di gestione:
http://pass.ealloora.net/dashboard/#/
15Configurazione web app
Passo 1. Registrazione del dispositivo.
• Creare l’area (se è già stata creato l’area, procedere con il passo successivo).
• Creare il gate nel quale si sta installando il dispositivo.
Passo 2. Registrazione degli utenti.
• Creare il gruppo di utenti (se è già stato creato il gruppo, procedere con il passo successivo).
• Creare utenti.
Passo 3. Associare un badge a un utente.
• Creare un badge e associarlo a un utente già creato.
16Passo 1.
Registrazione del dispositivo
1. Creare una area 2. Creare il gate
Crea l’area dove sarà collocato il dispositivo Creare il gate dove sarà installato il dispositivo
(Nome, Indirizzo, Descrizione). (Nome, ID Sigfox, seleziona Area, Indirizzo,
Es. Milano. Descrizione).
Es. Ufficio Milano Pza Garibaldi 1...
L’ID Sigfox si trova nella parte posteriore del
dispositivo.
PASS by
002E9A67
17Passo 2.
Registrazione degli utenti
1. Creare il gruppo di utenti 2. Creare utenti
Crea il gruppo di utenti Crea l’utente
(Nome, Descrizione, Seleziona il Partner). (Username, Password, Nome, Cognome,
seleziona il gruppo, seleziona il Ruolo, E-mail).
18Passo 3. Attivazione
Associare un badge a un utente • Attivare la batterie
1. Creare badge e associarlo a un
utente già creato PASS by
002E9A67
Creare badge e assegnarlo
(Codice badge, seleziona Utente e Descrizione).
Il codice badge si trova nella parte posteriore
del badge.
CARD by
051FD66D
19Controllo della copertura
1. Posizionati nell’area in cui desideri installare il dispositivo.
2. Premi il pulsante di accensione nella parte superiore del dispositivo.
3. Un LED blu si illuminerà intorno al pulsante per indicare che il dispositivo sta trasmettendo
correttamente.
4. Avvicina il badge al dispositivo (se il badge è stato letto correttamente si sentirà un leggero
bip), il LED blu si accenderà di nuovo, indicando la corretta trasmissione.
5. In 2 o 3 minuti nella home della web app verrà visualizzata la registrazione di un nuovo badge.
6. Se non visualizzare la registrazione, scegli un’altra area con una copertura maggiore e ripeti i
passaggi 4 e 5. Questo ti consentirà di scegliere la posizione migliore per il dispositivo.
7. Una volta verificata la copertura, installare il dispositivo nella sua posizione finale.
20ESPAÑOL
Registro de usuario
Una vez que el dispositivo ha sido comprado, el usuario debe registrarse en la página web:
www.ealloora.com/pass
Recibirá un nombre de usuario y una contraseña para acceder a la plataforma de administración:
http://pass.ealloora.net/dashboard/#/
21Configuración de la aplicación web
Paso 1. Registrar el dispositivo.
• Crear el área (si el área ya se ha creado, continúe con el siguiente paso).
• Crear el gate.
Paso 2. Registrar usuarios.
• Crear el grupo de usuarios (si el grupo ya se ha creado, continúe con el siguiente paso).
• Crear usuarios.
Paso 3. Asociar un badge a un usuario.
• Crear un badge y asociarlo con un usuario ya creado.
22Paso 1.
Registrar el dispositivo
1. Crear el área 2. Crear el gate
Crear el área donde se colocará el dispositivo Crear el gate donde se instalará el dispositivo
(Nombre, Dirección, Descripción). (Nombre, ID de Sigfox, seleccione Área,
Ej. Milano. Dirección, Descripción).
Ej. Ufficio Milano Pza Garibaldi 1...
El ID de Sigfox se encuentra en la parte
posterior del dispositivo.
PASS by
002E9A67
23Paso 2.
Registrar usuarios
1. Crear el grupo de usuarios 2. Crear usuarios
Crear grupo de usuarios Crear el usuario
(Nombre, Descripción, Seleccionar Socio). (Nombre de usuario, Contraseña, Nombre,
Apellido, seleccione el Grupo, seleccione la
Función, Correo electrónico).
24Paso 3. Activación
Asociar un badge a un usuario • Activar las baterias
1. Crear un badge y asócialo con
un usuario ya creado PASS by
002E9A67
Crear un badge y asígnelo
(Código badge, seleccione Usuario y
Descripción) .
El código del badge se encuentra en la parte
posterior del badge.
CARD by
051FD66D
25Control de la cobertura
1. Colóquese en el área donde desea instalar el dispositivo.
2. Presione el botón de encendido en la parte superior del dispositivo.
3. Un LED azul se encenderá alrededor del botón para indicar que el dispositivo está
transmitiendo correctamente.
4. Acerque el badge al dispositivo (si el badge se leyó correctamente, oirá un ligero bip), el LED
azul se encenderá nuevamente, indicando la transmisión correcta.
5. En 2 o 3 minutos, el registro de un nuevo badge se mostrará en la home page de la aplicación
web.
6. Si no ve el registro, elija otro área con más cobertura y repita los pasos 4 y 5. Esto le permitirá
elegir la mejor ubicación para el dispositivo.
7. Una vez que se haya verificado la cobertura, instale el dispositivo en su ubicación final.
26For complete information on the product, refer to the
User and maintenance manual on the website
.com
PASS is an exclusive solution of Nettrotter Srl
Via Zanella 21, 20851 Lissone (MB), Italy
Made in Italy
1.5-2019Vous pouvez aussi lire