19" All-in-One Digital Video Recorder - DVR4-5500 - Operating Instructions
←
→
Transcription du contenu de la page
Si votre navigateur ne rend pas la page correctement, lisez s'il vous plaît le contenu de la page ci-dessous
Advanced security made easy™

19” All-in-One
Digital Video Recorder
DVR4-5500™

                      Operating Instructions

SW349-DA9
www.swannsecurity.com                          SR349-DA9-60010-290509
DVR4-5500™                                         Operating Instructions

             This page intentionally left blank.

                              1
DVR4-5500™                                                                                Operating Instructions

                                                     CAUTION

                                    RISK OF ELECTRIC SHOCK

       CAUTION:
       To reduce the risk of electric shock, do not expose this apparatus to rain or moisture.
       Only operate this apparatus from the type of power source indicated on the label.
       The company shall not be liable for any damages arising out of any                             improper    use,
       even if we have been advised of the possibility of such damages.

  FCC WARNING STATEMENT

  This device complies with Part 15 of FCC Rules.                                                 Version
  Operation is subject to the following two conditions:                                      Firmware: 1142-1039-
       (1) This device may not cause harmful interference, and                                1013-1026-0A-0000
       (2) This device must accept any interference received, including interference          Video Viewer: 0114
            that may cause undesired operation

                                                                                  Graphic Symbol Explanation
                        The lightning flash with arrowhead symbol, within an equilateral triangle, is intended to alert
                        the user to the presence of uninsulated “dangerous voltage” within the product’s enclosure
                        that may be of sufficient magnitude to constitute a risk of electric shock to persons.
                        This exclamation point within an equilateral triangle is intended to alert the user to the
                        presence of important operating and maintenance (servicing) instructions in the literature
                        accompanying the appliance.
                        All lead-free products offered by the company comply with the requirements of the
                        European law on the Restriction of Hazardous Substances (RoHS) directive, which means
                        our manufacture processes and products are strictly “lead-free” and without the hazardous
                        substances cited in the directive.
                        The crossed-out wheeled bin mark symbolizes that within the European Union the product
                        must be collected separately at the product end-of-life. This applies to your product and any
                        peripherals marked with this symbol. Do not dispose of these products as unsorted
                        municipal waste. Contact your local dealer for procedures for recycling this equipment.

                        This apparatus is manufactured to comply with the radio interference requirements.

   MPEG4 Licensing
      THIS PRODUCT IS LICENSED UNDER THE MPEG-4 VISUAL PATENT PORTFOLIO LICENSE FOR
  THE PERSONAL AND NON-COMMERCIAL USE OF A CONSUMER FOR (i) ENCODING VIDEO IN
  COMPLIANCE WITH THE MPEG-4 VISUAL STANDARD (“MPEG-4 VIDEO”) AND/OR (ii) DECODING MPEG-4
  VIDEO THAT WAS ENCODED BY A CONSUMER ENGAGED IN A PERSONAL AND NON-COMMERCIAL
  ACTIVITY AND/OR WAS OBTAINED FROM A VIDEO PROVIDER LICENSED BY MPEG LA TO PROVIDE
  MPEG-4 VIDEO. NO LICENSE IS GRANTED OR SHALL BE IMPLIED FOR ANY OTHER USE. ADDITIONAL
  INFORMATION INCLUDING THAT RELATING TO PROMOTIONAL INTERNAL AND COMMERCIAL USES
  AND LICENSING MAY BE OBTAINED FROM MPEG LA, LLC. SEE HTTP://WWW.MPEGLA.COM.
   GPL Licensing
                                   This product contains codes which are developed by Third-Party-Companies
                                   and which are subject to the GNU General Public License (“GPL”) or the GNU
                                   Lesser Public Licence (“LGPL”).
                                   The GPL Code used in this product is released without warranty and is subject
                                   to the copyright of the corresponding author. Further source codes which are
                                   subject to the GPL-licenses, are available upon request.
                                   We are pleased to provide our modifications to the Linux Kernel, as well as a
                                   few new commands, and some tools to get you into the code. The codes are
                                   provided on the FTP site, and please download them from the following site or
                                   you can refer to your distributor:
                                   ftp://ftp.dvrtw.com.tw/GPL/AV074/
   Disclaimer
   We reserve the right to revise or remove any content in this manual at any time. We do not warrant or assume
   any legal liability or responsibility for the accuracy, completeness, or usefulness of this manual. For the actual
   display & operation, please refer to your DVR in hand. The content of this manual is subject to change without
   notice. The product & company names mentioned herein may be the registered trademarks or tradenames of
   their respective owners.

                                                         2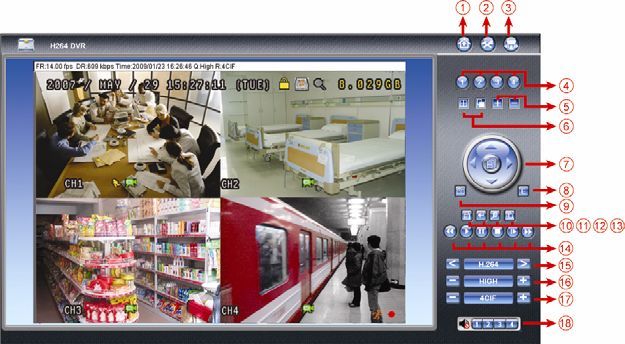
DVR4-5500™                                                                                  Operating Instructions

                                                    Introduction

Congratulations on your purchase of this Swann DVR4-5500™ LCD Digital Video Recorder. This stand-alone unit is
highly adaptable, and more than capable of providing a simple security solution for both home and business security
needs.

A high resolution, in-built LCD display as well as networking features makes this unit entirely self-sufficient, and does
not require attachment to a television, external monitor or computer.

This DVR is capable of simultaneously monitoring and recording up to four separate video sources simultaneously.
However, if you have fewer cameras, this will not interfere with the operation of the DVR in any way.

                                         Default Password Information
                           The default keylock code for the DVR is “0000” (four zeros).
                     The default username for remote access (via LAN or Internet) is “admin”.
                     The default password for remote access (via LAN or Internet) is “admin”.

                                    To prevent unauthorised access to your system,
                it is strongly suggested that these passwords be changed as soon as possible.
                      See the relevant sections for information on how to change your passwords.

                                                           3
DVR4-5500™                                                      Operating Instructions

                            MANUAL CONTENTS

Part 1: Setting up the DVR Hardware…………………………………………………………. 5
      1.1 Layout of the DVR…………………………………………………………………………………………… 5
      1.2 Connecting Cameras to the DVR………………………………………………………………………….. 5
      1.3 VGA Connection……………………………………………………………………………………………... 5
      1.4 Connecting Power to the DVR…………………………………………………………………………….. 5

Part 2: Configuring the DVR Software……………………………………………………………………….6
      2.1 Layout of the IR Remote……………………………………………………………………………………. 6
      2.2 Setting the Date and Time………………………………………………………………………………….. 7
      2.3 Setting the Password………………………………………………………………………………………... 7

Part 3: Basic Functions………………………………………………………………………… 8
      3.1 Overview of the Interface…………………………………………………………………………………… 8
      3.2 Locking / Unlocking the DVR (Keylock)…………………………………………………………………… 8
      3.3 Recording…………………………………………………………………………………………………….. 8
                3.3.1 Timer Recording……………………………………………………………………………….. 8
                3.3.2 Motion Recording……………………………………………………………………………… 9
                3.3.3 Manual Recording……………………………………………………………………………... 9
                3.3.4 Additional Recording Options………………………………………………………………... 9
      3.4 Playback……………………………………………………………………………………………………… 10
                3.4.1 Finding an Event………………………………………………………………………………. 10
                3.4.2 Controls for Playback…………………………………………………………………………. 10
      3.5 Upgrading Firmware………………………………………………………………………………………… 10

Part 4: Advanced Operations…………………………………………………………………... 11
      4.1 Quicksearch………………………………………………………………………………………………….. 11
      4.2 Configuring the Record Settings…………………………………………………………………………… 11
                4.2.1 Basic Settings.…………………………………………………..…………………………….. 11
                4.2.2 Advanced Settings…………………………………………………………………………….. 12
      4.3 Programming the Timer…………………………………………………………………………………….. 12
      4.4 Advanced Motion Detection Settings……………………………………………………………………… 13
      4.5 Advanced System Information……………………………………………………………………………... 13
      4.6 Backing up Events…………………………………………………………………………………………... 13
                4.6.1 …to a USB Flash Drive……………………………………………………………………….. 13
                4.6.2 …to your PC…………………………………………………………………………………… 14

Part 5: Networking……………………………………………………………………………….. 15
      5.1 Connecting the DVR to your Network……………………………………………………………………... 15
      5.2 Configuring the DVR………………………………………………………………………………………… 16
                5.2.1 Networks with DHCP………………………………………………………………………….. 16
                5.2.2 Networks with STATIC IP…………………………………………………………………….. 16
                5.2.3 PPPoE………………………………………………………………………………………….. 16
      5.3 Configuring your Network for Remote Viewing…………………………………………………………… 17
                5.3.1 Port Forwarding……………………………………………………………………………….. 17
                5.3.2 Your PUBLIC IP Address…………………………………………………………………….. 17

Part 6: Remotely Accessing your DVR……………………………………………………….. 18
      6.1 Finding your DVR via the Network or Internet……………………………………………………………. 18
      6.2 Using the Video Viewer Software………………………………………………………………………….. 18
                6.2.1 Installation……………………………………………………………………………………… 18
                6.2.2 Connecting to your DVR……………………………………………………………………… 18
                6.2.3 Using the Video Viewer Interface……………………………………………………………. 19
                6.2.4 The Miscellaneous Control Window………………………………………………………… 200
                6.2.5 The Record Settings Window………………………………………………………………... 200
                6.2.6 Playing Back Footage………………………………………………………………………… 211
                6.2.7 Backing up Footage via the Network……………………………………………………….. 211
      6.3 Accessing the DVR without Video Viewer………………………………………………………………… 222
                6.3.1 …via Internet Explorer………………………………………………………………………… 222
                6.3.2 …via QuickTime……………………………………………………………………………….. 23

Appendices
Appendix 1: Technical Specifications……………………………………………………………………………………… 24
Appendix 2: Compatible USB Flash Drive List …………………………………………………………………………… 24
Appendix 3: Compatible SATA HDD List………………………………………………………………………………….. 25
Appendix 4: Removing the DVR Module………………………………………………………………………………….. 25
Appendix 5: Replacing the SATA HDD……………………………………………………………………………………. 25

Warranty Terms & Conditions……………………………………………………………………………………………. 26

                                        4
DVR4-5500™                                                                                Operating Instructions

Part 1: Setting up the DVR Hardware
1.1 Layout of Digital Video Recorder (DVR)

AC POWER: Using the supplied power lead, connect this to a wall socket, using an extension lead if required. Uses
IEC13/14 connectors (this is the same plug that most desktop computers use).

VGA PORT: For the DVR to be connected to the LCD screen. A small VGA cable runs from the back of the LCD
screen, this should be plugged into the VGA connector.

LAN: Used to connect the DVR to a local area network. Use a standard networking cable if your network is
connected to a multi-port router or network switch/hub. Use a cross-over cable to connect the unit directly to a
computer. It uses standard Ethernet (cat5 or higher) networking cables (not included).

AUDIO IN: Connect to an active audio source, either built into a camera or a separate device. Requires a “line-level”
signal, connects using a standard RCA connector.

VIDEO IN: Connect your cameras to these inputs, in the order you would like to see them when you monitor multiple
channels (input 1 is shown in the top left of the screen in multi-view mode, and 4 in the bottom right). You can, if
required, send video signals into these inputs from any compatible video device.

USB: Can be connected to a USB mass storage device (such as a USB flash drive). You can easily backup recorded
images directly to the USB device without connecting the DVR to a computer. Also, you can use a USB device to
update the firmware for the DVR.

NOTE: The USB flash drive must be formatted with a “FAT32” file structure. See 4: Upgrading Firmware for
more information on how to do this.

1.2 Connecting Cameras to the DVR

The DVR will automatically detect what sort of cameras you have attached to it when it is turned on. Thus, it is
important that all cameras are attached correctly before the DVR is turned on! To attach your cameras correctly:

     1.   Place your cameras in the desired locations.
     2.   Ensure that your cameras are supplied power, using the correct power supplies.
     3.   Attach the video cable from the camera to the DVR. The cameras will have either an RCA or coaxial cable,
          and a BNC connector. To use the BNC connector correctly, push into the video input and twist to lock into
          position. If your cameras have an RCA connector, use an RCA to BNC adaptor.
     4.   If the camera is a model which monitors audio, attach the audio cable to the RCA connector marked “Audio
          IN”.

NOTE: The DVR has only one audio input. This means you should select the audio that you are recording carefully –
it’s usually worth testing all available audio sources and choosing the one that gives the best results. If you really
need to record multiple audio sources simultaneously, consider using an external audio mixing console to record
multiple sources. This is optional and purchased separately.

1.3 Check VGA Connection

Though they are one unit, the LCD screen has a small VGA cable extending from the back of the monitor. This
should be attached to the VGA connector immediately to its right. Check that this is the case and re-attach the cable
if it has come loose in transport. This cable and connector are located outside the unit to allow for the connection of
other screens to the DVR (if required).

1.4 Connecting Power to the DVR

Using the supplied power cable (an IEC13 cable), attach to the AC POWER connection on the DVR. Plug the other
end of the cable into a wall socket. If there are no wall sockets nearby, use an extension cable. The DVR will turn
itself on as soon as power is connected.

SUGGESTION: To ensure the continual operation of the DVR during power failures, consider using a UPS
(Uninterruptible Power Supply). Doing so is optional and they are available separately.

                                                          5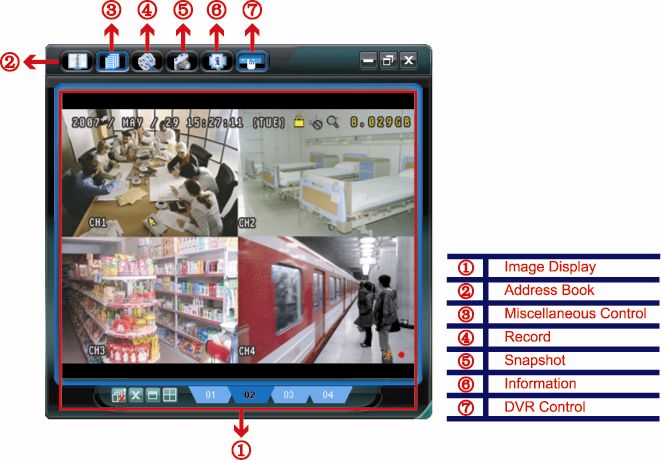
DVR4-5500™                                                                                                Operating Instructions

Part 2: Configuring the DVR Software

Before we can start recording video, we need to take a moment to configure some of the settings on the DVR. We
need to set the DATE & TIME, and then assign a PASSWORD for you. To do this, we need to use the infrared
remote control which came with the DVR – here’s a quick overview of the remote and what the assortment of buttons
on it do. Don’t be intimidated by the mass of buttons – most of them operate in a very similar way to the remote
control on a DVD player or VCR, and many of them you’ll probably never need to touch.

2.1 Layout of the Infrared Remote Control
                                             POWER: Turns the DVR and screen on and off.
                                             Press once to enter “power-saving” mode, turning OFF the monitor, leaving the DVR
                                             ON. Press and hold to turn OFF the DVR. If the DVR is recording, it will ask you to
                                             confirm the shutdown procedure. Press once when DVR is OFF to turn it ON again.

                                             NUMERICAL PAD: 0 – 9
                                              Press to switch channel, much like a TV. They can also be used to enter DVR
                IR LED                        password. In PTZ mode, used with the Goto key to access pre-set options.

                                             LDC adj.:     Adjust Screen Settings
                                              Press once to enter the LCD screen configuration menu. Changes made here will
  POWER         DVR / PC         DVR / PTZ    affect viewing conditions on screen, but will not alter the way that the DVR records
                                              images. The screen icon above will be shown whilst in LCD Adjustment Mode.

     4                5             6        Menu: Enter the main menu
                                              Press once to enter the menu, and once to exit the menu again. Whilst you are in a
     7                8             9         submenu, this button will take you back to the main menu.

                      0
                                                : Multi-camera Monitoring
  LCD adj.                         Menu
                                              Toggles the number of video inputs displayed onscreen at once. As this DVR has only
                                              four video inputs, the additional buttons for nine or sixteen cameras have been
                                    SEQ
                                              disabled.

                                             SEQ: Sequential Viewing Mode
                                              Press once to cycle between active video inputs. Video channels which are inactive or
                                              have been assigned “covert” will not be displayed. Press again to stop cycling.

                                             Arrow Keys: Basic Navigation
                                              When in the menu, navigates between available options. Up and down arrows change
                                              settings once they are highlighted.
                                              When in viewing mode, up and down change the channel, just like a regular TV.
   Stop      Slow         Snap     Pause
                                             Enter:
   Home      Stop         Audio    Zoom
                                              When in the menu, press to select an item or enter a sub-menu.

                                             LIST:
   Auto      Preset       Speed     Goto
                                              Press once to see a list of recorded events, divided into categories.
         Zoom                Focus
                                             Playback Keys: PLAY, REW (Rewind), FF (Fast-Forward), STOP, SLOW, PAUSE
                                              Controls the playback of recorded videos. They operate in the same way as a regular
                                              VCR or DVD player.

                                             Snap: Capture a Still Image (Snapshot)
                                              Used to take still images from the video, which are saved directly to an attached USB
                                              flash drive. (A USB device must be attached for this function to work correctly.)

                                             Audio: Toggle Audio Monitoring Mode
                                                 Live monitoring mode: You will be able to overhear any audio the system is
                                                                         recording live.
                                                No audio icon displayed: Audio is recorded, but not heard in the live window.

                                             Zoom: Increase/Decrease Digital Zoom
                                              Enlarges the image on the selected channel. Will not operate when the viewing mode
                                              is set to “default”. Will not change what the camera sees and records, just enlarges the
                                              displayed image.

                                             Additional Buttons:
                                             You might notice that there are several buttons on the remote not discussed here. This
                                             is not an omission on the part of the manual, but a function of the DVR remote. The
                                             remote control is designed to function with several DVR models. As such, the remote
                                             does have buttons which do not directly relate to your DVR. Don’t worry about these\
                                             buttons – they will not do anything when pressed.

                                                                          6
DVR4-5500™                                                                                 Operating Instructions

2.2 Setting the Date and Time
Once you have powered on the DVR for the first time, and it has finished initialising, we can now set the DATE AND
TIME. To do this:

     1.   Press the MENU button.
     2.   You may be asked for your password. The default password is “0000”. This can be entered by using the
          numerical keypad, or by using the up and down keys to select “0” and pressing     four times.
     3.   Using the up and down arrows, navigate to the DATE settings on the first page of the main menu.
     4.   Use the left and right arrows to select the attribute you want to change, and the up and down arrows to
          change their value. In this way, update the date and time settings.

IMPORTANT: Update the DATE AND TIME before you start recording – do not change it afterwards! If you do, the
recorded data will be out of order, and you will not be able to locate specific events via the ‘TIMESEARCH’ function.
In some cases, data loss may occur. If you accidentally change the DATE AND TIME settings whilst recording, it is
recommended that you clear all data off the hard drive and then start recording again.

2.3 Setting the Password
It is important to set a unique password to restrict unauthorized access to the DVR. To do this:

     1.   Open the MENU. You may need to enter the default password (“0000”) to do this.
     2.   Scroll down until you come to the SYSTEM INFO submenu, scroll right and select PASSWORD.
     3.   It will ask you for your old password (“0000”) and then let you enter a new password. Be careful when
          entering your new password, if you make a mistake you could accidentally lock yourself out.

Some tips on selecting a password:

     1.   A password can be any four digit long combination of the numbers 0 – 9 and the letters “a” and “b”.
     2.   It is important to choose something that you’ll remember, but not something so obvious that potential
          security risks might guess it.
     3.   Using the two optional letters (a or b) will improve the strength of your password, but will take longer to
          enter each time the DVR asks you, as the remote control does not have keys for letters. They can only be
          selected by using the up and down arrows to change the input character.

Why? The DVR will automatically lock itself after a certain time of inactivity. The default is 30 seconds – your
password unlocks the DVR once this has happened. You can change this in the SYSTEM INFO menu.

                                                          7
DVR4-5500™                                                                                 Operating Instructions

Part 3: Basic Functions
3.1 Overview of the Interface: The Live Monitoring Layout
This section will cover everything you need to start monitoring your cameras and recording footage. It is worth taking
some time to experiment with the basic functions of the DVR, so that you understand the features and limitations of
your particular setup.

First of all: here’s what you’ll see when you first turn your DVR on, and an explanation of what some of the icons
you’ll see mean.

    Icon       Description       Icon      Description         Icon    Description       Icon        Description
                                                                      1st live audio              1st playback
              Locked                      Unlocked
                                                                      channel                     audio channel
              Audio channel               Digital zoom                Digital zoom
                                                                                                  HDD overwrite
              unselected                  mode                        unselected
              Timer
                                          Motion                      Recording                   LCD adjustment
              recording

3.2 Locking / Unlocking the DVR (KEYLOCK)
To prevent unauthorised access to your DVR, the unit automatically locks itself after a short interval of inactivity. To
unlock the unit, it is necessary to enter your password. The time until the DVR locks can be adjusted in the SYSTEM
INFO submenu. It can be set to 30 seconds, 1 minute, 2 minutes or never. It is strongly suggested that, if the DVR is
in a non-secure location, that the auto-lock feature be left ON.

3.3 Recording
When the DVR is recording, it will display the recording icon ( ). If this icon does not appear when the DVR should
be recording, check that your recording settings are correct and that the connection between the DVR and the hard-
drive is in place.

There are two main ways that the DVR can be configured to record. The first is to record based on a programmed
schedule: this is referred to as TIMER RECORDING. The alternative, and often preferred method, is MOTION
RECORDING. In addition, both of these settings can be overridden by the option to manually start and stop
recordings.

3.3.1 Timer Recording

To set the unit up for TIMER RECORDING:
     1. Open the menu.
     2.    Select RECORD TIMER. It’s next to the TIMER ( ) icon.
     3.    Then, using the arrow buttons, set the RECORD TIMER setting to ON.
     4.    Whilst ON is highlighted, hit . This will open the Timer control window.
     5.    Using the arrow buttons and the      button, you can select what hours per day, and which days per week,
           that the DVR will record for. The DVR will record at all times that you highlight.

The timer icon (   ) will appear on screen whenever the TIMER RECORDING function triggers the DVR to record.

                                                           8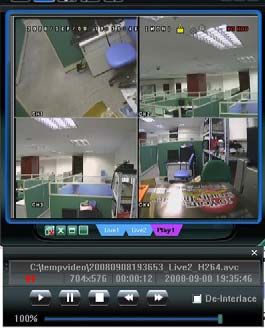
DVR4-5500™                                                                                 Operating Instructions

3.3.2 Motion Recording

This is a little more complex than TIMER RECORDING, but has some distinct advantages. Basically, MOTION
RECORDING will allow you to configure the DVR to record only when something is happening in front of the camera.
This means that the hard drive will not be filled up with hours and hours of nothing happening! This is a great mode to
select if, for example, you use the DVR to record images of a location during times that it is unoccupied.

To enable MOTION RECORDING:

     1.   Open the menu, and scroll down to ADVANCED CONGFIG.
     2.   Select RECORD from the submenu.
     3.   Set EVENT RECORD ENABLE to ON.
     4.   Whilst the DVR is detecting motion, the motion (    ) icon will light up next to the appropriate video channel
          to let you know about it.

3.3.3 Manual Recording

Of course, you can just make the DVR record whenever you want! To do this, use the manual override.

     1.   Open the menu, and scroll down to the ADVANCED CONFIG.
     2.   Select the RECORD option.
     3.   Switch the MANUAL RECORD ENABLE option to ON.
     4.   The DVR will now record any active video signal until the MANUAL RECORD ENABLE option is turned
          OFF.

Tips and Tricks: Recording everything (and the manual override will record everything) that your cameras pick up
will fill up the hard drive very quickly. Make sure you really want to do this before you enable it! Under most
circumstances, TIMER RECORDING or MOTION DETECTION are more useful settings.

3.3.4 Some More Recording Options

By carefully configuring the DVR, there is no limit to how automated your recording setup can be. You might have
already noticed the DETECTION TIMER setting in the QUICK START menu. By correctly configuring the motion
detection settings, and programming your schedule into the DETECTION TIMER window, you will be able to
configure the system so that your hard drive space will last weeks to months at a time.

By combining the RECORD TIMER with the DETECTION TIMER, you can create a customised recording criteria that
will suit whatever requirements your situation requires. For example, if you want to use the DVR to monitor a
warehouse after business hours, you could easily configure the DVR to not record during the day, and then to record
on motion at night. Alternatively, say you are monitoring a convenience store during busy hours to record incidents
for use as evidence at a later date. You could configure the system to automatically record at whatever times these
incidents are likely to occur – or even the whole time your store is open. There is no limit to how autonomously the
system can run, leaving you free to concentrate on the important things.

IMPORTANT: If the hard drive is about to run out of space, the DVR will automatically start recording over
previous footage. It will not tell you about this – it is an automatic function to ensure the DVR can record new
events as they occur. If you want to keep an eye on the remaining space, it is always listed in the upper right
corner of the screen. The DVR will overwrite the oldest footage first – that is, the earliest recorded events will
be deleted (in 8GB chunks at a time) to make room for new events to be recorded.

                                                          9
DVR4-5500™ Operating Instructions
3.4 Playback
3.4.1 Finding an Event
So – something has happened, and you want to review your footage. No problems! The easiest way to go about this
is to press the LIST button. This will bring up a menu of different options.
1. RECORD LIST: Choose this if you want to view footage that was captured when you manually enabled the
recording function.
2. MOTION LIST: This will bring up a list of motion triggered recordings. Select it if you are looking for an
event that occurred whilst the DVR was in motion detection mode.
3. ALARM LIST: Not applicable to this model.
4. TIMER LIST: Brings up a list of all recordings that were triggered by the Record Timer.
5. FULL LIST: Will display all events recorded by the DVR.
In all cases, the list of events will be ordered by the date and time that they occurred, with the most recent events at
the top of the list. To play back an event, simply select it on this list and press .
NOTE: There must be a minimum amount of data on the hard drive for playback to operate correctly.
Specifically, there must be 8182 images (frames) on the drive. This equates to about 10 minutes of footage at
30 IPS (NTSC standard) or 12 minutes at 25 IPS (PAL standard). Basically, if the drive is close to empty, it
won’t playback! If you really need to playback footage and the drive is almost empty, just record something
for a few minutes, and then it will work just fine.
3.4.2 Controls for Playback
The playback controls operate in much the same way as a DVD or VCR remote. Basically:
FF (Fast Forward) Press once to go at 4x speed forward, twice to get 8x, and so on up to 32x
REW (Rewind) Press once to go at 4x in reverse, twice for 8x and so on, again up to 32x
PAUSE Press once to pause the playback.
Whilst paused, you can use the FF button to advance one frame at a time, and the REW button
to go one frame back.
STOP Ends playback mode – will take you back to the live monitoring screen.
SLOW Press once to get 1/4x speed, twice to go to 1/8. If you want to go slower, we suggest using the
frame advance (PAUSE) button.
AUDIO Switches between live sound, recorded sound and no sound.
To end playback and return to the live monitoring screen, just hit STOP.
3.5 Upgrading Firmware
We are constantly trying to improve our products: upgrading their features, functionality and compatibility with other
devices. To achieve this end, from time to time we release a new copy of the firmware for this DVR. Firmware is
something in-between hardware and software (hence the name), and basically acts as a series of instructions for the
DVR that tells it how to run itself.
To upgrade the firmware to the latest version, you’ll need a USB flash drive. Format this to be FAT32 by right clicking
it in the My Computer window, and selecting Format. In the drop down menu (that let’s you select what type of format
you’d like to do) select FAT32, and hit Format. In just a few seconds, your USB drive will be ready to use with the
DVR.
You can find and download the most recent version of the firmware for this DVR from our website:
www.swann.com.au/downloads. Grab it via the Internet using your PC, and pop it onto the USB flash drive (simply
click and drag, or copy and paste it there). Don’t change the filename: we named it that way for a reason!
Put the USB flash drive into the USB port located on the back of the DVR, right next to the video inputs. Now, grab
the DVR remote and:
1. Press MENU.
2. Navigate down to SYSTEM INFO.
3. Select UPGRADE from the submenu.
4. Move across to START, and press .
5. When the popup window asks you to confirm this action, select YES and press .
6. Wait until the DVR finishes processing the upgrade. It will reboot by itself to complete the upgrade.
7. Remove the USB flash drive once this process is complete. Do not remove it until the DVR reboots!
8. For a list of USB flash drives which are compatible with this DVR, see Appendix 2.
10DVR4-5500™ Operating Instructions
Part 4: Advanced Operations
4.1 Quick Search
If you’re hunting some specific footage and you know the date and time at which the DVR recorded it, the best option
might be to do a QUICKSEARCH for the event you want.
1. Open the MENU and move down to the second page. Select the third submenu, called EVENT INFO.
2. In this submenu, select QUICKSEARCH.
3. Using the arrow buttons, select the date and time you would like to see an event from.
4. Don’t worry about the SEARCH HDD option – this doesn’t apply to this model, as it only has one HDD.
5. Select START.
6. If there was an event recorded at this time, you will be taken directly to it.
4.2 Setting the Recording Settings
4.2.1 Basic Settings
To change the basic recording settings (being the quality and size of the recorded video):
1. Open the MENU.
2. Find the RECORD SETTINGS in the QUICK START menu.
3. You’ll have the options to change the IMAGE SIZE, QUALITY and IMAGES PER SECOND.
4. Set these as you require.
There are many different recording options available and the ones that are right for you will depend on a number of
factors. Here is a very quick guide to selecting the video settings that are right for you.
First, select your IMAGE SIZE. There are two options available:
FRAME: Each image is stored as its own, discreet image. This option gives better quality at the expense
of a higher size.
CIF: Stands for Composite Image Frame. CIF results in a lower quality image per frame, but
maintains a high standard of quality when viewed in motion. When in CIF MODE, the IPS can be
set much higher – this is useful for multi-camera recording.
There are four settings available for QUALITY:
NORMAL: The lowest quality available, but takes up the least space.
HIGH: Better than NORMAL, not as good as BEST.
BEST: Better than HIGH, but not SUPER BEST.
SUPER BEST: A very detailed image, but requires the most space.
Finally, choose your IPS (Images Per Second). The higher this number, the smoother the motion in your videos will
be. The lower the number, the fewer images per second will be recorded. This saved hard drive space, but, if the IPS
is too low (5-10 IPS per camera or less), the video can look a little jerky when played back.
When in FRAME mode, the IPS can be set between 3 – 30 IPS (NTSC) and 3 – 25 IPS (PAL).
In CIF mode, the IPS value can range from 12 – 120 IPS (NTSC) and 12 – 100 IPS (PAL) this is sometimes called
“Real Time” recording.
Which settings are right for you? It all depends on how much detail you need to see in your images, how detailed the
images from your cameras are and how much footage you need to store on the hard drive.
For example, if you need to capture images of things moving rapidly, but don’t need to see much detail (say,
recording the number of cars that drive by, but not needing to identify them) then set the IPS to a high value, but, to
conserve space on the DVR, you might set the quality to HIGH or even NORMAL. CIF is most likely to be the right
option.
On the other hand, if you wanted to get a great amount of detail, but the subject you are shooting is in view of the
camera for some time (such as capturing peoples faces as they walk down a corridor) then set the IPS to a low value,
but keep the quality at SUPER BEST, using FRAME mode.
11DVR4-5500™ Operating Instructions
4.2.2 Advanced Settings
To get to the ADVANCED CONFIGURATION settings for recording:
1. Open the MENU and scroll down to the ADVANCED CONFIG.
2. Select the RECORD option.
There are a number of options that you can configure or engage here, such as:
1. Engaging the manual record override. This will make the DVR record constantly, regardless of whether
TIMER RECORD or MOTION RECORD modes are engaged.
2. Activating or deactivating the EVENT RECORDING and TIMER RECORDING modes. If these are
deactivated, the conditions specified in the QUICK START menu will not trigger the DVR to record.
3. EVENT RECORD IPS / TIMER RECORD IPS – you are able to configure custom IPS settings for different
recording modes here. In addition, the highest applicable setting takes effect. For example, you could set
the DVR to record for a period at 3 images per second and when it detects motion, increase the IPS to a
much higher setting.
4. OVERWRITE: You can disable the default overwrite mode of the DVR. When OVERWRITE is set to OFF,
and the DVR hard drive fills up, it will simply stop recording, rather than record over the oldest footage first
(its default behaviour).
4.3 Programming the Timer
To most efficiently use the DVR, it is important to set the timer carefully. The instructions that follow cover setting the
timer for both TIMER RECORDING and EVENT RECORDING modes.
1. Open the MENU.
2. From the QUICK START page, select either the RECORD TIMER or the EVENT TIMER (whichever you
want to set – you can set both to operate at once, but you must program each separately).
3. Set the applicable TIMER status to ON. Then, whilst ON is highlighted, press . The following window will
appear:
RECORD / DETECTION TIMER
0 2 4 6 8 10 12 14 16 18 20 22 24
SUN
MON
TUE
WED
THU
FRI
SAT
PLEASE CONSULT YOUR INSTALLER FOR ADVANCE SETTINGS
uv s t MOVE SELECT
4. The horizontal axis shows hours of the day, in 24-hour time (0 being midnight, 12 being midday)
5. The vertical axis shows the days of the week, from Sunday through Saturday.
6. Using the arrow buttons, move the yellow cursor to the beginning of the interval you want to set.
7. Press to set the start point. The cursor will turn red.
8. Use the arrow buttons to move to the end point of the period you wish to set. You’ll notice that a blue bar
stretches between the start point and the cursors location.
9. Press the button again to set the end point. The cursor will turn yellow again, and you are able to repeat
the process from step 4 to create another active interval.
10. When you have set all the intervals you want, press the MENU button to exit this screen.
11. Repeat this process if you wish to set a timer for an alternate recording mode.
12DVR4-5500™ Operating Instructions
4.4 Advanced Motion Detection Settings
To alter the MOTION DETECTION settings:
1. Open the menu, and scroll down to ADVANCED CONFIG.
2. Select DETECTION from the submenu and press
3. This will open the DETECTION WINDOW. You can access settings for all four channels from here.
4. Select which channels you’d like motion detection enabled on. There are four options, OFF, LOW,
MEDIUM and HIGH. The higher the setting, the less motion needs to occur in front of the camera to trigger
the recording on the DVR. It’s worth playing with this setting (particularly if the camera is monitoring
outdoors where wind and other environmental conditions could trigger the motion sensor) until you find the
settings that work for you.
5. Scroll over to the AREA SETUP option, and select with .
Whole Image Centre of Image Extreme Centre of Image
6. Use the left and right directional buttons to increase or decrease the number red squares that appear.
7. The areas marked by red squares will not count for the purposes of detecting motion in the frame.
8. You can select the whole window through to the very centre – motion detected outside this area will not
engage the record function. Hit the MENU button to go back to the DETECTION WINDOW.
4.5 Advanced System Information
The SYSTEM INFO submenu contains a few settings which you should only change if you are very familiar with the
operations of your DVR and a couple of items which you will need to set. Here’s a brief rundown of what’s what:
PASSWORD: Allows you to change the password to access the DVR (see 2.3 for details).
RESET DEFAULT: Recalls original factory settings. Great if you’ve really messed something up, not so good (in fact,
entirely bad) if you’ve got the system working the way you want it. Make sure you really want to
do this before selecting this!
CLEAR HDD: Deletes all recorded footage from the hard drive. Great if the hard drive is full of unwanted
images, not so good otherwise. Again, be sure you want to do this before selecting it.
UPGRADE: Allows for the updating of the firmware (see 3.5)
AUTO KEYLOCK: Changes the amount of time before the DVR automatically locks itself. Options are 30 seconds,
one minute (60 seconds), two minutes (120 seconds) or never.
LANGUAGE: Changes the language that the DVR displays. A great idea if French, German, Chinese (and
many others) are your native language, not so good for those who prefer English.
VIDEO FORMAT: Shows whether the DVR is detecting PAL or NTSC cameras. You cannot change this setting.
VERSION: Displays the installed version of the firmware the DVR is running.
4.6 Backing up Events
4.6.1 …to a USB Flash Drive
As mentioned earlier, make sure your USB flash drive is formatted as FAT32 (see 3.5 for how to do this). Also, it’s
recommended that you delete all data from the USB drive before inserting it into the USB port on the rear of the DVR.
1. Insert the USB flash drive into the USB port on the DVR.
2. Open the MENU, and navigate to USB BACKUP (the last option in the menu).
3. You will then see the USB BACKUP screen.
4. Select the start and end date and time the event you wish to backup occurred. If you don’t know this, it’s
worth doing a QUICKSEARCH or going through the EVENT LIST to find the exact footage you want first.
5. Select the VIDEO CHANNEL(S) you want to backup. Remember: the more channels you back up, the
more space this will take up on the flash drive.
6. Select START to begin the backup procedure.
7. Do not remove the flash drive whilst the backup is being processed. This will cause data corruption and
the information on the flash drive will be lost.
8. Once the backup is complete, the DVR will show the message BACKUP SUCCESS. You can now safely
remove the flash drive.
NOTE: Not all USB flash drives are compatible with this DVR. Consult Appendix 2 for a list of USB flash
drives that are confirmed to work with this DVR. It is not an exhaustive list, and many not listed there will
work – if not, the DVR will simply display the message USB ERROR. The flash drive will not be harmed.
13DVR4-5500™ Operating Instructions
4.6.2 …to your PC
Once you’ve finished backing up an event or two to the USB flash drive, you might be wondering what to do with it.
Well, whilst you’re backing up footage, the DVR automatically copies a small program onto the flash drive that will
allow you to access and playback the footage on a PC.
Insert the USB flash drive into a spare USB port on your PC, open it, and find the file named “PLAYER.EXE”.
Running this will give you instant access to the footage on the flash drive.
NOTE: The viewing program is supported by Windows Vista, XP and 2000. Using other platforms to view the
backed up information is neither recommended nor supported. However – as the files on the flash drive are
encoded using the H.264 codec – it is possible to play the files without the dedicated program. It’s worth
noting that this manual contains no information on how to do this, and it is not a supported function of the
unit. Attempting to do so could easily corrupt your data.
14DVR4-5500™ Operating Instructions
Part 5: Networking
Why would you put your DVR onto a network? Well, how about being able to monitor your security system from any
Internet capable computer on Earth, or even in low orbit if you travel that far from home? It’s pretty cool, and really
convenient. We’re not going to try and deceive you: this is a somewhat tricky process which does require some
knowledge of computers and networking.
Because of this, we recommend that only people familiar with networking (or those willing to put in the effort to learn)
attempt networking their DVR. Often the best thing to do, if you are completely unfamiliar with networking technology,
is to find someone who does know, and get them to walk you through it. We’ve got some additional networking
tutorials and information available on our website (check out: www.swannsecurity.com) to help you through the
process.
Tips and Tricks: Some additional research might help you out. Don’t be put off by the term “research” – all we really
mean is: say you come across a term you’re unfamiliar with (for example, “Ethernet”), just throw this term into your
favourite Internet search engine and – bam! – you’ll have more information about Ethernet than you’ll know what to
do with… and definitely enough to help you through the process.
Foolish Assumptions: We’re assuming, for the purposes of this walkthrough, that you have an active Internet
connection running through a router (yours might have a fancy name, such as “DSL Modem” or “Residential
Gateway” – basically, the thing that you use to gain access to the Internet). We’re also assuming you have an
Internet capable PC hooked up to the network, running a recent version of Windows (such as XP or Vista). If this is
not the case and you’re unfamiliar with the way your network is set up, we suggest having a chat with the folks who
set up your network – they’ll probably know what can and can’t be done.
Ready? Take a deep breath, and let’s start at the start…
5.1 Connecting the DVR to your Local Network
The way that you’ll connect your DVR to your network depends on what kind of network you’re running at home.
We’re going to cover the three most likely scenarios, and walk you through it step by step. (If you’re going to use
PPPoE, skip this step – but then, if you’re familiar with PPPoE, you probably know that already!)
First of all, we’re going to need to find out some information about your network. Open your network properties
window (usually done by right clicking your network icon and choosing Properties). Have a hunt around until you find
your network and IP settings.
They’ll look something like this.
You’ll need to make a note of a couple of things,
specifically your:
Address Type: Assigned by DHCP or
Manually Assigned
IP Address: ____ : ____ : ____ : ____
NOTE: This is your PRIVATE IP ADDRESS, as
distinct from your PUBLIC IP ADDRESS, which we’ll
discover later. You’ll need to know both.
Subnet Mask: ____ : ____ : ____ : ____
Default gateway: ____ : ____ : ____ : ____
EXAMPLE
Then, open the Details window.
Here, grab your:
DNS Servers: ____ : ____ : ____ : ____
____ : ____ : ____ : ____
There might be a few DNS servers: just grab the top two
if there are more.
If you’re having trouble with this step, again we suggest
talking to the nearest available computer-tech-person
(most likely the most convenient geek/student/child)
they’ll know how to find this information. Alternatively, the
people who installed your computer system will know all
this information (or at least how to get it).
Once you’ve got this information, we can go on to the
next step. EXAMPLE
15Vous pouvez aussi lire