Blender FR EN NL - Magimix
←
→
Transcription du contenu de la page
Si votre navigateur ne rend pas la page correctement, lisez s'il vous plaît le contenu de la page ci-dessous
FR   EN NL

             Blender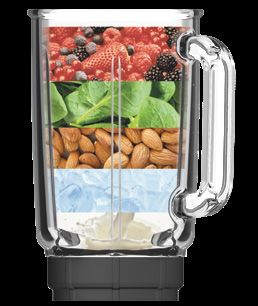
Téléchargez l’application Magimix
    ou visitez notre site internet
   Download the Magimix app
      or visit our website
   Download de Magimix-app
    of ga naar onze website

          magimix.com
FR   Consignes de sécurité�������������������������������������������������2
     Descriptif�������������������������������������������������������������������4
     Tableau de commande������������������������������������������������6
     Capacités������������������������������������������������������������������8
     Utilisation blender������������������������������������������������������9
     Utilisation accessoires�����������������������������������������������12
     Nettoyage���������������������������������������������������������������16
     Que faire si ?����������������������������������������������������������17
     Lisez attentivement les consignes de sécurité indiquées dans le mode
     d’emploi Blender avant d’utiliser votre appareil et ses accessoires.

EN   Safety instructions����������������������������������������������������18
     Description��������������������������������������������������������������20
     Control panel�����������������������������������������������������������22
     Blender capacities����������������������������������������������������24
     Using your blender���������������������������������������������������25
     Using the attachments�����������������������������������������������28
     Cleaning�����������������������������������������������������������������32
     Troubleshooting��������������������������������������������������������33
     Please read the blender safety instructions through carefully before using
     your appliance and its attachments.

NL   Veiligheidsvoorschriften��������������������������������������������34
     Beschrijving�������������������������������������������������������������36
     Bedieningspaneel�����������������������������������������������������38
     Verwerkingshoeveelheden�����������������������������������������40
     Gebruik van de blender��������������������������������������������41
     Gebruik van de accessoires���������������������������������������44
     Reiniging�����������������������������������������������������������������48
     Wat moet u doen als?����������������������������������������������49
     Lees aandachtig de veiligheidsvoorschriften in de gebruiksaanwijzing van
     de blender voordat u het apparaat en deze accessoire gebruikt.
                                                                                       1
CONSIGNES DE SÉCURITÉ

    AVERTISSEMENT : les consignes de sécurité font partie de l’appareil.
    Pour votre sécurité, veuillez les lire attentivement avant d’utiliser votre
    nouvel appareil.
    • Ne pas dépasser le repère Max.1,8 L.
    • Ne faites pas fonctionner l’appareil si le couvercle n’est pas bien
       enfoncé ou si le joint et l’ensemble lames ne sont pas assemblés
       correctement.
    • Ne jamais mettre les doigts ou tout autre objet à l’exception de la
       spatule livré avec le produit dans le bol pendant le fonctionnement du
       blender.
    • Si les lames se bloquent, débrancher toujours l’appareil avant de
       retirer les ingrédients.
    • Toujours déconnecter l’appareil de l’alimentation si on le laisse sans
       surveillance et avant montage, démontage ou nettoyage et avant de
       changer les accessoires ou d’approcher les parties mobiles lors du
       fonctionnement.
    • Les surfaces en contact avec les aliments doivent être nettoyées avec de
       l’eau savonneuse ou du produit vaisselle (plus de détails au paragraphe
       NETTOYAGE).
    • Des précautions doivent être prises lors de la manipulation des couteaux
       affûtés, lorsqu’on vide le bol et lors du nettoyage. Des risques de
       blessures sont possibles en cas de mauvaise utilisation de l’appareil.
    • Ne jamais plonger l’appareil dans l’eau ou dans tout autre liquide,
       afin d’éviter tout risque de choc électrique.
    • Ne pas placer sur un brûleur à gaz ou sur un élément électrique, ou
       près de ceux-ci ou encore, dans un four chaud.
    • Cet appareil est destiné uniquement à un usage domestique.
    • Ne pas utiliser l’appareil à l’extérieur.
    • Les enfants ne doivent pas jouer avec l’appareil. Cet appareil ne doit
       pas être utilisé par des enfants. Conserver l’appareil et son câble hors
       de portée des enfants.
    • Cet appareil peut être utilisé par des personnes ayant des capacités
       physiques, sensorielles ou mentales réduites ou dénuées d’expérience
       ou de connaissance, s’ils (si elles) sont correctement surveillé(e)s ou si
       des instructions relatives à l’utilisation de l’appareil en toute sécurité
       leur ont été données et si les risques encourus ont été appréhendés.
    • Les utilisations dans les cas suivants ne sont pas couvertes par la
       garantie : dans des coins de cuisines réservés au personnel dans des
       magasins, bureaux et autres environnements professionnels, dans
       des fermes, par les clients d’hôtels, motels et autres environnements à
       caractère résidentiel et dans des environnements de types chambres d’hôtes.
2
CONSIGNES DE SÉCURITÉ
RISQUE DE BRULURES
• Ne JAMAIS introduire de liquides ou ingrédients chauds dans les bols
accessoires : BlendCups, mini bol,.. mélanger des ingrédients chauds
dans un bol fermé peut provoquer une surpression et éjecter les liquides
chauds ou vapeur hors du bol.
• Préparations chaudes bol 1,8 L : mélanger des ingrédients chauds à
vitesse élevée peut provoquer une surpression et éjecter les liquides
chauds ou vapeur hors du bol. Faire preuve de vigilance si un liquide
chaud est versé dans le bol dans la mesure où il peut être éjecté de
l’appareil en raison d’une ébullition soudaine.
Ne pas verser d’ingrédients ou liquides dont la température dépasse
60°C. S’assurer toujours que le couvercle est fermement mis en place,
veiller à ce que le bouchon doseur soit juste posé et pas enfoncé (pour
laisser s’échapper la vapeur). Ne jamais utiliser la touche PULSE, utiliser
le programme soupe ou démarrer en vitesse lente avant d’augmenter
graduellement la vitesse.
RACCORDEMENT ELECTRIQUE
• L’appareil doit être branché sur une prise de courant électrique reliée
à la terre.
• Vérifier que la tension d’alimentation indiquée sur la plaque signalétique
correspond bien à celle de votre installation électrique.
• Ne pas laisser pendre le cordon du plan de travail ou d’un comptoir et
évitez qu’il entre en contact avec des surfaces chaudes.
SERVICE APRES-VENTE
• Si le câble d’alimentation est endommagé, il doit être remplacé par
le fabricant, son service après-vente ou une personne de qualification
similaire, afin d’éviter tout danger.
•L’utilisation de pièces non recommandées ou non vendues par le
fabricant pourrait entraîner un incendie, des chocs électriques ou des
blessures.
CONSERVEZ CES CONSIGNES DE SÉCURITÉ
3DESCRIPTIF
Bouchon doseur 70 ml
Couvercle d’étanchéité
Spatule mélangeur
Bol verre Max.1,8 l
Joint d’étanchéité
Ensemble lames
Support lames
Bloc moteur
Lavez soigneusement tous les éléments (sauf le bloc moteur) avant la 1ère utilisation.
4ACCESSOIRES*
Mini bol**
Mini bol verre idéal pour moudre des
épices, hacher du parmesan, préparer
des dips en petites quantités.
Bol livré avec l’ensemble lames spéciales
mélanges secs. Voir p.12.
BlendCups**
Bols compacts (400 et 700 ml) pour
préparer des petites quantités et / ou
emporter partout ses boissons.
Bols compatibles avec l’ensemble lames
du bol 1,8 L. Voir p. 13.
Presse-agrumes
Cet accessoire vous permet d’ajouter
facilement et directement un jus
d’agrumes à vos préparations. Il s’adapte
sur le couvercle de votre blender.
Voir p. 15.
Blender Kit**
Coffret premium composé de 2 BlendCups
d’une contenance de 400 et 700 ml
+ Mini Bol + 2 couvercles dont
1 couvercle saupoudreur
*Selon modèles / accessoires vendus séparemment
**Uniquement pour préparations froides
5TABLEAU DE COMMANDE
Mode manuel Programmes AUTO
Rapide Lent
Clean Ice Smoothie Soups Desserts
OFF : l’appareil est hors tension
Témoin allumé
Appareil sous tension
Témoin clignotant
• Cuve absente ou mal positionnée
• Surcharge moteur : mettre sur 0,
ajoutez du liquide ou diminuez les
quantités puis redémarrez
Arrête le Active le Vitesse
fonctionnement fonctionnement maximale
• Mise en route : sélectionnez une vitesse ou un programme avant d’appuyer sur AUTO.
• Mode manuel : démarrez toujours en vitesse lente puis augmentez graduellement
la vitesse.
• Ne faites pas fonctionner en continu plus de 60 secondes.
• PULSE : vitesse maximale pour un résultat encore plus lisse ou fonctionnement par
impulsions pour un résultat plus précis.
6PROGRAMMES AUTO
5 programmes qui ajustent à votre place les cycles et vitesses nécessaires pour
optimiser les résultats de la préparation.
Ces programmes sont optimisés pour le bol 1,8 l, reportez-vous aux instructions
pour les autres contenants.
Bol 1,8 l BlendCup Mini bol
Nettoyage
Programme automatique de rinçage ✓ ✓ ✓
Clean
Glace pilée
Pour piler et concasser des glaçons ✓
Ice
Boissons
Pour mieux mélanger les préparations ✓ ✓
Smoothie
liquides type milk-shakes, smoothies,
cocktails...
Soupes
Pour obtenir des soupes et veloutés ✓
Soups
(chauds ou froids) onctueux
Desserts glacés
Pour réaliser des glaces express à
✓
Desserts
base de fruits surgelés.
Pour mélanger, réduire en purée des
éléments denses et compacts.
Les cycles ont été déterminés pour les quantités maximales indiquées (voir p. 8).
Vous pouvez interrompre le programme avant la fin du cycle, si vous faites des
quantités inférieures ou si vous souhaitez un résultat moins fin.
7CAPACITES
Pour un usage optimale, respectez les recommandations ci-dessous :
Bol 1,8 L BlendCup Mini bol
3 biscottes (30 g)
Chapelure x x
V4, 14 s
500g fruits cuits 200 g fruits cuits
Compote de fruits refroidis V1 puis V3 x refroidis
+ spatule V1 puis V3
300 g fruits surgelés
Desserts glacés (cubes 2 cm) x x
Desserts + spatule
100 g
Epices moulus x x
V4, 20 s
80 g
Grains de café x x
V4, 40 s
300 g
Glace pilée (env. 15/20 glaçons) x x
Ice
1,6 L 0,4 L ou 0,7 L
Milkshakes x
Smoothies Smoothies
100 g
Noix, amandes x x
V3, 20 s
200 g V1 30s 100 g
Oignon x
+ spatule V1, 30 s
80 g
Parmesan x x (cubes 2 cm)
V4, 50 s
1 L V 3, 10 s
Pâte à crêpes x x
+ V 4, 20 s
200 g aliments cuits 200 g alimens cuits
Purée légumes refroidis x refroidis
V1, 50 s V1, 50 s
1,8 L 0,4 L ou 0,7 L
Smoothies x
Smoothies Smoothies
1,6 L
Soupes chaudes
Soups
200 g sucre semoule
Sucre glace x x
V4 + Pulse, 60 s
200g (en cube de
Viande crue x x
2 cm) V4 10s
Un blender n’est pas adapté pour pétrir ou faire une purée de pommes de terre.
Le temps de fonctionnement en continu, quel que soit l’accessoire et la recette ne
doit pas excéder 60 secondes.
8UTILISATION
1 Assemblez la base
Placez le joint bien à plat Posez l’ensemble Vissez et serrez le
sur l’ensemble lames. lames sur le bol. support.
2 Assemblez le bol
2
1
Retournez et posez le bol Ajoutez les ingrédients Enfoncez le couvercle
sur la base. Max 1,8 L. fermement. Insérez le
bouchon.
3 Mixez
Sélectionnez une vitesse Utilisez si nécessaire Attendez l’arrêt
ou un programme. la spatule pour aider complet avant
Appuyez sur AUTO. au mélange. d’ouvrir.
9CONSEILS
Glace / ingrédients surgelés
ou ingrédients collants
miel, banane, avocats...
Fruits et légumes frais
sauf banane, avocats...
Feuilles, herbes
épinards, aromates...
Ingrédients secs ou durs
céréales, oléagineux, carotte...
Liquides
eau, lait, jus...
Pour un résultat optimal :
• Coupez les ingrédients en morceaux de 2 cm environ
• Hachez grossièrement les herbes ou feuilles avant de les ajouter.
• Respectez l’ordre d’ajout des ingrédients indiqué dans la recette.
• Pour les préparations épaisses: démarrez toujours en vitesse lente et utilisez la
spatule, sinon les morceaux collent aux parois et la lame tourne dans le vide.
Si nécessaire, ajoutez un peu de liquide.
• Pour ajouter des ingrédients au cours du mélange, retirez le bouchon doseur
ou arrêtez l’appareil avant d’ouvrir.
• Ne faites pas fonctionner le bol blender à vide. Pour mixer des produits secs
(ex: épices, noix...), nous vous recommandons d’utiliser le mini bol dont la
lame est adaptée.
Ne pas dépasser le niveau MAX.
Ne pas verser d’ingrédients ou liquides dont la température dépasse 60°C.
10CONSEILS
Astuces
• Soupes chaudes : Laissez refroidir votre préparation à 60°C (température de
dégustation) avant de mixer votre soupe. Veillez à ce que le bouchon doseur
soit juste posé et pas enfoncé pour laisser s’échapper la vapeur Utilisez le pro-
gramme soupe ou démarrez en vitesse lente avant d’augmenter graduellement
la vitesse, n’ utilisez jamais la touche PULSE.
• Glace pilée : la fonction «Ice» permet de réduire les glaçons en poudre très fine
(aspect neige), si vous souhaitez obtenir un aspect plus concassé, mixez une
faible quantité de glaçons (100/150 g max.) et utilisez la touche Pulse.
• Pour incorporer des ingrédients sans les mixer (ex. pépites de chocolat dans
une pâte à gâteaux), ajoutez-les en fin de préparation et laissez tourner 5 à
10 s en vitesse lente 0,5.
• Utilisation de fruits surgelés : ils peuvent parfois former un bloc compact à la
sortie du congélateur. Brisez-les en cubes de 2 cm environ avant de les mettre
dans le blender pour ne pas endommager l’appareil.
• Pour rattraper une sauce : vous pouvez utiliser le blender pour supprimer les
grumeaux. Mixez 15 s en vitesse 3.
Protection automatique surcharge
L’appareil est équipé d’un système de sécurité qui arrête automatiquement le
moteur en cas de surcharge ou de fonctionnement trop prolongé. Le témoin
clignote.
• Positionnez le sélecteur sur 0 et débranchez la prise.
• Attendez environ 30 minutes avant d’utiliser à nouveau le blender.
• Réduisez la quantité d’ingrédients et/ou ajoutez du liquide.
11MINI BOL
1 Assemblez la base
Placez le joint bien à plat Ajoutez les ingrédients. Vissez et serrez le
sur l’ensemble lames. Posez l’ensemble lames support.
sur le bol.
2 Assemblez le bol
Retournez et posez le Appuyez avec la Sélectionnez une
mini bol sur la base main pour assurer le vitesse et appuyez
fonctionnement sur AUTO
• Crumbles express : concassez des cookies, petits beurre,…et répartissez-les
dans des verrines de salades de fruits / glaces.
• Sucre glace : versez 200 g de sucre semoule. Mixez 1 min en vitesse 4. Pour
un aspect encore plus glacé, mixez à nouveau 1 min.
• Glaçage : versez 200 g de sucre glace et 1 blanc d’oeuf. Mixez 20 s en vitesse 1.
Ne jamais utiliser de liquides chauds. L’ensemble lames peut être très
chaud après utilisation.
12BLENDCUPS
1 Ajoutez les ingrédients
Liquides
eau, lait, jus…
Ingrédients surgelés
ou ingrédients collants
miel, banane, avocat…
Ingrédients secs ou durs
céréales, oléagineux, carotte…
Feuilles, herbes
épinards, aromates…
Fruits et légumes frais
sauf banane, avocat…
Pour un résultat optimal :
• Coupez les ingrédients en petits morceaux (environ 2 cm)
• Hachez grossièrement les feuilles ou herbes avant de les ajouter surtout si elles
sont grandes ou épaisses
• Respectez l’ordre d’ajout des ingrédients
• Ajoutez toujours un peu de liquide
• Utilisez plutôt des glaçons que de la glace pilée (max. 4 cubes)
N’utilisez jamais de liquides chauds
Ne dépassez pas le niveau MAX
N’utilisez pas les BlendCups au micro-ondes
N’utilisez pas de liquides gazeux dans les BlendCups
13BLENDCUPS
2 Assemblez la base
Placez le joint bien Posez l’ensemble Vissez et serrez le
à plat sur l’ensemble lames sur le bol. support.
lames.
3 Mixez
Posez le BlendCup APPUYEZ sur le Sélectionnez une
sur la base (ergots à BlendCup pour vitesse ou un
l’arrière). activer le programme et
fonctionnement. appuyez sur AUTO.
4 Buvez immédiatement ou emportez.
Attendez l’arrêt Retirez le BlendCup. Vissez si besoin le
complet des lames. Dévissez. couvercle.
14BLENDCUPS
Astuces et conseils
• Démarrez en vitesse lente pendant quelques secondes jusqu’à ce que tous
les ingrédients commencent à être entraînés par les lames, puis augmentez
graduellement la vitesse.
• Ne laissez pas tourner en continu plus d’1 minute : les ingrédients peuvent
s’échauffer et créer une pression à l’intérieur du bol.
• Si le mélange est difficile, réduisez la vitesse, ou la quantité d’ingrédients. Si
la préparation est épaisse, ajoutez du liquide (sans dépassez le niveau MAX).
•
Pour certaines préparations denses ou collantes (préparations à base
d’oléagineux), les ingrédients peuvent coller aux parois : attendez l’arrêt
complet des lames, retirez le bol et secouez le vers le bas pour ramener les
ingrédients vers les lames.
• La dimension de la base est étudiée pour s’adapter au porte-gobelet de votre
voiture.
PRESSE AGRUMES
Insérez le presse-agrumes Tournez jusqu’au blocage Pressez...
dans le couvercle
15NETTOYAGE
Programme automatique de nettoyage
Immédiatement après utilisation, versez de l’eau tiède
(la moitié du contenant) + quelques gouttes de liquide
AUTO vaisselle. Fermez hermétiquement, sélectionnez le
programme CLEAN et appuyez sur AUTO.
Nettoyage complet
• Débranchez l’appareil et démontez toutes les pièces sans oublier les joints
• Toutes les pièces sont compatibles avec le lave-vaisselle (sauf la base): utilisez
un cycle court et placez les petites pièces dans le panier supérieur.
• Pour des résultats optimaux, nous vous recommandons néanmoins de laver le
couvercle et les joints à la main.
• Ne laissez pas tremper l’ensemble lames dans l’eau, vérifiez que la rotation se
fait librement avant assemblage.
• Nettoyez le base avec un chiffon humide.
Aidez-vous de la spatule La capsule du bouchon Vérifiez le coulissement
pour démonter le support. doseur est démontable. des ergots, si besoin
nettoyez-les.
Produits électroniques ou électriques en fin de vie
La législation européenne interdit de jeter des produits électroniques
ou électriques avec les ordures ménagères. Votre appareil contient de
nombreux matériaux valorisables ou recyclables. Il doit être apporté dans
un point de collecte adapté. Pour connaître l’emplacement des points de
collecte, vous pouvez contacter votre municipalité ou votre déchetterie. Les
magasins d’électroménager sont également points de collecte.
Pour en savoir plus : eco-systemes.fr
16QUE FAIRE SI ?
Constat Solution
Le couvercle est difficile Pour garantir l’étanchéité, le couvercle peut être un peu
à enfoncer dur à enfoncer (surtout si le produit est neuf ou inutilisé
pendant une longue période) : frottez le joint avec un
essuie tout légèrement imbibé d’huile végétale
Témoin clignotant Cuve ou accessoire mal positionné€
Surcharge moteur : éteignez, attendez 30 minutes avant
de rallumer
L’appareil ne démarre Vérifiez le branchement / prise
pas Vérifiez que le témoin lumineux blanc est allumé
fixement (cuve accessoire bien positionné), sélectionnez
une vitesse ou un programme puis appuyez sur AUTO
Le mélange ne se fait Ajoutez du liquide
pas bien / aliments mal Respectez l’ordre d’introduction des ingrédients
mixés Bol verre : utilisez la spatule
Coupez les aliments en morceaux plus petits
Fuite au niveau de la Vérifiez que le joint de l’ensemble lames est bien
base positionné
Vérifiez le serrage du support sur le bol ou sur l’accessoire
Pour plus de facilité sur le bol verre : utilisez la spatule
Desserts glacés ne Fruits surgelés : brisez-les en cubes de 2 cm environ
fonctionne pas avant de les mettre dans le blender pour ne pas endom-
mager l’appareil.
Respectez les quantités et ajoutez un peu de liquide
Utilisez la spatule
Odeur moteur A la première utilisation ou en cas de surcharge, il
peut y avoir une légère odeur. Ceci ne présente aucun
danger, cette odeur doit disparaître après plusieurs
utilisations. Laissez refroidir le moteur 30 minutes avant
de relancer.
Pièce plastique teintée Certains ingrédients (curry, carottes,..) peuvent colorer
les pièces. Essuyez les pièces avec un essuie-tout imbibé
d’huile végétale avant d’ajouter les ingrédients.
La préparation a Ajoutez du liquide
tendance à coller aux Utilisez la spatule, démarrez en vitesse lente avant
parois d’augmenter progressivement
17SAFETY INSTRUCTIONS
WARNING: the safety instructions are an integral part of the appliance.
For your own safety, please read them carefully before using it for the
first time.
• Never go above the Max.1.8 L mark.
• Never run the blender if the lid if not secured properly or if the lid seal
and blades are not assembled correctly.
• Never put your fingers or anything other than the spatula delivered
with the product in the bowl while the blender is operating.
• If the blades get stuck, always disconnect the blender before removing
the ingredients.
• Always disconnect the blender (i) if it is left without surveillance, (ii)
before mounting, dismounting or cleaning, (iii) before changing the
attachments and (iv) when you need to go near any moving parts.
• All surfaces in contact with food must be cleaned with soapy water or
washing-up liquid (see further details under CLEANING).
• Special precautions must be taken when handling sharpened blades,
when emptying the bowl and during cleaning. There is a risk of injury if
the blender is used incorrectly.
• Never immerse the blender in water or other liquids in order to avoid
the risk of electrocution.
• Do not place the blender on or near a gas burner or hot plate nor in
a hot oven.
• This appliance is intended solely for use in the home.
• Do not use the blender outside.
• Children must not play with the blender. The blender must not be used
by children. Keep the blender and its cord out of reach of children.
• The blender can be used by persons whose, physical, sensory or
mental capacities are reduced, or by persons who have no experience
or knowledge of the appliance, provided they are properly supervised
or have been instructed beforehand on using the blender safely and they
understand the risks involved.
• Use of the appliance in the following cases is not covered by the
warranty: in staff kitchen areas in stores, offices and other working
environments, in farms, by guests in hotels, motels, bed & breakfasts,
guest houses and other residential environments.
18SAFETY INSTRUCTIONS
RISK OF BURNS
• NEVER process hot ingredients (solid or liquid) in the BlendCups or
mill attachment, as blending hot foods in a lidded jug can lead to a
build-up of pressure, forcing out scalding steam or liquids.
• Processing hot foods in the 1.8l jug: blending hot ingredients at high
speed can lead to a build-up of pressure, forcing out scalding steam
or liquids. Always take care when pouring in a hot liquid, as it may
suddenly boil up and escape from the jug.
• Never introduce hot ingredients (solid or liquid) if they are over
60 °C in temperature. Always make sure the lid is firmly fitted but
the measuring cap is only loosely positioned, to allow any steam to
escape. Always use the SOUP programme or start at a low speed and
gradually increase it. Never use the PULSE button.
MAINS CONNECTION
• Your appliance must be connected to an earthed socket with the
original power cord.
• Check that the voltage indicated on its identification plate corresponds
to the voltage of your mains supply.
• Never allow the power cord to dangle over the edge of your worktop
or counter, and make sure that it does not come into contact with hot
surfaces.
AFTER-SALES SERVICE
• If the power cord has been damaged, it must be replaced by the
manufacturer, a Magimix-approved service agent or a similarly
qualified person, in order to avoid all risks.
• The use of parts that are not recommended or sold by Magimix may
result in injury, fire or electric shock.
KEEP THESE SAFETY INSTRUCTIONS
FOR FUTURE REFERENCE
19DESCRIPTION
70ml measuring cap
Watertight lid
Safe-stir spatula
Glass jug (max. 1.8l)
Watertight seal
Blade assembly
Blade assembly holder
Motor unit
Carefully wash all the parts (except the motor unit) before using for the first time.
20ATTACHMENTS*
Mill attachment**
Glass mill attachment ideal for grinding
spices or Parmesan, and making small
amounts of savoury dips.
Mill supplied with a special blade
assembly for processing dry ingredients.
See p. 28.
BlendCups**
Compact blend-and-go jugs (400 &
700 ml) for blending small amounts and/
or carrying around homemade drinks.
Compatible with the 1.8l jug’s blade
assembly. See p. 29.
Citrus press
This attachment slots onto the blender
lid, so that you can easily prepare citrus
juices and add them directly to your
preparations.
See p. 31.
Blender Kit**
A premium box containing:
2 BlendCups (400ml & 700ml), with 1
watertight lid and 1 easy grip handle
1 Mill attachment, with a blade assembly
and shake and pour lid
*Depending on the model / attachments sold separately
**Solely for cold preparations.
21CONTROL PANEL
Manual mode AUTO programmes
Fast Slow
Clean Ice Smoothie Soups Desserts
OFF: your appliance is switched off
Light on
Your appliance is switched on
Flashing light
• Jug missing or incorrectly positioned
• Motor overload: switch to 0,
either add some liquid or reduce the
amount being processed, then restart
Stop the Start the Maximum
appliance appliance speed
• Switching your appliance on: first select a speed or programme, then press AUTO.
• Manual mode: always start at the slowest speed and gradually increase it.
• Never run continuously for more than 60 seconds.
•
PULSE: maximum speed for an even smoother texture / pulsing to give you
complete control.
22PRE-SET PROGRAMMES
5 pre-set programmes of cycles and speeds to ensure the best result every time.
As these programmes are for use with the 1.8l jug, please read the instructions
on how to adapt them to the other jugs.
1.8l jug BlendCup Mill
attachment
Cleaning
Automatic rinsing programme ✓ ✓ ✓
Clean
Crushed glass
For crushing ice ✓
Ice
Drinks
For blending milkshakes, smoothies ✓ ✓
Smoothie
and cocktails
Soups
For making puréed soups and cream ✓
Soups
soups (hot or cold)
Frozen desserts
For making instant desserts (using
✓
Desserts
frozen fruit) and mixing or puréeing
dense and compact ingredients
The lengths of the cycles have been established on the basis of the maximum
blender capacities (see p. 24).
You can stop the programme before the end of the cycle if you are processing
smaller amounts or prefer a coarser texture.
23BLENDER CAPACITIES
To make best use of your appliance, please follow the recommendations below:
1.8l jug BlendCup Mill attachment
3 breakfast rusks (30g)
Dried breadcrumbs x x
Sp 4, 14 s
500g chilled cooked fruit 200g chilled cooked fruit
Fruit compote x
Sp 1, then Sp 3 + spatula Sp 1 then Sp 3
300g frozen fruit
Frozen desserts (2cm cubes) x x
Desserts + spatula
100g
Ground spices x x
Sp 4, 20 s
80 g
Coffee beans x x
Sp 4, 40 s
300g
Crushed ice (approx. 15-20 ice cubes) x x
Ice
1.6l 0.4l or 0.7l
Milkshakes x
Smoothies Smoothies
100g
Walnuts, almonds x x
Sp 3, 20 s
200g Sp 1 30 s 100g
Onion x
+ spatula Sp 1, 30 s
80g
Parmesan x x (2cm cubes)
Sp 4, 50 s
1l Sp 3, 10 s
Pancake batter x x
+ Sp 4, 20 s
200g chilled cooked 200g chilled cooked
Puréed vegetables vegetables x vegetables
Sp 1, 50 s Sp 1, 50 s
1.8l 0.4l or 0.7l
Smoothies x
Smoothies Smoothies
1.6l
Hot soups
Soups
200g caster sugar
Icing sugar x x
Sp4 + Pulse, 60 s
200g (2cm cubes)
Raw meat x x
Sp 4 10 s
A blender is not designed to knead dough or mash potatoes.
Whatever the attachment or recipe concerned, the blender must not be used
continuously for more than 60 seconds.
24USING YOUR BLENDER
1 Assemble the base
Place the seal on the rim of Position the blade Screw the holder tightly
the blade assembly, making assembly on the onto the blender jug.
sure it is completely flat. underside of the jug.
2 Assemble the jug
2
1
Place the upright jug on Add the ingredients Push the lid down firmly
the motor unit. (max. 1.8l). into place. Loosely
position the cap.
3 Blend
Select a speed or If necessary, use the Wait until the blades
programme. spatula to help with the have completely
Press AUTO. mixing. stopped moving before
opening.
25ADVICE
Ice / frozen or sticky ingredients
such as honey, banana and
avocado
Fresh fruit and vegetables except
for banana and avocado
Leaves, herbs such as spinach and
fresh herbs
Hard or dry ingredients such as
cereals, nuts and carrots
Liquids such as water, milk and fruit
juice
For the best possible result:
• Cut the food into chunks measuring approx. 2cm.
• Coarsely chop the herbs or leaves before adding them.
• Always add the ingredients in the order specified in the recipe.
• When processing thick mixtures, always start at a low speed, otherwise
the food will stick to the sides and not come into contact with the blades. If
necessary, add a little liquid and use the spatula.
• To add ingredients, either remove the measuring cap or stop the machine and
remove the lid.
• Never run your blender if the jug is empty. To process dry ingredients such
as nuts and spices, we recommend using the mill attachment, which has a
specially designed blade assembly.
Never fill above the MAX mark.
Never add solid or liquid ingredients if they are above 60°C in temperature.
26ADVICE
Tips
• Hot soups: wait for the ingredients to cool to 60°C (tasting temperature) before
blending. Make sure that the measuring cap is only loosely positioned on the
lid, to allow any steam to escape. Either use the SOUP programme or start at a
low speed and gradually increase it. Never use the PULSE button.
• Crushed ice: the ICE function reduces ice cubes to a very fine, snow-like pow-
der. If you want more coarsely crushed ice, put a small number of ice cubes
(100/150g max.) in the jug and use the PULSE button.
• To fold ingredients into a mixture without chopping them (e.g. chocolate chips
in a cake mixture), add them at the end and run your blender for a further 5-10
seconds at a slow speed (0.5).
• Using frozen fruit: when fruit come out of the freezer it sometimes forms a solid
block. Break this block into cubes measuring roughly 2cm before putting in the
jug, to avoid damaging your blender.
• To rescue a lumpy sauce, blend it for 15 s at Speed 3.
Automatic overload failsafe
Your appliance is fitted with a safety system that cuts the motor if it is overloaded
or has been running for too long. The indicator light then starts to flash.
• Turn to the selector to 0 and unplug your appliance.
• Wait for about 30 minutes before restarting your blender.
• Reduce the amount of ingredients in the jug and/or add some liquid.
27MILL ATTACHMENT
1 Assemble the base
Place the seal on the rim of Put the ingredients in the Screw the holder tightly
the blade assembly, making mill attachment. Position the onto the mill attachment.
sure it is completely flat. blade assembly on the mill
attachment.
2 Assemble the jug
Place the upright mill Press down with your Select a speed and
attachment on the motor hand to check that it press AUTO
unit. is ready to run.
• Instant crumble: crush digestives or butter biscuits and divide between fruit
salad / ice cream verrines.
• Icing sugar: pour in 200g caster sugar. Blend for 1 min at Speed 4. For an even
finer consistency, blend for a further minute.
• Cake icing: pour 200g icing sugar into the jug with 1 egg white. Blend for
20 s at Speed 1.
Never blend hot liquids. The blade assembly can be extremely hot after
use.
28BLENDCUPS
1 Add the ingredients
Liquids
water, milk, fruit juice
Frozen foods
or sticky ingredients
honey, banana, avocado
Hard or dry ingredients
cereals, nuts, carrots
Leaves, herbs
spinach, fresh herbs
Fresh fruit and vegetables
except banana and avocado
For the best possible result:
• Cut the ingredients into small chunks (approx. 2cm)
• Roughly chop leaves or herbs before adding to the jug, especially if they are large
or thick
• Always add the ingredients in the right order
• Always add a little liquid
• Use ice cubes (max. 4 cubes) rather than crushed ice
Never use hot liquids
Never fill above the MAX level
Never put the BlendCups in the microwave
Do not use sparkling liquids in the BlendCups
29BLENDCUPS
2 Assemble the base
Position the seal on the Place the blade Screw the holder
rim of the blade assembly, assembly on the jug. tightly onto the jug.
making sure it is completely
flat.
3 Blend
Place the BlendCup on PRESS on the Select a speed or
the motor unit (locking BlendCup to activate programme and
pins at the back). the blender. press AUTO.
4 Drink immediately or take away.
Wait until the blades Remove the BlendCup. If necessary, screw
have completely Unscrew the holder. on the lid.
stopped moving.
30BLENDCUPS
Tips and advice
• Run at a low speed for the first few seconds, until all the ingredients are caught
up in the blades, then gradually increase the speed.
• Never run the blender continuously for more than 1 minute, otherwise the
ingredients may heat up and pressure may build up inside the jug.
• If blending is difficult, reduce either the speed or the amount being processed. If
the preparation is thick, add some liquid (without going above the MAX mark).
• Dense or sticky (e.g. nut-based) preparations tend to stick to the sides. If this
happens, switch the blender off, wait until the blades have come to a complete
standstill and shake the jug downwards to send the ingredients back towards
the blades.
• The base of the jug is shaped to fit the cupholder in your vehicle.
CITRUS PRESS
Slot the citrus press onto Turn until it locks into Press then remove.
the lid. place.
31CLEANING
Automatic cleaning programme
As soon as you have finished using your appliance,
fill the jug up halfway with warm water + few drops
AUTO of washing-up liquid. Close the lid tightly, select the
CLEAN programme and press AUTO.
Thorough cleaning
• Unplug the appliance and remove all the parts, not forgetting the seals.
• All the parts are dishwasher safe (except motor unit): use the short cycle and
place all the small parts on the upper rack.
• For the best results, we nevertheless recommend washing the lid and the seals
by hand.
• Never leave the blade assembly to soak, and check that the blades move freely
before reassembling.
• Clean the base with a damp cloth.
Unscrew the holder with The top of the measuring Check that the locking
the aid of the spatula. cap can be removed. pins slide smoothly, and
clean them if necessary.
Electrical and electronic goods at the end of their lifetime
It is against European law to treat electrical and electronic equipment
(WEEE) as regular household waste. Your appliance contains many
materials that can be recovered or recycled. It should be taken to a WEEE
collection point. For more details about collection points, please contact
your local council or your household waste recycling centre. You can also
take your appliance to an electrical goods store.
32TROUBLESHOOTING
Problem Solution
The lid is stiff As the lid is designed to be watertight, it can be a little
hard to fit, especially if the appliance is new or has not
been used for a long time. Pour a little vegetable oil onto
some kitchen paper and rub the seal
Flashing light Jug or attachment incorrectly positioned
Motor overload: switch your appliance off and wait for
30 minutes before switching it back on
Your appliance will not Check the plug/socket
start If the white indicator light is on, reposition the jug, then
select a speed or programme and press AUTO
The ingredients are not Add some liquid
properly mixed/blended Always add the ingredients in the right order
Glass jug: use the spatula
Cut the ingredients into smaller pieces
Leaking base Check that the blade assembly seal is correctly
positioned
Check that the support is screwed on properly to the
base of the jug
Glass jug: use the spatula
Desserts programme Frozen fruit: break into cubes measuring roughly 2cm
does not work before putting in the blender, to avoid damaging your
appliance
Do not exceed the blender capacity and add a little
liquid
Use the spatula
The motor smells There may be a faint smell when you use your appliance
for the first time or if the motor is overloaded. This poses
absolutely no risk, and the smell will go away after you
have used your appliance a few times. Allow the motor
to cool for 30 minutes before restarting it
Stained plastic parts Some ingredients, such as curry and carrots, may give
rise to some staining. Pour some vegetable oil onto
kitchen paper and rub the parts before adding the
ingredients
The mixture tends to stick Add some liquid
to the sides Use the spatula, start at a low speed and gradually
increase it
33VEILIGHEIDSVOORSCHRIFTEN
WAARSCHUWING: de veiligheidsvoorschriften vormen onderdeel van
het apparaat. Lees ze voor uw eigen veiligheid aandachtig voordat u uw
nieuwe apparaat in gebruik neemt.
• Overschrijd het maximumniveau van 1,8 l niet.
• Schakel het toestel enkel in als het deksel, de afdichtingsring en de
messen correct zijn aangebracht.
• Steek nooit uw vingers of andere voorwerpen (met uitzondering van
de meegeleverde spatel) in de kom terwijl de blender in werking is.
• Als de messen vastlopen, haalt u altijd eerst de stekker uit het stopcontact
voordat u de ingrediënten verwijdert.
• Haal altijd de stekker uit het stopcontact als u het apparaat zonder
toezicht achterlaat, voordat u het apparaat monteert, demonteert of
schoonmaakt, voordat u de accessoires verandert en voordat u de
bewegende delen vastgrijpt.
• De oppervlakken die in contact komen met levensmiddelen, moeten
schoongemaakt worden met zeepwater of afwasmiddel (meer informatie
hierover vindt u onder SCHOONMAKEN).
• Wees voorzichtig bij het hanteren van de scherpe messen tijdens
het legen en schoonmaken van de kom. Een verkeerd gebruik van het
apparaat kan risico’s op verwondingen veroorzaken.
• Dompel het apparaat nooit onder in water of andere vloeistoffen, om
het risico op elektrische schokken te vermijden.
• Plaats het apparaat niet in de buurt van een gasbrander, een elektrisch
verwarmingselement of in een hete oven.
• Dit apparaat is uitsluitend bedoeld voor huishoudelijk gebruik.
• Gebruik het apparaat niet buitenshuis.
• Dit apparaat is geen kinderspeelgoed. Dit apparaat mag niet door
kinderen worden gebruikt. Bewaar het apparaat en het snoer buiten het
bereik van kinderen.
• Dit apparaat mag worden gebruikt door personen met een fysieke,
zintuiglijke of mentale handicap of bij weinig ervaring of kennis, indien
deze personen correct worden begeleid of indien ze de nodige instructies
krijgen om het apparaat veilig te kunnen gebruiken en ze de risico’s
begrijpen.
• Het gebruik in de volgende gevallen valt niet onder de garantie: in
keukens voorbehouden voor personeel in winkels, kantoren en andere
professionele omgevingen, in landbouwbedrijven, door klanten van
hotels, motels en andere residentiële omgevingen en in pensions.
34VEILIGHEIDSVOORSCHRIFTEN
RISICO OP BRANDWONDEN
• Giet NOOIT vloeistoffen of warme ingrediënten in de: BlendCup of
minikom. Het mixen van warme ingrediënten in een afgesloten kom
kan overdruk veroorzaken waardoor er warme vloeistoffen of stoom
uit de kom kunnen lopen.
• Warme bereidingen in 1,8 l kom: het mixen van warme ingrediënten
op hoge snelheid kan overdruk veroorzaken waardoor er warme
vloeistoffen of stoom uit de kom kan komen. Wees voorzichtig wanneer u
warme vloeistof in de kom giet. De vloeistof kan wanneer deze plotseling
begint te koken overdruk veroorzaken en uit de kom lopen.
Giet geen ingrediënten of vloeistoffen in de kom die warmer zijn dan
60 °C. Controleer altijd of de deksel goed vastzit en of de doseerdop
losjes is geplaatst en niet is ingedrukt (om de stoom te laten ontsnappen).
Gebruik het soepprogramma of start met een lage snelheid en verhoog
deze geleidelijk. Start bij hete ingrediënten nooit met de PULSE functie.
ELEKTRISCHE AANSLUITING
• Het apparaat moet op een geaard stopcontact worden aangesloten.
• Controleer of de netspanning op het typeplaatje overeenkomt met die
van uw elektrische installatie.
• Laat het snoer niet over het aanrechtblad of werkblad hangen en zorg
dat het niet in aanraking komt met warme oppervlakken.
KLANTENSERVICE
• Als het snoer beschadigd is, moet het worden vervangen door de
fabrikant, zijn klantenservice of door een gelijkwaardige erkende
reparateur, teneinde ieder risico te voorkomen.
• Het gebruik van onderdelen die niet door de fabrikant worden
aanbevolen of verkocht kan brand, elektrische schokken of
brandwonden veroorzaken.
BEWAAR DEZE VEILIGHEIDSVOORSCHRIFTEN
35BESCHRIJVING
Doseerdop 70 ml
Waterdichte deksel
Mengspatel
Glazen kom max. 1,8 l
Afdichtingsring
Mes
Houder voor mes
Motorblok
Was zorgvuldig alle onderdelen (behalve het motorblok) voordat u het apparaat voor
het eerst gebruikt.
36ACCESSOIRES*
Minikom**
Glazen minikom, ideaal om specerijen en
noten te malen, parmezaan te hakken of
dipsauzen te bereiden.
Kom wordt geleverd met speciaal mes
die uitsluitend te gebruiken is voor droge
mengsels. Gebruik voor natte mengsels het
mes van de 1,8L kom.
Zie p.44.
BlendCups**
Compacte kommen (400 en 700 ml) om
kleine hoeveelheden te bereiden en/of uw
drankjes overal mee naartoe te nemen.
Kommen zijn compatibel met het
messenplaat van de kom van 1,8 l.
Zie p.45.
Citruspers
Met dit accessoire kunt u op eenvoudige
wijze vers citrussap aan uw bereidingen
toevoegen. De pers past op de deksel van
uw blender.
Zie p.47.
Blender Kit**
2 BlendCups (400 ml + 700ml) & 1 Mini-kom
met een drinkdeksel, een strooideksel en een
handgreep.
*Afhankelijk van modellen/accessoires apart verkocht
**Uitsluitend voor koude bereidingen
37BEDIENINGSPANEEL
Handbediende modus Automatische programma’s
Snel Langzaam
Clean Ice Smoothie Soups Desserts
OFF: het apparaat staat niet onder spanning
Indicatielampje brandt
Apparaat staat onder spanning
Indicatielampje knippert
• Kom afwezig of verkeerd geplaatst
• Motor overbelast: zet op 0, voeg
vloeistof toe of verminder de hoe-
veelheid en schakel het apparaat
opnieuw in
Stopt de Stelt het Maximale
werking van het apparaat in snelheid
apparaat werking
• Opstarten: kies een snelheid of een programma alvorens op AUTO te drukken.
•
Handbediende modus: start altijd op een lage snelheid en verhoog geleidelijk
de snelheid.
• Om te zorgen dat uw apparaat lang meegaat, mag u het nooit langer dan 60 seconden
continu laten werken.
• PULSE: maximumsnelheid voor een nog gladder resultaat; /voor een nauwkeuriger
resultaat.
38AUTOMATISCHE PROGRAMMA’S
5 programma’s die voor u automatisch de cycli en snelheden aanpassen die
nodig zijn om de resultaten van de bereiding te optimaliseren.
Deze programma’s zijn geoptimaliseerd voor de kom van 1,8 l. Raadpleeg voor
de andere kommen de instructies daarvan.
Kom 1,8 l BlendCup Minikom
Reiniging
Automatische spoeling ✓ ✓ ✓
Clean
Gestampt ijs
Om ijsblokjes fijn te stampen en te ✓
Ice vermalen
Smoothie
Voor het beter mengen van vloeibare ✓ ✓
Smoothie
bereidingen, zoals milkshakes,
smoothies en cocktails
Soepen
Voor romige (warme of koude) soepen ✓
Soups
IJsdesserts
Om snel ijsjes te maken op basis van
✓
Desserts
bevroren fruit.
Voor het vermengen, reduceren
of pureren van dichte of compacte
ingrediënten.
De tijdaanduiding is vastgesteld voor de aangeduide maximumhoeveelheden
(zie p.40). U kunt het programma voor het eind van deze tijdaanduiding
onderbreken, als u kleinere hoeveelheden maakt of als u een minder fijn resultaat
wenst.
39VERWERKINGSHOEVEELHEDEN
Houd u voor een optimaal gebruik aan de onderstaande aanbevelingen:
Kom 1,8 l BlendCup Minikom
3 beschuiten (30 g)
Paneermeel x x
Sp4, 14 s
500 g afgekoelde 200 g afgekoelde
Vruchtencompote gekookte vruchten Sp1 x gekookte vruchten
dan Sp3 + spatel Sp1 dan Sp3
300 g bevroren
vruchten
IJsdesserts x x
(blokjes van 2 cm)
Desserts + spatel
100 g
Gemalen specerijen x x
Sp4, 20 s
80 g
Koffiebonen x x
Sp4, 40 s
300 g
Gestampt ijs (ca. 15/20 ijsblokjes) x x
Ice
1,6 l 0,4 l of 0,7 l
Milkshakes x
Smoothies Smoothies
Walnoten, aman- 100 g
x x
delen Sp3, 20 s
200 g Sp1 30 s 100 g
Ui x
+ spatel Sp1, 30 s
80 g
Parmezaan x x (blokjes van 2 cm)
Sp4, 50 s
1l
Flensjesbeslag Sp 3, 10 s + Sp 4, x x
20 s
200 g afgekoelde 200 g afgekoelde
gekookte gekookte
Groentepuree x
voedingsmiddelen voedingsmiddelen
Sp1, 50 s Sp1, 50 s
1,8 l 0,4 l of 0,7 l
Smoothies x
Smoothies Smoothies
1,6 l
Warme soep Soep
200 g kristalsuiker
Poedersuiker x x
Sp4 + Pulse, 60 s
200 g (in blokjes van
Rauw vlees x x
2 cm) Sp4 10 s
Een blender is niet geschikt voor het kneden van deeg of het maken van
aardappelpuree.
Ongeacht het accessoire of het recept mag een continue werking nooit langer
duren dan 60 seconden.
40GEBRUIK
1 Het onderstel monteren
Plaats de afdichtingsring Plaats het mes op de Draai de houder
goed plat op het mes. kom. goed vast.
2 De kom monteren
2
1
Plaats de kom op het Voeg de ingrediënten Druk de deksel
motorblok toe (max. 1,8 l) goed vast. Plaats de
doseerdop erin.
3 Mixen
Kies een snelheid of een Gebruik indien Wacht tot het
programma. nodig de spatel om apparaat volledig is
Druk op AUTO. goed te mengen. gestopt alvorens te
openen.
41ADVIEZEN
IJs/bevroren ingrediënten
of plakkerige ingrediënten
honing, banaan, avocado, etc.
Verse groenten en fruit
behalve banaan, avocado, etc.
Blaadjes, kruiden
spinazie, kruiden, etc.
Droge of harde ingrediënten
granen, oliezaden, wortels, etc.
Vloeistoffen
water, melk, sap, etc.
Voor een optimaal resultaat:
• Snijd de ingrediënten in stukjes van ca. 2 cm.
• Hak kruiden of blaadjes grof voordat u deze toevoegt.
• Houd u aan de volgorde waarin de ingrediënten moeten worden toegevoegd
(zie recept).
• Voor dikke bereidingen: begin altijd op langzame snelheid, anders plakken
er stukken tegen de wand en draaien de messen rond in de leegte. Voeg
indien nodig een beetje vloeistof toe en gebruik de spatel.
• Als u tijdens het mengen ingrediënten wilt toevoegen, kan dat via de
doseerdop. Schakel het apparaat uit voor u de deksel opent.
• Laat de blender niet werken met een lege kom. Mix droge ingrediënten (zoals
specerijen, noten, etc.), uitsluitend met de minikom met aangepast mes.
Overschrijd het niveau MAX niet.
Giet geen vloeistoffen of ingrediënten in de kom die warmer zijn dan 60 °C.
42ADVIEZEN
Tips
•
Warme soep: Laat uw bereiding tot 60 °C (opdientemperatuur) afkoelen
voordat u uw soep mixt. Let erop dat de doseerdop losjes is geplaatst en niet is
ingedrukt, om de stoom te laten ontsnappen. Gebruik het soepprogramma of
start op een lage snelheid en voer deze geleidelijk op. Gebruik nooit de PULSE
toets.
• Gestampt ijs: met het programma “Ice” kunnen ijsblokjes tot een zeer fijn poe-
der worden gemalen (dat eruit ziet als sneeuw). Wilt u een grover resultaat,
mix dan een kleine hoeveelheid ijsblokjes (max. 100/150 g) door gebruik te
maken van de PULSE toets.
• Om ingrediënten toe te voegen zonder ze te mixen (bijv. stukjes chocolade in
een taartbeslag), voegt u ze toe aan het eind van de bereiding en laat u het
apparaat 5 à 10 seconden op langzame snelheid 0,5 draaien.
• Gebruik van bevroren fruit: wanneer het fruit uit de vriezer komt, vormt het
soms een compact blok. Breek dit in stukken van ca. 2 cm voordat u ze in de
blender doet om het apparaat niet te beschadigen.
• Een saus corrigeren: u kunt de blender gebruiken om klontjes weg te werken.
Mix 15 s op snelheid 3.
Automatische bescherming tegen overbelasting
Het apparaat is voorzien van een beveiligingssysteem, waardoor de motor au-
tomatisch stopt in geval van overbelasting of te langdurige werking. Het indica-
tielampje knippert.
• Plaats de draaiknop op 0 en trek de stekker eruit.
• Wacht ca. 30 minuten voordat u de blender opnieuw gebruikt.
• Verminder de hoeveelheid ingrediënten en/of voeg vloeistof toe.
43MINIKOM
1 Het onderstel monteren
Plaats de afdichtingsring Voeg de ingrediënten Draai de houder goed
goed plat op het mes. en plaats het mes op de vast.
kom.
2 De kom monteren
Plaats de minikom op Druk met de hand Kies een snelheid en
het motorblok op de kom om het druk op AUTO.
apparaat in werking
te stellen.
• Snelle crumbles: verkruimel koekjes, petit-beurres, etc. en verdeel de kruimels
over glazen met vruchtensalade/ijs.
• Poedersuiker: doe 200 g kristalsuiker in de kom. Mix 1 min. op snelheid 4.
Voor een nog fijner poeder, mixt u nog 1 min.
• Glaceren: voeg 200 g poedersuiker en het wit van een ei toe. Mix 20 s op
snelheid 1.
• Gebruik voor natte mengsels het mes van de 1,8L kom.
Gebruik nooit warme vloeistoffen. Het mes kan na gebruik heel heet
zijn.
44BLENDCUPS
1 De ingrediënten toevoegen
Vloeistoffen
water, melk, sap, etc.
Bevroren ingrediënten
of plakkerige ingrediënten
honing, banaan, avocado, etc.
Droge of harde ingrediënten
granen, oliezaden, wortels, etc.
Blaadjes, kruiden
spinazie, kruiden, etc.
Verse groenten en fruit
behalve banaan, avocado, etc.
Voor een optimaal resultaat:
• Snijd de ingrediënten in stukjes van ca. 2 cm
• Hak de blaadjes of kruiden grof voordat u deze toevoegt, vooral als ze groot of
dik zijn
• Houd u aan de volgorde waarin de ingrediënten moeten worden toegevoegd
• Voeg altijd wat vloeistof toe
• Gebruik bij voorkeur ijsblokjes in plaats van gestampt ijs (max. 4 blokjes)
Gebruik nooit warme vloeistoffen
Overschrijd het niveau MAX niet
Doe de BlendCup niet in de magnetron
Gebruik green koolzuurhoudende vloeistoffen in de BlendCup
45BLENDCUPS
2 Het onderstel monteren
Plaats de Voeg de ingredienten Draai de houder
afdichtingsring goed toe en plaats het mes goed vast.
plat op het mes. op de kom
3 Mixen
Plaats de BlendCup DRUK op de Kies een snelheid of
op het motorblok BlendCup om het een programma en
(veiligheidspallen aan apparaat in werking druk op AUTO.
de achterzijde). te stellen.
4 Drink het drankje meteen op of neem dit mee.
Wacht tot het mes Verwijder de Draai de drinkdeksel
volledig tot stilstand BlendCup. Draai vast.
is gekomen. de houder los en
verwijder het mes.
46BLENDCUPS
Tips en adviezen
• Start gedurende enkele seconden met een lage snelheid tot alle ingrediënten
door het mes worden meegenomen en voer daarna geleidelijk de snelheid op.
• Laat het apparaat niet langer dan 1 minuut werken: de ingrediënten kunnen
immers warm worden en in de kom overdruk creëren.
•
Wanneer de ingrediënten moeilijk kunnen worden gemixt, verlaagt u de
snelheid of het aantal ingrediënten. Als de bereiding dik is, voegt u wat vloeistof
toe (zonder daarbij het niveau MAX te overschrijden).
• Bij bepaalde dikke of plakkerige bereidingen (op basis van oliehoudende
zaden) kunnen de ingrediënten tegen de wanden aan kleven: wacht tot het mes
volledig tot stilstand is gekomen, haal de kom los en schud deze in neerwaartse
richting, zodat de ingrediënten op het mes terechtkomen.
• De grootte van de voet is zodanig ontworpen dat de beker in de bekerhouder
van uw auto past.
CITRUSPERS
Breng de citruspers aan Draai de pers totdat Druk op de pers
op de deksel deze blokkeert
47REINIGING
Automatisch reinigingsprogramma
Giet er onmiddellijk na gebruik lauw water in (tot de
helft van de kom), plus enkele druppels afwasmiddel.
AUTO Zet de deksel er goed op en kies het programma
CLEAN en druk op AUTO.
Complete reiniging
• Trek de stekker uit het stopcontact en verwijder alle onderdelen; vergeet daarbij
de afdichtingsringen niet.
• Alle onderdelen zijn geschikt voor de vaatwasmachine (behalve het motorblok):
gebruik een korte cyclus en plaats de kleine onderdelen in de bovenste mand.
• Voor optimale resultaten raden wij u echter aan de deksel en de afdichtingsringen
met de hand af te wassen.
• Laat het mes niet in water weken en controleer of het mes vrij draait voordat u
het terugplaatst.
• Veeg de basis schoon met een vochtige doek.
Gebruik de spatel om de De deksel van de Controleer of de
houder te demonteren. doseerdop is veiligheidspallen vrij op
afneembaar. en neer schuiven; indien
nodig reinigt u deze.
Einde levensduur van elektronische of elektrische apparaten
Het is volgens de Europese wetgeving verboden om elektronische of
elektrische apparaten bij het huishoudelijk afval te gooien. Uw apparaat
bevat tal van herbruikbare of recycleerbare materialen. U moet het naar
een geschikt inzamelpunt brengen. Neem contact op met uw gemeente of
afvalverwerkingsbedrijf om te vragen waar deze inzamelpunten zich bevinden.
Witgoedzaken zijn eveneens inzamelpunten.
Ga voor meer informatie naar: https://www.rijksoverheid.nl/onderwerpen/afval
48Vous pouvez aussi lire


