Commercial Kitchen Exhaust Hoods - Models 6KWK8, 6KWK9, 6KWL0, 6KWL1, 20UD05 thru 20UD12

La page est créée Julien Lacombe
 
CONTINUER À LIRE
Commercial Kitchen Exhaust Hoods - Models 6KWK8, 6KWK9, 6KWL0, 6KWL1, 20UD05 thru 20UD12
Operating Instructions & Parts Manual             EN

                      Commercial
                        Kitchen
                       Exhaust
                        Hoods
                    Models 6KWK8, 6KWK9, 6KWL0, 6KWL1,
                             20UD05 thru 20UD12

                                                    474244
Commercial Kitchen Exhaust Hoods - Models 6KWK8, 6KWK9, 6KWL0, 6KWL1, 20UD05 thru 20UD12
PLEASE READ AND SAVE
        THESE INSTRUCTIONS.
                  READ CAREFULLY
               BEFORE ATTEMPTING
             TO ASSEMBLE, INSTALL,
         OPERATE OR MAINTAIN THE
             PRODUCT DESCRIBED.

         PROTECT YOURSELF AND
      OTHERS BY OBSERVING ALL
   SAFETY INFORMATION. FAILURE
  TO COMPLY WITH INSTRUCTIONS
     COULD RESULT IN PERSONAL
       INJURY AND/OR PROPERTY
  DAMAGE! RETAIN INSTRUCTIONS
        FOR FUTURE REFERENCE.

 PLEASE REFER TO BACK COVER
  FOR INFORMATION REGARDING
DAYTON’S WARRANTY AND OTHER
      IMPORTANT INFORMATION.

Model #: ____________________

Serial #: ____________________

Purch. Date: ________________

          Form 5S6781 / Printed in USA
          04632 Version 1 07/2014
© 2011 - 2014 Dayton Electric Manufacturing Co.
              All Rights Reserved
GETTING STARTED
BEFORE YOU BEGIN
                                Installation, troubleshooting and parts
                                replacement are to be performed only by
        qualified personnel.

        Tools Needed:
        •    Level

                                                                                           SPECIFICATIONS
        •    1/2 inch Diameter Threaded Rod

                                                                                              SAFETY /
        •    Weld Gun and Non-Ferrous Filler Wire
        •    Rotating Vane Anemometer or Shortridge Meter
        •    Up to 100 Watt Standard Light Bulbs
        •    Light Switche(s)
        •    Fire System Control Box

                                                                                           INSTALLATION
                                                                                            ASSEMBLY /
UNPACKING

        Contents:
        •    Duct Collars (3)
        •    Dayton® Commercial Kitchen Exhaust Hood (1)
        •    Operating Instructions and Parts Manual (1)

        Inspect:

                                                                                              OPERATION
        •    After unpacking unit, inspect carefully for any damage that may have
             occurred during transit. Check for loose, missing, or damaged parts.
             Shipping damage claim must be filed with carrier.

        Storage
        NOTE: If a kitchen hood must be stored prior to installation it must be
                                                                                              TROUBLESHOOTING

        protected from dirt and moisture.
        1.   Indoor storage is recommended. For outdoor storage, cover the
             hood with a tarp to keep it clean, dry, and protected from Ultra Violet
             Radiation damage.
        IMPORTANT: Improper storage which results in damage to the unit will void
        the warranty.

        •    See General Safety Instructions on page 2, and Cautions and
                                                                                           MAINTENANCE /

             Warnings as shown.
                                                                                              REPAIR

                                                                                       1
GETTING STARTED

                     GENERAL SAFETY INSTRUCTIONS
                             Type II exhasut hoods are designed to capture heat and condensation
                             from non-grease producing appliances, creating a more comfortable
                             environment for the cooking staff. Models 20UD07-20UD09 are primarily
                             used for ovens or general ventilation applications to capture heat and vapor.
                             Models 20UD10-20UD12 are primarily used for dishwasher or condensate
                             applications to capture heat and vapor. Hoods are constructed with a
SPECIFICATIONS

                             fully welded perimeter, condensate collecting gutter with a 1/2 inch N.P.T.
   SAFETY /

                             stainless steel drain fitting. Type II hoods comply with all requirements set
                             forth in NSF Standard 2.
                             NOTE: No repair parts available for Type II Hoods.
                             Type I wall canopy exhaust hoods are designed for use over cooking
                             equipment producing heat and grease laden effluent and are intended to be
                             used where cooking equipment is placed against a wall. Models 20UD05,
                             20UD06 and 6KWK8-6KWL1 are listed for working temperatures up to
                             600ºF. All canopy Type I hoods are UL/cUL 710 Listed, Exhaust Hoods for
INSTALLATION

                             Commercial Cooking Equipment. Type I hoods comply with all requirements
 ASSEMBLY /

                             set forth in NSF Standard 2 and NFPA 96 Standard for Ventilation Control
                             and Fire Protection of Commercial Cooking Operations.
                             1.   Read and follow all instructions and cautionary markings. Make sure
                                  electrical power source conforms to requirements of equipment and
                                  local codes.
                             2.   Canopy hood should be installed and serviced by a qualified
                                  technician. Have all electrical work performed by a qualified electrician.
                             3.   Follow all local electrical and safety codes in the United States
   OPERATION

                                  and Canada, as well as the National Electrical Code (NEC), the
                                  Occupational Safety and Health Act (OSHA), and the National Fire
                                  Protection Association (NFPA) Bulletin 96 in the United States. Ground
                                  motor in accordance with NEC Article 250 (grounding). Follow the
                                  Canadian Electric Code (CEC) in Canada.

                                          B
                                                                C
   TROUBLESHOOTING

                                                                                     NSF ®

                             A

                              Figure 1

                                         B
                                                                C
MAINTENANCE /

                              A                                                      E53236
   REPAIR

                                                                                     NSF ®

                     2        Figure 2
GETTING STARTED
SPECIFICATIONS

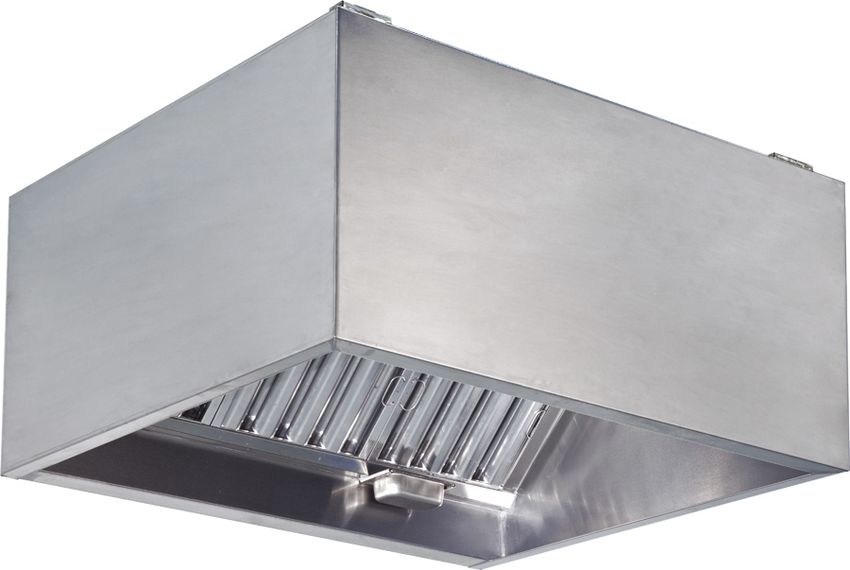
Heat And Condensation Hoods (See Figure 1)

                                   Heat Hoods                 Condensation Hoods
                           20UD07 20UD08 20UD09 20UD10 20UD11 20UD12
Hood Type                                       Canopy, Type II

                                                                                       SPECIFICATIONS
Material                             430 Stainless Steel (where exposed)
Agency Compliance                               NSF Standard 2

                                                                                          SAFETY /
Dimensions (inches)
                                   Heat Hoods                 Condensation Hoods
                           20UD07 20UD08 20UD09 20UD10 20UD11 20UD12
A                            24       24         24           24     24      24
B                            54       54         54           54     54      54
C                            48       60         72           48     60      72

                                                                                       INSTALLATION
                                                                                        ASSEMBLY /
Grease Hoods (See Figure 2)

                           20UD05 20UD06     6KWK8       6KWK9     6KWL0    6KWL1
Hood Type                                       Canopy, Type I
Material                             430 Stainless Steel (where exposed)
Max. Temp.                                            600ºF
Number of Light Fixtures      2        2         2            3       3       4

                                                                                          OPERATION
Recommended Air Supply
                           20UD13 20UD14     6KWL2       6KWL3     6KWL4   6KWL5
Plenum
Recommended End Skirt      6KWL6    6KWL6    6KWL6       6KWL6     6KWL6   6KWL6
Recommended Digital
                             48C175 48C175 48C175 48C175 48C175 48C176
Temperature Interlock
Recommended Digital
                             48C177 48C177 48C177 48C177 48C177 48C177
Temperature Interlock Sensor
Agency Compliance                          UL 710, NSF Standard 2
                                                                                          TROUBLESHOOTING

Dimensions (inches)

                           20UD05 20UD06     6KWK8       6KWK9     6KWL0    6KWL1
A                            24       24         24           24     24      24
B                            54       54         54           54     54      54
C                            48       60         72           96     120     144
                                                                                       MAINTENANCE /
                                                                                          REPAIR

                                                                                   3
GETTING STARTED

                     INSTALLATION INSTRUCTIONS
                                                     Installation, troubleshooting and parts
                                                     replacement is to be performed only by a
                                qualified personnel. Consult and follow NFPA 96 recommendations.
                                NFPA 96 instructions supercede this document.
                                                     Typical Kitchen Ventilation System

                                      Exhaust
                                     Ventilator          Make-Up Air
SPECIFICATIONS

                                                          Ventilator
                                 Ventilated
                                 Roof Curb                                                Airflow
   SAFETY /

                                                                         Air Supply
                                                                          Plenum
                                                  Exhaust Hood

                                                                  Outside Supply Air
                                                                      Replacing
                                                                    Exhausted Air
INSTALLATION
 ASSEMBLY /

                                                    Griddle

                                Figure 3
                                1.      Prior to installation, check with local authorities having jurisdiction on
                                        clearances to combustible surfaces, etc.
                                NOTE: Code for overhanging is a minimum of 6" on canopy hoods.
                                ASHRAE Research recommends 9-18". More is typically better especially
                                for some appliances. See Figure 4.
                                2.      With the hood still inside its packing crate, position the unit beneath its
   OPERATION

                                        installation location. Carefully remove the packing crate. Place some
                                        protective material on the floor next to the crate to avoid damaging the
                                        hood. Tip the hood on its side carefully onto the protective material, see
                                        Figure 5.
   TROUBLESHOOTING

                                         Overhang

                                                                                                    Hood Bottom

                                                                       Pallet

                                                                                                      Protective Material
MAINTENANCE /

                     Figure 4                                          Figure 5
   REPAIR

                                3.      Before raising hood, insert 1/2 inch diameter threaded rod (by others)
                                        into hanger brackets on hood top.

                     4
GETTING STARTED
4.    Install hood 6 feet 6 inches to 7 feet above the finished floor. This
      information is also given on the UL label located on the inside end
      panel of the hood.
IMPORTANT: Hood hanging height is critical, hanging the hood at the
incorrect height may significantly reduce the ability for the hood to function
properly and may be in violation of codes.
5.    Raise and hang hood from adequate roof or ceiling supports. All hanger

                                                                                     SPECIFICATIONS
      brackets must be used and the hood must be properly supported while

                                                                                        SAFETY /
      lifting to prevent damage or distortion to the hood.
IMPORTANT: Canopy hood must be hung level to operate properly. The
grease trough is pitched to drain into the grease container.
6.    After hood is secured, make the exhaust duct connections.
7.    A fire system distributor must be contacted. After the fire system has
      been installed, install optional air supply plenum (models 20UD13,
      20UD14 or 6KWL2-6KWL5), refer to instructions provided.

                                                                                     INSTALLATION
8.    Complete the fire system circuits as required by the job specification.

                                                                                      ASSEMBLY /
                     Installation of the canopy hoods shall be in
                     accordance with NFPA 96, Standard for
Ventilation Control & Fire Protection of Commercial Cooking
Operations.

9.    After the hood is installed, remove all protective plastic.
IMPORTANT: Do not walk or stand on the hood top as damage can result.
10. Install optional end skirts (6KWL6), temperature interlock (6KWL7,
    6KWL8), temperature interlock sensor (6KWL9) and/or control panel

                                                                                        OPERATION
    (by others). Refer to instructions provided.

Exhaust Duct Mounting
NOTE: Three size duct collars are provided with each kitchen exhaust
hood, only one collar should be used. For proper sizing, refer to the Types
of Cooking Equipment and chart on page 6.
                                                                                        TROUBLESHOOTING

                 Types of Cooking Equipment – Grease Level

           Light                   Medium                       Heavy

 Gas/Electric Steamer           Combi-Ovens                Upright Broiler
     Gas/Electric Oven        Gas/Electric Fryer      Gas/Electric Char-broiler
       Food Warmer                  Griddle                   Mesquite
       Pasta Cooker              Tilting Skillet           Infrared Broiler
       Dishwasher            Tilting Braising Pan      Lava Rock Char-broiler
          Smoker               Grill/Hibachi Grill                  Wok
                                                                                     MAINTENANCE /

        Rotisserie               Salamander                 Chain Broiler
        Pizza Oven
                                                                                        REPAIR

                                                                                 5
GETTING STARTED

                                          Grease             Duct CFM/                    Duct Collar
                          Model           Level             Velocity Ft. CFM           Connection (inches)

                          20UD05          Light              1600      200   800             8x9
                                          Medium             1500      250   1000            8 x 12
                                          Heavy              1600      300   1200            9 x 12
                          20UD06          Light              1500      200   1000            8 x 12
SPECIFICATIONS

                                          Medium             1500      250   1250           10 x 12
   SAFETY /

                                          Heavy              1500      300   1500           12 x 12
                          6KWK8           Light              1600     1200 1200              12 x 9
                                          Medium             1500     1500 1500             12 x 12
                                          Heavy              1543     1800 1800             12 x 14
                          6KWK9           Light              1600     1600 1600             12 x 12
                                          Medium             1500     2000 2000             12 x 16
                                          Heavy              1600     2400 2400             12 x 18
INSTALLATION

                          6KWL0           Light              1500     2000 2000             12 x 16
 ASSEMBLY /

                                          Medium             1500     2500 2500             12 x 20
                                          Heavy              1500     3000 3000             12 x 24
                          6KWL1           Light              1600     2400 2400             12 x 18
                                          Medium             1500     3000 3000             12 x 24
                                          Heavy              1543     3600 3600             14 x 24

                         1.   As specified in NFPA 96, Ch. 7.5, exhaust duct systems must be
                              constructed in the following manner:
   OPERATION

                              a.    Materials:
                                    Ducts shall be constructed of and supported by carbon steel
                                    not less than 1.37 mm (0.054 in.) (No. 16 MSG) in thickness or
                                    stainless steel not less than 1.09 mm (0.043 in.) (No. 18 MSG) in
                                    thickness.
                              b.    Installation:
                                    All seams, joints, penetrations, and duct to hood collar connections
   TROUBLESHOOTING

                                    shall have a liquid‑tight external weld.
                         2.   The exhaust duct connection needs to be located within 48 inches from
                              the center of the hood length to the center of the duct connection. See
                              Figure 6 and Figure 7.
                              8”                  Hanger Bracket                  3”

                                              Exhaust Plenum                  16”

                                                                              Hood
                                                         Duct Cut Out Area    Width
MAINTENANCE /
   REPAIR

                                                            Front of Hood
                                              Hood Length                         3”
                         Figure 6

                     6        8”                                             1”

                                              Exhaust Plenum                   12”
GETTING STARTED
                                                                               Front of Hood
                                                          Hood Length                                       3”

                                           8”                                                          1”

                                                          Exhaust Plenum                                 12”

                                                                         Duct Cut Out Area

                                      Figure 7
                                      3.    The exhaust duct connection is to be a continuous liquid- tight weld.
                                            Weld with a non-ferrous filler wire, such as silicon bronze or stainless

                                                                                                                                               SPECIFICATIONS
                                            steel filler wire.

                                                                                                                                                  SAFETY /
                                      IMPORTANT: Protect all stainless steel areas from weld splatter.

                                      Electrical Connection
                                      1.    Access for wiring the hood lights is provided by a junction box located
                                            on top of the hood. Use minimum 14 AWG copper wire. After all the
                                            wiring is completed, install standard light bulbs (by others) up to 100
                                            watt.

                                                                                                                                               INSTALLATION
                                                                                                                                                ASSEMBLY /
THE DIAGRAMS BELOW SHOW A TYPICAL HOOD SWITCH PANEL REMOTE MOUNTED.
                                                        For multiple hood systems that have more than 14
FOR HOOD MOUNTED SWITCHES REFER TO THE WIRING CONNECTION DECAL ON THE
                                                        lights total (incandescent or fluorescent), the
COVER OF THE JUNCTION BOX ON THE HOOD TOP.
                               hood lights must be wired to multiple circuits. Each circuit must have
THE DIAGRAM BELOW SHOWS HOW TO less
                               WIRE THE EXHAUST
                                     than       AND SUPPLY
                                            14 lights      FANS WITH A
                                                       total.
CONTROL PANEL TO A FIRE SUPPRESSION CONTACT (FSC1). WHEN WIRED PROPERLY,

                                      2.    Standard light switches (by others) are rated for 15 amps and shall not
THE SUPPLY FAN WILL BE TURNED OFF IF THE FIRE SYSTEM IS ACTIVATED, AND
ALLOW THE EXHAUST FAN TO CONTINUE TO OPERATE.
                                            have more than 14 lights connected to them.
THE FIRE SUPPRESSION CONTACT (FSC1) IS PROVIDED AS PART OF THE FIRE

                                      3.
                                      Figure 8 shows a typical hood switch panel remote mounted. Refer
SUPPRESSION SYSTEM AND IS NORMALLY MOUNTED IN THE FIRE SYSTEM CONTROL BOX.

                                      to Figure 8 for how to wire the exhaust and supply fans with a control
                                      panel
                 COMBINED EXHAUST & SUPPLY   to a fire suppression contact (FSC1).
                                           SWITCHING

                                                                                                                                                  OPERATION
                                                                                                        EXHAUST FAN CONTACT
                                                                                     OPTIONAL
                                                                                     SUP FAN

                       JUNCTION BOX                                       OL            FSC1
                       ON TOP OF HOOD
                                                            115VOLT                               OL
                       FOR FIELD                            CONTROL               EXH          SUP          SUP
                       CONNECTION OF                                              FAN          FAN          HTR       SUPPLY FAN CONTACT
                                                           N         H
                       120 VOLT                                                   STR          STR          CTRL
                       SUPPLY POWER
                                                                                                                                                  TROUBLESHOOTING

                                                                                                                     HOOD SWITCH
                                                                                                                     PANEL DETAIL

                 HOOD
               LIGHTS                                  LIGHT         EXHAUST & SUPPLY                  HEATER
                                                      SWITCH             SWITCH                        SWITCH

            Figure 8
                                      NOTE: When wired properly, the supply fan will be turned off if the fire
                                                                                                                                               MAINTENANCE /

                 SEPARATE EXHAUST & SUPPLY SWITCHING
                                      system is activated and allow the exhaust
                                                                     EXHAUST      fan to continue to operate.
                                                                             FAN CONTACT
                                                                                                                                                  REPAIR

                                      4.    The fire suppressionOLcontactOL(FSC1) is provided  as part of the fire
                                                                                        SUPPLY FAN CONTACT

                                            suppression
                                                 CONTROL
                                                         system and is normally mounted in the fire system control
           JUNCTION BOX
           ON TOP OF HOOD                   box. VOLTAGE
                                                 (By others.) EXH     SUP      SUP
                                                               FAN             FAN         HTR
           FOR FIELD
                                                 N   H
                                                               STR             STR         CTRL                                            7
           CONNECTION OF
           120 VOLT
           SUPPLY POWER
GETTING STARTED

                     OPERATION
                                                                                               QE

                             System Balancing
                                                According to NFPA 96,
                                                Ch. 8-3 Replacement Air:
                             Replacement air quantity shall be adequate to
                             prevent negative pressures in the commercial
                             cooking area(s) from exceeding 4.98 kPa (0.02                     QC
SPECIFICATIONS

                             in. water column).
   SAFETY /

                             NOTE: For complete smoke removal, the quantity
                             of air exhausted (QE) must be equal to, or greater
                             than the quantity of air generated by the cooking
                             equipment (QC).
                                                                                   Figure 9
                             1.   Determine the proper dining room air balance.
                                  a.   Determine total exhaust CFM from dining areas. (Exhaust fans,
                                       heating and air conditioning units, restrooms, etc.).
INSTALLATION
 ASSEMBLY /

                                  b.   Determine the total CFM of make-up air supplied to dining area.
                                  c.   Subtract (a) from (b) above. If the result is a negative number,
                                       a negative pressure is present in the dining area. In this case,
                                       kitchen exhaust odors could be drawn from the kitchen to the
                                       dining area. Therefore, exhaust or supply air should be adjusted to
                                       provide a slight positive pressure in the dining area.
                             2.   Determine proper kitchen air balance.
                                  a.   Determine total exhaust from the kitchen area. (Exhaust hoods,
   OPERATION

                                       dishwasher hoods, etc.)
                                  b.   Determine total CFM of make-up air supplied to kitchen area.
                                       (Make-up air hoods, heating and air conditioning units, etc.)
                                  c.   Subtract (a) from (b) above. The result should be a negative
                                       number. If the result is a positive number, a positive pressure is
                                       present in the kitchen area. Kitchen odors could be forced into the
                                       dining area.
   TROUBLESHOOTING

                             Test Exhaust Hood Air Volume
                             With all the filters in place, determine the total hood exhaust volume with a
                             rotating vane anemometer or shortridge meter.
                             1.   Rotating Vane Anemometer
                                  a.   All cooking equipment should be on.
                                  b.   Measure the velocities. Velocity measurements should be taken at
                                       five locations per filter. These must be over a filter slot as shown in
MAINTENANCE /

                                       Figure 10.
   REPAIR

                     8
GETTING STARTED
NOTE: When measuring the velocity of each location, a digital 2.75 inch
rotating vane anemometer or equivalent is suggested. The center of the
anemometer should be held parallel and 2 inches from the face of the filters
as shown in Figure 11. Squareness and distance are very important for
accuracy.

                                               H/4
                   x             x

                                                                                           SPECIFICATIONS
                           x

                                                                                              SAFETY /
                                                            Height

                   x              x                   H/2

                                                H/4

Figure 10
                                        Rotating Vane
                                         Anemometer
         Airflow

                                                                                           INSTALLATION
                                                                                            ASSEMBLY /
                            2”

Figure 11
    c.             Calculate the average velocity for the filter. Determine the filter’s
                   conversion factor from the table. Calculate the filter’s volume in
                   CFM (m3/hr) by multiplying the average velocity by the conversion
                   factor. Calculate the hood’s volume by repeating the process for

                                                                                              OPERATION
                   the remaining filters and summing the individual filter volumes.

                       Nominal Filter Size (Height x Length)         Conversion Factor
                                  20 x 16 inches                           1.90
                                  20 x 20 inches                           2.48
                                                                                              TROUBLESHOOTING
                                                                                           MAINTENANCE /
                                                                                              REPAIR

                                                                                       9
GETTING STARTED

                          FIGURE 6.3 VELGRID ASSEMBLY
                                2.    Shortridge Meter

                                 Place standoff spacers against
                                 face of outlet or inlet grill,                        Edge of outlet/inlet
                                 filter, coil, etc.                                    active face area

                                                                                                 Maintain 1½ inch
                                 Maintain 1½ inch
                                                                                                 (38.1 mm) margin
                                 (38.1 mm) margin
SPECIFICATIONS
   SAFETY /

                                                                                             Tubing harness

                                 Swivel bracket                                              Pressure input ports

                                 Tubing connectors
                                                                                                      Neckstrap

                                 Extension rods
INSTALLATION
 ASSEMBLY /

                                                                                     External read jack

                                                                        Pushbutton handle and plug
                                                                    Handle bracket
                                                             Captive knob screws
                                Figure 12
                                      a.    All cooking equipment should be on.
   OPERATION

                                      b.    Measure the velocities. Set up the Shortridge meter. Position
                                            the grid as shown in Figure 13 and Figure 14. Average the two
                                            measurements. Take velocity readings for each filter.
                                                    14"                                                   171⁄4"
                                                     23⁄4"                                                          6"

                                                                  10"                                                     10"
   TROUBLESHOOTING

                                Figure 13                                                Figure 14
                                      c.    Calculate the average velocity for the filter. Determine the filter’s
                                            conversion factor from the table. Calculate the filter’s volume in
                                            CFM (m3/hr) by multiplying the average velocity by the conversion
                                            factor. Calculate the hood’s volume by repeating the process for
                                            the remaining filters and summing the individual filter volumes.
MAINTENANCE /

                                              Nominal Filter Size (Height x Length)                       Conversion Factor
   REPAIR

                                                              20 x 16 inches                                       1.96
                                                              20 x 20 inches                                       2.40
                     10
GETTING STARTED
FILTERS
                   1.   Filters remove particulate, liquid or solid particles of grease/
                        cooking by-products. Filters will not remove vapor or gases!

TROUBLESHOOTING GUIDE

                                                                                                    SPECIFICATIONS
Symptom      Possible Cause(s)              Corrective Action
Exhaust      1. Fan is not receiving        1. Replace fuses, reset circuit breakers, check

                                                                                                       SAFETY /
fan is not      power                          disconnect
operating    2. Belt loose or broken        2. Replace or tighten belt
or is not
             3. Fan is rotating in wrong    3. Have the electrician correctly wire the fan
operating
                direction
at design
levels       4. Make-up air unit not        4. Problems with make-up air may interfere
                operating                      with the exhaust fan - check the
                                               manufacturers installation manual

                                                                                                    INSTALLATION
Hood         1. Fan is not operating at     1. See above troubleshooting section

                                                                                                     ASSEMBLY /
is full of      design levels
smoke        2. Fan is incorrectly sized    2. Refer to test and balance report, design
or there                                       specifications and fan curves; have an
is smoke                                       electrician check the motor amperage;
coming                                         try removing the filter temporarily to see if
out of the                                     capture improves. (Make sure to replace
edges of                                       filter to prevent risk of fire!) Switch to
the hood                                       different filters with lower static pressure
             3. Filters not in good         3. Clean or replace damaged filters, properly

                                                                                                       OPERATION
                usable condition               position filters
             4. Insufficient make-up air    4. Check make-up air unit, increase make-
                (Kitchen should be in a        up air, make-up air should be evenly
                slight negative but not        distributed throughout the kitchen
                excessive. Check to
                see if there is a strong
                draft through an open
                door)
                                                                                                       TROUBLESHOOTING

             5. Current cooking             5. Adjust or replace fan to match the cooking
                equipment does not             equipment load
                match the original
                design
             6. Are there multiple          6. One hood may be over exhausting and the
                hoods on one fan?              other hood not drawing enough. Restrict
                                               second hood to help problem hood
             7. Is the ductwork             7. Clear obstruction
                obstructed?
             8. Dirty or imbalanced fan     8. Clean the fan wheel/blade, replace fan
                                                                                                    MAINTENANCE /

                                               wheel if damaged, check for loose bolts,
                                               check for broken or damaged components,
                                                                                                       REPAIR

                                               check for rags and other foreign objects

                                                                                               11
GETTING STARTED

                     TROUBLESHOOTING GUIDE (CONTINUED)
                     Symptom        Possible Cause(s)               Corrective Action
                     Smoke          1. Fans directed at             1. Turn off or redirect fans
                     blows             the hood or cooking
                     away              equipment
                     before         2. Directional ceiling          2. Move diffusers to more neutral area or
                     reaching          diffusers directing air at      replace with a perforated diffuser or diffuser
SPECIFICATIONS

                     the bottom        the hood                        that directs air away from the hood
                     of the
   SAFETY /

                                    3. Open windows or doors        3. Close
                     hood
                                    4. Cross drafts or other        4. Find source of the draft and eliminate, add
                                       drafts in the kitchen           side skirts to hood; increase the amount of
                                                                       overhang on the spillage side; add a 6 in.
                                                                       lip around the base of the hood (test with
                                                                       cardboard – use stainless for permanent
                                                                       side skirts); make-up air should be spread
                                                                       out evenly through the kitchen
INSTALLATION

                                    5. Hood is near a main          5. Add side skirts to hood; increase the
 ASSEMBLY /

                                       walkway                         amount of overhang on spillage side
                                    6. Pass-thru windows near       6. Adjust amount and locations of make-up
                                       the hood                        air to eliminate drafts through the pass-thru
                                                                       windows
                                    7. Excessive velocity from      7. Turn off or reduce the amount of make-up
                                       Air Curtain Plenum (if          air being introduced through the air curtain
                                       applicable)                     plenum (supply air would have to increase
                                                                       from another source)
                     Pilot lights   1. Drafts from make-up air      1. Turn off or reduce the amount of make-up
   OPERATION

                     are being                                         air; block off portions of the supply to direct
                     blown out                                         air away from the problem area (test with
                     or cooking                                        cardboard first); remove any obstructions
                                                                       in front of supply that directs air toward
                                                                       cooking equipment (supply air would have
                                                                       to increase from another source)
                     Cold air       1. Cold air being               1. Turn off or reduce the amount of air
                     can be            introduced through              supplied to the air supply plenum; heat
   TROUBLESHOOTING

                     felt by the       air supply plenum (if           the supply air (supply air would have to
                     cook at the       applicable)                     increase from another source)
                     hood
                     The            1. Hood is not capturing        1. Hood is not drawing enough air, refer to
                     kitchen                                           troubleshooting sections
                     gets hot       2. Hot air being introduced     2.	Turn off or reduce the amount of air
                                       through air supply               supplied to the air supply plenum (supply
                                       plenum (if applicable)           air would have to increase from another
                                                                        source)
MAINTENANCE /
   REPAIR

                     12
GETTING STARTED
TROUBLESHOOTING GUIDE (CONTINUED)
Symptom       Possible Cause(s)              Corrective Action
Cooking       1. Hood is not capturing       1. Hood is not drawing enough air, see
odors in                                        sections above on fan performance and
the dining                                      hood capture
area          2. Draft through doors         2. Decrease make-up air in the kitchen;
                 between the kitchen            increase exhaust air through hood

                                                                                             SPECIFICATIONS
                 and dining area

                                                                                                SAFETY /
Grease is     1. Grease on top of the        1. Exhaust duct is not correctly welded
running off      hood
the hood      2.	Hood caulking missing      2. Clean problem area and re-caulk
                  or damaged
              3. Grease cup is not           3. Put grease cup back in place
                 inserted properly
Hood is       1. Fan is running in the       1. Refer back to page 6 troubleshooting
noisy            wrong direction                sections

                                                                                             INSTALLATION
              2.	Filters are not in place   2. Replace missing filters

                                                                                              ASSEMBLY /
              3. Hood is over                3. Slow down fan (see above troubleshooting
                 exhausting                     sections)

                                                                                                OPERATION
                                                                                                TROUBLESHOOTING
                                                                                             MAINTENANCE /
                                                                                                REPAIR

                                                                                        13
GETTING STARTED

                     MAINTENANCE

                            Daily
                            1.   Wipe grease from exposed metal surfaces on the hood interior using a
                                 clean, dry cloth.
                            2.   Visually inspect the filters or cartridges for grease accumulation.
SPECIFICATIONS

                            3.   Remove grease cup, empty contents, and replace cup.
   SAFETY /

                            Weekly
                            1.   Remove the grease filters or cartridges and wash in dishwasher or pot
                                 sink.
                            NOTE: Filters installed over heavy grease producing equipment may
                            require more frequent cleaning. See Filter Cleaning Schedule Guide.
                            2.   Before replacing filters, clean the interior plenum surfaces of any
INSTALLATION

                                 residual grease accumulations.
 ASSEMBLY /

                            Periodic
                            1.   Stainless steel hood exterior surfaces should be cleaned with a mild
                                 detergent and then polished with a good grade stainless steel polish to
                                 preserve the original luster.
                            NOTE: Never use abrasive cleaners or chemicals on hood surfaces. Never
                            use chlorine based cleaners or iron wool pads to clean the hood. They may
                            scratch or mar the material. Always rub with the grain of the stainless.
   OPERATION

                            2.   To maintain optimum performance of your hood and fan, duct cleaning
                                 should be performed as often as the application and code requires.
                            3.   Re-caulk the hoods with an NSF Approved silicone caulk, (GE
                                 SCS1000 or its equivalent) as needed.
   TROUBLESHOOTING
MAINTENANCE /
   REPAIR

                     14
GETTING STARTED
Filter Cleaning Schedule Guide
                           Temp.   Cooking                    Frequency                          Baffle Filter
Preference      Type                              Chemical                    Time or Cycles
                            (ºF)   Equipment                  Required                          Wash Frequency
                                                                                                 Every 3 days
                                   Griddle                    Every 3 days       2 Cycles
                                                                                                    2 Cycles
                                                                                                 Twice a week
             Commercial            Fryer           Dish       Weekly             2 Cycles
    1                      180                                                                      1 Cycle
             Grade Dish                           Washer
  Best                     Min.                                                                       Daily
              Washer               Charbroiler   Detergent    Daily              2 Cycles
                                                                                                    2 Cycles

                                                                                                                    SPECIFICATIONS
                                                                                                      Daily
                                   Wok                        Daily              2 Cycles
                                                                                                    2 Cycles

                                                                                                                       SAFETY /
                                                                                                 Every 3 days
                                   Griddle                    Every 3 days       3 Cycles
                                                                                                    2 Cycles
             Low Temp.
                                                                                                 Twice a week
                Dish               Fryer           Dish       Weekly             3 Cycles
                                                                                                    2 Cycles
    2          Washer      140                    Washer
                                                                                                      Daily
             (Chemical             Charbroiler   Detergent    Daily              4 Cycles
                                                                                                    2 Cycles
              Sanitizer)
                                                                                                      Daily
                                   Wok                        Daily              4 Cycles
                                                                                                    2 Cycles
                                                                                                 Every 3 days
                                   Griddle                    Every 3 days       10 Min.
                                                                                                   5 minutes
                Power                                                                            Twice a week
                                   Fryer                      Weekly             10 Min.

                                                                                                                    INSTALLATION
             Wash Sink     180                   Pot & Pan                                         5 minutes

                                                                                                                     ASSEMBLY /
    3
             (Whirlpool)   Min.                  Detergent                                            Daily
                                   Charbroiler                Daily              15 Min
             with Heater                                                                           5 minutes
                                                                                                      Daily
                                   Wok                        Daily              15 Min
                                                                                                   5 minutes
                                                                                                      Daily
                                   Griddle                    Every 3 days       15 Min
                                                                                                   5 minutes
               Power                                                                             Twice a week
                                   Fryer                      Weekly             15 Min
             Wash Sink                           Pot & Pan                                         5 minutes
    4                      140
             (Whirlpool)                         Detergent                                            Daily
                                   Charbroiler                Daily              25 Min
              no Heater                                                                           10 minutes
                                                                                                      Daily
                                   Wok                        Daily              25 Min
                                                                                                  10 minutes

                                                                                                                       OPERATION
                                                                                                      Daily
                                                                                               Soak 10 min., then
                                   Griddle                    Every 2 days        1 Hr.         scrub with scour
                                                                                                 pad and bottle
                                                                                                     brush
              Pot Sink
                                                                                                      Daily
             with Heater                         Pot & Pan
                                                                                               Soak 5 min., then
             (rinse with                         Detergent
    5                      180     Fryer                      Every 2 days        1 Hr.         scrub with scour
               sprayer                            and/or
                                                                                                 pad and bottle
                 after                           Degreaser
                                                                                                     brush
              soaking)
                                   Charbroiler                Daily               2 Hr.               Daily
                                                                                                                       TROUBLESHOOTING

                                                                                               Soak 10 min., then
                                                                                                scrub with scour
                                   Wok                        Daily               2 Hr.
                                                                                                 pad and bottle
                                                                                                     brush
                                                                                 2 Hours
                                                                                                     Daily
              Pot Sink             Griddle                    Daily          Change hot water
                                                                                               Soak 10 minutes
             no Heater                           Commercial                  every 30 minutes
                                                                                                then scrub with
    6        (rinse with                           Grade                         2 Hours
                           140                                                                scour pad & bottle
  Worst        sprayer             Fryer          Kitchen     Every 2 days   Change hot water
                                                                                                     brush
                 after                           Degreaser                   every 30 minutes
              soaking)             Charbroiler                                 Not Recommended
                                   Wok                                         Not Recommended
                                                                                                                    MAINTENANCE /
                                                                                                                       REPAIR

                                                                                                              15
GETTING STARTED

                     REPAIR PARTS ILLUSTRATION FOR 6KWK8, 6KWK9,
                     6KWL0, 6KWL1, 20UD05 AND 20UD06
                                                                                                4
SPECIFICATIONS
   SAFETY /

                                        1

                                                                                          3
INSTALLATION
 ASSEMBLY /

                                                                     2

                     REPAIR PARTS LIST FOR 6KWK8, 6KWK9, 6KWL0, 6KWL1,
                     20UD05 AND 20UD06
                      Ref.                                        Part Number for Models:
                      No.     Description                          20UD05   20UD06     6KWK8               Quantity
                      1       20x16x2 Aluminum Baffle Filter       21DX63            –        21DX63       1*
   OPERATION

                      2       20x20x2 Aluminum Baffle Filter             –       21DX64       21DX64       1*
                      3       Grease Cup                           21DX65       21DX65        21DX65       1
                      4       Hood Light Glass Globe               21DX66       21DX66        21DX66       1*
                      (∆)     100 Watt, A19 Light Bulb           Standard hardware item (available locally) 1*
                      Ref.                                        Part Number for Models:
                      No.     Description                          6KWK9    6KWL0      6KWL1               Quantity
                      1       20x16x2 Aluminum Baffle Filter       21DX63            –        21DX63       1*
   TROUBLESHOOTING

                      2       20x20x2 Aluminum Baffle Filter             –      21DX64        21DX64       1*
                      3       Grease Cup                           21DX65       21DX65        21DX65       1
                      4       Hood Light Glass Globe               21DX66       21DX66        21DX66       1*
                      (∆)     100 Watt, A19 Light Bulb           Standard hardware item (available locally) 1*

                     (∆) Not shown. (*) Quantity varies depending on model, sold in quantities of 1.

                     For Repair Parts, call 1-800-Grainger
                     24 hours a day – 365 days a year
MAINTENANCE /

                     Please provide following information:
                     -Model number
   REPAIR

                     -Serial number (if any)
                     -Part description and number as shown in parts list

                     16
SAFETY /       ASSEMBLY /                                  MAINTENANCE /
GETTING STARTED                                   OPERATION   TROUBLESHOOTING
                  SPECIFICATIONS   INSTALLATION                                    REPAIR

                                                                                         17
     NOTES
DAYTON ONE-YEAR LIMITED WARRANTY
  DAYTON ONE-YEAR LIMITED WARRANTY. All Dayton® product models covered in this manual are
  warranted by Dayton Electric Mfg. Co. (“Dayton”) to the original user against defects in workmanship or
  materials under normal use for one year after date of purchase. If the Dayton product is part of a set, only the
  portion that is defective is subject to this warranty. Any product or part which is determined to be defective
  in material or workmanship and returned to an authorized service location, as Dayton or Dayton’s designee
  designates, shipping costs prepaid, will be, as the exclusive remedy, repaired or replaced with a new or
  reconditioned product or part of equal utility or a full refund given, at Dayton’s or Dayton’s designee’s
  option, at no charge. For limited warranty claim procedures, see “Warranty Service” below. This warranty
  is void if there is evidence of misuse, mis-repair, mis-installation, abuse or alteration. This warranty does
  not cover normal wear and tear of Dayton products or portions of them, or products or portions of them
  which are consumable in normal use. This limited warranty gives purchasers specific legal rights, and
  you may also have other rights which vary from jurisdiction to jurisdiction.
  WARRANTY DISCLAIMERS AND LIMITATIONS OF LIABILITY RELATING TO ALL CUSTOMERS
  FOR ALL PRODUCTS
  LIMITATION OF LIABILITY. TO THE EXTENT ALLOWABLE UNDER APPLICABLE LAW, DAYTON’S
  LIABILITY FOR CONSEQUENTIAL AND INCIDENTAL DAMAGES IS EXPRESSLY DISCLAIMED. DAYTON’S
  LIABILITY IN ALL EVENTS IS LIMITED TO AND SHALL NOT EXCEED THE PURCHASE PRICE PAID.
  WARRANTY DISCLAIMER. A DILIGENT EFFORT HAS BEEN MADE TO PROVIDE PRODUCT INFORMATION
  AND ILLUSTRATE THE PRODUCTS IN THIS LITERATURE ACCURATELY; HOWEVER, SUCH INFORMATION
  AND ILLUSTRATIONS ARE FOR THE SOLE PURPOSE OF IDENTIFICATION, AND DO NOT EXPRESS OR
  IMPLY A WARRANTY THAT THE PRODUCTS ARE MERCHANTABLE, OR FIT FOR A PARTICULAR PURPOSE,
  OR THAT THE PRODUCTS WILL NECESSARILY CONFORM TO THE ILLUSTRATIONS OR DESCRIPTIONS.
  EXCEPT AS PROVIDED BELOW, NO WARRANTY OR AFFIRMATION OF FACT, EXPRESSED OR IMPLIED,
  OTHER THAN AS STATED IN THE “LIMITED WARRANTY” ABOVE IS MADE OR AUTHORIZED BY DAYTON.
  PRODUCT SUITABILITY. MANY JURISDICTIONS HAVE CODES AND REGULATIONS GOVERNING SALES,
  CONSTRUCTION, INSTALLATION, AND/OR USE OF PRODUCTS FOR CERTAIN PURPOSES, WHICH MAY VARY
  FROM THOSE IN NEIGHBORING AREAS. WHILE ATTEMPTS ARE MADE TO ASSURE THAT DAYTON PRODUCTS
  COMPLY WITH SUCH CODES, DAYTON CANNOT GUARANTEE COMPLIANCE, AND CANNOT BE RESPONSIBLE
  FOR HOW THE PRODUCT IS INSTALLED OR USED. BEFORE PURCHASE AND USE OF A PRODUCT, REVIEW
  THE SAFETY/SPECIFICATIONS, AND ALL APPLICABLE NATIONAL AND LOCAL CODES AND REGULATIONS,
  AND BE SURE THAT THE PRODUCT, INSTALLATION, AND USE WILL COMPLY WITH THEM.
  CONSUMERS ONLY. CERTAIN ASPECTS OF DISCLAIMERS ARE NOT APPLICABLE TO CONSUMER
  PRODUCTS SOLD TO CONSUMERS; (A) SOME JURISDICTIONS DO NOT ALLOW THE EXCLUSION OR
  LIMITATION OF INCIDENTAL OR CONSEQUENTIAL DAMAGES, SO THE ABOVE LIMITATION OR EXCLUSION
  MAY NOT APPLY TO YOU; (B) ALSO, SOME JURISDICTIONS DO NOT ALLOW A LIMITATION ON HOW LONG
  AN IMPLIED WARRANTY LASTS, SO THE ABOVE LIMITATION MAY NOT APPLY TO YOU; AND (C) BY LAW,
  DURING THE PERIOD OF THIS LIMITED WARRANTY, ANY IMPLIED WARRANTIES OF MERCHANTABILITY
  OR FITNESS FOR A PARTICULAR PURPOSE APPLICABLE TO CONSUMER PRODUCTS PURCHASED BY
  CONSUMERS, MAY NOT BE EXCLUDED OR OTHERWISE DISCLAIMED.
  THIS LIMITED WARRANTY ONLY APPLIES TO UNITED STATES PURCHASERS FOR DELIVERY IN THE
  UNITED STATES.
  WARRANTY SERVICE
  To obtain warranty service if you purchased the covered product directly from W.W. Grainger, Inc.
  (“Grainger”), (i) write or call or visit the local Grainger branch from which the product was purchased or
  another Grainger branch near you (see www.grainger.com for a listing of Grainger branches); or (ii) contact
  Grainger by going to www.grainger.com and clicking on the “Contact Us” link at the top of the page, then
  clicking on the “Email us” link; or (iii) call Customer Care (toll free) at 1-888-361-8649. To obtain warranty
  service if you purchased the covered product from another distributor or retailer, (i) go to www.grainger.com
  for Warranty Service; (ii) write or call or visit a Grainger branch near you; or (iii) call Customer Care
  (toll free) at 1-888-361-8649. In any case, you will need to provide, to the extent available, the purchase date,
  the original invoice number, the stock number, a description of the defect, and anything else specified in this
  Dayton One-Year Limited Warranty. You may be required to send the product in for inspection at your cost.
  You can follow up on the progress of inspections and corrections in the same ways. Title and risk of loss pass
  to buyer on delivery to common carrier, so if product was damaged in transit to you, file claim with carrier,
  not retailer, Grainger or Dayton. For warranty information for purchasers and/or delivery outside the
  United States, please use the following applicable contact information:

  Dayton Electric Mfg. Co.,
  100 Grainger Parkway, Lake Forest, IL 60045 U.S.A.
  or call +1-888-361-8649

DM_US 44930530-6.019350.0029
Manual de Instrucciones de Operación y Lista de Partes   ES

                           Campanas
                               de
                           Aspiración
                          para Cocina
                           Comercial
                       Modelos 6KWK8, 6KWK9, 6KWL0, 6KWL1,
                                 20UD05 al 20UD12

                                                          474244
POR FAVOR, LEA Y GUARDE
    ESTAS INSTRUCCIONES.
LEALAS CUIDADOSAMENTE ANTES
DE TRATAR DE MONTAR, INSTALAR,
  OPERAR O DAR MANTENIMIENTO
    AL PRODUCTO AQUI DESCRITO.

       PROTEJASE USTED MISMO Y
       A LOS DEMAS OBSERVANDO
         TODA LA INFORMACION DE
      SEGURIDAD. ¡EL NO CUMPLIR
          CON LAS INSTRUCCIONES
        PUEDE OCASIONAR DAÑOS,
        TANTO PERSONALES COMO
         A LA PROPIEDAD! GUARDE
      ESTAS INSTRUCCIONES PARA
       REFERENCIA EN EL FUTURO.

         CONSULTE LA CUBIERTA
           POSTERIOR PARA VER
            LA INFORMACION DE
     GARANTIA DE DAYTON Y OTRA
      INFORMACION IMPORTANTE.

Núm. de Modelo: _____________

Núm. de Serie: ______________

Fecha de Compra: ___________

    Formulario 5S6781 / Impreso en EE. UU.
          04632 Versión 1 07/2014
© 2011 - 2014 Dayton Electric Manufacturing Co.
        Reservados todos los derechos
PARA COMENZAR
ANTES DE COMENZAR
                                     Solo personal calificado debe realizar la
                                     instalación, la identificación de problemas y el
        reemplazo de partes.

        Herramientas Necesarias:
        •     Nivel

                                                                                               ESPECIFICACIONES
        •     Varilla roscada de 1/2 pulg. de diámetro

                                                                                                 SEGURIDAD /
        •     Pistola de soldar con alambre de relleno no ferroso

        •     Anemómetro de aspa giratoria o medidor Shortridge

        •     Bombillas estándar de hasta 100 vatios

        •     Interruptores de luz

        •     Caja de control del sistema contra incendios

DESEMBALAJE

                                                                                               INSTALACION
                                                                                                 MONTAJE /
        Contenido:
        •     Collares de Conductos (3)

        •     Campana de Aspiración para Cocina Comercial Dayton® (1)

        •     Manual de Instrucciones de Operación y Lista de Partes (1)

        Revise:
        •     Después de desembalar la unidad, revise si existen daños que se puedan haber

                                                                                                  OPERACION
              producido durante el transporte. Compruebe si hay partes sueltas, dañadas o si
              falta alguna. Se debe presentar una queja por daños de transporte a la empresa
              de transporte.

        Almacenamiento
        NOTA: Si se debe almacenar una campana de cocina antes de la instalación, protéjala
        de la suciedad y de la humedad.
        1.    Se recomienda el almacenamiento en interiores. Para el almacenamiento en
                                                                                               IDENTIFICACION
                                                                                               DE PROBLEMAS

              exteriores, cubra la campana con una lona para mantenerla limpia, seca y
              protegida de daños por la radiación ultravioleta.
        IMPORTANTE: El almacenamiento inapropiado que provoque el daño de la unidad
        anulará la garantía.

        •     Consulte las Instrucciones Generales de Seguridad en la página 2 y las
              Precauciones y Advertencias como se muestran.
                                                                                               MANTENIMIENTO /
                                                                                                REPARACION

                                                                                          1
PARA COMENZAR

                   INSTRUCCIONES GENERALES DE SEGURIDAD
                            Las campanas de aspiración de tipo II están diseñadas para capturar el calor y la
                            condensación de los artefactos que no produzcan grasa, lo que crea un ambiente
                            más cómodo para el personal de cocina. Los modelos 20UD07 a 20UD09 se usan
                            principalmente para hornos o aplicaciones de ventilación general, con el fin de
                            capturar el calor y el vapor. Los modelos 20UD10 a 20UD12 se usan principalmente
                            para lavavajillas o aplicaciones con condensado, con el fin de capturar el calor y el
ESPECIFICACIONES

                            vapor. Las campanas están fabricadas con un canal de recolección de condensado
  SEGURIDAD /

                            completamente soldado en el perímetro con un conector de drenaje de acero
                            inoxidable de 1/2 pulg. N.P.T. Las campanas de tipo II cumplen con todos los
                            requisitos establecidos en la norma 2 NSF.
                            NOTA: No hay partes de reparación disponibles para las campanas de tipo II.
                            Las campanas de aspiración de techo y pared tipo I están diseñadas para su uso
                            sobre equipos de cocina que produzcan calor y vertidos cargados de grasa y están
                            diseñados para usarse con equipos de cocina que se ubiquen contra un muro. Los
                            modelos 20UD05, 20UD06 y 6KWK8-6KWL1 son adecuados para temperaturas de
                            trabajo de hasta 316 ºC. Todas las campanas de techo tipo I están en las listas UL/
                            cUL 710, campanas de aspiración para equipos de cocina comerciales. Las campanas
INSTALACION

                            tipo I cumplen todos los requisitos que se establecen en la norma 2 NSF y la norma
  MONTAJE /

                            NFPA 96 para las operaciones de control de la ventilación y la protección contra
                            incendios de cocinas comerciales.
                            1.   Lea y siga todas las instrucciones y marcas de precaución. Asegúrese de que la
                                 fuente de energía eléctrica cumpla los requisitos del equipo y los códigos locales.
                            2.   Un técnico calificado debe realizar la instalación y el mantenimiento de la
                                 campana de techo. Un electricista calificado debe realizar todo el trabajo
                                 eléctrico.
                            3.   Respete todos los códigos eléctricos y de seguridad locales de los Estados
                                 Unidos y Canadá, además de National Electrical Code (NEC), la Ley de
   OPERACION

                                 Seguridad y Salud Ocupacionales (OSHA, por sus siglas en inglés), y el Boletín
                                 96 de la Asociación Nacional de Protección contra Incendios (NFPA, por sus
                                 siglas en inglés) en los Estados Unidos. Conecte el motor a tierra de acuerdo
                                 con el Artículo 250 de NEC (conexión a tierra). Respete el Código Eléctrico
                                 Canadiense (CEC, por sus siglas en inglés) en Canadá.

                                          B
                                                                   C

                                                                                          NSF
IDENTIFICACION
DE PROBLEMAS

                                                                                              ®

                            A

                             Figura 1

                                          B
                                                                   C
MANTENIMIENTO /
 REPARACION

                             A                                                            E53236

                                                                                          NSF ®

                   2         Figura 2
PARA COMENZAR
ESPECIFICACIONES

Campanas para Calor y Condensación (Consulte la Figura 1)

                                                                      Campanas para
                                Campanas para Calor
                                                                       Condensación
                              20UD07 20UD08 20UD09 20UD10 20UD11 20UD12

                                                                                               ESPECIFICACIONES
 Tipo de Campana                                   De techo, tipo II

                                                                                                 SEGURIDAD /
 Material                             Acero inoxidable 430 (donde esté expuesto)
 Cumplimiento de Normativas                         Norma 2 NSF

Dimensiones (cm)

                                                                      Campanas para
                                Campanas para Calor
                                                                       Condensación
                              20UD07 20UD08 20UD09 20UD10 20UD11 20UD12
 A                             61,0      61,0      61,0       61,0        61,0     61,0
 B                            137,2      137,2     137,2      137,2      137,2     137,2

                                                                                               INSTALACION
                                                                                                 MONTAJE /
 C                            121,9      152,4     182,9      121,9      152,4     182,9

Campanas para Grasa (Consulte la Figura 2)

                              20UD05 20UD06       6KWK8      6KWK9       6KWL0   6KWL1
 Tipo de Campana                                    Cubierta, tipo I
 Material                             Acero inoxidable 430 (donde esté expuesto)
 Temp. Máx.                                              316 ºC

                                                                                                  OPERACION
 Cantidad de Dispositivos de
                                2          2         2            3        3          4
 Luz
 Cámara Impelente
 de Suministro de Aire       20UD13     20UD14    6KWL2      6KWL3       6KWL4   6KWL5
 Recomendada
 Bordes Finales
                             6KWL6      6KWL6     6KWL6      6KWL6       6KWL6   6KWL6
 Recomendados
 Interbloqueo de Temperatura
                             48C175     48C175 48C175 48C175 48C175 48C176
 Digital Recomendado
                                                                                               IDENTIFICACION
                                                                                               DE PROBLEMAS

 Sensor de Interbloqueo
 de Temperatura Digital      48C177     48C177 48C177 48C177 48C177 48C177
 Recomendado
 Cumplimiento de Normativas                      UL 710, norma 2 NSF

Dimensiones (cm)

                              20UD05 20UD06       6KWK8      6KWK9       6KWL0   6KWL1
 A                             61,0      61,0      61,0       61,0        61,0     61,0
                                                                                               MANTENIMIENTO /

 B                            137,2      137,2     137,2      137,2      137,2     137,2
                                                                                                REPARACION

 C                            121,9      152,4     182,9      243,8      304,8     365,8

                                                                                           3
PARA COMENZAR

                   INSTRUCCIONES DE INSTALACIÓN
                                                        Solo personal calificado debe realizar la
                                                        instalación, la identificación de problemas y el
                              reemplazo de partes. Consulte y siga las recomendaciones de la norma
                              NFPA 96. Las   instrucciones de NFPA 96 sustituyen este documento.
                                        Sistema típico de ventilación de cocina

                                   Extractor         Ventilador
                                                     de aire de
ESPECIFICACIONES

                               Base de               reposición
                               montaje
                               de techo
  SEGURIDAD /

                               ventilada                                               Flujo de aire

                                                                          Cámara
                                                                        impelente de
                                                                         suministro
                                               Campana de                  de aire
                                                aspiración

                                                               Aire de suministro
                                                             externo que reemplaza
                                                                 al aire extraído
INSTALACION

                                               Plancha
  MONTAJE /

                              Figura 3
                              1. Antes de la instalación, consulte con las autoridades locales que tengan la
                                  jurisdicción sobre las holguras para superficies de combustible, etc.
                              NOTA: El código para la suspensión es de un mínimo de 15 cm para las campanas de
                              techo. La investigación ASHRAE recomienda usar 23 a 46 cm. Normalmente, más es
                              mejor, en especial para algunos aparatos. Consulte la Figura 4.
                              2.     Sin sacarla de su caja, ubique la unidad bajo la ubicación donde se instalará.
                                     Retire la caja cuidadosamente. Ubique algún material protector en el suelo
   OPERACION

                                     junto a la caja para evitar dañar la campana. Incline la campana hacia un lado
                                     cuidadosamente sobre el material protector, consulte la Figura 5.
IDENTIFICACION
DE PROBLEMAS

                              Voladizo

                                                                                               Parte inferior
                                                             Pálet de                          de la campana
                                                             carga

                                                                                                   Material protector

                   Figura 4                              Figura 5
                              3.     Antes de levantar la campana, inserte una varilla roscada de 1/2 pulg. de
MANTENIMIENTO /

                                     diámetro (de terceros) en los soportes suspendidos sobre la parte superior de la
 REPARACION

                                     campana.
                              4.     Instale la campana a unos 198 a 213 cm del suelo. Esta información también se
                                     entrega en la etiqueta UL ubicada en el panel final interior de la campana.

                   4
PARA COMENZAR
IMPORTANTE: La altura de la suspensión de la campana es fundamental, si
se suspende la campana a una altura incorrecta, esto puede reducir de manera
importante la habilidad de la campana de funcionar adecuadamente y puede infringir
los códigos.
5.     Levante y suspenda la campana a partir de soportes adecuados de techo o
       de cielo. Se deben usar todos los soportes suspendidos y la campana debe
       apoyarse correctamente al levantarla, para evitar daños o distorsión.

                                                                                            ESPECIFICACIONES
IMPORTANTE: La campana de techo se debe colgar nivelada, para que funcione

                                                                                              SEGURIDAD /
correctamente. La cubeta de grasa está inclinada para que se drene al recipiente de
grasa.
6.     Después de fijar la campana, realice las conexiones de los conductos de
       extracción.
7.     Se debe contactar un distribuidor de sistemas contra incendio. Después de
       instalar el sistema contra incendio, instale la cámara impelente de suministro de
       aire (modelos 20UD13, 20UD14 o 6KWL2-6KWL5), consulte las instrucciones
       proporcionadas.
8.     Complete los circuitos del sistema contra incendios según lo requiera la
       especificación del trabajo.

                                                                                            INSTALACION
                                                                                              MONTAJE /
                     La instalación de las campanas de techo se debe
                     realizar de acuerdo con la norma NFPA 96 para las
operaciones de control de ventilación y protección contra incendios de
cocinas comerciales.

9.     Después de la instalación de la campana, reitre todo el plástico protector.
IMPORTANTE: No camine ni se pare sobre la campana ya que esto puede causar
daños.
10. Instale bordes finales opcionales (6KWL6), interbloqueo de temperatura (6KWL7,
    6KWL8), sensor de interbloqueo de temperatura (6KWL9) o panel de control (de

                                                                                               OPERACION
    terceros). Consulte las instrucciones proporcionadas.

Montaje del Conducto de Extracción
NOTA: Se proporcionan collares de conductos de tres tamaños con cada campana de
aspiración para cocina, solo se debe usar un collar. Para utilizar el tamaño correcto,
consulte Tipos de Equipos de Cocina y la tabla en la página 6.

                    Tipos de Equipos de Cocina – Nivel de Grasa

             Bajo                       Medio                           Alto
                                                                                            IDENTIFICACION
                                                                                            DE PROBLEMAS

     Generador de Vapor
                                Hornos de Combinación        Asador de Posición Vertical
       Eléctrico/a Gas
     Horno Eléctrico/a Gas      Freidora Eléctrica/a Gas       Asador Eléctrico/a Gas
       Calentadores de
                                        Plancha                       Mezquite
          Alimentos
      Cocedor de Pasta             Sartén Basculante              Asador Infrarrojo
                                  Sartén Braseadora
          Lavaplatos                                         Asador de Piedra Volcánica
                                      Basculante
                                                                                            MANTENIMIENTO /

                                 Gratinador/Gratinador
          Ahumador                                                      Wok
                                                                                             REPARACION

                                        Hibachi
        Horno Asador                Hornillo Portátil             Horno de Cadena
        Horno de Pizza

                                                                                        5
PARA COMENZAR

                                                           Velocidad
                                          Nivel de            del               CFM/                       Conexión de Collar
                        Modelo            Grasa            Conducto             Pie.      CFM              de Conducto (cm)

                        20UD05            Bajo                 1600             200       800                 20,3 x 22,9
                                          Medio                1500             250      1000                 20,3 x 30,5
                                          Alto                 1600             300      1200                 22,9 x 30,5
ESPECIFICACIONES

                        20UD06            Bajo                 1500             200      1000                 20,3 x 30,5
  SEGURIDAD /

                                          Medio                1500             250      1250                 25,4 x 30,5
                                          Alto                 1500             300      1500                 30,5 x 30,5
                        6KWK8             Bajo                 1600             1200 1200                     30,5 x 22,9
                                          Medio                1500             1500 1500                     30,5 x 30,5
                                          Alto                 1543             1800 1800                     30,5 x 35,6
                        6KWK9             Bajo                 1600             1600 1600                     30,5 x 30,5
                                          Medio                1500             2000 2000                     30,5 x 40,6
                                          Alto                 1600             2400 2400                     30,5 x 45,7
INSTALACION
  MONTAJE /

                        6KWL0             Bajo                 1500             2000 2000                     30,5 x 40,6
                                          Medio                1500             2500 2500                     30,5 x 50,8
                                          Alto                 1500             3000 3000                     30,5 x 61,0
                        6KWL1             Bajo                 1600             2400 2400                     30,5 x 45,7
                                          Medio                1500             3000 3000                     30,5 x 61,0
                                          Alto                 1543             3600 3600                     35,6 x 61,0
                       1.     Según se especifica en la norma NFPA 96, Cap. 7.5, los sistemas de conducto
                              de extracción deben estar construidos de la siguiente forma:
   OPERACION

                              a.      Materiales:
                                      Los conductos deben estar construidos y apoyados con acero al carbono
                                      de un espesor no inferior a 1,37 mm (n.º 16 MSG), o de acero inoxidable de
                                      un espesor no inferior a 1,09 mm (n.º 18 MSG).

                              b.      Instalación:
                                      Todas las uniones, juntas, penetraciones y conexiones de collar del
                                      conducto a la campana deben tener soldaduras externas ‑impermeables.

                       2.     La conexión del conducto de extracción se debe ubicar dentro de 122 cm desde
IDENTIFICACION
DE PROBLEMAS

                              el centro de la longitud de la campana al centro de la conexión del conducto.
                              Consulte la Figura 6 y la Figura 7.
                            20,3 cm
                                                     Soporte suspendido                          7,6 cm

                                            Cámara impelente de extracción                 40,6 cm

                                                                                            Ancho
                                                              Área de recorte                de la
                                                              del conducto                 campana
MANTENIMIENTO /
 REPARACION

                                                                   Parte delantera
                                                                   de la campana                  7,6 cm
                                             Largo de la campana

                       Figura 6
                            20,3 cm
                                                                                      2,5 cm

                   6
                                           Cámara impelente de extracción                      30,5 cm
Parte delantera

                                                                                                                                         PARA COMENZAR
                                                            de la campana                         7,6 cm
                                      Largo de la campana

                       20,3 cm
                                                                                      2,5 cm

                                    Cámara impelente de extracción                             30,5 cm

                                                     Área de recorte del conducto

                  Figura 7
                  3. La conexión del conducto de extracción debe estar soldada de forma continua e

                                                                                                                                      ESPECIFICACIONES
                      impermeable. Suelde con un alambre de relleno no ferroso, como los alambres

                                                                                                                                        SEGURIDAD /
                      de relleno de bronce al silicio o de acero inoxidable.
                  IMPORTANTE: Proteja de las salpicaduras de la soldadura todas las áreas de acero
                  inoxidable.

                  Conexión Eléctrica
                  1.       Una caja de empalme en la parte superior de la campana permite el acceso par
                           el cableado de las luces de la campana. Use un alambre de cobre de un mínimo
                           de 14 AWG. Una vez realizado el cableado, instale ampolletas estándar (de
                           terceros) de hasta 100 vatios.
                                        Para sistemas de campanas múltiples que
                          PRECAUCIÓN

                                                                                                                                      INSTALACION
                                        tengan más de 14 luces en total (incandescentes

                                                                                                                                        MONTAJE /
                  o fluorescentes), las luces de las campanas deben estar cableadas a
                  circuitos múltiples. Cada circuito debe tener menos de 14 luces en
                  total.
                  2.       Los interruptores de luz estándar (de terceros) son adecuados para 15 amperios
                           y no se les debe conectar más de 14 luces.
                  3.    La Figura 8 muestra un panel del interruptor típico con montaje remoto. Consulte
                        la Figura 8 para obtener la información de cómo cablear los ventiladores
                        extractores y de suministro con un panel de control a un contacto para extinción
                        de incendios (FSC1).
  COMBINADA DE INTERRUPTOR DE EXTRACCIÓN Y DE SUMINISTRO

                                                                                                                                         OPERACION
                                                                                        CONTACTO DEL
                                                       VENTILADOR DE                    VENTILADOR ASPIRANTE
                                                     SUMINISTRO OPCIONAL

    CAJA DE EMPALME EN                               OL             FSC1
    LA PARTE SUPERIOR
    DE LA CAMPANA PARA                   CONTROL DE                             OL
    LA CONEXIÓN A TIERRA                 115 VOLTIOS          STR DE
                                                                           STR DE
                                                                                          CONTROL DEL
    DEL SUMINISTRO ELÉCTRICO                                VENTILADOR
                                                                         VENTILADOR
                                                                                           CALENTADOR       CONTACTO DEL VENTILADOR
                                          N      H          EXTRACTOR
                                                                             DE
                                                                                          DE SUMINISTRO
    DE 120 VOLTIOS                                                       SUMINISTRO                         DE SUMINISTRO
                                                                                                                                      IDENTIFICACION
                                                                                                                                      DE PROBLEMAS

                                                                                                             DETALLE DEL
                                                                                                              PANEL DEL
                                                                                                            INTERRUPTOR
  LUCES DE                                                                                                 DE LA CAMPANA
                                   INTERRUPT         INTERRUPTOR DE                   INTERRUPTOR
 LA CAMPANA
                                    OR DE LA         EXTRACCIÓN Y DE                       DEL
                                      LUZ              SUMINISTRO                      CALENTADOR

Figura 8
                  NOTA: Si se cablea adecuadamente, el ventilador de suministro se apagará si se
                  activa el sistema contra incendios y permitirá que el ventilador de aspiración continúe
                                                                                                                                      MANTENIMIENTO /
                                                                                                                                       REPARACION

                  funcionando.
                  4.       El contacto de extinción de incendios (FSC1) se proporciona como parte del
                           sistema de extinción de incendios y se monta normalmente en la caja de control
                           del sistema contra incendios. (De terceros).

                                                                                                                                 7
PARA COMENZAR

                   FUNCIONAMIENTO                                                                 QE

                           Equilibrio de Sistema
                                                 Según la norma NFPA 96,
                                PRECAUCIÓN       Cap. 8-3 Aire de
                           reemplazo: La cantidad del aire de reemplazo
                           debe ser la suficiente para evitar que las
                                                                                                  QC
                           presiones negativas en las áreas de cocinas
ESPECIFICACIONES

                           comerciales excedan 4,98 kPa.
  SEGURIDAD /

                           NOTA: Para la eliminación completa del humo, la
                           cantidad de aire extraído (QE) debe ser igual o mayor
                           que la cantidad de aire generado por el equipo de
                           cocina (QC).
                                                                                     Figura 9
                           1.   Determine el equilibrio del aire adecuado para el comedor.
                                a.   Determine el CFM total de la extracción de las áreas de los comedores.
                                     (Ventiladores extractores, unidades de aire acondicionado y calefaccionado,
                                     baños, etc.).
INSTALACION

                                b.   Determine el CFM total del aire de reposición que se proporciona al área de
  MONTAJE /

                                     los comedores.

                                c.   Reste (a) de (b) anterior. Si el resultado es un número negativo, existe una
                                     presión negativa en el área de los comedores. En este caso, los olores de
                                     la cocina pueden pasar al área de los comedores. Por lo tanto, el aire de
                                     extracción o de suministro se debe ajustar para proporcionar una presión
                                     levemente positiva en el área de los comedores.

                           2.   Determine el equilibrio adecuado del aire de la cocina.
                                a.   Determine la extracción total del área de la cocina. (Campanas de
                                     aspiración, campanas de lavaplatos, etc.)
   OPERACION

                                b.   Determine el CFM total del aire de reposición que se proporciona al
                                     área de la cocina. (Campanas de aire de reposición, unidades de aire
                                     acondicionado o calefaccionado, etc.)

                                c.   Reste (a) de (b) anterior. El resultado debe ser un número negativo. Si el
                                     resultado es un número positivo, existe una presión positiva en el área de la
                                     cocina. Los olores de la cocina pueden ser empujados hacia el área de los
                                     comedores.
IDENTIFICACION
DE PROBLEMAS

                           Prueba del Volumen de Aire de la Campana de Aspiración
                           Con todos los filtros en su lugar, determine el volumen de extracción de la campana
                           con un anemómetro de aspa giratoria o un medidor Shortridge.
                           1.   Anemómetro de Aspa Giratoria
                                a.   Todos los equipos de cocina deben estar encendidos.

                                b.   Mida las velocidades. Se deben realizar las mediciones de la velocidad en
                                     cinco ubicaciones por filtro. Estas ubicaciones deben ser sobre una ranura
                                     de filtro según se muestra en la Figura 10.
MANTENIMIENTO /
 REPARACION

                   8
PARA COMENZAR
NOTA: Se sugiere un anemómetro de aspa giratoria digital de 7 cm o equivalente para
medir la velocidad de cada ubicación. El centro del anemómetro se debe sostener de
forma paralela y a 5,1 cm de la superficie de los filtros según se muestra en la Figura
11. La cuadratura y la distancia son muy importantes para la precisión.

                                                     H/4
                        x            x

                                                                                           ESPECIFICACIONES
                               x                                 Altura

                                                                                             SEGURIDAD /
                        x            x                     H/2

                                                     H/4

Figura 10
                                          Anemómetro de
                                           Aspa Giratoria
        Flujo de aire

                            5,1 cm

                                                                                           INSTALACION
                                                                                             MONTAJE /
Figura 11
    c.  Calcule la velocidad promedio del filtro. Determine el factor de conversión
        del filtro a partir de la tabla. Calcule el volumen del filtro en CFM (m3/h)
        multiplicando la velocidad promedio por el factor de conversión. Calcule el
        volumen de la campana repitiendo el proceso para los filtros restantes y
        sumando los volúmenes de filtro individuales.

                               Tamaño de Filtro Nominal                    Factor de

                                                                                              OPERACION
                                   (Alto x Largo)                         Conversión
                                     20 x 16 pulg.                          1,90
                                     20 x 20 pulg.                          2,48

                                                                                           IDENTIFICACION
                                                                                           DE PROBLEMAS
                                                                                           MANTENIMIENTO /
                                                                                            REPARACION

                                                                                       9
PARA COMENZAR
                        FIGURA 6.3 CONJUNTO VELGRID

                          2.     Medidor Shortridge
                                 Coloque los separadores de
                                 montaje vertical contra la                               Borde del área de superficie
                                 superficie de la parrilla, filtro,                       activa de salida o entrada
                                 bobina, etc., de salida o entrada
                                                                                                       Mantenga un margen
                                 Mantenga un margen
                                                                                                       de 3,8 cm
                                 de 3,8 cm
ESPECIFICACIONES
  SEGURIDAD /

                                                                                                    Arnés de tubos

                               Soporte giratorio                                                    Puertos de entrada de presión

                               Conectores de tubos
                                                                                                           Correa para
                                                                                                           el cuello
                               Barras de extensión
INSTALACION
  MONTAJE /

                                                                                        Conector de lectura externa

                                                                            Mango y enchufe de botón pulsador
                                                                       Soporte del mango
                                                                Tornillos imperdibles con perilla

                          Figura 12
                              a. Todos los equipos de cocina deben estar encendidos.

                                 b.     Mida las velocidades. Configure el medidor Shortridge. Coloque la rejilla
                                        según se muestra en la Figura 13 y la Figura 14. Promedie las dos
   OPERACION

                                        mediciones. Realice las mediciones de velocidad de cada filtro.

                                            35,6 cm                                                             43,8 cm
                                              7,0 cm                                                                      15,2 cm

                                                                 25,4 cm                                                            25,4 cm
IDENTIFICACION
DE PROBLEMAS

                          Figura 13                                          Figura 14
                              c.  Calcule la velocidad promedio del filtro. Determine el factor de conversión
                                  del filtro desde la tabla. Calcule el volumen del filtro en CFM (m3/h)
                                  multiplicando la velocidad promedio por el factor de conversión. Calcule el
                                  volumen de la campana repitiendo el proceso para los filtros restantes y
                                  sumando los volúmenes de filtro individuales.

                                                     Tamaño de Filtro Nominal                                         Factor de
MANTENIMIENTO /

                                                         (Alto x Largo)                                              Conversión
 REPARACION

                                                               20 x 16 pulg.                                             1,96
                                                               20 x 20 pulg.                                             2,40

                   10
PARA COMENZAR
FILTROS
                       1.   Los filtros retiran el material particulado, partículas de grasa líquidas o
                            sólidas/productos secundarios de la cocina. Los filtros no retiran el vapor o
                            los gases.

GUÍA DE IDENTIFICACIÓN DE PROBLEMAS

                                                                                                             ESPECIFICACIONES
                                                                                                               SEGURIDAD /
Síntoma         Causa(s) Posible(s)               Medida Correctiva
El ventilador   1. El ventilador no está          1. Reemplace los fusibles, restablezca los
extractor          recibiendo energía                cortacircuitos, verifique la desconexión
no está         2. La correa está suelta o rota   2. Reemplace o apriete la correa
funcionando
o no está       3. El ventilador está girando     3. Pida a un electricista que conecte el ventilador de
operando           en la dirección incorrecta        la manera correcta
según los       4. La unidad de aire de           4. Los problemas con el aire de reposición pueden
niveles del        reposición no está                interferir con el ventilador extractor; verifique el
diseño             funcionando                       manual de instalación de los fabricantes
La campana      1. El ventilador no está          1. Consulte la sección de identificación de

                                                                                                             INSTALACION
está llena         funcionando según los             problemas antes mencionada

                                                                                                               MONTAJE /
de humo o          niveles del diseño
sale humo       2. El ventilador está             2. Consulte el informe de prueba y equilibrio, las
de los             dimensionado                      especificaciones de diseño y las curvas del
bordes de la       incorrectamente                   ventilador; pida a un electricista que verifique
campana                                              el amperaje del motor; intente quitar el filtro
                                                     temporalmente para ver si mejora la captación.
                                                     (Asegúrese de reemplazar el filtro para prevenir
                                                     el riesgo de incendio). Cambie a diferentes filtros
                                                     con menor presión de estática
                3. Los filtros no están en una    3. Limpie o reemplace los filtros dañados y coloque

                                                                                                                OPERACION
                   condición de uso adecuada         los filtros correctamente
                4. Aire de reposición             4. Verifique la unidad de aire de reposición,
                   insuficiente (La cocina           aumente el aire de reposición, el aire de
                   debe estar en niveles             reposición se debe distribuir de manera uniforme
                   negativos pero no en              por toda la cocina.
                   exceso. Verifique si hay
                   una corriente de aire fuerte
                   que provenga de alguna
                   puerta abierta)
                5. El equipo de cocina actual     5. Ajuste o reemplace el ventilador para que
                                                                                                             IDENTIFICACION
                                                                                                             DE PROBLEMAS

                   no coincide con el diseño         corresponda con la carga del equipo de cocina
                   original
                6. ¿Hay más de una                6. Una campana puede estar aspirando en exceso y
                   campana para un                   la otra campana puede tener un tiro insuficiente.
                   ventilador?                       Restrinja la segunda campana para ayudar a la
                                                     campana con problemas.
                7. ¿Hay una obstrucción en la     7. Elimine la obstrucción
                   red de conductos?
                8. Ventilador sucio o             8. Limpie la rueda del ventilador/paleta, reemplace
                   desequilibrado                    la rueda del ventilador si está dañada, identifique
                                                                                                             MANTENIMIENTO /

                                                     los pernos sueltos, busque componentes
                                                                                                              REPARACION

                                                     dañados o rotos, busque elementos extraños

                                                                                                        11
Vous pouvez aussi lire