HaptX Gloves DK2
User Manual
←
→
Transcription du contenu de la page
Si votre navigateur ne rend pas la page correctement, lisez s'il vous plaît le contenu de la page ci-dessous

HaptX Gloves DK2 User Manual
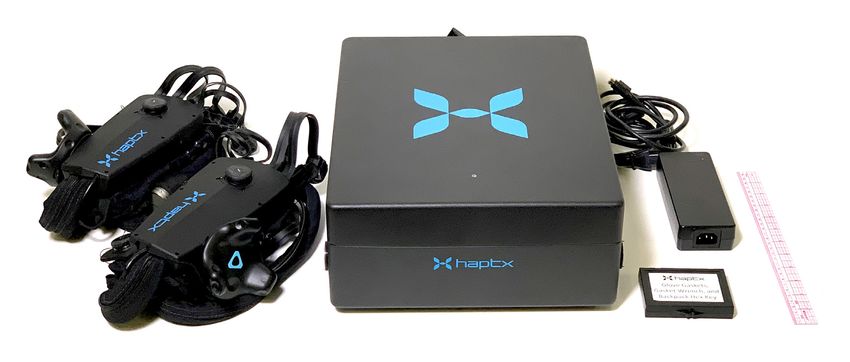
Table of Contents
    1 Safety Notices.  .  .  .  .  .  .  .  .  .  .  .  .  .  .  .  .  .  .  .  .  .  .  .  .  .  .  .    3
    2 Case content.  .  .  .  .  .  .  .  .  .  .  .  .  .  .  .  .  .  .  .  .  .  .  .  .  .  .  .  . 4
         Case 1: Gloves and Air Controller .  .  .  .  .  .  .  .  .  .  .  .  .  .  .  .  .  .  .  .  . 4
         Case 2: Backpack Accessories .  .  .  .  .  .  .  .  .  .  .  .  .  .  .  .  .  .  .  .  .  . 4
         Case 3: Smart Compressor.  .  .  .  .  .  .  .  .  .  .  .  .  .  .  .  .  .  .  .  .  .  .      4
    3 PC Requirements.  .  .  .  .  .  .  .  .  .  .  .  .  .  .  .  .  .  .  .  .  .  .  .  .  .  .      5
    4 Quick Start .  .  .  .  .  .  .  .  .  .  .  .  .  .  .  .  .  .  .  .  .  .  .  .  .  .  .  .  .   6
         4.1 Select Stationary or Room Scale Configuration and set up Vive .  .  .  .  .  .  .  . 6
         4.2 HaptX Gloves DK2 Overview .  .  .  .  .  .  .  .  .  .  .  .  .  .  .  .  .  .  .  .         7
         4.3 Attach Gloves to Air Controller.  .  .  .  .  .  .  .  .  .  .  .  .  .  .  .  .  .  .  .    8
         4.4 Attach Backpack Accessory (if Room Scale Configuration).  .  .  .  .  .  .  .  .  . 9
         4.5 Attach Air Controller to Smart Compressor .  .  .  .  .  .  .  .  .  .  .  .  .  .  .        10
         4.6 Power on the Smart Compressor and Air Controller.  .  .  .  .  .  .  .  .  .  .  . 10
         4.7 HTC Vive Setup .  .  .  .  .  .  .  .  .  .  .  .  .  .  .  .  .  .  .  .  .  .  .  .  .     11
         4.8 Software Setup .  .  .  .  .  .  .  .  .  .  .  .  .  .  .  .  .  .  .  .  .  .  .  .  .     11
         4.9 How To Don a HaptX Glove.  .  .  .  .  .  .  .  .  .  .  .  .  .  .  .  .  .  .  .  . 12
         4.10 Doffing the HaptX Glove.  .  .  .  .  .  .  .  .  .  .  .  .  .  .  .  .  .  .  .  .        13
    5 Tear Down.  .  .  .  .  .  .  .  .  .  .  .  .  .  .  .  .  .  .  .  .  .  .  .  .  .  .  .  .      13
    6 Troubleshooting and Common Error Codes.  .  .  .  .  .  .  .  .  .  .  .  .  .  .  .  . 14
    7 Still need help? .  .  .  .  .  .  .  .  .  .  .  .  .  .  .  .  .  .  .  .  .  .  .  .  .  .  .  . 15
    8 Product Maintenance .  .  .  .  .  .  .  .  .  .  .  .  .  .  .  .  .  .  .  .  .  .  .  .  . 15

DK2 User Manual - © HaptX Inc. 2022                                                                Page 2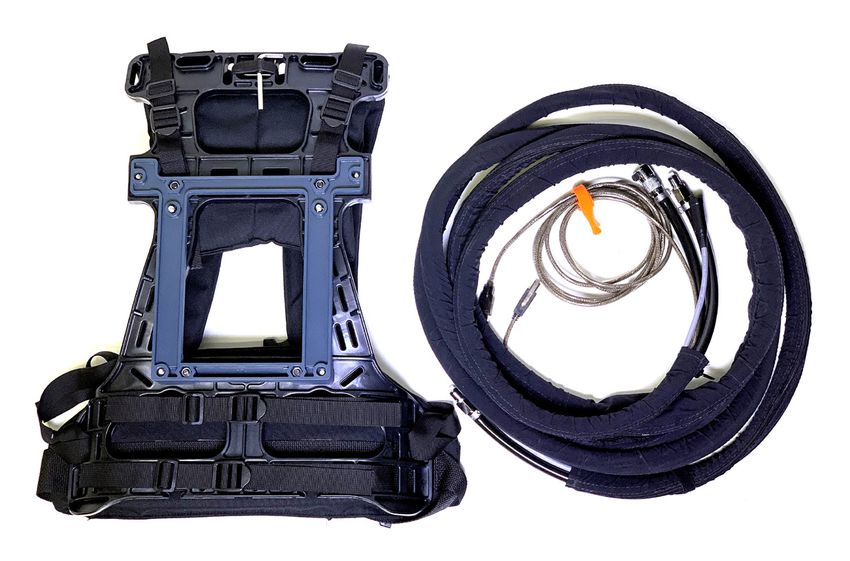
1 Safety Notices
        High Voltage Warning: The Air Controller and Smart Compressor contain high voltage electronics. Do not disassem-
        ble, expose to liquids, or use any power supply other than those provided with your HaptX Gloves Development Kit
        2 (the “DK2” or ”Product”).

       Pressurized Air Warning: The Air Controller and Smart Compressor contain pressurized air. Do not disassemble.
       Use care when connecting and disconnecting Tether. If you choose to supply your own air to the Air Controller, the
       pressure must not exceed 50 PSI and must meet the ISO 8573-1: 7:4:0 air quality specification for oil and dryness.

        Heat Warning: To reduce the possibility of heat-related injuries or of overheating the Air Controller and Smart Com-
        pressor, do not place the Air Controller and Smart Compressor directly on your lap or obstruct any air vents. Use
        the Air Controller and Smart Compressor only on a hard, flat surface or with the included backpack accessory. Do
not allow another hard surface, or a soft surface, such as pillows or rugs or clothing, to block airflow. Also, do not allow the
AC adapter to contact the skin or a soft surface, such as pillows or rugs or clothing, during operation. The device and the AC
adapter comply with the user-accessible surface temperature limits defined by applicable safety standards.

        Ensure You Are Able to Safely Use the Product: Consult with your doctor before using the Product if you have
        pre-existing serious medical conditions (such as a heart ailment), conditions that affect your ability to safely perform
        physical activities, psychiatric conditions (such as anxiety disorders or post-traumatic stress disorder), or if you are
pregnant or elderly. Do not use the Product if you are sick, fatigued, under the influence of intoxicants/drugs, or are not
feeling in general good health.

        Ensure the Area Around You is Safe for Use of the Product: While wearing a VR headset you cannot see the world
        around you. The image displayed in the headset will not match the real world. Always use the Product in a clear and
        safe area. Do not use near stairways, large windows, heat sources, or outdoors. Clear the Product use area of people,
furniture, and other things that may be obstacles or block you from freely moving around.

It is recommended that the Product be used only while under the supervision of another person who is ready to warn of
hazards that may arise while the Product is being used. Examples of hazards that could arise include, but are not limited to,
the tangling of a cable in a manner that presents a tripping hazard, pets entering the area where the Product is being used,
and the user walking too close to a wall or other hazard.

       Be Aware of the Tether and Connections: Keep in mind the location of the cables and connections running from
       the Air Controller and headset so that you don’t trip over or pull on them while moving around the Product use area.
       Move your feet slowly and carefully to avoid tripping. Be sure to maintain a solid footing. Tripping over the cable or
contacting obstacles could cause injury or damage.

       Tether Useage: The tether is only for connecting the Smart Compressor and Air Controller. Do not use the tether with
       any other source of compressed air. Do not permanently or temporarily affix the tether yo any part of your building
       or route the tether through the wall, floor, or ceiling.

        Radio Frequency Interference: The Product emits radio waves that can interfere with the operation of nearby elec-
        tronic devices. If you have a cardiac pacemaker or other implanted medical device, do not use the Product until you
        have consulted with your doctor or the manufacturer of your medical device. To minimize radio frequency interfer-
ence, use only original manufacturer-approved accessories, or accessories that do not contain any metal. Use of non-origi-
nal manufacturer-approved accessories may violate your local radio frequency exposure guidelines and should be avoided.

Always follow instructions in the User Manual. Improper use could result in serious injury or death.

DK2 User Manual - © HaptX Inc. 2022                                                                            Page 3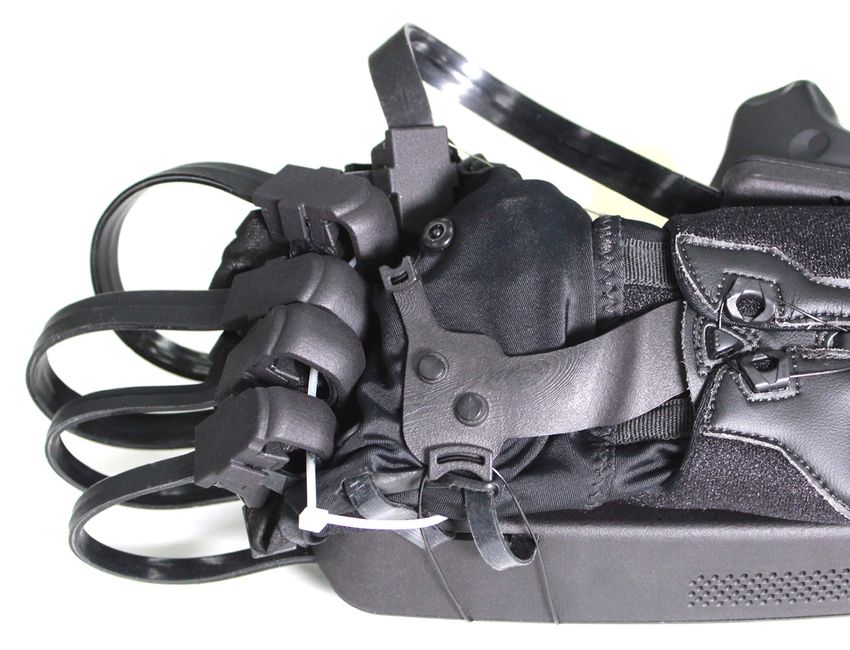
1 Avis de sécurité
        Mise en garde de haute tension : Le régulateur d’air et le compresseur intelligent contiennent des composants
        électroniques sous haute tension. Assurez-vous de ne pas désassembler, exposer à des liquides ou utiliser une
        source d’alimentation autre que celle fournie avec votre Ensemble de développement des gants HaptX 2 (le « DK2 »
        ou le « Produit »).

       Mise en garde d’air comprimé : Le régulateur d’air et le compresseur intelligent contiennent de l’air comprimé. Veillez
       à ne pas les désassembler. Prenez les précautions nécessaires lors de la connexion et de la déconnexion du cordon.
       Si vous choisissez d’alimenter le régulateur d’air avec votre propre air, la pression ne doit pas dépasser 50 PSI et doit
       satisfaire la spécification ISO 8573-1 : 7:4:0 concernant l’huile et l’assèchement.

         Mise en garde de chaleur : Pour réduire la possibilité de blessures provoquées par la chaleur ou de surchauffe
         du régulateur d’air et du compresseur intelligent, ne placez pas le régulateur d’air et le compresseur intelligent
         directement sur les cuisses et ne bloquez pas les fentes d’aération. Utilisez le régulateur d’air et le compresseur
intelligent sur une surface plane et dure ou avec l’accessoire de sac à dos inclus. Assurez-vous qu’aucune surface dure ou
souple, comme un oreiller, un tapis ou un vêtement, ne bloque pas la circulation d’air. Ne laissez pas l’adaptateur c.a. entrer
en contact avec la peau ou une surface souple, comme un oreiller, un tapis ou un vêtement, durant le fonctionnement.
L’appareil et l’adaptateur c.a. sont conformes aux limites de température de surfaces accessibles à l’utilisateur définies par
les normes de sécurité applicables.

         Assurez-vous d’être en mesure d’utiliser en toute sécurité le produit : Consultez un médecin avant d’utiliser le
         produit si vous souffrez d’une condition médicale préexistante (comme une maladie cardiaque), une condition qui
         affecte votre capacité à effectuer des activités physiques en toute sécurité, une condition psychiatrique (comme un
trouble anxieux ou un trouble de stress post-traumatique), ou si vous êtes enceintes ou que vous êtes une personne âgée.
N’utilisez pas ce produit si vous êtes malade, fatigué(e), sous l’influence de substances intoxicantes/drogues ou que vous
pensez ne pas être en bonne santé.

       Assurez-vous que la zone autour de vous est sûre pour utiliser le produit : Lorsque vous portez un casque de RV,
       vous ne pouvez pas voir l’environnement autour de vous. Les images apparaissant dans le casque ne correspondront
       pas au monde réel. Utilisez toujours le produit dans une zone propre et sûre. Ne l’utilisez pas à proximité d’un escalier,
d’une grande fenêtre, de sources de chaleur ou à l’extérieur. Assurez-vous qu’il ne se trouve personne et qu’aucun objet ne
puisse devenir un obstacle ou vous empêcher de vous déplacer librement dans la zone où vous utiliserez le Produit.

Il est recommandé que le Produit soit utilisé uniquement sous la supervision d’une autre personne qui est prête à vous
indiquer la présence de risques durant l’utilisation du Produit. Des exemples de risques pouvant survenir incluent, sans
pour autant s’y limiter, les câbles pendant qui peuvent présenter un risque de trébuchement, des animaux de compagnie
qui entre dans la zone où le Produit est utilisé et l’utilisateur qui marche trop près d’un mur ou d’une autre source de risque.

       Faites attention aux connexions et aux raccords : Gardez à l’esprit l’emplacement des câbles et des connexions
       partant du régulateur d’air et du casque afin de ne pas trébucher sur ceux-ci ou de ne pas tirer ces derniers lorsque
       vous vous déplacez dans la zone d’utilisation du Produit. Déplacez vos pieds lentement et avec précaution pour éviter
de trébucher. Assurez-vous de garder une position équilibrée. Trébucher sur le câble ou entrer en contact avec des obstacles
peut entraîner des blessures ou des dommages.

       Utilisation de la connexion : La connexion à pour but de relier le compresseur intelligent et le régulateur d’air.
       N’utilisez pas la connexion avec une autre source d’air comprimé. Ne fixez pas de façon permanente ou temporaire la
       connexion à une partie de votre édifice ou n’acheminez pas la connexion à travers un mur, un plancher ou un plafond.

         Interférence des fréquence radio : Le Produit émet des ondes radio qui peuvent interférer avec le fonctionnement
         d’appareils électroniques à proximité. Si vous avez un stimulateur cardiaque ou un dispositif médical implanté,
         n’utilisez pas le Produit sans avoir consulté votre médecin ou le fabricant de votre dispositif médical. Pour minimiser
l’interférence causée par les fréquences radio, utilisez les accessoires originaux approuvés par le fabricant ou des accessoires
qui ne contiennent pas de métal. L’utilisation d’accessoires non originaux et non approuvés par le fabricant peut enfreindre
vos directives locales d’exposition aux fréquences radio et doit être évitée.

Suivez toujours les instructions du Guide de l’utilisateur. Une utilisation inapropriée peut entraîner des
blessures graves ou la mort.
DK2 User Manual - © HaptX Inc. 2022                                                                             Page 4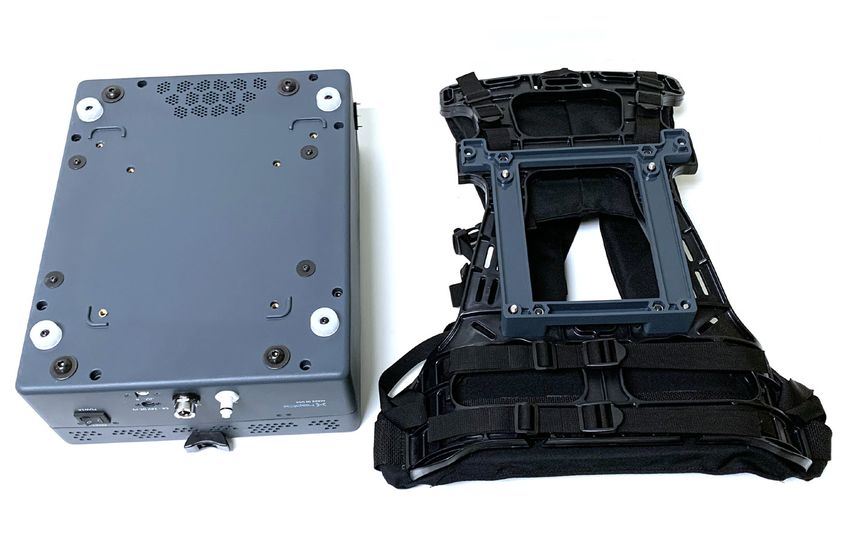
2 Case content
                           Case 1: Gloves and Air Controller

                                            1
            2

                                                                       4

                                                                                        3

                                                                               5

      1.	 Air Controller                        5.	 Glove Gasket, Gasket Wrench, and Back-
      2.	 HaptX Gloves                              pack Hex Key.
      3.	 Ruler                                 6.	 Setup Instructions (not pictured)
      4.	 Air Controller Power Supply           7.	 Hygiene Gloves (not pictured)

  Case 3: Backpack Accessories                    Case 2: Smart Compressor

                                                         10

                  8

                                        9

     8.  Backpack Accessory                     10. Smart Compressor
     9. Tether                                  11. Smart Compressor Power Supply
                                                    (not pictured)
                                                12. Hygiene Gloves (not pictured)

DK2 User Manual - © HaptX Inc. 2022                                                Page 5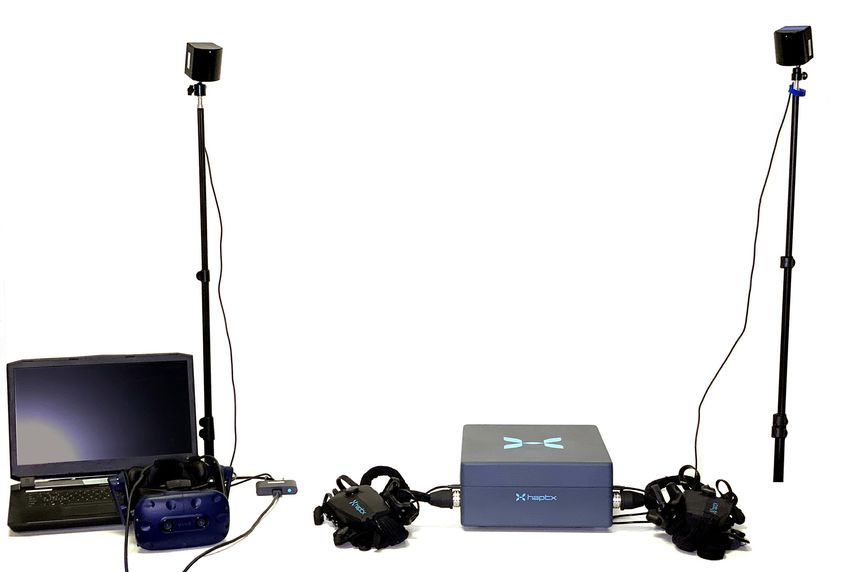
3 PC Requirements

To use the HaptX Gloves DK2, your computer must meet the following system requirements:

                        Recommend system                        Minimum system
   Component            requirements                            requirements
                        Intel or AMD 3.5 GHz quad core          Intel Core i5-4590/AMD FX 8350
   Processor
                        processor or better                     equivalent or better
                        Graphics card:                          Graphics card:
   GPU                  NVIDIA GeForce™ 1070,                   NVIDIA GeForce™ GTX 970,
                        AMD Radeon™ RX 480 or better            AMD Radeon™ R9 290 or better

   Memory               16 GB RAM or more                       8 GB RAM or more

   Video output                          DisplayPort 1.2 or newer (if using Vive Pro)

   USB port                      1x USB 2.0 or newer (if using Vive Pro) 1x USB 3.0 or newer

   Operating System                                 Windows 10 (64 bit)

DK2 User Manual - © HaptX Inc. 2022                                                        Page 6
4 Quick Start
4.1 Select Stationary or Room Scale Configuration and set up Vive
The HaptX Gloves DK2 can be used in a stationary configuration for seated and standing-only VR ex-
periences, or in a mobile configuration for room scale VR Experiences using the Backpack Accessory.
Before you start, decide which configuration you would like to use. Please follow the Vive guidelines for
setting up a room scale Product use area.
If you are using the HaptX Gloves DK2 for standing-only use, we recommend using a table that is shorter
than the user’s waist. The following figure shows the usable workspace in the stationary configuration.

DK2 User Manual - © HaptX Inc. 2022                                                        Page 7
4.2 HaptX Gloves DK2 Overview

The Smart Compressor supplies pressurized air to the HaptX Gloves DK2. Place the Smart Compressor
on the ground at the edge of the room scale VR experience area or near the table used for the station-
ary configuration. The Air Controller regulates the pressurized air supplied to the HaptX Gloves DK2. To
prevent overheating, do not obstruct any of the vents or place in a confined space with limited air
circulation

             Room Scale configuration                          Stationary Configuration

DK2 User Manual - © HaptX Inc. 2022                                                       Page 8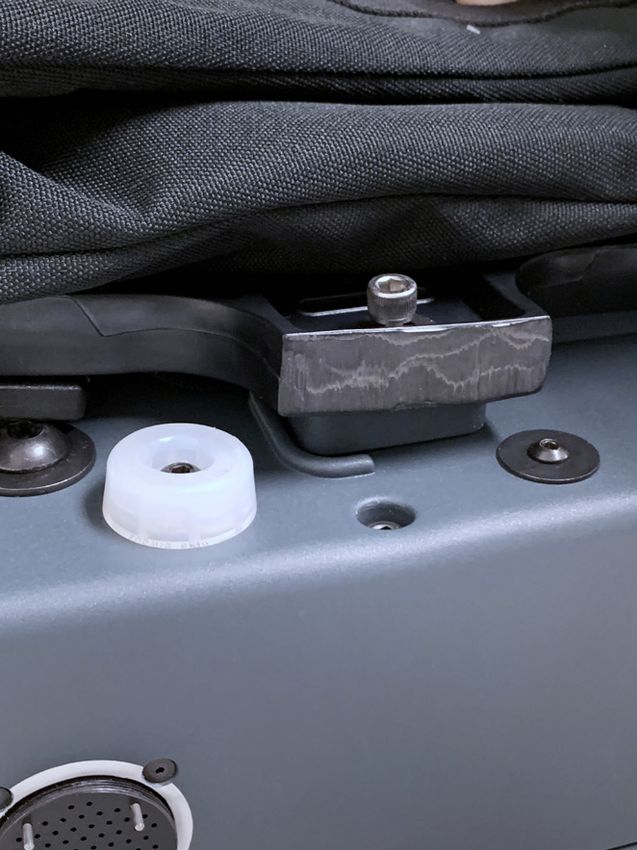
4.3 Attach Gloves to Air Controller
If using in the stationary configuration, attach the right Glove to the teal port and the left Glove to the
white port. If using the DK2 in the room scale configuration, attach the left Glove to the teal port and
the right Glove to the white port. (See page 8)

                              1                                  2                                 3

                              4                                  5                                  6

   1.   Inspect the Glove gasket for missing o-rings. The o-rings are critical for proper glove func-
        tionality. Note: Holes that are used for alignment pins should be empty (4 locations for 3
        pins along the outside ring)
   2. Install the Glove gasket by aligning pins to the holes.
   3. Line up the pins to the Glove tether and attach it to the Air Controller
   4. Tighten the Glove onto the Air Controller by hand
   5. Then tighten an additional quarter turn with the Connector Wrench
   6. Attach the USB cable
DK2 User Manual - © HaptX Inc. 2022                                                            Page 9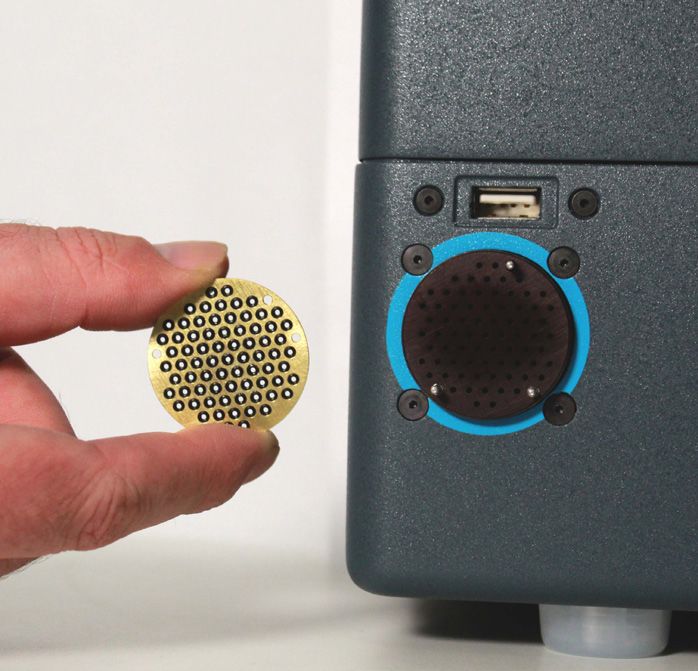
Note: The gloves come secured with a (white)
zip-tie through the fingertips. Cut this ziptie to
remove. Be carefull not to cut any other cables.
4.4 Attach Backpack Accessory (if Room Scale Configuration)
1 2 3
1. Flip the Air Controller upside down.
2. Place the Backpack Accessory on top of the Air Controller and thread the 6 screws on
the backpack frame by hand into the Air Controller.
3. Tighten the six screws a quarter-turn past hand-tight with the supplied 3/16” hex driver.
4. Handle the Air Controller with care when in the room scale configuration. Gently set the
system down when doffing the backpack. Do not step or trip on the tether when in VR.
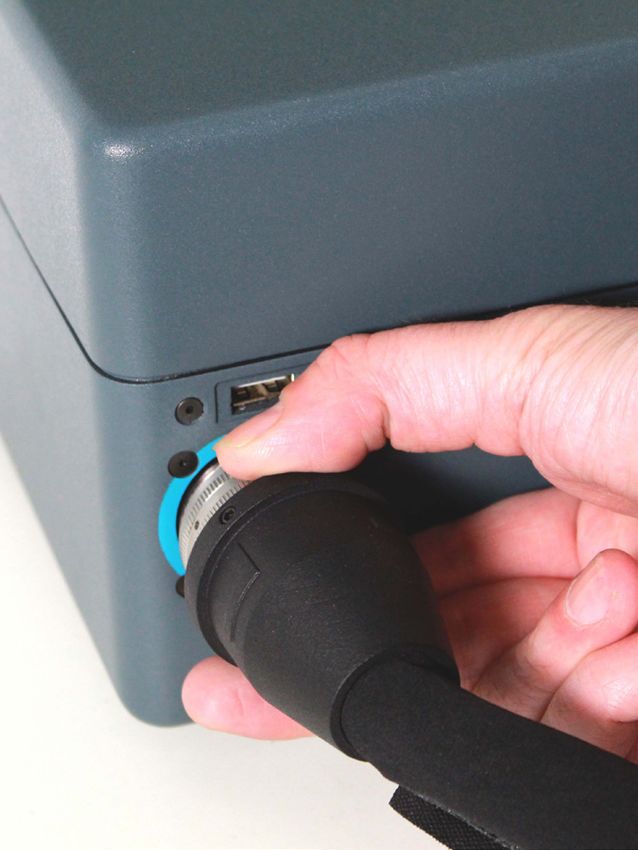
DK2 User Manual - © HaptX Inc. 2022 Page 104.5 Attach Air Controller to Smart Compressor
Connect the Smart Compressor to the Air Controller using the supplied connector.
1. The USB port in the connector attaches the Air Controller to your PC.
2. Connect the air inlet and exhaust lines to the Smart Compressor and Air Controller. Simply
insert the connector and stop when it locks into place and you hear a click. If the connector does
not easily connect, press the release button to reset latch. To remove, press the release button
on the side of the connector.
3. Plug in the 24-volt power adapters to the Air Controller and Smart Compressor.
3
2 3 3
2
1
4.6 Power on the Smart Compressor and Air Controller
1. On the back of the Air Controller, toggle the power switch on
2. On the top of the Smart Compressor, toggle the power switch on
3. Wait a few seconds until the LEDs alternate flashing green and yellow, indicating the Smart
Compressor is in standby mode. Firmly press the black button to begin the startup sequence
4. The compressor and fans will start up and the green LED will flash while the compressor
warms up
5. After 2.5 minutes, the green LED will turn solid, indicating the system is ready to be used
DK2 User Manual - © HaptX Inc. 2022 Page 114.7 VR Headset Setup The DK2 requires on SteamVR Base Station 2.0 for tracking and supports compatible headsets such at the HTC Vive Pro 2 and the Valve Index. At least 2 Base Stations are recommended for stationary configurations and 4 Base Stations for room scale configurations. Visit the headset manufacturer’s website for instructions to setup the headset you are using.. 4.8 Software Setup 1. Download and install the latest version of the HaptX SDK, by logging into the HaptX support portal, using the credentials provided by HaptX Support support.haptx.com/docs/sdk/index.html 2. Create a user hand profile by opening the User Profile Utility and following the on-screen in- structions. This tells the HaptX Gloves about your user hand size, skin tone, and preferred avatar so that your hand is accurately represented in VR. support.haptx.com/docs/sdk/page_user_pro- file_utility.html 3. Start the Airship demo http://support.haptx.com/docs/sdk/page_airship_demo_overview.html DK2 User Manual - © HaptX Inc. 2022 Page 12
1                              2                                  3

                                      4                       5

    4.9 How To Don a HaptX Glove:
    1. Don a hygiene glove
    2. Pull on the HaptX Glove using the pull tab on the wrist and the back of hand casing
    3. Seat each fingertip on your fingers by pulling down on the Glove fabric
    4. Tighten the back of hand dial lacer
    5. Tighten the wrist dial lacer

DK2 User Manual - © HaptX Inc. 2022                                                     Page 13
4.10 Doffing the HaptX Glove
Release both lacers by spinning counterclockwise. When you hear a click the lacer is released.
You may need to pull the wrist cuff outward to loosen the wrist lacer. Alternate pulling on the
fingers and back of hand casing to doff the Glove.
Warning: do not pull only on the fingertips, you may damage the Gloves.
5 Shutdown process
When you are done using HaptX Gloves DK2 or are looking to move the system to a new location:
1. On the back of the Air Controller, toggle the power switch off.
2. On the top of the Smart Compressor, firmly press the Run/Stop button. The compressor will au-
tomatically run a 30 seconds purge cycle to remove water from the moisture separator. Once you
hear the compressor stop, toggle the power switch to off.
3. The system is now off. If you are packing the system, you can disconnect everything and follow
the diagrams on the supplies boxes. Use the Glove wrench to remove the Gloves from the Air Con-
troller and do not forget to store the Glove gaskets in their case.
DK2 User Manual - © HaptX Inc. 2022 Page 146 Troubleshooting
and Common Error Codes
The Air Controller has a status light which indicates system state:
Color Code Description
BLACK Off: The Air Controller is powered down.
Initialization: The Air Controller is powered on and initializing drivers and un-
RED
derlying hardware.
WHITE POST: The Air Controller is performing power-on self-test (POST) to verify that
(flashing) hardware is fully functional.
Idle: The Air Controller is in low-power state. Any startup issues have been re-
YELLOW ported as power-on self-test (POST) codes. No errors which prevent function-
ing have been found, and the Air Controller is ready for connection to the SDK.
Active: The Air Controller is nominally operative and connected to the SDK.
GREEN Any tactile sensation requested from the SDK should be rendered to the
Gloves.
Error: The Air Controller has encountered an error which prevents operation.
MAGENTA
The nature of the error should be viewable in output logs via the SDK.
BLUE Low Inlet Pressure: During a demo the supply pressure has dropped too low.
The Smart Compressor has two status LEDs that indicate system state:
Green Yellow LED Indicated state
LED
Power is OFF
flashing flashing Power is ON, Smart Compressor system is OFF
flashing Start-up sequence (lasts two minutes)
Normal operation
Hard Fault (compressor system shuts down)
flashing Soft Fault (compressor system continues to run)
DK2 User Manual - © HaptX Inc. 2022 Page 157 Still need help?
Web: support.haptx.com
Phone: 855-427-8943
Email: haptx.support@advancedinput.com
8 Product Maintenance
To protect your health, you should clean the HaptX Gloves and your HMD before a new user dons them.
Follow the manufacturer’s guidelines for cleaning an HMD. To clean the HaptX Gloves:
1. Wipe down the exterior plastic surfaces with an ethyl alcohol-based wipe.
NOTE: Using isopropyl alcohol will cause discoloraton and cracking over time
2. Spray the exterior and interior with a fabric disinfectant, such as Oster Disinfectant Spray.
3. Only use the provided hygiene gloves once. These hygiene gloves shrink when washed, so if
you wash and reuse them, they will not fit larger hands properly.
The Smart Compressor and Air Controller require no regular maintenance.
Contact HaptX Support if either is not functioning as expected.
9 Disclaimer
This DK2 User Manual is not intended to form or modify any contract between HaptX or the provid-
er of the Product and you applicable to your use of the Product (the “Agreement”). The use of this
DK2 User Manual may be subject to such Agreement. IN NO EVENT SHALL HAPTX, ITS EMPLOY-
EES, CONTRACTORS, AGENTS OR SUPPLIERS BE LIABLE FOR ANY INDIRECT, CONSEQUENTIAL,
OR INCIDENTAL DAMAGES (INCLUDING DAMAGES FOR LOSS OF BUSINESS PROFITS, BUSINESS
INTERRUPTION, LOSS OF BUSINESS INFORMATION, AND THE LIKE) ARISING OUT OF THE USE OF
OR INABILITY TO USE THESE MATERIALS. Any third-party links provided herein are provided for con-
venience only.
DK2 User Manual - © HaptX Inc. 2022 Page 16DK2 User Manual - © HaptX Inc. 2021
Vous pouvez aussi lire