Kit système de communication Communication system kit - Système de communication Communication system
←
→
Transcription du contenu de la page
Si votre navigateur ne rend pas la page correctement, lisez s'il vous plaît le contenu de la page ci-dessous
Système de communication
      Communication system

Kit système de communication
  Communication system kit

                 Manuel d’installation et
            FR   d’utilisation
                 ST-DUO2

                 Installation and user manual
            EN
                 ST-DUO2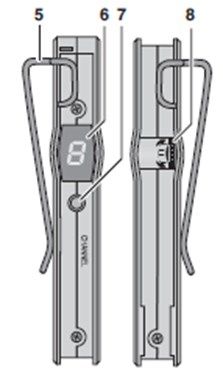
ST-DUO2 | Manuel d’installation et d’utilisation | Installation and user manual | 2

ST-DUO2 | Manuel d’installation et d’utilisation | Installation and user manual | 3
Table des matières
Table des matières.................................................................................................. 3
Manuel FR ............................................................................................................ 5
1. Introduction ......................................................................................................... 6
1.1 But .................................................................................................................... 6
1.2 Public visé ........................................................................................................ 6
1.3 Alerte ............................................................................................................... 6
1.4 Icônes ............................................................................................................... 6
1.4.1 Icônes et notes............................................................................................... 6
1.4.2 Icônes d’attention, d’avertissement et de danger ........................................ 6
2. Description .......................................................................................................... 7
2.1 La gamme......................................................................................................... 7
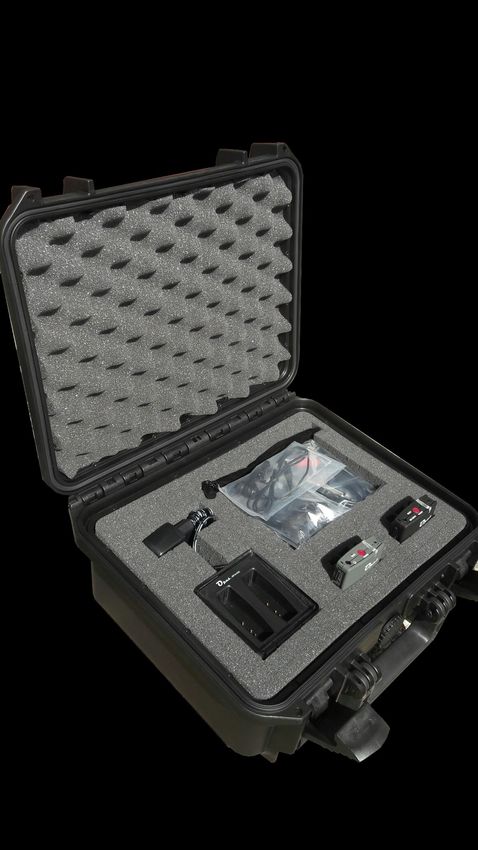
2.2 Le contenu ....................................................................................................... 7
2.3 ST-DUO2........................................................................................................... 7
2.4 Sécurité ............................................................................................................ 8
2.5 Conformité et autorisation .............................................................................. 8
3. Alimentation ....................................................................................................... 9
4. Installation ........................................................................................................ 10
4.1 Relier le microphone à l’émetteur ................................................................. 10
4.2 Relier l’écouteur au récepteur ....................................................................... 10
4.3 Positionnement de l’appareil sur le corps .................................................... 10
5. Fonctionnement ............................................................................................... 11
6. Utilisation .......................................................................................................... 12
6.1 Réunion .......................................................................................................... 12
6.2 Conversation ................................................................................................... 12
6.3 Evénements ..................................................................................................... 12
6.4 Connecté à la télévision .................................................................................. 12
6.5 En déplacement .............................................................................................. 12
7. Spécification ...................................................................................................... 13
ST-DUO2 | Manuel d’installation et d’utilisation | Installation and user manual |                                                        4

                                                           Table des matières

       Manual EN .......................................................................................................... 15
       1. Introduction ....................................................................................................... 16
       1.1 Purpose .......................................................................................................... 16
       1.2 Targeted audience ......................................................................................... 16
       1.3 Alert ............................................................................................................... 16
       1.4 Icons ............................................................................................................... 16
       1.4.1 Icons et notes ............................................................................................... 16
       1.4.2 Attention, warning and danger incons ........................................................ 16
       1.5 Conversion tables .......................................................................................... 17
       2. Description ........................................................................................................ 18
       2.1 The range ....................................................................................................... 18
       2.2 Content .......................................................................................................... 18
       2.3 ST-DUO2......................................................................................................... 18
       2.4 Safety note ..................................................................................................... 18
       2.5 compliance and autorisation ......................................................................... 18
       3. Power supply ..................................................................................................... 19
       4. Installation ........................................................................................................ 20
       4.1 Connect the microphone to the transmitter ................................................. 20
       4.2 Connect the receiver to the receiver ............................................................. 20
       4.3 Positioning the device on the body ................................................................ 20
       5. Operation .......................................................................................................... 21
       6. Use ..................................................................................................................... 22
       6.1 Meeting ........................................................................................................... 22
       6.2 Conservation ................................................................................................... 22
       6.3 Events .............................................................................................................. 22
       6.4 Tv ..................................................................................................................... 22
       6.5 On the move.................................................................................................... 22
       7. specifications..................................................................................................... 23
Français
    Système de communication

Kit système de communication

                       Manuel d’installation et
                  FR   d’utilisation
                       ST-DUO2
ST-DUO2 | Manuel d’installation et d’utilisation | Installation and user manual | 6
1. Introduction 1.4 Icônes
1.1 But 1.4.1 Icônes et notes
Le manuel d’installation et d’utilisation fournit Les icônes utilisées avec les notes fournissent
les informations nécessaires pour installer, con- un complément d'informations sur la note. Voir
figurer et utiliser un kit ST-DUO2. les exemples suivants :
1.2 Public visé
Note:
Icone Générale des notes
Le manuel d’installation et d’utilisation est des-
tiné aux installateurs et aux utilisateurs du kit ST
-DUO2.
1.3 Alertes Note:
Symbole renvoyant à la source
d’information indiquée.
Ce manuel évoque quatre types d’alertes.
Le type d’alerte est lié étroitement à l’effet sus-
ceptible de se produire en cas de non-
observance de l’alerte. Ces alertes, classées
dans l’ordre croissant de gravité, sont les sui-
vantes :
1.4.2 Icônes d’attention, d’avertisse-
ment et de danger
Note
Information complémentaire. Généralement, la Les icônes utilisées en combinaison avec Atten-
nonobservance d’une alerte de type Remarque tion, Avertissement et Danger indiquent le type
n’entraîne pas de dommage matériel ou corpo- de risque présent. Voir les exemples suivants :
rel.
• Attention Attention, avertissement, danger:
La non-observance d’une alerte de type atten- Icône générale des avis de prudence, des
tion peut entraîner des dommages matériels. avertissements et des dangers.
• Avertissement
La non-observance d’une alerte de type
avertissement peut entraîner des dommages Attention, avertissement, danger:
matériels et corporels graves. Icône risque d’électrocution.
• Danger
La non-observance d’une alerte du type danger
peut entraîner la mort.
Attention, avertissement, danger:
Icône de risque de décharge électrosta-
tique.
ST-DUO2 | Manuel d’installation et d’utilisation | Installation and user manual | 7
2. Description 2.3 ST-DUO2
ST-DUO2 est un système de communication Combiné à un ou plusieurs récepteurs OP-10R,
sans fil pour les personnes souffrant de perte l'émetteur OP-10T forme un système sans fil
auditive. Il offre une qualité d’écoute haute fidé- mobile pour la transmission de paroles, par
lité. Ce dispositif de transmission audio permet exemple pour des visites guidées ou des dis-
d’offrir une communication claire et précise cours en plusieurs langues.
dans des environnements d’écoute compliqués Pour la transmission sans fil, 16 canaux dans la
comme dans un amphithéâtre, une salle de réu- plage de fréquences 863 – 865 MHz sont dispo-
nion ou autour d’un repas de famille. nibles, parmi lesquels 3 peuvent être utilisés
Le système est compatible avec les prothèses simultanément au plus sans se gêner récipro-
auditives et les implants cochléaires mais offre quement. La portée de transmission dépend de
également une solution qualitative pour les per- la configuration des lieux d'utilisation et peut
sonnes non appareillées. aller jusqu'à 60 m.
Le kit nomade permet d’être transporté facile-
ment.
2.4 Sécurité
2.1 La gamme L'appareil répond à toutes les directives néces-
saires de l'Union Européenne et porte donc le
Le kit ST-DUO2 fait partie de la gamme de sys- symbole .
tème UHF Opus 10. Opus 10 propose des solu- L'appareil n'est conçu que pour une utilisation
tions de sonorisation et d’accessibilité audio en intérieur. Protégez-le de l’humidité et de la
pour les Etablissements Recevant du Public. Il chaleur (température ambiante admissible 0 –
s’agit d’une gamme de systèmes combinés pour 40 °C).
créer des systèmes de sonorisation et d’accessi- Pour le nettoyage, utilisez un chiffon sec et
bilité audio publique s’adaptant à toutes les si- doux, en aucun cas de produits chimiques ou de
tuations. l'eau.
Nous déclinons toute responsabilité en cas de
La gamme Opus 10 comprends: dommages corporels ou matériels si l'appareil
Les émetteurs et récepteurs est utilisé dans un but autre que celui pour le-
Les accessoires. quel il a été conçu, sʼil nʼest pas correctement
utilisé. En outre, s’il est réparé par une personne
Le divers éléments sont pensés pour se complé- habilitée la garantie deviendrait caduque.
ter entre eux, grâce à des caractéristiques
acoustiques, technologiques ou mécaniques as-
surant leur compatibilité.
2.5 Conformité et autorisation
2.2 Le contenu Par la présente, OPUS TECHNOLOGIES déclare
que l'émetteur OP-10T se trouve en conformité
Contenu du paquet: avec les exigences fondamentales et les régle-
Un émetteur avec micro mentations inhérentes à la directive 1999 / 5 /
Un récepteur avec casque ou boucle tour de CE. La déclaration de conformité peut nous être
cou demandée.
Un lot d’adaptateurs (TV, ordinateur, ...etc) Le système est autorisé dans l'Union Euro-
Valise de transport péenne et les pays de lʼA.E.L.E et nécessite pas
de déclaration.
ST-DUO2 | Manuel d’installation et d’utilisation | Installation and user manual | 8
3. Alimentation
L'émetteur/récepteur est alimenté par un accu-
mulateur Lithium-ion. Avant la première utilisa-
tion, l'accumulateur doit être chargé complète-
ment. Pour le charger, les chargeurs suivants
sont disponibles :
Station de charge OP-10CH2 pour charger
les accus de deux appareils au plus simulta-
nément.
Coffret de transport OP-10CH18 pour char-
ger les accus de 18 appareils au plus simulta-
nément.
Coffret de transport sur roulettes OP-
10CH36 pour charger les accus de 36 appa-
reils au plus simultanément.
En cas de non utilisation prolongée, il convient
de le recharger tous les trois mois. Tout accumu-
lateur défectueux doit être remplacé par un
technicien, car l'appareil doit être ouvert. Un
accumulateur adapté de rechange de marque
OPUS Technologies est référencé OP-3.7VB.
Ne jetez pas les accumulateurs défectueux dans
la poubelle domestique, déposez-les
dans un container spécifique.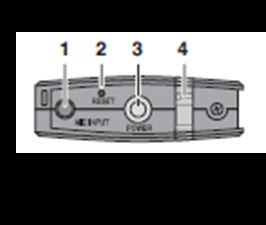
ST-DUO2 | Manuel d’installation et d’utilisation | Installation and user manual |   9

   4. Installation

   4.1 Relier le microphone à l’émetteur

   Si vous souhaitez utiliser le microphone oreil-
   lette à la place du microphone interne , reliez-le
   à la prise MIC INPUT (1).

   Le microphone interne est alors déconnecté. Si
   besoin, placez une bonnette anti-pop sur la cap-
   sule micro. Placez l'étrier de l'oreillette sur
   l'oreille gauche de telle sorte que le support de
   lobe appuie par l'arrière contre le lobe. Vous
   pouvez fixer le cordon micro au vêtement avec
   la pince.

   4.2 Relier l’écouteur au récepteur

   Pour capitonner l'écouteur, on peut le recouvrir
   avec la housse en mousse : mettez l'écouteur,
   face imprimée vers l'arrière, dans l'enveloppe
   non repérée, positionnez la housse autour de
   l'écouteur et mettez par-dessus la seconde en-
   veloppe. Le repère          représente le côté de
   sortie du son. Reliez l'écouteur à la prise    (1)
   et mettez-le sur le pavillon de l'oreille.

   Si le son doit être transmis à un appareil auditif,
   on peut relier la boucle à induction TR-iL
   (disponible en accessoire AUDIOFILS) à la place
   de l'écouteur. Elle se place autour du cou et
   transmet le son via un champ magnétique aux
   appareils auditifs avec la position T.

   4.3 Positionnement de l’appareil sur le
   corps

   L'émetteur/récepteur peut se fixer sur un vête-
   ment via son étrier (5) [par exemple à la cein-
   ture, sur une poche de pantalon] ou être porté
   autour du cou : tirez la boucle de fixation de la
   courroie via l'étrier ; en déplaçant le bouton sur
   la bandoulière, réglez la longueur voulue puis
   passez la bandoulière autour du cou. En déver-
   rouillant le système de fixation, (schéma
   gauche), vous pouvez retirez facilement l'appa-
   reil et le remplacer par un autre. Fig1

ST-DUO2 | Manuel d’installation et d’utilisation | Installation and user manual |                     10

 5. Fonctionnement                                     – la transmission est meilleure sur un autre ca-
                                                       nal.
 1) Pour allumer les appareils du système, ap-
                                                       – la distance entre l'émetteur et le récepteur est
 puyez sur la touche POWER (3). Le témoin de
                                                       trop grande.
 fonctionnement (4) brille en Vert. Sʼil brille en
                                                       – des obstacles se trouvent entre les appareils
 rouge, l'accumulateur est presque vide, il con-
                                                       pouvant perturber le signal radio.
 vient de le recharger le plus rapidement pos-
 sible.
                                                       On peut faire fonctionner en parallèle et sans
 Après chaque activation de touche, l'affichage
                                                       interférences 3 systèmes OP-10 au plus,
 (6) indique pendant 9 secondes environ le canal
                                                       émettant sur des canaux différents. En fonction-
 de transmission réglé puis l'indication disparaît.
                                                       nement parallèle de plusieurs systèmes, faites
 Par une brève pression sur une touche, on peut
                                                       attention à conserver une distance suffisante
 réactiver l'affichage pendant 9 secondes envi-
                                                       entre chacun des systèmes.
 ron.
                                                       5) Pour réinitialiser un appareil en cas de dys-
 2) Sélectionnez le canal de transmission parmi
                                                       fonctionnements, activez la touche RESET (2)
 les canaux disponibles à . L'émetteur et le récep-
                                                       avec un objet fin, par exemple une goupille mé-
 teur (les récepteurs) du système doivent être
                                                       tallique. L'appareil s'éteint et peut être remis en
 réglés sur le même canal. Pour régler le canal,
                                                       fonction.
 maintenez la touche CHANNEL (7) enfoncée jus-
 qu'à ce que, sur l'affichage, un point à côté de
                                                       6) Pour éteindre, maintenez la touche POWER
 l'indication de canal clignote. Ensuite appuyez
                                                       enfoncée, jusqu'à ce que le témoin de fonction-
 sur la touche CHANNEL jusqu'à ce que le canal
                                                       nement s'éteigne.
 voulu soit affiché. Le canal sélectionné est mé-
 morisé si 6 secondes environ après la dernière
                                                       Chargement des appareils:
 activation de la touche CHANNEL, le point sur
 l'affichage disparaît.
                                                       1) Reliez le bloc secteur à la prise sur la face ar-
                                                       rière de la station de charge et à une prise 230
 3) Sur l'émetteur, parlez dans le microphone in-
                                                       V~/50 Hz. La station est alors allumée. Tant
 terne (9) ou dans le micro oreillette relié. Avec
                                                       qu‘un compartiment de charge est vide, son té-
 le réglage (8), vous pouvez régler le volume sur
                                                       moin de fonctionnement clignote.
 l'émetteur pour le signal audio émis et sur le
                                                       2) Placez l’émetteur / le récepteur dans un com-
 récepteur vous pouvez régler le volume de resti-
                                                       partiment de charge, contacts de charge orien-
 tution.
                                                       tés vers le bas. Lorsque vous le positionnez, veil-
                                                       lez à enfoncer complètement l’appareil dans le
 Attention : Ne réglez jamais le volume de ma-
                                                       compartiment pour qu’il soit bien fixe. Pendant
 nière très élevée. Un volume trop élevé peut, à
                                                       la charge, le témoin de fonctionnement du com-
 long terme, générer des troubles de l'audition !
                                                       partiment de charge brille en continu.
 4) Si la réception est mauvaise ou perturbée,
 vérifiez si :
ST-DUO2 | Manuel d’installation et d’utilisation | Installation and user manual | 11
3) Lorsque l’accumulateur est totalement char-
gé, le témoin de charge correspondant s’éteint.
L’appareil peut alors être retiré du comparti-
ment de charge.
4) Après la charge, débranchez le bloc secteur
pour éviter toute consommation inutile de cou-
rant.
Note:
Si un témoin de charge clignote
pendant la charge, la station de
charge effectue un auto-test pour
protéger l’accumulateurST-DUO2 | Manuel d’installation et d’utilisation | Installation and user manual | 12
6. Utilisation
6.5 En déplacement
Tenez l’émetteur OP-10T côté micro et tendez le
Le ST-DUO2 peut être utilisé de différentes fa- à votre interlocuteur afin de capter sa voix
çon que nous allons énoncé ci-après : (exemple : communiquer avec un vendeur de
magasin).
6.1 Réunion
Pour une conversation autour d’une table placez
l’émetteur OP-10T au centre du plateau. Le mi-
cro intégré permettra de faire capter les voix des
personnes placé à 1 m du boitier. Pour une meil-
leure captation il est possible d’utiliser un micro
filaire à poser sur la table (option).
6.2 Conversation (exemple : restaurant)
Placer l’émetteur OP-10T autour du cou ou à la
ceinture de votre interlocuteur et brancher le
micro cravate fournit dans le kit sur le OP-10T.
6.3 Evénement (cours, conférence, etc)
Placez l’émetteur OP-10T à proximité du ou des
orateurs (exemple sur le bureau du professeur)
ou donnez l’émetteur OP-10T avec un micro cra-
vate afin que la personne se l’installe au début
de l’évènement.
Note:
Il est possible d’utiliser plusieurs
récepteurs OP-10R avec un émetteur
OP-10T.
6.4 Connecté à la télévision
Grâce au cordon fournit dans le pack, connectez
le OP-10T sur la sortie audio de votre télévision.
Pour une meilleure qualité d’écoute, utilisez un
convertisseur TO-Slink qui vous permettra d’être
connecté sur la sortie numérique de votre télé-
viseur. Dans de nombreux cas elle permettra
également de ne pas couper le son des haut-
parleurs.ST-DUO2 | Manuel d’installation et d’utilisation | Installation and user manual | 13
6. Spécifications
Plage de fréquence
Radio 863-865 MHZ
Bande passante audio 40-18 KHz
Puissance d’émission < 10mW
Micro émetteur interne Micro électret
(cardioïde)
Accessoires
Emetteur Micro électret oreillette (omnidirectionnel)
avec pince câble et 2 bonnettes anti-pop, tour
de cou
Récepteur Ecouteur mono dynamique avec capitonnage,
tour de cou
Alimentation Accu Lithium-ion, 3.7 V/1300 mAh
Dimensions, 54 x 99 x 17 mm, 80g
poidsST-DUO2 | Manuel d’installation et d’utilisation | Installation and user manual | 14
English
                                                    English
    Communication system

Communication system set

                     Installation and user manual
                EN   ST-DUO2
ST-DUO2 | Manuel d’installation et d’utilisation | Installation and user manual | 16
1. Introduction
1.4 Icons
1.1 Purpose
1.4.1 Icons and notes
The Installation and Operation Manual Icons used with notes provide additional infor-
provides the necessary information for mation about it. See the following examples:
installing, configuring and using an ST-
DUO2.
Note:
1.2 Targeted audience General icon of notes
The Installation and Operation Manual is in-
tended for installers and users of the ST-DUO
Kit. Note:
Symbol referring to the source
1.3 Alerts indicated information.
This manual discusses four types of alerts.
The type of alert is closely related to the effect
that may occur if the alert is not observed.
1.4.2 Attention, warning and danger
These alerts, ranked in ascending order of seve-
rity, are the following: icons
• Note The icons used in combination with Attention,
Additional information. Generally, the non- Warning and Danger indicate the type of risk
observance of a Note type alert does not result present. See the following examples:
in any material or bodily injury.
• Attention Attention, warning, danger:
Failure to observe a caution alert may result in the general icon of precautionary state-
property damage. ments,
• Warning
Non-compliance with a type alert Warning may
result in serious personal injury and property
damage. Attention, warning, danger:
Electrocution risk icon.
• Danger
Failure to observe a danger alert may result in
death.
Attention, warning, danger:
Electrostatic discharge risk icon.ST-DUO2 | Manuel d’installation et d’utilisation | Installation and user manual | 17
1.5 Conversion tables
In this manual, SI units are used to express leng-
ths, masses, temperatures etc.
These can be converted to non-metric units
using the following information.
Table 1: lenght units conversion
25,40 mm = 25,4 mm 1 mm = 1,00000
25,40 mm = 2,54 cm 1 cm = 0,3937 po
30,48 cm = 0,3048 m 1 m = 3,281 pd
1 ml = 1,609 km 1 km = 0,622 ml
Table 2: Mass units conversion
1 lb = 0,4536 kg 1 kg = 2,2046 lb
Table 3: Pressure units conversion
1 psi = 68,95 hPa 1 hPa = 0,0145 psi
Note:
1 hPa = 1 mbar
Table 4: temperature units conversion
° F = 9 /5. ( ° C + 32 ° C = 5 /9. ( ° F 32)ST-DUO2 | Manuel d’installation et d’utilisation | Installation and user manual | 18
2. Description 2.3 ST-DUO2
ST-DUO2 is a wireless communication system Combined with one or more OP-10R receivers,
for people with hearing loss. It offers a high fi- the OP-10T transmitter forms a mobile wireless
delity listening quality. This audio transmission system for speech transmission, as for example
device provides clear and precise communica- guided tours or speeches in multiple languages.
tion in complicated listening environments such For wireless transmission, 16 channels in the
as an amphitheater, meeting room or around a frequency range 863 - 865 MHz are available, of
family meal. which 3 can be used simultaneously at most wi-
The system is compatible with hearing aids and thout interfering with each other. The range of
cochlear implants but also offers a qualitative transmission depends on the configuration of
solution for people who are not paired. the places of use and can be up to 60 m.
The nomad kit can be transported easily.
2.4 Security
2.1 The range
The device meets all the necessary directives of
The ST-DUO2 kit is part of the Opus 10 UHF sys- the European Union and therefore bears the
tem range. Opus 10 offers audio accessibility symbol.
solutions for public-facing establishments. It is a The device is intended for indoor use only. Pro-
range of combined systems to create sound sys- tect it from moisture and heat (admissible am-
tems and public audio accessibility adapting to bient temperature 0 - 40 ° C).
all situations. For cleaning, use a dry, soft cloth, under no cir-
cumstances chemicals or water.
The Opus 10 range includes: We do not accept any liability for personal injury
Transmitters and receivers or property damage if the device is used for a
Accesories. purpose other than that for which it was de-
signed, if it is not used properly. In addition, if
The various elements are thought to comple- repaired by an authorized person, the warranty
ment each other, thanks to acoustic, technologi- will lapse.
cal or mechanical characteristics ensuring their
compatibility.
2.5 Compliance and autorisation
2.2 content OPUS TECHNOLOGIES hereby declares that the
OP-10T transmitter is in compliance with the
Package content: basic requirements and regulations of Directive
A transmitter with microphone 1999/5 / EC. The declaration of conformity may
A receiver with a helmet or a neck buckle be requested.
Adapters (TV, computers, …) The system is authorized in the European Union
Transport suitcase and the countries of the EA and requires no
declaration.ST-DUO2 | Manuel d’installation et d’utilisation | Installation and user manual | 19
3. Power supply
The transmitter / receiver is powered by a Li-
thium-ion battery. Before first use, the battery
must be fully charged. To load it, the following
chargers are available:
OP-10CH2 charging station for charging
batteries of up to two devices simultaneou-
sly.
OP-10CH18 transport case to charge the re-
chargeable batteries of up to 18 devices si-
multaneously.
Transport case on wheels OP-10CH36 to
charge batteries of up to 36 devices simulta-
neously.
In case of prolonged non-use, it should be re-
charged every three months. Any defective
battery must be replaced by a technician as the
device must be open. A suitable spare battery of
the OPUS Technologies brand is referenced OP-
3.7VB.
Do not dispose of defective accumula-
tors in the household trash, put them
in a specific container.ST-DUO2 | Manuel d’installation et d’utilisation | Installation and user manual | 20
4. Installation
4.1 Connecting the microphone to the
transmitter
If you want to use the headset microphone ins-
tead of the internal microphone, connect it to
the MIC INPUT jack (1).
The internal microphone is then disconnected.
If necessary, place an anti-pop windshield on
the microphone capsule. Place the earplug stir-
rup on the left ear so that the lobe support
leans back against the lobe. You can attach the
micro cord to clothes with the clip.
4.2 Connecting the receiver to the recei-
ver
To pad the earphone, it can be covered with the
foam cover: put the earphone, printed face
back, Position the cover around the earpiece
and put over the second envelope. The
mark represents the output side of the
sound. Connect the earphone to the jack (1)
and put it on the flag of the ear.
If the sound is to be transmitted to a hearing
aid, the TR-iL induction loop (available as an
Opus Technologies accessory) can be connected
at place of the earpiece. It is placed around the
neck and transmits the sound via a magnetic
Microphone transmitter for
field to the hearing instruments with the T posi- transmitting audio
tion.
4.3 Positioning the device on the body
The transmitter / receiver can be attached to a
garment via its stirrup (5) [eg at the belt, on a
jean’s pocket] or worn around the neck: pull the
strap fastening loop via the stirrup; by moving
the button on the shoulder strap, set the desi-
red length then put the shoulder strap around
the neck. By unlocking the attachment system, Listening receiver
(left diagram), you can easily remove the device
and replace it with another one. Fig1ST-DUO2 | Manuel d’installation et d’utilisation | Installation and user manual | 21
5. Operation
Up to 3 OP-10 systems emitting on different
1) To turn on the system devices, press the PO-
channels can be operated in parallel and wi-
WER button (3). The operation indicator (4)
thout interference. In parallel operation of mul-
lights up in green. If it glows red, the battery is
tiple systems, be careful to maintain enought
almost empty, it should be recharged as quickly
distance between each system.
as possible.
After each key press, the display (6) indicates
5) To reset a device in case of malfunctions,
for approximately 9 seconds the transmission
press the RESET key (2) with a thin object, for
channel set, then the indication disappears. By
example a metal pin. The unit turns off and can
briefly pressing a button, the display can be
be turned back on.
reactivated for about 9 seconds.
6) To switch off, press and hold the POWER
2) Select the transmission channel among the
button until the operation light goes off.
channels available at. The transmitter and recei-
ver (receivers) of the system must be set to the
Loading devices:
same channel. To adjust the channel, press and
hold CHANNEL (7) until a dot on the display next
1) Connect the mains unit to the socket on the
to the channel indication flashes. Then press the
back of the charging station and to a 230 V ~ /
CHANNEL key until what the desired channel is
50 Hz socket. The station is then switched on. As
displayed. The selected channel is memorized if
long as a charging compartment is empty, its
approximately 6 seconds after the last CHANNEL
operation indicator flashes.
key is pressed, the dot on the display disap-
pears.
2) Place the transmitter / receiver in a charging
compartment, load contacts facing down. When
3) On the transmitter, talk to the internal micro-
positioning it, be sure to push the unit all the
phone (9) or the connected headset. With
way into the compartment so that it is secure.
setting (8), you can adjust the volume on the
During charging, the charge compartment ope-
transmitter for the audio signal output and on
ration indicator lights continuously.
the receiver you can adjust the playback vo-
lume.
3) When the battery is fully charged, the corres-
ponding charge lamp turns off. The device can
Caution: Never adjust the volume very high. Too
then be removed from the charging com-
much volume can cause long-term hearing pro-
partment.
blems!
4) After charging, unplug the power supply to
4) If reception is poor or disturbed, check if:
avoid unnecessary power consumption.
- the transmission is better on another channel.
- the distance between the transmitter and the
receiver is too large
Note:
- There are obstacles between the devices that
If a charge indicator flashes du-
can disrupt the radio signal.
ring charging, the charging station
performs a self-test to protect the
batteryST-DUO2 | Manuel d’installation et d’utilisation | Installation and user manual | 22
6. Use
6.5 On the move
The ST-DUO2 can be used in different ways as
Hold the OP-10T transmitter on the microphone
described below:
side and extend it to the other party to pick up
his voice (example: contact a store salesman).
6.1 Meeting
For a conversation around a table place the OP-
10T transmitter in the center of the board. The
integrated microphone will capture the voices
of people placed 1 m from the box. For better
sound capture it is possible to use a wired mi-
crophone putted on the table (option).
6.2 Conversation (example: restaurant)
Place the OP-10T transmitter around the other
person's neck or waistband and plug in the lapel
microphone provided in the kit on the OP-10T.
6.3 Event (course, lecture, etc)
Place the OP-10T transmitter near the speaker
or speakers (example on the teacher's desk) or
give the transmitter OP-10T with a lapel micro-
phone so that the person installs it at the begin-
ning of the event.
6.4 Connected to TV
Note:
It is possible to use multiple OP-
10R receivers with an OP-10T trans-
mitter.
Thanks to the cord provided in the pack, con-
nect the OP-10T to the audio output of your te-
levision. For better listening quality, use a TO-
Slink converter that will allow you to be con-
nected to the digital output of your TV. In many
cases it will also not cut the sound of the spea-
kers.ST-DUO2 | Manuel d’installation et d’utilisation | Installation and user manual | 23
6. Specifications
Frequency range
Radio 863-865 MHZ
Audio bandwidth 40-18 KHz
Transmission power < 10mW
Internal transmitter mi- Micro electret (cardioid)
crophone
Accessories
Transmitter Microphone electret headset
(omnidirectional) with cable clip and 2 anti-
pop cups, neck buckle
Receiver Dynamic mono headset with padding, nekc
buckle
Power supply Accu Lithium-ion, 3.7 V/1300 mAh
Dimensions, 54 x 99 x 17 mm, 80g
weightST-DUO2 | Manuel d’installation et d’utilisation | Installation and user manual | 24
ST-DUO2 | Manuel d’installation et d’utilisation | Installation and user manual | 25
ST-DUO2 | Manuel d’installation et d’utilisation | Installation and user manual | 26
ST-DUO2 | Manuel d’installation et d’utilisation | Installation and user manual |   27

 Notes:

 ___________________________________________________________________
 ___________________________________________________________________
 ___________________________________________________________________
 ___________________________________________________________________
 ___________________________________________________________________
 ___________________________________________________________________
 ___________________________________________________________________
 ___________________________________________________________________
 ___________________________________________________________________
 ___________________________________________________________________
 ___________________________________________________________________
 ___________________________________________________________________
 ___________________________________________________________________
 ___________________________________________________________________
 ___________________________________________________________________
 ___________________________________________________________________
 ___________________________________________________________________
 ___________________________________________________________________
 ___________________________________________________________________
 ___________________________________________________________________
 ___________________________________________________________________
 ___________________________________________________________________
 ___________________________________________________________________
 ___________________________________________________________________
 ___________________________________________________________________
 ___________________________________________________________________
 ___________________________________________________________________
 ___________________________________________________________________
 ___________________________________________________________________
 ___________________________________________________________________
 ___________________________________________________________________
 ___________________________________________________________________
 ___________________________________________________________________
 ___________________________________________________________________
 ___________________________________________________________________
 ___________________________________________________________________
 ___________________________________________________________________
 ___________________________________________________________________
 ___________________________________________________________________
Les informations de ce documents sont susceptibles d’être modifiées
Document information is subject to change

Date: 2017/11
| manuel d’installation et d’utilisation | installation and user manual | ST-DUO2

                          Pour toutes questions complémentaires, contacter nous.
                          For any questions, contact us.

OPUS TECHNOLOGIES ou AUDIOFILS — ZI LAGRANGE 2 — 9 chemin de la Vieille Ferme
Tel: 09.81.24.00.06. — Fax: 09.82.63.22.56. — contact@opus-technologies.fr
Vous pouvez aussi lire