Quick Start Guide - Coolblue
←
→
Transcription du contenu de la page
Si votre navigateur ne rend pas la page correctement, lisez s'il vous plaît le contenu de la page ci-dessous
Quick Start Guide

Joining us
twitter.com/archos
www.facebook.com/archos
Blog https://blog.archos.com/
http://faq.archos.com/
www.archos.com, click Support > After-sales support
www.archos.com, click Support > Downloads > Declaration of conformity
As we are often updating and improving our products, your device’s software may have
a slightly different appearance or modified functionality than presented in this quick start
guide.
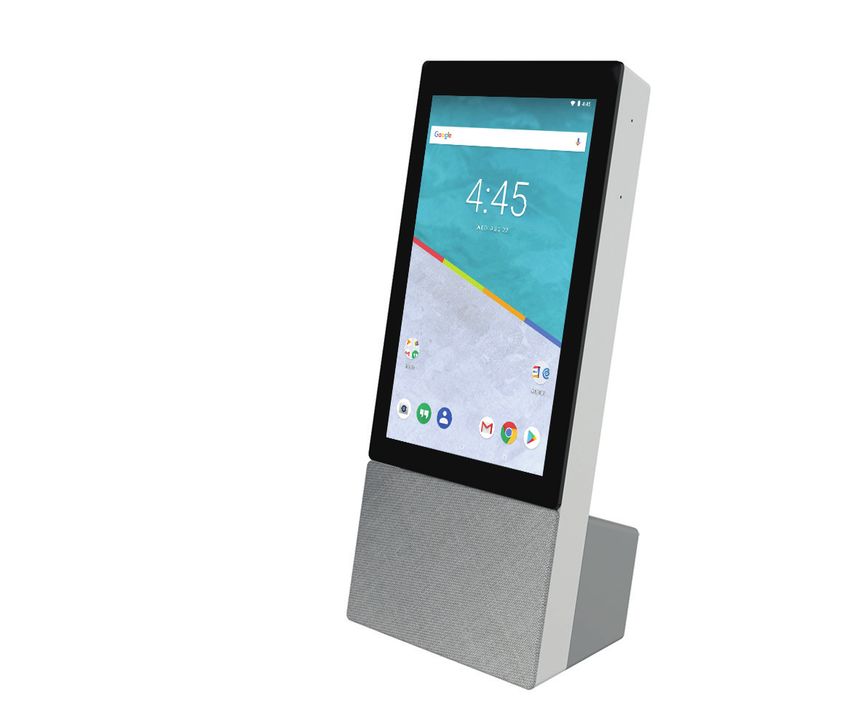
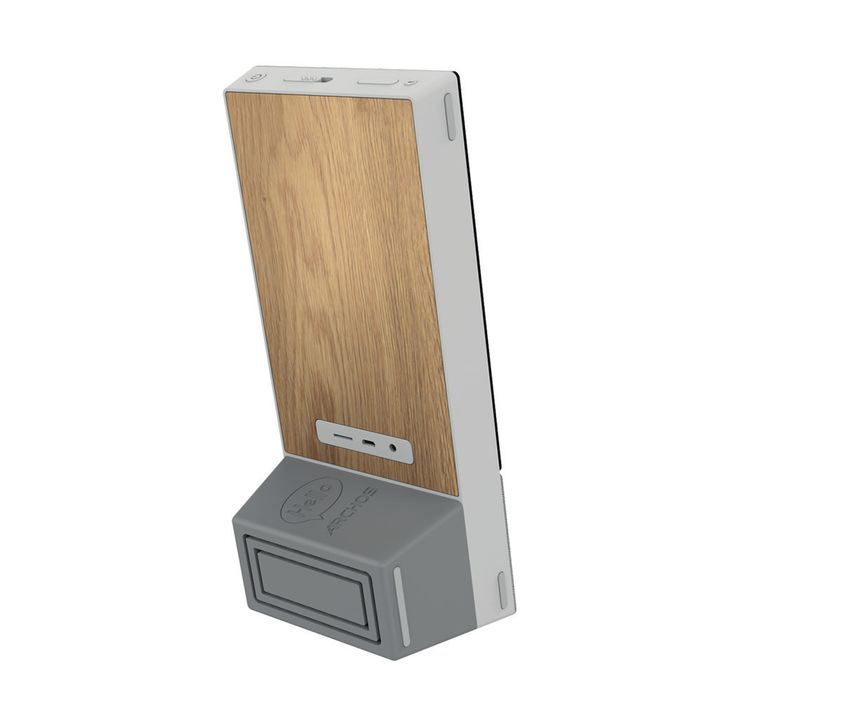
3 ENDescribing your device
1. ON/OFF
1 2. Camera cover
3. Volume +/-
6
2 4. Mic Mute
5. Back speaker
3
6. Non-skid pad
4 7. Micro SD slot
8. Micro USB port
9. DC-in charging port
7 8 9
5
4Describing your device
10. Microphones 12 13
11. Touch screen
12. Camera
13. LED light 10
14. Front speaker
11
Privacy
You can hide the
camera with the camera cover and turn
off the mic with the Mic Mute button.
Meaning of the LED indicator 14
-- Red light: Mic deactivated
-- No light: Mic activated
-- Yellow light: Low battery
5 ENStarting up
Installing your ARCHOS Hello 7
1. First, plug in the charging cable into the DC-in port of the ARCHOS Hello 7.
2. Plug in the charger to a socket.
Note: your device is battery-powered. We advise you to keep it plugged.
We recommend to install the device on a plain surface.
Sleep Mode of your ARCHOS Hello 7
When your device is in sleep mode, you can still wake it up with your voice and launch
apps. To see the results, unlock your screen. You can set up the time when the device goes
in sleep mode. To do so, go to the Settings app.
Removing a home screen item:
Touch and hold it, slide your finger towards the top of the screen and drop it over the
Remove icon.
6Starting up
Uninstalling an item
From the All apps screens, touch and hold it, slide your finger towards the top of the screen
and drop it over Uninstall bin.
Creating application folders
Drop one app icon over another on a home screen and the two icons will be combined.
Changing your wallpaper
Hold your finger on a home screen at an empty location, then choose from the list:
Wallpaper.
Widgets:
Hold your finger on a home screen at an empty location, then choose from the list: Widgets.
Securing your device
Define a lock screen to protect your privacy. Select the Settings app, then Security.
Choose a screen lock.
7 ENTroubleshooting -- If your device is frozen: Press the ON/OFF button for 10 seconds or use the reset button. -- If your device doesn’t turn on: 1. Charge your device. 2. Press the ON/OFF button for 10 seconds. -- If your device functioning is too slow: Close all apps which are not currently used. -- If your WiFi reception is too low: Make sure you are not far from the WiFi hotspot. Reset and redefine your connection parameters. Contact your WiFi connection provider. -- If your device has dysfunctions: Reinitialize your device. Go to Settings > Backup & reset > Factory data reset. If you can’t have access to the settings for any reason, consult our FAQs about the reinitialization process. For more answers about your technical difficulties, do not hesitate to visit: faq.archos.com EN 8
Contactez-nous

       twitter.com/archos

       www.facebook.com/archos

Blog   https://blog.archos.com/

       http://faq.archos.com/

       www.archos.com, cliquez Support > Service Après-vente

       www.archos.com, click Support > Téléchargements > Déclaration de conformité

Des appareils compatibles ou/et des abonnements à des services complémentaires
peuvent être nécessaires pour profiter pleinement de votre ARCHOS Hello 7.

                                         9                                       FR
Description du ARCHOS Hello 7
1. ON/OFF
1 2. Cache
3. Volume +/-
6
2 4. Désactivation du micro
5. Haut-parleur arrière
3
6. Pad antidérapant
4 7. Emplacement Micro SD
8. Port Micro USB
9. Connecteur de charge
7 8 9
5
10Description du ARCHOS Hello 7
10. Micros 12 13
11. Ecran tactile
12. Appareil photo
13. Lumière LED 10
14. Haut-parleur avant
11
Vie privée
Vous pouvez masquer la caméra avec le
cache et couper le micro avec le bouton
de désactivation du micro.
Signification de la lumière LED 14
-- Lumière rouge : micro désactivé
-- Aucune lumière : micro activé
-- Lumière jaune : batterie faible
11 FRPremiers pas
Installation de votre ARCHOS Hello 7
1. Branchez le câble de rechargement sur le port DC-in de l’appareil
2. Branchez la prise du câble sur une prise de courant.
Note : l’ARCHOS Hello 7 fonctionne aussi sur batterie. Il est recommandé de placer votre
ARCHOS Hello 7 sur une surface plane et stable.
Mise en veille de votre ARCHOS Hello 7
Lorsque votre appareil est en veille, il exécute toujours les commandes énoncées. Pour
afficher les résultats, il faudra déverrouiller l’appareil. La durée de la mise en veille est
paramétrable à partir de l’application Paramètres.
Supprimer une icône de l’écran d’accueil
Maintenez votre doigt appuyé sur l’icône, puis faites-la glisser vers le haut de l’écran, et
déposez-la sur l’icône Supprimer.
Désinstaller une application
A partir de l’écran Toutes les applications, maintenez votre doigt appuyé sur l’icône, puis
faites-la glisser vers le haut de l’écran et déposez-la sur l’icône Désinstaller.
12Premiers pas
Créer des dossiers d’applications
A partir d’un écran d’accueil, déposez une icône sur une autre pour les rassembler.
Changer le fond d’écran
Maintenez votre doigt appuyé sur un emplacement vide de l’écran d’accueil. Sélectionnez
fonds d’écran.
Widgets
Maintenez votre doigt appuyé sur un emplacement vide de l’écran d’accueil. Sélectionnez
Widgets.
Verrouiller votre appareil
Définissez un type de verrouillage pour protéger vos données. Sélectionnez l’application
Paramètres, puis Sécurité. Sélectionnez un type de verrouillage.
13 FRDépannage -- Si votre appareil est bloqué : Appuyez sur le bouton ON/OFF pendant 10 secondes ou utilisez le bouton de Reset. -- Si votre appareil ne s’allume pas : 1. Chargez votre appareil. 2. Appuyez sur le bouton ON/OFF pendant 10 secondes. -- Si votre appareil a un fonctionnement lent : Fermez toutes les applications inutilisées. -- Si votre réception WiFi est trop faible : Assurez-vous de ne pas être loin de la borne WiFi. Réinitialisez et redéfinissez vos paramètres connexion. Contactez votre fournisseur d’accès WiFi. -- Si votre appareil a des dysfonctionnements : Réinitialisez votre appareil. Allez dans Paramètres > Sauvegarde & réinitialisation > Réinitialiser votre appareil. Si vous ne pouvez pas accéder à ces paramètres, consultez notre foire aux questions sur le processus de réinitialisation.. Pour plus de renseignements sur vos problèmes techniques, n’hésitez pas à consulter la page : faq.archos.com FR 14
Sie benötigen Unterstützung? Kontaktieren Sie uns:

       http://faq.archos.com/

       www.archos.com, klicken Sie auf Support > After-Sales Support

Blog   twitter.com/archos

       www.facebook.com/archos

       www.archos.com, klicken Sie auf Support > Downloads > Declaration of
       conformity

       www.archos.com, click Support > Downloads > Declaration of conformity

Kompatible Geräte und/oder kostenpflichtige Streaming-/Abo-Dienste sind
möglicherweise zur voll umfänglichen Nutzung Ihres ARCHOS Hello 7 erforderlich.

                                         15                                       DE
Funktionen der Tasten von ARCHOS Hello 7
1. Ein/Aus
1 2. Abdeckung f. die Kamera
3. Lautstärke +/-
6
2 4. Mikro stumm
5. Lautsprecher 4
3
6. Rutschfestes Pad
4 7. microSD Steckplatz
8. Micro USB Port
9. Ladeanschluss
7 8 9
5
16Funktionen der Tasten von ARCHOS Hello 7
10. Mikrofon 12 13
11. Touchscreen
12. Kamera
13. LED-Anzeige 10
14. Lautsprecher
11
Privatsphäre
Wenn gewünscht, lässt sich die Kamera
abdecken und das Mikro ausschalten.
LED-Anzeige
-- Rotes Licht: Mikro aus
14
-- Kein Licht: Mikro an
-- Gelbes Licht: Schwache Batterie
17 DEStarten
Inbetriebnahme Ihres ARCHOS Hello 7
1.Verbinden Sie zuerst das Ladekabel mit dem Ladeanschluss des ARCHOS Hello 7
2.Stecken Sie dann den Stecker in eine Steckdose
Beachten Sie bitte, dass das ARCHOS Hello 7 unter Akku-Betrieb läuft. Wir empfehlen
jedoch eine dauerhafte Stromversorgung des Hello. Wir empfehlen, das Gerät auf einer
ebenen Fläche zu installieren.
Standby-Modus des ARCHOS Hello 7
Auch in Standby können Sie per Sprachbefehl Apps starten. Um Antworten / Ergebnisse des
Assistenten zu sehen, müssen Sie das Display aktivieren. Für die Aktivierung des Standby-
Modus können Sie in den „Einstellungen“ eine Zeit festlegen.
Entfernen eines Elements auf dem Startbildschirm
Drücken und halten Sie das Symbol, schieben Sie Ihren Finger auf dem Bildschirm nach
oben und das Symbol über dem Symbol “Entfernen” loslassen.
Element deinstallieren
Vom Bildschirm All Apps (Apps) aus berühren und halten Sie das Symbol und schieben dann
Ihren Finger auf dem Bildschirm nach oben und lassen es über Uninstall bin (Deinstallieren)
los.
Erstellen von Anwendungsordnern
Lassen Sie ein App-Symbol über einem anderen Symbol im Startbildschirm los und die zwei
Symbole werden kombiniert.
18Starten
Änderung des Hintergrundbildes
Halten Sie Ihren Finger an einer leeren Stelle auf dem Bildschirm und wählen Sie dann aus
der Liste: Hintergrundbilder.
Widgets
Halten Sie Ihren Finger an einer leeren Stelle auf dem Bildschirm und wählen Sie dann aus
der Liste: Widgets.
Sicherung Ihres Geräts
Definieren Sie eine Displaysperre zum Schutz Ihrer Privatsphäre. Wählen Sie die App Settings
[Einstellungen] und dann Security [Sicherheit].
Wählen Sie eine Displaysperre aus.
Android-Geräte-Manager
Wenn Ihr Gerät verloren geht, können Sie mit dem Android Geräte-Manager (https://www.
google.com/android/devicemanager) Ihre gesamten Inhalte löschen sowie das Gerät
sperren, orten oder klingeln lassen.
Automatisches Ein- und Ausschalten
Richten Sie eine automatische Ein- und Abschaltung ein, um das Gerät zu einer bestimmten
Uhrzeit aus- und einzuschalten. Sie können es z. B. zur Nachtzeit ausschalten.
19 DEFehlerbehebung -- Bei einem Absturz des Geräts: Halten Sie die Taste EIN/AUS 10 Sekunden lang gedrückt oder verwenden Sie die Reset- Taste. -- Schaltet sich das Gerät nicht ein: 1. Laden Sie Ihr Gerät. 2. Halten Sie die Taste EIN/AUS 10 Sekunden lang gedrückt. -- Bei zu langsamer Gerätefunktion: Schließen Sie alle Apps, die derzeit nicht verwendet werden. Bei schlechtem WLAN-Empfang: Vergewissern Sie sich, dass Sie nicht zu weit vom WLAN-Hotspot entfernt sind. Die Verbindungsparameter zurücksetzen und neu definieren. Kontaktieren Sie den Anbieter Ihrer WLAN-Verbindung. -- Bei einer Funktionsstörung des Geräts: Initialisieren Sie das Gerät neu. Gehen Sie zu Settings > Backup & reset > Factory data reset [Einstellungen > Sichern & zurücksetzen > Zurücksetzen auf Werkseinstellungen]. Falls Sie keinen Zugriff auf die Einstellungen haben, konsultieren Sie bitte unsere FAQs über den Vorgang der Neuinitialisierung. Weitere Antworten bei technischen Problemen finden Sie unter: faq.archos.com DE 20
Contact ons

       http://faq.archos.com/

       www.archos.com, klik Support > After-sales support

Blog   twitter.com/archos

       www.facebook.com/archos

       www.archos.com, klik Support > Downloads > Declaration of conformity

       www.archos.com, click Support > Downloads > Declaration of conformity

Compatibele apparaten of/en betaalde abonnement diensten kunnen nodig zijn om
volledig te profiteren van je ARCHOS Hello 7.

                                         21                                     NL
Beschrijving van de ARCHOS Hello 7 knoppen
1. AAN/UIT
1 2. Camera afdekschuif
3. Volume +/-
6
2 4. Microfoon Mute
5. Achter speaker
3
6. Anti slip voetje
4 7. Micro SD slot
8. Micro USB poort
9. DC-in oplaad poort
7 8 9
5
22Beschrijving van de ARCHOS Hello 7 knoppen
10. Microfoons 12 13
11. Touch screen
12. Camera
13. LED licht 10
14. Voor speaker
11
Privacy
u kunt de camera afdekken met de
camera afdekschuif en de microfoon
uitzetten met de Microfoon Mute.
Betekenis van de LED indicator 14
-- Rood licht: Microfoon gedeactiveerd
-- Geen licht: Microfoon geactiveerd
-- Geel lampje: bijna lege batterij
23 NLAan de slag
Installatie van je ARCHOS Hello 7
1.Plug eerst de oplaadkabel in de DC-in poort van de ARCHOS Hello 7.
2.Steek de stekker van de oplader in het stopcontact.
LET OP: dit apparaat is voorzien van een accu. We adviseren je om de oplader erop
aangesloten te laten. We raden aan om het apparaat op een vlak oppervlak te installeren.
Slaapstand van je ARCHOS Hello 7
Wanneer jouw apparaat in slaapstand is kun je nog altijd zeggen en applicaties openen. Om
de open applicaties te zien ontgrendel je je scherm. Je kan een tijd instellen wanneer je
apparaat in slaapstand moet gaan. Om dat in te stellen ga je naar de Settings.
Items in een beginscherm verwijderen
Houd uw vinger op het item en schuif het naar de bovenkant van het scherm. Laat het item
los boven het pictogram “Remove” [Verwijderen].
De installatie van items ongedaan maken
In het Alle apps-scherm houdt u het item vast en schuift u uw vinger naar de bovenkant van
het scherm. Laat de app los boven de Uninstall-prullenbak.
Applicatiemappen maken
Laat het pictogram van een app boven een andere app op het beginscherm vallen. De twee
pictogrammen worden gecombineerd.
24Aan de slag
Achtergrond wijzigen
Houd uw vinger op een lege plek op het beginscherm. Kies dan de volgende optie uit de
lijst: Wallpaper [Achtergrond].
Widgets
Houd uw vinger op een lege plek op het beginscherm. Kies dan de volgende optie uit de
lijst: Widgets.
Uw apparaat beveiligen
Stel een schermvergrendeling in om uw gegevens te beschermen. Kies de app Settings
[Instellingen] en dan Security [Beveiliging].
Kies een schermvergrendeling.
Android-apparaatbeheer
Wanneer u uw apparaat bent kwijtgeraakt dan kunt u op de pagina van Android-
apparaatbeheer (https://www.google.com/android/devicemanager) al uw gegevens wissen,
het apparaat vergrendelen, het apparaat lokaliseren of het apparaat bellen.
Geprogrammeerd in- en uitschakelen
U kunt de tijden voor het in- en uitschakelen van het apparaat vooraf programmeren. Zo
kunt u de uitschakeling van het apparaat instellen op het moment dat u gaat slapen.
25 NLProbleemoplossing -- Wanneer uw apparaat is vastgelopen: Druk 10 seconden lang op de AAN/UIT-knop Of gebruik de reset knop. -- Wanneer uw apparaat niet wordt ingeschakeld: 1. Laad uw apparaat op. 2. Druk 10 seconden lang op de AAN/UIT-knop. -- Wanneer uw apparaat traag is: Sluit alle apps die u niet gebruikt. -- Als de WiFi-ontvangst matig is: Controleer of u niet te ver uit de buurt bent van een WiFi hotspot. Reset uw verbindingsparameters en stel ze opnieuw in. Neem contact op met uw WiFi-provider. -- Als uw apparaat niet goed werkt: Herstel de standaardinstellingen van uw apparaat. Ga naar Settings > Backup & reset > Factory data reset [Instellingen > Back-up & reset > Fabrieksinstellingen herstellen]. Wanneer u geen toegang krijgt tot de instellingen, lees dan de FAQ’s over het herstellen van de fabrieksinstellingen. Voor meer antwoorden op technische vragen gaat u naar: faq.archos.com NL 26
Contatti

       http://faq.archos.com/

       www.archos.com, click Support > After-sales support

Blog   twitter.com/archos

       www.facebook.com/archos

       www.archos.com, click Support > Downloads > Declaration of conformity

       www.archos.com, click Support > Downloads > Declaration of conformity

Dispositivi compatibili di parti terze e/o abbonamenti a pagamento a servizi
complementari potrebbero essere necessari per ottenere un’esperienza d’uso più
completa del vostro ARCHOS Hello 7.

                                         27                                      IT
Descrizione dei tasti di ARCHOS Hello 7
1. ON/OFF
1 2. Chiusura Fotocamera
3. Volume +/-
6
2 4. Mic Mute
5. Speaker posteriore
3
6. Pad antiderapante
4 7. Micro SD slot
8. Porta Micro USB
9. Porta di ricarica DC-in
7 8 9
5
28Descrizione dei tasti di ARCHOS Hello 7
10. Microfoni 12 13
11. Touch screen
12. Fotocamera
13. Luce LED 10
14. Speaker anteriore
11
Privacy
É possibile oscurare la fotocamera
attraverso l’apposita chiusura e
disattivare il microfono grazie al Mic
Mute. 14
Significati dell’indicatore LED
-- Luce rossa: Mic inattivo
-- Luce spenta: Mic attivo
-- Luce gialla: batteria scarica
29 ITOperazioni preliminari
Istallazione di ARCHOS Hello 7
1.Inizia con il collegare il caricabatterie nella porta DC-in dell’ARCHOS Hello 7.
2.Collegare il caricabatteria ad una presa di corrente. NATA: ARCHOS Hello 7 funziona
anche con la batteria integrata. Si consiglia di lasciarlo collegato. Si consiglia di installare il
dispositivo su una superficie piana.
Sleep Mode su ARCHOS Hello 7
Quando il dispositivo é in modalità Sleep Mode, si potrà comunque pronunciare e far partire
le applicazioni. Per visualizzare i risulatati, sbloccare lo schermo. Si può impostare dopo
quanto tempo di inattività attivare lo sleep mode. Per farlo, andare sulle Impostazioni.
Rimozione di un elemento della schermata iniziale
toccare l’elemento e tenerlo premuto, far scorrere il dito verso la parte alta dello schermo e
rilasciare l’elemento sull’icona della rimozione.
Disinstallazione di un elemento
dalla schermata generale delle app, toccare l’elemento e tenerlo premuto, quindi far
scorrere il dito verso la parte alta dello schermo e rilasciare l’elemento sul cestino per la
disinstallazione.
Creazione di cartelle delle applicazioni
nella schermata iniziale, rilascia l’icona di un’app sopra un’altra: le due icone si
raggrupperanno.
30Operazioni preliminari
Modifica dello sfondo
tenere premuto con il dito un punto vuoto della schermata iniziale, quindi scegliere
dall’elenco: Wallpaper (Sfondo).
Widget
tenere premuto con il dito un punto vuoto della schermata iniziale, quindi scegliere
dall’elenco: Widgets.
Protezione del dispositivo
definire una schermata di blocco per proteggere la propria privacy. Selezionare
l’applicazione Settings (Impostazioni), quindi Security (Sicurezza).
Scegliere un blocco della schermata.
Gestione dispositivi Android
se il dispositivo viene smarrito, è possibile utilizzare la pagina di gestione dei dispositivi
Android (https://www.google.com/android/devicemanager) per cancellare tutti i dati,
bloccare il dispositivo, localizzarlo o farlo squillare.
Accensione e spegnimento programmato
è possibile programmare l’accensione e lo spegnimento del dispositivo, ad esempio per
impostarlo in modalità a riposo.
31 ITRisoluzione dei problemi -- Se il dispositivo è bloccato: Premere il pulsante ON/OFF per 10 secondi o utilizzare il pulsante di reset. -- Se il dispositivo non si accende: 1. Caricare il dispositivo. 2. Premere il pulsante ON/OFF per 10 secondi. -- Se il dispositivo è troppo lento: Chiudere tutte le app non in uso. -- Se la ricezione del WiFi è debole: Assicurarsi di essere abbastanza vicini all’hotspot WiFi. Ripristinare e ridefinire i parametri della connessione. Contattare il proprio provider di connessione WiFi. -- Se il dispositivo non funziona bene: Riavviare il dispositivo. Andare in Settings (Impostazioni) > Backup & reset (Backup e ripristino) > Factory data reset (Ripristino impostazioni di fabbrica). Se, per qualche ragione, non si avesse accesso alle impostazioni, consultare le FAQ relative alla procedura di riavvio. Per ulteriori soluzioni relative a problemi tecnici, visitare: faq.archos.com IT 32
Contáctenos

       http://faq.archos.com/

       www.archos.com, click Support > After-sales support

Blog   twitter.com/archos

       www.facebook.com/archos

       www.archos.com, click Support > Downloads > Declaration of conformity

       www.archos.com, click Support > Downloads > Declaration of conformity

Es posible que se necesiten dispositivos compatibles o/y servicios de suscripciones de
pago para aprovechar al máximo su ARCHOS Hello 7.

                                           33                                            ES
Descripción de los botones de ARCHOS Hello 7
1. Encendido/Apagado
1 2. Cubierta Cámara
3. Volumen +/-
6
2 4. Mic Silencio
5. Altavoz Trasero
3
6. Plataforma antideslizante
4 7. Micro SD ranura
8. Micro USB puerto
9. DC-in Punto de carga
7 8 9
5
34Descripción de los botones de ARCHOS Hello 7
10. Microfonos 12 13
11. Pantalla Táctil
12. Camara
13. LED luz 10
14. Altavoz frontal
11
Privacidad
Puede ocultar la camar con la cubierta de la
camara cover y desactivar el mic con el Mic
silencio.
Significado del indicador LED indicator 14
-- Luz Roja: Mic desactivado
-- Sin Lux: Mic activado
-- Luz amarilla: batería baja
35 ESAntes de empezar
Instalando tu ARCHOS Hello 7
1.Primero, conecte el cable de carga en el puerto de entrada de DC de ARCHOS Hello 7.
2.Conecte el cargador a un enchufe.
Note:Su dispositivo funciona con baterías. Le aconsejamos que lo mantenga enchufado.
Recomendamos instalar el dispositivo en una superficie plana.
Modo de suspensión de su ARCHOS Hello 7
Cuando su dispositivo está en modo de suspensión, aún puede decir e iniciar aplicaciones.
Para ver los resultados, desbloquea tu pantalla. Puede configurar el tiempo cuando el
dispositivo entra en modo de suspensión. Para hacerlo, ve a la aplicación de Configuración.
Eliminar un elemento de la pantalla de inicio
Con un dedo, mantenga pulsado el elemento seleccionado, deslícelo hacia la parte
superior de la pantalla y suéltelo sobre el icono de papelera.
Desinstalar un elemento
En la pantalla de Aplicaciones, mantenga pulsado el elemento seleccionado, deslícelo hacia
la parte superior de la pantalla y suéltelo sobre el icono de desinstalar.
Crear carpetas de aplicaciones
Suelte un icono de aplicación sobre otro icono en la pantalla de inicio para combinar
ambos iconos.
36Antes de empezar
Cambiar el fondo de pantalla
Mantenga pulsado el dedo en un lugar vacío de la pantalla de inicio y luego escoja en la
lista: Fondos de pantalla.
Widgets
Mantenga pulsado el dedo en un lugar vacío de la pantalla de inicio y luego escoja en la
lista: Widgets.
Protección del dispositivo
Establezca una pantalla de bloqueo para proteger su intimidad. Seleccione la app Ajustes, y
luego Seguridad.
Escoja una pantalla de bloqueo.
Administrador de dispositivos Android
Si perdiera el dispositivo, entre en la página del administrador de dispositivos Android
(https://www.google.com/android/devicemanager) para borrar todo su contenido, bloquear
el dispositivo, localizarlo o hacer que suene.
Programación del encendido y apagado
Programe el momento de encendido y apagado del dispositivo. Por ejemplo, a la hora de
irse a dormir.
37 ESResolución de problemas -- Si el dispositivo se bloquea: Mantenga pulsado el botón ON/OFF durante 10 segundos o utilizar el botón de reinicio. -- Si el dispositivo no se enciende: 1. Recargue el dispositivo 2. Mantenga pulsado el botón ON/OFF durante 10 segundos. -- Si el funcionamiento del dispositivo es demasiado lento: Cierre todas las aplicaciones que no esté utilizando. -- Si la recepción WiFi es demasiado débil: No se aleje demasiado del punto de acceso WiFi. Reinicie y reconfigure sus parámetros de conexión. Contacte con su proveedor de conexión WiFi. -- Si el dispositivo no funciona correctamente: Reinicialice el dispositivo. Vaya a Ajustes > Copia de seguridad / restablecer > Restablecer datos de fábrica. Si por cualquier motivo no puede acceder a los ajustes, consulte nuestra página de preguntas y respuestas sobre el proceso de reinicialización. Para resolver cualquier incidencia técnica, no dude en visitar: faq.archos.com ES 38
National restrictions
This device is intended for home and office use in all EU countries (and other countries following the
EU directive 2014/53/EU) without any limitation except for the countries mentioned below:
Country           Restriction          Reason/remark
                                       General authorization required for outdoor use and public
Bulgaria          None                 service
                  Outdoor use
                  limited to 10 mW Military Radiolocation use. Refarming of the 2.4 GHz band
France            e.i.r.p. within the has been ongoing in recent years to allow current relaxed
                  band 2454-2483.5 regulation. Full implementation planned 2012
                  MHz
                                      If used outside of own premises, general authorization is
Italy             None                required.
                                      General authorization required for network and service supply
Luxembourg        None                (not for spectrum)
                                      This subsection does not apply for the geographical aera within
Norway            Implemented         a radius of 20 km from the centre of Ny-Alesund
Russian          None             Only for indoor applications
Federation
Note: Frequency 2454-2483.5MHZ are restricted to indoor use in France.

Archos company (Contact adress : ARCHOS SA 12 Rue Ampère 91430 Igny France) declares that this
device ARCHOS Hello 7 is in compliance with the essential requirements and other relevant provisions
of directive 2014/53/EU: https://www.archos.com/products/conformity.html
Par la présente, ARCHOS (adresse de contact : ARCHOS SA 12 Rue Ampère 91430 Igny France) déclare
que la tablette ARCHOS Hello 7 est conforme aux exigences essentielles et aux autres dispositions
pertinentes de la directive 2014/53/EU. La déclaration de conformité peut être consultée sur le site :
https://www.archos.com/products/conformity.html

                                                   39
Enjoy all Google services ! For more information, go to:
Google Play https://www.android.com/play/
Youtube https://www.youtube.com/
Google Maps https://support.google.com/
Gmail https://support.google.com/mail
Google Drive https://www.google.com/drive/
Google, Google Play, Android, and related marks and logos are trademarks of
Google LLC.
40Déclaration de Conformité
Nous, soussignés Fabricant
Entreprise ARCHOS S.A.
Adresse 12,rue Ampere 91430 Igny
Pays France
Numéro de téléphone +(33)1 69 33 16 90
Numéro de fax +(33)1 69 33 16 99
E-mail wu@archos.com
Certifions et déclarons que le produit suivant:
Desciption Produit Hello 70
Fabricant ARCHOS S.A.
Marque ARCHOS
Modele AC70HELLO
Est testé et conforme aux ensembles de tests essentiels inclus dans les normes suivantes, qui sont en vigueur dans
l'UE:
Standard Date de délivrance Rapport de référence
EN 301 489-1 V2.2.0 2017-03 RSZ180806002-02
EN 301 489-17 V3.2.0 2017-03 RSZ180806002-02
EN 300 328 V2.1.1 2016-11 RSZ180806002-22A /22B/ 22C
EN 62479 2010 RSZ180806002
EN 55032 2015 RSZ180806003-01
EN 55035 2017 RSZ180806003-01
EN 61000-3-2 2014 RSZ180806003-01
EN 61000-3-3 2013 RSZ180806003-01
2006+A11:2009+A1:2010 RSZ180806002-SF
EN 60950-1
+A12:2011+A2:2013
Et donc conforme aux besoins essentiels des directives suivantes:
Nom de la directive Numéro de la directive Identifications
RED Directive 2014/53/EU
LVD Directive 2014/35/EU Année d'apposition du logo CE: 2018
ERP Directive 2009/125/EC
RoHS Directive 2011/65/EU
Battery Directive 2006/66/EC
Les organismes notifiés suivants ont été consultés dans la procédure d'évaluation de la conformité de la
directive RED (Lorsqu'applicable):
Numéro de l'organe notifié Bay Area Compliance Laboratories Corp.
Bay Area Compliance Laboratories Corp.
1274 Anvilwood Ave., Sunnyvale, CA 94089, USA
http://ec.europa.eu/growth/tools-databases/nando/index.cfm?fuseaction=directive.nb&refe_cd=EPOS_50193
La documentation technique requise par la procédure d'évaluation de la conformité est conservée à l'adresse suivan
pour une période se terminant au moins dix ans après la fabrication du dernier produit à la disposition des autorités
nationales compétentes de tout État membre pour inspection:
Entreprise ARCHOS S.A.
Adresse 12,rue Ampere 91430 Igny
Pays France
Téléphone +(86)755-83734678
Fax +(86)755-83734621
E-mail wu@archos.com
Le produit est marqué CE en: Europe
Nom de l'agent Titre l'agent
Jacky Wu General Manager
habilité: habilité:
Fait le
Date 2018.09.04
Signature et tamponDeclaration of Conformity
We, the undersigned (Manufacturer /
The manufacturers authorized representative established within EEA):
Company ARCHOS S.A.
Address 12,rue Ampere 91430 Igny
Country France
Telephone number +(33)1 69 33 16 90
Telefax number +(33)1 69 33 16 99
E-mail wu@archos.com
Certify and declare under our responsibility that the following product:
Product Description Hello 70
Manufacturer ARCHOS S.A.
Brand Name ARCHOS
Model/Type AC70HELLO
Is tested to and conforms with the essential test suites included in the following standards, which are in force
within the EEA:
Standard Issue date Reference to report /file
EN 301 489-1 V2.2.0 2017-03 RSZ180806002-02
EN 301 489-17 V3.2.0 2017-03 RSZ180806002-02
EN 300 328 V2.1.1 2016-11 RSZ180806002-22A /22B/ 22C
EN 62479 2010 RSZ180806002
EN 55032 2015 RSZ180806003-01
EN 55035 2017 RSZ180806003-01
EN 61000-3-2 2014 RSZ180806003-01
EN 61000-3-3 2013 RSZ180806003-01
2006+A11:2009+A1:2010 RSZ180806002-SF
EN 60950-1
+A12:2011+A2:2013
And therefore complies with the essential requirements of the following directives:
Directive Name Directive number Further identification
RED Directive 2014/53/EU
LVD Directive 2014/35/EU Year of affixing the CE Marking: 2018
ERP Directive 2009/125/EC
RoHS Directive 2011/65/EU
Battery Directive 2006/66/EC
The following Notified Bodies have been consulted in the Conformity Assessment procedure of RED Directive
(whenever applicable):
The NOTIFIED BODY: Bay Area Compliance Laboratories Corp.
Bay Area Compliance Laboratories Corp.
1274 Anvilwood Ave., Sunnyvale, CA 94089, USA
http://ec.europa.eu/growth/tools-databases/nando/index.cfm?fuseaction=directive.nb&refe cd=EPOS 50193
The technical documentation as required by the conformity assessment procedure is kept at the following address
for a period ending at least 10 years after the last product has been manufactured at the disposal of the relevant
national authorities of any Member State for inspection:
Company ARCHOS S.A.
Address 12,rue Ampere 91430 Igny
Country France
Telephone number +(86)75583734678
Telefax number +(86)75583734621
E-mail wu@archos.com
Product is CE-marked in Europe
Name of authorized Title of authorized
Jacky Wu General Manager
officer: officer
Drawn up in
Date 2018.09.04
Signature and Company Stampwww.archos.com
PN: 116724Vous pouvez aussi lire