DHIS 2 Android guide Destiné à être utilisé avec la version 2.29 - Équipe de documentation DHIS2 August 2020 - DHIS2 Documentation
←
→
Transcription du contenu de la page
Si votre navigateur ne rend pas la page correctement, lisez s'il vous plaît le contenu de la page ci-dessous
DHIS 2 Android guide

Destiné à être utilisé avec la version 2.29

Équipe de documentation DHIS2
August 2020
DHIS 2 Android guide                                          Destiné à être utilisé avec la version 2.29

    Copyright © 2006-2020 Équipe de documentation DHIS2

    August 2020

      Historique des révisions
      2.29@212c36a                              2020-08-18 14:57:22 +0200

    Garantie: CE DOCUMENT EST FOURNI PAR LES AUTEURS ’’ EN L’ETAT ’’ ET TOUTE GARANTIE
    EXPRESSE OU IMPLICITE, Y COMPRIS, MAIS SANS S’Y LIMITER, LES GARANTIES IMPLICITES DE
    QUALITÉ MARCHANDE ET D’ADÉQUATION À UN USAGE PARTICULIER SONT DÉCLINEES. EN
    AUCUN CAS, LES AUTEURS OU CONTRIBUTEURS NE PEUVENT ÊTRE TENUS RESPONSABLES DES
    DOMMAGES DIRECTS, INDIRECTS, ACCESSOIRES, SPÉCIAUX, EXEMPLAIRES OU ACCESSOIRES (Y
    COMPRIS, MAIS SANS S’Y LIMITER, L’ACHAT DE MARCHANDISES OU DE SERVICES SUBSTITUÉS;
    PERTE D’UTILISATION, DE DONNÉES OU DE PROFITS; INTERRUPTION COMMERCIALE) TOUTEFOIS
    CAUSÉE ET SUR TOUTE THÉORIE DE LA RESPONSABILITÉ, QU’IL SOIT DU CONTRAT, UNE
    RESPONSABILITÉ STRICTE OU UN LAC (Y COMPRIS LA NÉGLIGENCE OU AUTREMENT) DÉCOULANT
    DE TOUTE MANIÈRE DE L’UTILISATION DE CE MANUEL ET DES PRODUITS MENTIONNÉS DANS CE
    DOCUMENT, MÊME SI MIS À JOUR, TELS DOMMAGES.

    Licence: L’autorisation est donnée de copier, distribuer ou modifier ce document selon les
    termes de la licence GNU de documentation libre, dans sa version 1.3 ou dans toute version
    ultérieure publiée par la Free Software Foundation ; sans Section Invariante, sans Texte De
    Première De Couverture, et sans Texte De Quatrième De Couverture. Une copie de cette licence
    est incluse dans la section intitulée “Licence GNU de documentation libre”: http://www.gnu.org/
    licenses/fdl.html

2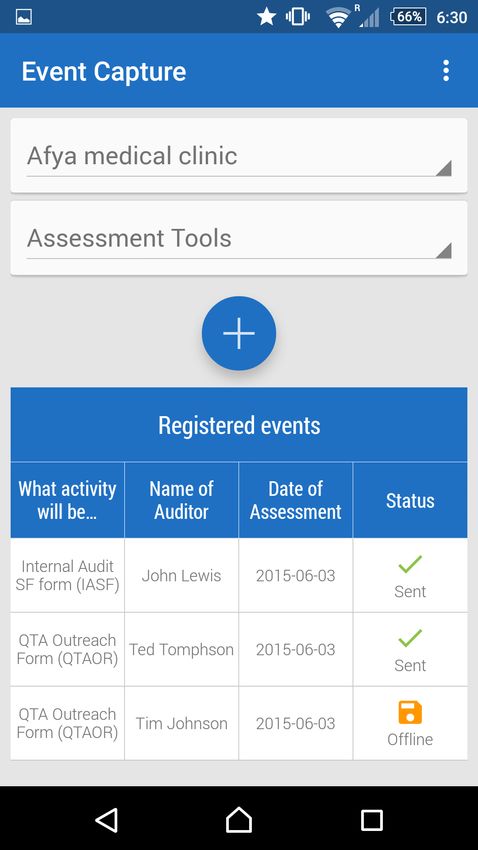
Table des matières                                          Destiné à être utilisé avec la version 2.29

  Table des matières
        1 A propos de ce guide
        2 Configure DHIS2 programs to work on Android apps
        3 Android Event Capture App
              3.1 Aperçu
              3.2 Installing and logging in
              3.3 Viewing events
              3.4 Creating events
              3.5 Modifying events
              3.6 Settings
        4 Android aggregate data capture app
              4.1 Aperçu
              4.2 Installation
              4.3 Logging in
              4.4 Entering and saving data
        5 Android Tracker Capture App
              5.1 Aperçu
              5.2 Installing and logging in
              5.3 Viewing Enrollments
              5.4 Creating and enrolling a tracked entity instance
              5.5 Downloading tracker data from the online DHIS2 instance
              5.6 Modifying enrollment and tracked entity instance attribute values
              5.7 Creating new events for Enrollment
              5.8 Create relationships
              5.9 Settings

                                                                                                     3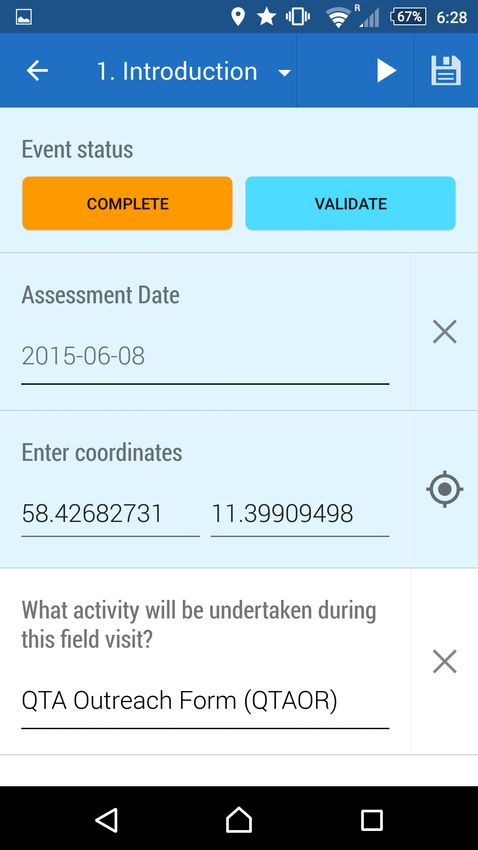
1 A propos de ce guide                                          Destiné à être utilisé avec la version 2.29

    1 A propos de ce guide
    La documentation de DHIS2 est un effort collectif est à été développée par l’équipe de
    développement mais aussi par les utilisateurs. Bien que ce guide vise à être complet, il se peut
    que certaines fonctionnaliés aient été omises ou doivent encore être documentées. Cette section
    explique certaines des conventions utilisées dans le document

    DHIS2 est une application fonctionnant dans un navigateur. Dans la plupart des cas, des
    impressions d’écran ont été incluse pour une meilleure compréhension. Des raccourçis vers
    diverses fonctionnalités sont affiché comme Element de donnée > Groupe d’élément de
    données. Le symbole “>” indique que vous devez cliquer sur Element de donnée et ensuite sur
    Groupe d’élément de données

    Differents styles de texte ont été utilisés pour mettre en avant des parties importantes ou des
    types particulier de texte comme par exemple du code source. Chaque convention est expliquée
    ci-dessous:

                   Note
                   Une note contient des informations complémentaires à considérer ou
                   une référence vers de l’information additionnelle

                   Truc
                   Un truc peut être un conseil utile, par exemple comment effectuer une
                   tâche de manière plus efficiente

                   Important
                   Les informations importantes ne doivent pas être ignorées et indiquent
                   souvent quelque chose que l’application requiert.

                   Prudence
                   L’information dans ces sections doit être lue avec attention. Ne pas la
                   suivre peut mener à des résultats innattendus

                   Attention
                   L’information dans ces sections doit être lue avec attention. Ne pas la
                   suivre peut mener à des pertes de données ou des problèmes de
                   stabilité dans le système.

     Les programmes contiennent le plus souvent du code informatique
     Ils sont affichés sur un background ombré et avec une police distincte

    Les commandes sont affichées en gras et représentent une commande à
    exécuter sur le système d'exploitation ou la base de données.

    Les liens vers des sites externes ou références croisées sont affichés en bleu et soulignés comme
    ceci..

4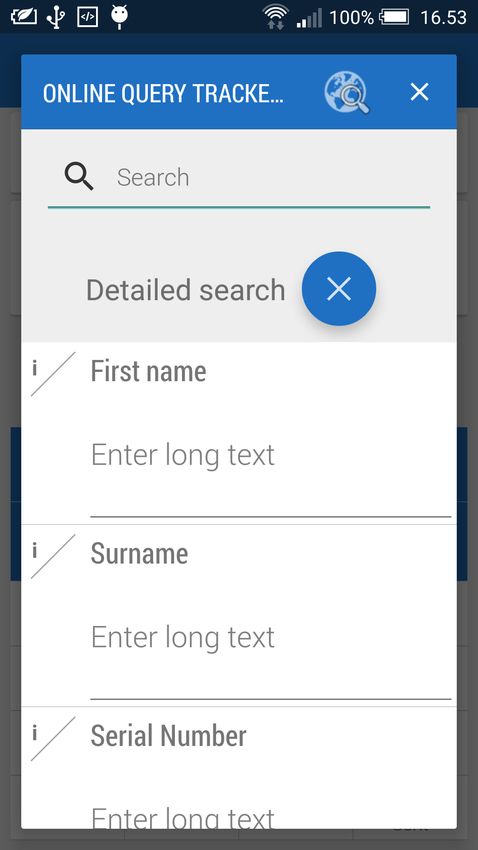
1 A propos de ce guide                                     Destiné à être utilisé avec la version 2.29

  Les références bibliographiques sont affichées entre crochets comme ceci Store2007. Une
  référence complète peut être trouvée dans la bibliographie à la fin du présent document.

                                                                                                    5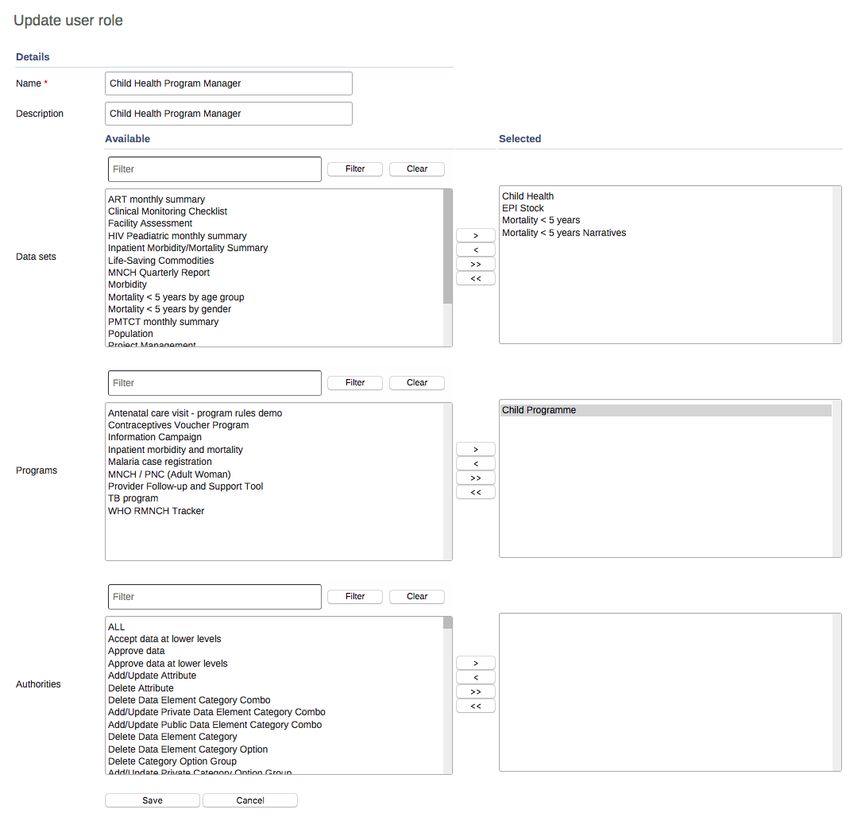
2 Configure DHIS2 programs to work on Android apps             Destiné à être utilisé avec la version 2.29

    2 Configure DHIS2 programs to work on Android apps
    To use event programs and tracker programs on the Android Event Capture and Tracker Capture
    apps, you must configure both the programs and the users’ profiles on your DHIS2 web instance.
    You do this in the Users and Program web apps.

                   Note

                       • To work on an Android device you must assign the same Data
                         capture and maintenance organisation units as the organisation
                         units you’ve assigned the program to.
                       • In the Android apps you want to save as much data as possible.
                         Therefore, the user can only download and capture data against
                         the Data capture and maintenance organisation units. You
                         configure these organisation units in the Users app.
                       • If you select the top organisation unit as the Data capture and
                         maintenance organisation units, the user can only download and
                         capture data on the top organisation unit.
                       • To give the user access to download and capture data on all
                         organisation units, you must assign all organisation units as Data
                         capture and maintenance organisation units.

       1. In the Users app, create a new or update an existing user with the following settings:

              ◦ Available roles: Assign a user role that allow the user to access programs.

              ◦ Data capture and maintenance organisation units: Select the organisation units that
                are relevant for your program.

                The Data capture and maintenance organisation units control for which organisation
                units the user can do data entry. You must assign at least one data capture and
                maintenance organisation unit to each user.

6
2 Configure DHIS2 programs to work on Android apps           Destiné à être utilisé avec la version 2.29

     2. In the Users app, assign programs to the user role you selected in the previous step.

                                                                                                      7
2 Configure DHIS2 programs to work on Android apps Destiné à être utilisé avec la version 2.29
3. In the Program app, assign your programs to the same organisation units as the Data
capture and maintenance organisation units you selected in the Users app.
82 Configure DHIS2 programs to work on Android apps Destiné à être utilisé avec la version 2.29
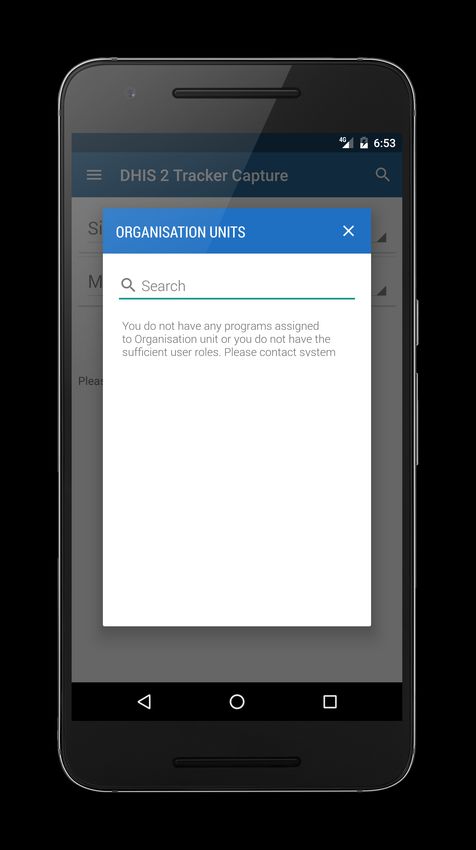
4. Open the relevant Android app and log in with the user you created.
5. Pull down to synch with the DHIS2 web instance.
The app downloads all programs and organisation units the user has access to.
Note
92 Configure DHIS2 programs to work on Android apps Destiné à être utilisé avec la version 2.29
Error
• Error message: “You don’t have any programs assigned to the
organisation unit”
• Solution: In the Program app, assign programs to the relevant
organisation units.
Voir également :
Manage programs
102 Configure DHIS2 programs to work on Android apps Destiné à être utilisé avec la version 2.29
Gérer les utilisateurs, les rôles des utilisateurs et les groupes d’utilisateurs
113 Android Event Capture App 3.1 Aperçu 3 Android Event Capture App 3.1 Aperçu The event capture Android app allows you capture, modify and list events. The event capture app works with event-based programs in DHIS2, which handles anonymous events not linked to registered entities. These programs are suitable for handling scenarios such as facility surveys, hospital registry summaries and training events. However the app is not tied to any specific domain and can potentially be utilized for any scenario of event-based information. The event capture app allows you to capture events offline, i.e. without Internet connectivity. The app will automatically synchronize events with the online DHIS2 server automatically when connectivity is present. This makes the app suitable for environments where Internet connectivity is scarce or unstable. 3.2 Installing and logging in The event capture add can be found on Google Play under the name “Event Capture for DHIS 2”. Event Capture on Google Play You can download the APK file directly from the GitHub release page. Event Capture GitHub releases Click on the app to open it after the installation is done. This will bring up the login screen. 12
3 Android Event Capture App                                                3.2 Installing and logging in

 In the URL field, enter the full URL to the DHIS2 instance (server) for which you want to capture
 and manage events for. Be careful to enter the http:// or https:// part of the URL as well. In the
 username and password field, enter the username and password for your account at the given
 DHIS2 instance. Note that you can use this login on the online DHIS2 server as well, i.e. you will
 be using the same account as you will use when logging into DHIS2 using a Web browser. After
 logging in the first time, the app will download meta-data from the online instance. This could
 take a few minutes so please be patient.

                                                                                                      13
3 Android Event Capture App 3.3 Viewing events 3.3 Viewing events The main screen will show an overview of events, as well as links to creating new ones. Start by selecting organisation unit and program from the selectors at the upper part of the screen. The + button below the selectors will take you to the new event screen. Below this button, all events which have been registered for the selected organisation unit and program will be listed. Each column is configurable, and could show various types of information from each event. The column to the far right shows the synchronization status. Sent means that the event has been uploaded to the server, whereas Offline means that the event is so far only stored at your device. 14
3 Android Event Capture App                                                      3.4 Creating events

 Events will be synchronized automatically once an Internet connection is present. You can swipe
 down on the screen in order to trigger a synchronization attempt.

 3.4 Creating events

 Click on the + button to go to the new event form. The new event will be associated with the
 organisation unit and program you selected previously. The new event screen has a range of
 functions:

                                                                                                   15
3 Android Event Capture App 3.4 Creating events The back button in the top top-left corner will take you back to the main screen (list of events). For programs that have specified sections, these sections will be displayed as a selector at the centre of the top bar. There are also right and left arrows which you can use to move between sections. You can use this selector and arrows to quickly navigate between form sections. The save button in the top-right corner will save what you have entered for the event so far. Data is also saved when you switch between sections. The Complete button on the second bar will mark the event as complete. The Validate button will trigger a check for validity of the information you have entered based on the validation rules which have been set up for the program. The first form field contains a date selector and indicators the time of when the event took place. The label is customizable and will vary from system to system. The Enter coordinates field, which will be displayed if the program is configured to store coordinates, lets you use the GPS capability of your device to set the longitude and latitude of your current location by pressing the circle-like symbol to its right. You can alternatively enter the coordinates directly. The event entry form itself will be rendered below. The type of input field selector will depend on the type of the data element representing the input field. For example, you will see date selectors, free text input and numeric input fields. Data elements with predefined options will be rendered using a special dialog where you can either click directly on options or use a text input field to search for a specific option (useful if there is a high number of options). 16
3 Android Event Capture App                                                     3.5 Modifying events

 3.5 Modifying events

 After an event has been created you can go back to or modify the event by simply clicking on it in
 the event list. This will open the event form pre-populated with information that has been
 captured so far.

                                                                                                      17
3 Android Event Capture App 3.6 Settings 3.6 Settings The settings screen lets you do configure synchronization frequency and log out. 18
3 Android Event Capture App                                                               3.6 Settings

 The frequency of automatic synchronization attemps can be set form the drop-down, where
 options range from one minute to one day. This affects the battery usage and bandwidth
 consumption. The default of one hour is a sensible choice.

 The log out button will log you out of the app, and request you to enter the login information
 again. You are not intended to log out of the application between each session. This is mostly
 useful when you want to log into another DHIS2 online instance.

                                                                                                   19
4 Android aggregate data capture app 4.1 Aperçu 4 Android aggregate data capture app 4.1 Aperçu The Data Capture for DHIS2 app allows you to enter data into a DHIS2 server with an Android device. The app downloads instances of forms which are required to enter data from the server, and stores them on the device. This means that you can enter data offline and then upload it to the DHIS2 server when you have network coverage. 4.2 Installation You can easily install the Data Capture for DHIS2 app by logging into the Google play store and searching for “Data Capture for DHIS2” 4.3 Logging in After you install and launch the Data Capture app on your device, when you launch it for the first time, you will be required to enter the server URL address of the DHIS2 server and your user name and password. Be sure to specify the full address of the server and protocol (either https or http). Once you have specified all details, press “Log in” to authenticate with the server. 4.4 Entering and saving data Once you login, you will need to select the organisation unit, dataset and time period for which you wish to enter data. Once you have selected all of this, press the highlighted area to proceed to the data entry screen. 20
4 Android aggregate data capture app                                       4.4 Entering and saving data

  Data entry in the android app is very straight-forward. Data elements are listed along with their
  category combination option. Just select the field for which you want to enter data by clicking it
  and entering the correct data value. Values will be saved locally to your device. When you finish
  entering data, press “Save” and data will be saved to the server.

                                                                                                       21
5 Android Tracker Capture App 5.1 Aperçu 5 Android Tracker Capture App 5.1 Aperçu The Tracker Capture Android app allows you capture, modify and list tracked entity instances with its enrolments and events. The Tracker Capture app works with multiple event-based programs in DHIS2, which handles events linked to registered entities. These programs are suitable for handling disease programmes where multiple visits is required. The Tracker Capture app can be used for disease programmes such as tuberculosis and malaria. However the app is not tied to any specific domain and can potentially be utilized for any scenario of multiple event- based information. The Tracker Capture app allows you to capture events offline, i.e. without Internet connectivity. The app will automatically synchronize events with the online DHIS2 server automatically when connectivity is present. This makes the app suitable for environments where Internet connectivity is scarce or unstable. 5.2 Installing and logging in The Tracker Capture app can be found on Google Play under the name “DHIS2 Tracker Capture”. Tracker Capture on Google Play You can download the APK file directly from the GitHub release page. Tracker Capture GitHub releases Click on the app to open it after the installation is done. This will bring up the login screen. 22
5 Android Tracker Capture App 5.2 Installing and logging in
In the URL field, enter the full URL to the DHIS2 instance (server) for which you want to capture
and manage data for. Be careful to enter the http:// or https:// part of the URL as well. In the
username and password field, enter the username and password for your account at the given
DHIS2 instance. Note that you can use this login on the online DHIS2 server as well, i.e. you will
be using the same account as you will use when logging into DHIS2 using a Web browser. After
logging in the first time, the app will download meta-data from the online instance.
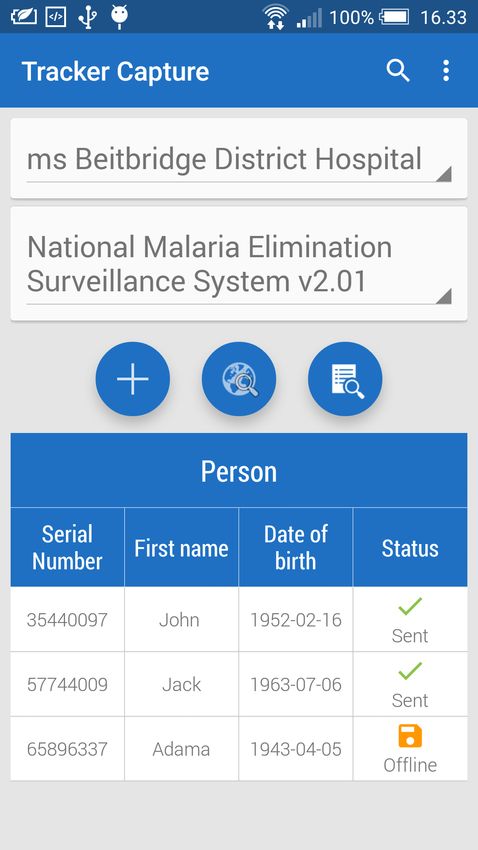
235 Android Tracker Capture App 5.3 Viewing Enrollments 5.3 Viewing Enrollments The main screen will show an overview of enrollments, as well as links to creating new ones. After the first login, there will be no enrollments showing up in the list. Start by selecting organisation unit and program from the selectors at the upper part of the screen. For downloading existing tracker data from the server on to your device, press the middle button. The + button below the selectors will take you to the new enrollment screen. Below this button, all enrollments which have been registered for the selected organisation unit and program will be listed. Each column is configurable, and could show various types of information from each 24
5 Android Tracker Capture App                     5.4 Creating and enrolling a tracked entity instance

  enrollment. The column to the far right shows the synchronization status. Sent means that the
  enrollment has been uploaded to the server, whereas Offline means that the enrollment is so far
  only stored at your device. Locally stored data will be synchronized automatically once an
  Internet connection is present. You can swipe down on the screen in order to trigger a
  synchronization attempt.

  5.4 Creating and enrolling a tracked entity instance

  Click on the + button to go to the new enrollment form. The new enrollment will be associated
  with the organisation unit and program you selected previously and the tracked entity instance
  that you create with this form. The new enrollment screen has a range of functions:

                                                                                                    25
5 Android Tracker Capture App 5.4 Creating and enrolling a tracked entity instance The back button in the top top-left corner will take you back to the main screen (list of enrollments). The save button in the top-right corner will automatically save what you have entered for the enrollment so far. The first form field contains a date selector and indicators the time of when the enrollment took place. If your program is selected to accept incident date, this will also be displayed. The labels is customizable and will vary from system to system. The enrollment data entry form itself will be rendered below. The type of input field selector will depend on the type of the data element representing the input field. For example, you will see 26
5 Android Tracker Capture App            5.5 Downloading tracker data from the online DHIS2 instance

  date selectors, free text input and numeric input fields. Data elements with predefined options
  will be rendered using a special dialog where you can either click directly on options or use a text
  input field to search for a specific option (useful if there is a high number of options).

  5.5 Downloading tracker data from the online DHIS2 instance

  From the main screen press the middle button for querying the server. Since this task requires an
  Internet connection, please make sure that you have one. This task will query the server with the
  organisation unit and programme that you have selected from the main screen. After you have
  pressed this button a dialog appears. In this dialog you can either specify your search by pressing

                                                                                                         27
5 Android Tracker Capture App 5.5 Downloading tracker data from the online DHIS2 instance the detailed search button. The detailed search queries the server for tracked entity instances that contains the values that you have specified in your query. When you are finished with your query, press the globe for displaying the results from the server. If you want to display all tracked entity instances from the selected organisation unit and programme, you can simply press the globe button without entering any details. Depending on your Internet connection, this task can take some time so please be patient. A new dialog will present a list of results from your query containing tracked entity instances. Select the tracked entity instances that you want to download by tapping on them (A green tick on the right side will indicate that you have selected the tracked entity instance). After you have selected all your tracked entity instances that you want to download, press the download button, that has an icon with a downwards arrow, at the top of the dialog screen. The tracked entity instances will be downloaded in the background and the synchronization wheel will be displayed. When a tracked entity instance is finished downloading it will appear in the list at the bottom of the main screen. 28
5 Android Tracker Capture App 5.6 Modifying enrollment and tracked entity instance attribute values

  5.6 Modifying enrollment and tracked entity instance attribute values

  After an enrollment has been created you can go back to or modify the event by simply clicking
  on it in the enrollment list. This will open an overview screen of the enrolled tracked entity
  instance with information that has been captured so far. To change the tracked entity instance
  attribute values that has been captured, simply press the profile box and a new screen will
  appear. By default the data entry rows will be disabled. To enable the data entry rows press the
  edit button in the top-right corner. This form will save whenever you do any changes. To change
  enrollment details, press the Enrollment box from the overview screen. To make the rows
  editable, press the edit button in the top-right corner. Data is automatically saved whenever

                                                                                                     29
5 Android Tracker Capture App 5.7 Creating new events for Enrollment changes is done. In the Overview screen you can also choose to complete or terminate the enrollment for the tracked entity instance. When an enrollment is completed or terminated, you will not be able to modify the data 5.7 Creating new events for Enrollment In the main screen click on any enrollment in the list to go into the Overview screen. This screen displays the information of the enrollment and the tracked entity instance with its relationships and active events. Some events is auto generated with the enrollment and therefore is already displayed in the list. This is customizable from the server side. Click on the new button to 30
5 Android Tracker Capture App                                   5.7 Creating new events for Enrollment

  generate a new event and go to the event form. The new event will be associated with the
  enrollment that you selected previously. The new event screen has a range of functions:

  The back button in the top top-left corner will take you back to the main screen (list of events).
  For programs that have specified sections, these sections will be displayed as a selector at the
  centre of the top bar. There are also right and left arrows which you can use to move between
  sections. You can use this selector and arrows to quickly navigate between form sections. The
  save button in the top-right corner will save what you have entered for the event so far. Data is
  also saved when you switch between sections.

                                                                                                       31
5 Android Tracker Capture App 5.7 Creating new events for Enrollment The Complete button on the second bar will mark the event as complete. The Validate button will trigger a check for validity of the information you have entered based on the validation rules which have been set up for the program. The first form field contains a date selector and indicators the time of when the event took place. The label is customizable and will vary from system to system. The Enter coordinates field, which will be displayed if the program is configured to store coordinates, lets you use the GPS capability of your device to set the longitude and latitude of your current location by pressing the circle-like symbol to its right. You can alternatively enter the coordinates directly. The event entry form itself will be rendered below. The type of input field selector will depend on the type of the data element representing the input field. For example, you will see date selectors, free text input and numeric input fields. Data elements with predefined options will be rendered using a special dialog where you can either click directly on options or use a text input field to search for a specific option (useful if there is a high number of options). 32
5 Android Tracker Capture App                                                    5.8 Create relationships

  5.8 Create relationships

  Relationships let you create links between different tracked entity instances. This could be useful
  in cases where you want to map the relationships between parents and children or persons with
  malaria breeding sites. To add a new relationship, first press the ‘new’ button on the relationship
  box. Now a dialog is presented where you can choose which relationship you want to create from
  the ‘Select relationship type’ input field. Below there is a list of tracked entity instances that are
  already enrolled in the same programme and thus can be chosen. After choosing a tracked entity
  instance and confirming the relationship then it will show up in the Overview screen.

                                                                                                           33
5 Android Tracker Capture App 5.9 Settings 5.9 Settings The settings screen lets you do configure synchronization frequency and log out. 34
5 Android Tracker Capture App                                                              5.9 Settings

  The frequency of automatic synchronization attemps can be set form the drop-down, where
  options range from one minute to one day. This affects the battery usage and bandwidth
  consumption. The default of one hour is a sensible choice.

  The log out button will log you out of the app, and request you to enter the login information
  again. You are not intended to log out of the application between each session. This is mostly
  useful when you want to log into another DHIS2 online instance.

                                                                                                    35
Vous pouvez aussi lire