COOPER Montageanleitung - Rika Nord Loire
←
→
Transcription du contenu de la page
Si votre navigateur ne rend pas la page correctement, lisez s'il vous plaît le contenu de la page ci-dessous

COOPER Montageanleitung
Varianten

Cooper RAO (Rauchrohr-Anschluss oben)        E15699             Cooper AH (Anschluss hinten)   E15700

Lieferumfang E15699                                         Lieferumfang E15700

                             1x Z36524                                                      1x Z36525
                             Konvektionsdeckel RAO                                          Konvektionsdeckel AH

                             6x N112248                                                     6x N112248
                             Befestigungsschraube                                           Befestigungsschraube

                             6x N111801                                                     6x N111801
                             Stellschraube                                                  Stellschraube

Zeichenerklärung

       ...wichtiger Hinweis                       ...Innensechskant #2 , #3                 ...Innensechsrund T25
                                             #2                                       #25

       ...praktischer Tipp                        ...per Hand                               ...Eisensägeblatt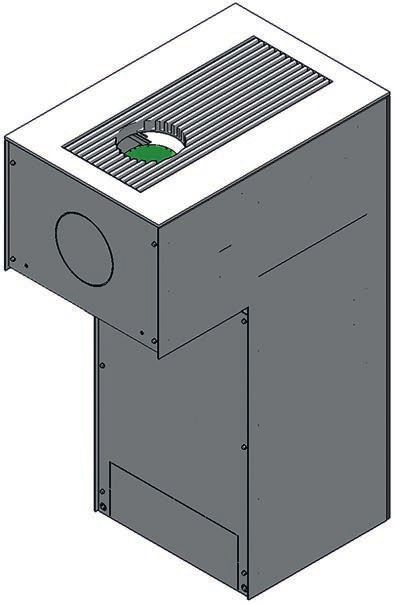
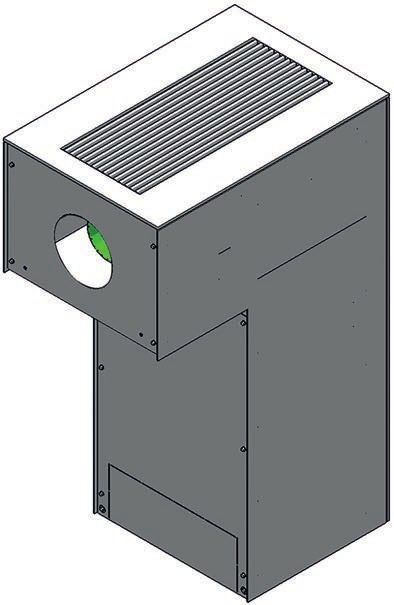
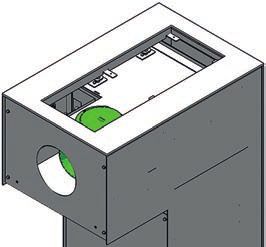
Auslieferungszustand Ofen                                                     2. COOPER AH

                                                                                                                                                            DE
                                                                              1. Schneiden Sie die Rückwand entlang der Perforierung aus.

                                                                              Lösen Sie die Schrauben des Rauchrohrstutzens oben und des Blinddeckels
                                                                              hinten.

                                                                                                                                                      #25

                                                                              Tauschen Sie den Rauchrohrstutzen und den Blinddeckel gegeneinander aus.
Hinweis                                                                       Entnehmen Sie den Blinddeckel dabei vorsichtig, um die Verkleidung nicht zu
Bei allen Umbautätigkeiten sollten Sie besonders auf Ihre Finger bzw. alle    zerkratzen.
Verkleidungsteile und Ofenanbauteile achten. Wählen Sie weiche Unterlagen,
damit Sie Ihre Wohnraumeinrichtung bzw. die Ofenverkleidungsteile nicht
beschädigen.

1. COOPER RAO
Legen Sie den Konvektionsdeckel auf den Ofen auf. Schrauben Sie die
Befestigungsschrauben ein, und richten Sie den Deckel mit Hilfe der
Stellschrauben bündig ein.

                                                                        #2

                                                                                                                                                      #25

                                                                        #3

Wenn Sie die Stellschrauben im Uhrzeigersinn drehen heben Sie den Deckel an
der betreffenden Stelle, mit den Befestigungsschrauben fixieren Sie ihn.
                                                                              Hinweis
                                                                              Bitte achten Sie auf eine dichte Ausführung!

                                                                              Die Montage des Konvektionsdeckel ist unter „Cooper RAO“ beschrieben.

Hinweis
Bitte achten Sie beim Anschluss des Rauchrohres auf eine dichte Ausführung!

                                                                                                                                               2   |3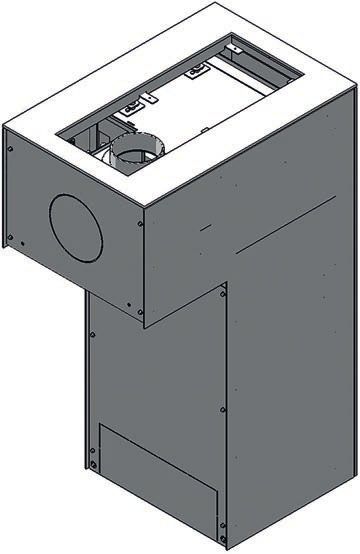
Technische und optische Änderungen, sowie Satz- und Druckfehler vorbehalten
© 2015 | RIKA Innovative Ofentechnik GmbH

                                                                                                                Z36526_Cooper_Montage_AH_RAO_DE_FR_IT_EN | 24.09.2015

                                                                  RIKA Innovative Ofentechnik GmbH
                                                                  4563 Micheldorf / Austria, Müllerviertel 20
                                                                  Telefon: +43 7582 686 - 41, Fax-DW: 43
                                                                  E-Mail: verkauf@rika.at

                                                                  RIKA.AT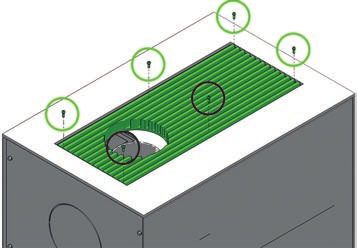
COOPER
Notice de montage
Variations

Cooper RAO (Raccordement en haut)       E15699                     Cooper AH (Raccordement à l‘arrière)   E15700

Eléments fournis E15699                                        Eléments fournis E15700

                              1x Z36524 Couvercle de                                           1x Z36525 Couvercle de
                              convection RAO                                                   convection AH

                              6x N112248 Vis de fixation                                       6x N112248 Vis de fixation

                              6x N111801                                                       6x N111801
                              Vis de réglage                                                   Vis de réglage

Explication des symboles

        ...Information importante                   ...Clef pour six pans #2 , #3              ...Clef pour vis étoile T25
                                               #2                                        #25

        ...Conseil pratique                         ...à la main                               ...Scie à métaux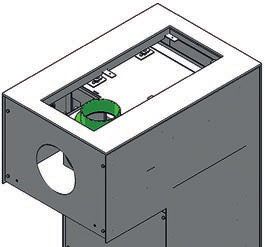
État de livraison                                                                  2. COOPER AH
                                                                                   2. Découpez la paroi arrière le long de la perforation marquée avec une lame
                                                                                   de scie de fer.

                                                                                                                                                                      FR
                                                                                   Devissez les vis du manchon de sortie de fumée en haut et du couvercle de
                                                                                   derrière.

                                                                                                                                                              #25

Attention
Faites particulièrement attention à vos doigts ainsi qu’aux différentes parties    Enlevez le couvercle de derrière avec précaution pour ne pas érafler le manteau.
du revêtement et aux modules du poêle pendant ces opérations. Placez les           Echangez le manchon de sortie de fumée du dessus avec le couvercle de
composants sur une surface douce pour éviter les éraflures.                        derrière.

1. COOPER RAO
Mettez le couvercle de convection au poêle. Positionnez les vis de fixation et
faites attention à ce que la surface du couvercle soit parfaitement alignées au
moyen des 4 vis de réglage.

                                                                            #2

                                                                            #3

                                                                                                                                                              #25

Tournez les vis de réglage dans le sens des aiguilles d’une montre pour soulever
le couvercle. Revissez les vis de fixation.

                                                                                   Attention à faire un montage étanche !

                                                                                   Pour la montage du couvercle de convection veuillez voir la déscription de
                                                                                   „Cooper RAO“.

Attention
Le raccordement au conduit doit être réalisé de façon étanche !

                                                                                                                                                         6   |7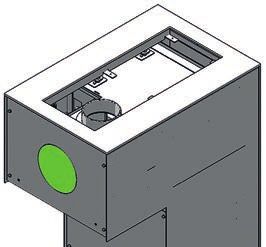
Sous réserve de modifications techniques et visuelles et d´erreurs de composition et d´impression.
© 2015 | RIKA Innovative Ofentechnik GmbH

                                                                                                                  Z36526_Cooper_Montage_AH_RAO_DE_FR_IT_EN | 24.09.2015

                                                                    RIKA Innovative Ofentechnik GmbH
                                                                    4563 Micheldorf / Austria, Müllerviertel 20
                                                                    Telefon: +43 7582 686 - 41, Fax-DW: 43
                                                                    E-Mail: verkauf@rika.at

                                                                    RIKA.AT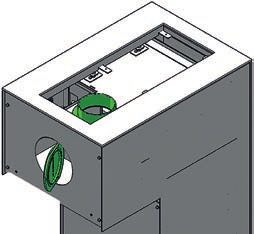
COOPER
Istruzioni di montaggio
Varianti

Cooper RAO (Raccordo superiore)        E15699                     Cooper AH (Raccordo posteriore)   E15700

Dotazione E15699                                                 Dotazione E15700

                                 1x Z36524 Coperchio                                         1x Z36525 Coperchio
                                 raccordo superiore                                          raccordo posteriore

                                 6x N112248 Vite di                                          6x N112248 Vite di
                                 fissaggio                                                   fissaggio

                                 6x N111801 Vite                                             6x N111801 Vite
                                 regolatrice                                                 regolatrice

Spiegazione dei simboli

                                                        ...Vite a testa cava
           ...Informazione importante                                                   ...Vite a stella T25
                                                        esagonale #2 , #3
                                                   #2                             #25

           ...Consigli pratici                          ...Manualmente                  ...Seghetto di ferro
Stato della stufa al momento della consegna 2. COOPER AH
Tagliare lo schienale con una sega da ferro seguendo la perforazione.
IT
Togliere le viti dal raccordo tubo che si trova sopra e dal coperchio posteriore.
#25
Scambiare il raccordo tubo e il coperchio uscita fumi. Togliere il coperchio con
cautela in modo da non graffiare gli elementi di rivestimento della stufa.
Attenzione
In occasione di tutti gli interventi occorre prestare particolare attenzione
alle dita ovv. a tutti gli elementi di rivestimento e ai componenti della stufa.
Scegliere basi di appoggio morbide in modo da non graffiare l’arredamento
della stanza ovv. gli elementi di rivestimento della stufa.
1. COOPER RAO
Appoggiare il top sulla stufa. Avvitare le vite di fissaggio e assicurarsi della
giusta posizione del coperchio a mezzo di vite regolatrice.
#2
#25
#3
Per sollevare il coperchio diffusore girare i vite regolatrice in senso orario, il
coperchio si alza. Fissarlo con le viti di fissaggio.
Attenzione
Fare attenzione alla perfetta tenuta!
Per la montaggio di coperchio vedere la descrizione „Cooper RAO“.
Attenzione
Fare attenzione alla perfetta tenuta!
10 |11Con riserva di modifiche tecniche e visive, come anche di errori di stampa e composizione.
© 2015 | RIKA Innovative Ofentechnik GmbH
Z36526_Cooper_Montage_AH_RAO_DE_FR_IT_EN | 24.09.2015
RIKA Innovative Ofentechnik GmbH
4563 Micheldorf / Austria, Müllerviertel 20
Telefon: +43 7582 686 - 41, Fax-DW: 43
E-Mail: verkauf@rika.at
RIKA.ATCOOPER Assembly Manual
Versions

Cooper RAO (flue pipe connection top)    E15699                Cooper AH (flue pipe connection rear)   E15700

Scope of delivery E15699                                       Scope of delivery E15700

                               1x Z36524 Cover RAO                                          1x Z36525 Cover AH

                               6x N112248 Fixing screw                                      6x N112248 Fixing screw

                               6x N111801 Adjusting                                         6x N111801 Adjusting
                               screw                                                        screw

Explanations to symbols

           ...Important note                     ...Allen key #2 / #3                       ...Hexalobular T25
                                            #2                                        #25

           ...Useful tip                         ...Manually                                ...Hacksaw
Delivery state stove 2. COOPER AH
Cut the rear wall along the perforation with a hacksaw.
EN
Remove the screws of the flue outlet on top and of the rear blind cover.
#25
Replace the flue outlet from the top and the rear cover against each other. Be
sure to remove the cover carefully not to scratch the panel.
Note
During any conversion work, take particular care of your fingers and any
panels and stove attachments. Select soft bases to prevent scratches to your
living space furniture and stove panels.
1. COOPER RAO
Put the cover on the stove and turn the fixing screws in. Make sure the cover is
flush and adjust it with the adjusting screws.
#2
#25
#3
If you turn the adjusting screws clockwise, the cover is lifting, then tighten the
fixing screws.
Note
Make sure that everything is air tight!
For the mounting of the cover look up the description in „Cooper RAO“.
Note
Make sure that everything is air tight!
14 |15Technical and design changes, as well as typesetting and printing errors reserved
© 2015 | RIKA Innovative Ofentechnik GmbH
Z36526_Cooper_Montage_AH_RAO_DE_FR_IT_EN | 24.09.2015
RIKA Innovative Ofentechnik GmbH
4563 Micheldorf / Austria, Müllerviertel 20
Telefon: +43 7582 686 - 41, Fax-DW: 43
E-Mail: verkauf@rika.at
RIKA.ATCOOPER Montagehandleiding
Varianten

Cooper RAO (Rookgasaansluiting bovenaan)     E15699        Cooper AH (Rookgasaansluiting achteraan)   E15700

Inhoud levering E15699                                     Inhoud levering E15700

                           1x Z36524 Deksel RAO                                        1x Z36525 Deksel AH

                           6x N112248 Vijs                                             6x N112248 Vijs
                           bevestiging                                                 bevestiging

                           6x N111801 Stelschroef                                      6x N111801 Stelschroef

Verklaring symbolen

       ...Belangrijke aanwijzing              ...Binnenzeskant #2 , #3                 ...T25
                                        #2                                       #25

       ...Praktische tip                      ...Manueel                               ...Saagblad voor ijzer
Levering kachel 4. COOPER AH
NL
Snijd de geperforeerde opening aan de achterzijde uit met een zaagblad voor
ijzer.
Maak de vijzen los van het rookgasaansluitstuk bovenaan en van de afdekplaat
achteraan.
#25
Aanwijzing
Tijdens alle werkzaamheden voorzichtig zijn voor uw handen. Gebruik zachte Wissel de aansluiting van het rookgaskanaal, die standaard aan de bovenzijde
ondergronden om de beschadiging van uw ondergrond en van de onderdelen zit, met de afdekplaat die aan de achterzijde is gemonteerd. Wees voorzichtig
te vermijden. tijdens het verwijderen van het afdekplaat om de bekleding niet te beschadigen.
3. COOPER RAO
Plaats het deksel op de kachel en draai de befestiging-vijzen in. Het deksel moet
in hetzelfde oppervlak liggen van de bovenkant.
#2
#3
#25
Draai de stelschroeven in wijzerzin en de deksel komt op. De vijzen voor
befestiging van de deksel vastdraaien.
Aanwijzing
Let op de luchtdichte aansluiting!
Aanwijzing Voor de montage van de convectiedeksel zie „Cooper RAO“.
Let op de luchtdichte aansluiting!
18 |19Technische en optische wijzigingen, zoals spelling- of drukfouten voorbehouden .
© 2015 | RIKA Innovative Ofentechnik GmbH
Z36526_Cooper_Montage_AH_RAO_DE_FR_IT_EN | 24.09.2015
RIKA Innovative Ofentechnik GmbH
4563 Micheldorf / Austria, Müllerviertel 20
Telefon: +43 7582 686 - 41, Fax-DW: 43
E-Mail: verkauf@rika.at
RIKA.ATVous pouvez aussi lire