HIGH POWER CEILING MOUNT WIRELESS 300N POE ACCESS POINT QUICK INSTALL GUIDE - MODEL 525251
←
→
Transcription du contenu de la page
Si votre navigateur ne rend pas la page correctement, lisez s'il vous plaît le contenu de la page ci-dessous
HIGH POWER
CEILING MOUNT
WIRELESS 300N
POE ACCESS POINT
QUICK INSTALL GUIDE
MODEL 525251

           intellinet-network.com

                                    INT-525251-QIG-ML1-0214-02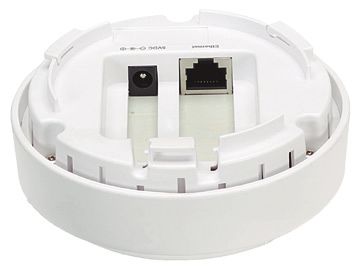
Wireless 300N PoE Access Point • Quick Install Guide English
Thank you for purchasing this Intellinet Network Solutions™ High Power Ceiling Mount
Wireless 300N PoE Access Point, Model 525251. This quick install guide presents basic
installation steps. For operation details and specifications, refer to the user manual on
the included CD or at intellinet-network.com.
CONNECTIONS
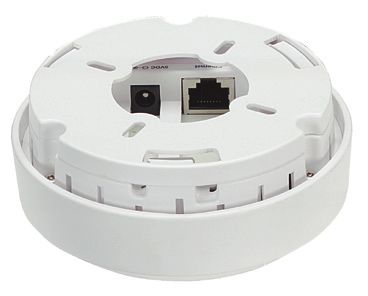
1. Remove the back panel of the access point and mount it (ceiling, wall, post, etc.)
where the cables will reach. NOTE: Placing the access point out of easy reach may
require that you use the Web management interface for the WPS and Reset functions.
2. Connect your Ethernet cable and the power adapter to the main chassis of the
access point. NOTE: Set both cables flush in the channel openings opposite the ports.
3. Twist the main chassis onto the back panel and connect the other end of the two
cables. NOTE: You can connect the access point to an IEEE802.3af PoE-compliant
source instead of an AC wall outlet.
1
2
LAN WLAN PWR
Reset/WPS
3 4
4. Check all LEDs on the front panel. The PWR and LAN LEDs should both be on to
indicate the access point is powered and connected properly. The WLAN LED will
light when WPS mode is enabled (refer to the user manual); both the LAN and WLAN
LEDs will blink when data is transmitted.
OPERATION
1. Enter http://192.168.2.1 on your Web browser to display a login window for the Web
management interface, where all functions and settings for the access point are
configured.
2. Enter “admin” for username and “1234” for
password, then click “OK” to display the User name:
home page of the interface. Refer to the user Password:
manual for further instructions.
2
ENGLISHWireless 300N PoE Access Point • Kurzanleitung Deutsch
Vielen Dank für den Kauf des Intellinet Network Solutions™ High Power Wireless 300N
PoE Access Point zur Deckenmontage, Modell 525251. Diese Kurzanleitung zeigt die
grundlegenden Installationsschritte. Details zur Anwendung sowie die Spezifikationen
finden Sie im Benutzerhandbuch auf der beiliegenden CD und auf intellinet-network.
com.
ANSCHLÜSSE
1. Drehen Sie die Halterung des Access Points ab und montieren Sie sie dort (Decke,
Wand, Mast, etc.) wo die Kabel angeschlossen werden sollen. HINWEIS: Wenn Sie den
Access Point an einer schwer zugänglichen Stelle platzieren, müssen Sie eventuell
das Web Interface für die WPS- und Reset-Funktionen verwenden.
2. Schließen Sie Ihr Ethernet-Kabel und das Netzteil an den Access Point an. HINWEIS:
Platzieren Sie beide Kabel in den Kabeldurchführungen vor den jeweiligen Ports.
3. Drehen Sie den Access Point auf die Halterung und verbinden Sie die Kabel für Strom-
und Netzwerkanschluss. HINWEIS: Statt an eine Wandsteckdose können Sie den
Access Point auch über das Netzwerkkabel an eine IEEE802.3af PoE-kompatible
Stromquelle anschließen.
1
2
LAN WLAN PWR
Reset/WPS
3 4
4. Prüfen Sie alle LEDs auf der Vorderseite. Die PWR- und LAN-LEDs sollten beide
leuchten und zeigen so die ordnungsgemäße Stromversorgung und Verbindung
an. Die WLAN-LED leuchtet, wenn der WPS-Modus aktiviert ist (siehe Benutzer-
handbuch); die LAN- und WLAN-LEDs blinken, wenn Daten übertragen werden.
BETRIEB
1. Geben Sie http://192.168.2.1 in die Adresszeile Ihres Webbrowsers ein, um ein Login-
Fenster aufzurufen. Über dieses gelangen Sie zur Benutzeroberfläche, auf der Sie
alle Funktionen und Einstelllungen des
Access Points zugreifen können.
2. Geben Sie “admin” als Benutzernamen und User name:
“1234” als Passwort ein, dann klicken Sie auf Password:
“OK”. So gelangen Sie ins Einstellungshaupt-
menü. Details hierzu finden Sie im
Benutzerhandbuch.
3
DEUTSCH
Access Point 300N con PoE • Guía de Instalación Rápida                                 Español
Gracias por adquirir el Access Point 300N con PoE de Alta Potencia para montaje en
techo de Intellinet Network Solutions™, Modelo 525251. En esta guía de instalación
rápida se presentan los pasos básicos para su instalación. Para detalles de operación y
más especificaciones, refiérase al manual de usuario incluido en el CD o visite
intellinet-network.com.
CONEXIONES
1. Retire el panel trasero del access point y móntelo (en pared, techo, columna, etc.)
		 donde lleguen los cables. NOTA: Coloque el access point de tal forma que le sea fácil
		 alcanzar las funciones tales como WPS y Reset.
2. Conecte el cable Ethernet y el cargador a la estructura principal del access point.
		 NOTA: Fije ambos cables en las aberturas frente a los puertos.
3. Inserte y gire la estructura principal en el panel trasero y conecte el otro extremo de
		 los dos cables. NOTA: Puede conectar el access point en un inyector de corriente PoE
		 IEEE802.3af en lugar de una toma de corriente.

                       1
                                                       2
                                                                         LAN WLAN PWR

                                                                           Reset/WPS

          3                                                                              4
4. Verifique todos los LEDs en el panel frontal. Los LEDs PWR y LAN deben estar
		 encendidos, indicando que el Access Point está conectado adecuadamente. El LED
		 WLAN se encenderá cuando el modo WPS este activado (refiérase al manual de
		 usuario); Tanto el LED de LAN como el de WLAN parpadean al transmitir datos.
OPERACIÓN
1. En su navegador web entre a http://192.168.2.1 para abrir la ventana de inicio de
		 sesión del Administrador Web, donde puede
		 configurar todas las funciones y ajustes del
		 Access Point.                                  User name:
2. Ingrese como usuario “admin” y contraseña      Password:
		 “1234” haga clic en “Aceptar” para mostrar la
		 página de inicio de la interface. Refiérase al
		 manual de usuario para más instrucciones.


  4
          ESPAÑOL
Point d’Accès sans Fil PoE 300N • Guide d’installation rapide Français
Merci d’avoir acheté le point d’accès sans fil PoE 300N “High Power” pour montage au
plafond Intellinet Network Solutions™, modèle 525251. Ce guide décrit les bases pour
installer le dispositif. Vous trouvez les détails et spécifications dans le manuel utilisateur
sur le CD inclus ou sur intellinet-network.com.
CONNEXIONS
1. Soulevez le support du point d’accès et montez le (plafond, mur, poteau, etc.) où les
câbles seront connectés. REMARQUE: Si vous installez le point d’accès à une place
difficile à accéder, vous devriez utiliser l’interface Web pour les fonctions WPS et Reset.
2. Connectez votre câble Ethernet et l’adaptateur secteur au point d’accès. REMARQUE:
Insérez les deux câbles platement dans les emplacements devant les ports.
3. Mettez le point d’accès sur la fixation et connectez les câbles pour l’alimentation et la
connexion réseau. REMARQUE: Au lieu d’une prise de courant murale, vous pouvez
aussi connecter le câble Ethernet à une source PoE compatible IEEE 802.3af.
1
2
LAN WLAN PWR
Reset/WPS
3 4
4. Vérifiez toutes les DELs au panneau avant. Les DELs PWR et LAN devraient être
allumées pour afficher que le point d’accès est alimenté et connecté correctement.
La DEL WLAN s’allume si le mode WPS est activé (veuillez lire le manuel utilisateur);
les DELs LAN et WLAN clignotent si des données sont transmises.
UTILISATION
1. Saisissez http://192.168.2.1 dans votre navigateur Web, pour afficher une fenêtre de
login pour l’interface de gestion Web où toutes les fonctions et paramètres du point
d’accès peuvent être configurés.
2. Saisissez “admin” comme nom d’utilisateur
et “1234” comme mot de passe, puis cliquez User name:
sur “OK” pour afficher le menu général de Password:
l’interface. Veuillez lire le manuel utilisateur
pour plus d’instructions.
5
FRANÇAISSufitowy Access Point o dużej mocy PoE 300N • Instrukcja szybkiej instalacji Polski
Dziękujemy za zakup Bezprzewodowego Access Pointa PoE o wysokiej mocy Intellinet
Network Solutions™, model 525251. Niniejsza instrukcja szybkiej instalacji przedstawia
podstawowe kroki potrzebne do uruchomienia urządzenia. Aby uzyskać szczegółowe
informacje techniczne oraz podręcznik użytkownika, zapoznaj się z zawartością
dołączonej płyty CD lub odwiedź stronę intellinet-network.com.
PODŁĄCZENIE
1. Zdemontuj tylni panel Access Pointa i przykręć go (do sufitu, ściany, słupa, itp.), w
miejscu, gdzie będzie możliwość podłączenia przewodów. UWAGA: Umieść Access
Pointa w miejscu łatwo dostępnym, aby w razie konieczności mieć możliwość
skorzystania z portu sieciowego urządzenia oraz funkcji WPS oraz Reset.
2. Podłącz kabel Ethernet oraz adapter zasilania do Access Pointa. UWAGA: Umieść
przewody w specjalnych kanałach znajdujących się naprzeciwko portów.
3. Przymocuj Access Pointa do jego tylnego panelu, następnie podłącz drugie końce
przewodów. UWAGA: Zasilanie można podłączyć poprzez zgodny ze standardem
IEEE802.3af adapter, zamiast do gniazda sieci elektrycznej.
1
2
LAN WLAN PWR
Reset/WPS
3 4
4. Sprawdź aktywność diod na przednim panelu urządzenia. Diody PWR oraz LAN powinny
świecić sygnalizując zasilanie oraz poprawne połączenie. Dioda WLAN będzie świecić,
gdy włączona jest funkcja WPS (zapoznaj się z instrukcją użytkownika, aby uzyskać
więcej informacji); diody LAN oraz WLAN będą migać podczas transmisji danych.
OBSŁUGA
1. W pasek adresu przeglądarki internetowej wpisz adres http://192.168.2.1, aby
wyświetlić okno logowania, a następnie opcje konfiguracyjne urządzenia.
2. W pole nazwa użytkownika wpisz „admin”, w
pole hasło wpisz „1234”, następnie wciśnij
„OK”. Wyświetlona zostanie strona główna User name:
urządzenia. Zapoznaj się z instrukcją Password:
użytkownika, aby uzyskać dodatkowe
informacje.
6
POLSKI
Punto d’accesso Wireless 300N PoE • Guida rapida all’installazione                        Italiano
Grazie per aver acquistato questo punto d’accesso Wireless 300N PoE Intellinet Network
Solutions™ ad alta potenza da montare a soffitto, Modello 525251. Questa guida rapida
all’installazione fornisce solo i passaggi basilari per l’installazione. Per ulteriori dettagli
e specifiche relativamente al funzionamento, fare riferimento al manuale d’istruzione
incluso nel CD o visitare il sito intellinet-network.com.
CONNESSIONI
1.   Rimuovere il pannello posteriore del punto d’accesso e montarlo (soffitto, parete,
		   posto, ecc.) dove raggiungerà i cavi. NOTA: Posizionando il punto d’accesso fuori
		   portata, potrebbe essere necessario utilizzare l’interfaccia di gestione Web per il WPS
		   e le funzioni Reset.
2.   Collegare il cavo Ethernet e l’alimentatore al telaio principale del punto d’accesso.
		   NOTA: impostare entrambi i cavi a filo nelle aperture di canale di fronte alle porte.
3.   Torcere il telaio principale sul pannello posteriore e collegare l’altra estremità dei
		   due cavi. NOTA: È possibile collegare del punto d’accesso ad una fonte compatibile
		   PoE IEEE 802.3af, invece di una presa a muro.

                         1
                                                          2
                                                                            LAN WLAN PWR

                                                                              Reset/WPS

            3                                                                              4
4.   Verificare tutti i LED sul pannello frontale. Il LED PWR e LAN dovrebbero essere per
		   indicare che il punto di accesso è alimentato e connesso correttamente. Il LED WLAN si
		   illuminerà quando la modalità WPS è attivata (fare riferimento al manuale d’istruzione);
		   sia il LED LAN che il LED WLAN lampeggeranno quando i dati sono trasmessi.
FUNZIONAMENTO
1.   Inserire http://192.168.2.1 sul Web browser per visualizzare una finestra di login per
		   la gestione dell’interfaccia Web, dove tutte le funzioni e le impostazioni per il punto
		   di accesso sono configurate.
2.   Inserire “admin” come username e “1234”
		   come password, quindi cliccare “OK” per           User name:
		   visualizzare l’home page dell’interfaccia.        Password:
		   Fare riferimento al manuale d’istruzione
		   per ottenere ulteriori istruzioni.


                                                                                               7
                                                                         ITALIANO
WASTE ELECTRICAL & ELECTRONIC EQUIPMENT
                        Disposal of Electric and Electronic Equipment
(applicable in the European Union and other European countries with separate collection systems)

ENGLISH
This symbol on the product or its packaging indicates that this product shall not be treated as household waste.
              Instead, it should be taken to an applicable collection point for the recycling of electrical and
              electronic equipment. By ensuring this product is disposed of correctly, you will help prevent
              potential negative consequences to the environment and human health, which could otherwise
              be caused by inappropriate waste handling of this product. If your equipment contains easily
              removable batteries or accumulators, dispose of these separately according to your local
              requirements. The recycling of materials will help to conserve natural resources. For more
detailed information about recycling of this product, contact your local city office, your household waste
disposal service or the shop where you purchased this product. In countries outside of the EU: If you wish
to discard this product, contact your local authorities and ask for the correct manner of disposal.
DEUTSCH
Dieses auf dem Produkt oder der Verpackung angebrachte Symbol zeigt an, dass dieses Produkt nicht mit
dem Hausmüll entsorgt werden darf. In Übereinstimmung mit der Richtlinie 2002/96/EG des Europäischen
Parlaments und des Rates über Elektro- und Elektronik-Altgeräte (WEEE) darf dieses Elektrogerät nicht
im normalen Hausmüll oder dem Gelben Sack entsorgt werden. Wenn Sie dieses Produkt entsorgen
möchten, bringen Sie es bitte zur Verkaufsstelle zurück oder zum Recycling-Sammelpunkt Ihrer Gemeinde.
ESPAÑOL
Este símbolo en el producto o su embalaje indica que el producto no debe tratarse como residuo doméstico.
De conformidad con la Directiva 2002/96/CE de la UE sobre residuos de aparatos eléctricos y electrónicos
(RAEE), este producto eléctrico no puede desecharse con el resto de residuos no clasificados. Deshágase de
este producto devolviéndolo a su punto de venta o a un punto de recolección municipal para su reciclaje.
FRANÇAIS
Ce symbole sur Ie produit ou son emballage signifie que ce produit ne doit pas être traité comme un
déchet ménager. Conformément à la Directive 2002/96/EC sur les déchets d’équipements électriques
et électroniques (DEEE), ce produit électrique ne doit en aucun cas être mis au rebut sous forme de
déchet municipal non trié. Veuillez vous débarrasser de ce produit en Ie renvoyant à son point de
vente ou au point de ramassage local dans votre municipalité, à des fins de recyclage.
ITALIANO
Questo simbolo sui prodotto o sulla relativa confezione indica che il prodotto non va trattato come un rifiuto
domestico. In ottemperanza alla Direttiva UE 2002/96/EC sui rifiuti di apparecchiature elettriche ed
elettroniche (RAEE), questa prodotto elettrico non deve essere smaltito come rifiuto municipale misto. Si
prega di smaltire il prodotto riportandolo al punto vendita o al punto di raccolta municipale locale per un
opportuno riciclaggio.
POLSKI
Jeśli na produkcie lub jego opakowaniu umieszczono ten symbol, wówczas w czasie utylizacji nie wolno
wyrzucać tego produktu wraz z odpadami komunalnymi. Zgodnie z Dyrektywą Nr 2002/96/WE w sprawie
zużytego sprzętu elektrycznego i elektronicznego (WEEE), niniejszego produktu elektrycznego nie wolno
usuwać jako nie posortowanego odpadu komunalnego. Prosimy o usuniecie niniejszego produktu
poprzez jego zwrot do punktu zakupu lub oddanie do miejscowego komunalnego punktu zbiórki
odpadów przeznaczonych do recyklingu.

  8
WARRANTY INFORMATION
ENGLISH: For warranty information, go to intellinet-network.com/warranty.
DEUTSCH: Garantieinformationen finden Sie unter intellinet-network.com/warranty.
ESPAÑOL: Si desea obtener información sobre la garantía, visite intellinet-network.com/warranty.
FRANÇAIS: Pour consulter les informations sur la garantie, visitez intellinet-network.com/warranty.
POLSKI: Informacje dotyczące gwarancji znajdują się na stronie intellinet-network.com/warranty.
ITALIANO: Per informazioni sulla garanzia, accedere a intellinet-network.com/warranty.
En México: Póliza de Garantía Intellinet — Datos del importador y responsable ante el consumidor
IC Intracom México, S.A.P.I. de C.V. • Av. Interceptor Poniente # 73, Col. Parque Industrial La Joya, Cuautitlán
Izcalli, Estado de México, C.P. 54730, México. • Tel. (55)1500-4500
La presente garantía cubre este producto por 3 años contra cualquier defecto de fabricación en sus
materiales y mano de obra, bajo las siguientes condiciones:
1. Todos los productos a que se refiere esta garantía, ampara su cambio físico, sin ningún cargo para
el consumidor.
2. El comercializador no tiene talleres de servicio, debido a que los productos que se garantizan no
cuentan con reparaciones, ni refacciones, ya que su garantía es de cambio físico.
3. La garantía cubre exclusivamente aquellas partes, equipos o sub-ensambles que hayan sido instaladas de
fábrica y no incluye en ningún caso el equipo adicional o cualesquiera que hayan sido adicionados al
mismo por el usuario o distribuidor.
Para hacer efectiva esta garantía bastará con presentar el producto al distribuidor en el domicilio donde
fue adquirido o en el domicilio de IC Intracom México, S.A.P.I. de C.V., junto con los accesorios conteni-
dos en su empaque, acompañado de su póliza debidamente llenada y sellada por la casa vendedora
(indispensable el sello y fecha de compra) donde lo adquirió, o bien, la factura o ticket de com-
pra original donde se mencione claramente el modelo, número de serie (cuando aplique) y fe-
cha de adquisición. Esta garantía no es válida en los siguientes casos: Si el producto se hubiese
utilizado en condiciones distintas a las normales; si el producto no ha sido operado conforme a los
instructivos de uso; o si el producto ha sido alterado o tratado de ser reparado por el consumidor o
terceras personas.
North & South America Asia & Africa Europe
IC Intracom Americas IC Intracom Asia IC Intracom Europe
550 Commerce Blvd. Far Eastern Technology Center Löhbacher Str. 7
Oldsmar, FL 34677 7-F No. 125, Section 2, Da Tong Rd. D-58553 Halver
USA Shijr, Taipei Germany
Taiwan, ROC
All trademarks and trade names are the property of their respective owners.
Alle Marken und Markennamen sind Eigentum Ihrer jeweiligen Inhaber.
Todas las marcas y nombres comerciales son propiedad de sus respectivos dueños.
Toutes les marques et noms commerciaux sont la propriété de leurs propriétaires respectifs.
Wszystkie znaki towarowe i nazwy handlowe należą do ich właścicieli.
Tutti i marchi registrati e le dominazioni commerciali sono di proprietà dei loro rispettivi proprietari.
9REGULATORY STATEMENTS
FCC Class B
This equipment has been tested and found to comply with the limits for a Class B digital device,
pursuant to Part 15 of Federal Communications Commission (FCC) Rules. These limits are designed
to provide reasonable protection against harmful interference in a residential installation. This
equipment generates, uses and can radiate radio frequency energy, and if not installed and used
in accordance with the instructions may cause harmful interference to radio communications.
However, there is no guarantee that interference will not occur in a particular installation. If this
equipment does cause harmful interference to radio or television reception, which can be determined
by turning the equipment off and on, the user is encouraged to try to correct the interference by one or
more of the following measures:
• Reorient or relocate the receiving antenna.
• Increase the separation between the equipment and the receiver.
• Connect the equipment to an outlet on a circuit different from the receiver.
• Consult the dealer or an experienced radio/TV technician for help.
CE / R&TTE
English: This device complies with the requirements of R&TTE Directive 1999/5/EC.
The Declaration of Conformity for this product is available at:
Deutsch: Dieses Gerät enspricht der Direktive R&TTE Direktive 1999/5/EC.
Die Konformitätserklärung für dieses Produkt finden Sie unter::
Español: Este dispositivo cumple con los requerimientos de la Directiva R&TTE 1999/5/EC.
La declaración de conformidad para este producto esta disponible en:
Français: Cet appareil satisfait aux exigences de la directive R&TTE 1999/5/CE.
La Déclaration de Conformité pour ce produit est disponible à l’adresse :
Polski: Urządzenie spełnia wymagania dyrektywy R&TTE 1999/5/EC.
Deklaracja zgodności dostępna jest na stronie internetowej producenta:
Italiano: Questo dispositivo è conforme alla Direttiva 1999/5/EC R&TTE.
La dichiarazione di conformità per questo prodotto è disponibile al:
intellinet-network.com
10© IC Intracom. All rights reserved. Intellinet is a trademark of IC Intracom, registered in the U.S. and other countries.
Vous pouvez aussi lire