KURZANLEITUNG GUIDE RAPIDE GUIDA RAPIDA QUICK GUIDE - HUSQVARNA AUTOMOWER 550 EPOS
←
→
Transcription du contenu de la page
Si votre navigateur ne rend pas la page correctement, lisez s'il vous plaît le contenu de la page ci-dessous

KURZANLEITUNG
                        GUIDE RAPIDE
                        GUIDA RAPIDA
                        QUICK GUIDE

           HUSQVARNA AUTOMOWER® 550 EPOS

QG_P2Z_1142322.indd 1                      2021-11-29 14:30:56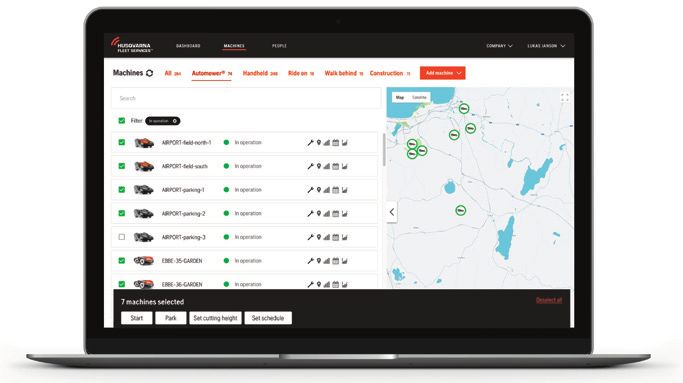
A              1

                                             2

                                                                      3
                                    2

                                                     4        5
                                8
                                        11               10

                            6                                                     6

                                                                          8
                                                         7
                                                                              9

         B
                                                                  B

                                                 A

QG_P2Z_1142322.indd 2                                                                 2021-11-29 14:30:58
de
                                                                                                                                          EN
               KURZANLEITUNG

               A        Eine Systemübersicht

                     Das EPOS-System umfasst einen Mähroboter, eine
                                                                                   C     Installation
                                                                                      Die Referenzstation und der Mähroboter benötigen eine
                     Ladestation und eine Referenzstation. Der Mähroboter             ungehinderte Sicht auf den Himmel, um zuverlässig und
                     und die Referenzstation empfangen Satellitensignale              unterbrechungsfrei arbeiten zu können.
                     zur Positionierung. Die Referenzstation ist stationär und
                     sendet Korrekturdaten an den Mähroboter, um eine              1. Installieren Sie die Automower® Connect-App und die
                     genaue Position des Mähers zu erhalten. Der                       Husqvarna Fleet Services™-App auf Ihrem Mobilgerät.
                     Arbeitsbereich wird virtuell in einer App erstellt. Mit ihr       Laden Sie die Apps aus dem App Store oder von Google
                     wird das Gerät bedient, und Wegpunkte werden                      Play herunter.
                     hinzugefügt, um in der App eine Karte zu erstellen.           2. Installieren Sie die Referenzstation. Weitere
                                                                                       Informationen finden Sie in der Bedienungsanleitung der
               1.    Navigationssatelliten                                             Referenzstation.
               2.    Satellitensignale                                             3. Installieren Sie die Ladestation.
               3.    Referenzstation                                               4. Verbinden Sie den Mähroboter mit der App.
               4.    Korrekturdaten                                                5. Verbinden Sie den Mähroboter mit der Referenzstation in
               5.    Ladestation                                                       der App.
               6.    Virtuelle Begrenzung                                          6. Verbinden Sie den Mähroboter mit der Ladestation, um
               7.    Verbotener Bereich                                                den Andockpunkt vor der Ladestation festzulegen.
               8.    Arbeitsbereich                                                7. Legen Sie den Arbeitsbereich fest, indem Sie das Gerät im
               9.    Mobilgerät                                                        Uhrzeigersinn mit appDrive um den Arbeitsbereich
               10.   Andockpunkt                                                       fahren und Wegpunkte auf der Karte in der App
               11.   Transportweg                                                      hinzufügen.
                                                                                   8. Legen Sie die verbotenen Bereiche fest, indem Sie das
               		 Für eine komplette Karteninstallation sind ein                       Gerät mit appDrive gegen den Uhrzeigersinn um den
                  Arbeitsbereich und eine Ladestation erforderlich. Ein                verbotenen Bereich fahren und Wegpunkte auf der Karte
                  Arbeitsbereich ist ein Bereich, in dem das Gerät                     in der App hinzufügen.
                  automatisch die Arbeit aufnimmt und Gras schneidet. Ein          9. Legen Sie den Transportweg fest, indem Sie das Gerät im
                  Arbeitsbereich wird durch virtuelle Begrenzungen                     Arbeitsbereich mit appDrive bedienen und Wegpunkte in
                  festgelegt. Die Ladestation kann im Arbeitsbereich oder              einer App auf der Karte hinzufügen. Beim Speichern des
                  in der Nähe des Arbeitsbereichs, der mit ihr über einen              Transportweges wird er mit dem Andockpunkt
                  Transportweg verbunden ist, aufgestellt werden. Ein                  verbunden.
                  Transportweg ist ein bestimmter Pfad zwischen dem                10. Legen Sie den Wartungspunkt fest und erstellen Sie einen
                  Andockpunkt und einem Arbeitsbereich. Das Gerät kann                 Pfad zur Ladestation. Starten Sie am Wartungspunkt und
                  auf diesem Pfad automatisch betrieben werden,                        bedienen Sie das Gerät mit appDrive, um auf der Karte in
                  schneidet aber kein Gras. Es können verbotene Bereiche               der App Wegpunkte hinzuzufügen. Der Pfad zur
                  eingerichtet werden, in denen das Gerät nicht arbeiten               Ladestation wird mit dem Andockpunkt verbunden, wenn
                  darf. Ein verbotener Bereich wird durch virtuelle                    Sie den Wartungspunkt speichern.
                  Begrenzungen festgelegt. Ein Wartungspunkt ist eine              11. Passen Sie mit der App den Zeitplan und die Einstellungen
                  bestimmte Position, an der das Gerät geparkt werden                  für den Mähroboter an.
                  kann.

                                                                                   Weitere Informationen finden Sie in der

               B        Konnektivität                                              Bedienungsanleitung der Referenzstation sowie
                                                                                   in der Bedienungsanleitung des Mähroboters.
               a. Die Automower® Connect-App wird für die Einstellungen
                  und den täglichen Betrieb des Geräts verwendet.
               b. Husqvarna Fleet Services™ ist eine Cloud-Lösung, mit der
                  Flottenmanager stets einen aktuellen Überblick über alle
                  Geräte haben. Sie ist als Webdienst und als App
                  verfügbar.

QG_P2Z_1142322.indd 3                                                                                                                         2021-11-29 14:30:59
fr
EN
GUIDE RAPIDE
A Présentation du système
Le système EPOS contient un robot tondeuse, une
C Installation
La station de référence et le robot tondeuse ont besoin
station de charge et une station de référence. Le robot d'une vue dégagée sur le ciel pour fonctionner de
tondeuse et la station de référence reçoivent des manière fiable et sans interruption.
signaux satellites pour le positionnement. La station de
référence est fixe et envoie des données de correction 1. Installez les applications Automower® Connect et
au robot tondeuse pour obtenir sa position précise. La Husqvarna Fleet Services™ sur votre appareil mobile.
zone de tonte est créée virtuellement dans une Téléchargez les applications depuis l'App Store ou Google
application en utilisant le produit et en ajoutant des Play.
points de réglage pour créer une carte dans une 2. Installez la station de référence. Pour plus d'informations
application. sur la station de référence, reportez-vous au manuel de
l'opérateur.
1. Satellites de navigation 3. Installez la station de charge.
2. Signaux satellites 4. Appairez le robot tondeuse avec l'application.
3. Station de référence 5. Appairez le robot tondeuse avec la station de référence
4. Données de correction dans l'application.
5. Station de charge 6. Appairez le robot tondeuse avec la station de charge pour
6. Périphérie virtuelle spécifier le point d'amarrage devant la station de charge.
7. Zone d'exclusion 7. Spécifiez la zone de travail en utilisant le produit dans le
8. Zone de travail sens des aiguilles d'une montre avec appDrive autour de
9. Appareil mobile la zone de travail et en ajoutant des points de réglage sur
10. Point d'amarrage la carte dans l'application.
11. Chemin de transport 8. Spécifiez les zones d'exclusion en utilisant le produit dans
le sens inverse des aiguilles d'une montre avec appDrive
Une zone de travail et une station de charge sont autour de la zone d'exclusion et en ajoutant des points de
nécessaires pour une installation complète de la carte. réglage sur la carte dans l'application.
Une zone de travail est une zone où le produit peut 9. Spécifiez le chemin de transport en démarrant dans la
fonctionner et tondre automatiquement l'herbe. Une zone de travail, en utilisant le produit avec appDrive et en
zone de travail est délimitée par des frontières virtuelles. ajoutant des points de passage sur la carte d'une
La station de charge peut être placée dans la zone de application. Lors de l'enregistrement du chemin de
travail ou à proximité de la zone de travail qui est reliée à transport, celui-ci est connecté à la station.
elle par un chemin de transport. Un chemin de transport 10. Spécifiez le point d'entretien et créez un chemin vers la
est un chemin délimité entre le point d'amarrage et une station de charge. Commencez au point d'entretien et
zone de travail. Le produit peut fonctionner utilisez le produit avec appDrive en ajoutant des points de
automatiquement dans ce chemin, mais ne coupe pas repère sur la carte de l'application. Le chemin vers la
l'herbe. Des zones à éviter peuvent être définies si le station de charge est connecté au point d'amarrage
produit n'est pas autorisé à fonctionner dans certaines lorsque vous enregistrez le point d'entretien.
zones. Une zone d'exclusion est délimitée par des 11. Utilisez l'application pour configurer le programme et les
frontières virtuelles. Un point d'entretien est une position réglages du robot tondeuse.
spécifiée où le produit peut être stationné.
B Connectivité Pour plus d'informations, lisez le manuel de
l'opérateur de la station de référence et le manuel
a. L'application Automower® Connect est utilisée pour les de l'opérateur du robot tondeuse.
réglages et le fonctionnement quotidien du produit.
b. Husqvarna Fleet Services™ est une solution cloud qui
permet au gestionnaire du parc commercial d'avoir un
aperçu à jour de tous les produits. Elle est disponible en
tant que service Web et en tant qu'application.
QG_P2Z_1142322.indd 4 2021-11-29 14:30:59it
GUIDA RAPIDA
A Panoramica del sistema
Il sistema EPOS include un robot rasaerba, una stazione
C Installazione
La stazione di riferimento e il robot rasaerba
di ricarica e una stazione di riferimento. Il robot necessitano di una visuale del cielo senza ostacoli per
rasaerba e la stazione di riferimento ricevono i segnali poter funzionare in modo affidabile senza interruzioni.
satellitari per il posizionamento. La stazione di
riferimento è ferma e invia i dati di correzione al robot 1. Installare l'app Automower® Connect e l'app Husqvarna
rasaerba per ottenere una posizione precisa del robot Fleet Services™ sul dispositivo mobile. Scaricare le app
rasaerba. L'area di lavoro viene creata virtualmente in dall'App Store o da Google Play.
un'app azionando il prodotto e aggiungendo punti di 2. Installare la stazione di riferimento. Fare riferimento al
passaggio per creare una mappa in un'app. manuale dell'operatore della stazione di riferimento.
3. Installare la stazione di ricarica.
1. Satelliti per la navigazione 4. Abbinare il robot rasaerba all'app.
2. Segnali satellitari 5. Abbinare il robot rasaerba alla stazione di riferimento
3. Stazione di riferimento nell'app.
4. Dati di correzione 6. Abbinare il robot rasaerba alla stazione di ricarica e
5. Stazione di ricarica specificare il punto di aggancio davanti alla stazione di
6. Confine virtuale ricarica.
7. Zona da evitare 7. Specificare l'area di lavoro utilizzando il prodotto in senso
8. Area di lavoro orario con appDrive intorno all'area di lavoro e
9. Dispositivo mobile aggiungendo punti di passaggio sulla mappa dell'app.
10. Punto di aggancio 8. Specificare le zone da evitare facendo funzionare il
11. Percorso di trasferimento prodotto in senso antiorario con appDrive intorno alla
zona da evitare e aggiungendo punti di passaggio sulla
Per un'installazione completa della mappa sono mappa dell'app.
necessarie un'area di lavoro e una stazione di ricarica. 9. Specificare il percorso di trasferimento iniziando dall'area
Un'area di lavoro è un'area in cui il prodotto può essere in di lavoro e utilizzare il prodotto con appDrive e
funzione e tagliare l'erba automaticamente. Un'area di aggiungendo punti di passaggio sulla mappa dell'app.
lavoro è specificata da confini virtuali. La stazione di Durante il salvataggio, il percorso di trasferimento è
ricarica può essere inserita nell'area di lavoro o in uno collegato al punto di aggancio.
spazio vicino ad essa, collegato tramite un percorso di 10. Specificare il punto di manutenzione e creare un percorso
trasferimento. Un percorso di trasferimento è specificato verso la stazione di ricarica. Iniziare dal punto di
tra il punto di aggancio e un'area di lavoro. Il prodotto può manutenzione e utilizzare il prodotto con appDrive per
funzionare automaticamente in questo percorso, ma non aggiungere punti di passaggio sulla mappa dell'app. Il
taglia l'erba. È possibile creare zone da evitare se ci sono percorso verso la stazione di ricarica è collegato al punto
zone in cui non è consentito il funzionamento del di aggancio quando si salva il punto di manutenzione.
prodotto. Una zona da evitare è specificata da confini 11. Utilizzare l'app per regolare il programma e le
virtuali. Un punto di manutenzione è una posizione impostazioni del robot rasaerba.
specifica in cui è possibile parcheggiare il prodotto.
Per ulteriori informazioni, leggere il manuale
B Connettività
a. L'app Automower® Connect viene utilizzata per le
dell'operatore della stazione di riferimento e il
manuale dell'operatore del robot rasaerba.
impostazioni e il funzionamento giornaliero del prodotto.
b. Husqvarna Fleet Services™ è una soluzione cloud che
fornisce al responsabile della flotta commerciale una
panoramica aggiornata di tutti i prodotti. È disponibile
come servizio Web e come app.
QG_P2Z_1142322.indd 5 2021-11-29 14:30:59en
QUICK GUIDE
A System overview
The EPOS system contains a robotic lawn mower, a
C Installation
The reference station and the robotic lawn mower need
charging station and a reference station. The robotic unimpeded sky view to be able to operate reliable
lawn mower and the reference station receive satellite without stops.
signals for positioning. The reference station is
stationary and sends correction data to the robotic lawn 1. Install the Automower® Connect app and Husqvarna
mower to get an accurate position for the robotic lawn Fleet Services™ app to your mobile device. Download the
mower. The work area is made virtually in an app by apps from App Store or Google play.
operating the product and adding waypoints to make a 2. Install the reference station. Refer to Operator's manual
map in an app. for the reference station.
3. Install the charging station.
1. Navigation satellites 4. Pair the robotic lawn mower with the app.
2. Satellite signals 5. Pair the robotic lawn mower with the reference station in
3. Reference station the app.
4. Correction data 6. Pair the robotic lawn mower to the charging station and it
5. Charging station will specify the docking point in front of the charging
6. Virtual boundary station.
7. Stay-out zone 7. Specify the work area by operating the product clockwise
8. Work area with appDrive around the work area and adding
9. Mobile device waypoints on the map in the app.
10. Docking point 8. Specify the stay-out zones by operating the product
11. Transport Path counterclockwise with appDrive around the stay out zone
and adding waypoints on the map in the app.
For a complete map installation a work area and a 9. Specify the transport path by starting in the work area
charging station are necessary. A work area is an area and operate the product with appDrive and adding
where the product can operate and cut grass waypoints on the map in an app. When saving the
automatically. A work area is specified by virtual transport path it is connected to the docking point.
boundaries. The charging station can be put in the work 10. Specify the maintenance point and make a path to the
area or near the work area that is connected to it with a charging station. Start at the maintenance point and
transport path. A transport path is a specified path operate the product with appDrive to add waypoints on
between the docking point and a work area. The product the map in the app. The path to the charging station is
can operate automatically in this path, but does not cut connected to the docking point when you save the
grass. Stay-out zones can be made if there are areas maintenance point.
where the product is not allowed to operate. A stay-out 11. Use the app to adjust the schedule and the settings for
zone is specified by virtual boundaries. A maintenance the robotic lawn mower.
point is a specified position where the product can be
parked at.
For more information, read the Operator's manual
B Connectivity
a. Automower® Connect app is used for settings and daily
for the reference station and the Operator's
manual for the robotic lawn mower.
operation of the product.
b. Husqvarna Fleet Services™ is a cloud solution that gives
the commercial fleet manager an updated overview of all
the products. This is available both as a web service and
as an app.
QG_P2Z_1142322.indd 6 2021-11-29 14:30:59C QG_P2Z_1142322.indd 7 2021-11-29 14:30:59
LED-Statusanzeigen                                 Indicateurs d'état LED                 Indicatori di stato a LED                 LED status indicators
                   Mähroboter		                                       Robot tondeuse		                       Robot rasaerba		                          Robotic lawn mower

                   Grünes Dauerlicht                                  Lumière verte allumée en continu       Luce verde fissa                          Green constant light
                   In Betrieb                                         En fonctionnement                      In funzione                               In operation

                   Grünes Blinklicht                                  Lumière verte clignotante              Luce verde lampeggiante                   Green flashing light
                   Pausiert                                           En pause                               Arrestato                                 Paused

                   Rotes Blinklicht                                   Lumière rouge clignotante              Luce rossa lampeggiante                   Red flashing light
                   Fehler                                             Erreur                                 Errore                                    Error

                   Gelbes Dauerlicht                                  Lumière jaune allumée en continu       Luce gialla fissa                         Yellow constant light
                   Angehalten                                         Arrêté                                 Arrestato                                 Stopped

                   Gelbes Blinklicht                                  Lumière jaune clignotante              Luce gialla lampeggiante                  Yellow flashing light
                   Warten auf PIN-Code                                En attente du code PIN                 In attesa del codice PIN                  Waiting for PIN code

                   Blaues Dauerlicht                                  Lumière bleue allumée en continu       Luce blu fissa                            Blue constant light
                   Parken/Verbunden mit Bluetooth®                    Stationnement/connexion                Parcheggio/connesso con                   Parking/Connected with Bluetooth®
                                                                      Bluetooth®                             Bluetooth®
                   Blaues Pulslicht                                   Lumière bleue pulsante                 Luce blu pulsante                         Blue pulsating light
                   Laden                                              En charge                              In carica                                 Charging

                   Blaues Blinklicht                                  Lumière bleue clignotante              Luce blu lampeggiante                     Blue flashing light
                   Geparkt/Bluetooth®-Verbindung aktiv                Stationné/appairage Bluetooth® actif   Abbinamento Parcheggio/                   Parked/Bluetooth® pairing active
                                                                                                             Bluetooth® attivo
                   Weißes Dauerlicht                                  Lumière blanche allumée en continu     Luce bianca fissa                         White constant light
                   appDrive-Modus                                     Mode appDrive                          Modalità appDrive                         appDrive mode

                   Weißes Pulslicht                                   Lumière blanche pulsante               Bianco lampeggiante                       White pulsating light
                   Ausschalten/Firmware-Installation                  Mise hors tension/installation du      Spegnimento/installazione del firm-       Switching off/Firmware installation
                   läuft                                              firmware en cours                      ware in corso                             ongoing
                   Weißes Blinklicht                                  Lumière blanche clignotante            Luce bianca lampeggiante                  White flashing light
                   Firmware-Aktualisierung erforderlich               Mise à jour du firmware requise        Aggiornamento del firmware richiesto      Firmware update required

                    Referenzstation		                                 Station de référence                   Stazione di riferimento		                 Reference station
                   Grünes Dauerlicht                                  Lumière verte allumée en continu       Luce verde fissa                          Green constant light
                   In Betrieb                                         En fonctionnement                      In funzione                               In operation

                   Grünes Pulslicht                                   Lumière verte pulsante                 Luce verde lampeggiante                   Green pulsating light
                   Start                                              Démarrage                              Avvio                                     Startup

                   Rotes Blinklicht                                   Lumière rouge clignotante              Luce rossa lampeggiante                   Red flashing light
                   Fehler                                             Erreur                                 Errore                                    Error

                   Weißes Blinklicht                                  Lumière blanche clignotante            Luce bianca lampeggiante                  White flashing light
                   Firmware-Aktualisierung erforderlich               Mise à jour du firmware requise        Aggiornamento del firmware richiesto      Firmware update required

                   Ladestation		                                      Station de charge                      Stazione di ricarica		                    Charging station
                   Grünes Dauerlicht                                  Lumière verte allumée en continu       Luce verde fissa                          Green constant light
                   Gutes Signal der Ladestation                       Signal de la station de charge de      Buon segnale della stazione di ricarica   Good charging station signal
                                                                      bonne qualité
                   Grünes Blinklicht                                  Lumière verte clignotante              Luce verde lampeggiante                   Green flashing light
                   ECO-Modus                                          Mode ECO                               Modalità ECO                              ECO mode

                   Rotes Blinklicht                                   Lumière rouge clignotante              Luce rossa lampeggiante                   Red flashing light
                   Fehler in der Ladestationsantenne                  Erreur de l'antenne de la station de   Errore nell'antenna della stazione di     Error in the charging station's antenna
                                                                      charge                                 ricarica
                   Rotes Dauerlicht                                   Lumière rouge allumée en continu       Luce rossa fissa                          Red constant light
                   Fehler                                             Erreur                                 Errore                                    Error

                 AUTOMOWER® IST EINE MARKE VON HUSQVARNA AB. COPYRIGHT © 2021
                 HUSQVARNA. ALLE RECHTE VORBEHALTEN.
                 AUTOMOWER® EST UNE MARQUE DÉPOSÉE APPARTENANT À HUSQVARNA AB.                                     1142322-39
                 COPYRIGHT © 2021 HUSQVARNA. TOUS DROITS RÉSERVÉS
                 AUTOMOWER® È UN MARCHIO DI PROPRIETÀ DI HUSQVARNA AB.
                 COPYRIGHT © 2021 HUSQVARNA. TUTTI I DIRITTI RISERVATI.
                 AUTOMOWER® IS A TRADEMARK OWNED BY HUSQVARNA AB.
                 COPYRIGHT © 2021 HUSQVARNA. ALL RIGHTS RESERVED.

                 www.husqvarna.com                                                                                 2021-11-29

QG_P2Z_1142322.indd 8                                                                                                                                                                 2021-11-29 14:31:02
Vous pouvez aussi lire