LOGIC INSTRUMENT Quick Start Guide - FIELDBOOK F60
←
→
Transcription du contenu de la page
Si votre navigateur ne rend pas la page correctement, lisez s'il vous plaît le contenu de la page ci-dessous
LOGIC INSTRUMENT

Quick Start Guide

FIELDBOOK F60
2
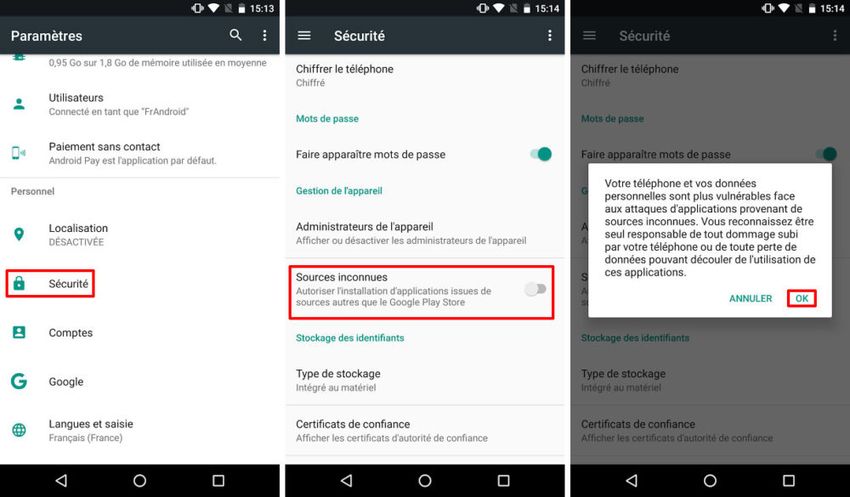
Table of contents                                                             FR

Package Contents                                                         4
Description of the phone                                                 5
Replacing the battery                                                    8
Inserting SIM & Micro-SD cards                                          10
Getting started                                                         12
4G & WiFi connections                                                   14
Barecode Scanner App 							                                             16
File Transfer 								                                                   20
How to Install an APK 							                                            22

As we are often updating and improving our products, your device’s software
may have a slightly different appearance or modified functionality than
presented in this Quick Start Guide.
                                                                               3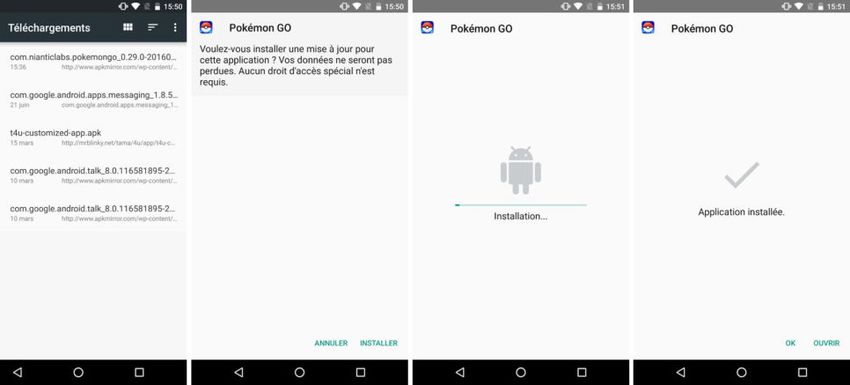
Package Contents
    Check your product box for the following items:
    --Fieldbook K101 with hand strap and battery
    --Active Stylus pen
    --Battery for stylus pen
    --Micro USB cable
    --USB host cable
    --AC adapter with EU, UK and US plug

    The items supplied with your device and available accessories may vary depending on
    your region or service provider.
    The supplied items are designed only for your device and may not be compatible with
    other devices.
    Unapproved accessories may cause your device to malfunction.

4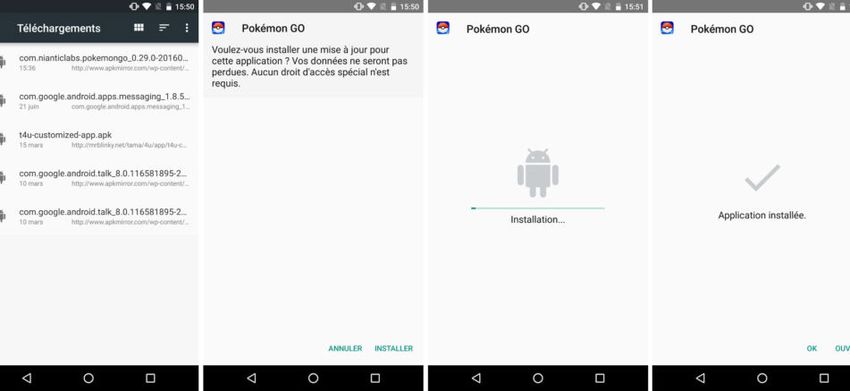
EN

Description of the smartphone
1 Webcam              1         2
2 Phone speaker
3 Microphone
4 Home button
5 Touchscreen
                  5

                  4                 3
                                         5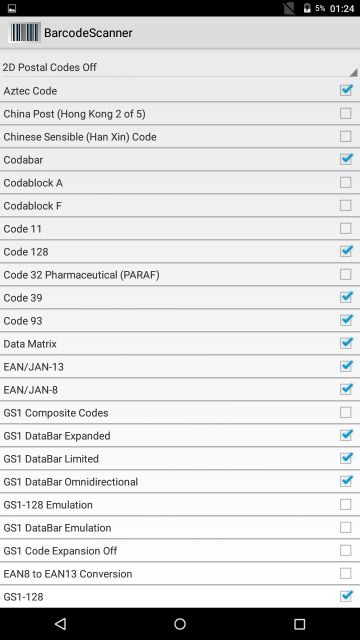
Description of the smartphone
                          6    7    8    9
                23

          22
          21                                 10
          20                                 11

          19                                 12

          13                                 13

               18    17   16   15   14
6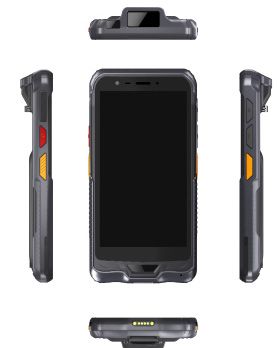
EN

6 IrDA interface                  18 Battery cover
7 2D barcode scanner              19 Left barcode trigger button
8 Upper hand strap fixation       20 Power ON/OFF button
9 Loudspeaker                     21 Micro USB port
10 Volume + button                22 3.5mm audio jack
11 Volume - button                23 AF camera with flash LED
12 Right barcode trigger button
13 Guide for docking station
14 Back docking connector
15 Battery lock
16 Bottom docking connector
17 Lower hand strap fixation
                                                                    7
Replacing the battery
WARNING: Make sure to turn off your Fieldbook before removing the battery.
Removing the battery
1. Slide the battery lock to the left (Picture 8.1 1 )
2. Use the gap to pull up the battery (Picture 8.2 2 )
Picture 8.1 Picture 8.2
1
2
8EN
Inserting the battery
1. Insert the battery into the compartment with the latches on the bottom side first
(Picture 9.1 1 )
2. Push down the other side of the battery until it fits into place (Picture 9.2 2 )
3. Slide the battery lock to the right to secure the battery in place (Picture 9.3 3 )
Picture 9.1 Picture 9.2 Picture 9.3
3
1 2
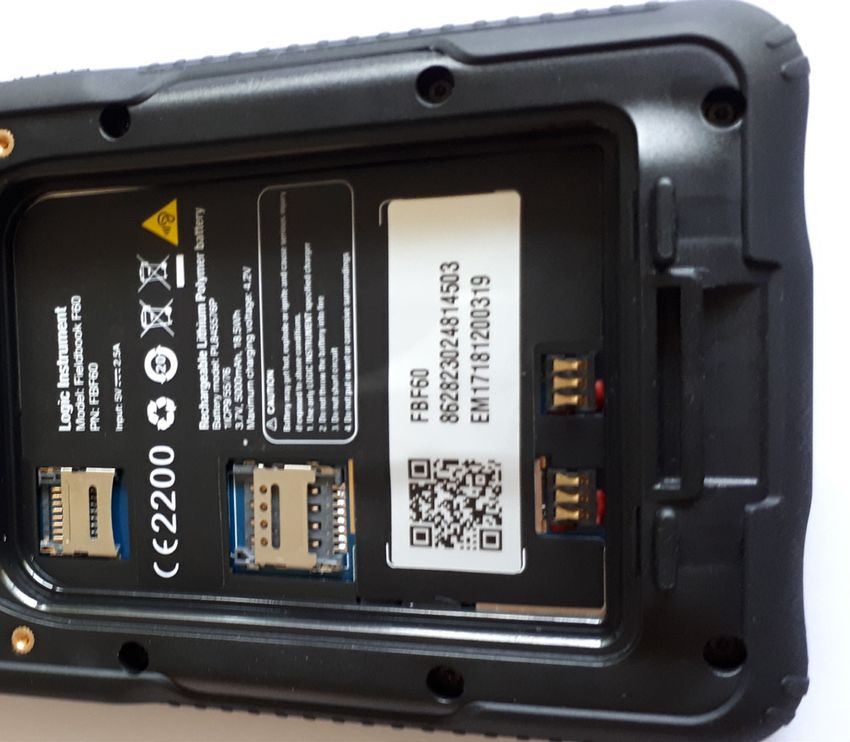
9Inserting SIM & Micro-SD cards
WARNING: Make sure to turn off your device before inserting a SIM or memory card.
To install or remove a SIM or SD card, the battery has to be removed first.
Please refer to “Removing the battery” on page 8.
Inserting the SIM card
The slot accepts only mini SIM cards. Insert the card into the SIM slots like shown in the
picture on the right.
Inserting a SD card
Insert the micro SD card like show in the picture on the right.
Closing
Please refer to “Inserting the battery” on page 9.
Tip:
For the SIM card, a Pin number may be requested. Enter the SIM card pin number and
tap OK.
10EN 11
Getting started
     Turn ON
     1. Press and hold the ON/OFF button to turn on the device.
     When you turn on your device, a PIN code may be requested.
     2. Type the PIN code supplied with your SIM card.
     Beware of typing a wrong PIN code.
     3. Select ‘OK’.
     Turn OFF
     To turn off your device, press and hold the ON/OFF button, and then select
     Power off > OK.
     Sound & Notification profiles
     1. When the device is turned on, press the Volume Up/Down button.
     2. Select an option.

      Tip:
      Your device goes in standby mode when you do not use it for a specified period of time.
      To wake up your device, press the ON/OFF button.
      To set the duration, go to Settings > Display > Sleep.
12
EN
Through the wizard
The first time you start up your Fieldbook, the installation wizard will help you
set up your device:
--Language
--Date & time
-- WiFi connection
--Location service options
Touch screen actions:
Tap: Touch once to select or launch a menu, option, or application.
Tap and hold: Tap an item and hold it for more than 2 seconds.
Drag: Tap an item and move it to a new location.
Double-tap: Tap an item twice quickly.
Flick: Briskly scroll up, down, left, or right to move through lists or screens.
Pinch: Place two of your fingers far apart, and then pinch them together.
134G & WiFi connections
4G connection
With your SIM card, you should be connected to the Internet without any further setup.
The Fieldbook will only have signal if you are ivn an area covered by your provider’s
network. When connected to the 4G network, the 4G icon is displayed in the status bar.
Activating the mobile data
To be able to access Internet, mobile data must be activated.
1. Drag down the status bar.
2. Tap the “Settings” icon to open the settings menu.
3. Tap “SIM cards”
4. Tap “Mobile data” to activate it.
14EN
WiFi connection
Make sure that you are in a WiFi zone. You can access the WiFi settings quickly from the
status bar.
1. Drag down the status bar.
2. The status dashboard is displayed.
3. Tap the “Settings” icon to open the settings menu.
4. Tap “Wi-Fi”
5. If Wi-Fi is off, slide the Wi-Fi switch to the “ON” position. Once the WiFi is on, the
Fieldbook will scan and display the Wi-Fi networks in range.
6. Tap the name of the network you want to connect to.
Private networks are shown with a lock icon and will require to enter your password.
15Barecode Scanner APP
First Step :
Navigate to settings folder --> choose “Device config Scanner”. (Picture.1)
Then select the scanner feature.(Picture.2)
1 2
16EN
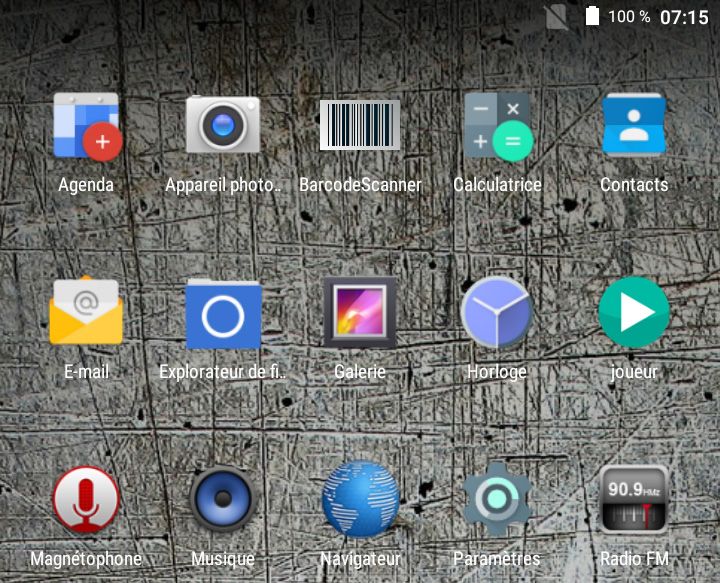
Open the App :
In the main menu --> Select the app Barecode Scanner. (Picture.3)
Then select : click on Settings. (Picture.4)
3 4
17Barecode Scanner APP
Settings : (Picture.5)
1. Select two dimensional module.
2. Choose the physical button you prefer (right or left)
3. HID Switch : Select On.
4. You can add sounds or vibration when you scan.
5. You can choose to add a prefix or a suffix that will be integrate to your code after
a scan.
Symbology :
In the main menu : Select Symbology (Picture.4)
You can choose the kind of code you need. (Picture.6)
18EN
5 6
19File Transfer
Settings :
Navigate to settings folder --> choose “Storage”. (Picture.1)
Then select the three small points. (Picture.2)
1 2
20Settings :
Select “USB computer connection”. (Picture.3)
Make sure “Media device (MTP)” is selected. (Picture.4)
3 4How to Install an APK
An APK file is an Android PacKage file designed to be used exclusively on
android devices and may required to download additional files before you can
run the application in android.
Settings :
Navigate to settings folder --> choose “Security”. (Picture.1)
Then navigate to Security folder :
Select --> “Unknown sources” . (Picture.2)
Press --> “OK”. (Picture.3)
22EN 23
How to Install an APK

     Then download your file from your smartphone.
     Open your app “Downloads.
     Click on the file downloaded to instal on your device .

24
EN 25
26
Table des matières                                                                      FR

Contenu de la boîte		                                                              28
Description de la tablette		                                                       29
Remplacer la batterie                                                              32
Insertion de carte SIM & carte mémoire                                             34
Mise en route			                                                                   36
Connexions 4G & WiFi		                                                             38
L’application Barecode Scanner 						                                              40
Transfert de fichier							                                                        44
Installation d’un APK                                                              46

Comme nous mettons à jour et améliorons régulièrement nos produits, le logiciel
de votre appareil peut présenter une interface ou des fonctionnalités légèrement
différentes de celles décrites dans ce guide.
Contenu de la boîte
Assurez vous que la boîte contiennent les éléments suivants :
--Fieldbook K101 avec un dragon et une batterie
--Un stylet
--Une batterie pour le stylet
--Un cable micro USB
--Un cable USB host
--Un chargeur (Eu, US & UK)

Les articles fournis avec votre appareil et les accessoires disponibles peuvent varier en
fonction de votre région ou fournisseur de services.
Les éléments fournis sont conçus uniquement pour votre appareil et peuvent ne pas
être compatibles avec d’autres appareils.
Les accessoires non approuvés peuvent provoquer un dysfonctionnement de votre
appareil.
Description du téléphone                 FR

1 Webcam                     1   2

2 Haut Parleur
3 Microphone
4 Bouton d’accueil
5 Ecran tactile
                     5

                         4           3
                                         29
Description du téléphone
6 7 8 9
23
22
21 10
20 11
19 12
13 13
18 17 16 15 14
30FR
6 IrDA interface 18 Couverture de la batterie
7 Scanner 2D 19 Gachette gauche du scanner 2D
8 Fixation haute du dragon 20 Boutton Power ON/OFF
9 Haut-parleur 21 Emplacement Micro USB
10 Volume + boutton 22 3.5mm audio jack
11 Volume - boutton 23 Appareil photo flash LED
12 Gachette droite du scanner 2D
13 Enclenchement de la station d’accueil
14 Connecteur arrière de la station
15 Sécurité de la batterie
16 Connecteur bas de la station d’accueil
17 Fixation basse du dragon
31Remplacement de la batterie
ATTENTION: Veuillez vous assurer d’éteindre votre appareil avant de retirer la batterie.
Remplacement de la batterie :
1. Faites glisser la sécurité de la batterie vers la gauche (Image 8.1 1 )
2. Utilisez l’espace pour retirer la batterie (Image 8.2 2 )
Image 8.1 Image 8.2
1
2
32FR
Insertion de la batterie
1. Insérer la batterie dans le compartiment en insérant d’abord la partie basse de la
batterie (Image 9.1 1 )
2. Pousser le haut de la batterie jusqu’à l’insertion complète (Image 9.2 2 )
3. Faites glisser la sécurité de la batterie vers la droite pour là vérouiller (Image 9.3 3 )
Image 9.1 Image 9.2 Image 9.3
3
1 2
33Insertion de la carte SIM & Micro-SD
ATTENTION : Veuillez vous assurer d’éteindre l’appareil avant d’insérer la carte SIM ou
Micro-SD
Pour installer/retirer la carte SIM/Micro-SD, la batterie doit d’abord être retirée.
Cf “Remplacement de la batterie” page 30.
Insertion de la carte Sim
L’emplacement ne supporte que les cartes Sim classique. Cf photo sur la droite
Insertion de la carte SD
Insérer la carte Micro SD comme présenté sur la photot de droite.
Fermeture
Cf “Insertion de la batterie” page 9.
Conseil :
Concernant la carte Sim, un code Pin peut être demandé. Entrer le code pin et faites
“OK”.
34FR 35
Mise en route
     Allumer
     1. Appuyez longement sur le bouton ON/OFF pour allumer votre appareil.
     Lorsque vous allumez votre appareil, il est possible qu’un code PIN vous soit demandé.
     2. Saisissez le code PIN de votre carte SIM.
     Attention : assurez-vous de saisir le bon code PIN.
     3. Sélectionnez ‘OK’.

     Eteindre
     Pour éteindre votre téléphone, faites un appui long sur le bouton ON/OFF, puis
     sélectionnez Eteindre > OK.

     Profil sonore & notifications
     1. Lorsque le téléphone est allumé, appuyez sur le bouton volume.
     2. Sélectionnez une option

        ASTUCE :
        L’écran tactile s’éteint après une certaine période d’inactivité. Pour rallumer l’écran,
        faites un appui court sur le bouton ON/OFF. Pour définir la mise en veille, allez sur
        Paramètres>Affichage>Veille.
36
FR
Assistant de démarrage
La première fois que vous allumez votre téléphone, l’assistant de démarrage vous
permet de le paramétrer :
--Langue
--Date & heure
--Connexion WiFi
--Les options du service de localisation
Utilisation de l’écran tactile
Appuyer: appuyez une fois pour sélectionner ou lancer un menu, une option ou une
application.
Appuyer et maintenir: sélectionnez un élément et maintenez votre doigt appuyé plus
de 2 secondes.
Déplacer: sélectionnez un élément, maintenez votre doigt appuyé et déplacez-le.
Tapoter: tapotez un élément deux fois rapidement.
Défiler: faites défiler rapidemlent vers le haut, vers le bas, vers la gauche, vers la droite
pour parcourir des listes ou des écrans.
Zoomer: placez deux doigts sur l’écran et les écarter pour zoomer ou les rapprocher
dans un mouvement de pincement pour dézoomer.
37Connexions WI-FI & 4G
Connexion 4G
L’insertion d’une carte sim devrait vous permettre d’accéder au réseau
automatiquement. Le Fieldbook percevra un signal uniquement, si vous vous situez dans
une zone couverte par votre opérateur. Une fois connecté au réseau, l’icône 4G apparaît
dans la barre de statut.
Activation des données mobiles
Pour accéder à Internet, les données mobiles doivent être activées.
1. Faites dérouler la barre de statut.
2. Pressez l’icône “paramètres” pour faire apparaître le menu.
3. Tap “SIM cards”
4. Tap “Mobile data” to activate it.
38FR
Connexion WI-FI
Vérifier que des réseaux WI-FI soient disponible. You can access the WiFi settings quickly
from the status bar.
1. Faites dérouler la barre de statut.
2. La barre de statut s’affiche.
3. Appuyez sur l’icône “paramètres” afin de faire apparaître le menu.
4. Appuyez sur “Wi-Fi”
5. Si le WI-FI n’est pas connecté, faites glisser le WI-FI sur la position “ON”. Une fois le WI-FI
connecté le Fieldbook scannera et fera apparaître la liste des WI-FI disponible.
6. Choisissez le nom du WI-FI auquel vous souhaitez vous connecter.
Les réseaux privés apparaissent avec une icône vérouillé et exigeront un mot de passe.
39L’application Barecode Scanner
Configuration :
Dans le menu paramètres --> Sélectionner “Device config”. (Image.1)
Cocher la case Scanner.(Image.2)
1 2
40FR
Configuration :
Ouvrir l’application Barecode Scanner
Dans le menu--> Cliquer sur les trois petis points. (Image.3)
Puis sélectionner : “Settings”. (Picture.4)
3 4
41L’application Barecode Scanner
Configuration : (Image.5)
1. Sélectionner le type de module : “two dimensional module”.
2. Choix du boutton gachette pour le scanner (droit ou gauche).
3. HID Switch : Sélectionner “ON”.
4. Vous pouvez ajouter un son ou une vibration à chaque scan.
5. Vous avez la possibilité d’ajouter un prefixe ou un suffixe à votre code barre qui
vous permettra de classer plus facilement vos scans.
Symbology :
Dans le menu principal, sélectionner : “Symbology”. (Image.4)
Choisissez le type de code correspondant à votre besoin. (Image.6)
42FR
5 6
43Transfert de fichier
Paramètres :
Brancher le fieldbook à votre ordinateur à l’aide d’un câble USB.
Ouvrer le menu paramètres et cliquer sur “stockage” (Image.1)
Sélectionner les trois petits points. (Image.2)
1 2
44FR
Paramètres :
Sélectionner “Connexion USB à l’ordinateur”. (Image.3)
Assurez vous de sélectionner la case “périphérique multimédia”. (Image.4)
3 4
45Installation d’un APK
Un fichier APK – pour Android PacKage – est comme son nom l’indique un
paquet contenant les fichiers d’une application. C’est grâce à lui qu’il est
possible d’installer une application sur son téléphone.
Paramètres :
Naviguer dans les paramètres --> choisissez “Sécurité”. (Photo.1)
Puis dans le dossier sécurité :
Sélectionner --> “Sources inconnues” . (Photo.2)
Appuyer --> “OK”. (Photo.3)
46FR 47
Installation d’un APK

     Téléchargez votre fichier APK depuis votre terminal ou copiez-le dessus. Il vous suffit
     ensuite d’utiliser un explorateur de fichiers (qu’il soit natif ou trouvé sur le Google
     Play Store) pour retrouver le fichier en question. Sur bon nombre d’appareils, vous
     trouverez une application intitulée « Téléchargements » vous permettant d’y
     accéder facilement.

     Cliquez alors sur le fichier APK et suivez les instructions qui s’affichent à l’écran.

48
FR 49
National restrictions
     This device is intended for home and office use in all EU countries (and other countries
     following the EU directive 1999/5/EC) without any limitation except for the countries
     mentioned below:

     Country       Restriction           Reason/
                                         remark
     Bulgaria      None                  General authorization required for outdoor use and public service
     France        Outdoor use limited   Military Radiolocation use. Refarming of the 2.4 GHz band has been
                   to 10 mW e.i.r.p.     ongoing in recent years to allow current relaxed regulation. Full
                   within the band       implementation planned 2012
                   2454-2483.5 MHz
     Italy         None                  If used outside of own premises, general authorization is required.
     Luxembourg    None                  General authorization required for network and service supply (not
                                         for spectrum)
     Norway        Implemented           This subsection does not apply for the geographical aera within a
                                         radius of 20 km from the centre of Ny-Alesund

50
Country Restriction Reason/
remark
Russian None Only for indoor applications
Federation
51Open Source Software Offer
The software bundled with this product includes software files subject to certain open
source license requirements. Such open source software files are subject solely to
the terms of the relevant open source software license. Such open source software is
provided on an “AS IS” basis to the maximum extent permitted by applicable law.
For the open source files contained herein, please access “Open source license” section
located at: Settings\About tablet\Legal information on the device for the relevant
copyright and licensing terms. You may obtain a copy of Apache License, Version 2.0
at http://www.apache.org/licenses/LICENSE-2.0. You may also obtain a copy of GNU
General Public License, Version 2 at the Free Software Foundation, INC, 51 Franklin
Street, Fifth Floor, Boston, MA 02110-1301, USA.
Until the date that is three years after our last shipment of this product, you may obtain
a copy of the source code corresponding to the binaries for any GPL-Licensed file by
contacting LOGIC INSTRUMENT customer service at www.logic-instrument.com and
Logic Instrument will send you a link to such source code or will provide instructions to
get the source on a physical medium.
This offer is valid to anyone in receipt of this information.
52EN
Vous pouvez aussi lire