Loi Martiale - TRENCH CLUB
←
→
Transcription du contenu de la page
Si votre navigateur ne rend pas la page correctement, lisez s'il vous plaît le contenu de la page ci-dessous
Loi Martiale
       Travail en cours - Seulement les «Résumé des règles» (p. 1-4) sont
            traduit. Les pages restantes sont toujours en traduction.

      Work in progress - Only the “Quick Start Guide” (p. 1-4) is translated
                yet. The remaining pages are still in translation

                               1

v01
Le jeu
Trench Club vous propulse Général de votre armée dans une bataille majeure de la première guerre mondiale, que cela soit dans
le camp de l’Allemagne/Autriche-Hongrie (« la puissance centrale ») ou la France/Grande-Bretagne (« l’entente »). Pour ce faire,
vous devrez envoyer vos troupes dans la bataille et conquérir des forts critiques pour la guerre.
Les joueurs incarnant l’Allemagne ou l’Autriche-Hongrie jouent ensemble contre les joueurs incarnant la France et la Grande-
Bretagne. Si vous jouez à deux, un des joueurs incarnera l’Allemagne ou l’Autriche-Hongrie et l’autre la France ou la Grande
Bretagne et vous utiliserez uniquement la moitié du plateau de jeu.
Votre équipe remporte la victoire dans l’un de ces 3 cas :
Toutes les unités ennemies sont détruite.
9 des 14 forts sont occupés par votre équipe (5 parmi les 7 pour 2 joueurs)
L’équipe adverse renonce (le cas le plus courant)
Les unités
Chaque joueur contrôle 11 unités différentes. La plupart des unités de chaque nation ont la même valeur, même si elles sont
visuellement très différentes.
A noter :
L’infanterie et l’infanterie montée sont basiquement les mêmes, mais l’infanterie montée est plus rapide et plus chère.
L’Allemagne et la Grande Bretagne ont une Troupe d’assaut alors que l’Autriche-Hongrie et la France ont un Howitzer.
Ces unités ne diffèrent que par leur portée.
Chaque nation à une unité spécifique en bas à droite de la fiche d’unités.
Fiche d’unités
Transport de
troupes Unité antiaérienne
Infanterie et Infanterie lourde
infanterie montée
Canon ou Mortier lourd
howitzer
Tank
Blindé
Avion de combat Unité spécifique au pays :
• Allemagne : grosse Bertha
• Autriche-Hongrie : troupes antitank
• Grande Bretagne : tank Mark I « female »
• France : tank Renault Ft-17
Les règles
Vous trouverez ci-dessous deux versions des règles :
1. Résumé des règles – commencez à jouer immédiatement : Si vous jouez au jeu pour la première fois, vous pouvez
commencer immédiatement. Les règles sont structurées comme le jeu lui-même : lisez le premier paragraphe « Phase 1
: déplacez vos troupes » et déplacez ensuite vos troupes. Lisez ensuite le paragraphe 2 “désignez vos cibles” et désignez
vos cibles, etc. La version courte des règles est simplifiée et ne couvre pas toutes les éventualités. Si un point de règle
ou une situation spécifique est floue, lisez la partie appropriée des règles détaillées.
2. Règles détaillées : Toute les règles sont détaillées en profondeur. Il est préférable de les lire après votre première
partie et de les utiliser comme livre de référence. Les règles peuvent sembler compliquées lorsque vous les lirez pour la
première fois mais elles deviendront intuitive très rapidement. Vous trouverez également un résumé des règles au dos
de ce livret.
1
Résumé des règles : Commencez à jouer immédiatement.

Préparation du jeu
Positionnez-vous autour de la table de sorte que deux joueurs allies ne soient pas l’un à côté de l’autre et placez votre fiche
d’unités devant vous. Le joueur Austro-Hongrois prend 3 bons de guerre (représentant l’argent en jeu). Chaque joueur prend ses
11 différentes unités et les divise en 3 groupes comme il le souhaite. Un des joueurs commence, pioche un jeton gris face
cachée, le retourne et place son premier groupe sur le plateau de jeu, près du nombre correspondant. Répétez jusqu’à ce que
tous les joueurs aient placé leurs 3 groupes sur le plateau de jeu.

        A vous de jouer : Placez maintenant vos unités

Lancez maintenant le dé pour déterminer le premier joueur. Chaque tour est divisé en 4 phases.
Phase 1 : Déplacer ses troupes: Le joueur actif peut maintenant déplacer toute ses unités. La distance maximale de
déplacement d’une unité dépend de sa vitesse (indiquée sur la fiche des unités) et le terrain sur lequel il se déplace. Un terrain
dégagé ne coûte qu’un point de mouvement, une route seulement 0.5 et une forêt 1.5.
                                                         Terrain
                                                                       Exemple : Un blindé à une vitesse de 4 et peut donc se
                                                         dégagé
                                                                       déplacer de 4 hexagones sur terrain dégagé, de 8 sur des
                                                         Route         routes ou encore de 2 hexagones en terrain dégagé et
                                                                       ensuite de 4 sur des routes.

                                                         Forêt         Vous trouverez plus d’exemple page 7.

                                                                                                                          Dernier
Exception : S’il reste seulement 0.5 unité de déplacement (vitesse) à la fin de son tour, l’unité peut se déplacer        tour :
en terrain dégagé.
(Background de cette exception : sans cela, les convois pourraient bloquer les routes).
                                                                                                                               FIN
Contact de l’ennemi : Les unités entourées par des ennemis doivent bien sûr être extrêmement prudentes : si une
unité est au contact de l’ennemi (qui pourrait théoriquement attaquer) deux fois de suite, il doit immédiatement
stopper son déplacement.

Forts : Les soldats (infanterie, infanterie montée, infanterie lourde, troupes antitank) peuvent capturer les forts neutre ou
ennemi. Pour se faire, ils doivent juste entrer via une des deux entrées du fort. Cela leur coûtera la totalité de leur mouvement
(vitesse) càd que l’unité doit se trouver directement devant l’entrée du fort au début de sa phase de mouvement pour pouvoir le
capturer. Quand vous capturez un fort, toutes les unités ennemies sont directement détruites et vous marquez votre fort avec
un de vos jetons drapeau. Le fort vous appartient jusqu’à ce qu’il soit recapturé par un ennemi. Chacune de vos unités peut
maintenant entrer dans le fort moyennant un coût de déplacement de 0.5.

                                                                                          Conquérir un fort :    Tour entier

                                                                                          Entrer dans un de vos forts :

      Entrées du fort               Tous les hexagones à partir desquelles vous pouvez
                                     capturer le fort (ou entrer s’il vous appartient).

Transport de troupes : Un camion de transport de troupe peut transporter jusqu’à 4 des unités suivantes : infanterie, infanterie
montée, infanterie lourde, troupe d’assaut, howitzer, mortier lourd, troupes antitank, grosse Bertha, lanceur de gaz. Ces unités
ont ce symbole:

En premier lieu, les unités doivent entrer dans le camion pendant leur déplacement. Entrer dans un camion de
transport à un coût de déplacement de 0.5 quel que soit le terrain sur lequel se trouve le camion (terrain
dégagé, forêt, …).

Le transport de troupe peut alors se déplacer pendant sa phase et décharge ensuite toutes les unités sur les hexagones
adjacents. Les unités déchargées ne peuvent plus se déplacer mais peuvent attaquer.

         A vous de jouer : Le premier joueur déplace ses unités.

                                                                   2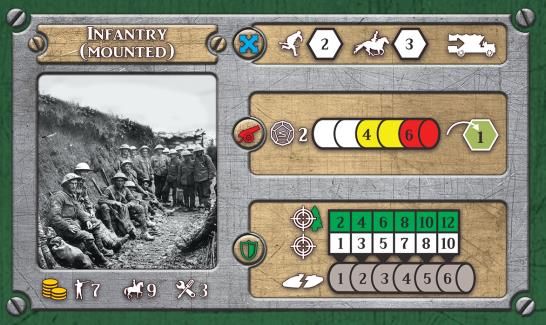
Phase 2 : Désigner ses cibles

Vous allez désigner les attaquants et les cibles ainsi que l’ordre d’attaque. Vous ne pouvez pas, par la suite, changer l’ordre,
l’attaquant ou la cible. La capacité d’attaque d’une unité dépend de sa distance d’attaque (indiquée sur la fiche des unités).

                                      Exemple : L’infanterie (distance 1) peut attaquer uniquement les ennemis dans un hexagone
                                      adjacent (combat rapproché). Un mortier lourd (distance 2-5) peut seulement attaquer un
                                      ennemi dans un hexagone se situant à 2, 3, 4 ou 5 hexagones de distance.

Les unités aérienne (avion, dirigeable) peuvent attaquer toutes les autres unités mais ne peuvent être attaquées que par les
autres unités aériennes, les unités antiaériennes, l’infanterie lourde et les canonnières (cette caractéristique est indiquée sur la
fiche des unités avec le symbole nuage          ).

                                                             Exemple : La séquence est fixée et les cibles sont désignées.
                                                             Premièrement, le blindé attaque l’infanterie, suivi de l’avion et pour
               1             2                               finir le mortier lourd attaque le Howitzer.

                                       3

         A vous de jouer : Le premier joueur désigne ses cibles

Phase 3 : Combats

Les combats sont résolus un par un dans l’ordre défini à la phase 2. Les unités qui sont attaquées en combat rapproché ripostent
en même temps – s’ils peuvent attaquer à une distance de 1. Pour les attaques aérienne, seul les unités aériennes, les unités
antiaériennes, l’infanterie lourde et les canonnières peuvent riposter (et seulement en combat rapproché         ).

Exemple : L’infanterie peut riposter contre le blindé mais pas contre l’avion puisqu’elle ne peut pas attaquer d’unités aériennes.
L’Howitzer ne peut pas riposter contre le mortier lourd, puisque la riposte n’est possible qu’en combat rapproché.

Chaque combat est mené suivant le même schéma dans lequel l’attaquant et la cible (si elle peut riposter) vont tous deux et en
même temps :

    1.    Déterminer le nombre de dés basé sur les dégâts de l’unité comme indiqué sur la fiche des unités.
          Exemple : le blindé ayant déjà subi 3 dégâts pourra combattre avec 8 dés, l’infanterie avec un dégât lancera 11 dés.

    2.    Seul l’attaquant (pas la cible) peut obtenir des dés rouge supplémentaire en attaquant en combat rapproché :
          Attaque de flanc : deux dés supplémentaires si au moins une de vos unités qui pourrait théoriquement attaquer (mais
          n’est pas obligé de le faire) est dans un hexagone adjacent de la cible.
          Encerclement : trois dés supplémentaires si au moins deux de vos unités qui pourrait théoriquement attaquer (mais ne
          sont pas obligées de le faire) se trouvent dans un hexagone adjacent de la cible ou une de vos unités est située dans un
          hexagone diamétralement opposé.

          Exemple : le blindé obtient deux dés rouge supplémentaire en attaquant l’infanterie parce qu’il réalise une attaque de
          flanc grâce à l’appui de l’avion. Il ne s’agit pas d’un encerclement puisque le mortier lourd ne saurait pas attaquer.
                                                                  3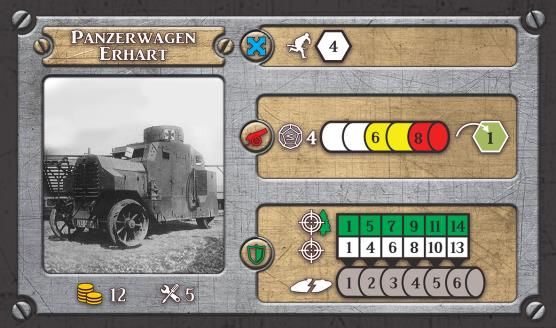
3. Lancez maintenant les dés et déterminez vos touches. Elles dépendront de l’expérience de combat, notée sur la fiche
des unités.
Exemple : pour le blindé, avec 3 points d’expérience, chaque dé avec une valeur de 6 ou moins est une touche ; pour
l’infanterie avec 2 points d’expérience, chaque dé avec une valeur de 2 ou moins est une touche.
Le blindé Allemand touche sur ≤6 L’infanterie Britannique touche sur ≤2
2 9. 7 6 11 8 1 3 6. 8
3 2 8 12 4 12 5 4 2 11 7
5 touches 2 touches
4. Il va s’agir maintenant de déterminer le nombre de dégâts de la cible. Cela passera par la fiche des unités. Si la cible se
trouve dans la forêt, il a la possibilité de se retrancher et pourra donc utiliser la ligne indiquée par . L’attaquant
n’est jamais autorisé à le faire et devra toujours utiliser la ligne avec le symbole .
Exemple : le blindé reçoit 1 dégât à cause des 2 touches. Pour causer 2 dégâts, il aurait fallu au minimum 4 touches.
L’infanterie reçoit 2 dégâts à cause des 5 touches. S’ils ne se situaient pas en forêt, ils auraient reçu 3 dégâts.
5. La dernière étape est de distribuer l’expérience et les dégâts. Si une unité inflige des dégâts, elle gagne un point
d’expérience. Si elle détruit une unité, elle en gagne 2.
Exemple : le blindé prend 1 dégât et gagne 1 point d’expérience.
L’infanterie prend 2 dégâts et gagne 1 point d’expérience.
Le tour de combat est terminé, vous pouvez commencer le combat suivant.
A vous de jouer : résolvez tous vos combats un par un.
Phase 4 : transactions monétaires
Pour chaque fort occupé, vous gagnez 3 bons de guerre (argent) à la fin de votre tour.
Ensuite, chaque unité peut être réparée, mais doivent pour cela être dans un fort au début
du tour. Une fois les frais de réparation payés (la somme est indiquées sur la fiche des
unités), tous les marqueurs de dégâts sont retirés de l’unité.
Pour finir, de nouvelles unités peuvent être achetées. Après que le coût ai été payé, les
nouvelles unités sont placés dans n’importe lequel de vos forts.
Fin du tour
Le tour est maintenant terminé et le tour du joueur suivant peur commencer.
A vous de jouer : Le second joueur déplace ses unités
Tous les joueurs vont maintenant jouer, chacun à leur tour dans le sens des aiguilles d’une montre. La première équipe qui
occupe 9 forts ou détruit toutes les unités de l’équipe adverse gagne. Généralement, une équipe abandonnera avant que cela
puisse se produire.
4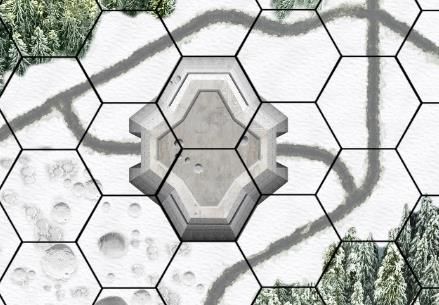
Detailed rules

Game preparation
The players should be distributed around the table in such a way that two allied players do not sit next to each other (seating
order e.g. Germany - Great Britain - Austria-Hungary - France). Each player takes his Unit Mat and places it in front of him.

Shuffle the 12 grey chips and distribute them face down to the players (3 per player). Then each player takes one unit from each
troop type (11 units per player) and distributes them to the 3 face-down chips. He may distribute his units as he likes, e.g., even
put all units on one chip and leave all others empty. Austria-Hungary is the only player to take 3 war bonds (money).

                                    3

Great Britain and Austria-Hungary place their armies.

Now roll the dice, for who will place his troops first. Each player rolls one die. The player with the highest number starts. He now
turns over one of his grey chips and places the corresponding troops (one army) on the appropriate square on the game board.
To do this, he first places one unit directly on the number on the board and the other units in a circle around it. If the fields
around the number are water, he may place units on them, but he does not have to.

                                                                   4

                      3

Chips are flipped and armies are placed.               If all accessible fields are full, a new "ring" is started.
                                                       Units may be placed in the river, but do not have to.

Now it is the turn of the next player (clockwise). He also turns over one of his 3 chips and places the units on the board. This is
how it goes round and round until each player has turned over his 3 chips and placed his units on the game board. Now the
actual game begins.

Game Sequence
The dice are now rolled again to see who goes first. The player with the highest number starts. Each turn is divided into
4 phases. The first player makes his turn with all 4 phases, then the other players make their turns one after the other
(clockwise).

Phases of the turn:

    1.   Move troops
    2.   Name attacks
    3.   Combat
    4.   Money transactions: collect money, repair units, purchase units

                                                                  5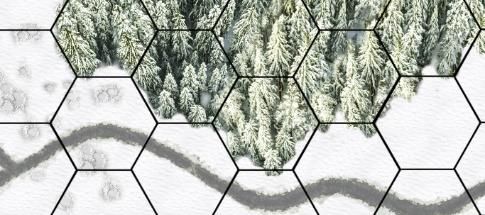
Special feature in the first round:
4 players: In order that the first player does not have too great an advantage, he may only make his first turn with 1 (freely
selectable) of his 3 armies. The second player may also only make his first turn with 1, the third player with 2 and the fourth
player with all his 3 armies. From the second round onwards, each player may use all of their units in each turn. [1 – 1 – 2 – 3]
2 players: If you play with 2 players only, the first player may only make his first turn with 1 (freely selectable) of his 3 armies,
and then the second player may make his first turn with 2 of his armies. In the second round, the first player makes his turn with
the remaining 2 of his armies and then the second player with all 3 of his armies. Starting in the third round, each player may
make his turn with all his units. [1 – 2 , 2 – 3]
Turn Phase 1: Move troops
All units (one after the other) may (but do not have to) be moved.
Each troop type has an individual speed. This is indicated on the Unit Mat. For example, an Armored Car (speed 4) is faster than
a Heavy Mortar (speed 1).
How far a unit can move depends not only on its speed but also on the terrain field it is moving to. For example, moving to a
meadow consumes 1 speed point, but moving to a road consumes only 0.5 speed points. An Armored Car with speed 4 could
move 4 fields on a meadow, but 8 fields on a road. It is only the target field that counts, i.e. where you want to go, not where
you are standing/ where you come from.
Moving to a meadow requires 1 speed point. Craters, single trees, stones, houses, trenches, etc. on
1 the map are only for decoration and the fields are still tough as meadows.
Moving to a forest field requires 1.5 speed points. Only dense coniferous forest counts as forest,
1.5 not fields with e.g. a single decorative tree.
Moving to a field with a road or bridge requires 0.5 speed points. You don't have to follow the
course of the road, but can also move across a road or "cut corners". As long as a road is shown on
0.5 the field you are moving to, it costs only 0.5 points to move onto that field (no matter where you
come from).
Foot soldiers (Infantry, Mounted Infantry, Heavy Infantry, Anti-Tank Gunners) can cross rivers and
full
lakes. Moving to a water field costs a full turn, regardless of the speed of the unit. While the unit is
turn on the water, it can neither attack nor defend itself.
Last
Exception: If a unit has only 0.5 speed points left at the end of its turn, the unit may still move to a
move: meadow field. (Background of this rule: Otherwise convoys would be jammed on roads).
0.5
Comments:
Air units of course move independently of the terrain as they fly. Each field needs 1 speed point.
One unit must make its move in one piece (you may not move another unit in between).
The possible movement points do not have to be fully used up (i.e. if a unit can move 3 fields, it may only move 2 fields
if you wish)
You can move over friendly or allied units, but not over enemy units (also applies to air units)
You cannot go/fly over forts (also not over the entry fields)
6
Examples of movement of an infantry (speed: 2):

                 2                                         2
                                                                                          2
          1
                                                          1,5
                                              0,5 1                                       1
                                                                                  0,5

On meadow                             On road over allied unit              Via road and meadow

                            2
                            1,5                                       2
                                                                                                2
                                                                1,5                     0,5
       0,5      1                            0,5      1

 „Curve cutting" (only                 Special rule: last move              Over road and forest
 target field counts)                  with 0.5 on meadow

Enemy contact
When a unit is threatened by enemy units, it has to move very carefully and is therefore slower. If a unit has enemy contact and
then moves to a field in which it has enemy contact again, the unit's turn is over. Only adjacent enemy units that can attack your
own unit in close combat count as enemy contact.

This rule is best illustrated by a few examples:

                                                                                 2
  End                              End 0.5
                                                                                  1
                                                                                                         0.5
                                                                               0.5                                    1.5
                                                                                                     End
                                                                                                               2.5
End of turn (two successive       End of turn (two successive     Turn not over (only               End of turn (two successive enemy
enemy contacts)                   enemy contacts)                 one enemy contact)                contacts in 3rd and 4th turn)

                    2
                                                   End                           End                                 End
                        1                                                  0.5                                 0,5
        0.5
                                              1

 Turn not over (neither           End of turn (Heavy Infantry     End of turn (two successive       End of turn (two successive
 Mortar nor Transport can         can attack aircraft)            enemy contacts)                   enemy contacts)
 attack in close combat)

                                                                      7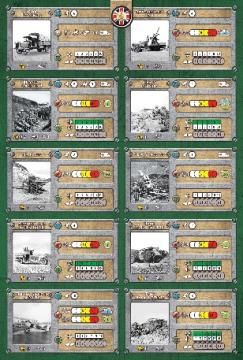
Troop Transport
A Troop Transport truck can carry up to 4 units of the following troop types: Infantry, Mounted Infantry, Heavy Infantry, Field
Gun, Howitzer, Heavy Mortar, Anti-Tank Gunner, Big Bertha, Gas Launcher. These units are marked with the symbol             .

First, the units move into the truck one after the other in their normal movement turn. Moving into a truck
costs 0.5 speed points, regardless of the terrain (meadow, forest ...) on which the truck is.

Then the truck makes its move. Finally, the truck unloads all loaded units onto adjacent free fields (not into another transporter
or fort). It may only do this in exactly this sequence. That means a unit must not hop on while the truck is moving; the truck
must not continue to move after unloading; etc.

Unloaded units cannot move any further, but can attack.

A truck loaded with units can also move into an own fort. If it does so, all loaded units are automatically in the fort (and no
longer in the transport truck) and can no longer be moved.

Transport trucks always leave forts empty (i.e. without loaded units).

The transport truck must move in way that there are enough surrounding fields free to unload all units.

        0,5

                                                                         2
                                                                      1,5

                                                                             1

1. Heavy Mortar boards the truck                                2. Infantry boards the truck

                                1,5
                           1
                 0,5

3. Transport Truck moves                                        4. Transport Truck unloads units to adjacent fields

Conquer forts
A fort is conquered when a foot soldier (Infantry, Mounted Infantry, Heavy Infantry, Anti-Tank Gunners) moves
to one of its two entrance fields. It does not matter from which field the foot soldier enters the entrance.            Full
                                                                                                                        turn
Moving on an entrance field of a neutral or enemy fort (i.e. conquering) requires the unit’s full movement turn,
regardless of the speed of the unit. That means you have to stand directly in front of the entrance to move in.

If you captured a fort, all enemy units previously in it are immediately removed from the game. The fort is marked with your
own flag chip. It remains in your possession, even if there are no more troops in the fort until it is conquered by an enemy.

You must not conquer your allied player's forts.

                                                                  8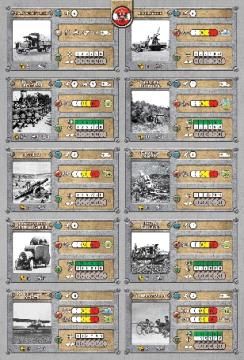
Entrances of the fort                                  All possible fields from which the fort can be conquered
                                                       (or entered if it is already your own fort marked with your flag chip)

Movement into own forts

All own units (not just foot soldiers) may be moved into own forts, but not allied units. Moving into the entry field
of your own fort costs 0.5 movement points. Any number of units fit into a fort. A unit in a fort does not count as
in play. It cannot be attacked and does not count as "enemy contact" for moving enemies. Units can exit a fort
through any of the two entrances. The first “enemy contact” is counted only from the first field outside the fort.

Turn Phase 2: Name attacks
After the moves are completed (conquering forts also counts as a move phase), all attacks are named. All units that want to
attack are named in the order of the attacks and determine which enemy unit they should attack. In the next phase (“Combat”),
all named units must attack the specified targets in exactly this order. (Don’t worry too much about this. Usually the order is
only relevant if several units attack the same enemy unit. It's just about not being able to change your mind spontaneously if the
fight turns out differently than expected.)
Example: If an attacking unit has already been destroyed, the next attack will go nowhere. The target may not be changed.

Who can attack whom is determined by the range. A mortar, for example, has range               , i.e. it can attack enemy units that
are 2, 3, 4 or 5 fields away. It cannot attack in close combat.

Only Anti-aircraft units        , Heavy Infantry      and other air units           may attack air units (or shoot back against them
in close combat). This is indicated by the cloud symbol behind the range.

                                                                 1              2

                                                                                          3

Turn Phase 3: Combat
After all attacks are named, the combat can begin. The combat always takes place as a 1 on 1 fight in the announced order. If
several own units attack an enemy unit, they do so one after the other, not simultaneously.

1.   The fight is announced.
     In the example above, the first battle would be: "This German Armored car is attacking this British Infantry"
2.   It is determined whether the defender can shoot back. Shooting back is only possible in close combat (i.e. at range 1) and
     only if the defending unit can fight the attacking unit in close combat.
     In the example: In the first battle the British Infantry can shoot back against the German Armored Car. In the second battle,
     the British Infantry cannot shoot back against the German fighter, because Infantry cannot fight air units. In the third battle,
     the French Howitzer cannot fire back against the German Heavy Mortar, because firing back is only possible in close combat.

                                                                  9
3. The attacker and defender (if he can shoot back) determine the number of combat dice. The number of dice depends on the
unit's damage.
4. It is determined whether the attacker attacks in a “Flank Attack” or a "Surround Attack”.
Flank Attack: A unit attacks an enemy unit in close combat and that enemy unit is touched by one (or more)
other of your unit(s) that (theoretically) could attack it in close combat (but doesn’t have to).
Surround Attack: A unit attacks an enemy unit in close combat and that enemy unit is touched by two (or
more) other of your units or is touched by one of your units on the opposite side. Again, only units that could
(theoretically) attack it in close combat count here.
When attacking with a “Flank Attack”, the attacker may roll 2 extra (red) dice, and in a “Surround Attack” even 3 extra (red)
dice.
For example:
The German Armored Car has 3 damage and therefore attacks with 8
combat dice. Due to the adjacent German Fighter Aircraft, the British
Infantry faces a “Flank Attack” and the German Armored Car gets 2
additional combat dice. This is not a “Surround Attack” because the
German Heavy Mortar cannot attack the Infantry in close combat. The
Austrian Armored Car does not count either, since the Flank and Surround
Attacks only take into account your own, but not allied units.
The British Infantry has 1 damage and therefore shoots back with 11 dice.
5. Now attackers and defenders roll the determined number of dice at the same time.
The number of hits is then determined based on the Unit Mat. First the experience of the units is determined.
At the beginning of the game all units start without any experience. In the course of the game they can earn
combat experience. At 0, 1 or 2 experience points, the unit is "Rookie" (white), at 3 or 4 experience points
"Veteran" (yellow) and from 5 experience points on "War Hero" (red) (see overview map). Based on the
combat experience, the Unit Mat shows which die has landed a hit.
German Armored Car (“Veteran”) lands hits at ≤6 British Infantry (“Rookie”) lands hits at ≤2
2 9. 7 6 11 8 1 3 6. 8
3 2 8 12 4 12 5 4 2 11 7
5 hits 2 hits
106. Now it is determined how many damage points the other unit suffers from the landed hits. Since the different units are
armored to different degrees, they can take hits with different degrees of effectiveness.
Since the defender can use the terrain to entrench himself when attacked, the defender gets a defense bonus when
standing in the forest. This bonus does not apply to the attacker, regardless of the terrain he is standing on.
The Armored Car receives 2 hits from the The Infantry receives 5 hits. Since it is standing as
Infantry. It suffers 1 damage as a result a defender in the forest, it suffers 2 damage (on a
(2 damage would have required 4 hits). meadow or road it would have taken 3 damage).
7. Now the damage points are distributed. For each damage point suffered, the affected unit gets a grey marker. A unit is
destroyed when it has 6 damage.
8. Then the experience points are awarded. If a unit has damaged an enemy unit, it receives 1 experience
point. If a unit has even destroyed an enemy unit, it even receives 2 experience points (in total).
The Armored Car has taken damage and gets 1
additional gray damage marker. It has damaged an enemy unit in this
battle and therefore gains
1 further combat experience (another yellow marker; the fifth marker
would then be red).
The Infantry receives 2 gray damage markers and 1 combat experience.
After the two white markers it is the first yellow marker for the Infantry.
This fight is now over and the next fight is on the line.
In the example, the German Fighter Aircraft would now attack the British Infantry. The Infantry now has already 3 damage
markers. The Infantry cannot shoot back because it cannot fight air units. The Fighter Aircraft would attack in “Flank Attack”
(+2 red dice), because another own unit which can theoretically attack (but does not have to) - namely the Armored Car - is
standing next to the defender. The Infantry would have better armor for defense because it is in the forest, just like in the last
battle.
Recommendation to speed up the game:
Attacker and defender should always roll at the same time, not one after the other.
The allied player should take care to determine the damage/experience points and put them on the partner’s unit. So
the partner player can move on to the next battle right away.
For this purpose the fighting player should just tell the partner of his opponent how many hit points he landed, e.g.
"The Armored car has landed 7 hits". The partner can then take care of everything else.
Turn Phase 4: Monetary Transactions
With military successes, more war bonds are subscribed at home. For each occupied fort, the player gets 3 war
bonds (money) at the end of his turn. A player can transfer some of his money to his ally at any time, but for
each donation, 1 war bond goes to the bank.
Units can then be repaired. The units to be repaired must have been in the fort at the beginning of the turn
already. The flat repair costs are paid and all damage markers are removed from the unit. The experience
points stay as they are.
Note: Repairing takes quite a long time. In the first turn the damaged unit moves into the fort, in the second it is
repaired, in the third it can move out of the fort again.
Finally, new units can be purchased. After the purchase price has been paid, the new units are placed in any of your own
forts.
11End of the turn
Now the turn is over and it is the next player's turn.
The team wins which first occupied 9 forts or destroyed all combat units of the opposing team. However, usually the opponent
team gives up before that happens.
Miscellaneous
Stopwatch: We recommend a stopwatch/mobile phone timer to limit the turns. In the first round, for example, each
player has 5 minutes for his turn (i.e. for “Phase 1 – Move” and "Phase 2 - Name Attacks"). This makes the game faster
and more exciting.
Reinforcements: If there are no more pieces for a unit type, you can use the chips. To do this, attach the provided
white sticks to the chips.
Special Forces: If you play with Special Forces (sold separately), you can purchase them during your regular purchase
phase for 18 War Bonds (money). But the trick is, you don't know which one you'll get. You have to roll the dice and you
get a random Special Forces unit. However, if one team has fewer units on the board and fewer forts than the opposing
team, the players of the inferior team do not have to roll the dice, but are free to choose the Special Forces unit. After
purchase, the Special Forces unit is placed in any of your own forts, or the gunboat on any water field.
Card symbols
The Big Bertha only hits imprecisely. If you are unlucky, it can hit an empty field or even your own units. Before you roll
the combat dice, roll a separate die to determine which field the Big Bertha hits. At 1-6 it hits a neighboring field
according to the table below and only at 7-12 it hits in the originally selected target field. If Big Bertha has “Veteran”
experience (yellow marker), it only hits an adjacent field at 1-3 and otherwise in the middle. If Big Bertha is a “War
Hero” (red marker), it always hits precisely.
The Anti-Tank Gunners are particularly effective against enemy tanks (Mark IV male, Mark I female, St. Chammond,
Renault Ft-17). This combat advantage does not apply when fighting with Armored Cars (because they are too fast).
Regular Infantry costs 7 War Bonds (money) to buy and has 2 movement points, Mounted Infantry costs 9 War Bonds
and has 3 movement points. Apart from that, the two units are the same.
Have fun playing! For questions about rules, tips & tricks, etc. please visit www.trench-club.com. I am also happy to receive any
feedback on the game at info@trench-club.com.
12Overview of the troops and trivia
Troop Transport: The Transport Truck is a fast unit that can transport troops but cannot attack.
Anti-Aircraft Unit: Their mobility, long range and high attack power make them the best units for fighting enemy aircraft.
However, they are defenseless against ground units and can neither attack nor defend themselves.
Infantry: Infantry units can be produced cheaply, but cannot keep up with modern warfare equipment in battle. Nevertheless,
they are often decisive for the war, as they can conquer enemy forts. In addition, small Infantry units placed in rough terrain can
often stop entire enemy armies.
Mounted Infantry: The Mounted Infantry is characterized by its high speed and is especially suited to conquer remote forts with
a surprise attack.
At the beginning of the war, the cavalry still rode towards the enemy armed with lances and swords - which did not prove
particularly effective against machine guns. Soon the horses were only used as a means of transport for regular infantry that
fought dismounted.
Heavy Infantry: Heavy infantry is equipped with machine guns and grenades. They have a high combat strength, can storm forts
and fight airplanes. Its versatility makes it the backbone of a modern army.
The German machine gun MG 08/15 (introduced in 1908, further developed in 1915) became such a standard that the term
"0815" is still used today in German language as a synonym for “common”.
Assault Gun: The Assault Gun is a short range artillery unit. Due to the flexibly adjustable angle of inclination of the gun barrel
and the protection of an armor plate shield, the Assault Gun is a feared opponent even in close combat.
Howitzer: Due to the ballistic trajectory of its projectiles, this artillery unit cannot be used in close combat and should be placed
behind its own lines to provide combat support.
Three quarters of all injuries in the First World War were caused by the shrapnel of artillery shells.
Heavy Mortar: The Heavy Mortar is characterized by its long range. Because of this characteristic and the lack of close combat
capability, the heavy mortar should be placed behind the front line and provide support and barrage fire.
The location of enemy artillery guns was only possible very roughly by sound measurement technology, i.e. the measurement of
the transit time differences of the sound from two different positions. Firing back was therefore hardly possible.
Armored Car: The Armored Car is an automobile or tractor converted for war use. Its high speed as well as its strong fighting
power combined with manageable production costs make the Armored Car the backbone of the combat vehicle units.
The first Armored Car was introduced to Emperor Franz Joseph I in 1906. However, since it frightened his horse, he initially had
the project stopped.
Fighter Aircraft: The Fighter Aircraft of the First World War had only very little firepower, but a strategic importance that should
not be underestimated. Since most ground troops are defenseless against planes, even small combat aircraft groups can block
the advance of entire enemy armies. Thanks to their high speed and reach, they are also well suited for attacking artillery
positions located behind the front. Aircraft can only be fought by Anti-Aircraft units, Heavy Infantry, Gunboats and other air
units.
The first combat aircraft were still very primitive and instead of bombs, they threw steel nails (so-called “flying arrows”) down
onto the ground troops by hand.
Tanks: Tanks are the strongest units. Due to their high attack power, they can easily break through enemy lines and their heavy
armor makes them difficult to destroy. Due to the high production costs, the number of tanks on the battlefield is very limited.
The first tanks were not only feared by the opponents. In the German A7V, for example, 26 men (including a carrier pigeon
keeper and turn signal giver) jammed together at inside temperatures of up to 70°C/160°F and deafening noise.
Tank Renault Ft-17: The French Renault Ft-17 is a fast and at the same time powerful tank and ranks between the Armored Car
and the heavy Tank in terms of speed, attack power and armor.
After World War I, the remaining Ft-17s were used against Germany in World War II, the ones that were not destroyed there
were captured by the Germans and used against Russia and later in Normandy against the American invasion.
Panzer Mark I Female: The Mark I Female is a British tank which, unlike the Male, is only equipped with machine guns, but not
with cannons. Therefore it has the armor and speed of a regular tank, but only the attack power of an Armored Car.
The Mark I could not yet control the right and left track separately - both were always running straight ahead. It tried to change
its direction with an outrigger wheel to the rear, which gave it a terrible turning circle.
13Big Bertha: The Big Bertha is the heaviest artillery gun of the German Empire. It has the greatest known penetrating power and a
terrifyingly long range. However, this is at the expense of accuracy. It is not unusual for Big Berta to hit its own troops on the
front line due to its wide spreading.
The Big Bertha was able to fire grenades with a caliber of 42 cm and a weight of up to one ton over 10 km.
Anti-Tank Gunners: Similar to the German Empire, Austria-Hungary relied primarily on the development of anti-tank weapons
instead of its own tanks. The Anti-Tank Gunners are a dreaded opponent in close combat and can also carry out long-range
attacks with its cannons. It specializes in combat against enemy tanks and develops its highest effectiveness there. Due to their
high speed, however, it is less suitable for combat against Armored Cars.
The first anti-tank units did not yet have cannons, but simply large-caliber rifles (“elephant killers”) with which the shooters tried
to shoot the driver through the relatively thin armor of the first tanks.
Forts: Forts are fortified strongholds where units can be produced and repaired. The fortified sides of the forts are impregnable.
Attacks would be pure suicide. Averted from the front there are large entrances for the supply of the fort. If the enemy manages
to bypass the fortified fort and get to the rear entrance, it can be easily stormed by foot soldiers with flamethrowers, poison gas
and hand grenades.
Fort Douaumont near Verdun was hit by more than 400,000 shells in 1916 and remained largely undamaged. However, it was
captured several times, alternately by French and German infantry - once even accidentally, when two German companies came
under their own artillery fire and stormed the fort unplanned to seek shelter.
Gunboat: The Gunboat is a flexible weapon that can be quickly moved on rivers or lakes, has a long firing range and is suitable
for air defense.
Medics: Medics can repair your troops without having to move them into a fort. Specializing in field repairs, the unit can be used
again in the next round. As with repairing in forts, however, the repair costs must be paid when using medics.
Ground Attack Aircraft: Due to technological progress in aircraft construction, heavy battle planes did not appear until the late
years of the war. They were armored with steel plates, had additional 45° downward facing machine guns for ground attacks,
light bombs and a rear gunner with machine guns for aerial combat.
Railway Gun: The railway gun achieves precise accuracy and high penetrating power at a long range, but is hardly mobile.
Usually, new railway tracks had to be laid to move railway guns. For example, they had no lateral directional range, so they had
to be moved in a curve to aim left and right.
Poison Gas Launchers: These units fire poison gas that spreads over a larger area, dealing damage to friend and foe alike.
Because of their protective equipment, the gas cannot be harmful to the gas troops themselves.
At the height of the gas war in 1918, on average one in three used grenades was filled with poison gas.
Airship: Airships were the first air units that could drop large bomb loads on ground troops. Although they were equipped with
machine guns for air defense, they were not very effective in air combat due to their sluggish maneuverability.
At the beginning of the war, airships were hardly vulnerable. They flew higher than the planes of that time and a few small bullet
holes in the hydrogen balloon didn't bother them much. That soon changed with the introduction of incendiary ammunition.
Gun Turret: Forts can be equipped with a gun turret that can fire at enemies in close and long-range combat. Due to the thick
armor the turrets are indestructible.
The gun turrets could be extended and retracted. They were only extended for a short shot and were otherwise retracted back in
the ground. That made them (apart from their strong armor) virtually indestructible.
Mine Layers: These units can lay landmines that immediately destroy an enemy unit when it enters a field with a mine.
Classic anti-personnel mines were rather rare. During trench warfare, it was more common to tunnel under enemy trenches,
mountain tops or entire villages and blown them up with massive explosive charges. The blast of one of these mines in France
was so big it was still audible in London.
14Quick Reference of Martial Laws
Game phases:
Move Name Collect
Combat Repair units Buy units
troops attacks money
Schnellreferenz 3 war Unit must be in Place new unit
bonds per the fort since in any own fort
fort the beginning
of the turn
Move troops: Combat:
Only the target field counts Attacker and defender roll the dice simultaneously
1. Damage Number of dice:
1 Meadow
Road;
0.5 "curve cutting" is allowed 2. Flank/ Surround attack? (attacker only)
1.5 Forest
full River; 3. Experience Hit probability
turn foot soldiers only
full Conquer fort;
turn foot soldiers only
0.5 Enter own fort
4. Roll dice number of hits
2 9. 7 6 11
0.5 Board transport truck
3 2 8 12 4
5. Hits Damage (terrain bonus only for defender)
Exception:
0.5 Last move
Enemy contact:
Unit with enemy contact 6. Set markers (damage, experience)
End
moves to a field with enemy
contact again
movement ends
(enemy must be able to attack)Vous pouvez aussi lire