MPH2 - Managed Rack PDU - Quickstart Guide - EMEA - Vertiv
←
→
Transcription du contenu de la page
Si votre navigateur ne rend pas la page correctement, lisez s'il vous plaît le contenu de la page ci-dessous
Integrated Rack Systems

MPH2™ – M
         anaged Rack PDU
Quickstart Guide – EMEA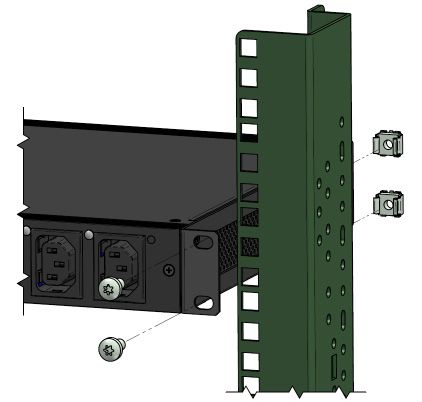
Inhalt                                                                                         Content                                                                                         Sommaire
               DEUTSCH                                                                                        ENGLISH                                                                                         FRANÇAIS

1              Bitte beachten Sie                                                                             Please read                                                                                     A consulter impérativement

               Sicherheitshinweise . . . . . . . . . . . . . . . . . . . . . . . . . . . . . . 3              Safety notes  . . . . . . . . . . . . . . . . . . . . . . . . . . . . . . . . . . . . . 3       Consignes de sécurité  . . . . . . . . . . . . . . . . . . . . . . . . . . . 3
               Zusätzlicher externer Erdungsanschluss . . . . . . . .  4                                      Additional external ground connection  . . . . . . . . .  4                                     Prise de terre externe supplémentaire . . . . . . . . . .  4
               Lieferung . . . . . . . . . . . . . . . . . . . . . . . . . . . . . . . . . . . . . . . .  6   Delivery . . . . . . . . . . . . . . . . . . . . . . . . . . . . . . . . . . . . . . . . .  6   Livraison . . . . . . . . . . . . . . . . . . . . . . . . . . . . . . . . . . . . . . . .  6
               Gewährleistung  . . . . . . . . . . . . . . . . . . . . . . . . . . . . . . . . .  6           Warranty . . . . . . . . . . . . . . . . . . . . . . . . . . . . . . . . . . . . . . . .  6     Garantie . . . . . . . . . . . . . . . . . . . . . . . . . . . . . . . . . . . . . . . . .  6
               Technische Support . . . . . . . . . . . . . . . . . . . . . . . . . . . . .  6                Technical support . . . . . . . . . . . . . . . . . . . . . . . . . . . . . . .  6              Support technique . . . . . . . . . . . . . . . . . . . . . . . . . . . . . .  6

2              Montage und Installation                                                                       Assembly and installation                                                                       Montage et installation
               Montagehinweise  . . . . . . . . . . . . . . . . . . . . . . . . . . . . . . . . 7             Assembly instructions  . . . . . . . . . . . . . . . . . . . . . . . . . . . 7                  Instructions de montage . . . . . . . . . . . . . . . . . . . . . . . . . 7
               Feste Installation . . . . . . . . . . . . . . . . . . . . . . . . . . . . . . . .  8          Fixed installation . . . . . . . . . . . . . . . . . . . . . . . . . . . . . . . .  8           Montage fixe . . . . . . . . . . . . . . . . . . . . . . . . . . . . . . . . . . . .  8
               Werkzeuglose Montage                                                                           Toolless mounting buttons . . . . . . . . . . . . . . . . . . . . . .  9                        Montage sans outil
               (Toollessmounting buttons) . . . . . . . . . . . . . . . . . . . . .  9                                                                                                                        (Toollessmounting buttons)  . . . . . . . . . . . . . . . . . . . .  9
                                                                                                              Toolless mounting
               Werkzeuglose Montage                                                                           (Speedmount DCM and InstaRack) . . . . . . . . . . . . .  9                                     Montage sans outil
               (Speedmount DCM und InstaRack) . . . . . . . . . . . . .  9                                                                                                                                    (Speedmount DCM und InstaRack)  . . . . . . . . . . . .  9
                                                                                                              Horizontal 19” profile (1U/2U units)  . . . . . . . . . . . .  10
               Horizontal 19“ (1HE/2HE Geräte) . . . . . . . . . . . . . . .  10                                                                                                                              Horizontal 19" (unités 1HE/2HE)  . . . . . . . . . . . . . . .  10
                                                                                                              Additional external
               Zusätzlicher externer Erdungsanschluss . . . . . . . . 11                                      ground connection . . . . . . . . . . . . . . . . . . . . . . . . . . . . . . 11                Prise de terre externe
                                                                                                                                                                                                              supplémentaire  . . . . . . . . . . . . . . . . . . . . . . . . . . . . . . . . . 11

3              Montage und Installation                                                                       Assembly and installation                                                                       Montage et installation
               RPC2 Karte  . . . . . . . . . . . . . . . . . . . . . . . . . . . . . . . . . . . . . 12       RPC2 card  . . . . . . . . . . . . . . . . . . . . . . . . . . . . . . . . . . . . . . 12       Carte RPC2  . . . . . . . . . . . . . . . . . . . . . . . . . . . . . . . . . . . . . 12

    Vertiv |        MPH2TM – Managed Rack PDU – Quickstart Guide – EMEA                                                          |     03.951.421.0.001                    |     Index c            |     ECR no. 18567            |     07/2018                                                   2
Bitte beachten Sie Please read A consulter impérativement
DEUTSCH ENGLISH FRANÇAIS
1.1 Sicherheitshinweise Safety notes Consignes de sécurité
Achtung! Warning! Attention !
Industrie-Steckdosenleiste! Industrial PDU. Réglette de prises industrielle !
Die Steckdosenleiste ist nur für The PDU is only permitted for industrial Les réglettes de prises sont admises
industrielle bzw. für IT-Anwendungen and IT applications. uniquement pour les applications
zugelassen. • Only connect the PDU to an earthed industrielles ou IT.
• Steckdosenleiste nur an ein geerdetes power supply system! • Raccorder la réglette de prises uni-
Stromversorgungssystem anschließen! quement à un système d’alimenta-
tion électrique avec prise de terre !
Gefahr! Danger !
Danger!
Die MPH2™ wird mit gefährlicher elektri- Le MPH2™ fonctionne avec une tension
The MPH2™ is operated at a dangerous
scher Spannung betrieben, die schwere électrique dangereuse pouvant provoquer
electrical voltage, which can lead to seri-
Verletzungen oder den Tod zur Folge haben des blessures graves ou entraîner la mort !
ous injuries or even death!
kann! • Avant tous travaux de montage ou d’installa-
• It is imperative that you read the user manual
• Vor allen Montage- oder Installationsarbeiten tion, lire et respecter impérativement dans leur
and the attached safety information entitled
unbedingt das Anwenderhandbuch und bei- intégralité le manuel utilisateur et les recom-
“Managed Rack PDU MPH2™” in full before
liegende Sicherheitshinweise „Managed Rack mandations concernant la sécurité « Managed
you start any assembly and installation work
PDU MPH2™“ vollständig lesen und beachten. Rack PDU MPH2™ ».
and that you follow the instructions therein.
– www.vertivco.com – www.vertivco.com
– www.vertivco.com
• Befolgen Sie alle Sicherheits- und Warnhinwei- • Respectez l’ensemble des consignes de sécuri-
• Comply with all the safety information and
se, um Verletzungen durch Stromschlag oder té ou mises en garde afin d’éviter les blessures
warnings to prevent suffering an electric shock
Schäden an den angeschlossenen Geräten dues aux décharges électriques ainsi que les
or damaging the connected equipment.
zu vermeiden. dommages sur les appareils branchés.
• The MPH2™ should only be assembled and
• MPH2™ nur durch geschultes und für die Aus- • Faire monter et installer le MPH2™ uniquement
installed by trained personnel who are qualified
führung von Elektroinstallationen qualifiziertes par du personnel formé et qualifié pour la ver-
to complete electrical installation work.
Personal montieren und installieren lassen. sion des installations électriques concernée.
Hinweis Information Remarque
Die PDU verfügt über keinen integrierten The PDU does not have integral over-voltage La PDU ne dispose pas de protection interne
Überspannungsschutz! protection! contre les surtensions !
• Zum Schutz vor Netzausfall oder Schäden • Connect the PDU to a UPS to protect it from a • En guise de protection contre une panne de
durch Spannungsspitzen die PDU an eine USV mains failure or damage caused by voltage peaks. secteur ou contre des pics de tension, raccorder
anschließen. la PDU à un onduleur.
Achtung! Warning! Attention !
Trennvorrichtung Warnung Warning – Disconnect devices Dispositif de déconnexion
• Bei MPH2™ mit Festanschluss muss eine • For MPH2™ with a fixed connection, a suitable • Pour le MPH2™ avec connexion permanente,
geeignete Trennvorrichtung außerhalb des disconnect device must be incorporated ex- un dispositif de déconnexion approprié exté-
Gerätes vorgesehen werden. ternal to the device. rieur à l‘appareil doit être prévu.
• Bei MPH2™ mit Steckanschluss muss • For MPH2™ with a plug connection, the socket • Pour le MPH2™ avec connecteur, la prise élec-
die Steckdose nahe des Gerätes an- must be installed near the device and must trique doit se trouver à proximité de l‘appareil
gebracht und leicht zugänglich sein. be easily accessible. et être facilement accessible.
Vertiv | MPH2TM – Managed Rack PDU – Quickstart Guide – EMEA | 03.951.421.0.001 | Index c | ECR no. 18567 | 07/2018 3Bitte beachten Sie Please read A consulter impérativement
DEUTSCH ENGLISH FRANÇAIS
Hinweis Information Remarque
Zum Schutz gegen überhöhte Ströme, To protect against excessive currents, Pour assurer une protection contre les surin-
Kurz- und Erdschlüssen ist eine externe short-circuits and earth faults, an external tensités, les courts-circuits et les défauts de
Schutzeinrichtung in der elektrischen Anlage protection device must be incorporated into mise à la terre, la présence d‘un dispositif de
des Gebäudes sicherzustellen! the electrical system of the building! protection externe dans l‘installation élec-
Diese Schutzeinrichtung ist folgendermaßen This protection device is to be rated as follows: trique du bâtiment est indispensable !
zu bemessen: Ce dispositif de protection doit avoir les carac-
téristiques suivantes :
Maximaler Eingangsstrom pro Pol Nennstrom für vorgeschalteten LS
Maximum Input Current Per Pole Rated Current of Upstream CB
Entrée de courant maximale par pôle Courant nominal de disjoncteur amont
16 A 16 A
32 A 32 A
63 A 63 A
Danger !
Gefahr! Danger! Un fonctionnement non conforme peut
Unsachgemäßer Betrieb kann Überhitzung Incorrect operation can cause overheating entraîner une surchauffe et augmenter les
verursachen und die Brandgefahr erhöhen. and increase the risk of fire. In addition, the risques d’incendie. Par ailleurs, l’appareil
Außerdem können das Gerät sowie die da- unit and the devices connected to it may et les récepteurs qui lui sont raccordés
ran angeschlossenen Verbraucher zerstört be destroyed. peuvent être endommagés.
werden. • Ensure that the total power consumption of • S’assurer que l’intensité absorbée totale
• Sicherstellen, dass die Stromaufnahme der the connected devices does not exceed the des récepteurs raccordés ne dépasse pas
angeschlossenen Verbraucher in Summe rated current details on the model plate of the la somme des courants nominaux indiqués
die jeweiligen Nennstromangaben des power distribution unit and circuit breaker. sur la plaque signalétique de la réglette
Typenschildes der Steck dosenleiste bzw. Data on the current can be found in the multiprises ou du disjoncteur de protection.
des Schutzschalters nicht übersteigt. operating manuals, on the model plates of Vous trouverez les indications concernant
Stromangaben finden Sie in den the connected devices, and on the circuit les intensités de courant dans les manuels
Bedienungsanleitungen und auf den breaker. utilisateur et sur les plaques signalétiques
Typenschildern der angeschlossenen • Ensure that the load of the phases is as des récepteurs raccordés ainsi que sur le
Verbraucher sowie am Schutzschalter. symmetrical as possible! disjoncteur de protection.
• Auf möglichst symmetrische Belastung der • Veiller à ce que les phases aient dans la
Phasen achten. mesure du possible une charge symétrique.
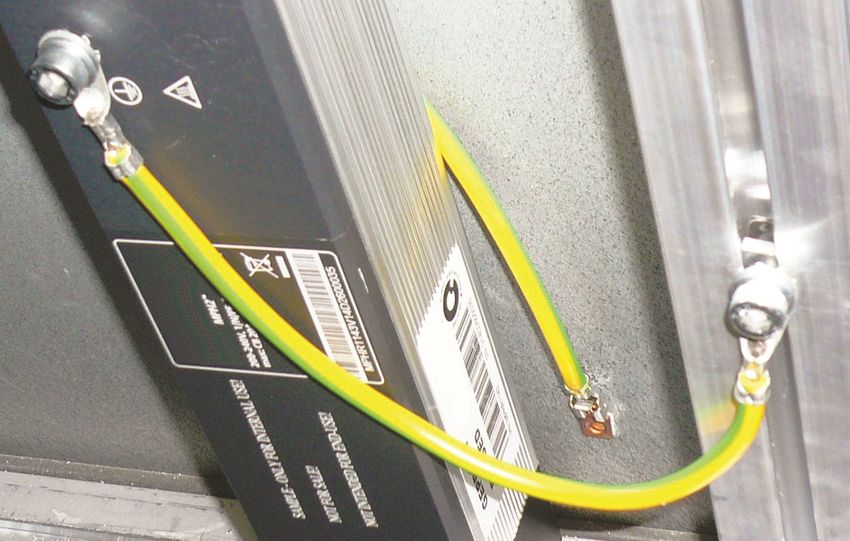
Zusätzlicher externer Erdungsanschluss Additional external ground connection Prise de terre externe supplémentaire
Hinweis Information Remarque
Beim Anschluss von mehreren Schutzklasse When connecting multiple protection class En cas de raccordement de plusieurs appa-
1 Geräten summieren sich die Ableitströme. 1 devices, the leakage currents are added reils de classe de protection 1, les courants de
Der zusätzliche externe Erdungsanschluss together. The additional external ground fuite se cumulent. La prise de terre externe
bietet hierzu eine weitere Sicherheit. Das connection provides further protection in this supplémentaire permet de bénéficier de
Erdungskabel kann optional bestellt werden. respect. The ground cable is available to be davantage de sécurité. Le câble de mise à
ordered as an option. la terre est disponible en option auprès de
Vertiv.
Vertiv | MPH2TM – Managed Rack PDU – Quickstart Guide – EMEA | 03.951.421.0.001 | Index c | ECR no. 18567 | 07/2018 4Bitte beachten Sie Please read A consulter impérativement
DEUTSCH ENGLISH FRANÇAIS
Hinweis Information Remarque
• Die auf dem Typenschild angegebenen Nennda- • For safe operation, it is not permitted to ex- • Afin d‘assurer un bon fonctionnement, il est néces-
ten für Strom, Spannung und Frequenz dürfen für ceed the rated values for current, voltage saire de ne pas dépasser les données nominales
einen sicheren Betrieb nicht überschritten werden. and frequency as stated on the type plate. figurant sur la plaque signalétique relatives au
courant, à la tension et à la fréquence.
• Die MPH2™-Rack-PDU muss an einem Standort • The MPH2™ rack PDU must be installed in a
mit eingeschränktem Zugang installiert werden. restricted-access location. A restricted-access • L‘unité PDU en rack MPH2™ doit être installée
Ein Standort mit eingeschränktem Zugang ist ein location is an area where access is possible only dans un endroit à accès restreint. Un endroit à
Bereich, auf den nur mit einem Hilfsmittel (z. B. through the use of a tool, such as a key, because accès restreint est une zone à laquelle on peut
einem Schlüssel) zugegriffen werden kann, weil a lock other means of security device has been accéder uniquement au moyen d‘un outil (par
er eine Sperre oder eine andere Sicherungsvor- installed and where access is controlled by the exemple une clé) car il comporte un verrouillage
richtung aufweist, und durch eine Person mit authority responsible for the location. ou un autre dispositif de sécurité et qui est contrô-
Zuständigkeit für diesen Bereich kontrolliert wird. lée par une personne responsable de cette zone.
• Refer any unexpected behavior or unusual fault
• Wenden Sie sich bei allen unerwarteten Verhalten conditions to your local dealer, Vertiv represen- • Veuillez signaler tout comportement inha-
oder ungewöhnlichen Fehlerbedingungen an Ih- tative or to Vertiv Applications Engineering. bituel ou tout état défectueux à votre dé-
ren Händler, an Ihre lokale Vertiv-Vertretung oder taillant local, votre représentant Vertiv ou
an das Vertiv Applications Engineering. • For MPH2™ devices with a fixed connection, a à l‘équipe d‘ingénierie d‘application Vertiv.
readily accessible disconnect device must be
• Bei MPH2™-Geräten mit Festanschluss muss eine incorporated into the on-site power supply circuit. • Pour les unités MPH2™ avec connexion perma-
leicht zugänglicheTrennvorrichtung im bausei- nente, un dispositif de déconnexion facilement
tigen Versorgungsstromkreis vorhanden sein. • For MPH2™ devices with mains plugs, the accessible doit être prévu dans le circuit d‘ali-
socket/outlet must be installed near the mentation sous la responsabilité du client.
• Bei MPH2™-Geräten mit Netzstecker muss equipment and must be easily accessible.
die Netzsteckdose in der Nähe des Gerä- • Pour les unités MPH2™ avec fiche d‘alimentation,
tes angebracht und leicht zugänglich sein. • Ensure that the ratings of the electric circuit of la prise de courant doit être installée près de
each connected device meet the specified rating l‘équipement et doit être facile d‘accès.
• Stellen Sie sicher, dass die Leistung des at each branch and outlet.
Stromkreises an jedem angeschlossenen Ge- • Assurez-vous que les puissances du cir-
rät der an jeder Abzweigleitung und Steck- cuit électrique de chaque appareil connec-
dose angegebenen Leistung entspricht. té correspondent aux puissances spécifiées
pour chaque dérivation et prise de courant.
Warnung! Warning! Attention !
Ein Öffnen einer MPH2™-Rack-PDU Opening an MPH2™ rack PDU may expose L‘ouverture d‘une unité PDU en rack MPH2™
kann das Personal der Gefahr durch im personnel to lethal voltages from within the peut exposer le personnel à une tension
Gerät vorhandene tödliche Spannung rack PDU. Observe all cautions and warn- mortelle provenant de l‘unité. Respectez
aussetzen. Beachten Sie alle Warn- und ings. Failure to do so may result in serious toutes les précautions et mises en garde.
Gefahrenhinweise. Andernfalls besteht die injury or death. MPH2™ rack PDU units con- Tout manquement à ces directives peut
Möglichkeit von schweren Verletzungen tain no user-serviceable parts. For techni- causer des blessures graves (pouvant en-
(unter Umständen mit Todesfolge). cal support, contact Vertiv Applications traîner la mort). Les unités PDU en rack
MPH2™-Rack-PDU-Geräte enthalten keine Engineering or your local Vertiv represen- MPH2™ ne contiennent aucune pièce dont
vom Benutzer zu wartenden Teile. Wenden tative. Do not attempt to service this prod- l‘utilisateur puisse effectuer la mainte-
Sie sich zum technischen Support an das uct yourself. nance. Pour bénéficier d‘une assistance
Vertiv Applications Engineering oder an technique, veuillez contacter votre repré-
Ihre örtlicheBitte beachten Sie Please read A consulter impérativement
DEUTSCH ENGLISH FRANÇAIS
Haftung Liability Responsabilité
Vertiv übernimmt keinerlei Gewähr für die voll- Vertiv cannot accept responsibility for the com- Vertiv ne donne aucune garantie en ce qui
ständige Richtigkeit der Angaben. Insbesondere pleteness and correctness of the information. In concerne l’exactitude totale des indications. Par
wird keine Haftung für Schäden übernommen, die particular, we accept no liability for damages that ailleurs, aucune responsabilité n’est assumée pour
aus unsachgemäßer Handhabung der Produkte result from incorrect use or operation of the prod- les dommages découlant d’une utilisation non
entstehen. uct. conforme des appareils.
Hinweis: Note: Remarque :
Bitte vor Inbetriebnahme Firmware-Version Please check the firmware version and, if nec- veuillez vérifier la version du firmware et
prüfen und gegebenfalls PDU updaten. Die ak- essary, update the PDU before use. The cur- mettre à jour la PDU si nécessaire. La ver-
tuelle Firmwareversion bitte hier downloaden: rent firmware version can be found here: sion actuelle du firmware peut être trouvée ici:
http://www.vertivco.com http://www.vertivco.com http://www.vertivco.com
1.3 Lieferung Delivery Livraison
Transportschäden Shipping damage Dommages liés au transport
Danger! Danger !
Gefahr! If the components have clearly suffered La sécurité n’est plus assurée en cas de
Bei erkennbaren Transportschäden ist die shipping damage, we cannot guarantee dommages apparents liés au transport !
Sicherheit nicht mehr gewährleistet! that they are safe! • Les dommages liés au transport doivent
• Transportschaden sofort nach Anlieferung • Report shipping damage to the forwarder or être signalés au transporteur et au
der Spedition und dem Hersteller melden. manufacturer immediately after delivery. constructeur immédiatement après la
livraison.
1.4 Gewährleistung Warranty Garantie
Die Gewährleistung beträgt 24 Monate. Als The warranty period is 24 months. The ef- La période de garantie est de 24 mois. La
Stichtag wird das Lieferdatum gerechnet. fective date is calculated from the delivery date de livraison sert de date de référence.
Weitere Details entnehmen Sie bitte den all- date. Further details can be found in the en- Vous trouverez d’autres précisions dans les
gemeinen Geschäftsbedingungen der Vertiv closed General Business Conditions of Vertiv conditions générales de vente de la société
Integrated Systems GmbH. Integrated Systems GmbH. Vertiv Integrated Systems GmbH.
1.5 Technische Support Technical support Support technique
Webseite: Website: Site Web :
https://www.vertivco.com/de-emea/ https://www.vertivco.com/en-emea/ https://www.vertivco.com/fr-emea/
Hardware Hardware Matériel
tel. +800 1155 4499 tel. +800 1155 4499 tel. +800 1155 4499
E-Mail eoc@vertivco.com e-mail eoc@vertivco.com e-mail eoc@vertivco.com
Vertiv | MPH2TM – Managed Rack PDU – Quickstart Guide – EMEA | 03.951.421.0.001 | Index c | ECR no. 18567 | 07/2018 6Montage und Installation Assembly and installation Montage et installation
DEUTSCH ENGLISH FRANÇAIS
2.1 Montagehinweise Assembly instructions Instructions de montage
Notwendiges Werkzeug Tools required Outils nécessaires
- Schlitzschraubendreher - Flat-blade screwdriver - Tournevis plat
- Torx-Schraubendreher TX30 - Torx screwdriver TX30 - Tournevis Torx TX30
- Drehmomentschlüssel - Torque wrench - Clé dynamométrique
- Kreuzschlitzschraubendreher PZ1 - Crosshead (Phillips) - Tournevis cruciforme PZ1
screwdriver PZ1
Vertiv | MPH2TM – Managed Rack PDU – Quickstart Guide – EMEA | 03.951.421.0.001 | Index c | ECR no. 18567 | 07/2018 7Montage und Installation Assembly and installation Montage et installation
DEUTSCH ENGLISH FRANÇAIS
2.2 Feste Installation Fixed installation Montage fixe
1. Install the mounting clip into the 1. Mettez le crochet de fixation dans
1. Stecken Sie die Befestigunsklammer in
designated hole. l'orifice prévu à cet effet.
die dafür vorgesehene Öffnung.
2. Using two screws, attach the PDU in the 2. Fixez la PDU à l'endroit prévu au moyen
2. Befestigen Sie die PDU mit jeweils zwei
desired place within the rack. de deux vis.
Schrauben an den dafür vorgesehenen
Platz.
1
2
2
Vertiv | MPH2TM – Managed Rack PDU – Quickstart Guide – EMEA | 03.951.421.0.001 | Index c | ECR no. 18567 | 07/2018 8Montage und Installation Assembly and installation Montage et installation
DEUTSCH ENGLISH FRANÇAIS
2.3 Werkzeuglose Montage Toolless mounting buttons Montage sans outil (Toollessmounting
(Toollessmounting buttons) buttons)
1. Befestigen Sie die werkseitig 1. Attach the factory-supplied button 1. Fixez sur la face arrière de la PDU en
mitgelieferten Knopfhalterungen an der mounts to the rear of the rack PDU. rack les supports de bouton fournis.
Rückseite der Rack-PDU. 2. Where necessary, install the keyhole 2. Le cas échéant, installez les angles de
2. Installieren Sie gegebenenfalls die slot brackets in the desired location in montage avec les trous de serrure (non
Einbauwinkel mit Schlüsselloch an der the rack (not supplied). fournis) aux emplacements souhaités
gewünschten Stelle im Rack (nicht im sur le rack.
3. Position the MPH2™ into the opening
Lieferumfang). of the keyhole slot. 3. Mettez le MPH2™ dans les trous de
3. Stecken Sie die MPH2™ in die dafür serrure prévus à cet effet.
vorgesehenen Schlüssellöcher.
2 3
1
4
2.4 Werkzeuglose Montage (Speedmount Toolless mounting Montage sans outil
DCM und InstaRack) (Speedmount DCM and InstaRack) (Speedmount DCM und InstaRack)
Bitte beachten Sie die zusätzlichen When using different mounting options, Veuillez consulter les manuels
Manuals für weitere Montagemöglichkeiten: please refer to the respective manual. complémentaires pour les autres possibilités
de montage :
“Mounting Options in InstaRack™” “Mounting Options in InstaRack™”
(03.951.426.0.002) oder “Mounting Options (03.951.426.0.002) or “Mounting Options in « Mounting Options in InstaRack™ »
in Vertiv DCM® Rack“ (03.951.426.0.001) Vertiv DCM® Rack“ (03.951.426.0.001) (03.951.426.0.002) ou « Mounting Options
in Vertiv DCM® Rack » (03.951.426.0.001)
Vertiv | MPH2TM – Managed Rack PDU – Quickstart Guide – EMEA | 03.951.421.0.001 | Index c | ECR no. 18567 | 07/2018 9Montage und Installation Assembly and installation Montage et installation
DEUTSCH ENGLISH FRANÇAIS
2.5 Horizontal 19“ (1HE/2HE Geräte) Horizontal 19” profile (1U/2U units) Horizontal 19" (unités 1HE/2HE)
1. Wählen sie einen 19”-Einbauplatz im 1. Choose a 19” slot in the rack for 1. Choisissez un emplacement de
Rack und installieren Sie die 4 Käfig- the PDU and install 4 cage/spring montage 19" et montez les 4 écrous
oder Federmuttern. nuts into the respective slots. prisonniers ou à ressort.
2. MPH2™ mit den dazugehörigen 2. Fasten the MPH2™ into place using the 2. Fixez le MPH2™ avec les vis
Schrauben befestigen. appropriate screws. correspondantes.
1
2
Vertiv | MPH2TM – Managed Rack PDU – Quickstart Guide – EMEA | 03.951.421.0.001 | Index c | ECR no. 18567 | 07/2018 10Montage und Installation Assembly and installation Montage et installation
DEUTSCH ENGLISH FRANÇAIS
2.6 Zusätzlicher externer Additional external ground connection Prise de terre externe supplémentaire
Erdungsanschluss
Hinweis Information Remarque
Beim Anschluss von mehreren Schutzklasse When connecting multiple protection class En cas de raccordement de plusieurs appa-
1 Geräten summieren sich die Ableitströme. 1 devices, the leakage currents are added reils de classe de protection 1, les courants de
Der zusätzliche externe Erdungsanschluss together. The additional external ground fuite se cumulent. La prise de terre externe
bietet hierzu eine weitere Sicherheit. Das connection provides further protection in this supplémentaire permet de bénéficier de
Erdungskabel kann optional bestellt werden. respect. The ground cable is available to be davantage de sécurité. Le câble de mise à
ordered as an option. la terre est disponible en option auprès de
Vertiv.
Vertiv | MPH2TM – Managed Rack PDU – Quickstart Guide – EMEA | 03.951.421.0.001 | Index c | ECR no. 18567 | 07/2018 11Montage und Installation Assembly and installation Montage et installation
DEUTSCH ENGLISH FRANÇAIS
3.1 RPC2 Karte RPC2 card Carte RPC2
B B1 B2 B3 B5 B6 B7
B4
Legende Legend Légende
B1 Serieller Port B1 Serial Port B1 Port série
B2 USB-Port B2 USB Port B2 Port USB
B3 Externer Sensor-Port B3 External Sensor Port B3 Port capteur externe
B4 Reset-Taste B4 Reset Button B4 Bouton réinitialisation
––Taste für mindestens 2 Sekunden ––Press the button for at least 2 sec- ––Appuyer sur le bouton pendant au
drücken ï Reset onds ï Reset moins 2 secondes ï Réinitialisation
––Taste 5x innerhalb 10 Sekunden drü- ––Press the button 5 times within 10 ––Appuyer sur le bouton 5 fois en 10
cken ï Factory seconds ï Factory secondes ï Réinitialisation réglages
default reset default reset d‘usine
B5 Display Port B5 Display Port B5 Port affichage
B6 Erweiterung/Management Port B6 Expansion/Management Port B6 Port extension/gestion
B7 LAN Port B7 LAN Port B7 Port LAN
Für die Konfigurieren die RPC2 Karte To configure a RPC2 card Pour la configuration de la carte RPC2
Der LAN Port ist im Auslieferzustand auf The LAN port is configured to DHCP on de- A la livraison, le port LAN est configuré
DHCP konfiguriert. Ist kein DHCP-Server livery. If no DHCP server is connected, the par défaut sur DHCP. S’il n’y a pas de ser-
angeschlossen, so hat der LAN Port keine LAN port will not have an IP address. The veur DHCP raccordé, le port LAN n’a pas
IP-Adresse. Die nachfolgende Beschreibung following description explains how to config- d’adresse IP. La description suivante montre
zeigt die Konfiguration einer festen IP-Adresse. ure a fixed IP address. la configuration d’une adresse IP fixe.
1. Laptop oder Rechner über Stan- 1. Connect your laptop or desktop 1. Raccorder l’ordinateur portable ou
dard-Ethernetkabel mit dem Expansi- computer via a standard Ethernet de bureau avec un câble Ethernet
on/Management Port verbinden. cable to the expansion/management standard au port extension/gestion.
port.
Expansion/Management Port nur für Only use the expansion/management Utiliser le port extension/gestion
die lokale Konfiguration verwenden! Die port for local configuration! Only inte- uniquement pour la configuration locale !
RPC2-Karte nur über den LAN Port in ein grate the RPC2 card into a network using Intégrer la carte RPC2 dans un réseau
Netzwerk einbinden! the LAN port! uniquement par l’intermédiaire du port
LAN !
Vertiv | MPH2TM – Managed Rack PDU – Quickstart Guide – EMEA | 03.951.421.0.001 | Index c | ECR no. 18567 | 07/2018 12Montage und Installation Assembly and installation Montage et installation
DEUTSCH ENGLISH FRANÇAIS
• Folgende Netzwerkeinstellung am Laptop oder • Ensure the following network settings on your • Sur l’ordinateur portable ou de bureau, procéder au
Rechner vornehmen: laptop or desktop computer. paramétrage du réseau suivant :
–– IP-Adresse: 192.168.1.9 –– IP address: 192.168.1.9 –– Adresse IP : 192.168.1.9
–– Subnetzmaske: 255.255.255.252 –– Subnet mask: 255.255.255.252 –– Masque de sous-réseau : 255.255.255.252
–– Standardgateway: 192.168.1.1 –– Default gateway: 192.168.1.1 –– Passerelle standard : 192.168.1.1
Hinweis Information Remarque
Laptop oder Rechner unbedingt auf It is essential that you set your laptop or Paramétrer impérativement l’ordinateur portable
die oben genannten Adressen einstellen, desktop to the above addresses because ou de bureau sur les adresses indiquées ci-des-
ansonsten kann keine Verbindung zur Karte otherwise it will not be possible to connect sus, sinon aucune liaison ne pourra être établie
hergestellt werden! to the card! avec la carte !
• Webbrowser öffnen und IP-Adresse des • Open your web browser and enter the IP • Ouvrir le navigateur Web et saisir l’adresse IP du
Expansion/Management Portes eingeben: address of the expansion/management port: port extension/gestion : http://192.168.1.10
http://192.168.1.10 http://192.168.1.10 • Indiquer le nom de l’utilisateur et le mot de passe
• Benutzernamen und Passwort unter • Enter your user name and password. Please en respectant les majuscules et les minuscules :
Beachtung der Groß-/Kleinschreibung einge- note, they are case-sensitive: Nom d’utilisateur : admin
ben: User name: admin Mot de passe : admin
Username: admin Password: admin • Sélectionner la page « System », puis « Settings
Passwort: admin • Select the “System” page and then select Network » sur la page de gauche.
• Seite „System“ und dort auf der linken Seite “Settings Network” on the left. • Le paramétrage standard de « Speed/Duplex »
„Settings Network“ auswählen. • The default setting for “Speed/Duplex” for the (vitesse/duplex) pour la connexion Ethernet est
• Die Standardeinstellung für „Speed/Duplex“ Ethernet port is “Auto 1000 Mbs/Full Duplex” « Auto 1000 Mbs/Full Duplex » (automatique). Pour
(Geschwindigkeit/Duplex) für den Ethernet- (automatic). To change this, choose from the le modifier, sélectionner « Speed/Duplex » (vitesse/
Anschluss ist „Auto 1000 Mbs/Full Duplex“ “Speed/Duplex” drop-down list. duplex) dans le menu déroulant.
(automatisch). Um dies zu ändern, im Drop- • Choose the IPV4 Boot Mode: “Static“ or • Sélectionner le mode de démarrage IPv4 : « Static »
Down-Menü „Speed/Duplex“ (Geschwindigkeit/ “DHCP” (the default setting is “DHCP”). (statique) ou « DHCP »
Duplex) wählen. If you select “Static”: Enter the IP address, sub- (le paramétrage standard est « DHCP »).
• IPv4-Boot-Modus wählen: „Static“ (Statisch) net mask and default gateway of the LAN port. Pour le paramétrage « Static » : saisir l‘adresse IP, le
oder „DHCP“ (die Standardeinstellung ist masque de sous-réseau et la passerelle standard
„DHCP“). • Click the “Save” icon above to save all du port LAN.
Bei Auswahl der Einstelllung „Static“: IP- your changes, or click the “Cancel” icon to
Adresse, Subnetzmaske und Standardgateway cancel the changes. • Enregistrer toutes les modifications en cliquant
des LAN Ports eingeben. • To complete the configuration, click the sur le bouton « Save » (Enregistrer) ci-dessus ou
“Reboot” icon in “System Settings”. les annuler en cliquant sur le bouton « Cancel »
• Oben mit Klick auf Schaltfläche „Save“ (Réinitialiser).
(Speichern) alle Änderungen speichern The Subnet for the configurations port of • Pour terminer la configuration, cliquer sur le bou-
oder mit Klick auf Schaltfläche „Cancel“ the PDU does not contain any gateway. ton « Reboot » (Redémarrer)
(Zurücksetzen) abbrechen. Nevertheless a few operating systems de la page « System Settings ».
• Um die Konfiguration abzuschließen, auf demand a default gateway configuration. If
Schaltfläche „Reboot“ (Neustart) auf so, please use: 192.168.1.1. An error message
Le sous-réseau pour le port de configuration de
might be displayed stating that the gateway
Seite „System Settings“ klicken.v la PDU ne comporte pas de passerelle. Cepen-
is not in the same subnet. This error message
dant, sur certains systèmes d’exploitation, l’indi-
can be ignored.
Das Subnetz für den Konfigurationsport cation d’une passerelle par défaut est obligatoire.
der PDU enthält kein Gateway. In einigen Dans ce cas, utiliser : 192.168.1.1. Le message d’er-
Betriebssystemen ist die Angabe eines Default For more information on configuring the reur éventuel indiquant que la passerelle ne se
Gateway aber zwingend vorgeschrieben. In RPC2 communication module, please refer trouve pas dans le même sous-réseau peut être
diesen Fällen nutzen sie bitte: 192.168.1.1. Eine to the RPC2 Communications Module user ignoré.
eventuelle Fehlermeldung, dass das Gateway manual. Vous trouverez davantage d’informations dans le
nicht im selben Subnetz liegt kann ignoriert manuel utilisateur du module de communication
werden.“ RPC2.
Weitere Informationen finden Sie in der Be-
dienungsanleitung RPC2 Kommunikations-
modul
Vertiv | MPH2TM – Managed Rack PDU – Quickstart Guide – EMEA | 03.951.421.0.001 | Index c | ECR no. 18567 | 07/2018 13VertivCo.com | Vertiv Integrated Systems GmbH, Mariakirchener Straße 38, 94424 Arnstorf, Germany © 2016 Vertiv Co. All rights reserved. Vertiv, the Vertiv logo and Vertiv Liebert DSE are trademarks or registered trademarks of Vertiv Co. All other names and logos referred to are trade names, trademarks or registered trademarks of their respective owners. While every precaution has been taken to ensure accuracy and completeness herein, Vertiv Co. assumes no responsibility, and disclaims all liability, for damages resulting from use of this information or for any errors or omissions. Specifications are subject to change without notice.
Vous pouvez aussi lire