REJA 26/11/2020 - Exterior Living
←
→
Transcription du contenu de la page
Si votre navigateur ne rend pas la page correctement, lisez s'il vous plaît le contenu de la page ci-dessous
REJA

                    1
26/11/2020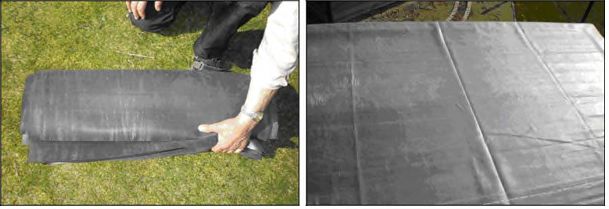
01

             2
26/11/2020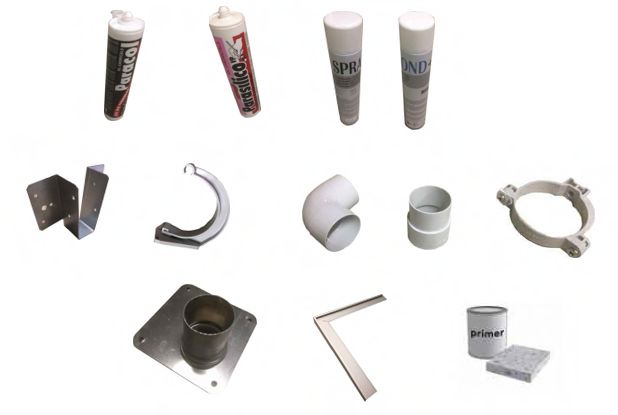
Schroef verzinkt / Vis galvanisé / Screw galvanized / Schraube galvanisiert

      4x30                                 4x50

      4x60                                 5x80

      Schroef inox / Vis inoxidable / Screw stainless steel / Schraube Edelstahl

      4x30                                 4,8 x 38 operal schroef
      Montageschroef EPDM / Vis de fixation EPDM / Mounting screw EPDM / Befestigungsschraube EPDM

                                                                                                     3
26/11/2020
02
        Optie: Assembleer de vloer
        Option: Assemblez le sol.
        Option: Assemble the floor.
        Option: Den Boden zusammenbauen

        Demonteer de beschermlat.
        Démontez la latte de protection.
        Disassemble the protective plank.
        Zerlegen Sie die Schutzleiste

                                            4
26/11/2020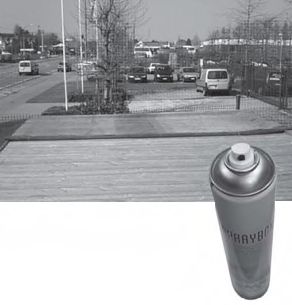
03

             4x60

             4x60

             4x60

                    Dicht alle hoekverbindingen af met PARAFIX
                    Sceller tous les joints d'angle avec PARAFIX avant le vissage
                    Seal all corner joints with PARAFIX before screwing
                    Alle Eckverbindungen vor dem Verschrauben mit PARAFIX abdichten

                                                                                      5
26/11/2020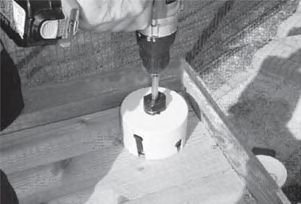
4x60

04

             4x30

             4x30

                    6
26/11/2020
05
                                                            Zaag het WPC-deurkader (10x70) en de WPC-dorpel
                                                            (32x56) op maat.
                                                            Découpez le cadre de porte WPC (10x70) et le seuil
                                                            WPC (32x56) aux dimensions voulues
                                                            Cut the WPC door frame (10x70) and the WPC sill
                                                            (32x56) to size.
                                                            Schneiden Sie den WPC-Türrahmen (10x70) und die
                                                            WPC-Schwelle (32x56) zu.

 De WPC-latten worden gecentreerd tov de opening, om de benodigde speling te waarborgen.
 Les lattes WPC sont centrées par rapport à l'ouverture, pour assurer le dégagement nécessaire
 The WPC battens are centered in relation to the opening, to ensure the necessary clearance.
 Die WPC-Latten sind in Bezug auf die Öffnung zentriert. Um den notwendigen Abstand zu gewährleisten.

              4x30 inox

 Bevestiging WPC 10x70 deurkader.(voorboren)
 Montage du cadre de porte WPC 10x70.(pré-
 percer)
 Mounting of WPC 10x70 door frame. (predrill)
 Befestigung WPC 10x70 Türträger (vorbohren)

                                                De openingen worden afgedicht met parafix.
                                                Les ouvertures sont scellées avec du parafix.
                                                The openings are sealed with parafix.
                                                Die Öffnungen sind mit Parafix verschlossen.

                                                                                                                 7
26/11/2020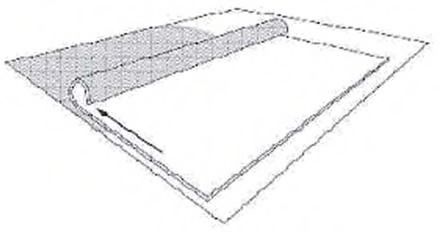
06

                     5x80

        Bevestiging stootprofiel.
        Montage de l’ arrêt.
        Mounting of the impact profile.
        Befestigung des Wirkungsprofils

     De WPC-dorpel (32x56)wordt gecentreerd vastgelijmd (zelf voorzien) op de beton, of vastgeschroefd op
     de houten vloer.
     Le seuil WPC(32x56) est collé au centre (fourni par vous-même) sur le beton ou vissé au plancher en bois.
     The WPC sill (32x56) is centrally glued ( provided by yourself) to the concrete, or screwed to the wooden
     floor.
     Die WPC-Schwelle (32x56) wird zentral auf den Beton geklebt ( selbst bereitgestellt) oder auf den
     Holzboden geschraubt.

                                                                 De openingen worden afgedicht met parafix
                                                                 Les ouvertures sont scellées avec du parafix
                                                                 The openings are sealed with parafix
                                                                 Die Öffnungen sind mit Parafix verschlossen

                                                                                                                 8
26/11/2020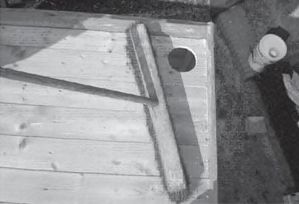
07

                      5x80

        Bevestiging lat (30x52 mm) en rail.
        Montage latte (30x52 mm) et rail.
        Mounting of slat (30x52 mm) and rail.
        Befestigung von Lamelle (30x52 mm)
        und Schiene

08

                      4x30

   Hang de deur op, en regel af.
   Accrochez la porte et réglez.
   Hang up the door and adjust.
   Hänge die Tür auf und arrangiere

 WPC zonder tand & groef (145x14) (voorboren)
 WPC sans languette & rainure (145x14) (pré-percer)
 WPC without tongue & groove (145x14) (predrill)
 WPC ohne Nut & Feder (145x14) (vorbohren)

                                                      9
26/11/2020
09
Bij de optie vloer / Avec l’option de sol / When opted for floor / Mit der Bodenoption

                       4x60

              4x30 inox

             BERGING

                    Bevestiging WPC 10x70 vloerkader (voorboren ! ! !)
                    Montage WPC 10x70 sur cadre de sol.(pré-percer ! ! !)
                    Mounting WPC 10x70 on floor frame (predrill ! ! !).
                    Befestigung WPC 10x70 am Bodenrahmen (vorbohren ! ! !)

                                                                                         10
26/11/2020
10
4x60
Bevestigen van de schuine muurplanken op de wanden. Let op dat ze aan beide kanten evenveel uitsteken.
Montage des planches en pente sur les murs. Assurez-vous qu'ils ont la même longueur des deux côtés
Fixing the sloping wall boards onto the walls. Make sure they protrude the same on both sides.
Befestigung der schrägen Wandbretter an den Wänden. Stellen Sie sicher, dass sie auf beiden Seiten gleich
weit herausragen
Positie bepalen van de schuine dakbalken, te bevestigen aan de rechte dakplank.
Déterminez la position des poutres de toit en pente, à fixer sur le panneau de toit droit.
Determine the position of the sloping roof beams, to be fixed to the straight roof board.
Bestimmen Sie die Position der schrägen Dachträger, die an der geraden Dachplatte befestigt werden sollen
4x30
11
26/11/202013
4x60
Bevestigen regel op wanden 56x32 mm (ter bevestiging planchet).
Montez le règle sur les murs 56x32 mm (fixation de la planchet)
Fixing plank on the walls 56x32 mm (fixation of slat).
Befestigen Sie der Regel an den Wänden 56x32 mm (zur Befestigung des Regals).
32x56
Fixation WPC
14
12
26/11/202015
4x50
De WPC-staande band wordt centraal t.o.v. de muurplank bevestigd,
zodat er op de hoeken voldoende ruimte aanwezig blijft voor
uitzetting.
Le bandeau WPC est fixé au centre de l'étagère murale, de sorte qu'il
y ait suffisamment d'espace aux coins pour l'expansion.
The WPC standing band is fixed centrally to the wall shelf, so that
trhere is sufficient space at the corners for expansion.
Das WPC-Stehband ist mittig am Wandregal befestigt, so dass an den
Ecken ausreichend Platz für die Erweiterung vorhanden ist.
TIP: voor een mooiere afwerking, plaats stroken
EPDM BAND tussen de muurplank en de WPC-
4x80 planchet van de oversteek.
4x50
ASTUCE: Pour une meilleure finition, placez des
bandes EPDM entre la planchet murale et l’ étagère
WPC du surplomb.
TIP: For a nicer finish place strips of EPDM band
between the wall plank and the WPC shelf of the
overhang.
TIPP: Für ein schöneres Finish legen Sie EPDM BAND-
Streifen zwischen die Wandplanke und das WPC-
Regal des Überhangs
13
26/11/202016
4x30
Elke dakplank wordt vastgeschroefd, 2x op de buitenste muurplank, 1x per zweping
Chaque panneau de toit est vissé, 2x sur le panneau mural extérieur, 1x par chevron
Each roof board is screwed on, 2x to the outer wall board, 1x every rafter
Jede Dachplatte wird 2x an der Außenwandplatte angeschraubt, 1x pro Sparrenträger
4X50 Bevestig de spielat
Fixez la barre de civière
Attach the stretcher bar
Befestigen Sie die Keilrahmen
14
26/11/202017
Bevestig de hoekprofielen met Parafix en enkele nietjes.
Fixez les profilés d'angle avec Parafix et quelques agrafes.
Attach the corner profiles with Parafix and some staples
Befestigen Sie die Eckprofile mit Parafix und einigen Heftklammern.
15
26/11/202018
Montage van de WPC-oversteek
Montage du surplomb WPC
Assembly of the WPC overhang
Montage des WPC-Überhangs
BERGING
Zaag de tand van de WPC-planchet af.
Scier la dent de l’étagère WPC.
Saw off the tooth from the WPC shelf.
Den Zahn aus dem WPC-Regal absägen.
Voorzie een speling van 2mm/m voor de benodigde uitzetting.
Prévoyez un dégagement de 2 mm/m pour l'expansion requise.
Provide a clearance of 2mm/m for the required expansion.
Stellen Sie einen Abstand von 2 mm / m für die erforderliche
Ausdehnung bereit.
Schroef de WPC-planchet vast in de muurplank en de kaderlat (32x56) langs de ene zijde (fig links)
Schroef de WPC-planchet vast in de muurplank en de zwepingen langs de andere zijde (fig rechts)
Fixez l’etagère WPC dans l’étagére murale et la latte d’encadrement(32x56) sur un côté (fig à gauche)
Fixez l’étagère WPC à l’étagère murale et les fouets de l’autre côté (fig. droite)
Fasten the WPC shelf into the wall shelf and the framing lath(32x56) along one side (fig. left)
Attach the WPC shelf to the wall shelf and the whips along the other side (fig right)
Befestigen Sie das WPC-Regal an einer Seite am Wandregal und an der Rahmenlatte(32x56) (Abb. Links)
Befestigen Sie das WPC Regal am Wandregal und die Peitschen auf der anderen Seite (Abb Rechts)
4,8 x 38 operal
Voorboren Ø6.5, pré-percer Ø6.5,
predrill Ø6.5, vorbohren Ø6.5
16
26/11/202019
Afwerking: Maak gebruik de bijgeleverde EPDM-band rol & WPC-lat (10x70) om
alle zichtbare openingen tussen de WPC-planchetten weg te werken.
Finition: pour une meilleure finition, placez des bandes EPDM entre la planchet
murale et l’étagère WPC du surplomb.
Finish: for a nicer finish, place strips of EPDM band between the wall plank and
the WPC shelf of the overhang.
Finish: Für ein schöneres Finish legen Sie EPDM BAND-Streifen zwischen die
Wandplanke und das WPC-Regal des Überhangs
EPDM-band
17
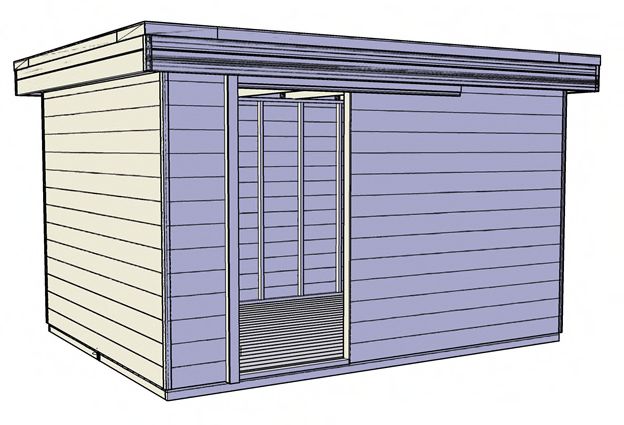
26/11/202018 PLAATSING EPDM DAKBEDEKKING / POSE DE LA COUVERTURE DU TOIT EPDM /
INSTALLATION OF EPDM ROOF COVER / INSTALLATION DER EPDM-DACHABDECKUNG
Hieronder vindt u richtlijnen terug voor het installeren van de dakbedekking van uw tuinhuis.
Veuillez trouver ci-après les instructions pour la mise en œuvre de la couverture de votre abri de jardin.
Below you find the guidelines regarding the installation of the roof cover of your garden house.
Nachstehend finden Sie die Anweisungen für die Umsetzung der Abdeckung Ihres Gartenhaus
BELANGRIJK: Lees de instructies aandachtig door vooraleer u met de plaatsing van start gaat.
De installatie dient te gebeuren bij droge en vriesvrije weersomstandigheden.
IMPORTANT: Lisez attentivement les instruction avant de commencer l’installation.
Les traveaux seront effectués dans de circonstances de temps sec et absence de gel.
IMPORTANT: Read the instructions carefully, before commencement of the installation.
This installation should only take place in dry and frost-free weather conditions.
WICHTIG: Lesen Sie die Anweisungen sorgfältig durch, bevor Sie mit der Installation beginnen.
Die Arbeiten werden bei trockener Witterung und Frostfreiheit durchgeführt
VOORBEREIDING / PRÉPARATION / PREPARATION / VORBEREITUNG
Het platte dak (hellingINSTALLATIE / INSTALLATION
1. Positionering EPDM folie / Application de la feuille EPDM /
Application of the EPDM foil / Positionierung von EPDM-Folie.
* Benodigdheden / Les outils / Equipment / Werkzeuge
EPDM
* Uitvoering / Exécution / Execution / Ausführung
Het EPDM membraan wordt op de grond opengevouwen.
Dépliez la feuille EPDM au sol.
Unfold the EPDM on the floor.
Falten Sie die EPDM-Folie auf den Boden.
Plaats de folie op het platte dak van uw tuinhuis en vouw open.
Repliez la feuille EPDM et possitionez-la sur le toit de votre abri de jardin.
Place the foil on the flat roof of your garden house and unfold.
Falten Sie das EPDM-Blat und positionieren Sie es auf dem Dach ihres Gartenhouse
2. Plaatsing hemelwaterafvoer / Installation du tuyau de descente /
Installation of rainwater drainage / Installation des Fallrohrs
* Benodigdheden / Les outils / Equipment / Werkzeuge
Klokboor en aluminium tapbuis.
Scie cloche et tuyau en aluminium.
Bell drill and aluminium spigot.
Lochsäge und Aluminiumrohr.
* Uitvoering / Exécution / Execution / Ausführung
Maak in de laagste zijde, al of niet in het hoekpunt van het dak, een gat met diameter 6 cm
in de houten structuur.
Vouw de EPDM folie hiervoor ca. 1 m terug.
Repliez la feuille EPDM environ 1 m.
Forez dans le cöté le plus bas, soit dans un coin du toit, un trou d’un diameter de 6 cm
dans la structure en bois.
Make a hole in the lowest side, whether or not at the corner of the roof, with a diameter of 6
cm in the wooden structure.
In order to do so, one needs to fold back the EPDM foil for approx. 1 m.
Falten Sie die EPDM-Folie ca. 1 m. Bohren Sie auf der untersten Seite, in einder Ecke des
Daches, ein Loch mit einem Durchmesser von 6 mm in der Holzkonstruktion.
19
26/11/2020X=15cm
Y=15cm
Boor het gat
Forez le trou
Drill the hole
Bohren Sie das Loch
Verwijder na het boren de houtvezels.
Éliminez le reste des bois de fibre.
Remove the wood fibres after drilling.
Entfernen Sie die Holzfasern nach dem
Bohren.
20
26/11/20203. Verlijming van de EPDM folie / Collage de la feuille EPDM /
Bonding of the EPDM foil / Collage des EPDM-Blattes.
* Benodigdheden / Les outils / Equipment / Werkzeuge
EPDM folie, Spuitbus met EPDM contactlijm, veegborstel
Feuille EPDM, Aérosol avec colle de contact EPDM, brosse
EPDM foil, spray can with EPDM contact adhesive, brush
EPDM-Folie, Aerosol mit EPDM-Kontaktkleber, Pinsel
* Uitvoering / Exécution / Execution / Ausführung
Vouw de helft van het membraan terug.
Repliez d’abord la moitié de la feuillie.
Fold back half of the foil.
Falten Sie die erste Hälfte des Blattes.
Breng de Bonding Adhesive contactlijm aan op de houten ondergrond én op de achterkant
van de EPDM folie met behulp van de bijgeleverde spuitbus (4m²/ spuitbus)
Appliquez la colle de contact Bonding Adhesive sur le fondement en bois et le côté arrière
de la feuille EPDM en utilisant l’aérosol (4m2/aérosol).
Apply the Bonding Adhesive contact adhesive on the wooden surface and on the back of
the EPDM foil using the supplied spray can (4m² / spray can).
Tragen Sie den Haftkleber mit der mitgelieferten Sprühdose (4 m² / Sprühdose) auf die
Holzoberfläche und die Rückseite der EPDM-Folie auf.
LET OP – ATTENTION – ACHTUNG
De EPDM folie moet goed gepositioneerd blijven tijdens de gehele uitvoering.
Loop zo weinig over de EPDM folie waar deze net gelijmd is,
dit om verschuivingen van de folie te voorkomen.
Faites en sorte que la feuille EPDM reste bien positionné pendant l’opération de collage.
Afin d’empêcher le déplacement de la feuille EPDM, nous vous conseillons d’éviter de marcher
sur la feuille EPDM ou elle vient d’être collée.
The EPDM foil must remain well positioned during the entire installation.
Avoid walking on the EPDM as much as possible, where it has just been glued.
This in order to prevent shifting of the foil.
Bringen Sie die EPDM-Folie gut positioniert an während des Klebesvorgangs, das verhindern.
Bewegen Sie das EPDM-Blatt, wir beraten Sie um zu vermeiden, auf das gerade geklebte
EPDM-Blech zu treten.
21
26/11/2020Wanneer de lijm droog is (max.10min) dient men het EPDM membraan in de lijm terug op zijn
plaats te rollen in een zigzag-beweging.
Une fois que la colle est sèche (après max. 10min), vous devez remettre la feuille EDPM à sa
place en zigzag.
When the glue is dry ( max. 10min), the EPDM foil needs to be rolled back into place in a zigzag
movement.
Sobald der Kleber trocken ist (max. 10Min), müssen Sie die EPFM-folie in einer Zick-Zack-
Bewegung wieder in ihre postion bringen
Bij de laatste zigzag-beweging dient de EPDM folie evenwijdig met de dakrand te komen en met
de hand goed in de hoek aangeduwd en afgestreken te worden.
Quand vous êtes arrivé au dernier mouvement zigzag, il faut mettre la feuille EPDM parallèle au
bord du toit, pousser et frotter fortement dans le coin.
With the last zigzag movement, the EPDM foil must be placed parallel to the roof edge and
pushed into the corner by hand, then smoothed out.
Wenn Sie bei der letzten Zickzack-Bewegung angekommen sind, legen Sie das EPDM-Blech
parallel zur Dachkante. Drücken und reiben Sie schwer in der Ecke
22
26/11/2020Overal goed aandrukken met de hand of met behulp van een zachte borstel.
Pousser fortement partout en utilisant votre main ou une brosse douce.
Press well everywhere, either by hand or by using a soft brush.
Drücken Sie mit der Hand oder einem weichen Pinsel überall hin.
Loop zo weinig over de EPDM folie waar deze net gelijmd is, dit om verschuivingen van de folie te
voorkomen.
Afin d’empêcher le déplacement de la feuille EPDM, nous vous conseillons d’éviter de marcher
sur la feuille EPDM ou elle vient d’être collée.
Avoid walking on the EPDM as much as possible, where it has just been glued. This in order to
prevent shifting of the foil.
Bewegen Sie das EPDM-Blatt, wir beraten Sie um zu vermeiden, auf das gerade geklebte EPDM-
Blech zu treten.
Vouw de andere helft van het membraan terug en herhaal bovenstaande procedure.
Repliez l’autre partie de la feuille EPDM et recommencer l’opération de collage.
Fold back the other half of the EPDM foil and repeat procedure above.
Falten Sie den anderen Teil der EPMD-Folie und widerholen Sie den Klebvorgang.
Snij de EPDM over de kanten met behulp van een mes, zonder de waterdichting hiermee in
gevaar te brengen.
Eliminez les feuilles EPDM extras sur le contour du toit, en utilissant un couteau, sans détériorer
l’étancheité.
Remove the additional EPDM foil on the roof edges with a knife, without damaging the
waterproofing.
Beseitigen Sie zusätzlice EPDM-Folieb auf der Dächkontur mit einem Messer, ohne die
Abdichtung zu schaden.
23
26/11/20204. Afwerking dakranden / Finition du contour du toit /
Finish of roof edges / Den Abstieg des Traufe
Silirub EPDM
Silirub EPDM
Silirub EPDM
24
26/11/2020Vous pouvez aussi lire