SolarVenti Standard (SV) - Wall Installation Manual
←
→
Transcription du contenu de la page
Si votre navigateur ne rend pas la page correctement, lisez s'il vous plaît le contenu de la page ci-dessous

SolarVenti Standard (SV)
                      Wall Installation Manual
          Wand Installationsanleitung         Væg Installationsvejledning
          Manuel d'installation murale        Vägg Installationsanvisningar
          Pared Manual de instalación         Seinäsarja Asennusohje
          Zed´- Montážní instrukce

                                                                              February 2018
UK   DE      FR     ES     CZ     DK     SE   FI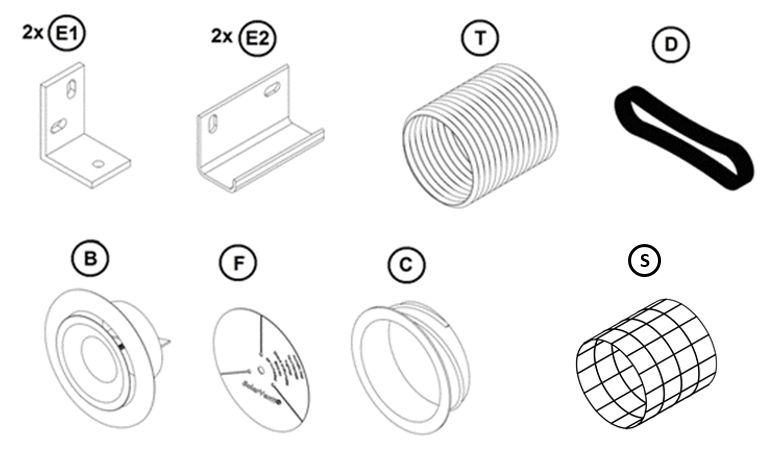
I. Collector Assembly ............................................................................ 1
                I.I SV3 & SV7
                I.II SV14, SV20 & SV30
        Montage des Kollektors                                  Samling af luftsolfangerpanel
        Montage du capteur                                      Hopsättning av luftsolfångarpanel
        Montage del colector                                    Keräimen asennus
        Montáž kolektoru

 II. Wall Mounting Kit ............................................................................ 3
        Wandmontage Set                                         Vægsæt
        Kit d'installation murale                               Väggfäste
        Kit para montage en pared                               Seinäkiinnityssarja
        Montážní sada na zed´

 III. Switch ............................................................................................. 7
        Ein-/Ausschalter                                        Afbryder/Kontakt
        Interrupteur                                            Brytare
        Interruptor                                             Katkaisin
        Vypínač

 IV. Regulator ........................................................................................ 8
        Komfortregler                                           Regulator
        Régulateur                                              Regulator
        Regulador                                               Säädin
        Regulátor

 V. Technical Details ............................................................................... 9
        Technische Daten                                Tekniske data
        Données techniques                              Tekniska data
        Datos técnicos                                  Tekniset tiedot
        Technická data

February 2018 - SolarVenti ®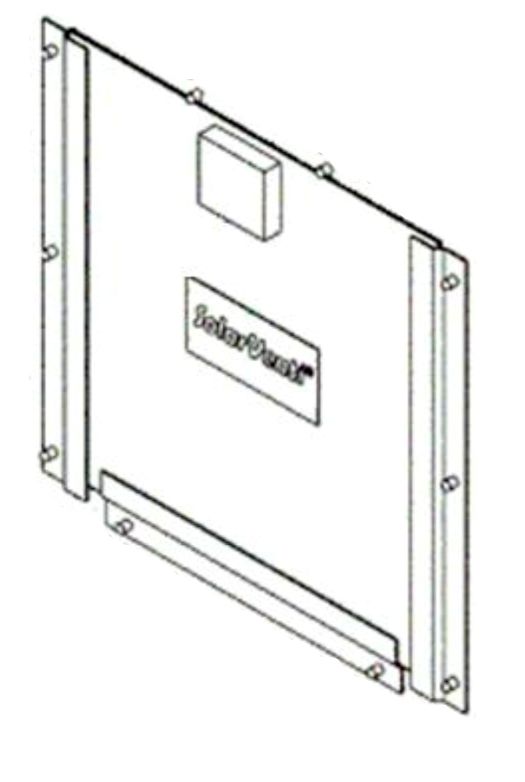
VI. Additional installation tips...........................................................11
        Weitere Montage-Tipps.........................................................................................................12
        Précisions complémentaires d'installation.…………………………………………………………………..….13
        Más consejos para la instalación...........................................................................................14
        Další instalační tipy................................................................................................................15

        Yderligere tips til installationen ............................................................................................16
        Fler tips för installation..........................................................................................................17
        Lisää vinkkejä asennukseen ..................................................................................................18

                                                                                                                           ……
                                                                                         Find more languages on:
                                                                                         www.solarventi.com

                              ?

February 2018 - SolarVenti ®
General information
General information
SV
SV
(*) Check reference on page 11
Weitere Erläuterungen siehe Seite 12 Se noter på side 16
Reportez vous à la page 13 Se anmärkningarna på sidan 17
Comprobar referencias en el pagina 14 Katso ohjeet sivulta 18
Další informace naleznete na straně 15
February 2018 - SolarVenti ®General information
Maintenance & Cleaning Tips
< 60 ˚C
Further cleaning instructions: www.solarventi.com
February 2018 - SolarVenti ®I. Collector Assembly
I. Collector Assembly
SV3 & SV7
[mm] SV3 SV7
I 515 700
II 700 1020
III 262 320
IV 175 175
V 240 460
PV-cell
PV 303x180 350x350
Cell 6W 12 W
January 2017 - SolarVenti ® 1I. Collector Assembly
I. Collector Assembly
SV14, SV20 & SV30
[mm] SV14 SV20 SV30
I 700 1020 1020
II 2010 2010 3000
III 320 320 370
IV 175 335 370
V 820 820 1235
PV- 350x350 350x350 555x305
cell 12 W 12 W 18 W
January 2017 - SolarVenti ® 2II. Wall Mounting Kit
II. Wall Mounting Kit
÷ SV3
January 2017 - SolarVenti ® 3II. Wall Mounting Kit
1
[mm] I II III IV
SV3 262 420 600 526
SV7 320 600 900 712
SV14 320 600 1800 712
SV20 320 800 1800 1032
SV30 375 800 2800 1032
(*)
January 2017 - SolarVenti ® 4II. Wall Mounting Kit 2 January 2017 - SolarVenti ® 5
II. Wall Mounting Kit

3                             SV7, SV14
                              SV20, SV30

                               S           30 cm
                  C

                                                                    (*)
January 2017 - SolarVenti ®                                            6
III. Switch
III. Switch
- +
`
BLUE BROWN
BROWN
BLACK
BLUE SV14 / SV20 / SV30
BROWN
(*) BLACK
BLUE
SV3 / SV7
January 2017 - SolarVenti ® 7IV. Regulator
IV. Regulator
- +
BLUE BROWN
`
BLUE (*)
BROWN
BLACK
January 2017 - SolarVenti ® 8V. Technical Details
V. Technical Details
(*)
January 2017 - SolarVenti ® 9Notes
Notes
January 2017 - SolarVenti ® 10VI. Additional installation tips
UK Installation manual for mounting SV standard to the wall
Additional installation tips
INTRO Optimal airflow: In a leaky building there is no need for an exhaust/pressure valve.
However, a valve for air outlet should be installed in a very tight building. As far as
possible inject the air into the driest room and extract from the most humid room to
eliminate the risk of leading the moisture through the rest of the building.
Position: The panel can be installed either vertically or horizontally. In a vertical
position it can be turned, so the injection takes place either in the top or bottom,
and by horizontal position either to the right or left.
p. 4 The hole: Drilling through a wall can be challenging and the tools needed to make
the hole will depend on the material of the wall. Contact your local SolarVenti
installer for further advice regarding the drilling and the installation.
Take care not to drill into cables, power sockets, etc. The optimal diameter of the
hole is Ø133 mm on the inside and Ø140 mm on the outside. However, it is possible
to use a diameter of Ø135 mm both inside and outside.
p. 6 Cable: The cable of the Solar Air Collector may either go through the hole of the air
inlet – as shown above – or a separate 6-8 mm hole may be drilled in the position
desired.
p. 9 The pressure losses in the SolarVenti standard panels are proportional to the air
flow per m² of collector. The pressure losses only refer to the collector itself and do
not take the specific installation (pipes, inlet valve etc.) into account.
In order to have protection against possible lighting, the installation should be
carrying on according with the norm EN 62305.
January 2017 - SolarVenti ® 11VI. Additional installation tips
DE Installationsanleitung für SolarVenti Standard Modell
Weitere Montage-Tipps
ALLGEMEINES Optimale Luftverteilung: Bei einem undichten Gebäude ist ein Absaugset/
Überströmventil nicht nötig. In einem dichten Gebäude muss jedoch eine Entlüftung
(Absaugset/Überströmventil) installiert werden. Der Lufteinlass muss möglichst
immer in dem trockensten Raum platziert werden und die Entlüftung immer im
feuchtesten Raum.
Die Montage: Der Kollektor kann entweder senkrecht oder waagerecht angebracht
werden. Bei senkrechter Montage kann der Kollektor nach Wunsch entweder mit
dem Lufteinlass nach unten oder oben angebracht werden, und bei waagerechter
Montage nach rechts oder links.
S. 4 Der Wanddurchbruch: Welche Werkzeuge für die Bohrung durch eine Wand
benötigt werden, hängt von der Beschaffenheit ab. Die Bohrung kann sich als
schwierig erweisen. Sind Sie unsicher bezüglich der Bohrung oder Installation eines
SolarVentis, ist die Installation durch einen SolarVenti Fachbetrieb durchzuführen.
Stellen Sie sicher, dass Sie nicht in Kabel u.ä. bohren. Der optimale Durchmesser des
Loches im Innenraum beträgt Ø133 mm und an der Außenwand Ø140 mm. Haben
Sie nur einen Bohraufsatz, können Sie stattdessen Ø135 mm sowohl für den Innen-
und Außenbereich benutzen.
S. 6 Kabelführung: Das Kabel des Warmluftkollektors kann entweder durch die
Wanddurchführung der Zuluft geführt werden oder durch eine separate
Durchführung Ø 6-8 mm.
S. 8 BLACK = Schwarz - - - - - - Blue = Blau - - - - - - Brown = Braun
S. 9 Der Druckverlust in einem SolarVenti Standard Kollektor verhält sich proportional
zur Luftströmung pr. m² Warmluftkollektor. Der hier dargestellte Druckverlust
beinhaltet nur den Druckverlust des Kollektors und ist nicht gleichbedeutend mit
dem Druckverlust der gesamten Installation (inkl. Rohrführung, Zuluftventil usw.).
Um vor möglichem Blitzeinschlag gesichert zu sein, muss die Installation in
Übereinstimmung mit dem Europäischen Norm EN 62305 durchgeführt werden.
January 2017 - SolarVenti ® 12VI. Additional installation tips
Manuel d’installation pour un SV standard sur un mur
FR Précisions complémentaires d'installation
INTRO Pour optimiser le flux d’air: Dans une construction peu étanche à l’air, il n’est pas
nécessaire de créer une sortie d’air. Cependant, il faudra en prévoir une dans un
bâtiment très étanche à l’air. Autant que possible, injecter l’air dans la pièce la plus
sèche et l’extraire de la pièce la plus humide pour éliminer le risque d’humidité
dans le reste du bâtiment.
Position: Le panneau peut être installé verticalement ou horizontalement, par
simple rotation. Verticalement: la sortie d'air peut se situer en haut ou en bas.
Horizontalement: la sortie d'air peut se situer à droite ou à gauche.
p. 4 Le trou : le forage d’un mur peut présenter quelques difficultés
Il est nécessaire d’avoir les outils adéquats selon la nature de la construction.
Prenez garde de ne pas endommager des câbles électriques, tuyaux divers, etc...
Le diamètre nécessaire du trou est de 133mm du côté intérieur et 140 mm côté
extérieur. Un percement d’un diamètre de 135 mm des deux côtés est correct.
p. 6 Cable: le câble du capteur solaire à AIr SOLARVENTI peut soit sortir par le trou
réalisé pour la sortie d’air ou par un trou séparé de 6-8mm à l’emplacement
souhaité.
p. 8 BLACK = Noir - - - - - - Blue = Bleu - - - - - - Brown = Brun
p. 9 Les pertes de charge des panneaux de la gamme standard SOLARVENTI sont
proportionnelles au débit d'air par M 2 de panneau. Elles ne concernent que le
panneau lui-même sans prendre en compte des installations spécifiques ( gaines,
coudes, etc...)
L'installation doit respecter les dispositions de la norme EN62305 pour les
éventuelles actions de la foudre.
January 2017 - SolarVenti ® 13VI. Additional installation tips
ES SV‐Standar Manual de instalación
Más consejos para la instalación
INTRO Flujo de aire óptimo: En un edificio estanco (que NO tenga grietas/orificios, que sea
hermetico) hay que crear/perforar una salida para el aire. Si el edificio no es estanco
no hara falta dicha salida. En la medida de lo posible, inyectar el aire caliente en la
habitación/zona mas seca y sacarlo en la mas humeda.
Localización: El panel se puede montar en posición vertical u horizontal. En posición
vertical, se puede colocar de manera que la inyección sea en la parte superior o
inferior y en posición horizontal para que sea en la parte derecha o izquierda.
pag. 4 Orificio de entrada de aire: La perforacion de un orificio a traves de una pared
puede ser un reto. Las herramientas necesarias dependeran del tipo de pared
Pongase en contacto con su instalador SolarVenti local para que le puedan
aconsejar.
Al hacer cualquier tipo de perforacion, hay que tener cuidado de no dañar ningun
cable, tuberia etc... El diametro óptimo del orificio de entrada de aire es de Ø133
por la cara interior y Ø140 en la exterior. Sin embargo es posible utilizar un unico
diametro de Ø135.
pag. 6 Cable: El cable del colector puede o bien ir por el orificio de entrada de aire o puede
ser perforado en el lugar mas conveniente, como un agujero de 6.8 mm.
pag. 8 BLACK = Negro - - - - - - Blue = Azul - - - - - - Brown = Marrón
pag. 9 Datos técnicos: La caída de presión en un panel SolarVenti estándar es proporcional
al flujo de aire/m² de panel. Curva de caída de presión cubre sólo la caída de presión
del colector solar y no significa que es la caída de presión en la instalación total
(tubería, curvas, difusores, etc.)
Para protegerse de la caída de rayos, la instalación debe estar de acuerdo con la
norma europea EN 62305ª
January 2017 - SolarVenti ® 14VI. Additional installation tips
CZ Standardní montážní instrukce
Další montážní tipy
INTRO Optimální objemový průtok vzduchu. U budov, které nejsou zcela hermeticky
uzavřené není potřeba další odtah. Nainstalujte však odtah u velmi utěsněných
budov. Talířový ventil, přes který se vzduch vhání dovnitř by měl být umístěn v
nejsušší místnosti a ventil na odtah naopak v nejvlhčí místnosti – jinak by docházelo
k rozhánění vlhkosti do zbytku budovy.
Umístění: Panel je možné namontovat buď svisle nebo vodorovně. U svislé polohy je
možné ho natočit výdechem buď nahoru, anebo dolů a při vodorovném umístění
může být výdech vpravo nebo vlevo.
str. 4 Otvor do zdi: Nářadí k tomuto účelu je speciální dle materiálu a složení zdi. Zeptejte
se svého prodejce či technika, pokud si přejete rady s vrtání otvoru.
Zajistěte, aby v místě prostupu nevedly žádné kabely či zásuvky.
Lze využít korunkový vrták s průměrem Ø135-142 mm.
str. 6 Kabel: Kabel z panelu je možné protáhnout přímo skrz prostupové potrubí, anebo
pro něj vyvrtat zvláštní díru 6-8 mm dle Vašich potřeb.
str. 8 BLACK = Černá - - - - - - Blue = Modrý - - - - - - Brown = Hnědý
str. 9 Ztráta tlaku v panelu SolarVenti Standard je úměrná průtoku vzduchu na m2
vzdušného panelu. Křivka ztráty tlaku znázorňuje pouze ztrátu tlaku panelu. Nemusí
být tedy totožná se ztrátou tlaku u celé instalace (vč. vzduchovodu apod.)
Pro zajištění panelu proti úderu bleskem, je třeba provést instalaci v souladu
s evropskou normou EN 62305.
January 2017 - SolarVenti ® 15VI. Additional installation tips
DK Installationsvejledning til vægmontage
Yderligere tips til installationen
INTRO Optimal luftflow. Ved en utæt bygning er der ikke behov for en udsugning/
trykventil. Installer dog en ventil til luftudstrømning i en meget tæt bygning.
Indblæsningen skal så vidt muligt ske i bygningens tørreste rum og udsugningen fra
det fugtigste rum – ellers risikerer man at presse fugten ud i resten af bygningen.
Placering: Panelet kan monteres enten lodret eller vandret. Ved lodret placering kan
det vendes, så indblæsningen sker enten i top eller bund, og ved vandret placering
enten til højre eller venstre.
s. 4 Hullet: At bore et hul gennem væggen kan være vanskeligt. Dertil kommer, at
værktøjet, der skal bruges til at lave hullet, afhænger af murens beskaffenhed. Få
råd og vejledning hos din lokale SolarVenti installatør, hvis du er i tvivl om
installationen.
Sørg for, at der ikke er nogen ledninger, stikkontakter e.l., hvor boringen skal
foretages. Den optimale diameter af hullet er Ø133 mm på indersiden og Ø140 mm
på ydersiden. I tilfælde af, at du kun har en borekrone, kan du dog bruge Ø135 mm
til både det indvendige og udvendige hul.
s. 6 Kabel: Luftsolfangerens kabel kan enten føres igennem indblæsningshullet eller der
kan bores et separat 6-8 mm hul, som placeres efter ønske.
s. 8 BLACK = Sort - - - - - - Blue = Blå - - - - - - Brown = Brun
s. 9 Trykfaldet i et SolarVenti Standard panel er proportional med luftflowet pr. m²
luftsolfanger. Trykfaldskurven indeholder alene luftsolfangerens trykfald og er ikke
ensbetydende med trykfaldet på den samlede installation (inkl. rørføring e.l.)
For at sikre sig mod lynnedslag skal installationen ske i overensstemmelse med den
europæiske norm EN 62305.
January 2017 - SolarVenti ® 16VI. Additional installation tips
Standards installationsanvisning
SE Fler tips för installation
INTRO Optimalt luftflöde: I en otät byggnad finns det inget behov av utsug/tryckventil.
Installera dock en ventil för luftutsläpp i en mycket tät byggnad. Inblåsningen skall
såvitt möjligt, ske i byggnadens torraste rum och utsuget från det fuktigaste rummet
– annars riskerar man att trycka ut fukten i resten av byggnaden.
Placering: Panelen kan monteras antingen lodrätt eller vågrätt. Vid lodrät placering
kan den vändas så att inblåsningen sker endera upptill eller nedtill och vid vågrät
placering till höger eller vänster.
s. 4 Hålet: Att borra hål i väggen kan vara vanskligt. Därtill kommer att verktyget, som
skall användas för att göra hålet, beror på murens beskaffenhet. Ta råd och
vägledning från din lokala SolarVenti-installatör ifall du är tveksam inför
installationen
Säkerställ att det inte är några ledningar, stickkontakter eller liknande där
borrningen skall utföras. Den optimala diametern för hålet är Ø133 mm på insidan
och Ø140 mm på utsidan. Ifall du enbart har ett borr kan du använda Ø135 mm för
både det invändiga och det utvändiga hålet.
s. 6 Kabel: Luftsolfångarens kabel kan antingen dras genom inblåsningshålet eller genom
att borra ett fritt placerat separat hål på 6-8 mm.
s. 8 BLACK = Svart - - - - - - Blue = Blå - - - - - - Brown = Brun
s. 9 Tryckfallet i SolarVenti standardpaneler är proportionellt mot luftflödet per m²
luftsolfångare. Tryckfallskurvan beskriver endast själva luftsolfångarens tryckfall och
inbegriper inte hela installationen (rör, inblåsventil etc).
För att skydda mot åsknedslag skall installationen utföras enligt den europeiska
förordningen EN62305.
January 2017 - SolarVenti ® 17VI. Additional installation tips
FI Seinäsarjan asennusohje
Lisää vinkkejä asennukseen
ESITTELY Ihanteellinen ilmavirta: Mikäli rakennuksessa vetää, tarvetta pako- / paineventtiilille
ei ole. Venttiili tulee asentaa mikäli rakennus on tiivis. Mikäli mahdollista, ohjaa
ilma kuivimpaan huoneeseen ja poista se kosteimman huoneen kautta. Näin
vältetään kosteuden leviäminen rakennukseen.
Asennus: Paneeli voidaan asentaa joko vaaka- tai pystyasentoon. Pystyasennossa
puhallin voidaan sijoittaa ylös tai alas ja vaaka-asennossa oikealle tai vasemmalle.
s. 4 Reiät: Seinän läpi poraaminen saattaa olla haasteellista ja tarvittavat työkalut
riippuvat seinän materiaalista. Ota tarvittaessa yhteyttä paikalliseen SolarVentin
asentajaan saadaksesi tarkempaa tietoa asennuksesta.
Varo poraamasta sähköjohtoihin, pistorasioihin jne. Reiän halkaisijan optimaalinen
koko on Ø133 mm sisällä ja Ø140 mm ulkona. Ø135 mm halkaisijaa voidaan käyttää
sekä sisällä että ulkona.
s. 6 Johto: Aurinkokeräimen johto voidaan viedä tuloaukon kautta – kuten yläpuolella-
tai sille voidaan porata erillinen 6-8 mm reikä haluttuun kohtaan.
s. 8 BLACK = Musta - - - - - - Blue = Sininen - - - - - - Brown = Ruskea
s. 9 Painehäviö vakiomallin SolarVentin paneelissa riippuu ilman virtausmäärästä.
Painehäviö koskee ainoastaan keräilijää, eikä erityisiä asennuksia (putkia,
tuloilmaventtiiliä tms.) tarvitse ottaa huomioon.
Jotta vältytään ukkosen aiheuttamilta vahingoilta, tulee asennus suorittaa
standardin EN 62305 mukaisesti.
January 2017 - SolarVenti ® 18SolarVenti® provides a healthy
indoor climate in your home
Avoid humidity
Avoid stale smell
Avoid mould and fungus
We are regularly tested by different national and international institutes in
order to remain the best on the market.
Your local dealer / installer:
Produced in Denmark
SolarVenti A/S
Fabriksvej 8
DK - 8881 Thorsø
Tlf. +45 8696 6700
www.solarventi.dk / www.solarventi.comVous pouvez aussi lire