Steven 2018 v1.0 - Opale Paramodels
←
→
Transcription du contenu de la page
Si votre navigateur ne rend pas la page correctement, lisez s'il vous plaît le contenu de la page ci-dessous
2018
  v1.0
                Manuel d’utilisation - User’s manual - Bedienungsanleitung

                                    Steven

         Choississez votre langue - Select your language - Wählen Sie Ihre Sprache

                         Français        English         Deutsch

                                                               O pale - Paramo del s. co m
                                                                     Opale Aero System SARL - 23 rue de la Motte
                                                                                      62250 MARQUISE - France
                                                              contact@opale-paramodels.com +33(0)981 144 387
2018                                            Notice d’utilisation
  v1.0

                        Steven

         Merci de lire ce manuel avant la première utilisation.

                                                     O pale - Paramo del s. co m
                                                            Opale Aero System SARL - 23 rue de la Motte
                                                                             62250 MARQUISE - France
                                                     contact@opale-paramodels.com +33(0)981 144 387
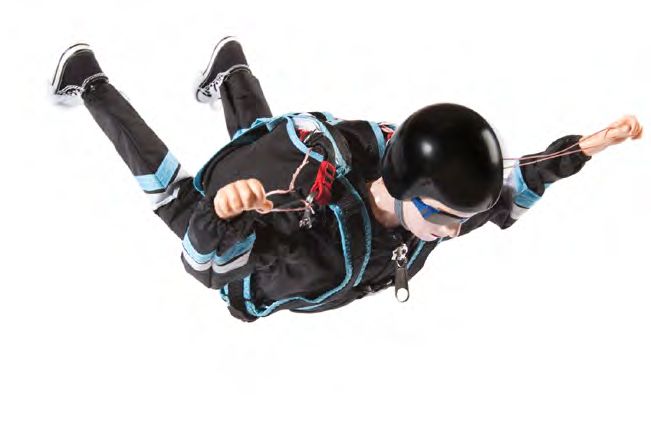
STEVEN PILOT
               Merci d’avoir choisi Opale-Paramodels. Nous sommes certains que ce parachutiste radio
               commandé vous procurera de merveilleux moments et vous permettra de découvrir de nou-
               velles sensations de pilotage. Ce manuel contient les informations dont vous aurez besoin
               pour faire voler et prendre soin de votre modèle. Une bonne connaissance de votre équipe-
               ment vous permettra de le faire évoluer dans les meilleures conditions de sécurité et de max-
               imiser les performances et votre plaisir. Merci de transmettre ce manuel au nouvel utilisateur
               de votre parachutiste radio commandé si vous le revendez.

               Salutations modélistes.

               L’équipe Opale-Paramodels

               Information sécurité

               En achetant notre matériel, vous devez être en possession d’une responsabilité civile et vous
               acceptez tous les risques inhérents à l’activité du modèle réduit.
               Une mauvaise utilisation du matériel peut augmenter les risques inhérents à cette activité.
               En aucun cas, Opale-Paramodels, ou le vendeur ne pourront être mis en cause pour les dom-
               mages survenus à la suite d’un accident quelles qu’en soient les circonstances. L’utilisateur
               du produit reste en toutes circonstances, responsable de l’utilisation qu’il en fait.

               Sommaire
                  Composition du pilote Steven							4
                  Données techniques									6
                  Assemblage du pilote Steven							6
                  Préparation de l’aile et pliage							22

               Garantie

                  Le pilote pour parachute radiocommandé est garanti contre tout défaut de fabrication.
                  Si lors de son utilisation, l’utilisateur vient à sectionner / endommager une suspente, à
                  déchirer quelconque partie de la voile, plier, rompre une partie du pilote, la réparation et
                  le remplacement des pièces endommagées ne sont pas pris en compte dans le cadre de
                  la garantie et reste à charge de l’utilisateur.

                                                                                      O pale - Paramo del s. co m
                                                                                             Opale Aero System SARL - 23 rue de la Motte
                                                                                                              62250 MARQUISE - France
         3                                                                            contact@opale-paramodels.com +33(0)981 144 387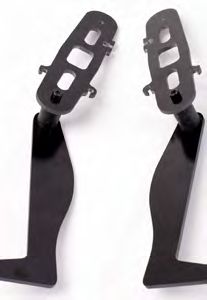
STEVEN PILOT
               Composition du pilote

                 -1-                   -2-

                 2x                     2x

                 -3-                   -4-

                 4x                     1x

                 -5-                   -6-

                 1x                     2x

                 -7-                   -8-

                 4x                     2x

                 -9-                   - 10 -

                 1x                     4x

                                                O pale - Paramo del s. co m
                                                       Opale Aero System SARL - 23 rue de la Motte
                                                                        62250 MARQUISE - France
         4                                      contact@opale-paramodels.com +33(0)981 144 387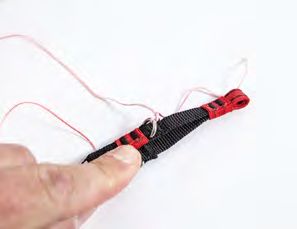
STEVEN PILOT
                  - 11 -                    - 12 -

                   2x                        2x

                  - 13 -                    - 14 -

                   1x                        2x

               Vis cruciforme 2x8   8    Silentbloc Type C M4 15-20                         2

               Vic CHC M3x8         4    Silentbloc Type B M4 15-20                         2

               Vis CHC M3x10        14   Entretoise d3                                      4

               Vis CHC M3x12        4    Entretoise d5                                      2

               Vis CHC M3x20        2    Collier plastique                                  3

               Vis CHC M3x25        2    Boucles inox                                       2

               Vis CHC M3x40        4    Elastique nylon                                    3

               Rondelle M3-S        2    Tige d’éjection                                    1

               Rondelle M3-L        6    Sangle de sécurité                                 1
               Ecrou frein M3       32   Suspente de conditionnement                        1

               Vis CHC M4x12        12   Harnais                                            1
               Vis CHC M4x16        2    Combinaison                                        1

               Vis CHC M4x20        2    Paire de chaussures                                1

               Rondelle M4-L        8    Servomoteur de 10kg.cm                             3

               Ecrou M4             10   Tête                                               1

               Bras G / D           1

                                                               O pale - Paramo del s. co m
                                                                      Opale Aero System SARL - 23 rue de la Motte
                                                                                       62250 MARQUISE - France
         5                                                     contact@opale-paramodels.com +33(0)981 144 387
STEVEN PILOT
               Données techniques
               Hauteur: 45cm
               Masse à vide (sans parachute): 850gr
               Matériaux: Fibre de verre / Résine et mousse polyuréthane / PU Nylon / Inox / Aluminium

               Assemblage du pilote Steven
               Installez sur la jambe (12) un silentbloc type
               C M4 15-20 avec une vis M4-12

               Fixez la partie haute de la jambe (8) avec
               une vis CHC M4-12

               Effectuez l’opération à l’opposé pour assem-
               bler la 2e jambe

                                                                                  O pale - Paramo del s. co m
                                                                                         Opale Aero System SARL - 23 rue de la Motte
                                                                                                          62250 MARQUISE - France
         6                                                                        contact@opale-paramodels.com +33(0)981 144 387
STEVEN PILOT
Installez la pièce (13) à l’aide d’une vis CHC
M3-8, rondelle M3 L et écrou frein M3
Réalisez la même opération pour l’autre
jambe.
Installez les deux silentblocs Type B M4 15-
20 avec deux écrous frein M4.
Disposez les 3 servomoteurs sur la pièce (4)
comme sur la photo ci-contre.
Utiliser 12 vis CHC M3-10 avec écrous freins.
Insérez de part et d’autre de la pièce (4) les
pièces (2). Les faire coulisser en butée.
O pale - Paramo del s. co m
Opale Aero System SARL - 23 rue de la Motte
62250 MARQUISE - France
7 contact@opale-paramodels.com +33(0)981 144 387STEVEN PILOT
Installez la pièce frontale (9) et la fixer sur
les pièces (2) à l’aide de 2 vis CHC M3-8 et
écrous freins.
Montez sur la pièce frontale (9) les deux
pièces (6) avec deux vis CHC M4-12 et écrous
freins M4.
Montez ensuite la pièce dorsale (5) sur les
deux pièces (6) à l’aide de 2 vis CHC M4-12
et écrous freins.
Préparez 2 vis CHC M3-10 avec rondelle
large et écrou freins.
Les fixer sur la platine dorsale (5) avec écrous
freins M3.
O pale - Paramo del s. co m
Opale Aero System SARL - 23 rue de la Motte
62250 MARQUISE - France
8 contact@opale-paramodels.com +33(0)981 144 387STEVEN PILOT
Préparez 2 vis CHC M3-12 avec rondelles
larges et écrous freins
Les monter sur la pièce frontale (9) avec
écrous freins M3. Ces 4 vis permettront par la
suite de maintenir les élastiques de fixation
de la tête du pilote.
Insérez fortement sur la pièce (2) une pièce
(7).
Idem
Insérez entre les deux pièces (7) la pièce (14).
Le montage des pièces (7) et (14) doit s’ef-
fectuer en force pour limiter le jeu.
Immobilisez l’ensemble avec 2 vis CHC M3-
40 avec écrous freins. Il est nécessaire que
ces vis soient fortement serrées, créant ainsi
une courbure sur les pieces (5) et (9).
O pale - Paramo del s. co m
Opale Aero System SARL - 23 rue de la Motte
62250 MARQUISE - France
9 contact@opale-paramodels.com +33(0)981 144 387STEVEN PILOT
Effectuez la même opération de l’autre côté.
Fixez les silentblocs sur les pièces (6) à l’aide
de 2 vis CHC M4-12 . Ne pas les serrer.
Positionnez les jambes vers l’avant avec une
inclinaison de 20°. Ensuite serrez fermement
les deux vis précédemment utilisées.
Insérez sur la pièce (7) une vis CHC M4-20.
Placez entre les deux pièces (7) une rondelle
M4 Large.
O pale - Paramo del s. co m
Opale Aero System SARL - 23 rue de la Motte
62250 MARQUISE - France
10 contact@opale-paramodels.com +33(0)981 144 387STEVEN PILOT
Insérez une pièce (3) et ensuite une entre-
toise d5.
Insérez de nouveau une 2e pièce (3) , et une
rondelle M4 large entre la 2e pièce (3) et la
pièce (7).
Mettre une goutte de frein filet sur l’ex-
trémité de la vis.
Mettez en place un écrou frein M4, mais sans
le serrer complètement. Le mouvement du
bras doit être fluide. Il est également recom-
mandé de mettre du lubrifiant type WD40
entre les pièces (3) et (7) pour limiter les
frottements et l’usure.
Insérez une vis CHC M4-16 sur la pièce (3).
A l’identique de l’opération précédente,
mettre à l’intérieur une rondelle M4 Large.
Positionnez l’avant bras (1) sur la vis et y
mettre une autre rondelle large M4.
O pale - Paramo del s. co m
Opale Aero System SARL - 23 rue de la Motte
62250 MARQUISE - France
11 contact@opale-paramodels.com +33(0)981 144 387STEVEN PILOT
Mettre une goutte de frein filet sur l’ex-
trémité de la vis.
Utilisez un écrou frein M4 sans le serrer for-
tement. L’avant bras doit bouger librement
sans jeu.
Fixez ensuite la main sur l’avant bras à l’aide
de 2 vis cruciformes 2x8. Si nécessaire,
percez le bras à l’aide d’un foret de 2mm de
diamètre.
Utilisez une vis CHC M3-25 et l’insérer dans
la pièce (10) et (7).
Montez de l’autre côté de la 2e pièce (7) une
2e pièce (10). Y insérer un écrou frein M3.
Ces deux pièces doivent se déplacer sans
frottement. Ne pas les serrer fortement et
ajouter si nécessaire du WD40 entre les deux
pièces.
Insérer de l’autre côté de la pièce (10) une
vis CHC M3-20, avec une entretoise d3.
O pale - Paramo del s. co m
Opale Aero System SARL - 23 rue de la Motte
62250 MARQUISE - France
12 contact@opale-paramodels.com +33(0)981 144 387STEVEN PILOT
Insérez la vis avec l’entretoise à l’extrémité
de la pièce (1). Mettre de l’autre coté une
nouvelle entretoise d3 et finir par insérer la
2e pièce (10). Serrez le tout avec un écrou
frein M3. L’ensemble doit bouger librement
sans jeu. Ajoutez du lubrifiant si nécessaire.
Positionnez la tête sur le corps du pilote et
à l’aide d’un feutre, dessinez la forme de la
pièce (5).
Découpez à l’aide d’une disqueuse la résine
ainsi que la mousse de la tête du pilote.
O pale - Paramo del s. co m
Opale Aero System SARL - 23 rue de la Motte
62250 MARQUISE - France
13 contact@opale-paramodels.com +33(0)981 144 387STEVEN PILOT
La tête est ainsi prête à être positionnée.
Connectez le servomoteur d’ouverture du
parachute sur votre récepteur radio.
Affectez ce servomoteur à un interrupteur 2
ou 3 positions.
Votre radiocommande doit être en réglage
par défaut ( canal réglé de -100 à 100% )
En position repos ( non déclenché ), le
palonnier du servomoteur doit être orienté
de 45° vers le haut.
En position ouvert ( déclenché ), le palonnier
doit être de 45° vers le bas.
Munissez vous du palonnier du servomoteur
et y insérer la tige d’éjection ( de préférence
à partir du 2e ou 3e en partant du centre
). Coupez l’excédent du palonnier à l’aide
d’une pince coupante.
O pale - Paramo del s. co m
Opale Aero System SARL - 23 rue de la Motte
62250 MARQUISE - France
14 contact@opale-paramodels.com +33(0)981 144 387STEVEN PILOT
Installez le palonnier sur le servomoteur
avec la tige lorsque celui-ci est en position
repos
Installez un collier en plastique pour main-
tenir la tige d’éjection dans l’axe durant son
utilisation. Ajustez le débattement du ser-
vomoteur afin que la tige ne soit pas au delà
du collier lorsque vous actionnez l’interrupt-
eur d’ouverture.
Coupez l’excédent à l’aide d’une pince
coupante si nécessaire.
Installez la pièce (11) sur l’un des palonniers
des deux servomoteurs prévu pour le con-
trôle des bras. Installez le au 3e ou 4e trou
en partant du centre ( à définir en fonction
de vos réglages et préférences). La pièce (11)
doit pouvoir tourner librement. Repercez la
si nécessaire.
O pale - Paramo del s. co m
Opale Aero System SARL - 23 rue de la Motte
62250 MARQUISE - France
15 contact@opale-paramodels.com +33(0)981 144 387STEVEN PILOT
Raccordez les deux servomoteurs sur votre
récepteur. N’affectez aucun mixage et laissez
les débattements par défaut.
Positionnez le bras du pilote comme sur
la photo ci-contre. Insérez ensuite une vis
cruciforme 2x8 dans la pièce (11) pour la
fixer sur la pièce (3). Choisissez par la suite le
trou que vous souhaitez en fonction de vos
préférences ( rapidité / précision / couple )
Réduisez le débattement de votre servo-
moteur à 30%, mettez votre manche à sa
position extrême basse et ajustez le débat-
tement jusqu’à avoir le bras du pilote en
position basse maximale. Veillez à ce que le
bras du pilote ne reste pas verrouillé lorsque
vous relacher le manche. Dans le cas con-
traire, il faudra remonter la fin de course du
servomoteur.
Effectuez la même opération pour la posi-
tion haute et pour l’autre bras.
Avec les manches en position neutre, les
deux bras du pilote doivent être alignés et
être dans la position ci-contre.
O pale - Paramo del s. co m
Opale Aero System SARL - 23 rue de la Motte
62250 MARQUISE - France
16 contact@opale-paramodels.com +33(0)981 144 387STEVEN PILOT
Pour le bon maintien des conducteurs des
servomoteurs, utilisez les 2 colliers en plas-
tique fournis avec le pilote.
Il est possible de placer un récepteur dans le
corps du pilote.
Fixez les deux élastiques nylon dans le dos
du pilote.
Positionnez la tête sur les épaules.
Celle-ci pourra être peinte à l’aide d’une
peinture acrylique ( pinceau ou pistolet à air
comprimé )
O pale - Paramo del s. co m
Opale Aero System SARL - 23 rue de la Motte
62250 MARQUISE - France
17 contact@opale-paramodels.com +33(0)981 144 387STEVEN PILOT
Placez les élastiques devant les épaules pour
maintenir la tête en position. Celle-ci doit
être fermement fixée sur les épaules, mais
une rotation Avant / Arrière doit être possi-
ble.
En option, il est possible de “rembourrer” les
jambes du pilote pour améliorer le confort
mais aussi les performances du parachutiste,
le rendant plus stable et aérodynamique.
Découpez 4 pièces d’environ 10x2x2cm dans
de la mousse
Fixez la mousse sur les jambes à l’aide d’un
adhésif renforcé. Serrez l’adhésif fermement.
O pale - Paramo del s. co m
Opale Aero System SARL - 23 rue de la Motte
62250 MARQUISE - France
18 contact@opale-paramodels.com +33(0)981 144 387STEVEN PILOT
Insérez la combinaison par les jambes du
pilote
Enfilez ensuite les bras et la refermer.
Insérez les chaussures. Pensez à bien faire les
lacets ;)
O pale - Paramo del s. co m
Opale Aero System SARL - 23 rue de la Motte
62250 MARQUISE - France
19 contact@opale-paramodels.com +33(0)981 144 387STEVEN PILOT
Le harnais peut être installé. Passez dans un
premier temps les jambes et ensuite les bras.
Derrière les jambes, juste au dessus du ge-
nou, percez un trou à l’aide d’un fer à souder
ou une paire de ciseaux pour permettre au
crochet situé sur la jambe de passer à travers
la combinaison.
Insérer un élastique nylon dans la boucle
prévue sur le volet arrière du harnais comme
sur la photo ci-contre.
O pale - Paramo del s. co m
Opale Aero System SARL - 23 rue de la Motte
62250 MARQUISE - France
20 contact@opale-paramodels.com +33(0)981 144 387STEVEN PILOT
Si vous rencontrez des conditions de vent
soutenu, le harnais est équipé d’une poche
dorsale pour y insérer du lest de 100 / 200 /
300gr .
Préparation de l’aile et pliage
Déballez l’aile de son sac.
Y sortir les élévateurs.
Les suspentes de freins sont attachées à
l’aide d’un noeud sur l’un des anneaux
présent sur l’élévateur.
Retirez délicatement ce noeud.
Vérifiez que l’ensemble des suspentes ne
soit pas emmêlé. Si ce n’est pas le cas, le
faire impérativement avant d’effectuer le
pliage de l’aile.
O pale - Paramo del s. co m
Opale Aero System SARL - 23 rue de la Motte
62250 MARQUISE - France
21 contact@opale-paramodels.com +33(0)981 144 387STEVEN PILOT
Fixer les élévateurs sur les pièces (14). Il est
aussi possible de les fixer directement sur le
harnais.
Passez la suspente de frein dans la main du
pilote. Vérifiez que celle-ci coulisse parfaite-
ment.
Mettre le bras du pilote en position basse à
l’aide de la radiocommande.
La suspente de frein comporte un point de
jonction avec une 2e suspente. Arrêtez ce
point juste au dessus de la main du pilote.
Effectuez ensuite un noeud avec la suspente
de frein au niveau de la boucle inox.
La même opération est à réaliser pour
l’autre bras. Assurez vous d’avoir un réglage
symétrique.
Ce réglage permet d’assurer un contrôle de
l’aile lors du premier vol. Il sera dans tous les
cas à ajuster en fonction de vos préférences.
Positionnez l’aile avec l’ensemble des sus-
pentes tendues au dessus du pilote, avec
une rotation de 90°.
O pale - Paramo del s. co m
Opale Aero System SARL - 23 rue de la Motte
62250 MARQUISE - France
22 contact@opale-paramodels.com +33(0)981 144 387STEVEN PILOT
Vérifiez que le tissu est correctement placé
entre les profils.
Positionnez ensuite l’ensemble des points
d’attache alignés, suspentes tendues, sans
noeuds.
Effectuer la même opération pour l’ensem-
ble des autres points d’encrage.
Amenez ensuite le pilote au niveau de l’aile
en le tirant par les élévateurs.
Insérez l’ensemble des suspentes dans l’aile
en soulevant le stab (wingtip) de la voile.
Saisissez l’ensemble des points d’attaches et
les amener au centre. N’hésitez pas à vous
aider d’un lest souple pour maintenir le tissu
en place.
O pale - Paramo del s. co m
Opale Aero System SARL - 23 rue de la Motte
62250 MARQUISE - France
23 contact@opale-paramodels.com +33(0)981 144 387STEVEN PILOT
Effectuez l’opération sur l’ensemble des
points d’attache.
Insérez dans la boucle blanche présente
dans le dos du harnais la suspente de 30cm.
Celle ci va vous aider à conditionner l’aile
dans le harnais.
Repliez l’aile en S en démarrant par le bord
de fuite (là où se trouvent les freins).
Les longueurs de pliages correspondent à la
longueur du harnais. (environ 12cm)
O pale - Paramo del s. co m
Opale Aero System SARL - 23 rue de la Motte
62250 MARQUISE - France
24 contact@opale-paramodels.com +33(0)981 144 387STEVEN PILOT
Arrêtez cette première partie au niveau de la
pate de fixation du parachute extracteur.
Effectuez la même opération en partant
cette fois ci du bord d’attaque de l’aile.
Positionnez les suspentes de freins en forme
de S dans la poche du harnais.
Positionnez ensuite le parachute plié en
veillant à ce que la pate de fixation de l’ex-
tracteur avec sa suspente soient bien placés
en haut.
Insérez maintenant la suspente de condi-
tionnement à travers l’oeillet du volet op-
posé et tirez fermement.
Effectuez la même opération avec le volet
supérieur présent en dessous de la tête du
pilote.
Sécurisez le tout à l’aide de la sangle de
sécurité. Y placer directement sa goupille
dans la boucle blanche du harnais.
O pale - Paramo del s. co m
Opale Aero System SARL - 23 rue de la Motte
62250 MARQUISE - France
25 contact@opale-paramodels.com +33(0)981 144 387STEVEN PILOT
Veillez à ce que les élévateurs soient bien
insérés sous les volets du harnais.
Maintenir l’extracteur et éclaircir chacun des
panneaux.
Le plier en deux
L’enrouler dans la sangle cousue sur le derni-
er volet en remontant vers le pilote.
Disposez la suspente de l’extracteur en S en-
tre le parachute et l’extracteur, sur le volet.
O pale - Paramo del s. co m
Opale Aero System SARL - 23 rue de la Motte
62250 MARQUISE - France
26 contact@opale-paramodels.com +33(0)981 144 387STEVEN PILOT
Fermez le dernier volet et y positionner la
goupille de la sangle de sécurité.
A l’aide de la radiocommande, appuyez sur
l’interrupteur d’ouverture du parachute.
Glissez ensuite la sangle du dernier vol dans
le trou supérieur situé en haut du dos du
pilote. Une fois l’anneau passé dans le trou,
relachez votre interrupteur en position ver-
rouillé. Le harnais est ainsi prêt.
Fixez l’élastique nylon situé sur le dernier
volet au niveau des crochets situés derrière
les jambes du pilote.
Pour une position aérodynamique stable,
les jambes du pilote doivent remontées vers
l’arrière comme sur la photo ci-contre.
Retirez la suspente de conditionnement et
y laisser la suspente de sécurité. Refermez
ensuite le cache du harnais.
Votre parachutiste Steven est désormais prêt
à faire son premier vol.
Pensez avant le largage à bien attacher la
sangle de sécurité sur le container de lar-
gage situé sur l’avion ou le paramoteur. Sans
cette opération, le parachute ne pourra pas
se déployer.
Programmez également votre radiocom-
mande pour obtenir le fonctionnement
voulu des manches de commandes.
Bons sauts!
O pale - Paramo del s. co m
Opale Aero System SARL - 23 rue de la Motte
62250 MARQUISE - France
27 contact@opale-paramodels.com +33(0)981 144 3872018 User’s manual
v1.0
Steven
Please read this manual before first use.
O pale - Paramo del s. co m
Opale Aero System SARL - 23 rue de la Motte
62250 MARQUISE - France
contact@opale-paramodels.com +33(0)981 144 387STEVEN PILOT
Thank you forchoosing Opale Paramodels. We truly believe that you will enjoy our products
and new outstanding experiences. The contents of this user’s guide contain all the infor-
mation you need for a safe handling. A comprehensive knowledge of your equipment will
guarantee you a long-term pleasure.
Please give this manual to the new owner in case you decided to sell your Opale product.
Your Opale Paramodels team.
Safety information
You should be properly insured according to the country regulation you are using our equip-
ment in.
You hereby accept the inherent risk of flying radio-controlled models.
Using our equipment in a bad way may increase risks. Neither Opale Paramodels nor any
other seller will be liable for any damage caused by any accident whatever the circumstances
are. The way our equipment is used is incumbent upon the final user, including towards the
law.
Table of contents
Kit content 30
Specifications 32
Pilot assembly 32
Wing preparation and folding 47
Warranty
The model is guaranteed against any manufacturing defect.
If, while using, the pilot cut or damage a bridle, tear any part of the wing,repair and re-
placement of dam- aged parts are not taken in account by the warranty and the user will
be charged for it.
O pale - Paramo del s. co m
Opale Aero System SARL - 23 rue de la Motte
62250 MARQUISE - France
29 contact@opale-paramodels.com +33(0)981 144 387STEVEN PILOT
Kit content
-1- -2-
2x 2x
-3- -4-
4x 1x
-5- -6-
1x 2x
-7- -8-
4x 2x
-9- - 10 -
1x 4x
O pale - Paramo del s. co m
Opale Aero System SARL - 23 rue de la Motte
62250 MARQUISE - France
30 contact@opale-paramodels.com +33(0)981 144 387STEVEN PILOT
- 11 - - 12 -
2x 2x
- 13 - - 14 -
1x 2x
Phillips screw - M2x8 8 Silent block - C Type - M4 15-20 2
CHC screw - M3x8 4 Silent block - B Type - M4 15-20 2
CHC screw - M3x10 14 Spacer - D3 4
CHC screw - M3x12 4 Spacer - D5 2
CHC screw - M3x20 2 Plastic clamp 3
CHC screw - M3x25 2 Stainless steel buckles 2
CHC screw - M3x40 4 Nylon elastic 3
Washer - M3 / S 2 Ejection pin 1
Washer - M3 / L 6 Safety strap 1
Nut - M3 32 Bridle for packing 1
CHC screw - M4x12 12 Harness 1
CHC screw - M4x16 2 Flight suitCombinaison 1
CHC screw - M4x20 2 Pair of shoes 1
Washer - M4/L 8 Servomotor - 10kg.cm 3
Nut - M4 10 Head 1
Arm G / D 1
O pale - Paramo del s. co m
Opale Aero System SARL - 23 rue de la Motte
62250 MARQUISE - France
31 contact@opale-paramodels.com +33(0)981 144 387STEVEN PILOT
Specifications
Length: 45cm
Empty weight (without parachute): 850gr
Materials: Glass Fiber / Polyurethan resin and foam / PU Nylon / Stainless Steel / Aluminium
Pilot assembly
Install on the leg (12) 1x C Type M4 15-20
silent block with 1x M4-12 CHC screw .
Fix the upper leg part (8) with 1x M4-12 CHC
screw.
Do the same operation with the second leg.
O pale - Paramo del s. co m
Opale Aero System SARL - 23 rue de la Motte
62250 MARQUISE - France
32 contact@opale-paramodels.com +33(0)981 144 387STEVEN PILOT
Install the part (13) with 1x M3-8 CHC screw,
1x large washer M3 and 1x nut M3.
Do the same operation on the other leg.
Install the 2x B Type M4 15-20 silent blocks
and 2x M4 nuts.
Place the 3 servomotors on the part (4) as
shown on the picture.
Use 12x M3-10 CHC screws with M3 nuts.
Insert the part (4) inside the holes of the
parts (2). Slide it to reach the stop.
O pale - Paramo del s. co m
Opale Aero System SARL - 23 rue de la Motte
62250 MARQUISE - France
33 contact@opale-paramodels.com +33(0)981 144 387STEVEN PILOT
Install the part (9) and fix it on the parts (2)
with 2x M3-8 CHC screws and M3 nuts.
Mount on the part (9) the 2 parts (6) with 2x
M4-12 CHC screws and M4 nuts.
Then mount the part (5) on the 2 parts (6)
with 2x M4-12 CHC screws and M4 nuts.
Prepare 2x M3-10 CHC screws with large M3
washers and M3 nuts.
Fix the part (5) with M3 nuts.
O pale - Paramo del s. co m
Opale Aero System SARL - 23 rue de la Motte
62250 MARQUISE - France
34 contact@opale-paramodels.com +33(0)981 144 387STEVEN PILOT
Prepare 2x M3-12 CHC screws with large M3
washers and M3 nuts.
Place them on the part (9) and hold them
with M3 nuts. These 4 screws will maintain
the elastics dedicated to the fixation of the
pilot’s head.
Insert the part (2) on the part (7).
Do it again.
Insert between the 2 parts (7) the part (14).
The assembly of the parts (7) and (14) is real-
ly tight to limit the clearance between these
parts.
Secure the whole thing with 2x CHC M3-40
and M3 nuts. the screws have to be strongly
tighten in order to bend the part (5) and (9).
O pale - Paramo del s. co m
Opale Aero System SARL - 23 rue de la Motte
62250 MARQUISE - France
35 contact@opale-paramodels.com +33(0)981 144 387STEVEN PILOT
Do the same operation on the opposit side.
Fix the silent blocks on the parts (6) with 2x
M4-12 CHC screws. Do not tighten them yet.
Move the legs forward in order to reach an
angle of 20°. Then Firmly tighten the 2x M4-
12 CHC screws.
Insert into the part (7) 1x M4-20 CHC screw.
Place between the 2 parts (7) a large M4
washer.
O pale - Paramo del s. co m
Opale Aero System SARL - 23 rue de la Motte
62250 MARQUISE - France
36 contact@opale-paramodels.com +33(0)981 144 387STEVEN PILOT
Insert the part (3) and then a D5 spacer.
Insert a second part (3) and place a large M4
washer between the second part (3) and the
part (7).
Place some threadlocker on the screw
thread.
Place a M4 nut but do not tighten too much.
Indeed the arm movement must remain
smooth. We advise you to use lube between
the parts (3) and (7) like WD40 to prevent
the friction and the wear of them.
Insert 1x M4-16 CHC screw into the part (3).
Place a large M4 washer as shown on the
picture.
Place the forearm (1) on the screw and add
another large M4 washer.
O pale - Paramo del s. co m
Opale Aero System SARL - 23 rue de la Motte
62250 MARQUISE - France
37 contact@opale-paramodels.com +33(0)981 144 387STEVEN PILOT
Then place some threadlocker on the screw
thread.
Use a M4 nut but do not tighten it too much.
The forearm must move freely but without
clearance.
Then fix the hand on the forearm with 2x
M2x8 phillips screws. If required, drill the
hand with a 2mm drill bit.
Use 1x M3-25 CHC screw and insert it
through the part (10) and (7).
Mount on the other end of the second part
(7) a second part (10). And the secure the
whole thing with a M3 nut.
Those 2 parts have to move without fric-
tion. Do not tighten the nut too much and
if required place some lube between those
parts.
Insert on the other end of the part (10) 1x
M3-20 CHC screw and place a D3 spacer as
shown on the picture.
O pale - Paramo del s. co m
Opale Aero System SARL - 23 rue de la Motte
62250 MARQUISE - France
38 contact@opale-paramodels.com +33(0)981 144 387STEVEN PILOT
Insert the screw with the spacer up to the
other end of the part (1). Place on the other
end another D3 spacer and then place the
second part (10). Tighten the whole thing
with an M3 nut. The whole thing must move
freely without clearance. Add lube if need
be.
Position the head on the body and draw
with a pen the shape of the part (5).
Then cut with a grinder the resin and the
foam of the pilot’s head.
O pale - Paramo del s. co m
Opale Aero System SARL - 23 rue de la Motte
62250 MARQUISE - France
39 contact@opale-paramodels.com +33(0)981 144 387STEVEN PILOT
The head is now ready to be positioned.
Connect the servomotor which triggers the
opening of the parachute to your receiver.
Assign this servo to a 2 or 3 positions switch.
Your transmitter must be set to the default
settings ( channel sets from -100 to +100%).
In rest position (not triggered), the servo
horn has to be oriented with an angle of 45°
upward.
In open position (triggered), the servo horn
has to be oriented with an angle of 45°
downward.
Take the servo horn and insert the ejection
pin inside the second or third hole from the
center. Then remove the extra part of the
servo horn with a pair of cutting pliers.
O pale - Paramo del s. co m
Opale Aero System SARL - 23 rue de la Motte
62250 MARQUISE - France
40 contact@opale-paramodels.com +33(0)981 144 387STEVEN PILOT
Install the servo horn on the servomotor
with the pin when the servo is on rest posi-
tion.
Install a plastic clamp to maintain the ejec-
tion pin axis during use. Adjust the move-
ment of the servomotor in order to keep the
pin inside the clamp when you trigger the
opening.
Cut the surplus with a pair of cutting pliers if
need be.
Install the part (11) on the servo horn of
one of the 2 servos dedicated to the control
of the arms. Attach the arm on the third or
fourth hole from the horn center (depend-
ing on your settings and your preferences).
The part (11) has to rotate freely. Increase
the hole size by drilling it, if need be.
O pale - Paramo del s. co m
Opale Aero System SARL - 23 rue de la Motte
62250 MARQUISE - France
41 contact@opale-paramodels.com +33(0)981 144 387STEVEN PILOT
Connect the 2 servos to your receiver. Leave
the default settings, do not mix your set-
tings.
Place the arm of the pilot as shown on the
picture. Then insert a M2x8 phillips screw
into the part (11) to fix it to the part (3).
Choose the hole regarding your preferences
( swiftness / accuracy / torque)
Reduce the servomotor travel from 30%,
place your stick into its lower position and
adjust the travel in order to have the arm in
the lowest position. Take care that the arm is
not hold when you release the stick. Oth-
erwise, you will have to reconsider the end
point of your servomotor.
Do the same operation but for the highest
position on the other arm.
With the stick in the neutral position, the 2
arms must have the same position as shown
on the picture.
O pale - Paramo del s. co m
Opale Aero System SARL - 23 rue de la Motte
62250 MARQUISE - France
42 contact@opale-paramodels.com +33(0)981 144 387STEVEN PILOT
To safely hold the servomotor wires, please
use the 2 plastic clamps included in this kit.
You can place a receiver inside the chest of
the pilot.
Fix the 2 elastics in the back of the pilot.
Position the head on the shoulders.
You can paint the head with acrylic paint (
you can use a paintbrush or an airbrush).
O pale - Paramo del s. co m
Opale Aero System SARL - 23 rue de la Motte
62250 MARQUISE - France
43 contact@opale-paramodels.com +33(0)981 144 387STEVEN PILOT
Place the elastics in front of the shoulders
to hold the position of the head. It has to
be firmly attached on the shoulders, but a
movement from the back to the front must
remain possible.
Optional, you can pad the legs of the pilot
to increase the performances of the skydiver
and the comfort, making it more steady and
aerodynamic.
Cut 4 pieces of 10x2x2cm in the foam.
Fix the foam on the legs with some heavy
duty duct tape. And firmly tighten the tape.
O pale - Paramo del s. co m
Opale Aero System SARL - 23 rue de la Motte
62250 MARQUISE - France
44 contact@opale-paramodels.com +33(0)981 144 387STEVEN PILOT
Insert the legs of the pilot inside the flight
suit.
Then the arms and zip up the flight suit.
Put on the shoes. Don’t forget to tie the
shoelaces ;-)
O pale - Paramo del s. co m
Opale Aero System SARL - 23 rue de la Motte
62250 MARQUISE - France
45 contact@opale-paramodels.com +33(0)981 144 387STEVEN PILOT
The harness can be installed. Slip the legs
and then the arms.
Behind the legs, just upon the knee, pierce
a hole with a soldering iron or scissors to
allow the hook located on the leg to pass
through the flight suit.
Insert an elastic in the buckle inside the rear
flap of the harness as shown on the picture.
O pale - Paramo del s. co m
Opale Aero System SARL - 23 rue de la Motte
62250 MARQUISE - France
46 contact@opale-paramodels.com +33(0)981 144 387STEVEN PILOT
If you encounter strong wind conditions, the
harness integrates a back pocket to insert
100 / 200 / 300gr ballast.
Wing preparation and folding
Unwrap the wing.
Take out the raisers.
The brakelines are attached on a riser D-ring
with a knot.
Remove gently the knot.
Make sure that all the bridles are not entan-
gled. If you did not check that, well you must
check it before the wing folding step.
O pale - Paramo del s. co m
Opale Aero System SARL - 23 rue de la Motte
62250 MARQUISE - France
47 contact@opale-paramodels.com +33(0)981 144 387STEVEN PILOT
Fix the risers on the parts (14). You can also
fix it on the harness.
Pass the brakeline into the pilot’s hand.
Make sure that it perfectly slides.
Place the arm of the pilot in its lowest posi-
tion with the transmitter.
The brakeline has a junction point with the
second bridle. Place this point right upon
the skydiver hand.
Then tie the brakeline on the D-ring.
Do the same operation on the other hand
and make sure that you have the same ad-
justment on both arms.
This setting will allow you to control your
wing on your first flight. It will be necessary
to adjust it according your preferences.
Place the wing with the bridles upon the
pilot, with a rotation of 90°.
O pale - Paramo del s. co m
Opale Aero System SARL - 23 rue de la Motte
62250 MARQUISE - France
48 contact@opale-paramodels.com +33(0)981 144 387STEVEN PILOT
Make sure that the fabric is properly placed
between the profiles.
Then position all the anchor points, taut
bridles, without knots.
Do the same operation on the other anchor
points.
Pull the skydiver up to the wing as shown on
the picture.
Place the bridles inside the wing by lifting
up the wingtip.
Grab all the anchor points and place it in
the center. Use a ballast to hold the fabric in
place.
O pale - Paramo del s. co m
Opale Aero System SARL - 23 rue de la Motte
62250 MARQUISE - France
49 contact@opale-paramodels.com +33(0)981 144 387STEVEN PILOT
Do the same on all the anchor points.
Insert the 30cm bridle into the white buck-
le located in the back of the harness. It will
help you to condition the wing inside the
harness.
Fold the wing in S starting from the trailing
edge (where the brakelines are).
The length of the foldings are the same than
the harness length (approximately 12cm).
O pale - Paramo del s. co m
Opale Aero System SARL - 23 rue de la Motte
62250 MARQUISE - France
50 contact@opale-paramodels.com +33(0)981 144 387STEVEN PILOT
Stop the first part near the fixation of the
puller parachute.
Do the same operation but this time starting
from the leading edge of the wing.
Place the brakelines in S shape inside the
harness.
Then insert the folded parachute and make
sure that the puller parachute fixation and
its bridle are on top.
Insert now the conditioning bridle through
the hole of the opposit flap and firmly pull.
Do the same operation with the upper flap
which is below the head.
Secure the whole thing with the safety strap.
And insert the pin inside the white buckle of
the harness.
O pale - Paramo del s. co m
Opale Aero System SARL - 23 rue de la Motte
62250 MARQUISE - France
51 contact@opale-paramodels.com +33(0)981 144 387STEVEN PILOT
Make sure that the risers are under the har-
ness flaps.
Maintain the puller parachute and unfold
each panels.
Fold it in half.
Roll it and store it inside the strap sewn on
the last flap.
Fold the puller parachute bridles in S shape,
between the parachute and the puller on
the flap.
O pale - Paramo del s. co m
Opale Aero System SARL - 23 rue de la Motte
62250 MARQUISE - France
52 contact@opale-paramodels.com +33(0)981 144 387STEVEN PILOT
Close the last flap and secure it with the pin
of the safety strap.
Using your transmitter, flip the switch to
trigger the parachute opening. Then slide
the strap of the last flap inside the upper
hole located on top the skydiver’s back.
Once the ring is inside the hole release the
switch into the lock position (rest position).
And the harness is ready.
Fix the elastic located on the back of the last
flap, on the hooks located on the legs.
For an aerodynamic and steady position, the
legs have to be placed like on the picture.
Remove the conditioning bridle but leave
the safety strap. Then close the harness
cover.
Your skydiver Steven is now ready to do is
first flight.
Make sure before the drop to attach the
safety strap to the dropping container locat-
ed on the plane or the paramotor.
Without this operation the parachute won’t
open. Set also your transmitter to ensure a
good operation of the sticks.
Good Jump!
O pale - Paramo del s. co m
Opale Aero System SARL - 23 rue de la Motte
62250 MARQUISE - France
53 contact@opale-paramodels.com +33(0)981 144 3872018 Bedienungsanleitung
v1.0
Steven
Bitte lesen Sie dieses Handbuch vor der ersten Verwendung
O pale - Paramo del s. co m
Opale Aero System SARL - 23 rue de la Motte
62250 MARQUISE - France
contact@opale-paramodels.com +33(0)981 144 387STEVEN PILOT
Vielen Dank, dass Sie sich für ein Opale-Parmodels-Produkt entschieden haben. Wir sind
überzeugt, dass Sie mit unseren Produkten viel Freude haben und es Ihnen ermöglicht, neue
herausragende Erfahrungen zu erfliegen. Der Inhalt dieses Benutzerhandbuchs enthält alle
Informationen, die Sie benötigen, für einen sicheren Umgang. Eine umfassende Kenntnis
über Ihre Ausrüstung garantiert Ihnen ein langfristiges Vergnügen.
Ihr Opale-Paramodels Team
Sicherheitsinformation
Bitte beachten Sie Ihre entsprechenden Ladesvorschriften bevor Sie das Modell einsetzen
und Ihren entsprechenden Versicherungsschutz. Sie akzeptieren hiermit das verbundene
Risiko ferngesteuerte Modell zu fliegen. Eine unsachgemäße Nutzung der Modelle und der
Ausrüstung erhöht das Risiko. Weder Opale Paramodels noch irgendein anderer Verkäufer-
haftet für alle Schäden, die durch einen Unfall entstanden sind, unabhängig von den Um-
ständen. Die Art und Weise der Nutzung unserer Modelle und Teilen davon obliegt dem
Endnutzer gegenüber dem Gesetzt.
Inhaltsverzeichnis
Bestandteile 56
Spezifikationen 58
Pilotmontage 58
Fallschirmvorbereitung und Falten 73
Garantie
Die Garantie gilt für Herstellungsfehler. Sofern durch unsachgemäße Handhabung oder
Missgeschick incl. Wettereinflüsse unsere Produkte beschädigt werden so können die
beschädigten Teile nur kostenpflichtig repariert oder ausgetauscht werden.
O pale - Paramo del s. co m
Opale Aero System SARL - 23 rue de la Motte
62250 MARQUISE - France
55 contact@opale-paramodels.com +33(0)981 144 387STEVEN PILOT
Bestandteile
-1- -2-
2x 2x
-3- -4-
4x 1x
-5- -6-
1x 2x
-7- -8-
4x 2x
-9- - 10 -
1x 4x
O pale - Paramo del s. co m
Opale Aero System SARL - 23 rue de la Motte
62250 MARQUISE - France
56 contact@opale-paramodels.com +33(0)981 144 387STEVEN PILOT
- 11 - - 12 -
2x 2x
- 13 - - 14 -
1x 2x
Kreuzschlitzschraube 8 Gummiblock - C Type - M4 15-20 2
- M2x8
CHC Schraube - M3x8 4 Gummiblock - B Type - M4 15-20 2
CHC Schraube - M3x10 14 Abstandshalter - D3 4
CHC Schraube - M3x12 4 Abstandshalter - D5 2
CHC Schraube - M3x20 2 Kunststoffklemme 3
CHC Schraube - M3x25 2 Edelstahlschäkel 2
CHC Schraube - M3x40 4 Nylon elastisch 3
Unterlagscheibe - M3 / S 2 Nylon elastisch 1
Unterlagscheibe - M3 / L 6 Sichgerheitsgurt 1
Mutter - M3 32 Hilfsleine für das Packen 1
CHC Schraube - M4x12 12 Gurtzeug 1
CHC Schraube - M4x16 2 Pilotenanzug 1
CHC Schraube - M4x20 2 Paar Schuhe 1
Unterlagscheibe - M4/L 8 Servomotor - 10kg.cm 3
Mutter - M4 10 Kopf 1
Arme 1
O pale - Paramo del s. co m
Opale Aero System SARL - 23 rue de la Motte
62250 MARQUISE - France
57 contact@opale-paramodels.com +33(0)981 144 387STEVEN PILOT
Spezifikationen
Größe: 45cm
Leergewicht (ohne Fallschirm): 850gr
Materialien: Glasfaser / Polyurethan Harz und Schaum / PU Nylon / Edelstahl / Aluminium
Pilotmontage
Montieren Sie an dem Bein (12) 1x C Typ
M4 15-20 Silentblock mit 1x M4-12 CHC
Schraube.
Befestigen Sie das obere Beinteil (8) mit 1x
M4-12 CHC Schraube.
Machen Sie das Gleiche für das andere Bein.
O pale - Paramo del s. co m
Opale Aero System SARL - 23 rue de la Motte
62250 MARQUISE - France
58 contact@opale-paramodels.com +33(0)981 144 387STEVEN PILOT
Montieren Sie das Teil (13) mit 1x M3-8 CHC
Schraube, 1x große Unterlegscheibe M3 und
1x Mutter M3.
Das gleiche auch beim anderen Bein.
Die 2x B Typ M4 15-20 Silent Blöcke und 2x
M4 Muttern einbauen.
Setzen Sie die 3 Servomotoren auf das Teil
(4) wie auf dem Bild gezeigt.
Verwenden Sie 12x M3-10 CHC Schrauben
mit M3 Muttern.
Die Teile (2) auf beiden Seiten des
Werkstücks (4) einlegen und einschieben.
O pale - Paramo del s. co m
Opale Aero System SARL - 23 rue de la Motte
62250 MARQUISE - France
59 contact@opale-paramodels.com +33(0)981 144 387STEVEN PILOT
Montieren Sie das Teil (9) und befestigen
Sie es an den Teilen (2) mit 2x M3-8 CHC
Schrauben und M3 Muttern.
Montieren Sie auf dem Teil (9) die 2 Teile
(6) mit 2x M4-12 CHC Schrauben und M4
Muttern.
Befestigen Sie dann das Teil (5) an den 2
Teilen (6) mit 2x M4-12 CHC Schrauben und
M4 Muttern.
Bereiten Sie 2x M3-10 CHC Schrauben
mit großen M3 Unterlegscheiben und M3
Muttern vor.
Befestigen Sie das Teil (5) mit M3 Muttern.
O pale - Paramo del s. co m
Opale Aero System SARL - 23 rue de la Motte
62250 MARQUISE - France
60 contact@opale-paramodels.com +33(0)981 144 387STEVEN PILOT
Bereiten Sie 2x M3-12 CHC Schrauben
mit großen M3 Unterlegscheiben und M3
Muttern vor.
Befestigen Sie diese auf das Teil (9) und
schrauben Sie sie mit M3-Muttern fest.
Diese 4 Schrauben halten die Gummibänder
fest, die für die Befestigung des Kopfes des
Piloten bestimmt sind.
Setzen Sie das Teil (2) auf das Teil (7).
Mache es noch einmal.
Fügen Sie zwischen den 2 Teilen (7) das Teil
(14) ein. Die Anordnung der Teile (7) und
(14) ist sehr eng, um den Abstand zwischen
diesen Teilen zu begrenzen.
Sichern Sie das Ganze mit 2x CHC M3-40
und M3 Muttern. Die Schrauben müssen fest
angezogen werden, um das Teil (5) und (9) zu
biegen.
O pale - Paramo del s. co m
Opale Aero System SARL - 23 rue de la Motte
62250 MARQUISE - France
61 contact@opale-paramodels.com +33(0)981 144 387STEVEN PILOT
Mache Sie das gleiche auf der anderen Seite.
Befestigen Sie die Silentblöcke an den Teilen
(6) mit 2x M4-12 CHC Schrauben. Ziehen Sie
sie noch nicht fest.
Bewegen Sie die Beine nach vorne, um einen
Winkel von 20 ° zu erreichen. Dann ziehen Sie
die 2x M4-12 CCH-Schrauben fest an.
In das Teil (7) 1x M4-20 CHC Schraube
einsetzen. Zwischen den 2 Teilen (7) eine
große M4 Unterlegscheibe.
O pale - Paramo del s. co m
Opale Aero System SARL - 23 rue de la Motte
62250 MARQUISE - France
62 contact@opale-paramodels.com +33(0)981 144 387STEVEN PILOT
Setzen Sie das Teil (3) und dann einen D5
Abstandshalter ein.
Setzen Sie einen zweiten Teil (3) ein und
legen Sie eine große Unterlegscheibe M4
zwischen den zweiten Teil (3) und den Teil (7).
Bringen Sie etwas Schraubensicherung auf
das Gewinde.
Platzieren Sie eine M4-Mutter, aber
ziehen Sie nicht zu fest an. In der Tat muss die
Armbewegung ruhig bleiben. Wir empfehlen
Ihnen, Schmiermittel zwischen den Teilen
(3) und (7) wie WD40 zu verwenden, um
Reibung und Verschleiß zu vermeiden.
Setzen Sie 1x M4-16 CHC Schraube in das
Teil (3) ein. Platzieren Sie eine große M4
Unterlegscheibe wie auf dem Bild gezeigt.
Setzen Sie den Unterarm (1) auf die Schraube
und fügen Sie eine weitere große M4
Unterlegscheibe hinzu.
O pale - Paramo del s. co m
Opale Aero System SARL - 23 rue de la Motte
62250 MARQUISE - France
63 contact@opale-paramodels.com +33(0)981 144 387STEVEN PILOT
Dann etwas Schraubensicherung auf das
Gewinde.
Verwenden Sie eine M4-Mutter, aber ziehen
Sie diese nicht zu fest an. Der Unterarm muss
sich frei, aber ohne Spiel.
Dann x die Hand auf den Unterarm mit 2x
M2x8 Kreuzschlitzschrauben. Wenn nötig,
bohren Sie die Hand mit einem 2mm Bohrer.
Verwenden Sie 1x M3-25 CHC Schraube und
führen Sie es durch das Teil (10) und (7).
Befestigen Sie am anderen Ende des
zweiten Teils (7) einen zweiten Teil (10). Und
das Ganze mit einer M3-Mutter sichern.
Diese 2 Teile müssen sich reibungslos
bewegen. Ziehen Sie die Mutter nicht zu
fest an und legen Sie gegebenenfalls etwas
Schmiermittel zwischen diese Teile.
Am anderen Ende des Teils (10) 1x M3-
20 CHC Schraube einstecken und ein D3
Distanzstück wie auf dem Bild gezeigt
anbringen.
O pale - Paramo del s. co m
Opale Aero System SARL - 23 rue de la Motte
62250 MARQUISE - France
64 contact@opale-paramodels.com +33(0)981 144 387STEVEN PILOT
Führen Sie die Schraube mit dem
Abstandshalter bis zum anderen Ende des
Teils (1). Setzen Sie am anderen Ende ein
weiteres D3-Distanzstück an und legen Sie
dann das zweite Teil (10) auf. Befestigen Sie
das Ganze mit einer M3 Mutter. Es muss sich
frei bewegen ohne Freiraum. Fügen Sie bei
Bedarf Gleitmittel hinzu.
Positionieren Sie den Kopf auf dem Körper
und zeichnen Sie mit einem Stift die Form
des Teils (5).
Schneiden Sie dann mit dem Schleifer
das Harz und den Schaum des Kopfes des
Piloten.
O pale - Paramo del s. co m
Opale Aero System SARL - 23 rue de la Motte
62250 MARQUISE - France
65 contact@opale-paramodels.com +33(0)981 144 387STEVEN PILOT
Der Kopf ist jetzt bereit, positioniert zu
werden.
Schließen Sie den Servomotor an, der
das Öffnen des Fallschirms an Ihren
Empfänger auslöst. Weisen Sie dieses Servo
einem Schalter mit 2 oder 3 Positionen zu. Ihr
Sender muss auf die Standardeinstellungen
eingestellt sein (der Kanal wird auf -100 bis
+100% eingestellt).
In Ruhestellung (nicht ausgelöst) muss das
Servohorn mit einem Winkel von 45 ° nach
oben ausgerichtet werden.
In geöffneter Stellung (ausgelöst) muss das
Servohorn mit einem Winkel von 45 ° nach
unten ausgerichtet sein.
Nehmen Sie das Servohorn und stecken Sie
den Auswurfstift in das zweite oder dritte
Loch von der Mitte. Dann entfernen Sie den
zusätzlichen Teil des Servohorns mit einer
Schneidzange.
O pale - Paramo del s. co m
Opale Aero System SARL - 23 rue de la Motte
62250 MARQUISE - France
66 contact@opale-paramodels.com +33(0)981 144 387STEVEN PILOT
Montieren Sie das Servohorn am
Servomotor mit dem Stift,
wenn sich das Servo in
Ruheposition befindet.
Installieren Sie eine Kunststoffklemme,
um die Achse des Ausstoßstiftes während
des Gebrauchs zu halten. Stellen Sie die
Bewegung des Servomotors ein, damit
der Stift beim Auslösen der Öffnung in der
Klemme bleibt.
Schneiden Sie den Überschuss bei Bedarf mit
einer Schneidzange ab.
Montieren Sie den Teil (11) auf das
Servohorn eines der beiden Servos, die für die
Steuerung der Arme vorgesehen sind.
Befestigen Sie den Arm am dritten oder
vierten Loch von der Hornmitte (abhängig
von Ihren Einstellungen und Ihren Vorlieben).
Der Teil (11) muss sich frei drehen. Erhöhen
Sie die Lochgröße, indem Sie diese bei Bedarf
aufbohren.
O pale - Paramo del s. co m
Opale Aero System SARL - 23 rue de la Motte
62250 MARQUISE - France
67 contact@opale-paramodels.com +33(0)981 144 387STEVEN PILOT
Verbinden Sie die 2 Servos mit Ihrem
Empfänger. Behalten Sie die
Standardeinstellungen bei, mischen Sie Ihre
Einstellungen nicht.
Legen Sie den Arm des Piloten wie auf dem
Bild gezeigt. Setzen Sie dann eine M2x8
Kreuzschlitzschraube in das Teil (11) ein, um
es am Teil (3) zu befestigen. Wählen Sie das
Loch nach Ihren Wünschen (Schnelligkeit /
Genauigkeit / Drehmoment).
Verringern Sie den Stellweg des Servomo-
tors von 30%, stellen Sie den Steuerknüppel
in die untere Position und stellen Sie den
Verfahrweg ein, um den Arm in die niedrigste
Position zu bringen. Achten Sie darauf, dass
der Arm nicht gehalten wird, wenn Sie den
Stick loslassen. Andernfalls müssen Sie den
Endpunkt Ihres Servomotors überdenken.
Tun Sie dieselbe Operation, aber für die
höchste Position auf dem anderen Arm.
Wenn sich der Steuerknüppel in der
neutralen Position befindet, müssen die zwei
Arme die gleiche Position haben, wie auf
dem Bild gezeigt.
O pale - Paramo del s. co m
Opale Aero System SARL - 23 rue de la Motte
62250 MARQUISE - France
68 contact@opale-paramodels.com +33(0)981 144 387STEVEN PILOT
Um die Servomotorkabel sicher zu halten,
benutzen Sie bitte die 2 Kunststoffklemmen,
die in diesem Kit enthalten sind.
Sie können einen Empfänger in der Brust des
Piloten platzieren.
Fix die 2 Gummizüge in der Rückseite des
Piloten.
Positionieren Sie den Kopf auf den Schultern.
Sie können den Kopf zuvor mit Acrylfarbe
bemalen (Sie können einen Pinsel oder eine
Airbrush verwenden).
O pale - Paramo del s. co m
Opale Aero System SARL - 23 rue de la Motte
62250 MARQUISE - France
69 contact@opale-paramodels.com +33(0)981 144 387STEVEN PILOT
Platzieren Sie die Gummibänder vor den
Schultern, um die Position des Kopfes
zu halten. Es muss fest an den Schultern
befestigt sein, aber eine Bewegung von hint-
en nach vorne muss möglich bleiben.
Optional können Sie die Beine des
Piloten aufpolstern, um die Leistung des
Fallschirmspringers und des Komforts zu
erhöhen, wodurch er stabiler und
aerodynamischer wird.
Schneiden Sie 4 Stücke von 10x2x2cm in den
Schaum.
Befestigen Sie den Schaum an den Bein-
en mit etwas Schwerlast Klebeband. Und
ziehen Sie das Band fest.
O pale - Paramo del s. co m
Opale Aero System SARL - 23 rue de la Motte
62250 MARQUISE - France
70 contact@opale-paramodels.com +33(0)981 144 387STEVEN PILOT
Setzen Sie die Beine des Piloten in den
richtigen Anzug.
Dann die Arme und ziehe den richtigen
Anzug hoch.
Zieh die Schuhe an. Vergiss nicht die
Schnürsenkel zu binden ;-)
O pale - Paramo del s. co m
Opale Aero System SARL - 23 rue de la Motte
62250 MARQUISE - France
71 contact@opale-paramodels.com +33(0)981 144 387STEVEN PILOT
Das Gurtzeug kann installiert werden. Zuerst
durch die Beine und die Arme.
Hinter den Beinen, direkt auf dem Knie, ein
Loch mit einem Lötkolben oder einer Schere
durchstechen, damit der Haken am Bein
durch den Körper ziehen kann.
Legen Sie ein Gummiband in die Schnalle im
hinteren Teil des Gurtzeuges, wie auf dem
Bild gezeigt.
O pale - Paramo del s. co m
Opale Aero System SARL - 23 rue de la Motte
62250 MARQUISE - France
72 contact@opale-paramodels.com +33(0)981 144 387STEVEN PILOT
Wenn Sie starken Windverhältnissen
ausgesetzt sind, integriert das Gurtzeug eine
Rückentasche, um 100/200 / 300gr Ballast
einzusetzen.
Fallschirmvorbereitung und Falten
Packen Sie den Fallschirm aus.
Nehmen Sie die gurte heraus.
Die Bremsleitungen sind an einem D-Ring
mit einem Knoten befestigt.
Lösen Sie vorsichtig den Knoten.
Stellen Sie sicher, dass alle Leinen nicht
verknotet sind. Wenn Sie das nicht überprüft
haben, müssen Sie es vor dem Fallschirm
zusammenlegen prüfen.
O pale - Paramo del s. co m
Opale Aero System SARL - 23 rue de la Motte
62250 MARQUISE - France
73 contact@opale-paramodels.com +33(0)981 144 387STEVEN PILOT
Befestigen Sie die Tragegurte an den Teilen
(14). Sie können diese auch am Gurtzeug
befestigen.
Die Bremsleine in die Hand des Piloten
einführen. Stellen Sie sicher, dass es perfekt
gleitet.
Stellen Sie den Arm des Piloten in die
unterste Position mit dem Sender.
Das Bremseline hat einen Verbindungspunkt
mit dem zweiten Bridle. Setze diesen Punkt
direkt auf die Hand des Fallschirmspringers.
Dann binden Sie die Bremsleitung an den
D-Ring.
Tun Sie die gleiche Operation auf der
anderen Seite und stellen Sie sicher, dass
Sie die gleiche Einstellung an beiden Armen
haben.
Mit dieser Einstellung können Sie Ihren
Flügel in der ersten Nacht steuern. Es wird
notwendig sein, es nach Ihren Vorlieben
anzupassen.
Legen Sie den Flügel mit den Leinen auf den
Piloten, mit einer Drehung von 90 °.
O pale - Paramo del s. co m
Opale Aero System SARL - 23 rue de la Motte
62250 MARQUISE - France
74 contact@opale-paramodels.com +33(0)981 144 387STEVEN PILOT
Stellen Sie sicher, dass der Stoff richtig
zwischen den Profilen platziert ist.
Dann positioniere alle Ankerpunkte, straffe
Leinen, ohne Knoten.
Die gleiche Operation an den anderen
Ankerpunkten.
Ziehe den Fallschirmspringer zum Schirm
wie auf dem Bild gezeigt.
Legen Sie die Leinen in den Schirm indem Sie
die Schirmspitze anheben.
Nimm alle Ankerpunkte und platziere diese
in der Mitte. Verwenden Sie ein Gewicht, um
den Stoff an Ort und Stelle zu halten.
O pale - Paramo del s. co m
Opale Aero System SARL - 23 rue de la Motte
62250 MARQUISE - France
75 contact@opale-paramodels.com +33(0)981 144 387STEVEN PILOT
Mach Sie das gleiche an allen Ankerpunkten.
Stecken Sie den 30 cm Leine in den weißen
Gurt an der Rückseite des Gurtzeugs. Es wird
Ihnen helfen, den Flügel im Gurtzeug zu
konditionieren.
Falten Sie den Schirm in S ausgehend von
der Hinterkante (wo sich die Bremsleitungen
befinden).
Die Länge der Faltungen ist gleich der Länge
des Geschirrs (ca. 12 cm).
O pale - Paramo del s. co m
Opale Aero System SARL - 23 rue de la Motte
62250 MARQUISE - France
76 contact@opale-paramodels.com +33(0)981 144 387Vous pouvez aussi lire