GAS STONES WITH FUSION BASKET - NATURAL VENT Installation, Operation and Owner's Manual - Urban Fireplaces
←
→
Transcription du contenu de la page
Si votre navigateur ne rend pas la page correctement, lisez s'il vous plaît le contenu de la page ci-dessous
GAS STONES WITH FUSION BASKET
                        NATURAL VENT
         Installation, Operation and Owner’s Manual

 WARNING: If the information in these                      WHAT TO DO IF YOU SMELL GAS
 instructions is not followed exactly, a fire            • Do not try to light any appliance.
 or explosion may result causing property                •   Do not touch any electrical switch; do
 damage, personal injury or loss of life.                    not use any phone in your building.
                                                         •   Immediately call your gas supplier from
                                                             a neighbor’s phone. Follow the gas
Do not store or use gasoline or other flam-                  supplier’s instructions.
mable vapors and liquids in the vicinity of this
                                                         •   If you cannot reach your gas supplier,
or any other appliance. Installation and service
                                                             call the fire department.
must be performed by a qualified installer,
service agency or the gas supplier.

                                       Report #284-L-02c-5

                                                                                             February2021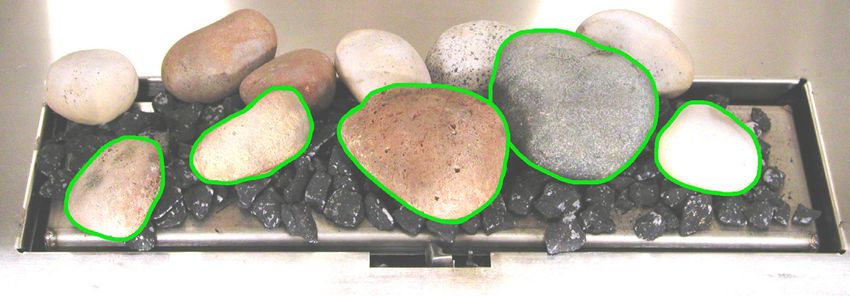
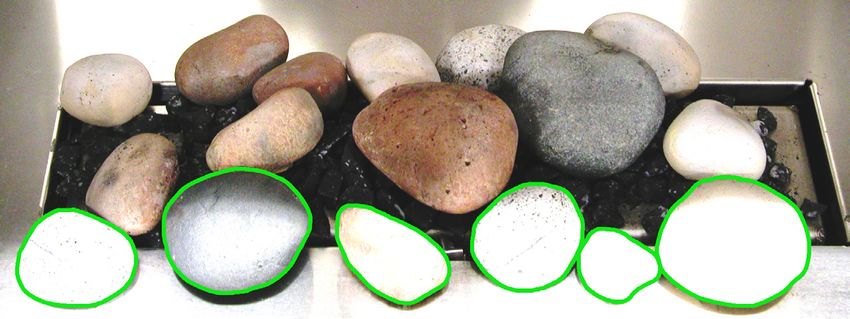
TABLE OF CONTENTS
                Important Safety Information     4
                Specifications and Dimensions    7
                Before You Begin                10
                Fireplace Requirements          11
                Installing the Burner           13
                Gas Supply                      13
                Stone Configuration             15
                Operating Instructions          18
                Maintenance                     21
                Troubleshooting                 22
                Parts List                      24
                Warranty                        25

Gas Stones Vented Rev#02172021 								              EuropeanHome.com
                                   3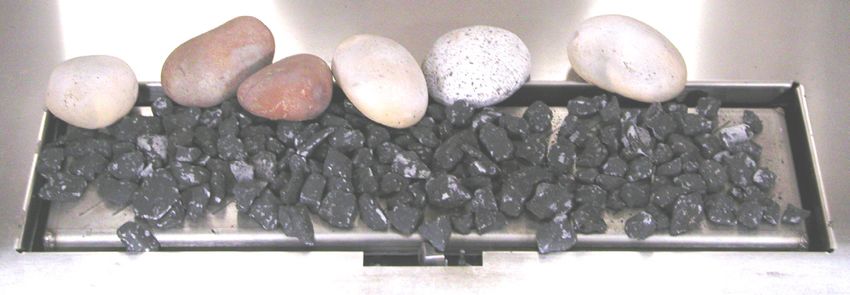
IMPORTANT SAFETY INFORMATION
1. This appliance must be installed only in a solid-fuel burning fireplace with a working flue and
    constructed of noncombustible material.
2. A fireplace screen must in place when the appliance is operating and must provide for the flow
    of combustion air.
3. The installation and the provision for combustion and ventilation air must conform with lo-
    cal codes or, in the absence of local codes, with the National Fuel Gas Code, ANSI Z223.1 or the
    Canadian Installation Code, CAN/CGA B149.1.
4. The appliance and its appliance main gas valve must be disconnected from the gas supply pip-
    ing system during any pressure testing of that system at test pressures in excess of ½ psi (3.5
    kPa).
5. The appliance must be isolated from the gas supply piping system by closing its equipment
    shutoff valve during any pressure testing of the gas supply system at test pressures equal to or
    less than ½ psi (3.5 kPa).
6. The appliance area must be kept clear and free from combustible materials, gasoline and other
    flammable vapors and liquids.
7. Do not use this appliance if any part has been under water. Immediately call a qualified service
    technician to inspect the appliance and to replace any part of the control system and any gas
    control which has been under water.
8. Solid fuels shall not be burned in a fireplace where a decorative appliance is installed.
9. This appliance is equipped for use with natural gas or propane and cannot be converted to the
    other fuel.
10. This appliance has been certified by OMNI-Test Laboratories, Inc. to ANSI Z21.60a-2003• CSA
    2.26a-2003 Decorative Appliances for Installation in Solid-Fuel Burning Fireplaces and CAN1-
    2.17-M91,Gas-Fired Appliances for Use At High Altitudes.
11. This appliance is approved for installation in the Commonwealth of Massachusetts. The Board
    of State Examiners of Plumbers and Gas Fitters has issued approval number G3-1209-252 for
    this appliance.
12. This appliance is approved for installation in New York City. The Department of Buildings has
    issued MEA number 25-06-E for this appliance.

Gas Stones Vented Rev#02172021 								                                             EuropeanHome.com
                                                 4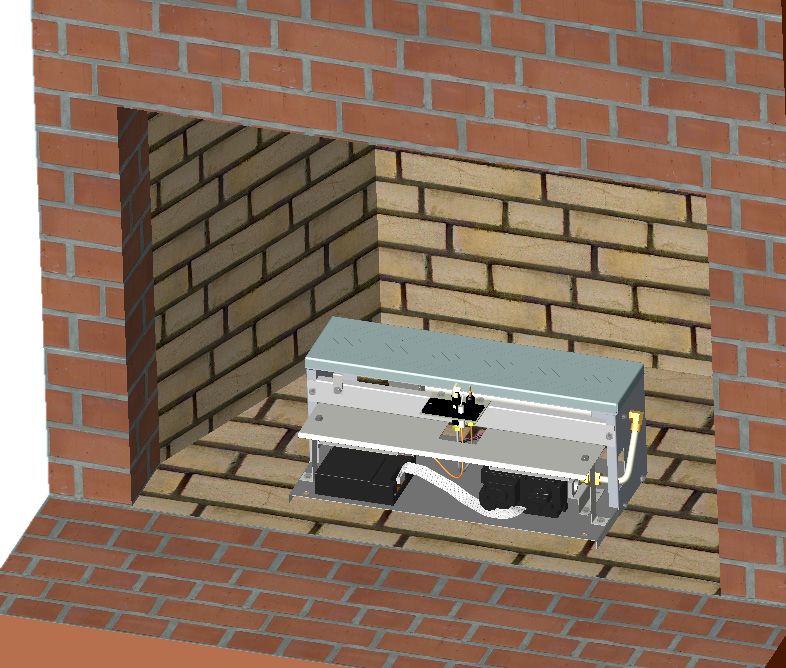
AVERTISSEMENT: Assurez-vous de bien suivre les instructions données dans cette
       notice pour réduire au minimum le risque d’incindie ou d’explosion ou pour éviter
       tout dommage matériel, toute blessure ou la mort.

   Ne pas entreposer ni utilizer d’essence ni d’autres vapeurs ou liquides inflammables dans le
   voisinage de cet appareil ou de tout autre appareil.

   QUE FAIRE SI VOUS SENTEZ UNE ODEUR DE GAZ:

   •   Ne pas tenter d’allumer d’appareil.
   •   Ne touchez à aucan interrupteur. Ne pas vous servir des téléphones se trouvant dans le
       bâtiment où vous trouvez.
   •   Appelez immédiatement votre fournisseur de gaz depuis un voisin. Suivezles instructions
       du fournisseur.
   •   Si vous ne pouvez rejoindre le fournisseur de gaz, appelez le service des incindie.

   L’installation et l’entretien doivent être assurés par un installateur ou un service d’entretien
   qualifié ou par le fournisseur de gaz.

AVERTISSEMENT: Risque de dommages ou de blessures si les pièces ne sont pas installées confor-
mément à ces schémas et ou si des pièces autres que celles spécifiquement approuvées avec cet
appareil sont utilsées.

Les dêgagements sont conformes aux codes d’installation locaux et aux exigences du fournisseur
de gaz.

NE PAS UTILISER AVEC DES PORTES EN VERRE.

Ne pas se servir de cet appareil s’il a été plongé,dans l’eau, même partiellement. Faire inspecter
l’appareil par un technicien qualifié et remplacer toute partie du système de commande et toute
commande qui ont été plongée dans l’eau.

Gas Stones Vented Rev#02172021 								                                                EuropeanHome.com
                                                   5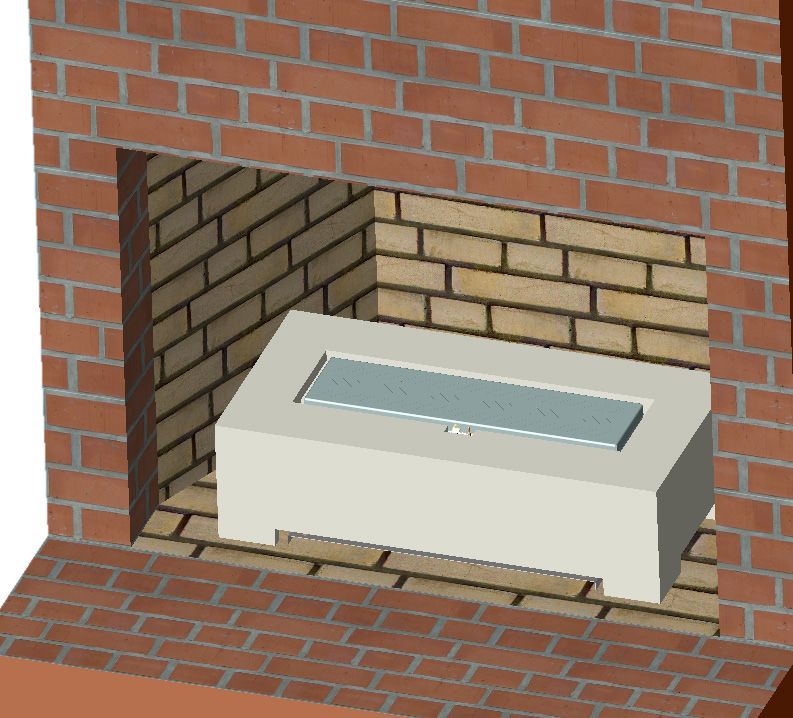
Vision Gas Burner Module, Model VBM-NG-02
                                                                                                             S/N
               Vision Gas Burner Module, Model VBM-LP-02
    This appliance is equipped for:            Natural Gas/Gaz Naturel                  Propane              Cet appareil est équipé pour:
    Input Rating Btu/hr                               42,000                            43,500               Debit Calorifique
    Min. Input (Btu/hr)                               27,000                            27,000               Puissance Minimum
    Orifice (DMS)                                   6 Port #55                           #48                 L'injecteur
    Manifold Press.                                4.0"/1.0kPa                        10"/2.5kPa             Press. a la Tubulure
    Min. Supply Press.                             4.0"/1.0kPa                        11"/2.7kPa             Press. D'Arrivée Min.
    Max. Supply Press.                             7.0"/1.7kPa                        13"/3.2kPa             Press. D'Arrivée Max.
    These burner modules are certified by OMNI-Test Laboratories to “ANSI Z21.50b-2005, CSA 2.22b-2005 and CGA 2.17-M91 Vented
    Gas Fireplaces” when installed in the Vision Gas Fireplace (Report #284-F-01-5) and “ANSI Z21.60b-2004, CSA 2.28b-2004 and
    CGA 2.17-M91 Decorative Gas Appliances for Installation in Solid Fuel Burning Fireplaces” when installed in the Gas Stones
    with Fusion Basket (Report #284-L-02c-5).
    Ces modules de brûleur sont certifiés par les laboratoires OMNI-Test (OMNI-Test Laboratories) conformes aux normes “ANSI
    Z21.50b-2005, CSA 2.22b-2005 et CGA 2.17-M91 pour les foyers à gaz ventilés” lorsqu’ils sont installés dans le foyer à gaz Vision
    (Rapport #284-F-01-5) et conformes aux normes “ANSI Z21.60b-2004, CSA 2.28b-2004 et CGA 2.17-M91 pour les appareil à gaz
    décoratifs pour une installation dans les foyers alimentés au combustible solide” lorsqu’ils sont installés dans le foyer Gas
    Stones with Fusion Basket (Rapport #284-L-02c-5).
    This appliance equipped only for altitudes 0-2000 feet (0-610m) in the USA and 0-4500 feet (0-1370m) in Canada without change.
    Cet appareil n’est équipé que pour les altitudes de 0 à 610 m (0 à 2000 pi) aux États-Unis et 0 à 1370 m (0 à 4500 pi) au Canada
    sans modification.
    This appliance must be installed in accordance with local codes, if any; if none, follow the ANSI Z223.1, or CSA-B149.1. Installer
    l'appareil selon les codes ou réglements locaux; ou, en l'absence de tels réglements, selon les codes d'installation ANSI Z223.1
    ou CSA-B149.1 en vigueur.

                                     CAUTION:                Hot while in operation. Do not touch. Severe burns
                                     may result. Keep children, clothing, furniture, gasoline and other liquids
        Vision Gas Fireplace
         Report #284-F-01-5          having flammable vapors away.

                                     ATTENTION:
    Gas Stones with Fusion Basket
         Report #284-L-02c-5
           Manufactured by                                             L'appareil est chaud lorsqu'il founctionne. Ne
          European Home              pas toucher l'appareil. Risque de brûlures graves surveiller les enfants. Garder
         div. of Europa Ja, Inc
         Middleton, MA 01949         les vêtements, les meubles, l'essence ou autres liquides produisant des
            (781) 324-8383           vapeur inflammables loin de l'appareil.
    WARNING: Improper installation, adjustment, alteration, service or maintenance can cause injury or property damage. Refer to the owner's
    information manual provided with this appliance. For assistance or additional information consult a qualified installer, service agency or
    the gas supplier.
    AVERTISSEMENT: Une installation, un réglage, une modification, une réparation ou un entretien mal effectué puet causer des dommages
    matériels ou des blessures. Voir la notice de l'utilisateur qui accompagne l'appareil. Pour de l'aide ou des renseignements supplémentaires,
    consultez un installateur, un technicien agréé ou les fournisseur de gaz.
    Keep burner and control compartment clean. See installation and operating instructions accompanying appliance.
    S'assurer que le brûleur et le compartiment des commande sont propres. Voir les instructions d'installation et d'utilisation qui accompagnent
    l'appareil.                                                                                                                               IGN

    EUROPEAN HOME
    11-0047                            Gas Stones with Fusion Basket Listing Label

Gas Stones Vented Rev#02172021 								                                                                                     EuropeanHome.com
                                                                      6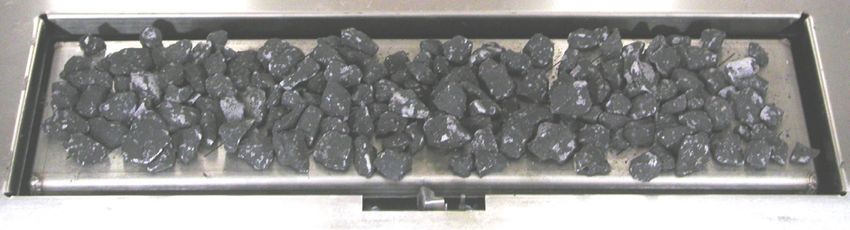
SPECIFICATIONS and DIMENSIONS

 		                                             Natural Gas     		   Propane (LP)
 Manifold Pressure:                             4.0” (1.0 kPa)		     10.0” ( 2.5 kPa)
 Maximum Supply Pressure:                       7.0” (1.7 kPa)			    13.0” (3.2 kPa)
 Minimum Supply Pressure:                       4.0” (1.0 kPa)		     11.0” (2.7 kPa)
 Orifice Size:		                                6 Port #55 DMS		     #48 DMS
 Canadian Efficiency P.4:                       32%			               39%
 High Fire Input:                               42,000 BTU/hr.		     43,500 BTU/hr.
 Low Fire Input:                                27,000 BTU/hr.		     27,000 BTU/hr.

                            Gas Stones with 24” Fusion Basket

                            Gas Stones with 30” Fusion Basket

Gas Stones Vented Rev#02172021 								                                EuropeanHome.com
                                            7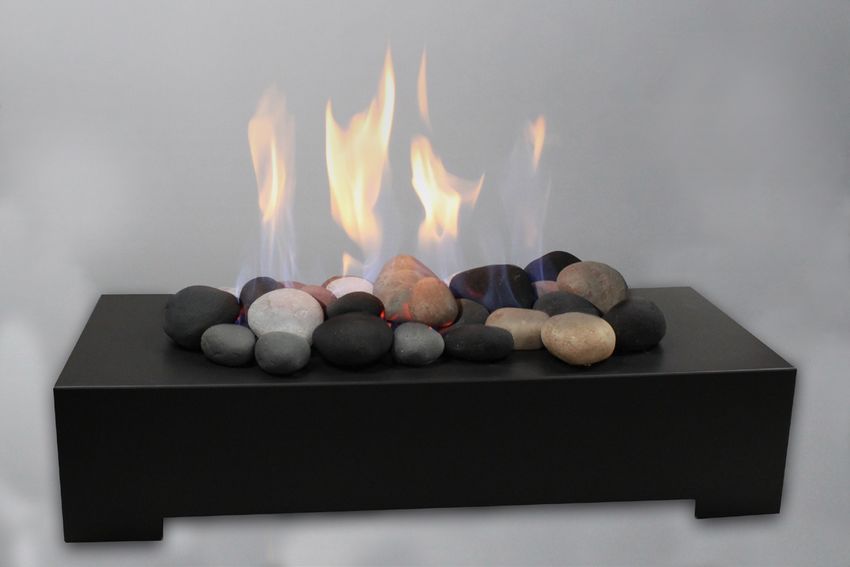
SPECIFICATIONS and DIMENSIONS
EuropeanHome.com          Gas Stones - Natural Vent
                                                                                                         05/19/2020

              This information is for reference only. Please consult the Installation Manual for all details prior to making any design decisions.
 Gas Stones Vented Rev#02172021
               Conversions
                           from millimeters                                                                                 EuropeanHome.com
                                            are rounded to the nearest fraction. A DWG file is available at www.europeanhome.com
                                                                                8
www.EuropeanHome.com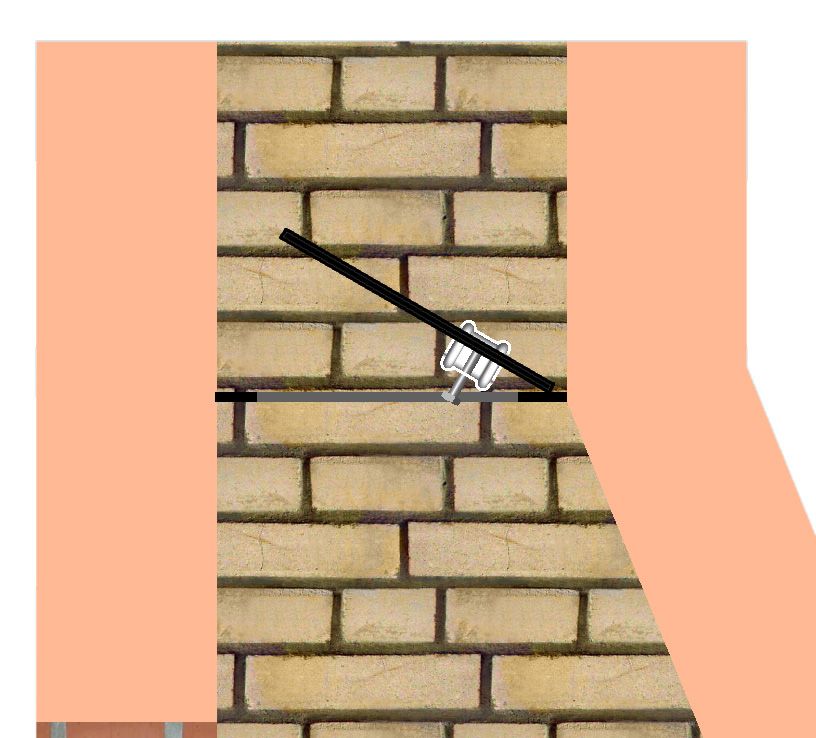
SPECIFICATIONS and DIMENSIONS

                 0.75                                                                  0.75
                                               22.50

                                                                                       3.00

  Rear of
 Fireplace

                                                                                            Room

       Premise gas supply should terminate within shaded area, shown on plan view, above.

Gas Stones Vented Rev#02172021 								                                          EuropeanHome.com
                                               9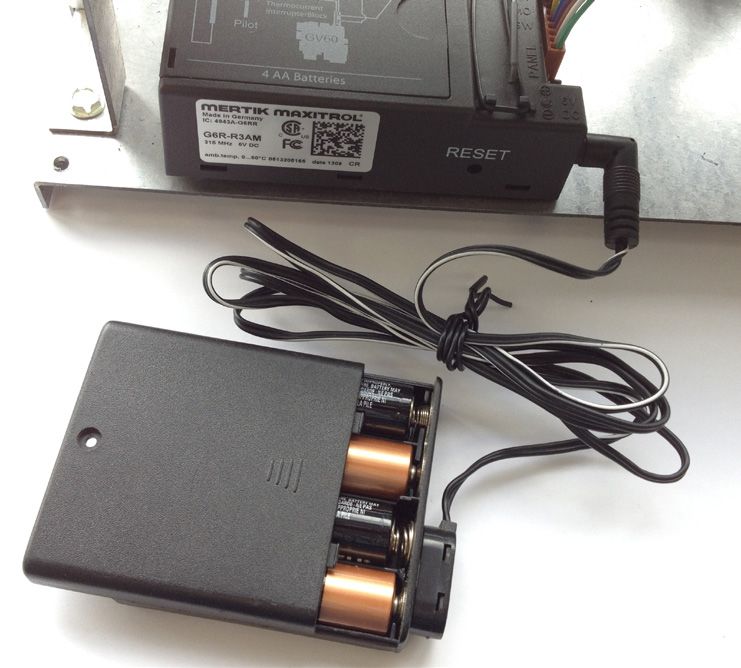
BEFORE YOU BEGIN
Before starting the installation of your Gas Stones with Fusion Basket be sure to have the following
tools and supplies:

•   Adjustable wrench
•   Phillips and straight-blade screwdrivers
•   Tape measure and framing square
•   Safety glasses and gloves
•   Manometer
•   Leak detection fluid (non-corrosive) or gas detector

                                               NOTE!
                   Reset the Gas Stones with Fusion Basket before the first fire.

            See Resetting the System under OPERATING INSTRUCTIONS for details.

Gas Stones Vented Rev#02172021 								                                             EuropeanHome.com
                                                 10
FIREPLACE REQUIREMENTS
Your Gas Stones with Fusion Basket must
sit fully inside your fireplace so that it
properly drafts up the chimney flue. Figure 1
Be certain that the burner of your Gas
Stones with Fusion Basket is behind the
fireplace lintel. See Figure 1.
Note: If the fireplace has
doors, they must be opened
fully during operation of the Lintel
appliance.
Clamp
A minimum free opening of 50 square inches must
be provided by the chimney or damper to vent the
flue gases. The chimney damper must be fixed with
the clamp provided to maintain the minimum free
opening. See Figure 2.
Note: The Commonwealth of Massachusetts
requires that the damper be removed or welded
Figure 2 in the fully open position.
Gas Stones Vented Rev#02172021 EuropeanHome.com
11MANTEL CLEARANCES
12.0”
5.0”
10.0”
8.0”
Top of existing
fireplace opening
Existing fireplace
opening
Figure 2a
Combustible mantels may be no closer to the fireplace opening than the distances shown in the
Figure 2a side view, above.
Gas Stones Vented Rev#02172021 EuropeanHome.com
12INSTALLING THE BURNER
Place 4 AA batteries in the battery case and con-
nect the battery case to the receiver as shown in
Figure 3a.
Ensure that the wiring is connected as shown in
Figure 3b.
RESET
button Red-tipped Yellow-tipped
Wire (TC) Wire (SW)
RESET Figure 3b
button
Figure 3a
GAS SUPPLY
Place the burner module in the center of the fireplace and connect the gas supply to the flexible
gas supply connector provided with the burner. The gas supply line must terminate with a male
½” NPT pipe thread in the rear of the fireplace. The gas supply piping should have a separate gas
shutoff valve and a 1/8” NPT plugged tapping up stream of the valve. The Gas Stones with Fusion
Basket and its main control valve must be disconnected from the gas supply piping system during
any pressure testing of that system at test pressures in excess of ½ psi (3.5 kPa). The Gas Stones
with Fusion Basket must be isolated from the gas supply piping system by closing the main control
valve during any pressure testing of the gas supply system at test pressures equal to or less than ½
psi (3.5 kPa).
Warning: This product
must be installed by a
licensed plumber or gas
fitter when installed within
the Commonwealth of
Massachusetts.
Figure 4
Gas Stones Vented Rev#02172021 EuropeanHome.com
13After the gas supply has been connected, open the main supply and apply a soapy water solution
to all the fittings to check for gas leaks. Never use a flame to test for leaks. If you are installing a
propane burner, check that the air shutter (see Figure 5) is in the open position. Replace the burner
in the burner module. Ensure that the burner inlet tube is in the shutter box.
Air shutter shown in the
open position
(for propane only)
Figure 5
Place the Fusion Basket over the burner
so the burner is centered in the opening
in the Fusion Basket as in Figure 6.
Figure 6
Gas Stones Vented Rev#02172021 EuropeanHome.com
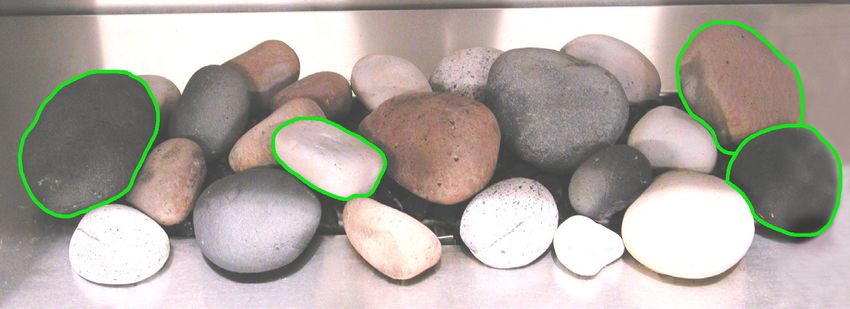
14STONE CONFIGURATION
The Gas Stones with Fusion Basket can be operated with, or without, the decorative stones and/or
embers. The following is the recommended configuration. Slight differences in the placements are
acceptable.
When using the stones and embers, begin by placing one layer of the embers evenly over the
entire burner top as shown in Figure 7.
Figure 7
Sort your stones, by size, into sixteen small, three medium and four large. Place a row of six small
stones along the rear edge of the burner as shown in Figure 8.
S S S
S S S
Figure 8
Gas Stones Vented Rev#02172021 EuropeanHome.com
15L
S L S
S
Figure 9
Next, place two large stones and three small stones on the burner as shown in Figure 9. Then place
two medium and four small stones along the front edge of the burner as shown in Figure 10.
M S M
S S S
Figure 10
Gas Stones Vented Rev#02172021 EuropeanHome.com
16L
L S
M
Figure 11
Finally, place the remaining two large, one medium and three small stones on top as shown in
Figure 11.
Gas Stones Vented Rev#02172021 EuropeanHome.com
17OPERATING INSTRUCTIONS
FOR YOUR SAFETY READ BEFORE LIGHTING!
WARNING: If you do not follow these instructions exactly, a fire or explosion
may result causing property damage, personal injury or loss of life.
A. This appliance is equipped with an ignition device which automatically lights the pilot. Do not
try to light the pilot by hand.
B. BEFORE LIGHTING smell all around the appliance area for gas. Be sure to smell next to the floor
because some gas is heavier than air and will settle on the floor.
WHAT TO DO IF YOU SMELL GAS
• Do not try to light any appliance.
• Do not touch any electric switch; do not use any phone in your building.
• Immediately call your gas supplier from a neighbor’s phone. Follow the gas supplier’s
instructions
• If you cannot reach your gas supplier, call the fire department.
C. Do not use this appliance if any part has been under water. Immediately call a qualified service
technician to inspect the appliance and to replace any part of the control system and any gas con-
trol which has been under water.
The Gas Stones with Fusion Basket has two safety features which affect the operation:
1) two-button child safety ignition
2) 45 second safety timer
The safety ignition requires that two buttons be depressed to begin the ignition sequence and
the timer requires that 45 seconds elapse between start attempts.
Gas Stones Vented Rev#02172021 EuropeanHome.com
18LIGHTING THE FIRE
1. STOP! Read the safety information above.
2. This appliance is equipped with an ignition device which
automatically lights the pilot. Do not try to light the pilot
by hand.
3. Push the OFF button on the remote control to insure the
appliance is off. LARGE
SET FLAME
4. Wait five (5) minutes to clear out any gas. Then smell for
gas including near the floor. If you smell gas, STOP! Follow
“B” in the safety information above. If you don’t smell gas,
go to the next step. OFF
5. Press the OFF and LARGE FLAME (Ç) buttons
simultaneously. Release the buttons once you hear a SMALL
beeping noise. This acoustic signal tells you that the start FLAME
sequence has begun. Further short signals will continue
until main gas flows and the burner is lit. If the pilot or
burner does not light, go back to Step 3, above.
6. Use the LARGE FLAME (Ç) and SMALL FLAME (È)
buttons to adjust the flame height.
TO TURN OFF THE HEATER
7. Push the OFF button on the remote control to turn the appliance off.
8. After powering off the fireplace, it can take about 45 seconds before
you are able to light it again.
RESET BUTTON
RESETTING THE SYSTEM
This procedure resets the system as well as ‘pairs’ the remote and the receiver. It is only needed to be
performed once but can be done as often as necessary. To reset the system:
1. press and hold the receiver reset button until you hear the second of two beeps then
2. release the reset button and, within twenty seconds,
3. press the SMALL FLAME button on the remote until you hear two confirming beeps
The receiver and remote are now each reset and ready for normal operation.
Gas Stones Vented Rev#02172021 EuropeanHome.com
19Note: The system shuts off the appliance completely if there is no change in the flame height for 5
days.
Igniting the Appliance.
Ensure the ON/OFF switch is in the ON position.
On the remote control, simultaneously press and hold the OFF andÇbuttons.
An acoustic signal indicates that the start sequence has begun.
The electronic system then checks that the main gas is flowing and ignites the main burner; this may
take up to 20 seconds.
NOTE: During start-up, the MANUAL knob on the gas valve cannot be in the MAN position.
Manual Flame Height Adjustment.
You are now able to use the remote control. To increase the flame, the LARGE FLAME (Ç)button
should be depressed. Pressing the SMALL FLAME (È) button on the handset will reduce the flame.
The main flame may be lowered all the way down until it is off, leaving only the pilot ignited.
Fully Extinguishing the Appliance
From any heat setting, press the OFF button for a few seconds. This will cause the burner to fully
extinguish.
The system has a safety interlock which will not allow the ignition until the interlock rests. This may
take a few minutes.
The appliance should be shut off completely using the OFF button on the handset and not left on
pilot only, except for temporary use. This resets the system and all safety features.
Automatic Turndown.
1. The valve will turn to pilot flame if there is no change in flame height for a six hour period.
Automatic Shut Off.
1. With low battery power in the receiver, the system shuts off the fire completely. This does not hap-
pen if the power supply is interrupted.
2. The system shuts off the fire completely if there is no change in flame height for 5 days.
3. The system shuts off the fire if the main burner does not completely ignite approximately 20 sec-
onds after ignition or after pushing the LARGE FLAME (Ç) button.
Gas Stones Vented Rev#02172021 EuropeanHome.com
20MAINTENANCE
A qualified service agency should conduct an annual inspection and maintenance of your Gas
Stones with Fusion Basket, the fireplace, chimney, and the installation to keep it running safely.
The following procedures should be performed only by a qualified service person. The gas supply
should be turned off whenever a maintenance procedure is performed. All parts of the fireplace
that are removed for servicing must be replaced prior to operation.
Cleaning the Stones and Burner.
With all parts of the fireplace at room temperature, carefully remove and clean the stones with a
soft bristled brush. Never use a vacuum cleaner to clean the stones. Clean the burner surface with
a brush. Replace the components according to the instructions starting on page 11 of this manual.
Inspecting the Chimney
An inspection of the chimney should be made as part of the annual service appointment. The
chimney must have no blockage and be in good repair.
Replacing the Batteries
With all parts of the fireplace at room temperature, remove the stones and embers. Remove the
Fusion Basket from the fireplace. Find the battery compartment door on top of the receiver and
slide it open. Remove the four batteries and, minding the correct polarity, replace them with fresh
AA batteries. Close the battery compartment cover and re-set the Fusion Basket, embers and
stones according to the previous instructions.
RESET
Battery
Compartment RESET button
Gas Stones Vented Rev#02172021 EuropeanHome.com
21TROUBLESHOOTING
OBSERVED PROBLEM: POSSIBLE CAUSE: REMEDY:
A. No transmission (motor does not 1. Receiver must learn new code. 1. Reset system as above.
turn)
2. Dead batteries. 2. Replace batteries.
3. The receiver is surrounded by 3. Change the position of the antenna.
metal, reducing the transmission
range.
4. Receiver 4. Replace receiver and
reprogram code as above.
5. Transmitter 5. Replace the transmitter and
reprogram code as above.
6. Wiring at valve damaged. 6. Replace valve.
7. Bent pins on 8 wire connector. 7. Straighten pins on 8 wire
connector.
B. No ignition; no tone 1. Dead batteries. 1. Replace batteries.
2. Receiver 2. Replace the transmitter and
reprogram code as above.
C. No ignition; one 5 second continu- 1. Loose wire. 1. Secure wire.
ous tone (7 short beeps might be
heard prior to the 5 second tone) 2. Receiver 2. Replace receiver and
reprogram code as above.
3. Bent pins on 8 wire 3. Straighten pins on 8 wire
connector. connector.
4. Valve 4. Replace valve.
D. No pilot flame and control contin- 1. Air in the pilot supply line. 1. Purge the line or start ignition
ues to spark several times.
2. No spark at pilot burner. 2. Check spark gap; check wiring connec-
tion. Check for spark in location along
cable.
3. Valve 3. Replace valve. Do not over
tighten the thermocouple.
Gas Stones Vented Rev#02172021 EuropeanHome.com
22OBSERVED PROBLEM: POSSIBLE CAUSE: REMEDY:
D. No pilot flame and control contin- 4. Over tightened thermocouple. 4. Replace valve and thermocouple inter-
ues to spark rupter.
5. Receiver 5. Replace receiver and
reprogram code as above.
E. Pilot is lit and control continues 1. Receiver 1. Replace receiver and
to spark. Valve shuts off after 10-30 reprogram code as above.
seconds. Valve operates manually.
F. Pilot is lit and sparking stops. 1. Not enough voltage generated 1. Use a digital multimeter set in
Valve shuts off after 10-60 seconds. from the thermocouple or too much the mV range and measure
Valve does not operate manually. resistance in the circuit. the voltage between the spade
connector closest to the thermocouple
(-) and thermocouple tube (+) itself. The
reading should be 21-30 mV.
2. Thermocouple 2. Replace thermocouple.
3. Low inlet pressure. 3. Confirm regulator pressure
and sizing. Replace if necessary.
4. Valve 4. Replace valve. Do not over-
tighten the thermocouple.
G. Three short beeps while the motor 1. Batteries are low. 1. Replace batteries.
turns.
H. Pilot flame lights but there is no 1. Manual override knob is in MAN 1. Turn manual override knob to
main gas flow. position. ON position.
2. Valve turned down to pilot flow. 2. Turn flame to high fire by
pressing the UP button on remote
control.
3. Low inlet pressure. 3. Confirm regulator pressure,
and sizing. Replace valve if
necessary.
4. Valve. 4. Replace valve.
Gas Stones Vented Rev#02172021 EuropeanHome.com
23The flames should look like those in the picture above.
PARTS LIST
Burner Module, NG GSBM-NG-01
Burner Module, LP GSBM-LP-01
Stone Kit VPK-01
Pilot Assembly VPA-01
Fusion Basket VSB-01
For replacement parts and customer service:
Contact your local Dealer
Gas Stones Vented Rev#02172021 EuropeanHome.com
24European Home Warranty
Vision and Gas Stones Family of Products
European Home warrants the Vision, Vision Vent Free, Gas Stones and Gas Stones Vent Free burners against defects in
materials and workmanship for a period of TWO (2) YEARS from the date of original retail purchase. We warrant the Vision
cabinet, Vision Vent Free cabinet, Fusion Basket and Beach Stones against defects in materials and workmanship for a
period of FIVE (5) YEARS from the date of original retail purchase. If a defect exists, European Home will, at its option, either
(1) repair the product at no charge, using new or refurbished replacement parts or (2) exchange the product with one which
is new or which has been manufactured from new or serviceable used parts and is at least functionally equivalent to the
original product. A replacement product/part assumes the remaining warranty of the original product or ninety (90) days
from the date of replacement or repair, whichever provides longer coverage for you. When a product or part is exchanged,
any replacement item becomes your property and the replaced item becomes the property of European Home.
Nothing in the above shall be deemed to imply that this warranty shall apply to work which has been abused or neglected
or shows evidence of changes or modifications by others with or without permit, damages caused by the acts of God,
building settlement or moving, fire or vandalism. In addition, installation of this product that varies from the requirements
stated in the instruction manual will void the warranty.
European Home is a division of Europa Ja, Inc.
PRODUCT INSTALLATION RECORD
Installer: Please complete this form. Customer: Please retain this information.
Purchased From
Date of Purchase
Installed By
Date of Installation
Fireplace Serial Number
Fuel Type
Gas Stones Vented Rev#02172021 EuropeanHome.com
25NOTES
Gas Stones Vented Rev#02172021 EuropeanHome.com
26Gas Stones Vented Rev#02172021 EuropeanHome.com
27EUROPEAN HOME
a division of Europa Ja, Inc.
30 Log Bridge Road
Building 300 - Suite 303
Middleton, MA 01949
www.europeanhome.com
Gas Stones Vented Rev#02172021 EuropeanHome.com
28Vous pouvez aussi lire