STÛV B.60 - A STATE OF MIND - INSTALLATION, SERVICING AND USER INSTRUCTIONS INSTALLATION, SERVICE ET MODE D'EMPLOI - Stûv America

La page est créée Patrick Berger
 
CONTINUER À LIRE
STÛV B.60 - A STATE OF MIND - INSTALLATION, SERVICING AND USER INSTRUCTIONS INSTALLATION, SERVICE ET MODE D'EMPLOI - Stûv America
A STATE OF MIND

          Gas fireplace / Foyer au gaz

 STÛV B.60
INSTALLATION, SERVICING AND USER INSTRUCTIONS
   INSTALLATION, SERVICE ET MODE D’EMPLOI

                                         OCTOBER / OCTOBRE 2015
STÛV B.60 - A STATE OF MIND - INSTALLATION, SERVICING AND USER INSTRUCTIONS INSTALLATION, SERVICE ET MODE D'EMPLOI - Stûv America
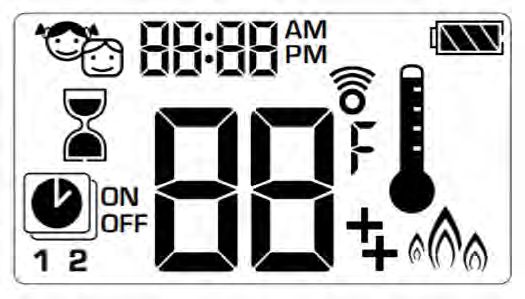
CONTENT                                   TABLE DES MATIÈRES
1 STANDARDS, SAFETY AND TECHNICALS               1 NORMES, SÉCURITÉ ET CARACTÉRISTIQUES
SPECIFICATIONS                              4    TECHNIQUES                                           4
  1.1 SAFETY AND LEGAL INSTRUCTIONS          5     1.1 INSTRUCTIONS DE SÉCURITÉ ET LÉGALES            5
  1.2 TECHNICAL SPECIFICATIONS              10     1.2 SPÉCIFICATIONS TECHNIQUES                     10
2. INSTALLATION INSTRUCTIONS                11   2. INSTRUCTIONS D’INSTALLATION                      11
  2.1 GAS CONNECTION                        11     2.1 RACCORDEMENT AU GAZ                           11
  2.2 VENTILATION OF THE ROOM               11     2.2 VENTILATION DE LA PIÈCE                       11
  2.3 FIREPLACE INSTALLATION                11     2.3 INSTALLATION DU FOYER                         11
  2.4 CONVECTION AND VENTILATION                   2.4 CONVECTION ET VENTILATION DU CAISSON
  OF THE CHASE                              12                                                       12
  2.5 SAFETY DISTANCES                      15     2.5 DISTANCES DE SÉCURITÉ                         15
  2.6 TV POCKET                             15     2.6 ALCOVE DE TÉLÉVISEUR                          15
  2.7 FRAMING KIT INSTALLATION              16     2.7 INSTALLATION DU BÂTIT MÉTALIQUE               16
  2.8 PROTECTION MESH INSTALLATION          17     2.8 INSTALLATION DE LA GRILLE DE PROTECTION       17
  2.9 REMOVING THE GLASS                    18     2.9 ENLEVER LA VITRE                              18
  2.10 FUEL BED ARRANGEMENTS                19     2.10 MISE EN PLACE DU JEU DE BÛCHES/GALETS        19
  2.11 BLACK GLASS INSTALLATION (OPTION)    21     2.11 INSTALLATION DE LA VITRE NOIRE (OPTION) 21
3 GAS CONNECTIONS                           22   3 CONNEXIONS GAZ                                    22
  3.1 ARRIVING GAS LINES                    22     3.1 ARRIVÉ DES CONDUITES DE GAZ                   22
  3.2 VALVE AND REGULATORS                  23     3.2 VALVE ET RÉGULATEURS                          23
  3.3 GAS TYPE CONVERSION                   24     3.3 CONVERSION DU TYPE DE GAZ                     24
  3.4 ASSEMBLY CIRCUIT                      25     3.4 CIRCUIT D’ASSEMBLAGE                          25
4 FLUE                                      26   4 CHEMINÉE                                          26
  4.1 FLUE CONNECTION                       26     4.1 RACCORDEMENT DES CONDUITS DE CHEMINÉE 26
  4.2 LOCATING THE WALL MOUNTED TERMINALS          4.2 INSTRUCTIONS POUR LE POSITIONNEMENT DU
                                            31     DÉBOUCHÉ MURAL                            31
  4.3 CONCENTRIC FLUE SYSTEM                33     4.3 CONDUITS DE CHEMINEE CONCENTRIQUES            33
5. USER INSTRUCTIONS                        34   5. INFORMATIONS D’UTILISATION                       34
  5.1 FIRST TIME OF OPERATION               34     5.1 PREMIÈRE MISE EN SERVICE                      34
  5.2 REMOTE CONTROL OVERVIEW               34     5.2 TÉLÉCOMMANDE                                  34
  5.3 CLEANING AND MAINTENANCE              43     5.3 NETTOYAGE ET ENTRETIEN                        43
6. SERVICING                                44   6. ENTRETIEN                                        44
  6.1 CLEANING THE CERAMICS                        6.1 NETTOYAGE DU JEU DE BÛCHES OU DES
                                            44     GALETS                                            44
  6.2 SERVICING THE BURNERS                 45     6.2 ENTRETIEN DES BRÛLEURS                        45
  6.3 SPARE PARTS                           45     6.3 PIÈCES DÉTACHÉES                              45
7. MANUFACTURER’S GUARANTEE                 50   7. GUARANTIE D’USINE                                50
  GUARANTEE CERTIFICATE                     51     CERTIFICAT DE GUARANTIE                           52

                                                                                  OCTOBER / OCTOBRE 2015
1. Standards, certifications                                                                                                                                 1. Normes, sécurité et
          and markings                                                                                                                                                 caractéristiques techniques
     RATING
    RATING  PLATE
           PLATE NONO  / NO
                    / NO    PLAQUE
                          PLAQUE DE DE MARQUAGE
                                    MARQUAGE                                                                 INSTALLATION
                                                                                                                                                                                                                       FOR
                                                                                                                                                                                                                       FOR SAFETY
                                                                                                                                                                                                                           SAFETY READ
                                                                                                                                                                                                                                  READ BEFORE
                                                                                                                                                                                                                                       BEFORE LIGHTING
                                                                                                                                                                                                                                              LIGHTING // A
                                                                                                                                                                                                                                                          A LIRE
                                                                                                                                                                                                                                                            LIRE AVANT L’ALLUMAGE
                                                                                                                                                                                                                                                                 AVANT L’ALLUMAGE
                                                                                                             • This appliance must be properly connected to a venting system in accordance with the manufacturer’s
      MODEL STÛV B.60                                                                                          installation instructions. ICC (Excel direct) and Duravent (Directvent pro) are authorized.
                                                                                                             • Sections of the venting system have not been installed. WARNING – Do not operate the appliance
                                                                                                                                                                                                                      This appliance must be installed in accordance with local codes. If any; if none, follow the current
                                                                                                                                                                                                                      CAN/CGA-B149 (Canada), or ANSI Z223.1 (USA) Installation Codes.
                                                                                                               until all sections have been assembled and installed in accordance with the manufacturer’s             Cet appareil doit être installé en respect des codes locaux ou, en l’absence de tels règlements, selon
    ANS Z21.88-2014 / CSA 2.33-2014 Vented Gas Fireplaces                                                      instructions.                                                                                          les codes d’installation CAN/CGA-B149 (Canada), or ANSI Z223.1
    CAN/CGA 2.17-M91                                                                                         • This appliance must be installed in accordance with the Standard for Manufactured Housing, CAN/        WARNING: If you do not follow these instructions exactly, a fire or explosion may result
    Gas-Fired Appliance For Use At High Altitudes / Foyez au gaz à évacuation pour toutes altitudes            CSA Z240 MH, in Canada; or with the Manufactured Home Construction and Safety Standard, Title          causing property damage, personal injury or loss of life. Improper installation, adjustment,
    Certified for / Certifié pour Canada and U.S.                                                              24 CFR, Part 3280, in the United States; or when such a standard is not applicable, the Standard for   alteration, service or maintenance can cause injury or property damage. Refert to the owner’s
                                                                                                               Manufactured Home Installations, ANSI A225.1/NFPA 501A.                                                information manual provided with this appliance. For assistance or additional information consult
                                                                           DATE OF MANUFACTURE /
    MANUFACTURED BY/FABRIQUÉ PAR: STUV S.A.,                                DATE DE FABRICATION                                                                                                                       a qualified installer, service agency or gas supplier.
    rue Jules Borbouse 4                                                                                     • Cet appareil doit être connecté adéquatement à un système de ventilation suivant les instructions      AVERTISSEMENT: Si vous ne suivez pas à la lettre ces instructions risque de déclencher
    B-5170 Bois-de-Villers, Belgium (www.stuv.com)                     JAN     FEB   MAR APR 2015              d’installation du manufacturier. ICC (Excel direct) et Duravent (Directvent pro) sont authorisés.      un incendie ou une explosion entrainant des dommages, des blessures ou la mort. Une
                                                                                                             • Des sections du système de ventillation n’ont pas été installés. ATTENTION – Ne pas utiliser           mauvaise installation, ajustement, ou modification, de service ou d’entretien peut provoquer des
                                                                   MAY JUN JUL AUG 2016
    TYPES OF GAS / TYPE DE GAZ:                                                                                l’appareil avant que toutes les sections soient assemblées et installé selon les instructions du       blessures ou des dommages matériels. Raportez-vous au manuel d’information du propriétaire
    This appliance is only for use with Propane or Natural Gas.    SEP OCT NOV DEC 2017                        fabriquant.                                                                                            fournie avec cet appareil. Pour de l’aide ou des informations supplémentaires consulter un
    Cet appareil doit être utilisé uniquement avec du Propane ou                                             • Cet appareil doit être installé selon les Normes pour l’Habitation Usinée, CAN/CSA Z240 MH, au         installateur qualifié, une agence de service ou fournisseur de gaz.
    Gaz Naturel.                                                                                               Canada; ou selon les Normes de Sureté pour l’Habitation Usinée, Titre 24 CFR, Section 3280,            A) This appliance is equipped with an ignition device which automatically lights the pilot. Do not try
    CONVERSION / CONVERSION:                                                                                   aux États Unis; ou quand ces normes sont applicables, les Normes d’installation, ANSI A225.1/                to light the pilot by hand.
    This fireplace can’t be converted from one gas type to the other unless the official and certified         NFPA 501A.                                                                                             B) BEFORE OPERATING: smell all around the appliance area for gas. Be sure to smell near to the
    conversion kit is used.                                                                                                                                                                                                 floor because some gas is heavier than air and will settle on t e floo .
    Cet appareil ne peut être converti d’un type de gaz à l’autre sauf si une trousse de conversion                                                                                                                         WHAT TO DO IF YOU SMELL GAS
    certifiée est utilisée                                                                                                                                                                                                  • Do not try to light any appliance
                                                                                                                                                                                                                            • Do not touch any electric switch, do not use any phone in your building
    MANUFACTURED (MOBILE) HOME:                                                                                         VENTED GAS FIREPLACE - NOT FOR USE WITH SOLID FUEL                                                  • Immediatly call your gas supplier from a neighbour’s phone. Follow the gas supplier’s
    This appliance may be installed in an aftermarket, permanently located, manufactured (mobile) home        FOYER AU GAZ À ÉVACUATION - NE PAS UTILISER AVEC DU COMBUSTIBLE SOLIDE                                            instructions
    where not prohibited by local codes. See manufacturer + owners manuals and install in Canada                                                                                                                            • If you cannot reach your gas supplier, call the fire departmen
    accordance to CSA Z240 MH (Title 24, Part 3280).                                                                                                                                                                  C) Do not use the applicance if any part has been under water. Have the appliance inspected by a
                                                                                                                                                                        False ceiling (see installation manual) /           qualified service technician and replace any part of the control system and any gas control which
    MAISON (MOBILE) PREFABRIQUÉE:                                                                                                                                       Faux plafond (voir manuel d’installation)           have been underwater
    Cet appareil peut être installé dans une maison préfabriquée (mobile) à demeure si les règlements
                                                                                                                                                                                                                      A) Cet appareil est muni d’un dispositif d’allumage qui allume automatiquement la veilleuse. Ne
    locaux le permettent. Voir la notice du fabricant + propriétaire et installer au Canada selon CSA Z240                                                                                                                  tentez pas d’allumer la veilleuse manuellement
    MH (titre 24, partie 3280).                                                                                                                                                                                       B) AVANT DE FAIRE FONCTIONNER, reniflez tout autour de l’appareil pour déceller une odeur
                                                                                                                                                                                                                            de gaz. Assurez vous de reniflez près du plancher, car certains gaz sont plus lourds que l’air et
    FOR USE WITH GLASS CERTIFIED WITH THE                                                                                                                               Convection:                                         peuvent s’accumuler au niveau du sol
    APPLIANCE ONLY                                           This Appliance is Equipped For Use With /                                                                  2 x 28 sq. in. air flow outlet /                    QUE FAIRE SI VOUS SENTEZ UNE ODEUR DE GAZ :
    THIS VENTED GAS FIREPLACE IS NOT FOR USE                 Cet Appareil est Équipé Pour Utilise Avec :                                                                po2 sortie d’air                                    • Ne pas tenter d’allumer d’appareil
    WITH AIR FILTERS
    POUR UTILISATION EXCLUSIVE AVEC LES VITRES               NATURAL GAS              LP GAS                                                                                                                                • Ne touchez à aucun interrupteur; ne pas vous servir des téléphones se trouvant dans le
                                                                                                                                                                        Ventilation:                                            bâtiment
    CERTIFIÉES AVEC L’APPAREIL.                              GAZ NATUREL              LP GAZ                                                                            2 x 6 sq. in. air flow outlet /
    CE FOYER AU GAZ A ÉVACUATION NE PEUT ÊTRE                                                                                                                                                                               • Appelez immédiatement votre fournisseur de gaz depuis un voisin. Suivez les instructions
    UTILISÉ AVEC DES FILTRES A AIR.                                                                                                                                     po2 sortie d’air                                        du fournisseur
                                                                                                                                                                                                                            • Si vous ne pouvez rejoindre le fournisseur, appelez le service des incendies
                                                                                                                                                                                                                      C) N’utlisez pas cet appareil s’il a été plongé dans l’eau, même partielement. Faites inspecter
                                                                                                                                                                                                                            l’appareil par un technicien qualifié et remplacez toute partie du système de contrôle et toute
                                                                                                                                                                        2 x 28 sq. in. air flow intlet                      commande qui on été plongés dans l’eau.
                    DO NOT REMOVE THIS INSTRUCTION PLATE
                                                                                                                                                                        entré d’air 2 x 28 po2
                  NE PAS ENLEVER CETTE PLAQUE DE MARQUAGE
    CAUTION: Hot while in operation. Dot not touch. Severe Burns may result. Due to high
                                                                                                                                                                                                                                            LIGHTING
                                                                                                                                                                                                                                            LIGHTING INSTRUCTIONS
                                                                                                                                                                                                                                                     INSTRUCTIONS // ALLUMAGE
                                                                                                                                                                                                                                                                     ALLUMAGE
    surface temperatures keep children, clothing and furniture, gasoline and other liquids having                                                                       MINIMUM CLEARANCES TO
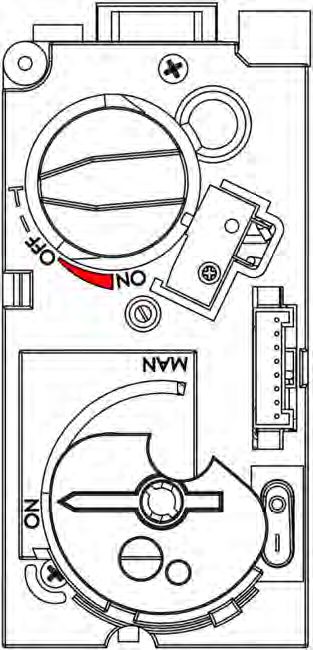
    flammable vapors away. Keep burner and control empartment clean. See installation and                                                                                                                             1. STOP! Read the safety information                           1. ARRÊT!       veuillez   lire    les
                                                                                                                                                                        COMBUSTIBLE MATERIALS /                          on the data label!!                                            recommandations de sécurité sur
    operating instructions accompanying appliance.                                                              27 5/8”                     15”                         DISTANCES MINIMALES AUX                       2. Make sure the gas control valve                                l’étiquette de marquage.
    ATTENTION: Chaud lorsqu’en fonctionnement. Ne pas toucher. De graves brûlures peuvent                                                                               MATÉRIAUX COMBUSTIBLES                           settings are as below:                                      2. Assurez-vous que les règlages de
    survenir. A cause de surfaces très chaudes, tenir éloignés les enfants, les vêtements et les                                                                                                                                                                                        contrôle de la valve sont tels que
                                                                                                                         Floor clearances to combustible materials      Side standoff / côté espaceur          0”                                                                       ci-dessous
    meubles, essence et autres produits inflammables. Garder la cavité enfermant le brûleur et                                    (minimum 6” from floor)               Back standoff / arrière espaceur       0”
    les moniteurs toujours propre. Voir le manuel d’installation et d’utilisation qui accompagne                                                                        Top standoff / au-dessus espaceur      0”
    cet appareil.                                                                                                      Distances aux materiaux combustibles au sol
                                                                                                                                   (6” du sol minimum)                  Floor (legs) / plancher (pattes)       0”         Left knob arrow pointing on “ON” /
    REFER TO INSTALLATION AND OPERATING MANUAL FOR LIGHTING AND EXTINGUISHING                                                                                                                                             La flèche du bouton droit sur “ON
    INSTRUCTIONS
    USE OF PROTECTION MESH IS MANDATORY
    SE REFERER AU MANUEL D’INSTALLATION ET D’UTILISATION POUR LES INSTRUCTIONS                                                                                                                                                           “1/0” button on “1” /
    D’ALLUMAGE ET D’EXTINCTION                                                                                                                                                                                                           Bouton “1/0” sur “1”

                                                                                                                                                  DANGER
    L’UTILISATION DE LA GRILLE DE PROTECTION EST OBLIGATOIRE

4
                                                                                                                                                                                                                      3. Press       button on the remote                            3. Appuyez sur le bouton          de la
                                                                                                                                                                                                                         control handset as shown here:                                 télécommande tel qu’indiqué ci-
    Gas type / type de gaz                                                       NG            LPG                                                                                                                    4. The gas control valve will now                                 joint
    Supply Pressure / pression                                     iwc            7             11                                                                HOT GLASS WILL CAUSE BURNS.                            make a “beep” sound. The pilot                              4. Le contrôle de la valve va
    Nominal Heat Input / apport de chaleur nominal                 BTU          47000         39000                                                                                                                      light will go on and it will start at                          maintenant émettre un « bip ». La
    Consumption / consommation                                     m³/hr        1,306         0,423                                                           DOT NOT TOUCH GLASS UNTIL COOLED.                          1 burner.                                                      veilleuse va s’allumer et enflammer
    Burner Pressure (hot) / pression du brûleur                    iwc           4,4            8,3                                                         NEVER ALLOW CHILDREN TO TOUCH GLASS.                      5. You can now control the appliance.                             le premier brûleur.
    Injector Marking (x2) / marquage injecteur (x2)                              560           180                                                                                                                       For information how to use the                              5. Vous pouvez maintenant contrôler
                                                                                                                                                                                                                         remote control, check the manual!                              le feu. Pour plus d’information
    Pilot / veilleuse                                                             51            30                                                                                                                                                                                      sur la télécommande, veuillez
    Efficiency Class / classe d’efficaci                                           2             2                                                         VITRE CHAUDE PEUT CAUSER DES BRÛLURES.
                                                                                                                                                                                                                                                                                        consulter le manuel.
    Nox Class / classe Nox                                                         4             4                                                        NE PAS TOUCHER LA VITRE JUSQU’À CE QU’ELLE
    Interior Ø / Ø intérieur                                                      4”            4”                                                                      SOIT FROIDE.
    Authorized conduct / Conduit autorisé                                            ICC (ExcelDirect)
                                                                            DURAVENT (DirectVent Pro)
                                                                                                                                                        NE PAS LAISSER LES ENFANTS TOUCHER LA VITRE.                    TURN
                                                                                                                                                                                                                        TURN OFF
                                                                                                                                                                                                                             OFF GAS
                                                                                                                                                                                                                                 GAS TO
                                                                                                                                                                                                                                     TO APPLIANCE
                                                                                                                                                                                                                                        APPLIANCE // COUPER
                                                                                                                                                                                                                                                     COUPER L’ALIMENTATION
                                                                                                                                                                                                                                                            L’ALIMENTATION DU
                                                                                                                                                                                                                                                                           DU GAZ
                                                                                                                                                                                                                                                                              GAZ
                                                                                                               A barrier designed to reduce the risk of burns from the hot viewing glass is provided with this        1. Press the button on the remote control handset until the display says: ”OFF”
                                                                                                               appliance and shall be installed for the protection of children and other at-risk-individuals.         2. Put the “1/0” button on “0” for servicing

                                                                                                               Une barrière conçue pour réduire le risque de brûlures causées par la vitre est fournis avec           1. Appuyer sur le bouton      de la télécommande jusqu’à ce que l’indicateur affiche: ”OFF”
                                                                                                               cet appareil et doit-être installée pour la protection des enfants et autres individus à risque.       2. Mettre le bouton “1/0” sur “0” pour l’entretient

          Standards sticker application                                                                                                                                 Application de l’autocollant des normes

                                                                             Location of Standards sticker /
                                                                             Emplacement de l’autocollant des normes

                                                                                                   Warning : The maintenance door
                                                                                                   assembly must alway stay with
                                                                                                   the appliance.                                                                                                                                                             Propane
                                                                                                                                                                                                                                   Natural gas
                                                                                                   Attention: L’assemblage de la                                                                                                      71.5%                                  68.1%
                                                                                                   porte doit rester avec l’appareil.

                                                                                                                                                                                                                              Steady state efficiency, weigthed avg. (ss) EFFss,w (%)
1.1 safety and legal instructions                               1.1 instructions de sécurité et légales

  INSTALLER:                                                      INSTALLATEUR:
  Leave this manual with the appliance.                           Laisser cette notice avec le foyer.

  CONSUMER:                                                       UTILISATEUR:
  Retain this manual for future reference.                        Garder cette notice pour utilisation future.

  WARNING:                                                        ATTENTION:
  If the information in these instructions is not followed        si les instructions de cette notice ne sont pas suivies à
  exactly, a fire or explosion may result causing                 la lettre, un feu ou une explosion pourrait se produire
  property damage, personal injury or death. FIRE OR              et provoquer des dommages, des blessures ou même
  EXPLOSION HAZARD.                                               causer la mort. DANGER DE FEU OU D’EXPLOSION

FOR YOUR SAFETY                                                 POUR VOTRE SECURITE:
Do not store or use gasoline or other flammable vapors          Ne pas ranger ou utiliser d’essence ou autres liquides et
and liquids in the vicinity of this or any other appliance.     solvants inflammables à proximité d’un foyer.

WHAT TO DO IF YOU SMELL GAS                                     QUE FAIRE SI VOUS SENTEZ DES
 ++ Leave the building immediatly.                              ODEURS DE GAZ:
 ++ Do not try to light any appliance.                            ++ sortir du batiment immédiatement
 ++ Do not touch any electrical switch;                           ++ ne pas tenter de démarrer votre appareil
                                                                                                                                  5
 ++ Do not use any phone in your building.                        ++ ne toucher aucun interrupteur électrique
 ++ Immediately call your gas supplier from a                     ++ ne pas utiliser de téléphone
    neighbour’s phone. Follow the gas supplier’s
                                                                  ++ appeler votre forunisseur de gaz depuis le
    instructions.
                                                                     téléphone d’un voisin et suivre ses instructions - si
 ++ If you cannot reach your gas supplier call the fire              vous ne parvenez pas à joindre votre fournisseur
    department.                                                      de gaz, appeler les pompiers
Installation and service must be performed by a qualified       L’installation doit être confiée à un installteur qualifié, une
installer, service agency or the gas supplier.                  agence de service qualifiée ou le fournisseur de gaz.

This appliance is only for use with the type of gas indicated   ce foyer ne peut être utilisé qu’avec le type de gaz
on the rating plate. This appliance is not convertible for      renseigné sur la plaque d’identification. Ce foyer ne peut
use with other gases, unless a certified kit is used.           être converti à un autre type de gaz que si une trousse
                                                                d’adaptation certifiée est utilisée.

USE OF PROTECTION MESH IS MANDATORY                             L’UTILISATION D’UNE GRILLE DE
                                                                PROTECTION EST OBLIGATOIRE;

                                                                                                        OCTOBER / OCTOBRE 2015
Caution                                                         Recommandations
    FOR YOUR SAFETY - Do not install or operate your                POUR VOTRE SECURITÉ - ne pas installer votre foyer
    STÛV fireplace without first reading and understanding          STÛV sans avoir attentivement lu cette notice. Tout écart
    this manual. Any installation or operational deviation          à cette notice rendra la garantie STÛV non opposable et
    from the following instructions voids the STÛV Warranty         pourrait provoquer des dommages.
    and may prove hazardous.
                                                                    Ce foyer ainsi que sa valve de fermeture indviduelle
    This appliance and its individual shut off valve must be        doivent être déconnectés du réseau d’alimentation du
    disconnected from gas supply piping system during               gaz durant tout test de pression dépassant 1/2 psig (3.5
    any pressure testing of that system at test pressures in        kPa).
    excess of 1/2 psig (3.5 kPa).
                                                                    Ce foyer doit être isolé du réseau d’alimentation du
    This appliance must be isolated from the gas supply             gaz en fermant sa valve manuellement durant tout
    piping system by closing its individual manual shut off         test de pression inférieur ou égal à 1/2 psig (3.5kPa).
    valve during any pressure testing of the gas supply             Remarque: au premier allumage, ce foyer va émettre
    piping system at test pressures equal to or less than 1/2       une légère odeur durant quelques heures. C’est normal,
    psig (3.5 kPa).                                                 il s’agit de solvants qui se dégagent de la cuisson de la
                                                                    peinture générée par le premier feu dans la chambre de
    Note: When lit for the first time, the appliance will emit      combustion. C’est temporaire, ouvrez portes et fenêtres
    a slight odour for a couple of hours. This is due to the        pour ventiler la pièce. La fumée et les odeurs produites
    curing of paints, sealants and lubricants used in the           peuvent être désagréables.
    manufacturing process. This condition is temporary. Open
    doors and windows to ventilate area. Smoke and fumes            Ne jamais utiliser l’appareil si un composant ou l’autre a
    caused by the curing process may cause discomfort to            été sous l’eau. Appeler un technicien qui se chargera de
    some individuals.                                               remplacer tous les composants ayant pu souffrir de l’eau.
    Do not use the fireplace if any part has been under water.
    Immediately call a qualified service technician to inspect
    the fireplace and to replace any part of the control
    system and any gas control which has been under water.

    Safety                                                          Securité
6   Due to high temperatures, this gas appliance should             Parce que ce foyer dégage de hautes températures, tous
    be located out of traffic and away from furniture and           les meubles ou habits doivent être placés à distance.
    draperies.                                                      Les enfants et adultes doivent être sensibilisés aux
    Children and adults should be alerted to the hazards            dangers et se tenir à distance pour éviter les brûlures ou
    of high surface temperatures and should stay away to            inflammation des vêtements.
    avoid burns or clothing ignition.                               Les jeunes enfants doivent être surveillés lorsqu’à
    Young children should be carefully supervised when they         proximité de l’appareil.
    are in the same room as the appliance.                          Les habits ne doivent jamais être déposés sur ou à
    Clothing or other flammable material should not be              proximité du foyer.
    placed on or near the appliance.                                Les grilles ou portillon de service doivent être replacés
                                                                    à leur
    Any grill, panel or door removed for servicing the unit
    must be replaced prior to operating. Failure to do so may       bonne place avant l’allumage. tout manquement peut
    create a hazardous condition.                                   engendrer des dégâts.
    Installation and repair should be done by a qualified           L’installation et la maintenance doivent être réalisés par une
    service person. The appliance should be inspected before        personne qualifiée. Cet appareil doit être inspecté avant
    use and at least annually by a professional service person.     l’utilisation et par un professionnel au moins une fois par an.
    More frequent cleaning may be required due to excessive
    lint from carpeting, bedding material, etc.. It is imperative   Des nettoyages plus fréquents peuvent se justifier si
    that control compartments, burners and circulating air          des travaux sont effectués, il est impératif que les zones
    passageways of the appliance be kept clean.                     sensibles, les
    It is our policy that no responsibility is assumed by the       contrôles, les brûleurs ainsi que les chemins d’air restent
    Company or by any of its employees or representatives           parfaitement propres.
    for any damages caused by an inoperable, inadequate,            Tout dégât direct ou indirect engendré par une
    or unsafe condition which is the result, either directly        installation ou une utilisation inadéquate ou impécise du
    or indirectly, of any improper operation or installation        foyer par rapport à cette notice, dégage STÛV et ses
    procedures.                                                     représentants de toute responsabilité.
    This appliance must not be connected to a chimney flue          Ce foyer ne doit pas être raccordé à une cheminée
    serving a separate solid fuel burning appliance.                servant à l’extraction des fumées d’un autre foyer à
                                                                    combustible solide.
Important Note for the Commonwealth of Massachusetts:
From Massachusetts Rules and Regulations 248 CMR 5.08:           unless, upon inspection, the inspector observes
                                                                 carbon monoxide detectors and signage
(a) For all side wall horizontally vented gas fuelled
                                                                 installed in accordance with the provisions of 248
equipment installed in every dwelling, building or structure
                                                                 CMR 5.089(2)(a) 1 through 4.
used in whole or in part for residential purposes, including
those owned or operated by the Commonwealth and                  b. EXEMPTIONS. The following equipment is
where the side wall exhaust vent termination is less than           exempt from 248 CMR 5.089(2)(a) 1 through 4.
seven (7) feet above finished grade in the area of the
                                                               1. The equipment listed in Chapter 10 entitled
venting, including but not limited to decks and porches,
                                                                  “Equipment Not Required To Be Vented” in the
the following requirements shall be satisfied.
                                                                  most current edition of NFPA 54 as adopted by
 1. INSTALLATION OF CARBON MONOXIDE                               the Board; and
    DETECTORS. At the time of installation of the
                                                               2. Product Approved side wall horizontal vented
    side wall horizontal vented gas fuelled equipment,
                                                                  gas fuelled equipment installed in a room or
    the installing plumber or gas fitter shall observe
                                                                  structure separate from the dwelling, building or
    that a hard wired carbon monoxide detector
                                                                  structure used in whole or in part for residential
    with an alarm and battery back-up is installed
                                                                  purposes.
    on the floor level where the gas equipment is to
    be installed, in addition, the installing plumber or         c. MANUFACTURER REQUIREMENTS – GAS
    gas fitter shall observe that a battery operated                EQUIPMENT VENTING SYSTEM PROVIDED.
    or hard-wired carbon monoxide detector with an                  When the manufacturer of Product Approved
    alarm is installed on each additional level of the              side wall horizontally vented gas equipment
    dwelling, building or structure served by the side              provides a venting system design or venting
    wall horizontal vented gas fuelled equipment. It                system components with the equipment, the
    shall be the responsibility of the property owner               instructions provided by the manufacturer for
    to secure the services of qualified licensed                    installation of the equipment and the venting
    professionals for the installation of hard-wired                system shall include:
    carbon monoxide detectors.
                                                                    1. Detailed instructions for the installation of
    a. In the event that the side wall horizontally                    the venting system design or the venting
       vented gas fuelled equipment is installed in a                  system components; and
       crawl space or an attic, the hard-wired carbon
                                                                    2. A complete parts list for the venting system
                                                                                                                            7
       monoxide detector with alarm and battery
       back-up may be installed on the next adjacent                   design or venting system.
       floor level.                                              d. MANUFACTURER REQUIREMENTS – GAS
    b. In the event that the requirements of this                   EQUIPMENT        VENTING      SYSTEM      NOT
       subdivision cannot be met at the time of                     PROVIDED. When the manufacturer of a
       completion of installation, the owner shall have             Product Approved side wall horizontally
       a period of thirty (30) days to comply with the              vented gas fuelled equipment does not
       above requirements; provided, however, that                  provide the parts for venting the fuel gases,
       during said thirty (30) day period, a battery                but identifies “special venting systems”, the
       operated carbon monoxide detector with an                    fol- lowing requirements shall be satisfied by
       alarm shall be installed.                                    the manufacturer.

 2. APPROVED CARBON MONOXIDE DETECTORS.                             1. The referenced “special venting system”
    Each carbon monoxide detector as required                          instructions shall be included with the
    in accordance with the above provisions shall                      appliance or equipment installation
    comply with NFPA 720 and be ANSI/UL 2034                           instructions; and
    listed as IAS certified.                                        2. The “special venting systems” shall be
 3. SIGNAGE. A metal or plastic identification plate                   Product Approved by the Board, and the
    shall be permanently mounted to the exterior of                    instructions for that system shall include
    the building at a minimum height of eight (8) feet                 a parts list and detailed installation
    above grade directly in line with the exhaust vent                 instructions.
    terminal for the horizontally vented gas fuelled             e. A copy of all installation instructions for all
    heating appliance or equipment. The sign shall                  Product Approved side wall horizontally vented
    read, in print size no less than one-half (1/2)                 gas fuelled equipment, all venting instructions,
    inch in size, “GAS VENT DIRECTLY BELOW. KEEP                    all parts lists for venting instructions, and/or
    CLEAR OF ALL OBSTRUCTIONS”.                                     all venting design instructions shall remain with
 4. INSPECTION. The state or local gas inspector                    the appliance or equipment at the completion
    of the side wall horizontally vented gas fuelled                of the installation.
    equipment shall not approve the installation

                                                                                                   OCTOBER / OCTOBRE 2015
Lighting Instructions                                       Instructions pour l’allumage
    FOR YOUR SAFETY READ BEFORE                                 POUR VOTRE SECURITÉ LIRE AVANT
    LIGHTING                                                    L’ALLUMAGE
    WARNING: If you do not follow these instructions exactly,   ATTENTION: si vous ne suivez pas précisément ces
    a fire or explosion may result causing property damage,     instructions, un feu ou une explosion peut se produire et
    personal injury or loss of life.                            causer des dégâts, des blessures ou la mort.
     A. This appliance is equipped with an ignition device       A. Ce foyer est équippé d’un allumeur automatique
        which automatically lights the pilot. Do not try to         pour la veilleuse. Ne jamais essayer d’allumer la
        light the pilot by hand.                                    veilleuse manuelement.
     B. BEFORE LIGHTING smell all around the                     B. AVANT L’ALLUMAGE, reniflez autour du foyer
        appliance area for gas. Be sure to smell next to            pour vérifier si vous sentez du gaz. Reniflez
        the floor because some gas is heavier than air              particulièrement au sol, certains gaz étant plus
        and will settle on the floor.                               lourds que l’air.
    WHAT TO DO IF YOU SMELL GAS:                                QUE FAIRE SI VOUS SENTEZ DES ODEURS DE GAZ:
        • Do not try to light any appliance.                        • ne pas tenter de démarrer votre appareil
        • Do not touch any electric switch; do not use              • ne toucher aucun interrupteur électrique
          any phone in your building.
                                                                    • ne pas utiliser de téléphone
        • Immediately call your gas supplier from a
                                                                    • appeler votre forunisseur de gaz depuis le
          neighbour’s phone. Follow the gas supplier’s
                                                                      téléphone d’un voisin et suivre ses instructions
          instructions.
                                                                    • si vous ne parvenez pas à joindre votre
        • If you cannot reach your gas supplier, call the
                                                                      fournisseur de gaz, appeler les pompiers
          fire department.
                                                                 C. N’utilisez que votre main pour ouvrir ou fermer
     C. Use only your hand to push in or turn the gas
                                                                    l’arrivée de gaz. N’utilisez jamais d’outils. Si
        control knob. Never use tools. If the knob will not
                                                                    l’arrivée d’air ne s’ouvre ou ne se ferme pas,
        push in or turn by hand, don’t try to repair it, call
                                                                    n’essayez pas la réparer, faites appel à un
8       a qualified service technician. Force or attempted
        repair may result in a fire or explosion.                   technicien. D’une mauvaise réparation pourrait
                                                                    survenir un feu ou une explosion.
     D. Do not use this appliance if any part has been
                                                                 D. Ne jamais utiliser l’appareil si un composant ou
        under water. Immediately call a qualified service
                                                                    l’autre a été sous l’eau. Appeler un technicien qui
        technician to inspect the appliance & to replace
                                                                    se chargera de remplacer tous les composants
        any part of the control system & any gas control
                                                                    ayant pu souffrir de l’eau.
        which has been under water.

    LIGHTING INSTRUCTIONS                                       INSTRUCTIONS POUR L’ALLUMAGE
     1. STOP! Read the safety information above in this          1. ATTENTION! Lire les informations de sécurité plus
        manual.                                                     haut dans cette notice.
     2. Set wall switch/ hand held remote to lowest setting.     2. régler l’allure du feu à son minimum à partir de la
                                                                    télécommande.
     3. This appliance is equipped with an ignition device
        which automatically lights the pilot. Do not try to      3. Cette appareil est équipé d’un allumage
        light the pilot by hand.                                    automatique de la veilleuse. Ne jamais essayer
                                                                    d’allumer la veilleuse à la main.
     4. Push the “On/ Off” switch to the fireplace Off.
                                                                 4. Mettre l’appareil sur OFF.
     5. Allow sufficient length of time (minimum 5
        minutes) for any gas in the combustion chamber           5. Laisser passer 5 minutes pour vérifier si du gaz ne
        to escape. If you still smell gas, STOP! Follow “B”         s’échappe pas de la chambre de combustion. Si
        in the safety information above on this label. If           vous sentez du gaz, arrêtez et reportez-vous au
        you don’t smell gas, go to the next step.                   points B de l’information de sécurité. Si vous ne
                                                                    sentez rien, poursuivez.
     6. Push the “On/ Off” switch to turn the fireplace on.
                                                                 6. Tourner l’appareil sur ON.
        • If the burner does not light, repeat steps 4
          through 6.                                                • Si le brûleur ne prend pas, reprenez les étapes
                                                                      4 à 6.
        • If the burner will not light or stay lit after
          several tries, push the “On/ Off” switch to the           • Si après plusieurs reprises cela ne fonctionne
          fireplace off and call your service technician or           pas, alors mettez l’appareil sur OFF et appelez
          gas supplier.                                               un technicien.
Note: Sufficient time must be allowed for air to escape                 Remarque: suffisament de temps doit être laissé à l’air
from lines if the unit is being lit for the first time.                 pour s’échapper des conduits si l’appareil s’allume pour
                                                                        une première fois.
 7. Set fireplace to desired setting by using either
    the wall switch or hand held remote.                                 7. Positionner le foyer au niveau de flamme désiré à
                                                                            l’aide de la télécommande.

TO TURN OFF GAS TO APPLIANCE                                            POUR STOPPER LE FOYER
 1. Set wall switch / hand held remote to lowest                         1. Ajuster le niveau de flammeà son minimum.
    setting.
                                                                         2. Mettre l’appareil sur OFF.
 2. Turn off all electric power to the appliance and
                                                                         3. Arrêtez le courant et enlever les batteries en
    remove
                                                                            cas d’intervention technique ou d’arrêt du
 3. Push the “on/ off” switch to the “Off” position.                        fonctionnement pour une plus longue durée.
    backup batteries if service is to be performed or
    for extended shutdown.

Due to high surface temperatures, keep children,
                                                                        A cause de la temperature elevee des parois, tenir
clothing and furniture away. Keep burner and control
                                                                        eloignés les enfants, les vêtements et les meubles.
compartment clean. See installation and operating
                                                                        Maintenir propres le brûleur et le compartiment de
instructions accompanying the appliance.
                                                                        commande. Voir les instructions relatives à l’installation
                                                                        et au fonctionnement qui accompagnent l’appareil.
CAUTION:                                                                ATTENTION:
Hot while in operation. Do not touch. Severe burns may                  Chaud pendant l’utilisation. Ne pas toucher. Peut
result. Keep children, clothing, furniture, gasoline and                causer des brûlures graves. Garder loin des enfants,
other liquids having flammable vapours away. Keep                       linge, meubles, gasoline et autres liquides à vapeurs
burner and control compartment clean. See installation                  inflamables. Maintenir le brûleur et le compartiment de
and operating instructions accompanying the appliance.                  contrôle propre. Voir le guide d’installation et d’opération
                                                                        qui accompagne l’appareil.

First Fire                                                              Premier Feu                                                              9
     When lit for the first time, the fireplace will emit                    Remarque: au premier allumage, ce foyer va
     a slight odour for 6 to 8 hours. This is due to the                     émettre une légère odeur durant 6 à 8 heures.
curing of paints, sealants and lubricants used in the                   C’est normal, il s’agit de solvants qui se dégagent de la
manufacturing process. This condition is temporary. Open                cuisson de la peinture générée par le premier feu dans la
doors and windows to ventilate area. Smoke and fumes                    chambre de combustion. C’est temporaire, ouvrez portes
caused by the curing process may cause discomfort to                    et fenêtres pour ventiler la pièce. La fumée et les odeurs
some individuals.                                                       produites peuvent être désagréables.
It is normal for fireplaces fabricated of steel to give off             Il se peut que vous entendiez certains bruits d’expansion
some expansion and/or contraction noises during the                     ou de contraction de l’acier lors des phases d’allumage
start up or cool down cycle. Similar noises are found with              ou d’extinction. C’est simplement l’acier qui se dilate, ce
your furnace heat exchanger or cook stove oven.                         phénomène est tout à fait normal.

                       DANGER                                                                  DANGER
                                        HOT GLASS WILL                                                  VITRE CHAUDE PEUT CAUSER DES
                                         CAUSE BURNS.                                                            BRÛLURES.

                                    DOT NOT TOUCH GLASS                                                    NE PAS TOUCHER LA VITRE
                                       UNTIL COOLED.                                                    JUSQU’À CE QU’ELLE SOIT FROIDE.

                                   NEVER ALLOW CHILDREN                                                   NE PAS LAISSER LES ENFANTS
                                      TO TOUCH GLASS.                                                          TOUCHER LA VITRE.

 A barrier designed to reduce the risk of burns from the hot viewing     Une barrière conçue pour réduire le risque de brûlure causées par
 glass is provided with this appliance and shall be installed for the    la vitre est fournis avec cet appareil et doit-être installée pour la
 protection of children and other at-risk-individuals.                   protection des enfants et autres individus a risque.

                                                                                                                      OCTOBER / OCTOBRE 2015
1.2 Technical specifications                                                                                                             1.2 Spécifications techniques
                                     Combustible material /
                                       Matériel combustible
                                                                                                                                              MINIMUM CLEARANCES TO COMBUSTIBLES /
      Non-combustible material (cement board, stone,
          concrete, brick, etc.) or 5/8 Type X gypsum /
                                                                                                                                              DISTANCES MINIMUM AUX MATIÈRES COMBUTSTILE
       Matériel non-combustible (panneaux de ciment,
        pierre, béton, brique, etc.) ou gypse 5/8 Type X
                                                                                                                                              Side standoff / côté espaceur     0”
                                                                                                                                              Back standoff / arrière espaceur  0”
                          Ventilation intake (see page 11) /                                                                                  Top standoff / au-dessus espaceur 0”
                     Entré d’air de ventilation (voir page 11)                                  2”                                            Floor (legs) / plancher (pattes)  0”

         Back panel must be made of non-combustible
                  material (front panel can be made of
                                combustible material) /
             Le panneau arrière doit être composé de                                                                                                                                  Combustible material /
        matériel non-combustible (panneau avant peut
            être composé de matériaux combustibles)                                                                                                                                     Matériel combustible
                                                                                                                                                                                                                                           False celing /
                                                                                                                                                 All interior joints air-tight
                                                                                                                                                             (see page 12)/                                                                Faux plafond
                                                                                                                      MIN 0”                      Tous les joints intérieurs
                                                                                                                                               hermétiques (voir page 12)
                                                                                                                      NOTE: we
                                                                                                                      recommende
                                                                                                                      4” minimum to
                                                                                                                      prevent ceiling paint
                                                                                                                      discoloration /
                                                                                                                      NOTE: 4” minimum
                                                                                                                      est recommandé                                Wood framing /
                                                                                                                      pour éviter la                               Structure de bois
                                                                                                                      décoloration de la
                                                                                                                      peinture du plafond

                    Combustible over                                 42 1/2”
           non-combustible material /
                                                                                                               Combustible material /
      Matériel combustible sur matériel                                                                                                                     Combustible material /
                     non-combustible                                                                           Matériel combustible
                                                                                                                                                              Matériel combustible

           Minimum wall clearance, see                                                                         Access panel must be placed
             mantle chart on page 14 /                                                                         within 48” of the hearth /
          Pour la distance minimum du                                                                          La trappe d’accès doit être
     mur, voir la charte de manteau de                                               31 3/4”                   placé à l’intérieur de 48” de l’âtre                                     69 5/8”
                   cheminée en page 14

                                                                                                                                                                     Front baffle /
                                                                                                            MIN : 0”                                              Déflecteur avant
                                                                                                            MAX : grid flush to hearth
                                                                                                                   opening level, no higher/
                                                                                         6”                        Le bas de la grille égale à

10
                                                   27 5/8”                                                         l’ouverture de l’âtre, pas
                                                                                   15”                             plus haut

                                                                                                                                                                                                            42 1/2”
                                                                               Area must be made of non-combustible material
                                                                               (Type X gypsum excluded) even if the appliance is
                                                                               flush with the floor /                                                                                                                                                           21”
                                                                               Zone composée de matériaux non-combustibles
                                                                               (gypse Type X exclus) même si l’appareil est au
                                                                               niveau du sol

                                                                                                                                                                                                  8X :
                                                                                                                                                                                                  2 on each side, 2 on top
                                                                                                                                                                                                  and 2 to the back /
                                                                                                                                                                                                  2 par côté, 2 sur le dessus
                                                                                                                                                                                                  et 2 à l’arrière

                                                                                                            42 1/2”
                          21 1/2”                                                                                                                                                                                     Fold standoffs to
                                                                                                                                                                                                                      install /
                               21”                                                                                                                                                                                    Plier les espaceur
                                                                                                                                                                                                                      pour les installer

                                                                                                                                                                                                                      42 1/2”

                                                                                                                                                                                                                                                10 1/2”
                                                                                                           23 5/8”
                                                                                                     MESH / GRILLE
     FRAME / CADRE

                                                                                                                                                                                                                                                            8 3/4”
                                                                                                                                                                                        10 3/4”
                                                 45 5/8”
                                                           69 5/8”

                                                                                                                                                       69 5/8”
          32”

                                                                                                                                                                                                                                                                      21 1/2”
                                                                                                                       31 1/2”

                                                                                                                                                                                                                       24 1/8”
           6”

                                                                                                                                                                                                                   FRAME / CADRE
2. Installation instructions                                2. Instructions d’installation
Before commencing Installation, confirm that the details    Avant d’entamer l’installation, contrôlez les points
on the appliance data plate correspond to the local         suivants : Plaque signalétique : type de gaz, la pression
distribution conditions, gas type and pressure to which     du gaz sur place correspond à ce qui est indiqué sur la
the appliance is to be installed.                           plaque signalétique.
Ensure that gas supply and supply pipe is capable of        Contrôlez la capacité et la pression de l’amenée de gaz.
delivering the required volume and pressure of gas and is   Vérifiez également si celle-ci a été installée suivant les
in accordance with the rules in force.                      prescriptions en vigueur.

2.1 Gas Connection                                          2.1 Raccordement au gaz
This appliance has a gas inlet connection of Ø 3/8”.        Cet appareil est équipé d’un raccordement au gaz « flux
                                                            entrant » de 3/8” NPT.

2.2 Ventilation of the room                                 2.2 Ventilation de la pièce
This appliance is a Balanced Flue room sealed appliance,    Ce foyer est un foyer à gaz fermé, ce qui signifie qu’il
and as such needs no additional ventilation. However an     n’aspire pas d’air de la pièce dans laquelle il se trouve.
adequate supply of fresh air to maintain temperatures       L’appareil ne doit pas être « aéré ». Il est toutefois
and a comfortable environment is recommended.               recommandé de ventiler suffisamment la pièce en vue
                                                            de garantir ainsi un environnement agréable.
This appliance may be installed in a completely sealed
or mechanically ventilated house; no need to plan for       L’appareil peut être placé dans une habitation très bien
extra aeration for good combustion and/or ventilation to    isolée et/ou équipée d’une ventilation mécanique ; il n’y a
disperse fumes or smoke.                                    pas besoin de prévoir une aération complémentaire pour
                                                            la bonne combustion et/ou un ventilateur d’évacuation
                                                            des gaz de fumée.

2.3 Fireplace Installation                                  2.3 Installation du foyer
 ++ Determine the position required for the appliance.       ++ Déterminez le positionnement de l’appareil.
 ++ Create a gas connection for the appliance in             ++ Prévoyez un raccordement au gaz près de
    approximately the correct location for the gas              l’endroit où le foyer sera installé.
    controls.
                                                             ++ Le bloc de réglage du gaz est raccordé au brûleur          11
 ++ The gas controls are connected to the Burner                dans l’appareil. Le bloc de réglage et le récepteur
    of the appliance. These controls need to                    sont placés dans la trappe encastrable, veillez
    be located in the control access box, so an                 donc à ce que celle-ci soit facilement accessible.
    appropriate position for the access box need to
    be determined.

 ++ This appliance has fully adjustable legs, these          ++ Cet appareil est équipé de pieds ajustables en
    must be set to the desired length before the flue           hauteur. Ceux-ci doivent être réglés à la bonne
    position is finalized. Fine adjustment of the legs is       hauteur avant de déterminer la position du
    available via the feet.                                     conduit. De légères adaptations en hauteur sont
                                                                possibles au moyen des petits pieds réglables.
 ++ Do not make any adjustments to the appliance,
    except the leg length.                                   ++ Ne modifiez aucun réglage de l’appareil (mis à
                                                                part la longueur des pieds).

                                                                                                  OCTOBER / OCTOBRE 2015
2.4 Convection and ventilation                                      2.4 Convection et ventilation du caisson
     of the chase
                                                                                   Top of grill box must be flush with false ceiling (false
                                                                                   ceiling can be combustible materials) /
                                                                                   Le dessus de la boîte de grille doit être tout contre
                                                                                   le faux plafond (le faux plafond peut être fait de
                                                                                   matériel combusitble)
              Firestop /
             Coupe-feu

                                                                                                             Convection

                                                                                                             Ventilation

                                                                                               Hot air outtakes: 2 x 28 (total 56) square
                                                                                                             inches / pouces carrés
                                                                                               Ventilation: 2 x 6 square (total 12) inches /
                                                                                                             pouces carrés
         Air-tight joints /
     Joints hermétiques
                                                                                               Interior panels can be of a
                                                                                               combustible material /
                                                                                               Les panneaux intérieurs peuvent être
                                                                                               composés de matériaux combustibles

                                                                                               Front panel must be made of
                                                                                               non-combustible material (5/8 Type X gypsum,
                                                                                               cement board, stone, concrete, brick, etc.) /
                                                                                               Le panneau avant doit être composé de
                                                                                               matériel non-combustible (gypse 5/8 Type X,
12                                                                                             panneaux de ciment, pierre, béton, brique, etc.)

                                                                                               2 x 28 (total 56) square
                                                                                               inches / pouces carrés
                                                                                               NOTE: The convection air intake is not
                                                                                               connected to the unit
                                                                                               NOTE: La grille de prise d’air de
                                                                                               convection n’est pas raccordée à l’appareil

                                                                                       Option A

                                 Option B

                                                    Option B

                           CONVECTION AIR INTAKE /
                           ARRIVÉ D’AIR DE CONVECTION

                           Option A: Use supplied vents /
                                     Utiliser les grilles fournies
                           Option B: Make an opening equal to 56 sq. in. in the bottom of the front wall /
                                     créer dans le bas du mur un passage d’air équivalent à 56 p²
The convection and ventilation have two objectives:                La convection et la ventilation ont deux objectifs :
  1. Take hot air out through flexible tubes and send               1. Récupérer l’air chaud via des tuyaux flexibles
     it further to the room or to other rooms                          isolés et le renvoyer dans la pièce ou vers une
                                                                       autre pièce ;
  2. Ventilate the chase
                                                                    2. Ventiler le caisson qui renferme le foyer.
STÛV provides with the unit one convection kit made of:            STÛV fournit avec l’appareil un kit de convection
                                                                   composé de :
  1. Two air inlet grids corresponding to a 28 square
     inches flow each;                                              1. Deux grilles d’entrée d’air correspondant à un
                                                                       flux d’air de 28 pouces carrés chacune ;
  2. Two air outlet insulated flexibles tubes with a 6
     inches interior diameter and 10 feet long;                     2. Deux flexibles isolés de diamètre intérieur de 6
                                                                       pouces et 10 pieds de long pour les sorties d’air
  3. Four clamps;                                                      chaud ;
  4. Two insulated air boxes for air outlets;                       3. Deux collets de serrage pour sortie d’air ;
  5. Two air outlet grids corresponding to a 34 square              4. Deux boîtes d’air isolées ;
     inches flow each (28 square inches + 6 square
     inches);                                                       5. Deux grilles de sortie d’air correspondant à
                                                                       un flux d’air de 34 pouces carrés chacune (28
  6. Two flanges 3” x 6”;                                              pouces carrés + 6 pouches carrés ;
  7. Two security clips for flanges;                                6. Deux flanges 3” x 6” ;
  8. Two non-insulated air boxes;                                   7. Deux clips de sécurité pour flanges ;
                                                                    8. Deux boîtes d’air non isolées ;
                           1                  2                3                    4

                                                                                                                                            13
                           5                  6                7                    8

The air enters the chase as well as the unit convection            L’air s’introduit à l’intérieur du caisson et dans la paroi
chamber through the two air inlet grids but also from the          de convection de l’appareil via d’une part les deux grilles
front of the unit, just above the glass. The total air inlet       d’entrée d’air et d’autre part par l’avant du foyer, juste
surface is 74 square inches.                                       au-dessus de la vitre. La surface d’entrée d’air totale est
The air comes out from the chase and the convection                de 74 pouces carrés.
chamber through the two air outlet grids. The total air            L’air ressort exclusivement par les deux grilles de sortie
outlet surface is 74 square inches (twice 28 square inches         d’air, 2 fois 28 pouces carrés de surface d’air à la sortie
coming from the flexible tubes and twice 6 inches directly         des flexibles isolés et 2 fois 6 pouces carrés de surface
from the chase.                                                    pour ventiler le caisson.

                                                                    28p²

                                                                                 2x 3p²

This drawings shows the two components                                                       Ce dessin illustre les deux composants
of the insulated air box as well as the hot                                                  de la boîte d’air isolée ainsi que la grille
air grid.                                                                                    d’air chaud.
                                                                                        6”
Dimensions on page 15                                                                        Dimensions en page 15

                                                                      14”

                                                                                                              OCTOBER / OCTOBRE 2015
2.4.1 Safety precautions                                                      2.4.1 Précautions et sécurité

                                                                                                      Maximum height of convection intake /
                                                                                                      Hauteur maximum de l’entré de convection

     All interior joints should be sealed with either aluminum tape or drywall joint tape
                                  with one layer of compound /
      Tous les joints intérieurs doivent être scellés avec du ruban d’aluminium ou du
                           ruban à joint avec une couche de composé

14

                                                                                            Top of grill box must be flush with false ceiling (false ceiling
                                                                                            can be combustible materials) /
                  WARNING: Potential heat accumulation
                                                                                            Le dessus de la boîte de grille doit être tout contre le faux
                  ATTENTION: Accumulation potentielle de la chaleur                         plafond (le faux plafond peut être fait de matériel combusitble)

                                                                                                                           False ceiling / Faux plafond

                                                                                                                                             √
2.5 Safety distances                                                                      2.5 Distances de sécurité
                  Side view / vue de côté                                                                Mantle clearances /
  Combustible material area /                Ventilation intake (see page 11) /                         dégagements de l’âtre
 Zone de matériel combustible                Entré d’air de ventilation (voir page 11)

                                  6”

                                        4”
                                              1”

                                                                                                                  27 5/8”
                                                                                                                                                     15”
                                                                                                                                                            6”
     6”                                                                                      Non combustible material /
             4”                                                                               Matériel non-combustible*
                    2”
                                                                                                        Top view / vue du haut
Non-combustible material (5/8
    type X gypsum included) /
  Matériaux non-combustibles
     (gypse 5/8 Type X inclus)
                                                                                                                      2"
                                                                                                                            4"
                                                                                                                                 6"
                                  15”                                                                                                 8" 9"

                         6”
                                                                                                                2"                     Strictly non combustible
                                                                                                              4"                       material /
                                                                                                             6"                        Strictement matériel
                                                                                                         8"                            combustible*
  Strictly non combustible
            material area /
                                             Combustible material area /
                                             Zone de matériel combustible
                                                                                                        9"
                                                                                                                                       Combustible material /
                                                                                                                                                                              15
      Zone strictement de                                                                                                              Matériel combustible
matériel non-combustible*

2.6 TV Pocket                                                                             2.6 Alcôve de téléviseur

                                                                                         largeur TV width + 4”

                                                 hauteur TV height + 4”

          NOTE : The addition of a reveal (as                                               MAX 4”
          shown) adds the depth of the reveal to                       MIN 16”
          the maximum depth of the TV pocket.
          NOTE: L’addition d’un retour ajoute la
          profondeur du retour à la profondeur de
          l’alcôve de téléviseur.

* Non-combustible material : cement board, stone, concrete, brick, etc. /
* Matériel non-combustible : panneaux de ciment, pierre, béton, brique, etc.
                                                                                                                                                     OCTOBER / OCTOBRE 2015
2.7 Framing kit installation (optional)                                         2.7 Installation du bâtit métalique (option)
                                                                                                                            Brackets /
                                                                                                                            Attaches
                                           Metal furring /
                                      Fourrure metalique

16

         Clip the metal furrings onto
                      the brackets /
              Agrapher les fourrures
            métaliques aux attaches

                                                                 Convection out-takes grills /                       Convection intakes grills /
         Access door / Porte d’accès                         Grilles de sortie d’air de convection              Grilles d’entré d’air de convection
                                                                    16”                                                    10 1/8”

                         12   1/2”
                                                                                             5 1/2”

                9 3/4”

                                     10”
                                                                                                           5”                                         6”
                 7”      9 3/4”
                                                                                                      6”
        7”
                                                     7”

                                                                                                                                         11”
                                                                                       14”
2.8 Protection mesh installation                       2.8 Installation de la grille de protection

  1                                               2                        3

  4                                               5a                      5b

                                                                                                                     17

1. Place the protection screen in front of                            1. Présenter l’écran de protection devant
   the fireplace by holding the upper left        6                      le foyer en le soutenant par les angles
   and right angles.                                                     droit et gauche supérieurs
2. Place the protection screen inside the                             2. Déposer l’écran de protection dans le
   decorative frame starting with the                                    cadre de finition en commençant par
   bottom left and right angles, but without                             les angles droit et gauche inférieurs,
   pushing it all the way.                                               mais sans le pousser à son maximum
3. Similarly, push in the top of the protection                       3. De la même manière emboiter le
   screen but not all the way in.                                        dessus de l’écran de protection sans le
                                                                         pousser davantage
4. Holding the top and bottom frame
   edges, push the protection screen                                  4. En le tenant par les transversales
   towards the back of the frame.                                        inférieure et supérieure, pousser l’écran
                                                                         de protection vers l’intérieur
5. Push the protection screen all the way
   to the back.                                                       5. Pousser l’écran de protection jusqu’au
                                                                         fond du cadre de finition
6. Insert the safety screw into the hole for
   this purpose located at the center of                              6. Insérer la visse de sécurité dans le trou
   the top frame edge of the protection                                  prévu à cet effet situé au centre de
   screen. Screw in completely but not so                                la transversale supérieure et la visser
   tight as to damage the top frame edge.                                jusqu’à son maximum sans serrer trop
                                                                         fort afin de ne pas bomber la traverse
                                                                         supérieur.

                                                                                          OCTOBER / OCTOBRE 2015
2.9 Removing the glass                                           2.9 Enlever la vitre

       1                                              2                                           3a
                   Screws x6 /
                      Vis x6

                    Brackets /
                    serre-vitre

      3b                                              4                                            5

18

     1. Remove protection mesh.                                       1. Enlever la grille de protection.
        (see section 2.9)                                                (voir section 2.9)
     2. Loosen the 6 screws (3 on each side) using a 3mm Allen key,   2. Dévisser les 6 vis (3 par côté) en utilisant une clée Allen
        making sure that you do not completely remove the screws.        de 3mm en vous assurant de ne pas enlever les vis
                                                                         complètement.
     3. Remove the bracket holding the glass in place from under
        the screws.                                                   3. Enlever les serre-vitre qui retiennent la vitre d’en dessous
                                                                         des vis.
     4. Lift the glass from the frame.
                                                                      4. Lever la vitre dans le cadre.
     5. Pull the bottom of the glass towards you to remove from the
        frame.                                                        5. Tirer le bas de la vitre vers vous pour l’enlever du cadre.
     To put the glass back on, follow the procedure in reverse.       Pour replacer la vitre, suivre la procédure à l’inverse.
     NOTE: A set of two suction cup handles are supplied to help      NOTE: Une paire de poignées ventouse est livrée avec chaque
     with the operation if needed.                                      appareil pour aider à l’opération en cas de besoin.
2.10 Fuel Bed Arrangements                                    2.10 Mise en place du jeu de bûches/
                                                              galets
With the appliance a colour copy is delivered. Here you       Le foyer est fourni avec un schéma en couleur qui illustre
see how the logs should be placed. Do not use another         comment les bûches/galets doivent être placés. Si vous
arrangement of the logs! This can cause soot!                 ne respectez pas la bonne mise en place, vous pourriez
                                                              obtenir de la formation de suies. Suivez-donc bien les
White and black pebbles must be shattered evenly over         instructions.
the grate.
                                                              Les cailloux blancs ou noirs peuvent être répartis
Pay attention: always make sure that the pilot light is       uniformément sur la grille et les brûleurs.
free and not blocked! This goes for as well the logs as the
pebbles!                                                      Assurez-vous que le la veilleuse reste libre. Cela vaut tant
                                                              pour les bûchettes que pour les cailloux!
Pay attention: when using LPG/Propane do not put
chips or black or white pebbles on top of the burners. The    Note: ne pas mettre galets noirs ou de cailloux blancs
burners must be completely open!                              sur le dessus des brûleurs. Les brûleurs doivent être
                                                              complètement découverts!

The kit is composed of:                                                                    Le kit est composé de:
 ++ 7 logs
                                         1                                                   ++ 7 bûches
 ++ 2 small bags of                                                                          ++ 2 petits sachets de
    embers                                                                                      braises
 ++ 1 small bag of                                                                           ++ 1 petit sachet de
    vermiculite                                                                                 vermiculite
Empty half a bag of                                                                        Vider un demi sachet de
embers and half a bag of                                                                   braises et un demi sachet
vermiculite on the burners                                                                 de vermiculite sur les
and the grill.                                                                             brûleurs et la grille.

                                                              5                                                              19
                                   2          3       4                6        7

WARNING: Do not spread                                                                     ATTENTION: ne pas
embers or vermiculite on         A                                                         éparpiller de braises ou de
open burners. This will                                                                    vermiculite sur les brûleurs
prevent gravel or dust                                                                     ouverts. Cela empêche
getting into the burners.                                                                  que du gravier ou de la
                                                                                           poussière ne s’introduise
WARNING: Do not cover                                                                      dans les brûleurs.
the pilot with embers!
                                                                                           ATTENTION : ne pas
                                                                                           couvrir le pilote de
                                                                                           braises!

Place log 7 just behind the                                                                Placer la bûche 7 juste
back burner.                     B                                                         derrière le brûleur du fond.

                                                                                    7

                                                                                                    OCTOBER / OCTOBRE 2015
Vous pouvez aussi lire