QUICK START GUIDE - POLAROID3D
←
→
Transcription du contenu de la page
Si votre navigateur ne rend pas la page correctement, lisez s'il vous plaît le contenu de la page ci-dessous
Quick Start Guide
Safety instructions
•   WARNING - BURN HAZARD: Parts of this product get very hot during use
    (approx. 165 - 200°C). DO NOT touch the tip of the pen, the surrounding
    area (where you see this sign      ), or the melted material as it could
    cause a BURN.
•   Before storage always allow the product to completely cool after use.
•   This product IS NOT A TOY.
•   This product is suitable for ages 14+ unless under adult supervision.
•   Please read this Quick Start Guide carefully before use.

Consignes de sécurité
•   AVERTISSEMENT - RISQUES DE BRÛLURES: Des parties de ce produit
    sont très chaudes pendant l’utilisation (env. 165 - 200°C). NE PAS
    TOUCHER la pointe du stylo et sa zone environnante (où vous voyez ce
    signe      ) ou le filament fondu car il pourrait vous causer des BRÛLURES.
•   Avant le stockage toujours laisser complètement refroidir le produit après
    utilisation.
•   Ce produit N’EST PAS UN JOUET.
•   Ce produit convient aux enfants de 14 ans et plus sauf sous la
    surveillance d’un adulte
•   Veuillez lire attentivement le présent manuel de mise en route
    avant utilisation.

Sicherheitshinweise
•   ACHTUNG - BRANDGEFAHR: Teilen dieses Produktes sind während
    Gebrauch sehr heiß (ca. 165 - 200°C). Berühren Sie die Spitze von der
    Pen, das Gebied rund um der Pen (wo Sie das Zeichen      sehen) oder
    den geschmolzenen Filament NICHT an, da es Brandwunde verursachen
    könnte.
•   Nach Gebrauch immer das Produkt völlig kühlen lassen, bevor Sie der Pen
    weglegen.
•   Dieses Produkt IST KEINEN SPIELZEUG.
•   Es ist geeignet für Kinder ab 14 Jahren.
•   Lesen Sie diese Kurzanleitung zur Verwendung.

    For further information please visit / Pour plus d’informations merci de
                visiter / Weitere Informationen finden Sie unter:
                   www.polaroid3d.com/support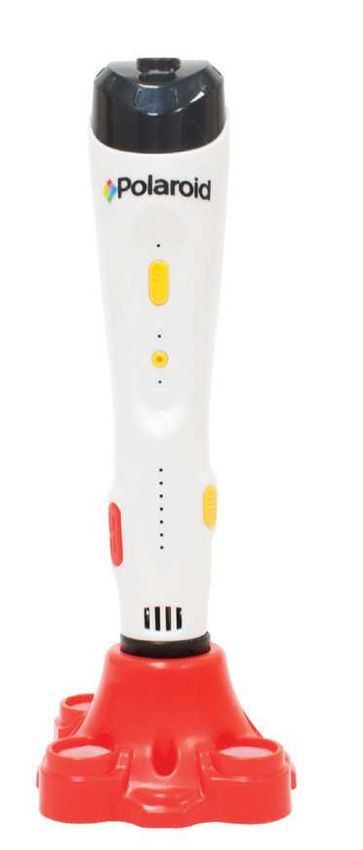
Istruzioni di sicurezza
•    ATTENZIONE NON BRUCIARSI: Parti di questo prodotto diventano molto
     calde durante l’uso (circa. 165 - 200°C). NON toccare la punta della penna,
      l’area circostante (dove si vede questo segno      ) o la parte in plastica
     fusa in quanto potrebbe causare ustioni.
•    Prima di riporre il prodotto consentire sempre il raffreddamento
     dopo l’uso.
•    Questo prodotto NON E’ UN GIOCATTOLO.
•    Questo prodotto è adatto per le età 14+ anni.
•    Si prega di leggere attentamente la presente guida rapida prima dell’uso.

Instrucciones de seguridad
•   ADVERTENCIA PELIGRO DE QUEMADURAS: Las partes de este producto
    se calientan mucho durante el uso (aprox. 165 - 200°C). NO toque la punta
    del lápiz, el área circundante (donde vea este signo  ), o el plástico
    fundido ya que podría causar una QUEMADURA.
•   Siempre espere a que el producto se enfríe después de usarlo y antes
    de guardarlo.
•   Este producto NO ES UN JUGUETE.
•   Este producto es adecuado para mayores de 14 años a menos que esté
    bajo la supervisión de un adulto.
•   Por favor, lea cuidadosamente esta Guía de Usuario antes de usar el lápiz.

Veiligheidsinstructies
•   WAARSCHUWING BRAND-GEVAAR: Delen van dit product zijn zeer heet
    tijdens het gebruik (ongeveer 165-200°C). Raak de punt van de pen,
    het gebied rondom de pen (waar u het teken       ziet), of het gesmolten
    filament NIET aan. Dit kan brandwonden veroorzaken.
•   Na gebruik het product volledig laten afkoelen, voordat deze opgeborgen
    wordt.
•   Dit product is GEEN speelgoed.
•   Het product is geschikt voor kinderen vanaf 14 jaar.
•   Lees deze Quick Start Guide voor gebruik.

    Per ulteriori informazioni si prega di visitare il sito / Para obtener más
         información, visite / Voor meer informatie kunt u terecht op:
                   www.polaroid3d.com/support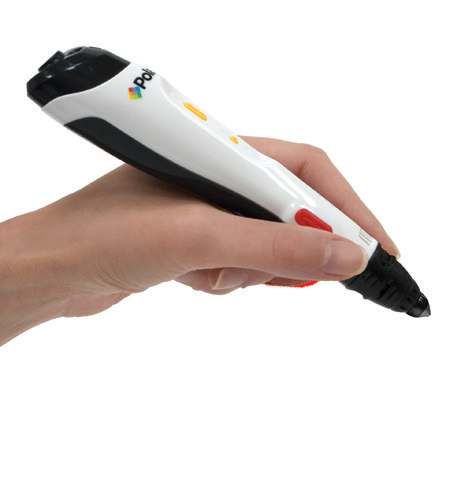
Box contents                      Contenance de la boite
1 x Polaroid FAST Play 3D Pen     1 x Stylo Polaroid FAST Play 3D
  and Holder                        et Support
3 x Interchangeable Nozzles       3 x Buses interchangeables
1 x 1.5m USB Cable (USB           1 x 1.5m Câble USB (adaptateur
  Power Adapter not included)       d’alimentation USB non inclus)
3 x 15g (5m) PLA Plastic          3 x Packs 15g Filaments (5m)
  Filament Packs (assorted          Plastique PLA (assortiment
  colours)                          de couleurs)
1 x Quick Start Guide             1 x Manuel D’utilisation
1 x Trace App Screen              1 x Protection Écran pour Trace
  Protector with fixing pads        App avec pastilles adhésives

Verpackungsinhalt                 Contenuto confezione
1 x Polaroid FAST Play 3D Stift   1 x Penna 3D Polaroid FAST
  und Halter                        Play e Relativo Supporto
3 x Austauschbare Düsen           3 x Punte intercambiabili
1 x 1.5m USB-Kabel (USB-          1 x Cavo USB da 1,5m
  Netzteil nicht im                 (caricatore USB non incluso)
  Lieferumfang enthalten)         3 x Pacchi di Filamenti Plastici
3 x 15 g (5 m) PLA Kunststoff-      PLA (colori assortiti) da 15g (5m)
  Filament-Packungen (Farblich    1 x Guida all’uso
  sortiert)                       1 x Protettore per lo schermo e
1 x Kurzanleitung                   relativi gommini da usare con
1 x Trace App Schutzfolie mit       la Trace App
  montage padds

Contenido de la caja              Inhoud van de doos
1 x Lápiz Polaroid FAST           1 x Polaroid FAST Play 3D Pen
  Play 3D                           en Houder
3 x Boquillas intercambiables     3 x Verwisselbare Nozzles
1 x Cable USB de 1.5m (no         1 x 1,5 m USB-kabel (exclusief
  incluye adaptador de              USB adapter)
  corriente USB)                  3 x 15g (5m) PLA Plastic
3 x 15g (5m) Paquetes de            Filament Packs (verschillende
  Filamentos Plásticos PLA          kleuren)
  (colores surtidos)              1 x Quick Start Guide
1 x Guía de Usuario               1 x Trace App Screen Protector
1 x Plantilla Protectora            met bevestigings Pads
  Trace App con almohadillas
  adhesivas
EN NOTE: The Polaroid FAST Play 3D pen should only be used with
   original Polaroid 1.75 mm PLA filament. Use of third party filament can
   cause damage to your pen. This could invalidate your warranty.
FR REMARQUE: Le stylo Polaroid FAST Play 3D ne doit être utilisé
   qu’avec un filament PLA d’origine Polaroid de 1,75 mm de diamètre.
   L’utilisation de filaments tiers peut endommager votre stylo et pourrait
   invalider votre garantie.
DE HINWEIS: Der Polaroid FAST Play 3D Pen sollte nur mit Original
   Polaroid 1.75 mm PLA Filamenten verwendet werden. Die
   Verwendung von Fremdfilamenten kann zu Schäden am Stift führen,
   die zum Erlöschen der Garantie führen kundigen.
IT NOTA: La penna 3D Polaroid FAST Play deve essere utilizzata solo con i
   filamenti PLA Polaroid da 1,75 millimetri. L’uso del filamento di terze parti
   può causare danni alla penna che potrebbe invalidarne la garanzia.
ES NOTA: El lápiz Polaroid FAST Play 3D sólo se debe utilizar con el
   filamento PLA de Polaroid 1.75 mm. El uso de otros filamentos puede
   dañar su lápiz 3D. Esto podría invalidar su garantía.
NL LET OP: De Polaroid FAST Play 3D pen mag alleen gebruikt worden
   met de originele Polaroid 1.75mm PLA filament. Gebruik van een
   ander soort filament kan de pen beschadigen. Hierdoor kan de garantie
   komen te vervallen.

    TECHNICAL SPECIFICATIONS
   Model Number: PL-2001-00                     USB cable: 1.5m
   Filament: 1.75mm diameter PLA                Power Input: 5.0VDC       2.0A
   Pen Size: 165 (L) x 32 (W) x 33 (D)mm        Auto turn-off for added safety
   For ages 14+ unless under adult supervision.

   Guarantee: 12 Month Manufacturer’s Guarantee (this may differ by country
   according to minimum statutory requirements).

    SPECIFICATIONS TECHNIQUES
   Model Number: PL-2001-00                    Cable USB: 1.5m
   Filament: Diamètre 1.75 mm PLA              Alimentation: 5.0VDC       2.0A
   Taille stylo: 165 (L) x 32 (I) x 33 (D)mm   Éteindre automatique pour plus sécurité
   Ce produit convient aux enfants de 14 ans et plus.
   Garantie: 12 mois de garantie fabricant (cela peut varier d’un pays à l’autre en
   fonction de la législation).
TECHNISCHE SPEZIFIKATION
Modell-NR: PL-2001-00                        USB-Kabel: 1.5m
Filament: Diameter 1.75mm PLA                Leistung: 5.0VDC     2.0A
Größe pen: 165 (L) x 32 (B) x 33 (D)mm       Auto turn-off for added safety
Es ist geeignet für Kinder ab 14 Jahren.

Garantie: 12 Monate Werksgarantie (laut mindestens gesetzliche Vorschriften,
kann je nach Land variieren).

SPECIFICHE TECNICHE
N. Modello: PL-2001-00                       Cavo USB: 1.5m
Filamento: Diametro di 1.75mm PLA            Alimentazione: 5.0VDC       2.0A
Formato Penna: 165(L) x 32(W) x 33(P)mm Auto spegnimento automatic
Questo prodotto è adatto per le età 14+ anni.

Garanzia: 12 mesi di garanzia del produttore (puo’ variare a seconda del paese
secondo i requisiti minimi di legge).

ESPECIFICACIONES TÉCNICAS
Número de Modelo: PL-2001-00                    Cable USB: 1.5m
Filamento: 1.75mm de diámetro PLA               Entrada de energía: 5.0VDC    2.0A
Tamaño del lápiz: 165(L) x 32(A) x 33(P)mm      Desconexión automática
Este producto es adecuado para mayores de 14 años.

Garantía: 12 meses de garantía del fabricante (puede variar según los
requisitos legales de cada país).

TECHNISCHE SPECIFICATIES
Model No: PL-2001-00                         USB-Kabel: 1.5m
Filament: 1.75mm diameter PLA                Vermogen: 5.0VDC       2.0A
Afmeting pen: 165(L) x 32(W) x 33(D)mm       Auto turn-off for added safety
Het product is geschikt voor kinderen vanaf 14 jaar.

Garantie: 12 maanden fabrieksgarantie (volgens de minimale wettelijke
voorschriften, kan per land verschillen).
Operating instructions       Istruzioni per l’uso
    Mode d’emploi                Instrucciones de operación
    Gebrauchsanweisung           Gebruiksaanwijzing

    USB cable entry point
1   Fiche de câble USB           1
    Stecker USB-Kabel
    Spina del cavo USB                                      3
    Enchufe de cable USB
    Plug USB-kabel

    Power
2   Alimentation
    Netzschalter
    Accensione
    Encender
    Aan-knop                                        2
    Loading
3   Chargement
    Ladungsloch filament
    Caricamento
    Alimentación
    Laadopening filament

4   Print                                               4
    Imprimer
    Taste drucken
                             5
    Stampare
    Impresión
    Print knop

    Speed
5   Vitesse
    Geschwindigkeit
    Velocità
    Velocidad
    Snelheid

                                                                7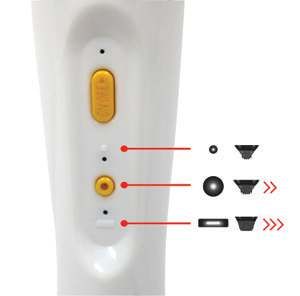
1
             Use the USB cable provided to connect to a power source
             (DC 5V 2A required).
             Utilisez le câble USB fourni pour vous connecter à une source
             d’alimentation (DC 5V 2A requis).
    Verwenden Sie die mitgelieferte USB-Kabel um diese an zu schließen
    auf eine Stromquelle (DC 5V        2A erforderlich).
    Usare il cavo USB in dotazione per connettere il prodotto ad una spina
    elettrica (e’ richiesto un voltaggio di DC 5V 2A).
    Utilice el cable USB suministrado para conectar a una fuente de energía
    (necesita un conector de DC 5V 2A).
    Gebruik de meegeleverde USB kabel om deze aan te sluiten op een
    stroombron (DC 5V 2A vereist).

2
             Press the Power Button (2). The light directly above the Power
             Button will turn Red to indicate that the Polaroid FAST Play 3D
             Pen is heating up.
             Appuyez sur le bouton d’alimentation (2). Le voyant, qui se situe
             immédiatement au-dessus du bouton d’alimentation, devient
    rouge pour indiquer que le stylet 3D de Polaroid FAST Play se réchauffe.
    Drücken Sie auf den Netzschalter (2). Das Licht wird Rot um an zu
    zeigen dass der Polaroid FAST Play 3D Pen aufwärmt.
    Premere il pulsante di accensione (2). La luce sopra il pulsante di
    accensione diventerá rossa per indicare che la Penna 3D Polaroid FAST
    Play si sta scaldando.
    Presione el botón de encendido (2). La luz cambiará a rojo para indicar
    que el lápiz Polaroid FAST Play 3D se está calentando.
    Druk op de aan-knop (2). Het lampje wordt rood om aan te geven dat de
    Polaroid FAST Play 3D Pen aan het opwarmen is.

3
            When the light turns Blue it means the Pen is ready for use.
            Insert one end of your Polaroid Play PLA filament material into
            the loading hole at the top of the pen (3). Please ensure that
            the end of the filament is flat across the end (cut carefully with
    scissors if not) before inserting. Insert the filament gently until it reaches
    the stop. Press and hold the Print button (4) until you feel the filament
8
being gently guided into the Pen. You can then release this button and
the loading will continue automatically. The filament is fully loaded when
you see filament appear from the end of the nozzle. You can speed up
(or slow down) this loading process by pressing the Speed buttons (5) at
any point during the process. NOTE this loading process may take a few
minutes. DO NOT TOUCH any part of the nozzle at this point as it will be
VERY HOT.
Lorsque la lumière devient bleue, cela signifie que le stylet est prêt
à l’emploi. Insérez une extrémité de votre matériel PLA dans le trou
de chargement en haut du stylo (3). Veillez à ce que la fin du filament
soit à plat sur l’extrémité (couper soigneusement avec des ciseaux
sinon) avant d’insérer. Poussez doucement jusqu’à ce que vous vous
sentiez arrêter. Ensuite, maintenez enfoncé le bouton d’impression
(4) et vous sentirez le filament être doucement tiré dans le stylo. Vous
pouvez maintenant relâcher ce bouton et le stylet continuera charger
automatiquement. Le filament est complétement chargé quand vous
verrez que le filament apparaisse à la fin de la buse. Vous pouvez
accélérer ou ralentir ce procès en appuyant sur les boutons de vitesse
(5). NE PAS TOUCHER aucune partie de la buse à ce point car elle sera
TRÈS CHAUDE.
Wenn das Licht Blau wird dann ist der Pen gebrauchsfertig. Stecken Sie
das Ende von Ihre Polaroid Play PLA Material in das ladungsloch auf die
Oberseite von der Pen (3). Kontrolieren Sie bitte, bevor einstecken, ob
das Ende des Filaments flach ist (wenn nicht Bitte abschneiden mit eine
Schere). Stecken Sie vorsichtig das filament ein bis Sie die Stop fühlen.
Pressen Sie auf die Taste drucken (4), dann fühlen Sie dass das Filament
vorsichtig in der Pen geleitet werd. Halten Sie diese Taste eingedruckt
bis Sie sehen dass das Filament aus dem ende der Düse erscheint.
Sie können diesen Ladevorgang beschleunigen (oder verlangsamen),
indem Sie an einem beliebigen Punkt während des Vorgangs auf die
Geschwindigkeitstasten (5) drücken. ANMERKUNG dieses dauert ein
paar Minuten. FASSEN SIE KEINEN teil der Düsen an, dieses ist jetzt
SEHR HEIß!
Quando la luce diventa blu significa che la penna è pronta per l’uso.
Inserire un’estremità del filamento in PLA nel foro di carico nella parte
superiore della penna (3). Assicurarsi che l’estremità del filamento sia
9piatta (in caso contrario si tagli accuratamente l’estremità con le forbici) prima di inserire. Inserire il filamento delicatamente fino a raggiungere il punto di fermo. Tenendo premuto il pulsante Stampa (4) si sentirá il filamento scorrere all’interno della penna. Si prega di tenere premuto questo buttone fino a quando non vedrete il filamento apparire alla fine dell’ugello. A questo punto sará possibile rilasciare il pulsante e il caricamento continuerà automaticamente. Quando il filamento sará completamente carico si vedrá il filamento fuoriuscire dall’ugello alla fine della penna. È possibile accelerare (o rallentare) questo processo di caricamento premendo i pulsanti Velocità (5) in qualsiasi momento durante il processo. NOTA: questo processo potrebbe richiedere alcuni minuti. NON TOCCARE la parte finale della penna, potrebbe essere MOLTO CALDA. Cuando la luz se vuelve azul, significa que el lápiz está listo para su uso. Inserte un extremo del filamento PLA en el orificio de alimentación en la parte superior del lápiz 3D (3). Asegúrese que el extremo del filamento esté plano en la punta (sino lo está, corte cuidadosamente con tijeras) antes de insertarlo. Empuje suavemente hasta que sienta que se detiene. Luego presione y mantenga presionado el botón de Impresión (4) hasta que sienta que el filamento está siendo halado suavemente dentro de el lápiz. Luego puede soltar el botón y este continuará automáticamente. El filamento está completamente cargado cuando se ve filamento en la boquilla de impresión. Puede acelerar (o reducir la velocidad) este proceso de carga al presionar los botones de Velocidad (5) en cualquier punto durante el proceso. NOTA: este proceso de carga puede demorar hasta un minuto. NO TOQUE ninguna parte de la boquilla en este punto ya que estará MUY CALIENTE. Als het licht blauw wordt dan is de pen gebruiksklaar. Steek een uiteinde van uw Polaroid Play PLA filament in de daarvoor bestemde opening aan de bovenkant van de pen (3). Controleer voor het invoeren van uw filament of het uiteinde vlak is (zo niet knip het dan af met een schaar). Steek het filament voorzichtig in de pen totdat u de stop voelt. Druk de print knop (4) in, u voelt nu dat het filament voorzichtig geleid wordt in de pen. U kunt deze knop vervolgens loslaten en het laden wordt automatisch voortgezet. De gloeidraad is volledig geladen als u de gloeidraad vanaf het uiteinde van de spuitmond ziet verschijnen. U kunt dit laadproces versnellen (of vertragen) door op elk gewenst moment tijdens het proces
op de Snelheidsknoppen (5) te drukken. OPMERKING dit kan een paar minuten
duren. RAAK GEEN ENKEL DEEL van het spuitstuk aan, deze is op dit moment
ZEER HEET!

 4
             Click and release the Print button (4) for continuous printing
             (the pen will start extruding automatically). Whilst in this mode
             pressing the Print button (4) again will pause printing. For
             manual printing press and hold the Print button (4); releasing
   your finger in this mode will immediately stop the printing.
   Appuyez et relâchez le bouton d’impression (4) pour une impression
   en continu (le stylo démarrera automatiquement l’extrusion). Dans
   ce mode automatique, le fait d’appuyer sur le bouton Impression (4)
   mettra en pause l’impression. Pour une impression manuelle, maintenez
   enfoncé le bouton Impression (4); La libération de votre doigt arrêtera
   immédiatement l’impression.
   Presse und entlassen Sie die Taste drucken (4) für ununterbrochen Zufuhr
   Ihres Filaments (die Pen startet automatisch mit den Zufuhr). Wenn Sie
   in diesem Modus wieder drücken auf die Taste drucken (4), pausiert die
   Zufuhr. Für manuelle Zufuhr halten Sie die Taste drucken (4) eingedrückt;
   entlassung Ihrer Finger in diesem Modus wird den Zufuhr sofort beenden.
   Premere e lasciare il pulsante Stampa (4) per la stampa continua
   (la penna inizierà l’estrusione automaticamente). Mentre in questa
   modalita’, premendo il pulsante di stampa (4) ancora una volta viene
   messa in pausa la stampa. Per la stampa manuale premere e mantenere
   premuto il pulsante Stampa (4); rilasciando il dito in questa modalità si
   interrompe immediatamente la stampa.
   Presione y suelte el botón de impresión (4) para la impresión continua (el
   lápiz iniciará automáticamente la extrusión). Mientras esté en este modo,
   el pulsar el botón (4) nuevamente hará una pausa en la impresión. Para
   impresión manual mantenga pulsado el botón de impresión (4); quitar el
   dedo en este modo detendrá inmediatamente la impresión.
   Voor ononderbroken toevoer van uw filement drukt u op de Print
   knop (4) en laat deze gelijk weer los (de pen start automatisch met de
   toevoer). Wanneer u in deze modus weer op de Print knop (4) drukt,
   wordt de toevoer gepauzeerd. Voor handmatige toevoer drukt en houdt
   u de Print knop (4) vast; het loslaten van uw vinger in deze modus zorgt
   ervoor dat de toevoer onmiddellijk zal stoppen.
5
To speed up or slow down the extrusion of the filament press
the Speed button (5). There are 7 speed settings. The number of
green LED lights that are lit indicate the speed that the pen is set
to, where 1 light lit is the slowest speed and all 7 lights lit are the
fastest speed.
Pour accélérer ou ralentir l’extrusion du filament appuyez sur les boutons
de vitesse (5) Il y a 7 vitesses d’extrusion. Le numéro de voyant LED qui
devient verts indique la vitesse du stylet. Un voyant vert est la vitesse
plus longue et tous les sept voyants verts indique la vitesse la plus
rapide.
Um den Zufuhr des Filaments zu beeilen drücken sie auf die (5) taste;
um den Zufuhr des Filaments zu verzögern drücken Sie auf die (5) Taste.
ANMERKUNG: es gibt 7 verschiedene Geschwindigkeiten.
Per velocizzare l’estrusione del filamento permere il tasto (5). Ci sono 7
impostazioni di velocitá. Il numero di spie LED verdi accese indicano la
velocità alla quale è impostata la penna, 1 luce accesa indica la velocità
più bassa mentre tutte e 7 le luci accese indicano la massima velocità.
Para acelerar (o reducir la velocidad) de la extrusión del filamento
presione el botón (5). Hay 7 configuraciones de velocidad. La cantidad
de luces LED verdes que están encendidas indica la velocidad a la que
está ajustado el lápiz, donde 1 luz encendida es la velocidad más lenta y
las 7 luces encendidas son la velocidad más rápida.
Om de toevoer van het filament te versnellen drukt u op de knop (5);
om de toevoer van het filament te vertragen drukt u op de knop.
OPMERKING: er zijn 7 verschillende snelheden.
6
To retract the current filament material (either to change colour
or to remove the filament completely), press and hold the Power
button (2). You will hear and see the filament being removed
from the Pen. Please note that full retraction may take a few
minutes. NOTE: The 3D pen has an inbuilt safety feature that
means it will automatically retract the filament from the Pen and turn
itself off if it has not being used for approximately 7 minutes.
Pour rétracter le filament (afin de changer de couleur ou de le retirer
complètement), maintenez enfoncé le bouton Power (2). Vous entendrez
12et verrez le filament se retirer du stylo. Veuillez noter que la rétractation
complète peut prendre quelques minutes. NOTE: Le filament du
stylo 3D se rétractera automatiquement s’il n’est pas utilisé pendant
approximativement 7 minutes.
Um das zur Zeit Benutzte Filament zurück zu nehmen (entweder um die
Farbe zu wechseln oder um das komplett zu entfernen), pressen und
halten Sie die Netzschalter (2). Sie hören und sehen dass das Filament
entfernt wird aus der Pen. Bitte merken Sie an das zurück nehmung von
das ganzes Filament einige Minuten dauert. ANMERKUNG: wenn der
3D Pen 7 Minuten nicht gebraucht wird nehmt der Pen automatisch das
Filament zurück.
Per sfilare il materiale filamento corrente (sia per cambiare colore o
rimuoverlo completamente), tenere premuto il pulsante di alimentazione
(2). Vedrete e sentirete il filamento che viene rimosso dalla penna. Si
prega di notare che la piena retrazione può richiedere alcuni minuti.
NOTA: La penna 3D ritrarra’ automaticamente il filamento se non viene
utilizzata per circa 7 minuti.
Para retraer el material de filamento actual (ya sea para cambiar de color
o para eliminarlo completamente), mantenga presionado el botón
de encendido (2). Escuchará y verá el filamento retraerse del lápiz. Tenga
en cuenta que la retracción completa puede tardar unos minutos.
NOTA: El lápiz 3D tiene una característica de seguridad incorporada
que significa que retraerá automáticamente el filamento del lápiz y se
apagará solo si no se ha utilizado durante aproximadamente 7 minutos.
Om het huidige materiaal terug te nemen (ofwel om de kleur te wisselen
of om volledig te verwijderen) houdt u de Power knop (2) ingedrukt. U
hoort en ziet nu dat het filament uit de pen wordt verwijderd. Houdt u
er rekening mee dat het verwijderen van het filament enige minuten kan
duren. LET OP: wanneer de 3D pen 7 minuten niet gebruikt wordt zal de
pen automatisch het filament intrekken.
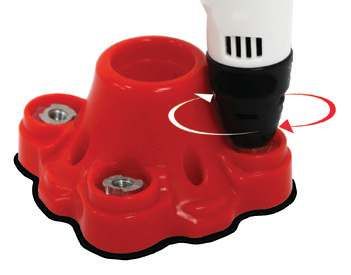
13TO CHANGE THE NOZZLE
NOTE: ALL nozzle changes must
be done once the pen has reached
its correct operating temperature.
In order to reach this, turn on the
pen and wait for the light above the
power button to go blue. The pen
is then ready for the nozzle to be
changed.
The Polaroid FAST Play 3D Pen
comes with 3 different size nozzles to allow you to create your models
faster or with different design techniques. To change the nozzle simply
place the pen into the empty nozzle slot in the holder. Then turn the
pen anti-clockwise to release the current nozzle. Remember, the pen
MUST be at its correct operating temperature in order to do this.
Once the nozzle has been released it will stay within the holder to allow
you to move the pen onto the next nozzle. To affix a new nozzle simply
place the pen into the part of the holder where the nozzle is that you
want to attach. Turn the pen clockwise to screw the new nozzle tight
into place. Remember, the pen MUST be at its correct operating
temperature in order to do this.
When your new nozzle is in place, please select the correct setting for
that specific nozzle before using the pen.
To change this setting, click the round yellow button in the middle of the
pen until the correct orange light is lit to correspond with the nozzle on
the pen. The symbols marked on the pen will show you which nozzle
setting is currently selected.
POUR CHANGER LA BUSE
REMARQUE: Tous les changes de la buse doivent être effectué
lorsque le stylet a REACHED la température d’opération. Pour ce faire,
14allumez le stylet et attendez lorsque le voyant au-dessus du bouton d’alimentation devient bleu. Le stylet 3D Polaroid FAST Play est équipé avec trois buses de tailles diffèrent, ce qui vous permet de construire plus rapidement vos modelés ou d’utiliser des techniques de dessin différentes. Pour changer la buse il faut mettre le stylet dans l’espace de buse libre dans le soutien et faites clic. Donc tournez le stylet dans le sens antihoraire. Souvien que le stylet DOIT être à la température d’opération pour le faire. Après avoir être libéré, la buse restera dans le soutien pour vous permettre de bouger le stylet a la buse prochaine. Pour apposer une buse nouvelle, il ne faut qu’insérer le stylet dans la buse désirée et faites clic. Pour serrer la buse nouvelle, il faut tourner le stylet dans le sens horaire. Souviens que le stylet DOIT être à la température d’opération pour le faire. Quand vous avez apposé votre buse nouvelle, veillez sélectionner les paramètres corrects pour cette buse avant d’utiliser le stylet. Pour changer ce paramètre, poussez sur le bouton jaune au centre du stylet jusque ce que le voyant orange qui correspond avec la buse est allumé. Les symboles sur le stylet vous montrant quelle buse est sélectionné. UM DIE DÜSE ZU ÄNDERN HINWEIS: Alle Düsenwechsel müssen durchgeführt werden, sobald der Stift seine korrekte Betriebstemperatur erreicht hat. Um dies zu erreichen, schalten Sie den Stift ein und warten Sie, bis das Licht über dem Ein- / Ausschalter blau wird. Der Stift ist dann bereit für den Austausch der Düse. Der Polaroid FAST Play 3D Pen wird mit 3 verschiedenen Düsen geliefert, damit Sie Ihre Modelle schneller oder mit verschiedenen Designtechniken erstellen können. Um die Düse zu wechseln, setzen 15
Sie den Stift einfach in den leeren
     Schlitz des Halters und klicken Sie
     ihn an. Drehen Sie dann den Stift
     entgegen dem Uhrzeigersinn, um
     die aktuelle Düse freizugeben.
     Denken Sie daran, der Stift
     MUSS auf seiner korrekten
     Betriebstemperatur sein, um
     dies zu tun. Sobald die Düse
     freigegeben wurde, verbleibt sie im
     Halter, damit Sie den Stift auf die
     nächste Düse bewegen können. Um
     eine neue Düse anzubringen, setzen Sie den Stift einfach in den Teil des
     Halters, an dem sich die Düse befindet, die Sie befestigen möchten, und
     klicken Sie ihn an. Drehen Sie den Stift im Uhrzeigersinn und die neue
     Düse wird festgeschraubt. Denken Sie daran, der Stift MUSS auf
     seiner korrekten Betriebstemperatur sein, um dies zu tun.
     Wenn Ihre neue Düse eingesetzt ist, wählen Sie bitte die richtige
     Einstellung für diese spezielle Düse, bevor Sie den Stift verwenden.
     Um diese Einstellung zu ändern, klicken Sie auf die runde gelbe
     Schaltfläche in der Mitte des Stifts, bis das richtige orangefarbene Licht
     aufleuchtet, das der Düse auf dem Stift entspricht. Die Symbole auf dem
     Stift zeigen Ihnen, welche Düseneinstellung gerade ausgewählt ist.

     COME CAMBIARE L’UGELLO

     NOTA: Il cambio di tutte le punte deve essere effetuato solo una volta
     che la penna ha raggiunto la temperatura operativa corretta. Al fine di
     poter procedere, accendi la penna e attendi che la luce sopra il pulsante
     di accensione diventi blu. La penna è quindi pronta per la sostituzione
     dell’ugello.

     La penna 3D Polaroid FAST Play è dotata di 3 punte di dimensioni
     diverse per consentire di creare i modelli più velocemente e/o con
     tecniche di progettazione differenti. Per cambiare l’ugello è sufficiente
     posizionare la penna nella fessura dell’ugello vuota nel supporto e
16
farla scattare in posizione. Quindi ruotare la penna in senso antiorario
per rilasciare l’ugello corrente. Ricorda, la penna DEVE sempre
raggiungere la temperatura operativa corretta al fine di poter
cambiare l’ugello. Una volta che l’ugello è stato rilasciato, rimarrà
all’interno del supporto per consentire di spostare la penna sul
successivo ugello. Per fissare un nuovo ugello è sufficiente posizionare
la penna nella parte del supporto in cui si trova l’ugello che si desidera
sostituire e fare clic in posizione. Girare la penna in senso orario per
avvitare saldamente il nuovo ugello. Ricorda, la penna DEVE sempre
raggiungere la temperatura operativa corretta al fine di poter
cambiare l’ugello.
Quando il nuovo ugello è stato sostituito, si prega di selezionare
l’impostazione corretta per quello specifico ugello prima di usare la
penna.
Per modificare questa impostazione,
fare clic sul pulsante rotondo giallo
al centro della penna fino a quando
non si accenderá la luce arancione
corrispondente al tipo di ugello montato
sulla penna. I simboli contrassegnati
sulla penna intorno il pulsante centrale
rotondo, mostrano quale impostazione
selezionare in base al corrispondente
tipo di ugello montato sulla penna 3D.
CAMBIAR LA BOQUILLA
NOTA: Todos los cambios de boquilla deben realizarse una vez que
el lápiz ha alcanzado la temperatura de funcionamiento correcta. Para
llegar a esto, encienda el lápiz y espere a que la luz sobre el botón de
encendido se vuelva azul. El lápiz está listo para cambiar la boquilla.
El lápiz Polaroid FAST Play 3D viene con 3 boquillas de diferentes
tamaños que permite crear sus modelos más rápido o con diferentes
técnicas de diseño. Para cambiar la boquilla, simplemente coloque el
17lápiz en la ranura de la boquilla vacía
del soporte. Luego gire el lápiz en
sentido contrario a las agujas del
reloj para liberar la boquilla actual.
Recuerde, el lápiz debe estar a la
temperatura correcta para poder
hacer esto. Una vez que la boquilla
ha sido liberada, esta permanecerá
dentro del soporte; y asi permitirá
mover el lápiz a la siguiente boquilla.
Para colocar una nueva boquilla,
simplemente coloque el lápiz en la
otra ranura del soporte donde se encuentra la otra boquilla que desea
conectar. Gire el lápiz en el sentido de las agujas del reloj para atornillar
la nueva boquilla en el lápiz. Recuerde, el lápiz debe estar a la
temperatura correcta para poder hacer esto.
Cuando su nueva boquilla está en su lugar, seleccione la configuración
correcta para esa boquilla específica antes de usar el lápiz.
Para cambiar esta configuración, haga clic en el botón redondo de
color amarillo en el medio del lápiz hasta que se encienda la luz color
naranja correcta que coincida con la boquilla específica. Los símbolos
marcados en el lápiz le mostrarán cual configuración está seleccionada
actualmente.
DE NOZZLE VERWISSELEN
OPMERKING: ALLE mondstukveranderingen moeten worden
uitgevoerd nadat de pen de juiste bedrijfstemperatuur heeft bereikt.
Om dit te bereiken, zet u de pen aan en wacht u tot het lampje boven
de aan / uit-knop blauw wordt. De pen is dan klaar om de spuitmond te
veranderen.
De Polaroid FAST Play 3D Pen wordt geleverd met 3 verschillende
mondstukken waarmee u uw modellen sneller of met verschillende
ontwerptechnieken kunt maken. Om het mondstuk te wisselen plaatst
18u de pen eenvoudig in de lege opening op de houder en klikt u deze
op zijn plaats. Draai de pen vervolgens tegen de klok in om het huidige
mondstuk te ontgrendelen. Vergeet niet dat de pen MOET op de
juiste bedrijfstemperatuur zijn om dit te doen. Nadat het mondstuk
is losgelaten, blijft het in de houder zodat u de pen op het volgende
mondstuk kunt zetten. Om een nieuw mondstuk aan te brengen, plaatst
u de pen eenvoudig in het deel van de houder waar het mondstuk zich
bevindt dat u wilt bevestigen en klikt u het op zijn plaats. Draai de pen
met de klok mee en de nieuwe spuitmond zal op zijn plaats schroeven.
Vergeet niet dat de pen MOET op de juiste bedrijfstemperatuur
zijn om dit te doen.
Wanneer uw nieuwe mondstuk(Nozzle)
gebruikt, selecteert u dan de juiste
instelling voor dit specifieke mondstuk
voordat u de pen gebruikt.
Als u deze instelling wilt wijzigen, klikt u
op de ronde gele knop in het midden van
de pen totdat het juiste oranje lampje
gaat branden wat overeenkomt met de
Nozzle op de pen. De symbolen die op
de pen zijn aangegeven, laten zien welke
Nozzle instelling is geselecteerd.
For further information please scan the QR code
or visit www.polaroid3d.com/fastplay
For troubleshooting please visit
www.polaroid3d.com/support
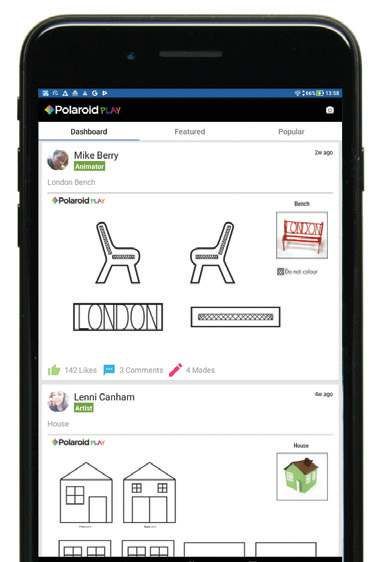
19Trace App
EN Use the unique Polaroid Play Trace App to stencil your own
photographs and then bring them to life in 3D. Alternatively, you can
trace imported templates and then assemble the parts together to
create a 3D model. And now you can even create your own 3D Pen
community by sharing your designs and models via the Polaroid Play
Trace App.
Get started by visiting the App Store or Google Play and downloading
the Polaroid Play Trace App to your Smartphone or Tablet and either
signing in with your Facebook or Twitter details or creating an account.
Once logged in you will be able to scroll through the Dashboard which
gives you a wide selection of models that can be created. They will
either be in the form of a stencil or a ‘How to’ video. You can also use
the search functionality in the top right corner if you have something
specific in mind that you want to create.
FR Utilisez l’unique application Polaroid Play Trace App pour créer vos
propres photos et leur donner vie en 3D. Par ailleurs, vous pouvez
tracer les modèles importés et ensuite assembler toutes les pièces
pour créer un modèle en 3D. Et alors vous pouvez maintenant créer
votre propre communité 3D en partageant vos conceptions et modèles
par l’application Polaroid Play trace App
Commencez par visiter l’App Store ou Google Play et télécharger
l’application Polaroid Play Trace App sur votre Smartphone ou sur votre
tablette et vous pouvez ou vous connecter en utilisant vos détailles de
Facebook ou Twitter ou vous inscrire en créant un compte.
Après avoir vous connecté vous pourrez défiler par le Dashboard qui
donne une sélection large des modelés que vous pourrez créer. Elles
seront sous la forme d’un pochoir ou d’un vidéo de ‘comment faire’
Vous pouvez aussi utiliser la fonctionnalité de recherche en haut droit si
vous avez quelque chose de spécifique que vous voulez créer.
20DE Verwenden Sie die exklusive Polaroid Play Trace App um Ihre eigenen
Fotos in 3D zu beleben. Als alternativ können Sie importierte Schablone
überziehen, setzen Sie die Teile anschließend zusammen um ein
3D-Modell zu erstellen.Downloaden Sie die Polaroid Play Trace App in
den App Store oder Google Play auf Ihres Smartphone oder Tablet.
Und jetzt können Sie sogar Ihre eigene 3D-Pen-Community erstellen,
indem Sie Ihre Designs und Modelle über die Polaroid Play Trace App
teilen. Mit ein Facebook- oder Twitter-Daten anmelden oder ein Konto
erstellen.
Sobald Sie eingeloggt sind, können Sie durch das Dashboard blättern,
das Ihnen eine große Auswahl an Modellen bietet, die erstellt werden
können. Sie werden entweder in Form einer Schablone oder eines
“How to” -Videos vorliegen. Sie können auch die Suchfunktion in der
oberen rechten Ecke verwenden, wenn Sie etwas Bestimmtes im Kopf
haben, das Sie erstellen möchten.
IT Utilizza la fantastica applicazione Polaroid Play Trace App per stampare
fotografie portandole in 3D. In alternativa, è possibile importare modelli
di oggetti assemblando le parti per creare un modello 3D. Ed ora puoi
anche creare i modelli della tua community 3D pen condividendo i
modelli attraverso le Polaroid Play Trace App.
Inizia scaricando l’applicazione Polaroid Play Trace App dall’App Store o
da Google Play per il tuo smartphone o tablet o effettuando l’accesso
tramite il tuo Facebook o Twitter account o creando un nuovo account.
Una volta effettuato l’accesso, potrai scorrere la Dashboard dove
troverai un’ampia selezione di modelli che possono essere creati
e saranno sotto forma di stencil o di video. Puoi anche utilizzare la
funzionalità di ricerca nell’angolo in alto a destra se hai in mente
qualcosa che desideri creare.
21Trace App
ES Utilice la exclusiva aplicación Polaroid Play Trace para crear tus propias
fotografías y luego llevarlas a 3D. Alternativamente, puede trazar las
plantillas importadas a la aplicación y luego ensamblar las piezas para
crear un modelo 3D. Y ahora incluso puedes crear tu propia comunidad
de 3D compartiendo tus diseños y modelos a través de la aplicación
Polaroid Play Trace.
Visite su App Store o Google Play y descargue la aplicación Polaroid
Play Trace en su móvil o tableta, iniciando sesión con tus datos de
Facebook, Twitter o creando una cuenta.
Una vez que haya iniciado sesión, tendrá acceso a una amplia
selección de modelos que se pueden crear. Estos serian en plantillas
o en videos de ‘How to’. También puede utilizar la funcionalidad de
búsqueda en la esquina superior derecha si tiene en mente algo
específico que desea crear.
NL Gebruik de unieke Polaroid Play Trace-app om uw eigen foto’s te
stencilen en ze vervolgens in 3D tot leven te brengen. U kunt ook
geïmporteerde sjablonen volgen en vervolgens de onderdelen
samenvoegen om een 3D-model te maken. En nu kun je zelfs je eigen
3D Pen-community maken door je ontwerpen en modellen te delen via
de Polaroid Play Trace-app.
Ga aan de slag door de App Store of Google Play te bezoeken en de
Polaroid Play Trace-app naar uw smartphone of tablet te downloaden
en u aan te melden met uw Facebook- of Twitter-gegevens of door een
account aan te maken.
Nadat u bent aangemeld, kunt u door het Dashboard scrollen, waardoor
u een brede selectie modellen kunt maken. Ze zijn ofwel in de vorm
van een stencil of een ‘How to’ -video. U kunt ook de zoekfunctie in de
rechterbovenhoek gebruiken als u iets specifieks in gedachten hebt dat
u wilt maken.
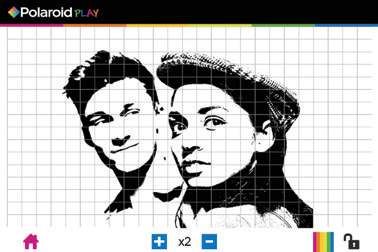
22Using a stencil from the Polaroid Play Trace App
Utilisez un stencil de la bibliothèque de l’appli Polaroid
Play Trace App.
Benutze eine Schablone aus der Polaroid Play Trace
App Library.
Usa gli stencil dalla Polaroid Play Trace App.
Utilizar una plantilla de la biblioteca de Polaroid Play
Trace App.
Maak gebruik van een stencil uit de Polaroid Play Trace
App Library
Once you have found a stencil that you want to create, simply
1 click the ‘Let’s Draw’ button and the image will open up to full
screen showing you all of the component parts for the model.
Si vous avez trouvé un stencil que
vous voulez créer, il vous suffit de
cliquer dessus pour qu’il s’ouvre
en plein écran. Vous verrez alors
un stencil de tous les différents
éléments que vous devrez dessiner
pour créer le modèle en 3D.
Wenn Sie eine Schablone gefunden
haben, die Sie erstellen möchten,
klicken Sie einfach auf die
Schaltfläche “Let’s Draw” und das
Bild wird sich bis zum Vollbildmodus
öffnen und alle Komponenten des
Modells anzeigen.
Se hai trovato uno stencil che vuoi
tracciare per creare un modello in
3D, clicca su ‘Let’s Draw’ e si aprirá
l’immagine a schermo intero con le
varie parti per comporre il modello
selezionato. 23Trace App
Si ha encontrado una imagen que desea crear, simplemente haga clic en el
botón “Let’s Draw” y la imagen se abrirá en pantalla completa mostrándo
cada componente del modelo.
Als u een sjabloon hebt gevonden dat u wilt maken, klikt u op de knop
Laten we tekenen en de afbeelding wordt geopend op het volledige scherm
met alle onderdelen van het model.
To increase the size of the stencil simply select the magnification
2 button until you reach the size you want. Select the “Lock”
button to lock your stencil into place at the right size and position.
The grid over the image will help you to draw your model one
section at a time.
Pour augmenter la taille du stencil
appuyez simplement sur le
du bouton loupe jusqu’à ce que
vous obteniez la taille souhaitée.
Sélectionnez le bouton “Verrouiller”
pour que votre stencil soit bien
positionné et aux dimensions
désirées. La grille au-dessus de
l’image vous permettra de dessiner
votre modèle une section à la fois.
Um die Größe der Schablone zu verbreiten wählen Sie einfach die Taste
bis Sie die gewünschte Größe erreicht haben. Klicken Sie dann auf die
Taste “Lock” , um die Schablone in der richtigen Größe und Position
fest zu legen. Das Raster auf das Bild wird Ihnen helfen um Ihr Modell per
Bestandteil zu machen.
Per aumentare le dimensioni dello stencil é sufficiente selezionare il
pulsante di ingrandimento fino a raggiungere le dimensioni desiderate.
Seleziona poi il pulsante “Lock” per bloccare la dimensione e posizione
scelta dello stencil. La griglia sopra l’immagine ti aiuterá a disegnare una alla
volta, la sezione del modello scelto.
Para aumentar el tamaño de la plantilla, simplemente pulse hasta que
alcance el tamaño deseado. Seleccione el botón “Lock” para asegurar
24su plantilla en su tamaño y posición deseados. La cuadrícula sobre la
imagen le ayudará a dibujar su modelo una sección a la vez.
Om het stencil te vergroten klikt u eenvoudig op de toets totdat u de
gewenste grootte heeft bereikt. Druk de knop “Lock” om uw stencil op
de juiste grootte en positie vast te leggen. Het raster op de afbeelding zal u
helpen om uw model per onderdeel te maken.
3
Once your image is locked into your chosen size and position
simply place the Trace App Screen Protector provided over your
Smartphone or Tablet. Please ensure that you place the fixing
pads underneath the screen protector in each corner before use as
these will ensure that there is sufficient distance between the screen
of your device and your screen protector where you will be creating your
model. NOTE: DO NOT draw directly onto the screen of your device or place
your Screen Protector directly onto the screen of your device without using
the fixing pads as this may cause damage!
Une fois que votre image est à la bonne taille et positionnée comme vous la
souhaitez, il vous suffit d’apposer le Protecteur d’écran de l’appli Trace sur
l’écran de votre Smartphone ou de votre tablette. Veillez assurer que vous
utilisez les pastilles adhésives fournies pour créer une distance nette entre
l’écran et le Protecteur d’écran. REMARQUE: NE dessinez PAS directement
sur l’écran de votre appareil ou apposer le Protecteur d’écran directement
au-dessus de ‘écran car cela pourrait l’endommager!
Sobald Ihr Bild in Ihrer gewählten Größe und Position festgelegt ist, fixieren
Sie einfach die Trace App Screen Protector auf Ihrem Smartphone oder
Tablet-Bildschirm. Fixieren Sie die Klebepads direkt auf das Bildschirm.
Legen Sie dann die Screen Protector auf die Klebepads hiermit entsteht
einen deutliche Abstand zwischen das Bildschirm und die Screen Protector
(siehe Abbildung). HINWEIS: NICHT direkt auf das Bildschirm Ihrem
Smartphone oder Tablet verwenden, da dieses Schäden verursachen
kann!
Una volta scelta e bloccata la dimensione e posizione dell’immagine,
applica il protettore dello schermo Trace App al tuo Smartphone o Tablet
25Trace App
con i cuscinetti adesivi forniti. Fissa i cuscinetti adesivi direttamente sullo
schermo del tuo dispositivo e poi posiziona la protezione dello schermo
a contatto con i cuscinetti in modo da creare una distanza netta tra lo
schermo del dispositivo e la protezione dello schermo (vedi illustrazione
per maggiori informazioni). NOTA: NON disegnare direttamente sullo
schermo del tuo dispositivo o direttamente sopra il protettore dello
schermo senza aver applicato i cuscinetti adesivi in quanto potrebbe
causare danni allo schermo del tuo dispositivo!
Una vez que su imagen está bloqueada en el tamaño y posición elegido,
simplemente coloque el protector de pantalla Trace App en la pantalla de
su móvil o tableta. Asegúrese de colocar las almohadillas adhesivas debajo
del protector de pantalla en cada esquina antes de su uso, ya que esto
garantizará que haya suficiente distancia entre la pantalla de su dispositivo
y el protector de pantalla donde va a crear su modelo. NOTA: NO dibuje
directamente en la pantalla de su su móvil o tableta, ni coloque su protector
de pantalla directamente en la pantalla de su dispositivo sin usar las
almohadillas adhesivas, ya que esto puede causar daños.
Zodra uw afbeelding is vastgelegd in het door u gekozen formaat en positie,
bevestig dan de Trace App Screen Protector met de zelfklevende pads op
uw smartphone of tablet-beeldscherm. Bevestig de pads rechtstreeks op
het beeldscherm, vervolgens plaatst u de Screen Protector op de pads,
hierdoor ontstaat een duidelijke afstand tussen het scherm en de Screen
Protector (zie afbeelding). LET OP: POLAROID FAST PLAY 3D PEN NIET
rechtstreeks op het scherm van uw smartphone of tablet gebruiken,
dit kan schade veroorzaken!
4
Use your Polaroid FAST Play 3D Pen to draw onto the Trace App
Screen Protector using the stencil below as your guide to create
the correct shapes. NOTE: Do not press too hard onto the Trace
App Screen Protector and always ensure there is a minimum gap
of 3mm between the Trace App Screen Protector and the screen of
your device. This process, for best results requires a very light touch!
Utilisez votre stylo 3D Polaroid FAST Play pour dessiner sur le Protecteur
d’écran de l’appli Trace à l’aide du stencil ci-dessous comme guide pour
créer les formes correctes. REMARQUE: N’appuyez pas trop fort sur le
26Protecteur d’écran de l’appli Trace et assurez-vous qu’il existe
un écart minimum de 3mm entre le Protecteur d’écran
de l’appli Trace et l’écran de votre appareil. Pour de
meilleurs résultats, ce processus nécessite un
toucher très léger!
Verwenden Sie die unterliegende Schablone
als Leitfaden um die richtige Modellen mit
Ihren Polaroid FAST Play 3D Pen zu machen
auf die Trace App Screen Protector. HINWEIS:
Drücken Sie nicht zu fest auf die Trace App
Screen Protector und stellen Sie immer sicher dass
zwischen dem Trace App Screen Protector und das Bildschirm Ihres Geräts
einen Mindestabstand von 3mm liegt. Die beste Ergebnisse erreichen Sie
dürch sehr leichte Belastung!
Usa la penna 3D Polaroid FAST Play per disegnare sopra il protettore
dello schermo Trace App usando lo stencil come guida al fine di creare il
modello correttamente. NOTA: Non premere troppo intensamente sulla
protezione dello schermo Trace App ed assicurarsi che ci sia sempre una
distanza minima di 3mm tra il proteggi schermo Trace App e lo schermo del
dispositivo. Questo processo, richiede un tocco molto leggero per ottenere
i migliori risultati!
Usa tu lápiz Polaroid FAST Play 3D para dibujar sobre el protector de
pantalla Trace App usando plantillas como guía para crear las partes de
su modelo correctamente. NOTA: No presione con demasiada fuerza
el protector de pantalla Trace App y asegúrese siempre de que haya un
espacio mínimo de 3mm entre el protector de pantalla y la pantalla de su
dispositivo. Para obtener los mejores resultados requiere un toque muy
ligero!
Gebruik het onderliggende stencil als leidraad om de juiste patronen met
uw Polaroid FAST Play 3D Pen te maken op de Trace App Screen Protector.
OPMERKING: Druk niet te hard op de Trace App Screen Protector en zorg
altijd voor een minimale afstand van 3mm tussen de Trace App Screen
Protector en het scherm van uw apparaat. Het beste resultaat bereikt u
door weinig druk uit te oefenen!
27Trace App
Once you have completed all of the stencil parts for the current
5 screen remove the Trace App Screen Protector from your device
and simply remove the completed model from the Trace App
Screen Protector.
Une fois toutes les pièces du stencil terminées pour l’écran en cours,
retirez le protecteur d’écran de l’appli Trace de votre appareil et supprimez
tout simplement le modèle terminé du Protecteur d’écran de l’appli Trace.
Nachdem alle Unterteile des Schablones fertig sind können Sie die Trace
App Screen Protector entfernen von Ihrem Gerät und dann einfach das
fertiggestellte Modell vom Trace App Screen Protector abnehmen.
Una volta completate tutte le parti dello stencil selezinato per la schermata
scelta, rimuovi la protezione dello schermo trace App dal tuo dispositivo
e rimuovi il modello dalla protezione dello schermo Trace App.
Una vez que haya finalizado todas las partes de la plantilla, remueva el
protector de pantalla Trace App de su dispositivo y simplemente remueva
el modelo terminado del protector de pantalla.
Als alle onderdelen van het stencil klaar zijn kunt u de Trace App Screen
Protector van uw apparaat verwijderen, daarna kunt u gemakkelijk het
model van de Trace App Screen Protector afhalen.
To continue drawing with another section of the stencil simply
6 select the Unlock button
and “Lock”
and move the image to the next area
the screen again. Once you have positioned
the Trace App Screen Protector back into place you can begin
drawing again.
Pour continuer à dessiner sur une autre section du stencil, il vous suffit
de sélectionner le bouton Déverrouiller et de déplacer l’image vers
la zone suivante et de “Verrouiller” à nouveau l’écran. Une fois que
vous avez repositionné le Protecteur d’écran de l’appli Trace, vous pouvez
commencer à dessiner à nouveau.
Um weiter zu gehen mit einem anderen Unterteil der Schablone wählen
Sie einfach die Taste “Entsperren” , verschieben Sie das Bild in den
28nächsten Bereich und “Sperren” Sie das Bildschirm wieder. Sobald Sie
die Trace App Screen Protector wieder positioniert haben können Sie mit
dem Zeichnen anfangen.
Per continuare a disegnare con un’altra sezione dello stencil è sufficiente
selezionare il pulsante di sblocco e spostare l’immagine verso la
prossima area bloccando lo schermo di nuovo premendo il tasto “Lock” .
Una volta posizionato il proteggi schermo Trace App sopra i cuscinetti
adesivi si può iniziare a disegnare nuovamente.
Para seguir dibujando otra sección de la plantilla, simplemente seleccione
el botón Desbloquear y mueva la imagen a la siguiente área, seleccione
otra vez “Lock” en la pantalla. Una vez que haya posicionado el protector
de pantalla Trace App puede comenzar a dibujar de nuevo.
Om door te gaan met het maken van een ander onderdeel van het sjabloon
selecteert u de knop ontgrendelen Verplaats het beeld naar het volgende
gebied en ‘Lock’ het scherm opnieuw. Zodra u de Trace App Screen
Protector weer op de juiste plaats heeft gezet kunt u weer beginnen met tekenen.
Upon completion of each of the individual parts to create
7 your 3D model simply assemble them into position and use
your Polaroid FAST Play 3D pen to affix them together at the
appropriate points.
Lorsque chaque composant de votre modèle en 3D est terminé,
il vous suffit de les assembler et d’utiliser votre stylo 3D Polaroid FAST Play
pour les apposer aux points correspondants.
Um von den einzelnen Teile Ihr 3D-Modell zu erstellen, montieren Sie sie
einfach in die richtigen Position mit Gebrauch von Ihren Polaroid FAST
Play 3D Pen um den entsprechenden Teilen zu befestigen.
Una volta terminata la realizzazione di ciascuno dei singoli componenti
del modello 3D, semplicemente assembla le parti nella posizione corretta
usando la penna 3D Polaroid FAST Play in modo da ottenere il modello
scelto.
29Trace App
Al completar cada una de las partes individuales de su modelo 3D,
simplemente instálelas en su posición y use su lápiz Polaroid FAST Play
3D para unirlas juntas en los puntos apropiados.
Om van elk van de afzonderlijke onderdelen een geheel te maken monteert
u ze eenvoudig op de juiste positie door gebruik te maken van de Polaroid
FAST Play 3D pen.
Creating a stencil from your own image Gallery.
Créer un stencil à partir de votre propre galerie d’images.
Erstellen einer Schablone aus Ihre eigenen Bildergalerie.
Crea uno stencil dalla tua galleria immagini.
Crear una plantilla de su propia galería de imágenes.
Het maken van een stencil uit uw eigen galerij.
Open the Trace App on your Smartphone or Tablet and select the
1 Camera icon in the top right hand corner of the screen. You will then
be given the option of opening an image from the Gallery on your
device or taking a photograph. Select the image you want or take a
photograph and this will then open into the Polaroid Play Trace App.
Ouvrez l’application Trace sur votre Smartphone ou sur votre tablette et
appuyez sur le bouton « camera » en haut droit de l‘écran. Il vous donnera
le choix d’ouvrir n’importe quelle image enregistrée sur votre appareil ou
de prendre une photo. Sélectionner l’image que vous souhaitez ou prenez
un photo cette image s’ouvrira automatiquement dans l’application Polaroid
Play Trace.
Öffnen Sie die Trace App auf Ihrem Smartphone oder Tablet und
drücken Sie auf die Taste “Select Image”. Dadurch wird die Galerie Ihres
Mobilgeräts geöffnet, wo Sie ein Bild auswählen können die bereits
auf Ihrem Smartphone oder Tablet gespeichert sind. Dieses Bild wird
automatisch in die Polaroid Play Trace App geöffnet.
Apri la Trace App sul tuo Smartphone o Tablet e premere il pulsante
“Seleziona immagine”. Automaticamente si aprirá sul tuo dispositivo la
galleria immagini da cui potrai selezionare qualsiasi immagine salvata sultuo Smartphone o Tablet. Automaticamente, l’immagine selezionata si
aprirá sulla Polaroid Play Trace App.
Abra la aplicación Trace en su su móvil o tableta y seleccione el ícono de la
cámara en la esquina superior derecha de la pantalla. A continuación, tendrá
la opción de abrir una imagen de la Galería en su dispositivo o tomar una
fotografía. Seleccione la imagen que desea o tome una fotografía y esta se
abrirá en la aplicación Polaroid Play Trace.
Open de Trace App op uw smartphone of tablet en druk op de ‘Select Image’
knop. Dit zal de galerij van uw mobiele apparaat openen waar u een afbeelding/
foto kunt selecteren die op uw smartphone of tablet is opgeslagen. Deze
afbeelding/foto wordt automatisch geopend in de Polaroid Play Trace App.
If the image you have opened is a photograph (and not already
2 a 3D stencil image which you have previously saved from
somewhere else), you can simply select the “Stencilize” button
which will turn your photograph into an easy-to-copy from stencil
(if you want to draw straight from the original photograph without
‘Stencilizing’ then simply click ‘Let’s Draw’ at this point). You can then
adjust the contrast on your stencilized image until you are happy with the
output. Then simply click ‘Let’s Draw’ and the grid will appear allowing you
to easily create your very own unique model!
Si l’image que vous avez ouverte est une photographie (et n’est pas
déjà une image stencil en 3D que vous avez sauvegardée ailleurs
précédemment), vous pouvez simplement sélectionner le bouton
“Stenciliste” qui transformera votre photo en une photo facile à reproduire
à partir du stencil. (Si vous voulez dessiner directement de la photo
originale sans « stencilize » il suffit de cliquer sur ‘dessiner’) Vous pouvez
régler le contraste sur votre image stencilisé jusque ce que vous êtes
content. Puis il vous suffit de cliquer sur ‘Dessiner’ et la grille apparaitra
pour vous permettre de créer votre propre modèle unique.
Wenn das Bild das Sie geöffnet haben ein Foto ist (und nicht bereits ein
3D-Schablonenbild das Sie eher gespeichert haben), wählen Sie einfach die
Taste “Stencilize” aus. Hiermit soll Ihr Foto ändern in einem einfach zu kopieren
31Vous pouvez aussi lire