NOTE: Subaru Online Parts
←
→
Transcription du contenu de la page
Si votre navigateur ne rend pas la page correctement, lisez s'il vous plaît le contenu de la page ci-dessous
PART NUMBER: E771SSJ000
     INSTALLATION INSTRUCTIONS                                         DESCRIPTION: REAR BUMPER COVER

TOOLS REQUIRED:

Notes:

 NOTE:
 • Do not wash the vehicle for 24 hours following installation of bumper cover.
 • If bumper cover requires cleaning after installation, wipe with a soft cloth or sponge and mild soap and wipe
 thoroughly with a dry cloth. Do not use gasoline, thinner, acid, alkali or other solvent based products.
 • The recommended adhesive surface temperature range is: 60°-110°F (15°- 43°C).
 • If the surface temperature is below 60°F (15°C), heat the double sided tape and bumper surface to a t emperature of
 80°F (27°C).
 • A one-hour cure time is recommended before exposing the vehicle to extreme temperatures (hot or cold).

 REMARQUE:
 • Ne pas laver le véhicule pendant 24 heures suivant I’installation du couvre pare-chocs.
 • Si Ie couvre pare-chocs doit être nettoyé après l'installation, l'essuyer à l'aide d'une éponge ou d'un linge imbibé d'une
 solution de savon doux puis frotter avec un chiffon sec. Ne pas utilizer d'essence, de diluant, d'acide ou d'alcali ou
 d'autres prodults à base de solvant.
 • La plage de température recommandée pour Ia surface adhésive est de 15 à 43°C (60 à 110°F).
 • Si la température de Ia surface est sous 15°C (60°F), chauffer Ie ruban à double face et la surface du pare-chocs à une
 température de 27°C (80°F).
 • Un temps de durcissement d'une heure est recommandé avant d'exposer le véhicule à des températures extrêmes
 (chaudes ou froid es).

         PART NUMBER:                ISSUE
          E771SSJ000                   00
                                                               12/20/17               SUBARU OF AMERICA                    PAGE 1 / 9
PART NUMBER: E771SSJ000
PREPARATION: Park vehicle in well lit area. Open rear gate. Unpack parts. Read the entire installation instruction prior to beginning.

STEP 1: Clean any dirt, oil or wax from attaching area of bumper with a clean cloth and rubbing alcohol. Then prepare the surface with the supplied alcohol pads.

STEP 2: Note: If the temperature is below 60°F (15°C), heat the double sided tape and bumper surface to a temperature of 80°F (27°C).

        PART NUMBER:                            ISSUE
         E771SSJ000                               00
                                                                                 12/20/17                    SUBARU OF AMERICA                           PAGE 2 / 9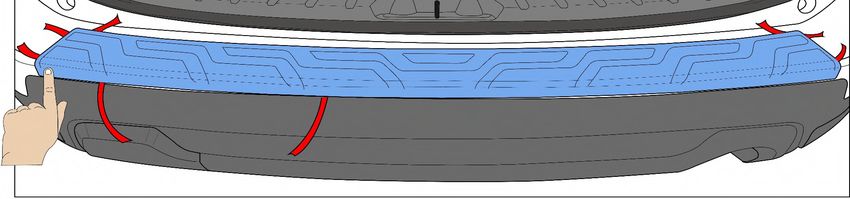
PART NUMBER: E771SSJ000
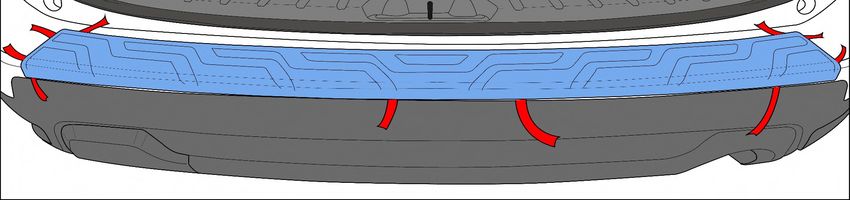
STEP 3: DO NOT REMOVE ANY TAPE AT THIS TIME. Place part on rear bumper and roughly align the rear gate's latch striker with the center triangle on the part. Then
look under the hatch's weather stripping for molded-in triangles in the rear bumper and align with the outboard triangles on the part. See detailed illustration below.
Inspect the gaps on all 4-sides and become familiar with the "home" position of this part.
STEP 4: Flip part over. Fold and crease the tape liners as shown in the illustration below. You may tape each liner to the top surface of the part (optional).
STEP 5: Reposition part onto rear bumper. Align again following STEP 3. Ensure each tape liner is positioned properly from STEP 4. Find the "home" position and inspect
both sides of the part to ensure proper positioning then firmly hold part in place.
PART NUMBER: ISSUE
E771SSJ000 00
12/20/17 SUBARU OF AMERICA PAGE 3 / 9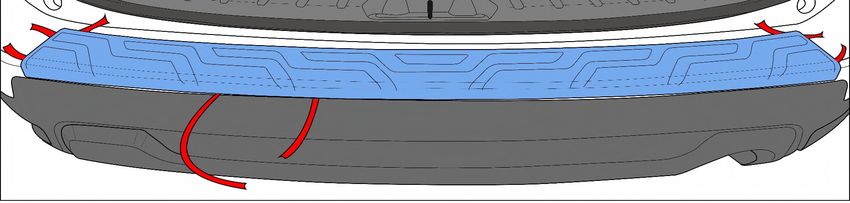
PART NUMBER: E771SSJ000
STEP 6: While firmly holding the part with your left hand, use your right hand to gently pull the liner shown below by approximately 3" (76mm) BUT DO NOT PRESS
DOWN.

                                                                            3" (76mm)

STEP 7: Press down on the part by a finger's width only at the location shown below. Do not press down anywhere else but now lightly hold the part in place.

                                                                                   Only press here.

STEP 8: Gently pull the liner shown below by approximately 3" (76mm) BUT DO NOT PRESS DOWN.

                                                                                                                                3" (76mm)
        PART NUMBER:                           ISSUE
         E771SSJ000                              00
                                                                               12/20/17                   SUBARU OF AMERICA                            PAGE 4 / 9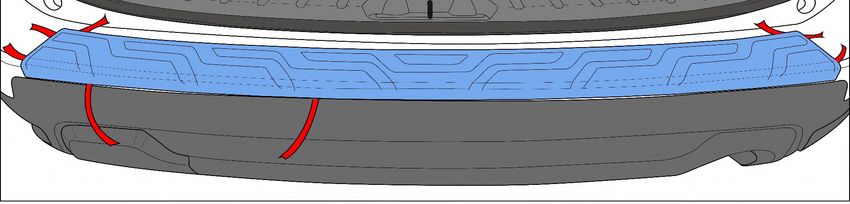
PART NUMBER: E771SSJ000
STEP 9: Carefully inspect and align (if necessary) the side of the part to the bumper and then press down on the part by a finger's width only at the location shown
below. Do not press down anywhere else.

                                                                                                                         Only press here.

STEP 10: Carefully and gently remove the entire tape liner section shown below. Pulling with too much force or too quickly can tear the tape liner. TIP: If liner tears, pull
the other liner that is intact.

STEP 11: Use a towel and apply firm pressure (approximately 15 lbs. of force) to the area highlighted in yellow.

         PART NUMBER:                            ISSUE
          E771SSJ000                               00
                                                                                  12/20/17                     SUBARU OF AMERICA                             PAGE 5 / 9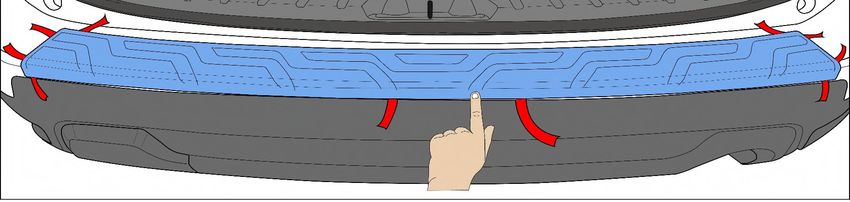
PART NUMBER: E771SSJ000
STEP 12: Gently pull the liner shown below by approximately 3" (76mm) BUT DO NOT PRESS DOWN.

                                                                           3" (76mm)

STEP 13: Press down on the part by a finger's width only at the location shown below. Do not press down anywhere else.

                                                                    Only press here.

STEP 14: Gently pull the liner shown below by approximately 3" (76mm) BUT DO NOT PRESS DOWN.

                 3" (76mm)
        PART NUMBER:                          ISSUE
         E771SSJ000                             00
                                                                             12/20/17                   SUBARU OF AMERICA   PAGE 6 / 9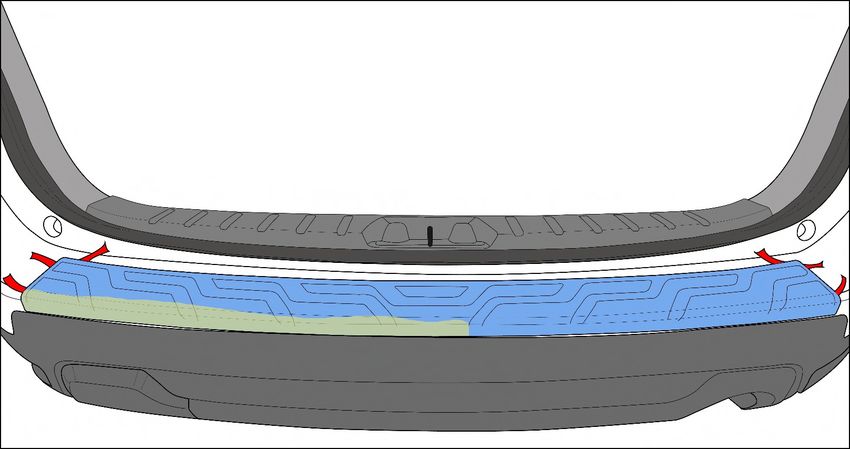
PART NUMBER: E771SSJ000
STEP 15: Carefully inspect and align (if necessary) the side of the part to the bumper and then press down on the part by a finger's width only at the location shown
below. Do not press down anywhere else.

                         Only press here.

STEP 16: Carefully and gently remove the entire tape liner section shown below. Pulling with too much force or too quickly can tear the tape liner. TIP: If liner tears, pull
the other liner that is intact.

STEP 17: Use a towel and apply firm pressure (approximately 15 lbs. of force) to the area highlighted in yellow.

         PART NUMBER:                            ISSUE
          E771SSJ000                               00
                                                                                  12/20/17                     SUBARU OF AMERICA                             PAGE 7 / 9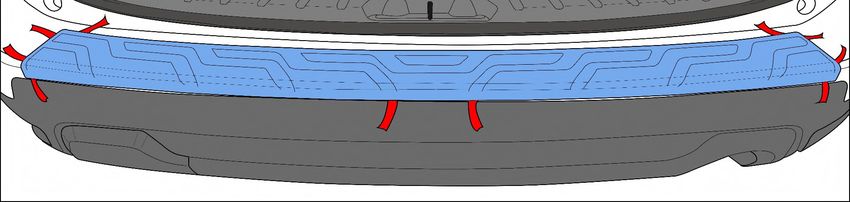
PART NUMBER: E771SSJ000
STEP 18: Carefully and gently remove the entire tape liner section shown below. Pulling with too much force or too quickly can tear the tape liner. TIP: If liner tears, pull
the other liner that is intact.

STEP 19: Use a towel and apply firm pressure (approximately 15 lbs. of force) to the area highlighted in yellow.

STEP 20: Carefully and gently remove the two tape liner sections shown below. Pulling with too much force or too quickly can tear the tape liner. TIP: If the liner tears,
pull the same liner from the opposite direction.

         PART NUMBER:                            ISSUE
          E771SSJ000                               00
                                                                                  12/20/17                     SUBARU OF AMERICA                             PAGE 8 / 9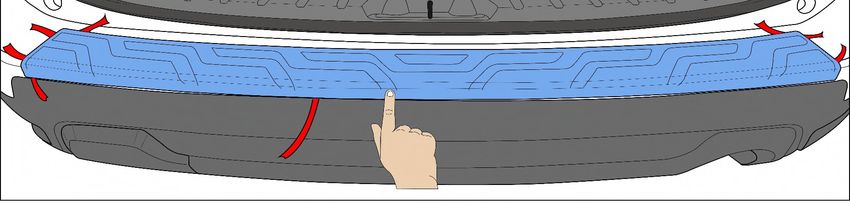
PART NUMBER: E771SSJ000
STEP 21: Use a towel and apply firm pressure (approximately 15 lbs. of force) to the areas highlighted in yellow.

STEP 22: Inspect part for any areas not adhering to the bumper. Firmly pressed down as needed. Done.

        PART NUMBER:                            ISSUE
         E771SSJ000                               00
                                                                                 12/20/17                    SUBARU OF AMERICA   PAGE 9 / 9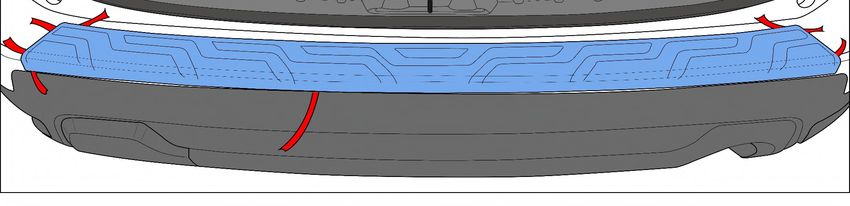
NUMÉRO DE PIÈCE : E771SSJ000
    INSTRUCTIONS D’INSTALLATION                                   DESCRIPTION : COUVRE PARE-CHOCS ARRIÈRE

OUTILS REQUIS :

Remarques :

NOTE:
• Do not wash the vehicle for 24 hours following installation of bumper cover.
• If bumper cover requires cleaning after installation, wipe with a soft cloth or sponge and mild soap and wipe
thoroughly with a dry cloth. Do not use gasoline, thinner, acid, alkali or other solvent based products.
• The recommended adhesive surface temperature range is: 60°-110°F (15°- 43°C).
• If the surface temperature is below 60°F (15°C), heat the double sided tape and bumper surface to a t emperature of
80°F (27°C).
• A one-hour cure time is recommended before exposing the vehicle to extreme temperatures (hot or cold).

REMARQUE:
• Ne pas laver le véhicule pendant 24 heures suivant I’installation du couvre pare-chocs.
• Si Ie couvre pare-chocs doit être nettoyé après l'installation, l'essuyer à l'aide d'une éponge ou d'un linge imbibé d'une
solution de savon doux puis frotter avec un chiffon sec. Ne pas utilizer d'essence, de diluant, d'acide ou d'alcali ou
d'autres prodults à base de solvant.
• La plage de température recommandée pour Ia surface adhésive est de 15 à 43°C (60 à 110°F).
• Si la température de Ia surface est sous 15°C (60°F), chauffer Ie ruban à double face et la surface du pare-chocs à une
température de 27°C (80°F).
• Un temps de durcissement d'une heure est recommandé avant d'exposer le véhicule à des températures extrêmes
(chaudes ou froid es).

    NUMÉRO DE PIÈCE :               VERSION
      E771SSJ000                      00
                                                                12/20/17               SUBARU OF AMERICA                       Page 1/9
NUMÉRO DE PIÈCE : E771SSJ000
PRÉPARATION : Garez le véhicule dans une zone bien éclairée. Ouvrez le hayon arrière. Déballez les pièces.
Lisez l'ensemble de la notice de montage avant de commencer.
ÉTAPE 1 : Nettoyez les dépôts de poussière, d'huile ou de cire sur la zone de fixation du pare-chocs avec un chiffon propre et de l'alcool dénaturé.
Préparez ensuite la surface avec les tampons d'alcool fournis.
ÉTAPE 2 : Remarque : Si la température est inférieure à 15°C (60°F), chauffez la bande adhésive double-face et la surface du pare-chocs pour
atteindre une température de 27°C (80°F).
NUMÉRO DE PIÈCE : VERSION
E771SSJ000 00
12/20/17 SUBARU OF AMERICA Page 2/9NUMÉRO DE PIÈCE : E771SSJ000
ÉTAPE 3 : À CETTE ÉTAPE, NE RETIREZ AUCUNE BANDE ADHÉSIVE. Placez la pièce sur le pare-chocs arrière et alignez approximativement la gâche de verrouillage du
hayon arrière avec le triangle situé sur la partie centrale de la pièce. Sous le coupe-froid du hayon, recherchez des triangles moulés dans
le pare-chocs arrière et alignez-les avec les triangles orientés à l'extérieur de la pièce. Voir l'illustration détaillée ci-dessous. Examinez les ouvertures
des 4 côtés et familiarisez-vous avec la position d'origine de cette pièce.
ÉTAPE 4 : Retournez la pièce. Pliez les bandes de revêtement comme dans l'illustration ci-dessous. Vous pouvez coller chaque bande sur la surface
supérieure de la pièce (optionnel).
ÉTAPE 5 : Repositionnez la pièce sur le pare-chocs arrière. Recommencez l'alignement comme à l'ÉTAPE 3. Assurez-vous que chaque bande soit bien positionnée, comme
à l'ÉTAPE 4. Trouvez la position d'origine et examinez les deux côtés de la pièce pour assurer son bon positionnement, puis maintenez fermement la pièce en place.
NUMÉRO DE PIÈCE : VERSION
E771SSJ000 00
12/20/17 SUBARU OF AMERICA Page 3/9NUMÉRO DE PIÈCE : E771SSJ000
ÉTAPE 6 : Tout en maintenant fermement la pièce avec votre main gauche, utilisez la main droite pour tirer doucement sur la bande comme ci-dessous sur environ
76 mm, MAIS N'APPUYEZ PAS.
76 mm (3 pouces)
ÉTAPE 7 : Appuyez sur la pièce avec un seul doigt , exclusivement à l'emplacement indiqué ci-dessous.
N'appuyez pas ailleurs, et maintenez la pièce en place.
Appuyez exclusivement à cet endroit.
ÉTAPE 8 : Tirez doucement sur la bande comme illustré ci-dessous, sur environ 76 mm (3 pouces), MAIS N'APPUYEZ PAS.
76 mm (3 pouces)
NUMÉRO DE PIÈCE : VERSION
E771SSJ000 00
12/20/17 SUBARU OF AMERICA Page 4/9NUMÉRO DE PIÈCE : E771SSJ000
ÉTAPE 9 : Inspectez soigneusement et alignez (si nécessaire) le côté de la pièce avec le pare-chocs, puis appuyez sur la pièce avec un doigt , exclusivement à
l'emplacement indiqué ci-dessous. N'appuyez nulle part ailleurs.
Appuyez exclusivement à cet endroit.
ÉTAPE 10 : Procédez avec précaution pour enlever la bande de revêtement, comme indiqué ci-dessous. Tirer trop fort ou trop rapidement peut déchirer
la bande de revêtement. CONSEIL : Si la première bande se déchire, tirez sur l'autre bande qui est intacte.
ÉTAPE 11 : Utilisez une serviette et appliquez une pression ferme (avec une force d'environ 7 kg) sur la zone en surbrillance jaune.
NUMÉRO DE PIÈCE : VERSION
E771SSJ000 00
12/20/17 SUBARU OF AMERICA Page 5/9NUMÉRO DE PIÈCE : E771SSJ000
ÉTAPE 12 : Tirez doucement sur la bande comme illustré ci-dessous, sur environ 76 mm (3 pouces), MAIS N'APPUYEZ PAS.
76 mm (3 pouces)
ÉTAPE 13 : Appuyez sur la pièce avec un seul doigt , exclusivement à l'emplacement indiqué ci-dessous. N'appuyez nulle part ailleurs.
Appuyez exclusivement à cet endroit.
ÉTAPE 14 : Tirez doucement sur la bande comme illustré ci-dessous, sur environ 76 mm (3 pouces), MAIS N'APPUYEZ PAS.
76 mm (3 pouces)
NUMÉRO DE PIÈCE : VERSION
E771SSJ000 00
12/20/17 SUBARU OF AMERICA Page 6/9NUMÉRO DE PIÈCE : E771SSJ000
ÉTAPE 15 : Inspectez soigneusement et alignez (si nécessaire) le côté de la pièce avec le pare-chocs, puis appuyez sur la pièce avec un doigt,
exclusivement à l'emplacement indiqué ci-dessous. N'appuyez nulle part ailleurs.
Appuyez exclusivement à cet endroit.
ÉTAPE 16 : Procédez avec précaution pour enlever la bande de revêtement, comme indiqué ci-dessous. Tirer trop fort ou trop rapidement peut déchirer
la bande de revêtement. CONSEIL : Si la première bande se déchire, tirez sur l'autre bande qui est intacte.
ÉTAPE 17 : Utilisez une serviette et appliquez une pression ferme (avec une force d'environ 7 kg) sur la zone en surbrillance jaune.
NUMÉRO DE PIÈCE : VERSION
E771SSJ000 00
12/20/17 SUBARU OF AMERICA Page 7/9NUMÉRO DE PIÈCE : E771SSJ000
ÉTAPE 18 : Procédez avec précaution pour enlever la bande de revêtement, comme indiqué ci-dessous. Tirer trop fort ou trop rapidement peut déchirer
la bande de revêtement. CONSEIL : Si la première bande se déchire, tirez sur l'autre bande qui est intacte.
ÉTAPE 19 : Utilisez une serviette et appliquez une pression ferme (avec une force d'environ 7 kg) sur la zone en surbrillance jaune.
ÉTAPE 20 : Procédez avec précaution pour enlever les deux bandes de revêtement, comme indiqué ci-dessous. Tirer trop fort ou trop rapidement peut déchirer la bande
de revêtement. CONSEIL : Si le revêtement se déchire, tirez la même bande de revêtement dans la direction opposée.
NUMÉRO DE PIÈCE : VERSION
E771SSJ000 00
12/20/17 SUBARU OF AMERICA Page 8/9NUMÉRO DE PIÈCE : E771SSJ000
ÉTAPE 21 : Utilisez une serviette et appliquez une pression ferme (avec une force d'environ 7 kg) sur les zones en surbrillance jaune.
ÉTAPE 22 : Inspectez la pièce pour vérifier que toutes les zones adhèrent au pare-chocs. Appuyez fermement, au besoin. Vous avez terminé.
NUMÉRO DE PIÈCE : VERSION
E771SSJ000 00
12/20/17 SUBARU OF AMERICA Page 9/9Vous pouvez aussi lire