A CeramicSteel Serif Installation Guide - Americas 2019 English Español Français Canadien - Smith System

La page est créée Denis Fournier
 
CONTINUER À LIRE
A CeramicSteel Serif Installation Guide - Americas 2019 English Español Français Canadien - Smith System
a³™ CeramicSteel Serif™
Installation Guide
Americas 2019

English
Español
Français Canadien

Guidelines for installing your new
a3 CeramicSteel Serif board

Doc # 141163 | Rev A | Page 1 of 14
A CeramicSteel Serif Installation Guide - Americas 2019 English Español Français Canadien - Smith System
English

Safety Requirements

a3 CeramicSteel Serif - Wall Mounted Frameless                         Verify Wall Construction
Dry Erase Board, Non-Seismic Applications                                       •    CAUTION! Adequate wall construction is
                                                                                     required to support the weight of the board.
The building’s Engineer of Record must be
                                                                                     Minimum wall construction must be capable
consulted to determine if there are any seismic
                                                                                     of supporting weight amounts listed in Table
requirements.
                                                                                     1 on page 5.

                                                                      Minimum Required Wall Construction
                                                                      Drywall with metal studs:

                                                                            •       Must be at least 25 ga. (0.018” or .5 mm thick)
                                                                                    33 ksi steel studs 38 mm x 89 mm (1.5” x 3.5”)

                                                                            •       Studs on maximum 610 mm (24”) centers

                                                                            •       Must be at least 16 mm (5/8”) thick Type X
                                                                                    gypsum drywall for the US or 12 mm (1/2”)
                                                                                    thick for EU

                                                                            •       32 mm (#6 x 1-1/4”) drywall screws on 305 mm
                                                                                    (12”) centers

                                                                      Drywall with wood studs:

                                                                            •       Stud grade SPF, DF-L or Hem-Fir 38 mm x
                                                                                    89 mm (1.5” x 3.5”)

                                                                            •       Studs on 610 mm (24”) centers

                                                                            •       Must be at least 16 mm (5/8”) thick Type X
                                                                                    gypsum drywall for the US or 12 mm (1/2”)
                                                                                    thick for EU

                                                                            •       32 mm (#6 x 1-1/4”) drywall screws on 305 mm
                                                                                    (12”) centers

Visit our website for a comprehensive Installation Guide:
polyvision.com/resources/installation
Or scan follow QR code:

                                      Doc # 141163 | Rev A | Page 2 of 14                                                             Doc # 141163 | Rev A | Page 3 of 14
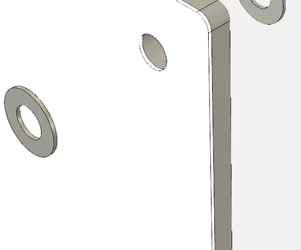
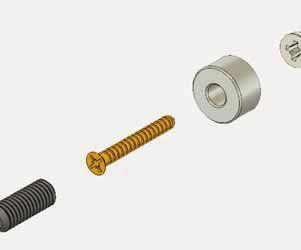
A CeramicSteel Serif Installation Guide - Americas 2019 English Español Français Canadien - Smith System
Washer                                                                                                                                                                                                Anchor*

           Serif panel                                                                                                                                                                                               Barrel

                                                                                                                                                                                                                      Screw
               Washer

                                                                                                                                                                                                                      Threaded stud
                   Cap

1.                                                             2.                                                         3.
Use the predrilled holes in the Serif panel as a               Drill the anchor into the drywall until flush. Drive the   Place a protective washer on the threaded stud                                            Table 1
template to mark the holes to be drilled into the              screw through the barrel into the anchor. Screw            and put the Serif panel into place. Place a second                       Product      # of Screws   Weight (kg / lb)
drywall.                                                       threaded stud into the barrel.                             washer onto the threaded stud and thread on cap                          Serif 2420       6          37 kg / 81.5 lb
                                                                                                                          until snug.                                                              Serif 1830       6         28 kg / 61.73 lb
                                                                                                                                                                                                   Serif 1185       4         18 kg / 39.68 lb

                                                                                                                                                                                                 * Not required for wood or metal studs

                                      Doc # 141163 | Rev A | Page 4 of 14                                                                                               Doc # 141163 | Rev A | Page 5 of 14
Español

Requisitos de seguridad

Pizarra de borrado en seco sin marco montada                                                  Verificar la construcción de la pared
en la pared a3 CeramicSteel Serif para                                                              •   ¡PRECAUCIÓN! La construcción de la pared
aplicaciones no sísmicas                                                                                deberá ser la adecuada para soportar el peso
                                                                                                        de la pizarra. La construcción mínima de la
Se deberá consultar al ingeniero responsable del
                                                                                                        pared debe poder soportar los pesos que se
edificio para determinar si existe algún requisito
                                                                                                        incluyen en la Tabla 1 en la página 5.
sísmico.

                                                                                              Construcción mínima requerida de paredes
                                             CAUTION                                          Panel de yeso con montantes metálicos:
                          CRUSH HAZARD. FDLOXUHWRSURSHUO\VHFXUH
                          ERDUGFRXOGUHVXOWLQSHUVRQDOLQMXU\                                    •   Deben ser montantes de acero de al menos
                                           PRECAUCIÓN                                                   calibre 25 (0,018” o 0,5 mm de espesor) de
                          PELIGRO DE APLASTAMIENTO. Si no se sujeta la
                          pizarra correctamente, podrían producirse lesiones.                           33 ksi y 38 mm x 89 mm (1,5” x 3,5”)

                                                                                                    •   Montantes con una distancia entre centros
                    SAFETY INSTRUCTIONS                                                                 máxima de 610 mm (24”)
  5HDGDOODVVHPEO\GLUHFWLRQVEHIRUHEHJLQQLQJLQVWDOODWLRQ
  %XLOGLQJFRQVWUXFWLRQYDULHVJUHDWO\7KH%XLOGLQJ¶V(QJLQHHURI5HFRUGLV                       •   Debe ser un panel de yeso tipo X de al menos
  UHVSRQVLEOHIRUWKHGHVLJQRIEXLOGLQJZDOOVZKLFKWKHERDUGVDUHDWWDFKHG                           16 mm (5/8”) de espesor para los EE. UU. o de
  WRDQGPXVWYHULI\WKHDGHTXDF\RIWKHPRXQWLQJKDUGZDUHHYHQLISURYLGHG
  E\3RO\YLVLRQ                                                                                        12 mm (1/2”) de espesor para la UE
  7KHEXLOGLQJRZQHURUGHVLJQDWHGDJHQWLVUHVSRQVLEOHIRUYHULI\LQJWKDWWKH
  LQVWDOODWLRQLVLQFRPSOLDQFHZLWKDLOORFDOFRGHVDQGUHJXODWLRQV                               •   Tornillos para panel de yeso de 32 mm
                                                                                                        (n.° 6 x 1-1/4”) con centros a 305 mm (12”)
            INSTRUCCIONES DE SEGURIDAD
  Lea todas las indicaciones para el ensamblaje antes de comenzar la
  instalación.                                                                                Panel de yeso con montantes de madera:
  Las construcciones edilicias varían enormemente. El ingeniero responsable
  GHOHGL¿FLRHVWiHQFDUJDGRGHOGLVHxRGHODVSDUHGHVGHOHGL¿FLRDODVTXH                       •   Montantes de grado SPF, DF-L o Hem-Fir de
  HVWiQXQLGDVODVSL]DUUDV\GHEHFRPSUREDUTXHORVDFFHVRULRVGHPRQWDMH
  VHDQORVDGHFXDGRVDXQVLIXHURQVXPLQLVWUDGRVSRU3RO\9LVLRQ                                       38 mm x 89 mm (1,5” x 3,5”)
  (OSURSLHWDULRGHOHGL¿FLRRHODJHQWHGHVLJQDGRVRQUHVSRQVDEOHVGH
  YHUL¿FDUTXHODLQVWDODFLyQFXPSODFRQWRGRVORVFyGLJRV\                                       •   Montantes con centros a 610 mm (24”)
  reglamentaciones locales.
                                                                 1078781001 Rev. A                  •   Debe ser un panel de yeso tipo X de al menos
                                                                                                        16 mm (5/8”) de espesor para los EE. UU. o de
                                                                                                        12 mm (1/2”) de espesor para la UE

                                                                                                    •   Tornillos para panel de yeso de 32 mm
                                                                                                        (n.° 6 x 1-1/4”) con centros a 305 mm (12”)

Visite nuestro sitio web para ver una guía completa
de instalación:
polyvision.com/resources/installation
O escanee el siguiente código QR:

                                                              Doc # 141163 | Rev A | Page 6 of 14                                                       Doc # 141163 | Rev A | Page 7 of 14
Arandela                                                                                                                                                                                          Anclaje*

           Panel Serif                                                                                                                                                                                         Tambor

                                                                                                                                                                                                               Tornillo
             Arandela

                                                                                                                                                                                                               Perno roscado
                  Tapa

1.                                                             2.                                                     3.
Use los orificios preperforados en el panel Serif              Perfore el anclaje en el panel de yeso hasta que       Coloque una arandela de protección en el perno                                          Tabla 1
como plantilla para marcar los orificios a perforar en         esté al ras. Coloque el tornillo por el tambor en el   roscado y coloque el panel Serif en su lugar.                                         N.º de
                                                                                                                                                                                              Producto                  Peso (kg/lb)
el panel de yeso.                                              anclaje. Atornille el perno roscado en el tambor.      Coloque una segunda arandela en el perno                                             tornillos
                                                                                                                      roscado y enrosque la tapa hasta que esté firme.                        Serif 2420      6         37 kg/81,5 lb
                                                                                                                                                                                              Serif 1830      6         28 kg/61,73 lb
                                                                                                                                                                                              Serif 1185      4         18 kg/39,68 lb

                                                                                                                                                                                            * No se requiere para pernos de madera
                                                                                                                                                                                            o metal

                                      Doc # 141163 | Rev A | Page 8 of 14                                                                                          Doc # 141163 | Rev A | Page 9 of 14
Français Canadien

Exigences en matière de sécurité

a3 CeramicSteel Serif – Tableau effaçable à sec                                             Vérifier la construction murale
sans cadre mural, utilisation non sismique                                                         •   AVERTISSEMENT! Une construction murale
                                                                                                       adéquate est nécessaire pour soutenir le poids
Consulter l’ingénieur du bâtiment en charge pour                                                       du tableau. La construction murale minimale
déterminer la présence d’exigences sismiques.                                                          doit pouvoir supporter le poids indiqué dans le
                                                                                                       tableau 1 à la page 5.

                                            CAUTION                                         Construction murale minimale requise
                          CRUSH HAZARD. FDLOXUHWRSURSHUO\VHFXUH
                          ERDUGFRXOGUHVXOWLQSHUVRQDOLQMXU\                            Cloison sèche avec montants en métal :
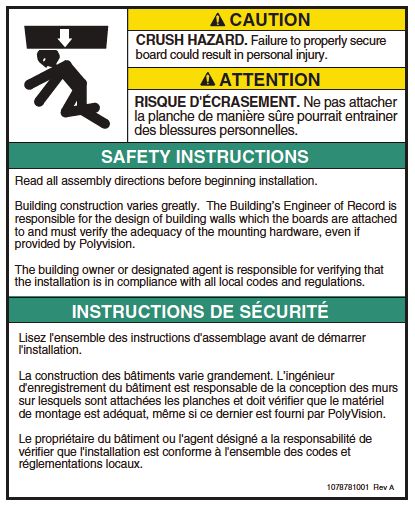
                                       AVERTISSEMENT
                          RISQUE D’ÉCRASEMENT. La mauvaise
                                                                                                   •   Doit être doté de montants en acier de 33 ksi
                          ¿[DWLRQGXWDEOHDXSRXUUDLWHQWUDvQHUGHV                                   de 38 x 89 mm (1,5 x 3,5 po) d’un calibre d’au
                          EOHVVXUHV                                                                   moins 25 (épaisseur de 0,018 po ou 0,5 mm).
                    SAFETY INSTRUCTIONS                                                            •   Les montants doivent avoir une distance entre-
  5HDGDOODVVHPEO\GLUHFWLRQVEHIRUHEHJLQQLQJLQVWDOODWLRQ                                          axes maximale de 610 mm (24 po).
  %XLOGLQJFRQVWUXFWLRQYDULHVJUHDWO\7KH%XLOGLQJ¶V(QJLQHHURI5HFRUGLV
  UHVSRQVLEOHIRUWKHGHVLJQRIEXLOGLQJZDOOVZKLFKWKHERDUGVDUHDWWDFKHG                      •   Cloison sèche de type X en gypse d’une
  WRDQGPXVWYHULI\WKHDGHTXDF\RIWKHPRXQWLQJKDUGZDUHHYHQLISURYLGHG                          épaisseur d’au moins 16 mm (5/8 po) pour les
  E\3RO\YLVLRQ
                                                                                                       É.-U. ou de 12 mm (1/2 po) pour l’Europe
  7KHEXLOGLQJRZQHURUGHVLJQDWHGDJHQWLVUHVSRQVLEOHIRUYHULI\LQJWKDWWKH
  LQVWDOODWLRQLVLQFRPSOLDQFHZLWKDLOORFDOFRGHVDQGUHJXODWLRQV                              •   Les vis de la cloison sèche doivent être de
                                                                                                       32 mm (#6 de 1 1/4 po) et avoir une distance
                 DIRECTIVES DE SÉCURITÉ                                                                entre-axes de 305 mm (12 po).
  9HXLOOH]OLUHWRXWHVOHVGLUHFWLYHVG¶DVVHPEODJHDYDQWGHFRPPHQFHU
  O¶LQVWDOODWLRQ
  /DFRQVWUXFWLRQGHEkWLPHQWYDULHFRQVLGpUDEOHPHQW/¶LQJpQLHXUGX
                                                                                            Cloison sèche avec montant en bois :
  EkWLPHQWFKDUJpGHVWUDYDX[HVWUHVSRQVDEOHGHODFRQFHSWLRQGHVPXUVGX
  EkWLPHQWVXUOHVTXHOVVRQW¿[pVOHVWDEOHDX[HWGRLWYpUL¿HUO¶H[DFWLWXGHGX                    •   Montant de classe EPS, Douglas vert – Mélèze
  PDWpULHOGHPRQWDJHPrPHV¶LOHVWIRXUQLSDU3RO\9LVLRQ                                            (DF-L) ou Pruche-Sapin (H-F) de 38 x 89 mm
  /HSURSULpWDLUHGXEkWLPHQWRXO¶DJHQWGpVLJQpHVWUHVSRQVDEOHGHYpUL¿HU                           (1,5 x 3,5 po)
  TXHO¶LQVWDOODWLRQHVWFRQIRUPHjWRXVOHVFRGHVHWUqJOHPHQWVORFDX[
                                                                5pY$                  •   Les montants doivent avoir une distance entre-
                                                                                                       axes de 610 mm (24 po).
                                                                                                   •   Cloison sèche de type X en gypse d’une
                                                                                                       épaisseur d’au moins 16 mm (5/8 po) pour les
                                                                                                       É.-U. ou de 12 mm (1/2 po) pour l’Europe
                                                                                                   •   Les vis de la cloison sèche doivent être de
                                                                                                       32 mm (#6 de 1 1/4 po) et avoir une distance
                                                                                                       entre-axes de 305 mm (12 po).

Veuillez consulter notre site Web pour obtenir un guide
d’installation complet :
polyvision.com/resources/installation
Vous pouvez également balayer le code QR suivant :

                                                            Doc # 141163 | Rev A | Page 10 of 14                                                         Doc # 141163 | Rev A | Page 11 of 14
Rondelle                                                                                                                                                                                              Ancrage*

       Panneau Serif                                                                                                                                                                                               Cylindre espaceur

                                                                                                                                                                                                                   Vis
             Rondelle

                                                                                                                                                                                                                   Goujon fileté
           Capuchon

1.                                                             2.                                                       3.
Utiliser les trous déjà percés dans le panneau Serif           Insérer l’ancrage dans la cloison sèche jusqu’à ce       Mettre une rondelle de protection sur le goujon                                          Tableau 1
comme modèle pour marquer les trous à percer                   qu’il soit affleurant. Aligner la vis dans le cylindre   fileté et installer le panneau Serif. Mettre une                                       Nombre
                                                                                                                                                                                                  Produit                    Poids (kg / lb)
dans la cloison sèche.                                         espaceur et dans l’ancrage. Visser le goujon fileté      deuxième rondelle sur le goujon fileté et visser le                                     de vis
                                                               dans le cylindre espaceur.                               capuchon jusqu’à ce qu’il soit ajusté serré.                              Serif 2420      6          37 kg / 81,5 lb
                                                                                                                                                                                                  Serif 1830      6          28 kg / 61,73 lb
                                                                                                                                                                                                  Serif 1185      4          18 kg / 39,68 lb

                                                                                                                                                                                                 * N’est pas obligatoire pour les montants
                                                                                                                                                                                                 en bois ou en métal

                                     Doc # 141163 | Rev A | Page 12 of 14                                                                                              Doc # 141163 | Rev A | Page 13 of 14
PolyVision Americas                           PolyVision Europe                                     PolyVision Asia-Pacific
10700 Abbotts Bridge Road                     Zuiderring 56                                         15th Floor, Kinwick Centre
Suite 100                                     3600 Genk, Belgium                                    32 Hollywood Road, Central District
Johns Creek, GA 30097 USA                                                                           Hong Kong
                                              T +32 89 32 31 30
T 1 888 325 6351                              E EMEAsupport@polyvision.com                          T +852 2520 0160
E info@polyvision.com                                                                               E APACsupport@polyvision.com

©2019 PolyVision Corporation. All rights reserved. Trademarks used herein are the trademarks of PolyVision
Corporation or their respective owner. PolyVision Corporation reserves the right to make changes in product
design, construction or detail, and to discontinue any product or material without notice.

polyvision.com                                                                                                                            10-30-2019
Vous pouvez aussi lire