Everything you always wanted to know about Screen Goo but were afraid to ask.
←
→
Transcription du contenu de la page
Si votre navigateur ne rend pas la page correctement, lisez s'il vous plaît le contenu de la page ci-dessous
Everything you always wanted to know about
      Screen Goo but were afraid to ask.
                           By Ken Hotte,
    Goo Systems technician and head of research and development

Tout ce que vous avez toujours voulu savoir sur
Screen Goo mais que vous n’osé pas demander.
                             Par Ken Hotte,
      technicien et directeur de la recherche chez Goo Systems.
■ What is Screen Goo?                             your screen from sources such as windows
Goo Systems’ Screen Goo products are spe-         or connecting rooms. The lower the level of
cially formulated, color corrected, screen        any remaining ambient light in the room, the
coatings in liquid form. They are designed to     better.
achieve the highest performance levels pos-
sible for a given display situation.              ■ How do I Use it?
                                                  Applying Screen Goo is much like applying
■ Who uses it?                                    normal house paint, however for optimal
Screen Goo products are being used by all         results please follow the rolling instructions
levels of the video industry from do-it-your-     outlined in this booklet. For a video demon-
self home theater aficionados to large scale      stration of rolling Screen Goo go to Goo Tips
commercial and industrial clients.                and FAQ and click on the video link on our
                                                  website: www.goosystems.com.
■ Can I use it?
Designed for easy application via spraying        Rolling Instructions:
or rolling, screen goo products can be suc-
cessfully applied by the novice or profes-        ■ Step 1: Surface Preparation and
sional alike.                                     Determination of Screen Size
                                                  Screen Goo can be applied to any smooth
■ Is it expensive?                                paintable surface. Many materials other than
The cost of screen execution can be as little     the products listed below can be used suc-
as the price of the coating itself - when ap-     cesfully. For best results the surface should
plied to an available wall space. More dedi-      be flat and smooth. If this surface to be coat-
cated videophiles can investigate the pos-        ed is not smooth, it should be sanded down
sibilities of elaborate framing systems and       and wiped off prior to applying the Screen
custom screen design.

■ Which product for which
projector?
A seemingly simple question to which, of
course, there is no simple answer. We’ve re-
cently introduced a “Pick Your Product” sec-
tion to our website. Filling in the requested
data as accurately as possible will result in a
recommendation of the products best suited
to your projector and to your installation.

■ How much do I need?                             Inspecting a primed surface for irregularities before
                                                  applying Screen Goo. / Inspection d’une surface ap-
The Topcoat and Basecoat work together;           prêtée afin d’y déceler des irrégularités avant d’appliquer
both are required to create a screen.Topcoat      Screen Goo.
and Basecoat coverage per sq. ft. can vary
                                                  Goo basecoat. Porous surfaces such as dry-
somewhat, depending on the surface condi-
                                                  wall, gyproc, and wood based materials such
tions. One liter (just slightly more than a US
                                                  as plywood, particle board, MDF, should be
Quart in volume) will typically cover approxi-
                                                  sealed with a flat, white latex primer prior to
mately 50 sq. ft. with two thin coats, under
                                                  applying Screen Goo basecoat. Coloured
ideal conditions on an ideal non-absorp-
                                                  surfaces should also be primed with a flat,
tive surface. Starting with a primed white
                                                  white latex.
surface is strongly recommended for peak
performance.
                                                  We recommend mounting your projector
                                                  in its permanent location before determin-
■ What about ambient light?                       ing the actual screen dimentions. Once the
To realize the best performance from a pro-       projector is mounted you should project an
jected image you should do your best to           image from onto your surface and adjust for
control or eliminate light which could fall on    image geometry. The width of the image at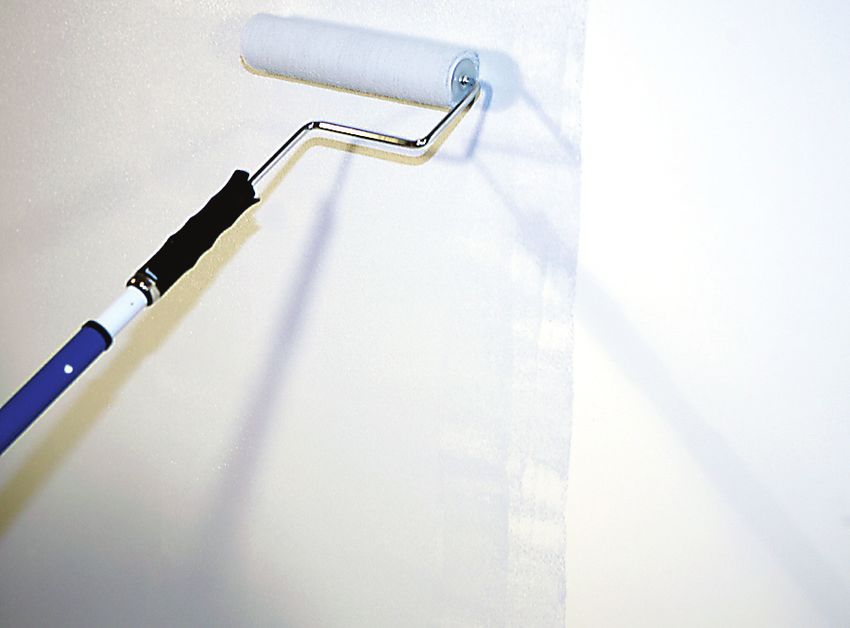
the top of the screen should be the the same           over the original first stroke, in a straight run,
as the width at the bottom and likewise the            from top to bottom of the screen. You must
sides of the image should have the same                go from over the top edge, to off the bot-
height. Finally you should check that the im-          tom of the screen. This is to prevent marks
age is level and square in the corners. Now            caused by stopping the roller on the viewing
you are ready to mask off the area you will            surface. From this point, continue by mov-
be coating with a high quality painters tape.          ing across the screen, bit by bit, two rows at
If you intend to create a border around your           a time. The finishing strokes should be ap-
screen you should allow an extra inch around
all sides so that the coated surface will be
slightly larger than the your projected image.

■ Step 2: Basecoat
Rolling this product is a bit trickier than roll-
ing normal latex paint. This means that at-
tention must be paid to application method
and roller handling. Some users report im-
proved results with a light sanding of the
Basecoat; we see no disadvantage to this,
but only the Basecoat layers and only after
allowing for a minimum 24 hour drying pe-
riod prior to sanding.                                 Orient the wire support side of the roller away from the
                                                       freshly coated side of the screen. / Orientez le support
                                                       du rouleau du côté opposé à la surface de l’écran que
                                                       vous venez de peindre.

                                                       plied very lightly, making sure the open end
                                                       of the roller (which receives less pressure)
                                                       is on the just coated side, so that the over-
                                                       laying layer will have a somewhat feathered
                                                       edge. The wire support side of the roller
                                                       mechanism naturally presses harder on the
                                                       surface, so it should be oriented away from
                                                       the freshly coated side of the screen.

                                                       The ‘finishing’ strokes should be done no
                                                       more than 2-3 minutes after the original
Rolling with vertical strokes. / Passages de rouleau
verticaux.                                             paint strokes in a given area. Remember, the
                                                       finishing strokes should have a slight over-
Place about 200mL of Basecoat in the paint             lap, run from top to bottom of the screen
tray to do your first coat. Load the roller very
lightly. Dab some on one side of the roller, ro-
tate and dab some on the other. You should
have enough paint on the roller to complete
approximately two vertical columns with a
bit left over.

Roll the coating using vertical strokes cover-
ing the full height of the screen. The coat-
ing density should be just sufficient to cover
the underlying surface. After the first stroke,
apply the second full height stroke, with
a slight overlap. Place approximately the
same amount of paint on the roller again,
                                                       Close up of a fresh Topcoat application over the dry
and lay down an adjacent two to three rows             Basecoat layers. A visible texture is desired. / Gros plan
of coating. Then go back to the start of the           d’une couche de Topcoat qui vient d’être appliquée sur
screen and complete a full finishing stroke            des couches de Basecoat sèches. La texture doit être
                                                       visible.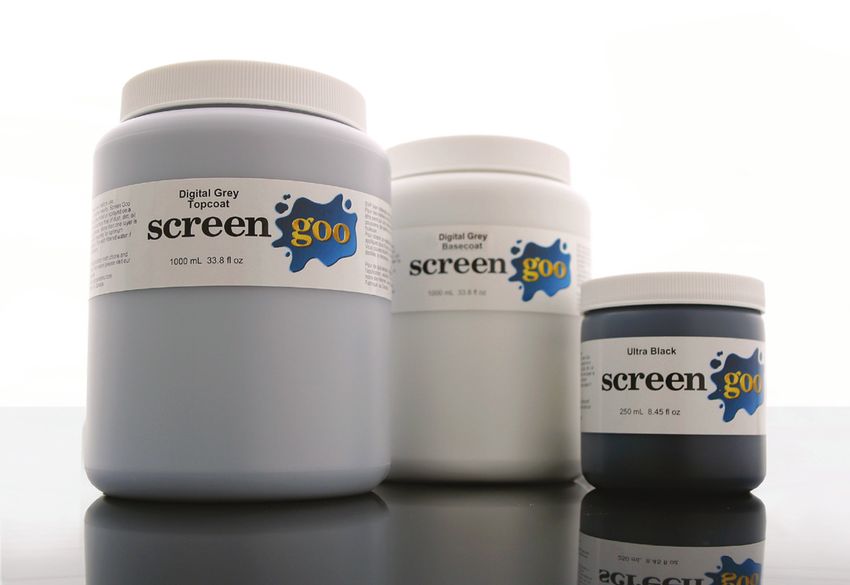
Ultra Black being applied to masked off border. / Ap-   Finished screen with Ultra Black border. / L’écran terminé
plication d’Ultra Black sur une bordure délimitée.      avec une bordure d’Ultra Black.

moving past the perimeter edges. Allow the              Following these instructions when applying
Basecoat to dry thoroughly (typically 1 - 1.5           Screen Goo will give you a uniform high-
hrs.) and then repeat the above procedures              performance screen surface that will look
for the second layer of Basecoat.                       fantastic for many years to come. Sit back
                                                        and enjoy, you won’t believe your eyes!
■ Step 3: Topcoat
After allowing the Basecoat to dry repeat               Troubleshooting
the above procedures to apply two coats                 Faint vertical lines or streaks may be visible
of Topcoat. Unlike Basecoat, THE TOP-                   where your roller patterns overlap. These are
COAT LAYERS MUST NOT BE SANDED OR                       not unusual and in almost all cases they will
ABRADED UNDER ANY CIRCUMSTANCES.                        clear up on their own as the coating cures. If
                                                        you can still see these lines 4-6 weeks after
                                                        application, contact us for assistance.
■ Step 4: Ultra Black
Your Goo Kit includes a 250mL jar of Ultra              A rolled Goo screen will have a slightly bumpy
Black, a specially formulated light absorptive          or “orange peel” texture to it. This is entirely
coating, and a foam applicator brush. This              normal. Do not attempt to sand or otherwise
is to permit the creation of an optional black          smooth the surface as this will compromise
border around your screen. The simplest                 the performance of the screen.
method of creating a border is to purchase
pre-cut wood trim at your local hardware                LIMITED WARRANTY
store, coat it with the Ultra Black and install it      • Goo Systems warrants its coating product to be
around your Goo viewing surface. If you wish            free from manufacturing defects and will be delivered
to apply Ultra Black directly to your wall, use         within Goo Systems’ manufacturing specifications.
a good quality painter’s tape and mask out              • Goo Systems does not warrant the performance
an area 2-3 inches around the perimeter of              of the coating product as it cannot be responsible for
the viewing area and then apply the Ultra               conditions beyond its control, including, but not lim-
Black with the provided foam applicator.                ited to, surface preparation, application procedures,
The topcoat surface must be thoroughly dry              curing conditions and third party modifications to the
                                                        product.
before applying masking tape (minimum 24                • If the coating product fails to meet the manufactur-
hrs). After allowing 4-6 hours for the Ultra            ing specifications, GOO SYSTEMS LIABILITY SHALL
Black to dry, slowly and carefully remove the           BE EXPRESSLY LIMITED TO THE REPLACEMENT
painter’s tape covering the border.                     OF THE PRODUCT ONLY. Goo Systems shall not as-
                                                        sume responsibility for subsequent or incidental dam-
Curing Times                                            ages, external materials or labour costs arising from
                                                        the use of the product.
The product can be used immediately after
rolling or spraying and will look very good             • The UN Convention on Contracts for the Interna-
                                                        tional Sale of Goods (1980) does not apply to the
after the first day, but its performance will           supply of product by Goo Systems.
continue to improve for up to 3 months by
which time The acrylic mixtures should be
fully cured and clarified.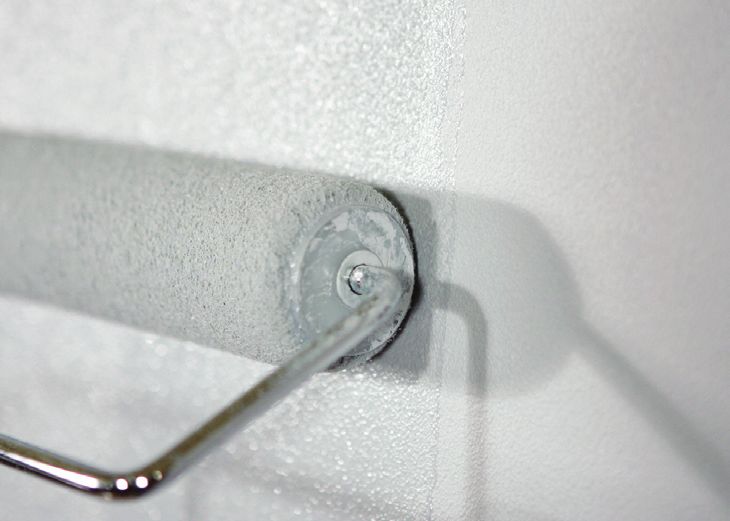
■ Qu’est-ce que Screen Goo?                       Ainsi, nous recommandons fortement de
Des enduits faits d’acrylique pur conçu pour      sceller la surface à l’aide d’un apprêt blanc
réaliser des écrans vidéo, spécialement for-      avant d’appliquer la peinture Goo, et ce afin
mulés pour équilibrer le rendu des couleurs.      d’obtenir un rendement supérieur.
Les produits Screen Goo sont conçus pour
obtenir le plus haut niveau de performance        ■ Et la lumière ambiante?
possible pour chaque type de projecteur.          Pour que l’image projetée soit à son mieux,
                                                  vous devez faire votre possible pour con-
■ À qui s’adresse le produit?                     trôler ou éliminer la lumière provenant de
Les produits Screen Goo sont utilisés dans        sources comme les fenêtres ou les pièces
tous les milieux de la projection vidéo. De       adjacentes et qui pourrait se retrouver sur
l’amateur de cinéma-maison au profession-         votre écran. Moins il restera de lumière am-
nel de l’industrie commerciale et industrielle.   biante dans la pièce et mieux ce sera.

■ Puis-je l’appliquer moi-même?                   Directives pour l’application
Les produits ont été conçus pour être facile
d’application soit en roulant ou pulvérisant la   ■ Étape 1: Préparation de la sur-
peinture au fusil. Screen Goo peut être ap-       face et détermination de la taille
pliqué au rouleau avec succès par un novice       de l’écran.
ou au fusil par un peintre professionnel.
                                                  Screen Goo peut être utilisé sur n’importe
                                                  quelle surface lisse prête pour l’application.
■ Est-ce dispendieux?                             D’autres produits que ceux énumérés ci-des-
Le coût de l’écran peut être aussi bas que le     sous peuvent être utilisés et donner de bons
prix de la peinture elle-même lorsque appli-      résultats. Une surface régulière et bien lisse
qué sur un mur existant. Il n’y a pas de limite   permettra d’obtenir des résultats optimaux.
à l’imagination des vidéophiles qui peuvent       Si la surface à peindre n’est pas suffisam-
décider d’encadrer leurs écrans aux dimen-        ment lisse, elle doit être poncée et essuyée
sions personnalisées avec des moulures            avant d’appliquer la couche de fond Screen
plus élaborées.                                   Goo Basecoat. Les surfaces poreuses telles
                                                  que les cloisons sèches, le placoplâtre ainsi
■ Quels produits pour quels pro-                  que les panneaux dérivés du bois comme
                                                  le contreplaqué, l’aggloméré de bois et les
jecteurs?                                         panneaux MDF devraient être étanchéisées
Voilà une question bien simple mais sans
                                                  à l’aide d’une couche d’apprêt au latex
réponse simple. Nous avons récemment
                                                  blanc mat avant d’appliquer la couche de
dévoilé sur notre site Web un ‘Calculateur
                                                  fond Screen Goo. Les surfaces de couleur
de produit’. Répondez le plus précisément à
                                                  devraient également être recouvertes d’un
l’ensemble des questions posées et le cal-
                                                  apprêt au latex blanc mat.
culateur vous proposera la meilleure solution
pour votre projecteur et votre installation.
                                                  Nous recommandons d’installer votre pro-
                                                  jecteur dans son emplacement permanent
■ Combien m’en faut-il?                           avant de déterminer les dimensions de
La couche de base réfléchissante et la            l’écran. Une fois le projecteur installé, vous
couche de surface diffusante travaillent          devriez projeter une image sur votre sur-
ensemble et sont toutes deux primordia-           face et apporter les réglages nécessaires
les afin de créer un système d’écran. La          en fonction de sa géométrie. La largeur de
quantité nécessaire par pied carré dépend         l’image dans le haut de l’écran devrait être
du type de surface à couvrir. Normalement,        la même qu’au bas de l’écran, et ses côtés
un contenant de 1 litre couvre une super-         devraient être de la même hauteur. Finale-
ficie d’environ 50 pieds carrés avec deux         ment, vous devriez vérifier que l’image est
fines couches. Cette superficie équivaut à        de niveau et d’équerre dans les coins. Vous
un écran allant jusqu’à 130’’ de diagonal en      pouvez ensuite délimiter la zone à peindre
format 16:9. Pour obtenir ce résultat opti-       avec un ruban à masquer de bonne qualité.
mal, la surface doit toutefois être non absor-    Si vous prévoyez ajouter un cadre autour de
bante et peinte dans des conditions idéales.      votre écran, vous devriez laisser un pouce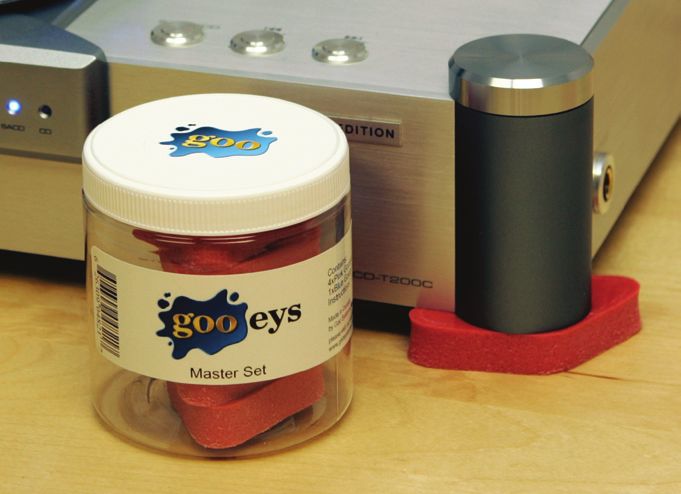
de plus sur tous les côtés afin que la sur-       à la fois. Lorsque vous revenez uniformiser
face peinte soit légèrement plus large que        l’application comme précédemment, as-
l’image projetée.                                 surez-vous d’appliquer une pression légère
                                                  sur le rouleau en s’assurant que le côté ouvert
Les derniers passages du rouleau ne doi-          du rouleau (celui où il y a le moins de pres-
vent pas être donnés plus de deux ou trois        sion) se trouve sur la colonne précédente.
minutes après les premiers pour une surface       De cette façon, le débordement ne laissera
donnée. Souvenez-vous que les derniers            pas de trace. Le côté du rouleau où se trouve
passages du rouleau doivent se chevaucher         le manchon applique une plus grande pres-
légèrement, de haut en bas, et dépasser           sion sur l’écran et devrait toujours se trouver
quelque peu le périmètre. Laissez la couche       à l’extérieur de la colonne que l’on dessine.
de fond Basecoat sécher complètement (de          La couche d’uniformisation devrait être ap-
60 à 90 minutes habituellement) puis répé-        pliquée immédiatement après la couche
tez la procédure ci-dessus pour la deuxième       originale. Souvenez-vous que la couche
couche de Basecoat.                               d’uniformisation devrait toujours débuter en
                                                  dehors de la surface de projection de l’écran
                                                  (la partie qui sera sous la bordure) en appli-
■ Étape 2: Basecoat                               quant de haut en bas sans arrêt.
Rouler ce produit n’est pas beaucoup plus
compliqué que rouler une peinture à l’eau         Après avoir appliqué la première couche de
conventionnelle. Ceci dit, vous devez tout de     base complète, vous serez en mesure de
même porter une attention particulière sur la     mieux saisir le principe d’application. Lais-
méthode d’application et sur le maniement         sez sécher la première couche de une heure
du rouleau. Certains utilisateurs ont obtenu      à une heure et demi. Répétez le même exer-
de meilleurs résultats en ponçant légère-         cice pour la deuxième couche de base.
ment la couche de fond Basecoat; nous n’y
voyons aucun inconvénient, à la condition
que cela se limite aux couches de Basecoat
et que le ponçage ne soit effectué qu’après       ■ Étape 3: Couche de finition
un séchage d’au moins 24 heures.                  Une fois que la couche de fond est sèche,
                                                  reprenez la procédure ci-dessus pour appli-
Versez environ 200ml de la couche de base         quer deux couches de finition Topcoat. CON-
(basecoat) dans le récipient à peinture pour      TRAIREMENT À LA COUCHE DE FOND,
débuter votre première couche. Trempez le         LES COUCHES DE FINITION NE DOIVENT
rouleau très légèrement. Imprégnez un côté        PAS ÊTRE PONCÉES OU SABLÉES POUR
du rouleau légèrement, faire tourner le rouleau   QUELQUE RAISON QUE CE SOIT.
et imprégnez maintenant l’autre côté. Vous
devriez avoir suffisamment de peinture pour
peindre 2 colonnes verticales et un peu plus.     ■ Étape 4: Ultra Black
                                                  Votre ensemble Goo comprend un pot
Roulez en traçant des colonnes verticales         d’Ultra Black de 250 ml (un enduit spéciale-
de pleine hauteur de l’écran. La densité de       ment formulé pour absorber la lumière) et un
l’application devrait être juste assez suf-       pinceau en mousse, qui vous permettront de
fisante pour marquer la surface. Après avoir      créer, si vous le souhaitez, une bordure noire
dessiné la première colonne entière, déb-         autour de votre écran. La méthode la plus
utez-en une deuxième tout en débordant            simple pour créer cette bordure consiste à
légèrement sur la première. Placez approxi-       acheter un cadre de bois préfabriqué chez
mativement la même quantité de peinture           votre quincaillier, à lui appliquer une couche
sur le rouleau et continuez à dessiner 2 à 3      d’enduit Ultra Black et à l’installer autour de
nouvelles colonnes adjacentes. Ensuite, re-       votre zone de projection Goo. Pour appli-
commencez au début et repassez de haut            quer l’enduit Ultra Black directement sur le
en bas sur l’ensemble des colonnes dessi-         mur, utilisez un ruban à masquer de bonne
nées afin d’uniformiser l’application. Vous       qualité pour délimiter une bordure de 2 à 3
devez rouler du haut jusqu’au bas de l’écran      pouces sur le périmètre de la zone de pro-
afin de ne pas laisser de trace de départ.        jection et appliquez ensuite l’enduit Ultra
Vous pouvez maintenant continuer le travail       Black à l’aide du pinceau en mousse fourni.
en dessinant de 2 à 3 nouvelles colonnes          La couche de finition doit être bien sèche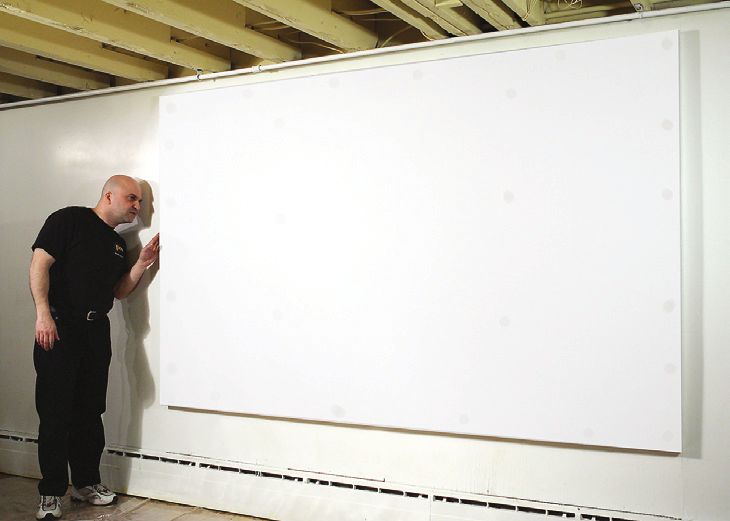
avant de pouvoir mettre le ruban à masquer       Un écran Goo appliqué au rouleau présente
(minimum de 24 h). Après avoir laissé séch-      un fini légèrement texturé, un peu comme
er la couche d’Ultra Black de 4 à 6 heures,      une pelure d’orange. Cela est parfaitement
retirez lentement le ruban à masquer autour      normal. Ne tentez pas de poncer la surface
de l’écran en faisant bien attention.            ou de la rendre plus lisse d’une autre façon.
                                                 Son rendement pourrait en être diminué.
Temps de cure
L’écran que vous venez de créer peut être        GARANTIE LIMITÉE
utilisé dès que la surface a séché. Il don-      • Goo Systems garantit que ses enduits ne com-
nera un très bon rendement dès le jour           portent pas de défaut de fabrication et qu’ils sont
suivant, mais sa performance ne cessera          fournis conformément aux normes de fabrication
                                                 de Goo Systems.
de s’améliorer de jour en jour pour les pre-
mières 6 semaines, et ce jusqu’à ce que le       • Goo Systems ne garantit pas le rendement de
mélange d’acrylique ait atteint son plein po-    ses enduits puisqu’elle ne peut être tenue respon-
tentiel.                                         sable de conditions qui ne sont pas sous son con-
                                                 trôle, incluant, sans s’y limiter, la préparation de la
En suivant ces instructions pour l’application   surface, la procédure d’application, les conditions
de Screen Goo, vous serez assuré d’une           de vieillissement et les modifications apportées
haute performance uniforme sur toute la          par des tiers à son produit.
surface de votre écran et d’un look fantas-
                                                 • Si l’enduit devait se révéler non conforme aux
tique pour des années à venir.
                                                 normes de fabrication, LA RESPONSABILITÉ DE
                                                 GOO SYSTEMS SE LIMITE EXPRESSÉMENT AU
Dépannage                                        REMPLACEMENT DU PRODUIT SEULEMENT.
Des lignes ou des rayures verticales peu-        Goo Systems ne peut être tenue responsable
vent demeurer visibles aux endroits où les       des dommages ultérieurs ou indirects, des coûts
passages du rouleau se chevauchent. Ces          d’autres matériaux ou des frais de main-d’œuvre
                                                 découlant de l’utilisation du produit.
lignes ne sont pas inhabituelles et dispara-
issent dans presque tous les cas lorsque         • La Convention des Nations Unies sur la vente in-
la peinture vieillit. Si vous voyez encore       ternationale de marchandises (1980) ne s’applique
ces lignes quatre à six semaines après           pas aux produits fournis par Goo Systems.
l’application, communiquez avec nous pour
obtenir de l’aide.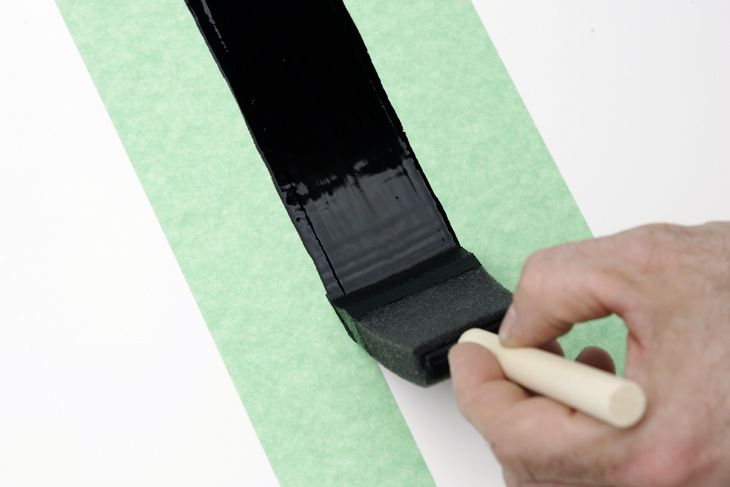
Introducing Gooeys! The Vibration                  Voici les Gooeys! Les suppresseurs
      Killers from Goo Systems.                       de vibrations de Goo Systems.
From the relatively large-scale vibrations of      Qu’il s’agisse des vibrations relativement im-
mechanical systems like disc drives to the         portantes des systèmes mécaniques comme
electromagnetically induced micro vibra-           les lecteurs de disques ou des micro-vibrations
tions of purely electronic circuits, your audio/   d’origine électromagnétique des circuits électro-
video gear is constantly in motion. This, un-      niques, votre matériel audio-vidéo est toujours en
fortunately, compromises its performance.          mouvement. Malheureusement, cela a un impact
Vibrations will smear                                                          sur la performance. Les
fine detail, add ex-                                                           vibrations noient les dé-
traneous information                                                           tails subtils, ajoutent des
and generally distort                                                          informations superflues
the reproduction of                                                            et nuisent généralement
source material. Here                                                          à la reproduction du pro-
at Goo Systems we                                                              gramme source. Pour
find that unnaccept-                                                           nous, à Goo Systems,
able and have done                                                             cette situation était inac-
something about it!                                                            ceptable et il fallait que
The principle at work                                                          nous nous en occupi-
with our new Gooeys,                                                           ons! Le principe derrière
is the extremely rapid                                                         notre nouveau produit,
conversion of mechanical energy (vibration)        Gooeys, consiste à convertir extrêmement rap-
to heat energy. Gooeys, strategically placed       idement l’énergie mécanique (les vibrations) en
under your equipment, will convert those           énergie thermique. Les Gooeys, judicieusement
bad vibrations to heat, and will help you en-      disposés sous vos appareils, convertissent ces
joy your expensive toys and media collec-          vibrations indésirables en chaleur, et vous aident
                         tion to their fullest.    à tirer le meilleur parti de vos coûteux appareils et
                                                   de votre collection de musique ou de films.

                         Goo Systems wants to give you a FREE set
                         of Gooeys... Well almost free!
                        All we want is a decent quality digital photo of your Goo Screen
                        installation and a brief testimonial on how you like it, what it does
 best, etc. If we use your submition on our website we will send you a FREE set of Gooeys,
                                      a $50.00 U.S. value!!
 Goo Systems veut vous offrir un jeu de Gooeys GRATUITEMENT...
                        Enfin presque!
 Tout ce que nous voulons, c’est une photo numérique de bonne qualité de votre installation
 Goo Screen, avec une brève description de ce que vous en pensez, des avantages, etc. Si
 votre envoi est utilisé sur notre site Web, vous recevrez un jeu de Gooeys d’une valeur de
                                  50,00 $US GRATUITEMENT!*
                     Submissions / Soumissions: kevin@goosystems.com

                                 www.goosystems.com
               Goo Systems, 4 Harvey Street, Kingston ON Canada K7K 5B9
              ph: (613) 541-0299 fax: (613) 541-1765 toll free: 1-888-541-0299
Vous pouvez aussi lire