NEOLAB TWIN - NOTICE - Carré
←
→
Transcription du contenu de la page
Si votre navigateur ne rend pas la page correctement, lisez s'il vous plaît le contenu de la page ci-dessous
www.carre.fr

      NEOLAB TWIN

     NOTICE                 INSTRUCTIONS
  D’UTILISATION              INSTRUCTION
                               FOR USE                  INSTRUCTION

               A LIRE ATTENTIVEMENT
A LIRE ATTENTIVEMENT   AVANT        AVANT
                                 READ      D’UTILISER LA MACHINE
                                      IT ATTENTIVELY         READ IT ATTENTIVELY
                   READ CAREFULLY
    D’UTILISER LA MACHINE         BEFORE   USING  THE MACHINE
                              BEFORE USING THE MACHINE BEFORE USING THE MACHINE
               VOR GEBRAUCH DER MASCHINE AUFMERKSAM LESEN!

                                                                 Réf. 38412121
                                                                      38010101 A
                                                                    MAJ
                                                                      MAJ12.2013
                                                                          12.2011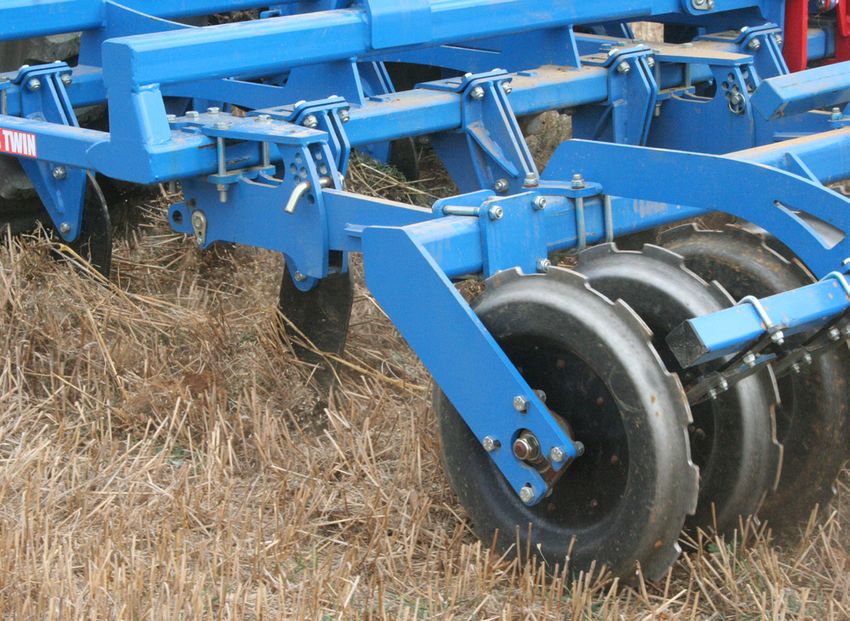
Type machine/ Type of machine/: NEOLAB TWIN
    Type  machine/
      Année                Type/ Built
             de construction          of machine:
                                          in / : 2013
Année de   construction
        Numéro   de série / Serial / Built    in :/ : 2012
                                         Number
                      ................
   Numéro     de série / Serial Number :
      Catalogues pièces/ Spare parts book/ :
 Catalogues pièces/           Spare parts book :
                      .................
        Masse
           Masse / Weight
                   / Weight/ :: ……….KG
                                     ……….KG
Accessoires / Accessories/ : .......................................
       Accessoires        / Accessories :
                     ...................
SOMMAIRE - SUMMARY - SUMMARY

1.    INTRODUCTION                   1.    INTRODUCTION
2.    SPECIFICATION                  2.    SPECIFICATION
2.1 Description                      2.1 Description
2.2 Caractéristiques                 2.2 Technical characteristics
techniques                           3.    SAFETY INSTRUCTIONS
3.    CONSIGNES DE SECURITE          3.1 Warning symbols
3.1 Symboles de sécurité             3.2 Compliance with intended
3.2 Utilisation conforme à           use
l’usage prévu                        3.3 General safety precautions
3.3 Prescription générale de         3.4 Safety in public areas
sécurité                             3.5 Accident prevention
3.4 Sécurité sur domaine             3.6 Maintenance and repairs
public                               4.    OPERATOR CONTROLS
3.5 Prévention des accidents         5.    ASSEMBLY AND START UP
3.6 Entretien et réparation          5.1 Tractor linkage
4.    COMMANDES DE                   5.2 Tine assembly
L’OPERATEUR                          5.3 Equipment
5.    MONTAGE ET MISE EN             5.4 Rear equipment adjustment
SERVICE                              5.6 SEMLOC equipment
5.1 Liaison sur le tracteur          5.7 Electronic control box use
5.2 Montage des lames                6.    PROCEDURE AND START-
5.3 Equipements                      UP
5.4 Réglage          équipement      7.    PROTECTION       OF    THE
arrière                              ENVIRONMENT
5.6 Equipement SEMLOC                8.    MAINTENANCE
5.7 Utilisation    du      boitier   8.1 Maintenance performed by
electronique                         the user
6.    PROCÉDURE ET MISE EN           8.2 Maintenance performed by
ROUTE                                specialised technicians
7.    PROTECTION DE                  8.3 Troubleshooting
L’ENVIRONNEMENT                      8.4 Tightening torques
8.    MAINTENANCE                    8.5 Wearing parts
8.1 Entretien par l’utilisateur      9.    DECOMMISSIONING
8.2 Entretien par du personnel       10. CERTIFICATE OF
spécialisé                                 COMPLIANCE WITH EC
8.3 Dépannage                              REGULATIONS
8.4 Couples de serrage
8.5 Pièces d’usure
9. MISE AU REBUT
10. DECLARATION CE DE
CONFORMITE
1. INTRODUCTION - INTRODUCTION
Vous prenez possession d’un              You have taken delivery of one
matériel de notre production, au         of our products, and on behalf of
nom de tous mes collaborateurs, je       all my colleagues I would like to
vous remercie de votre confiance.        thank you for the confidence that
                                         you have shown in us.
Avant d’utiliser la machine, nous re-
commandons de lire attentivement         Before using the machine, we re-
le présent manuel et d’en respecter      commend that you read this manual
scrupuleusement les instructions.        carefully and that you comply with
Vous éviterez ainsi de vous mettre       the instructions scrupulously. By
en danger, vous réduirez les temps       doing this, you will avoid exposing
de mise en service et les risques        yourself to danger, you will reduce
d’incidents fâcheux hors période de      the time required for putting the
garantie.                                machine into service and the risk of
                                         undesirable incidents.
Cette notice d’instructions contient
toutes les informations pratiques        This instruction manual contains all
pour faire fonctionner, manier, régler   the practical information required to
et entretenir votre machine correcte-    operate, handle, adjust and main-
ment et en sécurité.                     tain your machine correctly and
                                         safely.
Conservez la notice d’instructions
pour consultation ultérieure à portée    Keep this instruction manual per-
de la main en permanence ou sur          manently at hand or at your place of
votre lieu de travail (ou d’exploita-    work (or farm).
tion).                                   Give it to any other user, or if your
Transmettez la à tout autre utilisa-     machine is sold or lent to someone
teur, y compris en cas de revente ou     else.
de prêt de votre machine.
                                         The warning symbols below identify
Les symboles de mise en garde ci-        the important messages that should
dessous identifient les messages         be adhered to for your safety. When
importants à respecter pour votre        you see these symbols, read the
sécurité. Lorsque vous rencontrez        message that follows carefully and
ces symboles, lisez attentivement        inform other users.
le message qui suit et informez les
autres utilisateurs:

                                         		 Recommendation of
        Recommandation d’une             particular importance
       importance particulière
                                         		            Warning symbol
        Symbole de mise en garde
                                         Your CARRÉ retailer will advise
Votre revendeur CARRÉ vous               you on how to make the best use
conseillera pour que vous puissiez en    of your machine. Do not remove the
obtenir la meilleure satisfaction. Ne    manufacturer’s plates and the CE
pas ôter les plaques du constructeur     marking affixed to the machine.
et du marquage CE fixées sur la
machine.

                                                              1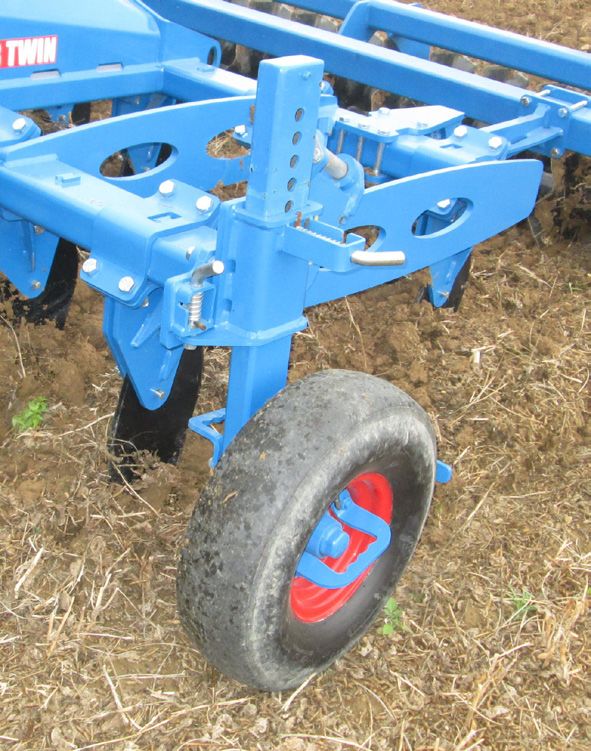
Respectez les consignes de sécurité.   Comply with the safety instructions

CARRÉ décline toutes responsabili-     CARRÉ cannot be held liable for any
tés pour les dommages et incidents     damage and operating incidents oc-
de fonctionnement survenus à la        curring due to use that does comply
suite d’utilisations non conformes     with the instructions in this manual.
aux instructions du présent manuel.
                                       Warranty: Please complete the
Garantie : Veuillez rapidement         warranty certificate enclosed with
compléter le certificat de garantie    the machine and return it as soon
joint avec la machine, et l’envoyer    as possible to the address indica-
à l’adresse indiquée pour qu’elle      ted in order to activate your war-
soit effective. Vous pouvez égale-     ranty.
ment remplir ce certificat de ga-      You also can full in this warranty
rantie directement sur notre site      certificate directly in our website
internet www.carre.fr                  www.carre.fr

                                                          2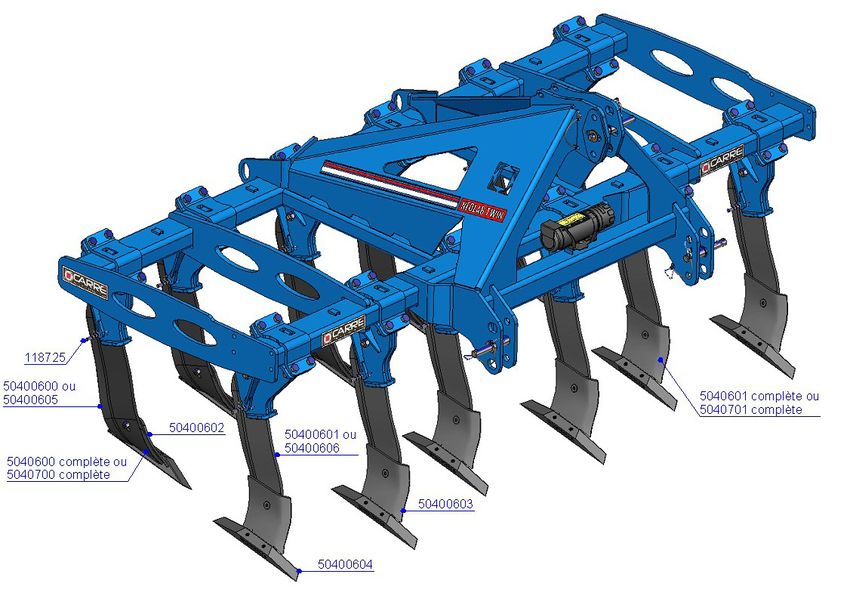
2. SPÉCIFICATIONS - SPECIFICATIONS
2.1 Description - Description -
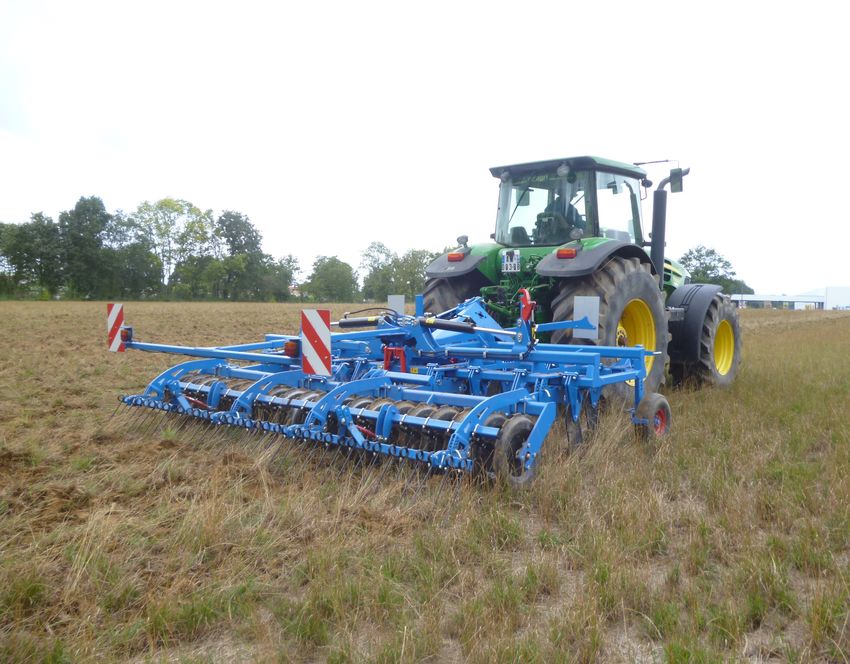
La machine est prévue pour remplacer The implement is designed to be both
le labour et pour décompacter avec un a replacement for ploughing and also a
châssis susceptible de recevoir diffé- subsoiler. It’s frame is capable of recei-
rentes configurations de montage de ving different tine arrangements.
lames.
La machine effectue un travail du sol The implement works the ground wit-
sans retournement avec des lames hout soil inversion, using shear bolt pro-
courbes sécurité boulon jusqu’à 0m30. tected curved tines that have a working
Les largeurs de travail vont de 2m50 à depth of up to 0.3 m.
3m50 fixe et de 4m à 5m repliable. Working widths are from 2.5 m to 3.5 m
La machine peut être équipée de diffé- for the fixed versions and from 4 m to 5
rents équipements arrières. m for the folding versions.
The implement can be equipped with
different rear attachments.
2.2 Caractéristiques techniques - Technical caracteristics
CARACTÉRISTIQUES TECHNIQUES NEOLAB TWIN FIXE / FIXED NEOLAB TWIN TECHNICAL CARACTERISTICS
Largeur - Width 3M 3 M 50
Configuration montage - Tine setup - 1 2 1 2
Largeur de travail - Working width 2 M 50 3M 3M
Nombre de lames - Number of tines - 10 12 12
Puissance requise CV - Power requirement HP 130 160 160
Poids - Weight 750 kg 820 kg 900 kg
CARACTÉRISTIQUES TECHNIQUES NEOLAB TWIN REPLIABLE / FOLDING NEOLAB TWIN TECHNICAL CARACTERISTICS
Largeur - Width 4M 5M
Nombre de lames - Number of 16 20
tines
Puissance Requise CV - Power 210 CV 260 CV
requirement HP
Poids - Weight 1750 kg 1980 kg
Nota : Pour les configurations de NB: for the different tine arrange-
montage des lames voir parag.5.2 ments see paragraph 5.2.
Les caractéristiques techniques, The technical details, dimensions and
dimensions et poids sont données à weight are only given as a guide, they
titre indicatif, elles peuvent être modi- may be modified without warning and
fiées sans préavis et varier vary depending on the equipment and
suivants les équipements et le type the tine arrangement of the NEOLAB
du montage du NEOLAB TWIN. TWIN.
3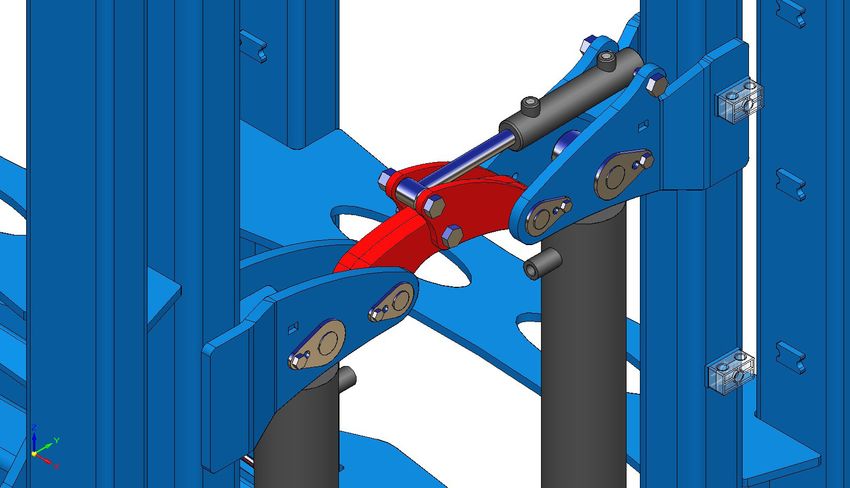
3. CONSIGNES DE SÉCURITÉ - SAFETY INSTRUCTIONS

             3.1 Symboles de sécurité - Safety symbols -
Veillez à ce que les avertissements       Ensure that both the warnings, and
et pictogrammes restent propres et        the warning diagram stickers are
visibles en permanence. En cas de         always clean and visible. In the event
détérioration, demandez des auto-         of deterioration, ask for new warning
collants neufs à votre fabricant (ou      stickers from the manufacturer (or
distributeur).                            your dealer).
En cas de réparation, veillez à ce que    In the event of repairs being carried
les pièces de rechange portent les        out, ensure that the replacement
mêmes autocollants que les pièces         parts carry the same warning stickers
d’origine.                                as the original parts.

                   Lire le livret d’entretien et les
                   consignes de sécurité avant la mise
                   en marche. Avant toute intervention,                            Pour prévenir les fuites dans le circuit
                   éteindre le moteur du tracteur et retirer                       hydraulique, respecter les consignes
                   la clé de contact.                                              du livret d’entretien.

                   Read the maintenance manual and the                             To prevent leaks from the hydraulic
                   safety instructions before starting up.                         circuit, adhere to the instructions in
                   Before any intervention, turn off the                           the maintenance manual.
                   tractor engine and remove the ignition
                   key.                                                            Um Undichtigkeiten an den Hydrau-
                                                                                   likleitungen vorzubeugen, War-
                   Vor Inbetriebnahme Wartungsbuch und                             tungshinweise befolgen.
                   Sicherheitshinweise lesen.
                   Vor Eingriffen an der Maschine Schlep-
                   per-motor abschalten und Zündschlüs-
                   sel ziehen.

                   Ne jamais mettre les mains dans les                             Eloigner toute personne de la zone
                   zones de danger tant que des pièces                             dangereuse, Il y a risque d’écrase-
                   sont en mouvement, il y a risque de                             ment.
                   pincement.
                                                                                   People should be kept away from
                   Never put your hands in hazardous                               the danger zone. There is a risk they
                   areas while the parts are moving.                               may be run over.
                   There is a danger of trapping your
                   hands.                                                          Darauf achten, dass sich niemand im
                                                                                   gefahrenbereich befindet, es besteht
                   Hände bei drehenden Teilen nicht in                             Quetschgefahr.
                   die Gefahrenbereiche halten, es bes-
                   teht Einklemmgefahr.

                                                                 4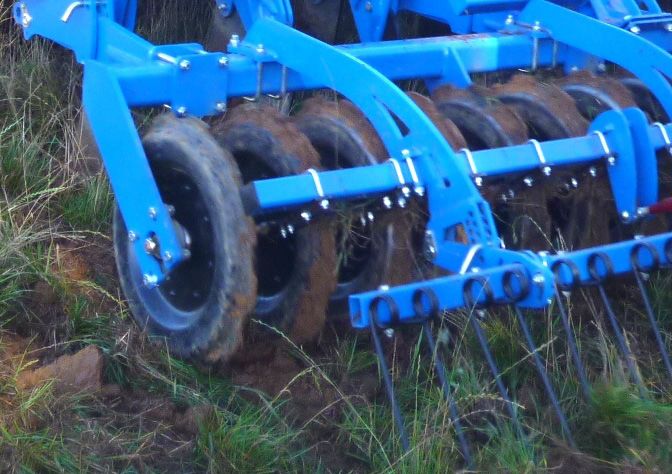
Eloigner toute personne de la zone                            Ne pas monter sur le marche pieds
                        dangereuse, Il y a risque d’écrase-                           pendant le déplacement de la
                        ment.                                                         machine

                        People should be kept away from                               Do not go up on the step during the
                        the danger zone. There is a risk they                         moving of the machine.
                        may be run over.
                                                                                      Nicht des Trittbrett besteigen wegen
                        Alle Person von der Gefahrzone ent-                           der Maschinebewegung.
                        fernen, es gibt Überfahrungsgefahr.

                        Maintenir en place le carter de protec-                       ATTENTION ! Risque de collision
                        tion de la courroie d’entrainement du                         des roues au repliage contre la
                        semoir pour protéger les mains                                cabine du tracteur.

                        Maintain in place the protection cran-                        Be CAREFUL ! Risk of collision of
                        kcase of the training belt of the seed                        the wheels durng the folding against
                        drill to protect your hands.                                  hte tractor.

                        Die Schutzhaube des Antriebsriemens                           ACHTUNG! Kolisionsrisiko der Räde
                        der Sämaschine anstehend erhalten,                            an Klappung gegen des Schlepper-
                        um Hände zu schützen.                                         kabine.

                        Après la 1ère heure de travail, resserrer                       Pour éviter les blessures des yeux,
                        tous les boulons.                                               ne pas regarder directement dans la
                        Les vibrations peuvent desserrer les as-                        zone du capteur radar en service.
                        semblages boulonnés.                                            To avoid eye injuries, do not look di-
                        After the first hour of work, tighten the                       rectly at the area where the radar sen-
                        bolts.                                                          sor is operating.
                        Vibrations can loosen the bolt assembly.                        Um Augenverletzungen zu vermei-
                        Nach der ersten Arbeitsstunde, an-                              den, darf man nicht direkt in den Ra-
                        ziehen Sie bitte die Schrauben.                                 darsensor schauen.
                        Schwingungen können die Schrauben
                        lösen.

         3.2 Utilisation conforme à l’usage prévu - Usage as intended

Le NEOLAB TWIN est un outil pour            The NEOLAB TWIN is an implement
décompacter, aérer et préparer le           designed for subsoiling, aerating and
sol sans le déplacer. Son utilisation       preparing the ground, without soil in-
peut se faire simultanément avec le         version. It can be used simultaneous-
semis.                                      ly with sowing.
Toute utilisation autre que celle-          Any use,other than those mentio-
ci sera considérée comme non                ned above, will be considered as not
conforme à l’usage prévu et dégage-         complying with its intended use, and
ra le constructeur de toute responsa-       therefore free the manufacturer of
bilité en cas de préjudice, l’utilisateur   any liability in the event of a problem
supportera seul les risques résultant       occurring, The user will be solely res-
d’une telle utilisation.                    ponsible for the consequences of any
                                            such use.

                                                                  5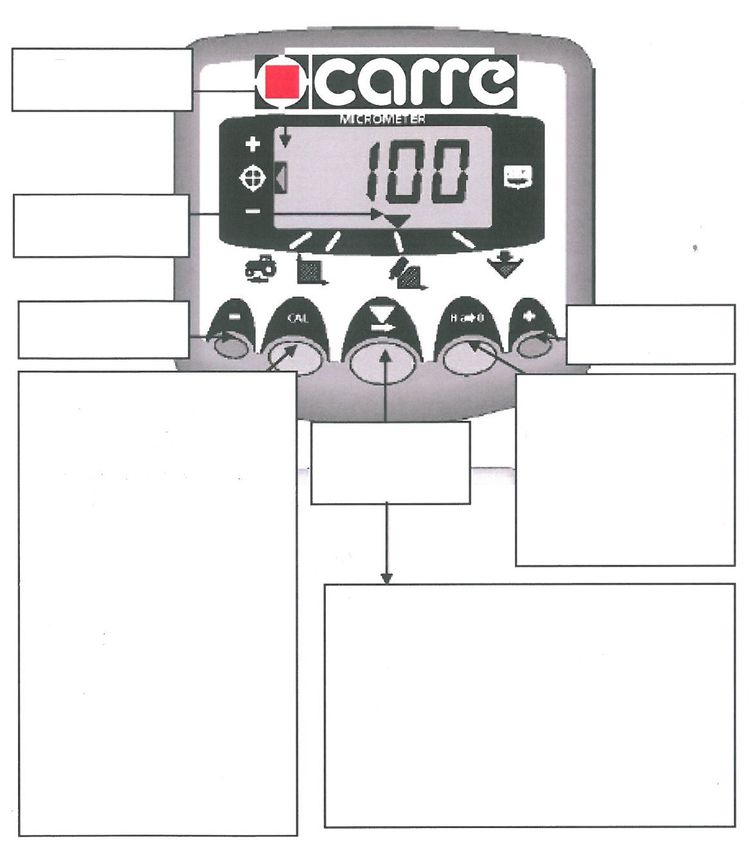
Respectez         l’ensemble          des   All of the instructions for mounting,
prescriptions      d’installation,     de   use, settings, maintenance and
fonctionnement, de réglages, de             repairs shown in this manual must be
maintenance et de réparation                complied with.
contenues dans cette notice.                Only use replacement parts and
Utilisez exclusivement des pièces           accessories that comply with the
de rechange et des accessoires              manufacturers specifications. The
conformes aux préconisations du             use, maintenance and repairs of the
fabricant. L’utilisation, l’entretien       implement should only be carried out
et la remise en état de la machine          by people that have been informed
ne devront être confiés qu’à des            and are aware of any potential hazard.
personnes familiarisées et informées        Do not carry out any modifications
des dangers éventuels.                      (mechanical, electric, hydraulic, or
Ne modifiez pas vous-même et                wheel equipment) yourself or ask
ne faites pas modifier par une              anybody to carry out any modifications
autre personne votre machine et             of your implement or its accessories,
ses accessoires (caractéristiques           without prior written agreement
mécaniques,                  électriques,   from the manufacturer. The non-
hydrauliques, pneumatiques), sans           compliance with these regulations
demander au préalable l’accord écrit        may lead to your implement being
de votre fabricant. Le non-respect de       dangerous. The manufacturer will not
ses règles peut rendre votre machine        be held liable for any damage or any
dangereuse. En cas de dégâts ou             injury caused. All legislation for health
de blessures, la responsabilité du          and safety at work, and the use of
fabricant sera entièrement dégagée.         public highways must be complied
Il convient en outre de respecter les       with.
consignes particulières de prévention
des accidents, ainsi que les règles         The manufacturer refuses all liabi-
générales en matière de sécurité            lity in the event of any accident or
technique, de médecine de travail et        loss following a modification car-
de législation routière.                    ried out on the implement without
                                            his prior agreement.
Le constructeur décline toute res-
ponsabilité en cas de préjudice ré-
sultant d’une modification apportée
à la machine sans son agrément.

           3.3 Prescription générale de sécurité - General safety instructions
N’utiliser la machine que si tous les       Only use the implement If all the
dispositifs de protection et de sécuri-     equipment related to safety is in
té sont en place et fonctionnent bien.      place and functions correctly.

Contrôler régulièrement le bon ser-         Ensure that all bolts are correctly
rage des vis et les resserrer si néces-     tightened, and if necessary re-tigh-
saire, en particulier les vis de serrage    ten them, particularly the tine holding
des dents.                                  bolts.

En cas d’incidents de fonctionne-           In the event of any incident occur-
ment, arrêter tout de suite la ma-          ring while the implement is in use,
chine, puis procéder ou faire procé-        stop immediately and carry out any
der immédiatement à la réparation           repairs that are necessary.
de la panne.

                                                                 6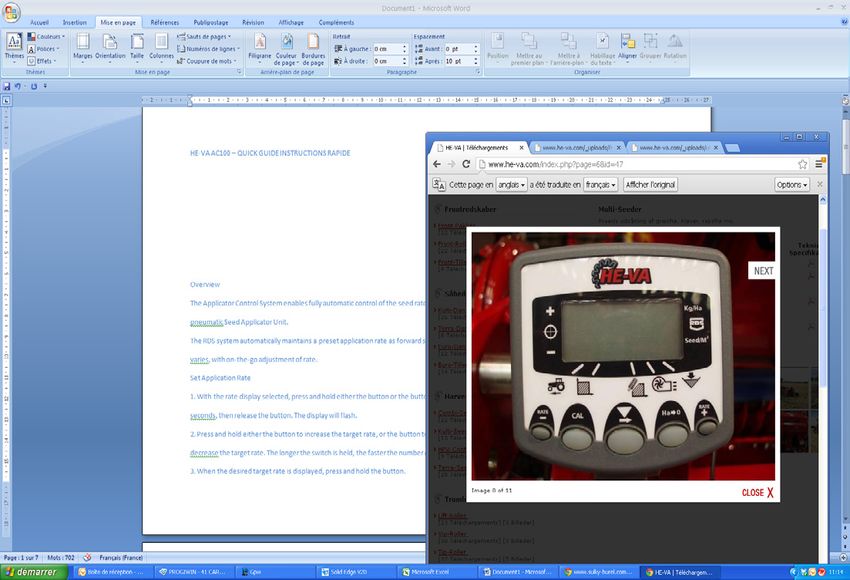
3.4 Sécurité sur le domaine public - Safety in the public domain
 Avant d’aller sur une route, il faut se     Before using the public highway it is
 familiariser avec le fonctionnement         essential that the operator fully un-
 de toutes les commandes.                    derstands all of the controls.
 Respectez les règles du code de la          Respect the highway code when
 route lorsque vous vous engagez sur         using roads and tracks and all other
 le domaine public (routes, chemins et       public areas. Ensure that the state
 places). Assurez vous préalablement         of the implement complies with the
 que l’état de la machine est conforme       highway code, particularly marker
 aux réglementations prescrites par le       panels and road lighting equipment.
 code de la route, en particulier au ni-     Comply with the permitted transport
 veau de la signalisation et de l’éclai-     width.
 rage.                                       Ensure that your speed and driving
 Respecter la largeur de transport           style is suitable for the roads , tracks
 admise.                                     and terrain. Always remain vigi-
Adaptez votre vitesse et votre mode          lant and cautious, particularly when
de conduite aux terrains, routes et          travelling over uneven or sloping
chemins. Soyez vigilants et prudents         ground; drive at a low speed particu-
en toute circonstance et notamment           larly when turning, and avoid any bru-
sur les terrains accidentés        et        tal changes of direction. Do not start
pentus, conduisez la machine à faible        or brake aggressively when going up
vitesse, surtout dans les virages et         or down a slope.
évitez les brusques changements de           The manner in which the tractor
direction. Ne pas freiner ou démarrer        behaves is determined by the imple-
brutalement en montant ou descendant         ment attached to it. Comply with the
une pente.                                   maximum axle weight limits, and
La conduite est influencée par la            overall laden weight in order that
machine attelée sur le tracteur.             precise steering and braking can be
Respecter la limite de charge d’essieu       maintained, and in bends pay atten-
et la masse totale admise afin que la        tion to overhang and momentum.
précision de direction et de freinage soit   Never carry anyone on the imple-
maintenue, et, dans les virages, tenir       ment.
particulièrement compte du porte à faux      Ensure that the hydraulic locking is
et de la masse d’inertie de la machine.      used to ensure that the implement is
                                             transported safely.
Ne transportez aucune personne sur
la machine.
Veillez à utiliser le verrouillage hy-
draulique de sécurité pour le trans-
port.

                                 Verrouillage hydraulique de sécurité à distributeur indépendant
                                 Hydraulic transport locking using an independent hydraulic service

                                                               7
3.5 Prévention des accidents - Accidents prevention
En complément aux recommanda- Always comply with the Health and
tions faites dans ce manuel, respec- Safety at Work Regulations, as well
tez les prescriptions des assurances as the recommendations set out in
mutuelles agricoles. this instruction manual.
Pendant l’opération d’attelage de la When hitching the implement to the
machine sur le tracteur : tractor:
- Veiller à ce que la machine repose - Ensure that the implement is stan-
sur un sol stable. ding on firm ground.
- Ne jamais rester entre le trac- - Never stand between the
teur et la machine il y a risque d’acci- tractor and the implement is there is
dent. an accident risk.
- Manœuvrer le relevage trois - Always alter the three point
points hydraulique lentement et avec linkage position slowly and carefully.
précaution. - Ensure that the category of
- Vérifier que les catégories de the implement linkage and the tractor
l’attelage trois points du tracteur et linkage are the same.
de la machine correspondent.
Système hydraulique : Hydraulic system :
- Ne brancher les conduites hydrau- - Never attach the hydraulic pipes
liques au système hydraulique du to the tractor if there is pressure in
tracteur que s’il n’y a aucune pres- either the implement’s hydraulic sys-
sion coté tracteur et coté machine. tem or the tractor’s hydraulic system.
- Le système hydraulique fonctionne - The hydraulic system works under
avec de la haute pression, vérifier a high pressure, check that there
régulièrement si toutes les conduites, are no hydraulic leaks on any of the
les tuyaux et les raccords n’ont pas hydraulic pipes, and that the connec-
de fuite ou de détériorations visibles. tors do not leak, or that there is any
Si c’est le cas, le remplacement doit visible deterioration.In the event of
être immédiat. there being leaks or deterioration
- L’huile s’échappant sous pression replace the defective pipe or connec-
peut causer des blessures et des tors immediately.
infections: Consulter un médecin. - Oil escaping under high pressure
- Avant de travailler sur le circuit hy- can cause injuries and infections.
draulique, enlever la pression et cou- Consult a Doctor.
per le moteur. - Before working on a hydraulic cir-
cuit release all of the pressure, and
Pendant l’utilisation : stop the engine.
- Avant la mise en route, s’assurer
que personne ne se trouve à proxi- During use:
mité de la machine. Veiller à avoir - Before starting off, ensure that
une visibilité suffisante. nobody is in the area around the
- Ne transporter aucune personne machine. Ensure that you have suf-
sur la machine pendant le travail. ficient visibility.
- Aucun dispositif de protection pres- - Never carry anyone on the imple-
crit et livré avec la machine ne doit ment.
être enlevé. - Never take off any of the safety de-
- Eloigner toute personne se trouvant vices or guards shown in the manual.
dans la zone de pivotement des ral- - Ensure that nobody is in the area
longes repliables par hydraulique. around hydraulically controlled pivot
- La machine entraîne au cours du points of wings etc.
travail et lors du déplacement de - When the machine is in work it can
nombreuses projections de terre et cause earth and stones etc. to be
de cailloux. Eloigner toute personne thrown up. Ensure that nobody is in
se situant à proximité de la machine. the area around it.
83.6 Entretien et réparation - Maintenance and repair -
- Respecter les délais prescrits ou Comply with the timing shown in this
indiqués dans ce manuel pour pro- manual when checking over the im-
céder aux vérifications et inspections plement.
prévues. - Before carrying out maintenance
- Avant de faire des travaux d’entre- and repairs unhitch the implement
tien et de réparation, dételer la ma- from the tractor.
chine du tracteur. - Do not carry out any maintenance
- Ne procéder à des travaux d’entre- or repairs unless the implement is
tien ou de réparation que si la ma- placed on firm ground and there is no
chine repose à plat sur un sol bien risk of it turning over.
stable et ne risque pas de se renver- - Never carry out any repairs or main-
ser. tenance if the implement is raised
- Ne pas effectuer des travaux d’en- unless appropriate stands have been
tretien sur l’appareil relevé sans avoir put into place to ensure that it is safe
mis par mesure de sécurité des sup- to do so.
ports appropriés.
- Pour le montage et le démontage, - For assembly and dismantling
utiliser des moyens appropriés qui ne always use the appropriate means to
mettent pas votre sécurité en danger. avoid endangering your own safety.
- Profiter du nettoyage de la machine - Make the most of cleaning the ma-
à la fin de chaque campagne - au mi- chine at the end of the season(at the
nimum - pour vérifier si les conduites very least) to check the condition of
hydrauliques sont bien étanches, si all hydraulic pipes and fittings, that
les raccords sont desserrés ou s’il the connectors are not loose, and
y a des défauts dus au frottement. that there is no damage due to rub-
Remplacer immédiatement ce qui est bing.
détérioré. - Replace any parts that shows signs
- Pour le remplacement des pièces of deterioration immediately.
d’usure, utiliser des outils appropriés - All replacement parts must comply
et porter des gants. with the manufacturers specifica-
- Les pièces détachées doivent cor- tions, which is the case when ge-
respondre aux exigences techniques nuine replacement parts are used.
du constructeur, ce qui est toujours le - Before carrying out any welding on
cas avec des pièces d’origine. the implement when it is hitched to
- Avant d’effectuer des travaux de a tractor, ensure that the alternator
soudure électrique sur la machine, wires and the battery cables have
lorsqu’il est attelé sur le tracteur, dé- been disconnected.
connecter les câbles de l’alternateur
et de la batterie.
94. COMMANDES DE L’OPÉRATEUR - OPERATOR CONTROLS
En matière d’attelage, et pour For safety reasons when
une raison de sécurité, il est hitching the implement it is
impératif d’utiliser les broches d ‘ori- essential to use the pins provided.
gine. Afin de ne pas les égarer, les In order to prevent them from being
broches ainsi que leurs goupilles lost, the pins and their linchpins are
clips sont liées à la machine par une attached to the implement by a small
chaînette. chain.
Where the implement wings
Dans le cas d’une machine à are hydraulically folded, it is
repliage hydraulique des rallonges, essential that the tractor’s hydraulic
la commande du circuit hydraulique service requires pressure to be main-
doit être à action maintenue, c’est à tained on its control button or lever in
dire que le distributeur du tracteur, order to operate it, that is to say that
lorsqu’il n’est pas maintenu, revient the hydraulic control must always
en position neutre et le mouvement spring back into neutral when it is
est arrêté. released.
5. MONTAGE ET MISE EN SERVICE - ASSEMBLY AND PUTTING INTO
SERVICE
5.1 Liaison sur le tracteur - Link on the tractor
Le NEOLAB TWIN fixe est équipé The fixed version of the NEOLAB
d’un attelage 3 Points à broches TWIN is equipped with a 3 point lin-
entre chape N°3, avec broche N°2/3. kage using a Cat. 2/3 pin and a Cat.3
Le NEOLAB TWIN repliable est clevis arrangement.
équipé d’un attelage 3 Points à The folding version of the NEOLAB
broches entre chape N°3/4 avec TWIN is equipped with 3 point lin-
broche N°3/4. kage using a Cat.3/4 clevis and a
10ATTENTION : Ne jamais rester entre WARNING: Never stay between the
le tracteur et le NEOLAB TWIN, il y tractor and the NEOLAB TWIN as
a risque d’accident. there is the risk of an accident oc-
curring.
L’ensemble «Tracteur +
NEOLAB TWIN» représente une The weight of the combi-
masse importante. En vue de per- nation ‘NEOLAB TWIN + tractor’ is
mettre une stabilité statique suffi- extremely heavy. In order to ensure
sante il faut s’assurer que la charge stability when the combination is
sur l’essieu avant du tracteur n’est stationary, it is essential that the
pas inférieure à 20% de la masse weight on the front axle of the trac-
à vide du tracteur. Pour cela la tor exceeds 20% of the total tractor
méthode la plus pratique consiste unladen weight. The easiest way
à peser l’avant du tracteur sur une of doing this is to weigh the front of
bascule et comparer le résultat avec the tractor on a weighbridge and to
la valeur conseillée. Dans la notice compare it with the recommended
du tracteur, ajouter des masses à weight according to the tractors ins-
l’avant du tracteur si nécéssaire. truction manual. Use tractor front
end weights if necessary.
5.2 Montage des lames - Tine mounting
• 2 choix possible pour le travail du sol - 2 Possibilities for working the ground
Montage 1: lames en symétrie - Symmetrical tine Montage 2: lames en opposé - Tines arranged oppo-
arrangement site each other.
Pour fissurer de manière intensive - For intensive Pour travailler de manière uniforme - For uniform
soil restructuring soil work
• 2 choix possible pour le positionnement des lames -
Choice of two different layouts for the tines.
Sens d’avance - Direction of travel
Type 1
Pour éliminer le tassement - Pour améliorer le flux de terre -
To eliminate compaction To improve soil flow
Type 2
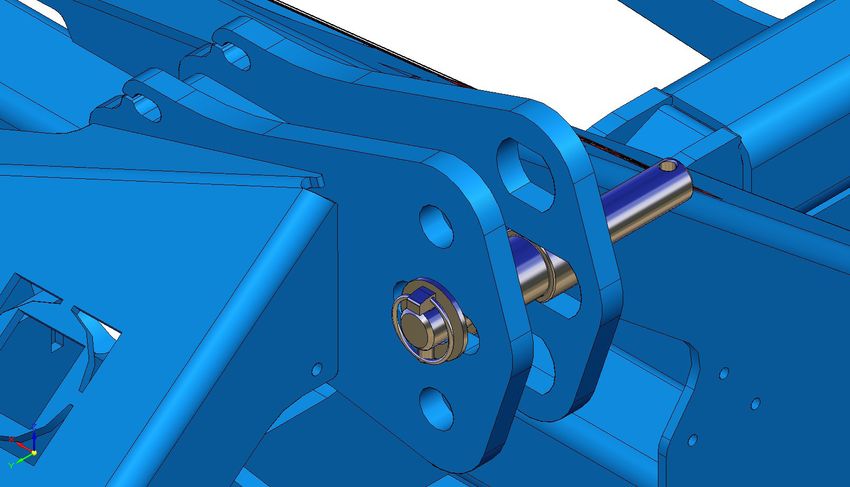
11Les lames sont montées avec un The tines are mounted with a pre-cut
axe précisaillé pour dégager la lame shear pin in order to allow them to
en cas d’effort important. Cet axe à break back if there is too much resis-
positions multiples, peut être utilisé tance. The shear pin can be used up
jusqu’à 3 fois. to 3 times as it has several sections.
Il existe plusieurs configurations pos- There are various settings in order to
sibles en fonction du travail recher- achieve the required finish.
ché.
Axe à position multiple - Multiposition tine
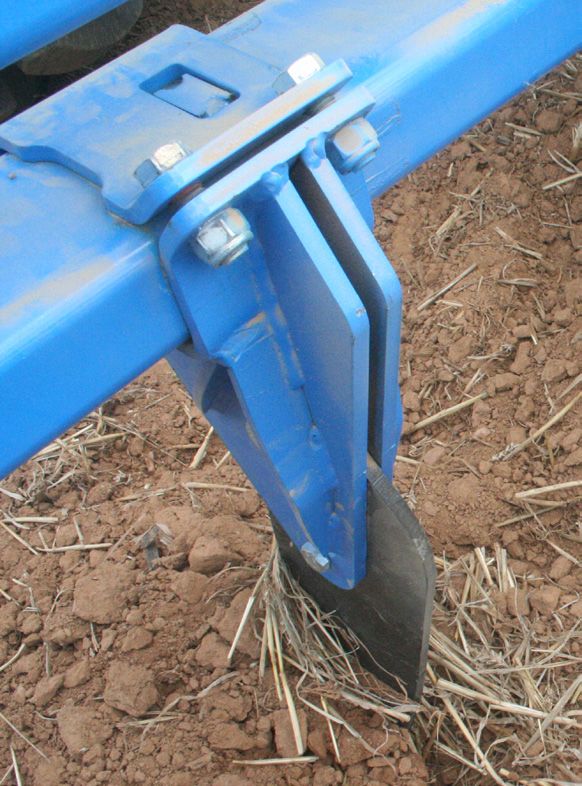
Deux types de montage de lames There are two different tine possibili-
sont possible, lame 600 ou lame 700. ties, the 600 tine or the 700 tine.The
Le positionnement des brides de tine holder bracket positions are de-
lames est défini par l’emplacement termined by the spigots on the frame.
de l’ergot sur le châssis.
Ergot -Spigot
Le sens de la lame Echancrure côté courbure
gauche ou droit est The indentation is on the
défini par l’échancrure same side as the curve of
sur la bride. The left or the tine.
right hand tine position
is determined by the
indentation on the tine
mounting bracket.
125.3 Equipements - Equipments
5 équipements arrières sont au choix. There is a choice of five rear mounted
attachments.
5.3.1 Rouleau BP - CRUMBLER ROLLER
- Herse peigne - Pivoting bar with a single
escamotable Ø 16 sur 1 row of levelling harrow tines
barre + rouleau 8 barres Ø16 + crumbler roller Ø 445
carrées 25 mm, Ø 445. with 8 square (25mm) bars.
Permet de niveler et Enables levelling and fir-
rappuyer la couche ming of the area that has
travaillée been worked.
5.3.2 Rouleau DO - WAVY DISC CRUMBLER ROLLER
- Double rouleau disques
- Double row of wavy
ondulés Ø 510 pas
discs Ø510, spacing 125
de 125 mm. Permet de
mm.Enables slicing and
trancher et mélanger
mixing of crop residues in
les résidus organiques
order to encourage decom-
et favorise la
position
décomposition
5.3.3 Rouleau DA - NOTCHED RING PACKER ROLLER
- Rouleau simple
- Packer roller with a single
disque alvéolé
row of notched discs
Ø 600 au pas
Ø600,spacing 230mm.
de 230 mm. Permet de
Presses the soil in order
consolider le sol pour
to to protect it from poor
résister aux intempé-
weather. Reduces the effect
ries. Diminution du
of erosion.
phénomène d’érosion
135.3.4 Rouleau DAP - NOTCHED RING PACKER ROLLER
- Pivoting bar with a single
- Herse peigne
row of levelling harrow tines
escamotable Ø16 sur 1
Ø16 + packer roller with a
barre + rouleau simple
single row of notched discs
disque alvéolé Ø600 au
Ø600,spacing 230mm.
pas de 230 mm.Permet de
Controls the soil flow,
réguler le flux de terre et
spreads crop debris and
d’égaliser les débris puis
presses the soil in order
consolide le sol pour
to to protect it from poor
résister au intempéries
weather.
5.3.5 Rouleau PDA - NOTCHED RING PACKER ROLLER
- Rouleau simple disque - Packer roller with a single
alvéolé Ø600 au pas de row of notched discs
230 mm + herse peigne Ø600,spacing 230mm +
escamotable Ø10 sur 1 pivoting bar with a single
barre. Permet de conso- row of levelling harrow tines
lider le sol et parfaire Ø10.
la finition lors de semis
avec le SEMLOC
5.4 Réglage équipement arrière - Rear equipment adjustment
Quel que soit le type d’équipement, The working depth is governed by the
la profondeur de travail souhaitée pin position on the NEOLAB TWIN’s
est fonction de l’emplacement de la rear equipment mounting brackets
broche sur le secteur de terrage ar- regardless of the type of rear equip-
rière du NEOLAB TWIN. ment.
14Exemple : Tableau indicatif des valeurs de terrage avec rouleau disque alvéolé (DA) Ø600 mm.
Example: a table showing the working depths for the ROULEAU DA (NOTCHED RING PACKER ROLLER) Ø600mm
Secteur - Position 1 2 3 4 5 7
Profondeur de travail en mm - Working depth mm
Lame 600 - Tine 600
- - 100 120 180 280
Profondeur de travail en mm - Working depth mm
Lame 700 - Tine 700
100 160 190 250 290 350
Deux positions pour l’ancrage du bras de fixation de l’équipement arrière sont possible.
There are two positions possible for the rear equipment’s mounting brackets.
Hole for mounting with a 600 Haut - Top
mm tine
Hole for mounting with a
700 mm tine
Bas - Bottom
Depth control pin contact area
155.5 Réglage roue de terrage - Depth control wheel settings
Les roues de terrage permettent de The depth control wheels enable the
contrôler de manière fiable la profon- working depth to be controlled in a
deur de travail pour offrir une meil- more precise manner and offer better
leure stabilité de l’appareil. implement stability.
Exemple : Tableau indicatif des valeurs de terrage avec roue pneu Ø535 mm.
Example: a table showing the working depths for the rubber tyred depth control wheel Ø535mm
Secteur -
1 2 3 4 5 6 7 8 9 10 11
Position
Lame 600 Profondeur de travail en mm - Working depth mm
- Tine 600 - - - - 88 123 158 193 228 263 298
Lame 700 Profondeur de travail en mm - Working depth mm
- Tine 700 - 83 118 153 188 223 258 293 328 363 398
La valeur d’intervalle de terrage entre deux trous du secteur de roue est de 35 mm.
Changing the depth control wheel adjustment by one hole alters the working depth by 35 mm.
16Dans le cas ou la machine est dotée Where the implement is equipped
d’un équipement arrière, les roues with the following equipment the
de terrage permettent un équilibre depth control wheels provide give
avant/arrière performant. Dans ce highly effective front/rear stability.
cas, il est préconisé de positionner la Where this is the case we advise you
broche 3e point dans la lumière de to put the top link pin in the slit posi-
l’attelage. tion at the top of the implement’s 3
point linkage.
175.6 Equipement SEMLOC - SEMLOC equipment
5.6.1 Semloc
Semoir SEMLOC : Le semoir The SEMLOC seeder unit:The
de petites graines SEMLOC à SEMLOC small grain seeder
distribution pneumatique avec distributes seed pneumatically
soufflerie hydraulique permet using a hydraulic fan enabling it
de diffuser de la semence sur to distribute seed uniformly over
toute la largeur de travail du the whole width of the NEOLAB
NEOLAB TWIN. La semence est TWIN. Seed placement is uniform
uniformément répartie grâce au thanks to the distribution outlets
positionnement des diffuseurs being placed close to the ground
et à leur faible hauteur par (wind has no effect on seed
rapport au sol (le vent n’a pas distribution). Seed distribution is
d’incidence sur la répartition). via a fluted cylinder driven by an
La semence est distribuée par un electric motor and is proportional
cylindre à cannelures entraîné to forward speed. A hydraulic
par un moteur électrique, fan sends the seed to the seed
le débit est proportionnel à distribution heads. Before filling
l’avancement. Un ventilateur the hopper with seed check that
hydraulique propulse les graines it is fitted with the correct seed
vers les diffuseurs. distribution roller, adjust the
Avant de remplir de semences, shutter above the fluted roller to
contrôler si l’on a bien le bon suit the size of the seed.
rouleau de dosage et régler le
berceau au-dessus du rouleau
au bon écartement selon la taille
du grain.
5.6.2 Vidange ou nettoyage parfait - Emptying or perfect cleaning
Pour vider le semoir, monter In order to empty the seeder unit
la tôle de dérivation, placer raise the guide plate, set the
le berceau supérieur tout en shutter above the fluted roller as
haut, appuyer sur le bouton high as possible, and press on
d’essai de débit pour évacuer le the output test button to empty
reste de semences. Pour vider the rest of the seed.
complétement, sortir le rouleau To empty it completely take out
doseur. the fluted roller.
Cette opération doit être effectuée avec une personne seule
This operation must be carried out single-handedly
185.6.3 Soufflerie hydraulique - Hydraulic fan
La soufflerie hydraulique est montée The hydraulic fan is fitted on both the
sur le NEOLAB TWIN, modèle fixe NEOLAB TWIN fixed and folding
ou repliable. models.
Un manomètre indique par la A pressure gauge indicates the
pression la vitesse de rotation hydraulic fan speed by using the
soufflerie. pressure.
La pression ne doit pas The pressure must not
excéder 160 bars exceed 160 bars
Vitesse de la soufflerie hydraulique en fonction de la pression - Hydraulic fan speed
depending on the pressure - Geschwindigkeit des hydraulischen Gebläses relativ
zum Drucks
Ce tableau est donné pour une vitesse d’environ 8 km/h.
This table is given for a speed of about 8 km/h.
Diese Tabelle ist auf eine Geschwindigkeit von 8 km/h ausgelegt.
Largeur (M) - Width (M) - Breite (M) Vitesse de soufflerie (tr/min) Pression sur manomètre (bars)
Fan speed (rpm) Pressure shown on the pressure
gauge (bars)
1 Gebläsegeschwindigkeit (U/Min) Druck am Manometer (Bar)
Approx 2
Approx
3 3120 45
3,50 3640 55
4 4160 65
5 5200 80
1 : Choisir la largeur de travail -Choose the working width - Die Arbeitsbreite wählen
2 : Ensuite, voir quelle pression vous devez ajuster - Then, see what pressure you need to adjust -
Anschließend den entsprechenden Druck einstellen.
Le débit maximal autorisé ne doit pas excéder 40 litres/mn - The maximum oil flow must not
exceed 40 L per minute - Die zugelassene maximale Streumenge darf 40 Liter/Min. nicht
überschreiten.
Mettre en fonctionnement la soufflerie hydraulique pendant 5 minutes, pour sécher les tuyaux.
Run the hydraulic fan for five minutes to dry the seed tubes.
Zum Trocknen der äußeren Rohre soll das hydraulische Gebläse, für 5 Minuten in Betrieb genommen
werden.
195.7 Utilisation du boitier électronique - Use of the electronic control box
GENERALITES GENERAL
Le boitier électronique du semoir The seeder’s electronic control box
permet un contrôle entièrement au- provides fully automatic control
tomatique du débit des semences. of seed rates. The RDS system
Le système RDS permet la régu- maintains the required seed rate
lation d’une dose quel que soit la regardless of the forward speed.
vitesse d’avancement. It is possible to increase or reduce
Un sur dosage ou un sous dosage the seed rate per hectare from the
de la dose hectare est possible tractor cab.
depuis la cabine du tracteur.
Indicateur dose cible
Target seed rate indicator
Curseur selection canal
Channel selection indicator
Diminution valeur
Augmentation valeur
Decrease value
Increase a value
Sectionner le canal 2 et appuyer A l’affichage du compteur d’Ha
sur CAL pour basculer d’un comp- selectionné, appuyez sur cette
teur d’Ha à l’autre touche pendant 5 secondes pour
ou Selection du canal le RAZ
Sectionner le canal 1 et appuyer Channel selection When the hectare metre is
sur CAL pendant 10 secondes pour selected, press on this button
basculer en mode programmation for five seconds in order to set it
facteur calibration radar back to 0
ou
Sectionner le canal 2 et appuyer
sur CAL pendant 10 secondes pour
basculer en mode programmation
largeur CANAL FONCTION UNITES
1 Vitesse d’avance Km/h
Select Channel 2 and press on CAL 2 Compteur d’hectare 1 ou 2 Ha
to switch from one hectare metre to 3 Non utilisé /
the other 4 Dose cible de semis Kg/ha
or 5 Non utilisé /
select Channel 1 and press on CAL 6 Niveau trémie /
Ces canaux ont des fonctions différentes lorsque l’appareil est réglé en mode
for 10 seconds in order to switch to
programmation (CAL) 1,2,3 ou 4
radar calibration mode CHANNEL FUNCTION UNIT
or 1 Forward speed Km/h
Or select channel 2 and press on 2 Hectare metre 1 or 2 Ha
CAL for 10 seconds in order to set 3 Not used /
the working width 4 Target seed rate Kg/ha
5 Not used /
6 Hopper seed level /
The channels have different functions when the electronic control box is set in
programming mode
20 Réglage de la dose de semis
1. Sélectionner le canal 4 à l’aide de la touche , appuyez et maintenez enfoncée la touche
ou la touche pendant 5 secondes, puis relâchez la touche. L'affichage de la dose cible se met
à clignoter.
2. Appuyez et maintenez enfoncée la touche pour augmenter la dose, ou sur la touche
pour diminuer la dose. Plus la touche est maintenue enfoncée longuement, plus le changement de
numéro est rapide.
3. Lorsque la dose cible de semis désirée s'affiche, appuyez et maintenez enfoncée la touche
L'appareil émet un bip 5 fois et l'écran alterne entre la dose cible de semis fixée et la vitesse
calculée d’avance minimale. Après 5 secondes, l'écran affiche donE, après quoi la touche peut
être relâchée pour revenir au mode de fonctionnement normal.
N.B. : La vitesse d’avance minimale ne doit pas être inférieure à 1,5 km/h
.
Test de calibrage
1. S’assurer lors de ce test que la turbine de soufflerie est inactive
2. Enlever le couvercle protecteur du doseur puis mettre en lieu et place la tôle déflecteur dans les
fentes prévues à cet effet.
3. Mettre en place la bassine sous la sortie de semence puis maintenez appuyé le bouton PRIME
sur la boite grise placé latéralement sur le châssis du semoir.
3. Une fois que vous avez distribué suffisamment de semence, relâchez le bouton PRIME et peser
la semence obtenue.
La valeur théorique de la semence réceptionnée clignote sur l'affichage.
4. Ajuster la valeur affichée en fonction de la valeur mesurée à l'aide des touches ou
5. Appuyez une fois sur la touche pour afficher la vitesse minimale d’avancement requise.
6. Appuyez de nouveau sur la touche pour enregistrer le nouveau facteur d'étalonnage.
L'écran affiche donE pour indiquer que le nouveau facteur de calibrage est enregistré.
N.B. : La valeur pesée lors du test de calibrage ne doit pas excéder 9.999Kg
Réglage de la largeur de semis
1. Sélectionner le canal 2 à l’aide de la touche
2. Appuyez et maintenez enfoncée la touche pendant 5 secondes. L‘affichage clignote
"tot.1", puis "tot.2" puis affiche la largeur de semis.
Largeur par défaut = 4 mètres.
3. Continuez de maintenir enfoncée la touche et appuyez sur la touche de manière
ponctuelle pour sélectionner le chiffre ou la virgule à changer
4. Continuez de maintenir enfoncée la touche et appuyez sur la touche de manière
continue pour modifier le chiffre ou l’emplacement de la virgule
4. Relâchez la touche pour retourner à l’affichage principal
21 Affichage compteur d’Ha et remise à zéro
1. Sélectionner le canal 2 à l’aide de la touche
2. Appuyez une fois sur la touche l‘affichage "tot.1" s’affiche.
3. Appuyez une seconde fois sur la touche l‘affichage "tot.2" s’affiche.
4. Appuyez et maintenez enfoncée la touche pour remettre à zéro les compteurs d’Ha
de manière respective.
Réglage du pré démarrage
1. Moniteur éteint, appuyez et maintenez enfoncée la touche puis allumez le moniteur.
2. Le moniteur passe en mode programmation 2 sur le canal 1
3. Sélectionner le canal 6 avec la touche
4. Appuyez et maintenez enfoncée la touche pour changer le nombre de secondes
avant le démarrage
5. Eteindre le moniteur pour sauvegarder les modifications puis le rallumez pour reprendre
un fonctionnement normal
Utilisation du pré démarrage
1. L’ensemble machine doit être posée dans le sol, turbine en fonctionnement nominal.
2. Appuyez une fois sur la touche , le moteur commence à tourner pendant le nombre
défini de secondes au pré démarrage
3. Si après ce laps de temps la valeur de vitesse d’avancement n’est pas supérieure à 2
Km/h, le moteur s’arrêtera de tourner
3. Si après ce laps de temps la valeur de vitesse d’avancement est supérieure à 2 Km/h, le
moteur continuera de tourner et prendra en compte l’information radar
Coupure
manuelle
Afficheur
Bornier
Terminal Bouton
essai débit
Radar
Alimentation
Capteur niveau Coupure
Motorisation trémie automatique
22Setting the seed rate
1.Select Channel 4 by using the button press and keep pressure on the button. or the button. for five
seconds, release the button. The target dose will start to flash.
2.Press and maintain pressure on the button to increase the seed rate, or on the button to reduce the
seed rate. The longer the pressure is maintained on the button, the quicker the numbers change.
3.When the required seed rate is shown, press and maintain pressure on the button . The control box will beep
5 times, and the screen will alternate between the target seed rate chosen and the minimum calculated forward speed.
After five seconds donE will appear on the screen after which the button can be released in order to return to the nor-
mal operation mode.
N.b.: the minimum forward speed must not be less than 1.5 km per hour
Calibration test
1.Ensure that the hydraulic fan is stationary.
2.Take the cover off the seed dispenser and put the deflector plate in the slits provided.
3.Put the container under the seed outlet and press the PRIME button that is on the grey box on the side of the seeder
frame.
4.Once you have collected enough seed release the PRIME button and weigh the seed collected.
The theoretical weight that you should have collected will flash on the screen.
5.Change the amount shown on the screen to the amount collected by using the buttons or .
6.Press the button once, to show the required minimum forward speed.
7. Press the button again to memorise the new calibration setting.The screen will show done to confirm that the
calibration setting has been put into the memory.
N.b.: the amount of weighed during the calibration test must not exceed 9.999 kg
Setting the working width
1.Select Channel 2 by using the button.
2.Press and maintain pressure on the button for five seconds. The screen will flash «tot.1» then»tot.2» then show
the working width. Default setting = 4 metres.
3.Continue to maintain the pressure on the button and press on the button in order to select the number or
the decimal point to be altered.
4.Continue to maintain pressure on the button and press on the button in such a way that it continues to
alter the number or the position of the decimal point
5.Release the button in order to return to the main screen.
23Hectare metre and resetting to zero
1.Select Channel 2 with the aid of the button .
2.Press on the button once «tot1.» will appear on the screen.
3.Select Channel 6 with the aid of the button .
Press and maintain pressure on the button in order to put the hectare metre back to zero.
Pre-start settings
1.The monitor is switched off, press and maintain pressure on the button then turn the monitor on.
2.The monitor changes to programming mode 2 on Channel 1.
3.Select Channel 6 with the button .
4.Press and maintain pressure on the button in order to change the number of seconds before starting.
5.Turn the monitor off in order to save any modifications and then turn it back on to continue in normal work
mode.
Use of the pre-start
1.The implement must be on the ground, with the hydraulic fan working.
2.Press once on the button , the motor will start to run for the period set as a pre-start setting.
3.If, after the time entered has passed, the forward speed is not above 2 km/h the motor will stop running.
4.If, after the time entered has passed, the forward speed is above 2 km/h the motor will continue to run and
take the information received from the radar into account.
Manual
control
Screen Junction box
Terminal Output test button
Radar
Electric supply
cable
Hopper level Automatic cut out
Motor sensor
24Programmation - Programming
Mode 1 Mode 2 Mode 3 Mode 4
Mode d’entrée - En mode d’affichage normal, Afficheur OFF, appuyez et mainte- Afficheur OFF, appuyez et mainte- Appuyer et maitenez enfonçé la
Entry mode sélectionner le canal à modifier et nez enfonçé la touche CAL 10 nez enfonçé la touche HA-0 pen- touche RATE + 10 secondes pen-
maintenez enfonçé le bouton CAL secondes pendant la commuta- dant la commutation de l’afficheur dant la commutation de l’afficheur
en continu. tion de l’afficheur sur ON. sur ON. sur ON.
In normal display mode choose Display OFF Display OFF press and maintain Press and maintain pressure on
the channel to be modified press and maintain pressure on pressure on the button HA-O the button RATE+ for seconds,
whilst maintaining pressure on the the button CAL for 10 seconds while the display is being turned while the display is being turned
button CAL whilst turning the display ON. ON. ON.
Sélection du canal - Appuyer sur touche CAL Appuyer sur touce HA-0 Appuyer sur touche RATE +
Channel selection Press on the button CAL Press on the button HA–0 Press on the button RATE+
Canal 1 - Channel 1 Facteur capteur de vitesse Simulation vitesse d’avance Pulses (600)
(7,78 mn/pulse) (10 km/H)
Speed sensor coefficient (7.78 Simulation of forward speed
mm/pulse) (10 km/h)
25
Canal 2 - Channel 2 Largeur de travail (4.0m) Compteur d’Ha total (Ha) Réponse (1000)
Working width (4.0m) Total hectare metre Response (1000)
(ha)
Canal 3 - Channel 3 Valeur en % variation dose cible
(5%)
Number in % for target dose
variation (5%)
Canal 4 - Channel 4 Facteur calibration semence (0.01 Pré démarrage automatique (ON) Affichage dose cible Calibration vitesse rotation moteur
Kg/tour) Automatic pre-start (ON) (0-9999 grams) (35 rpm)
Seed calibration coefficient (0.01 Display target dose Calibration motor rotation speed
kg/turn) (0-9999 grams) (35 rpm)
Canal 5 - Channel 5 (4500) Vitesse d’avance minimale (0.000)
Minimum forward speed
Canal 6 - Channel 6 Alarme niveau trémie ON/OFF Durée pré démarrage Calibration complète Vitesse rotation minimale (3.500
(ON) (4 secondes) Calibration finished tours/mn)
Hopper level alarm ON/OFF Pre-start time (4 secs) Minimum rotation speed
(ON) (3500rpm)6. PROCÉDURE ET MISE EN ROUTE - START-UP PROCEDURE FOR THE
1. Atteler la machine au tracteur 1.Hitch the implement to the
2. Remonter les béquilles de tractor.
dépose sur la machine et sur 2.Raise the parking stands on
l’équipement arrière repliable both the implement and the rear
3. Régler l’aplomb de la machine equipment.
via le réglage de 3e point 3.Ensure that the implement is
4. Connecter les coupleurs level by adjusting the top link.
hydrauliques de la machine à celui 4.Connect the implement’s
du tracteur hydraulic couplings to the tractor’s
Nécessite un distributeur DE pour hydraulic services.
replier / déplier la machine 1 D/A hydraulic service is
Nécessite un distributeur DE required for folding/unfolding the
pour verrouiller / déverouiller les implement.
rallonges 1 D/A hydraulic service is required
5. Déplier les rallonges for locking/unlocking the wings.
6. Connecter l’éclairage au tracteur 5.Unfold the wings.
7. Régler la position et la 6.Connect the lighting plug to the
profondeur de travail des roues de tractor.
terrage (pression = 7 bars) ainsi 7.Set both the depth wheels
que l’équipement arrière (pressure =7 bars) and the rear
equipment’s positions.
Une fois toutes ces opérations
vérifiées ou exécutées, réaliser le Once all these operations have
travail sur quelques mètres pour been checked or carried out,put
vérifier la profondeur de travail des the implement into work for a
lames puis affiner les réglages si few metres in order to check the
nécessaire. working depth of the tines, and
adjust the settings if necessary.
267. PROTECTION DE L’ENVIRONNEMENT – ENVIRONMENT PROTECTION –
ENVIRONMENT PROTECTION
Veiller à ne pas répandre sur le sol Ensure that you don’t let any waste
et à ne pas jeter dans les égouts les oil,used grease,fuel, hydraulic oil
graisses usagées et les substances or similar substances fall onto the
telles que l’huile hydraulique, carbu- ground or run into drains.
rant…
Ne pas mélanger carburants et Do not mix fuel and oils.
huiles.
• Waste oil recovery: collect all
• Récupération des huiles: used substances in watertight contai-
Recueillir la vidange des liquides ners that are clean and intended for
dans des récipients étanches, this purpose.Avoid using any food
propres et prévus à cet effet. containers or drink bottles.
Eviter d’utiliser les récipients pour ali-
ments et les bouteilles pour boisson. • Used tyre recovery: it is for-
bidden to stock ,abandon, dump or
• Récupération des pneuma- burn tyres in the open air.
tiques usagés:
Il est interdit de stocker, d’abandon-
ner, de déposer dans le milieu natu-
rel ou de bruler à l’air libre les pneu-
matiques.
8. MAINTENANCE - MAINTENANCE - MAINTENANCE
8.1 Entretien par l’utilisateur - Maintenance by the user -
APRES LA PREMIERE HEURE AFTER THE FIRST HOUR OF USE
D’UTILISATION
• Check that all bolts are still tight.
• Vérifier le serrage de la boulonne- • Check that there are no leaks in the
rie. hydraulic circuit.
• Contrôler l’absence de fuite dans le
circuit hydraulique. DAILY, BEFORE STARTING WORK
AVANT CHAQUE JOURNEE DE IMPORTANT: check the state of wear
TRAVAIL on the points, reverse or change
them when necessary.
IMPORTANT : Vérifier l’état d’usure • Check that there are no leaks in the
des socs de lames, inverser ou hydraulic circuits. If necessary call a
changer ceux qui le nécessite. specialist in order to repair them.
• Contrôler l’absence de fuites dans
le circuit hydraulique. Si besoin, faire YEARLY, AT THE END OF EACH
appel à du personnel spécialisé. SEASON.
UNE FOIS PAR AN, APRES • Replace the points, and the wear
CHAQUE SAISON plates if they are worn, as well as
the tines if they are showing signs of
• Remplacer les socs et les contre wear (cracks…)
plaques usagés, ainsi que les lames • Wheel bearings are greased for life,
qui donnent des signes de fatigue check by hand to see if there is any
(fissures...) play in the hubs.
• Les roulements des roues de ter- • Check that all hydraulic pipes are
rage sont graissés à vie, contrôler à leak free, that the connectors are not
la main le jeu des moyeux. loose and that there has been no
• Vérifier si les conduites hydrau- rubbing, replace any parts that are
liques sont bien étanches, si les rac- showing signs of deterioration.
cords sont desserrés ou s’il y a des
défauts dus au frottement. Rempla-
cer ce qui est détérioré.
27Vous pouvez aussi lire