ONE Veerteruggangmotor Servomoteur à ressort de rappel Actuator - Rf-Technologies
←
→
Transcription du contenu de la page
Si votre navigateur ne rend pas la page correctement, lisez s'il vous plaît le contenu de la page ci-dessous
5

7

                                                                                                                               4

1

                                                                                                                               3

                                                                                                2              6

 ONE
                                                                                                                                                K132-E 04/2021

    Veerteruggangmotor
    Servomoteur à ressort de rappel
    Actuator
Rf-Technologies nv - Lange Ambachtstraat 40 - 9860 Oosterzele - België - Tel +32 9 362 31 71 - Fax +32 9 362 33 07 - www.rft.be - info@rft.be
ONE Veerteruggangmotor
K132-E
04/2021
Productvoorstelling
De Rf-t veerteruggangmotor ONE is speciaal ontwikkeld om brandkleppen van alle
afmetingen eenvoudig automatisch en vanop afstand te bedienen.
2
Als de veerteruggangmotor onder spanning komt, brengt deze het klepblad in haar
wachtstand. Wordt de spanning onderbroken of overschrijdt de temperatuur in het
1 luchtkanaal 72°C, dan brengt de inwendig opgespannen veer de klep in veiligheidspositie.
4 De manuele herwapening van de veerteruggangmotor gebeurt met behulp van een standaard
3 9V-batterij.
Een ingebouwde LED geeft de status van de veerteruggangmotor weer. De ingebouwde
begin- en eindeloopschakelaars duiden (op een controlebord) aan of de klep open of dicht is.
De ONE bestaat in 4 uitvoeringen, namelijk 24 of 230 volts, met FDCU of FDCB schakelaars.
1 Ontgrendelingsknop GEPATENTEERD
2 Indicator klepblad positie
3 LED
4 Batterij compartiment
Nederlands
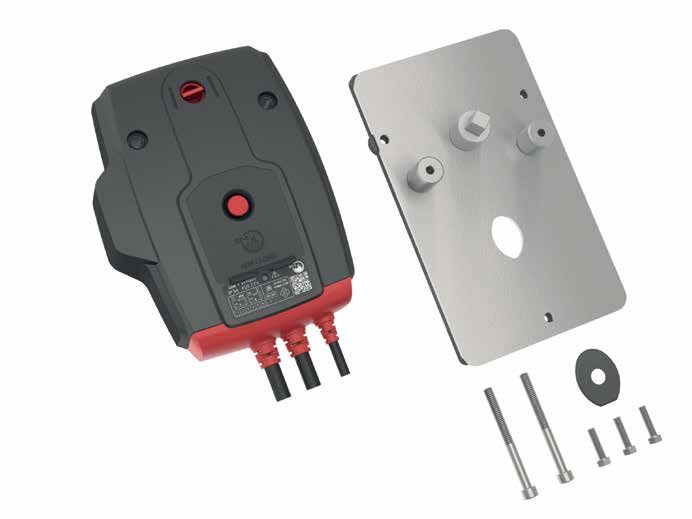
Onderdelenlijst
Omschrijving Kenmerken Aantal
ONE T 24 FDCU / ONE T 24 FDCB /
1 Veerteruggangmotor 1
ONE T 230 FDCU / ONE T 230 FDCB
2 Bevestigingsschroef motor DIN 912 M6x65 2
3 Membraan PLAME-D218 1
4 Basisplaat FE-VOOR-265 1
5 As basisplaat PLAME-D027 1
6 Bevestigingsbout basisplaat DIN 933 M6x20 3
7 Thermische zekering FUS72 ONE 1
8 Etiket KIT (geel) ETIK-D042 1
Gedetailleerde kenmerken
ONE Nominale spanning Looptijd
FC DC ONE T 24 FDCU: 24VAC/DC -10%/+20% motor: (Bekabeld)ONE Veerteruggangmotor
K132-E
04/2021
Bediening ONE
Ontgrendeling
AUTO
(T)
1 72°C
• Manuele ontgrendeling: druk 1x kort op de knop (1)
• Op afstand gestuurde ontgrendeling: door het onderbreken van de voedingsspanning.
• Automatische ontgrendeling: zodra de reactietemperatuur van het smeltlood (72°C) bereikt is.
Herwapening
4
Nederlands
9V 5’’ 75’’
3
60” 100” +
• Gemotoriseerde herwapening
1. Schakel de voedingsspanning minstens 5sec uit
2. Voed de ONE (respecteer de aangegeven spanning) min 75sec
3. De beweging van de ONE stopt automatisch bij het bereiken van de eindeloop (klep open)
• Manuele herwapening
1. Open het batterij compartiment (4) en druk een 9V batterij tegen de contact veren.
Hou deze op positie tot de LED (3) continu oplicht.
2. Controleer op de indicator (2) of het klepblad in open stand staat :
Verwijder de batterij, de LED dooft uit.
3. Sluit het batterij compartiment
Opgelet:
i Als de LED (3) snel knippert (3x/sec), dan dient een nieuwe batterij gebruikt te worden (batterij is leeg).
i Een traag knipperende LED (3) (1x/sec), betekent dat de wapening bezig is.
i Een continu oplichtende LED (3), betekent dat de wapening voltooid is en spanning aanwezig is.
i Wanneer de ONE voedingsspanning detecteert op de voedingskabel, volstaat het om de batterij korte tijd aan te
leggen om het wapenen te starten.
i De voedingskabel van deze motor kan niet afzonderlijk worden vervangen. Als de kabel beschadigd is, moet het
gehele toestel worden vervangen.
i De behuizing van het mechanisme bevat een temperatuursensor. Wanneer de temperatuur in de behuizing 72°C
bereikt, wordt het mechanisme ontgrendeld. De LED knippert 2 keer per seconde. Wanneer de temperatuur terug
onder 72°C gaat, kan het mechanisme enkel terug gemotoriseerd gewapend worden, wanneer er eerst een manuele
herwapening (met batterij) gebeurt.
i De eindeloopschakelaars hebben na bediening 1 sec. nodig om een stabiele positie aan te nemen.
iZorg ervoor dat de thermische zekering in de veerteruggangmotor aanwezig is. De veerteruggangmotor werkt
mogelijk niet correct als dit niet het geval is.
3ONE Veerteruggangmotor
K132-E
04/2021
Demontage van het mechanisme
Type BFL(T) en BFN(T) op Type B(L)F(T) op
CR2/CU2/CA2/CU4/CU2-15: CR2/CU2/CA2/CU4/CU2-15:
1. Ontgrendel de 4. Demonteer de basisplaat 1. Ontgrendel de 4. Demonteer de basisplaat
motor door de door de drie bouten los motor door de door de drie bouten los
voedingsspanning te te draaien. voedingsspanning te te draaien.
onderbreken. Bewaar de onderbreken. Bewaar de
2. Schroef de bedieningsarm, bout, 2. Schroef de bedieningsarm, bout,
Nederlands
bevestigingsschroeven rondel en veerring voor bevestigingsschroeven rondel en veerring voor
van de motor los en de nieuwe basisplaat. van de motor los en de nieuwe basisplaat.
verwijder de oude motor. verwijder de oude
3. Schroef de motor.
bevestigingsschroeven 3. Schroef de
van de thermo- bevestigingsschroeven
elektrische zekering los van de thermo-
en verwijder de zekering elektrische zekering los
(type BFLT/BFNT). en verwijder de zekering
(type B(L)FT).
Type BFL(T)/BLF(T) op Type MFUS(P) op Type CFTH op
CR60/CR120/CU-LT(1s): CR60/CR120/CU-LT(1s): CR2/CU2/CA2/CU4/CU2-15:
1. Ontgrendel de 1. Ontgrendel 3. Verwijder het oude 1. Ontgrendel het
motor door de het bestaande membraan en vervang mechanisme.
voedingsspanning te mechanisme door de door het nieuwe, 2. Schroef de drie
onderbreken. ontgrendelingsknop in gesloten membraan. bevestigingsbouten
2. Schroef de te drukken. los en verwijder het
bevestigingsschroeven 2. Schroef de twee mechanisme.
van de motor los en bevestigingsschroeven
verwijder de oude motor. los en verwijder het
3. Schroef de mechanisme.
bevestigingsschroeven
van de thermo-
elektrische zekering los
en verwijder de zekering
(type BFLT/BLFT).
4. Verwijder het oude
membraan.
4ONE Veerteruggangmotor
K132-E
04/2021
Type ONE op Type ONE op
CR2/CU2/CA2/CU4/CU2-15: CR60/CR120/CU-LT(1s):
1. Ontgrendel de 1. Ontgrendel de
motor door de motor door de
voedingsspanning te voedingsspanning te
onderbreken. onderbreken.
2. Schroef de 2. Schroef de
Nederlands
bevestigingsschroeven bevestigingsschroeven
van de motor los en van de motor los en
verwijder de oude motor. verwijder de oude
motor.
5ONE Veerteruggangmotor
K132-E
04/2021
Montage van het mechanisme
Op CR60/CR120 en CU-LT(1s)
1. Monteer het nieuwe 4. Sluit de motor elektrisch
membraan. aan volgens het
2. Zorg ervoor dat het aansluitschema.
klepblad in gesloten 5. Test de werking van de
stand staat. motor.
Nederlands
3. Monteer de ONE op de 6. Kleef het gele etiket 'KIT'
klep en schroef vast met en vul de gegevens in.
de 2 bijgeleverde M6
schroeven.
Op CR2/CU2/CA2/CU4/CU2-15
1
1. Recupereer de oude 2. Monteer de basisplaat 4. Zorg ervoor dat het
bedieningsarm en in de aangeduide gaten klepblad in gesloten
monteer deze op de op de klep met de 3 stand staat.
nieuw bijgeleverde as bijgeleverde bouten. 5. Monteer de ONE op
(gebruik universeel vet de basisplaat en
rond de as.). schroef deze vast met
de 2 bijgeleverde M6
schroeven.
6. Sluit de motor elektrisch
aan volgens het
aansluitschema.
7. Test de werking van de
motor.
8. Kleef het gele etiket 'KIT'
en vul de gegevens in.
3. Opgelet! De
bedieningsarm
moet precies in de
geleidingsarm van de
klep passen.
6
Bij het uitvoeren van niet-vermelde manipulaties is Rf-Technologies niet verantwoordelijk en vervalt de garantie!ONE Servomoteur à ressort de rappel
K132-E
04/2021
Présentation du produit
Le moteur à ressort de rappel ONE est conçu pour commander simplement, de manière
automatique ou à distance, les clapets coupe-feu Rf-t de toutes les dimensions.
2 Lors de la mise sous tension, le servomoteur amène la lame du clapet en position d'attente.
Lorsque l'alimentation électrique est interrompue ou lorsque la température dans la gaine
dépasse 72°C, l'énergie accumulée par la tension du ressort amène la lame du clapet dans sa
1 position de sécurité.
4
3 Le réarmement manuel du moteur se fait à l’aide d’une pile standard 9V.
Un LED intégré indique la position ouverte ou fermée du moteur. Le contact de position fin et
début de course inclus signale (sur un panneau de commande/contrôle) la position ouverte
ou fermée de la lame du clapet.
Quatre variantes du ONE sont disponibles : 24 ou 230 volts, avec contact de position FDCU
1 Bouton de déclenchement ou FDCB.
2 Indicateur position de lame
3 Diode LED BREVETÉ
Compartiment pour pile de
4
réarmement
Liste des pièces
Français
Description Code Quantité
ONE T 24 FDCU / ONE T 24 FDCB /
1 Servomoteur 1
ONE T 230 FDCU / ONE T 230 FDCB
2 Vis de fixation moteur DIN 912 M6x65 2
3 Membrane PLAME-D218 1
4 Platine de base moteur FE-VOOR-265 1
5 Axe moteur PLAME-D027 1
6 Vis de fixation platine de base DIN 933 M6x20 3
7 Fusible thermique FUS72 ONE 1
8 Etiquette kit (jaune) ETIK-D042 1
Caractéristiques détaillées
ONE Tension nominale Temps de marche
FC DC ONE T 24 FDCU: 24VCA/CC -10%/+20% moteur: (Câblé)ONE Servomoteur à ressort de rappel
K132-E
04/2021
Commande ONE
Déclenchement
AUTO
(T)
1 72°C
• Déclenchement manuel: pressez une fois brièvement sur le bouton (1).
• Déclenchement télécommandé: par l’interruption de l’alimentation électrique.
• Déclenchement autocommandé: par la réaction du fusible thermique si la température dans la gaine atteint 72°C.
Réarmement
4 9V 5’’ 75’’
3
60” 100”
Français
+
• Réarmement motorisé
1. Coupez l’alimentation électrique pendant au moins 5 sec.
2. Alimentez le moteur (respectez la tension indiquée) pendant au moins 75 sec.
3. La rotation du moteur s’arrête automatiquement à la fin de course (lame ouverte).
• Réarmement manuel
1. Ouvrez le compartiment de la pile (4) et maintenez une pile de 9V contre les ressorts
de contact jusqu’à ce que la diode LED (3) s’allume de manière continue.
2. Contrôlez si l’indicateur (2) indique que la lame est en position ouverte :
Retirez la pile : la LED s’éteint.
3. Fermez le compartiment de la pile.
Attention :
i Lorsque la diode LED (3) clignote rapidement (3x/sec.), la pile est déchargée : utilisez une nouvelle pile.
i Lorsque la diode LED (3) clignote lentement (1x/sec), le réarmement est en cours.
i Lorsque la diode LED (3) est allumée de manière continue, le réarmement est terminé et le moteur est sous tension.
i Lorsque le moteur détecte une tension sur le câble d’alimentation, il suffit de connecter la pile brièvement pour
démarrer le réarmement.
i Le câble d’alimentation de ce moteur ne peut pas être remplacé séparément. Si le câble est endommagé, l’unité
complète doit être remplacée.
i Le boîtier du mécanisme contient un capteur de température. Lorsque la température dans le boîtier dépasse 72°C, le
mécanisme se déclenche. La diode LED clignote 2 fois par seconde. Lorsque la température redescend en dessous de
72°C, le mécanisme ne peut être réarmé de manière motorisée qu’après un réarmement manuel (avec une pile).
iAprès fonctionnement, il faut attendre 1 seconde pour que les contacts de fin de course atteignent une position stable.
i Soyez sûr que le déclencheur thermique soit présent dans le mécanisme. Le mécanisme pourrait ne pas fonctionner
correctement - si ce n’était pas le cas.
8ONE Servomoteur à ressort de rappel
K132-E
04/2021
Demontage de l'ancien mécanisme
Type BFL(T) et BFN(T) sur Type B(L)F(T) sur
CR2/CU2/CA2/CU4/CU2-15: CR2/CU2/CA2/CU4/CU2-15:
1. Déclenchez le moteur 4. Démontez la platine de 1. Déclenchez le moteur 4. Démontez la platine de
en interrompant base en dévissant les en interrompant base en dévissant les
l'alimentation électrique. trois vis. l'alimentation électrique. trois vis.
2. Démontez l'ancien Conservez le levier de 2. Démontez l'ancien Conservez le levier de
moteur en dévissant les commande, le boulon moteur en dévissant les commande, le vis et la
vis. et la rondelle pour la vis. rondelle pour la nouvelle
3. Pour les types BFLT/ nouvelle platine de base. 3. Pour le type platine de base.
Français
BFNT: démontez l'ancien B(L)FT: démontez
fusible thermique en l'ancien fusible
dévissant les vis. thermique en dévissant
les vis.
Type BFL(T)/BLF(T) sur Type MFUS(P) sur Type CFTH sur
CR60/CR120/CU-LT(1s): CR60/CR120/CU-LT(1s): CR2/CU2/CA2/CU4/CU2-15:
1. Déclenchez le moteur 1. Déclenchez le 3. Remplacez l’ancienne 1. Déclenchez le
en interrompant mécanisme en poussant membrane par la mécanisme.
l'alimentation électrique. sur le bouton de nouvelle membrane 2. Dévissez les trois vis et
2. Démontez l'ancien déclenchement. (fermée). démontez le mécanisme.
moteur en dévissant les 2. Dévissez les deux vis et
vis. démontez le mécanisme.
3. Pour les types BFLT/
BLFT: démontez l'ancien
fusible thermique en
dévissant les vis.
4. Retirez l’ancienne
membrane.
9ONE Servomoteur à ressort de rappel
K132-E
04/2021
Type ONE sur CR2/CU2/CA2/ Type ONE sur CR60/CR120/
CU4/CU2-15: CU-LT(1s):
1. Déclenchez le moteur 1. Déclenchez le moteur
en interrompant en interrompant
l'alimentation électrique. l'alimentation électrique.
2. Démontez l'ancien 2. Démontez l'ancien
moteur en dévissant les moteur en dévissant les
vis. vis.
Français
10ONE Servomoteur à ressort de rappel
K132-E
04/2021
Montage du nouveau mécanisme
Sur CR60/CR120/CU-LT(1s)
1. Placez la nouvelle 4. Branchez le moteur
membrane. selon le schéma de
2. Veillez à ce que la lame raccordement.
du clapet soit en position 5. Testez le bon
fermé. fonctionnement du
3. Montez le moteur sur moteur.
la platine de base et 6. Appliquez l'étiquette
vissez-le avec les deux jaune 'KIT' et remplissez
Français
vis M6 fournis. les données.
Sur CR2/CU2/CA2/CU4/CU2-15
1
5
3
6
1. Récupérez les levier 2. Montez la platine de base 4. Veillez à ce que la
de commande, vis et sur le tunnel avec les 3 vis lame du clapet soit en
rondelle de l'ancien fournis. Utilisez les trous position fermé.
mécanisme. Montez-les indiqués. 5. Montez le moteur sur
sur la platine avec le la platine de base et
nouvel axe (appliquez vissez-le avec les deux
de la graisse universelle vis M6 fournis.
autour de l'axe). 6. Branchez le moteur
selon le schéma de
raccordement.
7. Testez le bon
fonctionnement du
moteur.
8. Appliquez l'étiquette
jaune 'KIT' et
remplissez les
données.
3. Attention! Assurez-
vous que le levier de
commande se trouve
bien dans le guide de
transmission.
11
Si les manipulations ne se déroulent pas conformément à la présente notice, Rf-Technologies
ne peut pas être tenu responsable et les conditions de garantie ne seront pas d'application!ONE Actuator
K132-E
04/2021
Product presentation
The spring-return actuator ONE is designed to simply operate Rf-t fire dampers of all sizes,
automatically or remotely.
2
When powered, the actuator moves the damper blade into its stand-by position. When
the power is interrupted or when the temperature in the duct exceeds 72°C, the internal
1 armed spring brings the damper blade back into its safety position. The motor can be reset
4 manually by using a standard 9V battery.
3
An integrated LED indicates the open or closed position of the motor. The (included)
beginning and end of range switches indicate the position of the damper blade (on a
controller panel).
Four models are available, 24 or 230 volts, with FDCU or FDCB position switches.
1 Unlocking button
2 Blade position indicator PATENTED
3 LED
Battery compartment
4
(to reset motor)
List of parts
English
Description Code Quantity
ONE T 24 FDCU / ONE T 24 FDCB /
1 Actuator 1
ONE T 230 FDCU / ONE T 230 FDCB
2 Fastening screw motor DIN 912 M6x65 2
3 Membrane PLAME-D218 1
4 Base plate motor FE-VOOR-265 1
5 Axis motor PLAME-D027 1
6 Fastening screw base plate DIN 933 M6x20 3
7 Fusible link FUS72 ONE 1
8 KIT label (yellow) ETIK-D042 1
Detailed characteristics
ONE Nominal voltage Running time
FC DC ONE T 24 FDCU: 24VAC/DC -10%/+20% motor: (Cabled)ONE Actuator
K132-E
04/2021
Operating mechanism ONE
Unlocking
AUTO
(T)
1 72°C
• Manual unlocking: shortly press the unlocking button (1) once.
• Remote unlocking: by interrupting the power supply.
• Automatic unlocking: the fusible link reacts as soon as the temperature in the duct reaches 72°C.
Resetting
4 9V 5’’ 75’’
3
60” 100” +
English
• Motorised resetting
1. Switch off the power supply for at least 5sec.
2. Power the actuator (respect the prescribed voltage) for at least 75sec.
3. The resetting stops automatically when the end of range is reached (damper open).
• Manual resetting
1. Open the battery compartment (4) and press a 9V battery against the contact springs. Hold this position until the LED
(3) emits a continuous light.
2. Control whether the indicator (2) indicates that the damper blade is open :
Remove the battery, the LED fades away.
3. Close the battery compartment.
Caution:
i If the LED (3) flickers fast (3x/sec.), the battery is discharged: use a new battery.
i If the LED (3) flickers slowly (1x/sec), the resetting is in progress.
i If the LED (3) is continuously on, the resetting is complete and the motor is powered.
i If the actuator detects voltage on the power cable, a brief contact of the battery is enough to start the resetting
process.
iThe power supply of this actuator cannot be individually replaced. If the cable is damaged, the whole unit must be
discarded and replaced.
iThe housing of the mechanism contains a temperature sensor. When the temperature in the housing exceeds 72°C,
the mechanism unlocks. The LED flashes twice per second. When the temperature drops below 72°C, the mechanism
can only be reset in a motorised manner after a manual reset (with a battery).
iThe end of range switches need 1 second after operation to adopt a stable position.
i Make sure the thermal trigger device is present in the actuator. The actuator might not function properly if this is not
the case.
13ONE Actuator
K132-E
04/2021
Dismantling the previous mechanism
Type BFL(T) and BFN(T) on Type B(L)F(T) on
CR2/CU2/CA2/CU4/CU2-15: CR2/CU2/CA2/CU4/CU2-15:
1. Unlock the motor by 4. Loosen the three screws 1. Unlock the motor by 4. Loosen the three screws
interrupting the power and remove the base interrupting the power and remove the base
supply. plate. supply. plate.
2. Loosen the fixing screws Set aside the operating 2. Loosen the fixing screws Set aside the operating
of the motor and remove arm, screw and washer of the motor and remove arm, screw and washer
the old motor. to use on the new base the old motor. to use on the new base
3. For types BFLT/BFNT: plate. 3. For type B(L)FT: Unscrew plate.
Unscrew the thermo- the thermo-electric fuse
English
electric fuse and remove and remove it.
it.
Type BFL(T)/BLF(T) on Type MFUS(P) on Type CFTH on
CR60/CR120/CU-LT(1s): CR60/CR120/CU-LT(1s): CR2/CU2/CA2/CU4/CU2-15:
1. Unlock the motor by 1. Unlock the existing 3. Replace the old 1. Unlock the existing
interrupting the power mechanism by pressing membrane by the new mechanism.
supply. the unlocking button. (unperforated) one. 2. Loosen up the
2. Loosen the fixing screws 2. Loosen up the two fixing three fixing screws
of the motor and remove screws and dismantle and dismantle the
the old motor. the mechanism. mechanism.
3. For types BFLT/BLFT: un
screw the thermo-electric
fuse and remove it.
4. Remove the old
membrane.
14ONE Actuator
K132-E
04/2021
Type ONE on CR2/CU2/CA2/ Type ONE on CR60/CR120/
CU4/CU2-15: CU-LT(1s):
1. Unlock the motor by 1. Unlock the motor by
interrupting the power interrupting the power
supply. supply.
2. Loosen the fixing screws 2. Loosen the fixing screws
of the motor and remove of the motor and remove
the old motor. the old motor.
English
15ONE Actuator
K132-E
04/2021
Mounting the new mechanism
On CR60/CR120/CU-LT(1s)
1. Put the new membrane 4. Connect the motor
in place. according to the wiring
2. Make sur the damper diagram.
blade is closed. 5. Test the functioning of
3. Fasten the ONE on the motor.
the damper with the 6. Apply the label 'KIT' to
supplied (2) M6 screws. the motor.
English
On CR2/CU2/CA2/CU4/CU2-15
1
5
3
6
1. Retrieve the operating 2. Fasten the base plate 4. Make sur the damper
arm, bolt and washer with the 3 supplied blade is closed.
of the old mechanism screws. Please use the 5. Fasten the ONE on
and mount them with indicated holes. the damper with the
the newly supplied axis supplied (2) M6 screws.
on the base plate (use 6. Connect the motor
universal grease around according to the wiring
the axis). diagram.
7. Test the functioning of
the motor.
8. Apply the label 'KIT' to
the motor.
3. Caution: make sure the
operating arm is fitted in
the transmission arm.
16
If the product is manipulated in any other way than described in this manual, Rf-Technologies
will decline any responsibility and the guarantee will immediately expire!Vous pouvez aussi lire