Session du lundi 10 février
←
→
Transcription du contenu de la page
Si votre navigateur ne rend pas la page correctement, lisez s'il vous plaît le contenu de la page ci-dessous
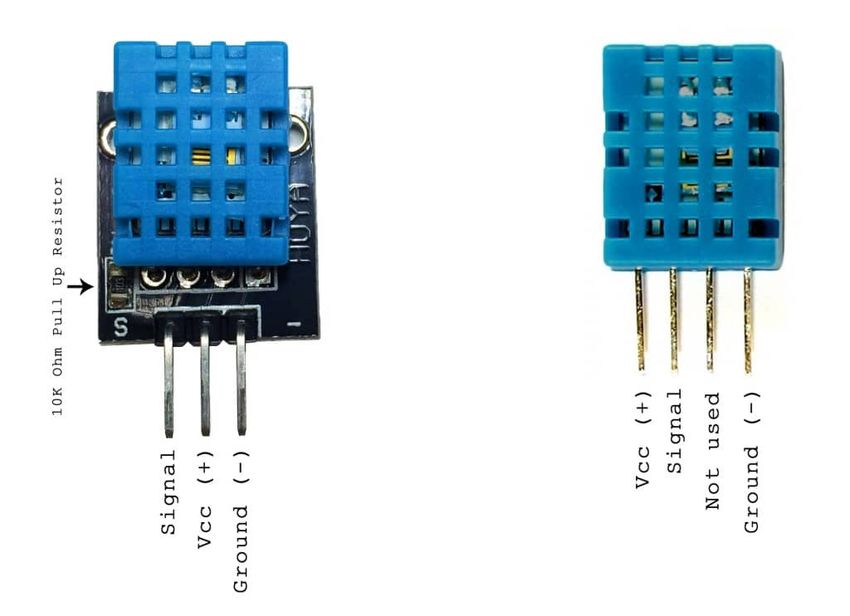
Session du lundi 10 février
Support : prog

Session du lundi 13 janvier
2020 18h

Quand ça ne marche pas, que faire ? debug

Faire marcher le composant / shield DHT11 (capteur de
température et d’humidité)

 How to Set Up the DHT11 Humidity Sensor on an Arduino

Installer la librairie ci-dessous :

DHTLib

Faire le montage :

Code :

#include

dht DHT;

int DHT11_PIN=7;

void setup(){
  Serial.begin(9600);
}

void loop()
{
  int chk = DHT.read11(DHT11_PIN);
  Serial.print(chk);
  Serial.print(",Temperature = ");
  Serial.print(DHT.temperature);
  Serial.print(",Humidity = ");
  Serial.println(DHT.humidity);
  delay(2000);
}
Les valeurs de la température et de l’humidité doivent
s’afficher sur la console.

0,Temperature = 21.00,Humidity = 52.00
0,Temperature = 21.00,Humidity = 52.00
0,Temperature = 21.00,Humidity = 52.00
0,Temperature = 21.00,Humidity = 52.00
0,Temperature = 21.00,Humidity = 51.00
0,Temperature = 21.00,Humidity = 51.00
0,Temperature = 21.00,Humidity = 51.00
0,Temperature = 21.00,Humidity = 51.00
-1,Temperature = 21.00,Humidity = 51.00

Voiture Lego Arduino
robot

Atelier Arduino #1
Lundi 14 octobre dans les locaux d’ICV au Pradet

Initiation (fichier pdf)

Projet (fichier pdf)

Projet (fichier odp)
A propos de Yolo
https://pjreddie.com/darknet/yolo/

 YOLO object detection with OpenCV

[karim@10-83-102-17 yolo-object-detection]$ pwd
/home/karim/perso/yolo/yolo-object-detection

[karim@10-83-102-17 yolo-object-detection]$ python yolo.py
–image images/baggage_claim.jpg –yolo yolo-coco
[INFO] loading YOLO from disk…
X server found. dri2 connection failed!
X server found. dri2 connection failed!
X server found. dri2 connection failed!
X server found. dri2 connection failed!
X server found. dri2 connection failed!
X server found. dri2 connection failed!
X server found. dri2 connection failed!
X server found. dri2 connection failed!
X server found. dri2 connection failed!
X server found. dri2 connection failed!
X server found. dri2 connection failed!
X server found. dri2 connection failed!
X server found. dri2 connection failed!
X server found. dri2 connection failed!
X server found. dri2 connection failed!
X server found. dri2 connection failed!
[INFO] YOLO took 1.680755 seconds
[array([[0.03601214, 0.04780507, 0.39001054, …, 0. , 0. ,
0. ],
[0.04536078, 0.03608821, 0.2888255 , …, 0. , 0. ,
0. ],
[0.0528849 , 0.03706014, 0.7606114 , …, 0. , 0. ,
0. ],
…,
[0.9585623 , 0.948351 , 0.3713468 , …, 0. , 0. ,
0. ],
[0.962664 , 0.9636656 , 0.2799068 , …, 0. , 0. ,
0. ],
[0.9637902 , 0.9584853 , 0.87090683, …, 0. , 0. ,
0. ]], dtype=float32), array([[0.02014969,          0.02389977,
0.04925819, …, 0. , 0. ,
0. ],
[0.01900613, 0.01717794, 0.38852233, …, 0. , 0. ,
0. ],
[0.02272185, 0.01636733, 0.07095726, …, 0. , 0. ,
0. ],
…,
[0.9744766 , 0.9797191 , 0.0464907 , …, 0. , 0. ,
0. ],
[0.98238534, 0.9776212 , 0.3838935 , …, 0. , 0. ,
0. ],
[0.97990173, 0.9834362 , 0.07725822, …, 0. , 0. ,
0. ]], dtype=float32),     array([[0.00975429,      0.00449965,
0.01337121, …, 0. , 0. ,
0. ],
[0.00856061, 0.01010363, 0.01735355, …, 0. , 0. ,
0. ],
[0.01061513, 0.00706433, 0.17565256, …, 0. , 0. ,
0. ],
…,
[0.9893361 , 0.9900188 , 0.01663892, …, 0. , 0. ,
0. ],
[0.9902003 , 0.9875034 , 0.01849871, …, 0. , 0. ,
0. ],
[0.987604 , 0.99132895, 0.16302222, …, 0. , 0. ,
0. ]], dtype=float32)]
Yolo 9000
https://github.com/philipperemy/yolo-9000

Dans le Makefile, mettre OPENCV=0 (sinon ca ne compile pas …)

[karim@10-83-102-17 darknet]$ ./darknet        detector test
cfg/combine9k.data     cfg/yolo9000.cfg         ../yolo9000-
weights/yolo9000.weights data/horses.jpg
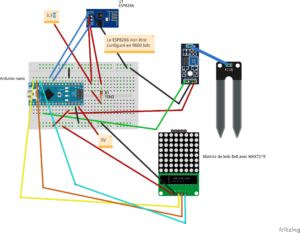
La plante                a    besoin            d’être
arrosée
Un capteur d’humidité est connecté à un module Arduino pour
savoir si une plante a besoin d’être arrosée. Si la plante a
besoin d’être arrosée, une notification est envoyée sur un
téléphone Android (voir le second lien ci-dessous) et la
matrice de leds affiche une tête triste.

Le module ESP8266 doit être configuré en 9600 bds (voir
premier lien ci-dessous). Il faut une alimentation externe,
n’alimenter que par le port USB du PC ne suffit pas.

L’envoi de SMS doit être possible (en particulier via Free
mobile) mais il faut probablement utiliser une autre librairie
pour la connexion WIFI (elle doit gérer le https).

https://home.et.utwente.nl/slootenvanf/2018/03/17/connect-esp8
266-control-blynk/

https://www.geekstips.com/android-push-notifications-esp8266-a
rduino-tutorial/

     Matériel
           1 module Arduino Nano
           1 module ESP8266 pour la connexion WIFI
           1 capteur d’humidité comme sur le schéma ci-
           dessous
           1 matrice de leds avec MAX7219
           1 résistance de 10 kO
           1 plaque à insertion
           Des fils
           Une alimentation externe 5V et 3.3V

     Le montage
Le code #include "LowPower.h" #include "LedControl.h" #include "binary.h" #include "WiFiEsp.h" // Emulate WifiSerial on pins 2/3 if not present //#ifndef HAVE_HWWifiSerial #include "SoftwareSerial.h" SoftwareSerial WifiSerial(7, 6); // RX, TX //#endif // PushingBox scenario DeviceId code and API String deviceId = "xxxxxxx"; const char* logServer = "api.pushingbox.com"; char ssid[] = "SON_SSID"; char pass[] = "SON_MOT_DE_PASSE"; int status = WL_IDLE_STATUS; // the Wifi radio's status LedControl lc=LedControl(12,11,10,1); // delay time between faces unsigned long delaytime=1000; unsigned long lastConnectionTime = 0; // last time you connected to the server, in milliseconds // happy face byte hf[8]=
{B00111100,B01000010,B10100101,B10000001,B10100101,B10011001,B
01000010,B00111100};
// neutral face
byte                                     nf[8]={B00111100,
B01000010,B10100101,B10000001,B10111101,B10000001,B01000010,B0
0111100};
// sad face
byte                                                   sf[8]=
{B00111100,B01000010,B10100101,B10000001,B10011001,B10100101,B
01000010,B00111100};

void setup()
{
  Serial.begin(115200);
  // No setup is required for this library

lc.shutdown(0,false);
 // Set brightness to a medium value
 lc.setIntensity(0,8);
 // Clear the display
 lc.clearDisplay(0);

WifiSerial.begin(9600);
  // initialize ESP module
  WiFi.init(&WifiSerial);

 // check for the presence of the shield
if (WiFi.status() == WL_NO_SHIELD) {
   Serial.println("WiFi shield not present");
   // don't continue
   while (true);
 }

 // attempt to connect to WiFi network
 while ( status != WL_CONNECTED) {
   Serial.print("Attempting to connect to WPA SSID: ");
   Serial.println(ssid);
   // Connect to WPA/WPA2 network
   status = WiFi.begin(ssid, pass);
 }
// you're connected now, so print out the data
Serial.println("You're connected to the network");
Serial.println();
printCurrentNet();
printWifiData();
}
void sendNotificationAndroid(String message){
// initialize serial for ESP module
WiFiEspClient client;
Serial.println("- connecting to pushing server: " +
String(logServer));
if (client.connect(logServer, 80)) {
Serial.println("- succesfully connected");
String postStr = "devid=";
postStr += String(deviceId);
postStr += "&message_parameter="+message;
postStr += "\r\n\r\n";
Serial.println("- sending data...");
client.print("POST /pushingbox HTTP/1.1\n");
client.print("Host: api.pushingbox.com\n");
client.print("Connection: close\n");
client.print("Content-Type: application/x-www-form-
urlencoded\n");
client.print("Content-Length: ");
client.print(postStr.length());
client.print("\n\n");
client.print(postStr);
}
client.stop();
Serial.println("- stopping the client");
}
void printWifiData()
{
// print your WiFi shield's IP address
IPAddress ip = WiFi.localIP();
Serial.print("IP Address: ");
Serial.println(ip);// print your MAC address
byte mac[6];
WiFi.macAddress(mac);
char buf[20];
sprintf(buf, "%02X:%02X:%02X:%02X:%02X:%02X", mac[5],
mac[4], mac[3], mac[2], mac[1], mac[0]);
Serial.print("MAC address: ");
Serial.println(buf);
}
void printCurrentNet()
{
// print the SSID of the network you're attached to
Serial.print("SSID: ");
Serial.println(WiFi.SSID());
// print the MAC address of the router you're attached to
byte bssid[6];
WiFi.BSSID(bssid);
char buf[20];
sprintf(buf, "%02X:%02X:%02X:%02X:%02X:%02X", bssid[5],
bssid[4], bssid[3], bssid[2], bssid[1], bssid[0]);
Serial.print("BSSID: ");
Serial.println(buf);
// print the received signal strength
long rssi = WiFi.RSSI();
Serial.print("Signal strength (RSSI): ");
Serial.println(rssi);
}
void drawSadFace(){
// Display sad face
lc.setRow(0,0,sf[0]);
lc.setRow(0,1,sf[1]);
lc.setRow(0,2,sf[2]);
lc.setRow(0,3,sf[3]);
lc.setRow(0,4,sf[4]);
lc.setRow(0,5,sf[5]);
lc.setRow(0,6,sf[6]);
lc.setRow(0,7,sf[7]);delay(600);
}
void drawHappyFace(){
// Display happy face
lc.setRow(0,0,hf[0]);
lc.setRow(0,1,hf[1]);
lc.setRow(0,2,hf[2]);
lc.setRow(0,3,hf[3]);
lc.setRow(0,4,hf[4]);
lc.setRow(0,5,hf[5]);
lc.setRow(0,6,hf[6]);
lc.setRow(0,7,hf[7]);
delay(600);
}
void loop()
{
int sensorValue = analogRead(A0);
Serial.println(sensorValue);
Serial.println(millis());
if ( sensorValue > 700 ) // A ajuster !!!!!!
{
if (millis() - lastConnectionTime > 50000) {
sendNotificationAndroid("Arrose moi !");
lastConnectionTime = millis();
drawSadFace();
delay(10000);
}
}
else
{
if (millis() - lastConnectionTime > 50000) {
sendNotificationAndroid("C'est OK !");
lastConnectionTime = millis();
drawHappyFace();
delay(10000);
}
}lc.clearDisplay(0);
}
Transformer un Raspberry Pi
Zero W en point d’accès local
avec partage de répertoire
Le SSID sera JONATHAN et la clé 12345678910. Les appareils qui
se connecteront récupèreront une adresse IP en 192.168.2.X. Le
Raspberry Pi Zero aura pour IP 192.168.2.1. Il n’aura pas
accès à internet et les postes clients connectés dessus non
plus. Un répertoire Public sera accessible à tout le monde.
Télécharger la dernière Raspbian (vous obtiendrez un
fichier .zip)
https://www.raspberrypi.org/downloads/raspbian/
Décompresser l’archive
[karim@monpc$ unzip 2018-06-27-raspbian-stretch.zip
Archive: 2018-06-27-raspbian-stretch.zip
inflating: 2018-06-27-raspbian-stretch.img
Installer Raspbian sur une microSD (16 Go)
https://www.raspberrypi.org/documentation/installation/install
ing-images/README.md
Récupérer Etcher pour Linux x64 (64-bit) (AppImage) et lancer
l’appliChoisir l’image 2018-06-27-raspbian-stretch.img et lancer
l’écriture
Insérer la microSD dans le Raspberry PI Zero W, brancher
un clavier + souris + écran (il faudra un réplicateur de
ports USB qui fonctionne avec un Pi Zero …) puis
démarrer
Raspbian démarre et on arrive directement sur le bureau
Lancer Raspi-config en mode graphique et faire les
changements pour démarrer en console, activer l’accès
SSH, mettre le clavier en azerty
Configurer le Wifi
Redémarrer, on arrive en mode console (plus d’interface
graphique)
Se mettre en root
sudo bash
Changer le mot de passe par défaut (raspberry) avec la
commande passwd
Mettre à jour tous les paquets :
apt-get update
Installer les paquets suivants :
apt install hostapd dnsmasq samba samba-common-bin
Dans le fichier /etc/rc.local, ajouter la ligne
ifconfig wlan0 192.168.2.1
Dans le fichier /etc/dhcpd.conf, mettre :
interface wlan0
static ip_address=192.168.2.1/24
denyinterfaces eth0
denyinterfaces wlan0
Dans le fichier /etc/dnsmasq.conf, mettre :
interface=wlan0
dhcp-range=192.168.2.2,192.168.2.50,255.255.255.0,24h
Dans le fichier /etc/default/hostapd, il faut
DAEMON_CONF= »/etc/hostapd/hostapd.conf »Dans le fichier /etc/hostapd/hostapd.conf, mettre :
interface=wlan0
ssid=JONATHAN
hw_mode=g
channel=11
wpa=1
wpa_passphrase=12345678910
wpa_key_mgmt=WPA-PSK
wpa_pairwise=TKIP CCMP
wpa_ptk_rekey=600
macaddr_acl=0
Dans le fichier /etc/samba/smb.conf, mettre :
[public]
comment= Public Storage
path=/home/shares/public
writable = yes
browsable=yes
;valid users = @users
;force group = users
create mask = 0644
directory mask = 0755
read only = no
public = yes
force user = pi
Exécuter les commandes suivantes :
update-rc.d hostapd defaults
systemctl enable hostapd
systemctl enable dnsmasq
systemctl enable samba
systemctl start hostapd
systemctl start dnsmasq
/etc/init.d/samba restart
reboot
Sous Android, installer, via le PlayStore, l’application Xplorer. Le partage est accessible via l’IP 192.168.2.1.
Tracking …
Détecte un object en mouvement (caméra sur RPI), prend une
photo et l’envoie par mail.
import math,sys,os,cv2,time
import Queue,threading
import numpy as np
import signal
import datetime
import commands
import smtplib
import datetime,traceback
from email import Encoders
from email.MIMEText import MIMEText
from email.MIMEBase import MIMEBase
from email.MIMEMultipart import MIMEMultipart
import imutils
def sendMail(tfrom, to, subject,messhtml,tosenddir,filename):
print 'in sendMail'
try:
server = smtplib.SMTP("smtp.gmail.com", 587)
server.ehlo()
server.starttls()
server.ehlo()
server.login("xxxx", "xxx")
mail = MIMEMultipart()
mail['From'] = tfrommail['Subject'] = subject
mail['To'] = to
part2 = MIMEText(messhtml, 'html')
mail.attach(part2)
# now attach the file
if filename != '':
fileMsg = MIMEBase('application','octet-stream')
fileMsg.set_payload(file(tosenddir+'/'+filename).read())
Encoders.encode_base64(fileMsg)
fileMsg.add_header('Content-Disposition',
'attachment; filename="'+filename+'"')
mail.attach(fileMsg)
server.sendmail(tfrom, [to], mail.as_string())
except :
print traceback.print_exc()
return 1
return 0
CAMERA=0 # 0 cam interne, 1 cam externe
WRITE_JPEG=True
SENDMAIL=False
CONF='1280x720'
#CONF='640x480'
TIMEBETWEENIMGSECS=2
BACKGROUND=True
# Size, colors parameters
SIZETOKEEP=5000
DIST=400 # 200
RPI=True
if RPI :
import RPi.GPIO as GPIO
GPIO.setwarnings(False)
GPIO.setmode(GPIO.BCM)
GPIO.setup(26,GPIO.OUT)# BBoxes must be in the format:
# ( (topleft_x), (topleft_y) ), ( (bottomright_x),
(bottomright_y) ) )
top = 0
bottom = 1
left = 0
right = 1
def merge_collided_bboxes( bbox_list ):
# For every bbox...
for this_bbox in bbox_list:
# Collision detect every other bbox:
for other_bbox in bbox_list:
if this_bbox is other_bbox: continue # Skip self
# Assume a collision to start out with:
has_collision = True
# These coords are in screen coords, so > means
# "lower than" and "further right than". And <
# means "higher than" and "further left than".
# We also inflate the box size by 10% to deal with
# fuzziness in the data. (Without this, there are many
times a bbox
# is short of overlap by just one or two pixels.)
if (this_bbox[bottom][0]*1.1 < other_bbox[top][0]*0.9):
has_collision = False
if (this_bbox[top][0]*.9 > other_bbox[bottom][0]*1.1):
has_collision = False
if (this_bbox[right][1]*1.1 < other_bbox[left][1]*0.9):
has_collision = False
if (this_bbox[left][1]*0.9 > other_bbox[right][1]*1.1):
has_collision = False
if has_collision:
# merge these two bboxes into one, then start over:
top_left_x = min( this_bbox[left][0],
other_bbox[left][0] )
top_left_y = min( this_bbox[left][1],
other_bbox[left][1] )
bottom_right_x = max( this_bbox[right][0],
other_bbox[right][0] )
bottom_right_y = max( this_bbox[right][1],other_bbox[right][1] )
new_bbox = ( (top_left_x, top_left_y),
(bottom_right_x, bottom_right_y) )
bbox_list.remove( this_bbox )
bbox_list.remove( other_bbox )
bbox_list.append( new_bbox )
# Start over with the new list:
return merge_collided_bboxes( bbox_list )
# When there are no collions between boxes, return that
list:
return bbox_list
class WorkerDraw(threading.Thread):
def __init__(self, queue):
threading.Thread.__init__(self)
self.queue = queue
def run(self):
while True:
point = self.queue.get()
print '=========> point =',point
self.queue.task_done()
class Target:
def __init__(self):
self.capture = cv2.VideoCapture(CAMERA)
if CONF == '1280x720':
print 'OK set'
self.capture.set(cv2.CAP_PROP_FRAME_WIDTH,1280)
self.capture.set(cv2.CAP_PROP_FRAME_HEIGHT, 720)
self.capture.set(cv2.CAP_PROP_FPS, 25)
time.sleep(2)
w = self.capture.get(cv2.CAP_PROP_FRAME_WIDTH)
h = self.capture.get(cv2.CAP_PROP_FRAME_HEIGHT)
print w,hif BACKGROUND == False:
cv2.namedWindow("Target", CAMERA)
def run(self):
out_queue=Queue.Queue(maxsize=1)
t = WorkerDraw(out_queue)
t.start()
prev_x=0
prev_y=0
t0= time.time()
t0_img= time.time()
Process=False
# initialize the first frame in the video stream
firstFrame = None
# loop over images
while True:
# Capture frame from webcam
rval,color_image = self.capture.read()
hsv =
cv2.cvtColor(color_image,cv2.COLOR_BGR2HSV)
if not rval :
print 'Pb cam'
break
t1 = time.time()
t1_img = time.time()
if t1-t0 > 30 and Process == False: # 30s le
temps de chauffer
Process=True
print 'Processing !'
com="df -h / | awk '{print $5}' | grep -v Uti
| sed 's/%//g'"res,out=commands.getstatusoutput(com)
print out
if int(out) > 80 :
print 'Not enough disk space !'
Process=False
# resize the frame, convert it to grayscale,
and blur it
#color_image = imutils.resize(color_image,
width=500) # commente par KB le 27/05/2018
gray = cv2.cvtColor(color_image, cv2.COLOR_BGR2GRAY)
gray = cv2.GaussianBlur(gray, (21, 21), 0)
# if the first frame is None, initialize it
if firstFrame is None:
firstFrame = gray
continue
# compute the absolute difference between the
current frame and
# first frame
frameDelta = cv2.absdiff(firstFrame, gray)
thresh = cv2.threshold(frameDelta, 15, 255,
cv2.THRESH_BINARY)[1]
if BACKGROUND == False :
cv2.imshow("diff",thresh)
# dilate the thresholded image to fill in holes,
then find contours
# on thresholded image
thresh = cv2.dilate(thresh, None, iterations=2)
contour= cv2.findContours(thresh.copy(),
cv2.RETR_EXTERNAL,cv2.CHAIN_APPROX_SIMPLE)
# a commenter / decommenter
firstFrame=gray
#######################################
bounding_box_list = []
for c in contour[1]:
bounding_rect = cv2.boundingRect( c )
point1 = ( bounding_rect[0],
bounding_rect[1] )point2 = ( bounding_rect[0] +
bounding_rect[2], bounding_rect[1] + bounding_rect[3] )
bounding_box_list.append( ( point1, point2
) )
# Find the average size of the bbox
(targets), then
# remove any tiny bboxes (which are prolly
just noise).
# "Tiny" is defined as any box with 1/10th
the area of the average box.
# This reduces false positives on tiny
"sparkles" noise.
box_areas = []
for box in bounding_box_list:
box_width = box[right][0] - box[left][0]
box_height = box[bottom][0] - box[top][0]
box_areas.append( box_width * box_height )
#cv2.rectangle( color_image, box[0],
box[1], [255,0,0], 1)
average_box_area = 0.0
if len(box_areas):
average_box_area = float( sum(box_areas) )
/ len(box_areas)
trimmed_box_list = []
for box in bounding_box_list:
box_width = box[right][0] - box[left][0]
box_height = box[bottom][0] - box[top][0]
# Only keep the box if it's not a tiny
noise box:
print 'size=',box_width * box_height
if (box_width * box_height)-SIZETOKEEP >
200 :
print 'ignore size'
#if (box_width * box_height) >
average_box_area*0.1 and math.fabs((box_width * box_height)-SIZETOKEEP) < 200 :
#if (box_width * box_height) >
average_box_area*0.1 :
trimmed_box_list.append( box )
# Draw the trimmed box list:
for box in trimmed_box_list:
# jaune
cv2.rectangle( color_image, box[0],
box[1], [0,255,255], 2 )
'''
trimmed_box_list2=[]
for box in trimmed_box_list:
box_width = box[1][0] - box[0][0]
box_height = box[1][1] - box[0][1]
print
'tbox=',(box[0][0],box[0][1],box_width,box_height)
trimmed_box_list2.append((box[0][0],box[0][1],box_width,box_he
ight))
trimmed_box_list2b=[]
for b in trimmed_box_list2:
trimmed_box_list2b.append(b)
trimmed_box_list2b,weights =
cv2.groupRectangles(trimmed_box_list2b,1)
'''
bounding_box_list = merge_collided_bboxes(
trimmed_box_list )
print bounding_box_list,len(bounding_box_list)
print
'estimated_target_count=',len(bounding_box_list)
if Process == True :
print 'Processing !'
# Draw the merged box list:
for box in bounding_box_list:
#vert
#cv2.rectangle( color_image,
(box[0],box[1]),(box[0]+box[2],box[1]+box[3]), [0,255,0], 1 )# box pas bons
cv2.rectangle( color_image, box[0],
box[1], [0,255,0], 1 )
#x=int(box[0]+box[2]/2.0)
#y=int(box[1]+box[3]/2.0)
x=int((box[0][0]+box[1][0])/2.0)
y=int((box[0][1]+box[1][1])/2.0)
center_point=(x,y)
#print center_point
center_point=(x,y)
box_width = box[1][0] - box[0][0]
box_height = box[1][1] - box[0][1]
#box_width = box[2] - box[0]
#box_height = box[3] - box[1]
thesize=box_height*box_width
print 'thesize=',thesize
dist=(x-prev_x)*(x-prev_x)+(y-prev_y)*(y-
prev_y)
print "dist=",dist
prev_x=x
prev_y=y
print 'hsv x,y=',x,y
px=hsv[y,x]
print 'px=',px
h=px[0]
s=px[1]
v=px[2]
if thesize >SIZETOKEEP and out_queue.empty() and
dist>DIST and Process == True :
#if Process==True:
print 'ADDED','x=',x,'y=',y
print 'thesize=',thesize
out_queue.put({'point': (x,y)})
#cv2.rectangle( color_image,
(box[0],box[1]), (box[0]+box[2],box[1]+box[3]), [0,255,0], 1)
#vert
cv2.rectangle( color_image, box[0],box[1], [0,255,0], 1)
cv2.circle(color_image, center_point,
20, [255, 255,255], 1)
cv2.circle(color_image, center_point,
15, [100, 255, 255], 1)
cv2.circle(color_image, center_point,
10, [255, 255, 255], 2)
cv2.circle(color_image, center_point,
5, [100, 255, 255], 3)
if WRITE_JPEG and t1_img-t0_img >
TIMEBETWEENIMGSECS:
if RPI:
GPIO.output(26, GPIO.HIGH)
t0_img=t1_img
filename='target_'+datetime.datetime.now().strftime("%Y%m%d%H%
M%S")+'_x'+str(x)+'_y'+str(y)+'_thesize'+str(thesize)+'.jpg'
cv2.imwrite(filename,color_image)
if SENDMAIL == True:
res=sendMail('adresse mail
expediteur', 'adresse mail de destination',
'mous','','/home/karim/perso/moustiques/',filename)
print res
if RPI:
GPIO.output(26, GPIO.LOW)
# Display frame to user
if BACKGROUND == False:
cv2.imshow("Target", color_image)
# Listen for ESC or ENTER key
# ### il faut avoir le focus sur l image
c = cv2.waitKey(1) % 0x100
if c == 27 or c == 10:
os.kill(os.getpid(), signal.SIGKILL)
if __name__=="__main__":
# start
t = Target()
#import cProfile
#cProfile.run( 't.run()' )
t.run()Transmission de données entre
un Arduino et une Raspberry
Pi 3 en utilisant des modules
radio Nrf24L01
Il s’agit ici de faire une démo de transmission de données
(température) entre un Arduino et un Raspberry Pi 3. C’est le
protocole SPI qui est utilisé.
Liens utiles :
https://github.com/Michelgard/Capteur-DS18D20-Arduino-av
ec-emetteur-2.4Ghz
https://arduino-info.wikispaces.com/Nrf24L01-2.4GHz-HowT
o#PP
ATTENTION : si Arduino alimenté via port USB PC alors il faut
que le module radio émette à puissance minimale
Connexions :
Connexion nRF24L01+ sur l’arduino :
1 GND 2 VCC 3.3
3 D9 4 D10
5 D13 6 D11
7 D12 8 D2
Installer nRF24L01+ sur le Raspberry PI
NRFL01 Raspi
1 6 GND2 1 VCC 3.3
3 22 CE
4 24 CSN
5 23 SCK
6 19 MOSI
7 21 MISO
Activer le SPI sur le Raspberry Pi (raspi-config)
Code Python pour le Raspberry Pi
#!/usr/bin/env python
# -*- coding: utf-8 -*-
from nrf24 import NRF24
import time
from time import gmtime, strftime
import xml.dom.minidom
import sys
verbose = 0
if len(sys.argv) > 1:
if sys.argv[1] == "-v":
verbose = 1
else:
print "Argument non reconnu ! -v pour verbose"
sys.exit(0)
"""Variable de connexion R24"""
pipes = [[0xf0, 0xf0, 0xf0, 0xf0, 0xe1], [0xf0, 0xf0, 0xf0,
0xf0, 0xd2]]
""" init variable"""
temperExt = '0.0'
"""Initialisation connexion R24"""
radio = NRF24()
radio.begin(0, 0,25,18) #set gpio 25 as CE pin
radio.setRetries(15,15)
radio.setPayloadSize(52)radio.setChannel(0x4c)
radio.setDataRate(NRF24.BR_250KBPS)
radio.setPALevel(NRF24.PA_MAX)
radio.setAutoAck(1)
radio.openWritingPipe(pipes[0])
radio.openReadingPipe(1, pipes[1])
radio.startListening()
"""fin initialisation R24"""
"""Fonction pour extraire de la variable receptionnée les
différentes valeurs"""
def extract(raw_string, start_marker, end_marker):
start = raw_string.index(start_marker) + len(start_marker)
end = raw_string.index(end_marker, start)
return raw_string[start:end]
if verbose:
print
print ("Attente réception du capteur")
print
"""Boucle infinie de réception des données"""
while True:
pipe = [0]
"""Si pas de réception on attends ..."""
while not radio.available(pipe, True):
time.sleep(1000/1000000.0)
recv_buffer = []
radio.read(recv_buffer) #Les données réceptionnées sont
mise dans la variable
out = ''.join(chr(i) for i in recv_buffer)#création d'une
variable blobage avec les valeurs du tableu buffer
"""Création de la date et heure en francais et en SQL"""
now = time.localtime(time.time())
year, month, day, hour, minute, second, weekday, yearday,
daylight = now
dateheure = "%02d/%02d/%04d" % (day, month, year) + " " +
"%02d:%02d:%02d" % (hour, minute, second)
dateheureSQL = "%04d-%02d-%02d" % (year, month, day) + " "+ "%02d:%02d:%02d" % (hour, minute, second)
""""La variable out est décortiquée avec les données de
numéro de capteur, température, humidité, tension pile """
temperExt=extract(out,'E','E')
"""affichage des données recues pour es teste"""
if verbose:
print (dateheure)
if verbose:
print ("La température Ext : " + temperExt + "°C")
print
Code Arduino :
#include
#include
#include
#include "nRF24L01.h"
#include
#include
#include // Inclusion de la librairie OneWire
#define DS18B20 0x28 // Adresse 1-Wire du DS18B20
#define BROCHE_ONEWIRE 7 // Broche utilisée pour le bus 1-Wire
OneWire ds(BROCHE_ONEWIRE); // Création de l’objet OneWire ds
//variables radio
RF24 radio(9,10); //création instance radio (pin ce,csn)
const uint64_t pipes[2] = { 0xF0F0F0F0E1LL,0xF0F0F0F0D2LL };
// Fonction récupérant la température depuis le DS18B20
// Retourne true si tout va bien, ou false en cas d’erreur
boolean getTemperature(float *temp){
byte data[9], addr[8];
// data : Données lues depuis le scratchpad
// addr : adresse du module 1-Wire détecté
if (!ds.search(addr)) { // Recherche un module 1-Wire
ds.reset_search(); // Réinitialise la recherche de modulereturn false; // Retourne une erreur } if (OneWire::crc8(addr, 7) != addr[7]) // Vérifie que l’adresse a été correctement reçue return false; // Si le message est corrompu on retourne une erreur if (addr[0] != DS18B20) // Vérifie qu’il s’agit bien d’un DS18B20 return false; // Si ce n’est pas le cas on retourne une erreur ds.reset(); // On reset le bus 1-Wire ds.select(addr); // On sélectionne le DS18B20 ds.write(0x44, 1); // On lance une prise de mesure de température delay(800); // Et on attend la fin de la mesure ds.reset(); // On reset le bus 1-Wire ds.select(addr); // On sélectionne le DS18B20 ds.write(0xBE); // On envoie une demande de lecture du scratchpad for (byte i = 0; i < 9; i++) // On lit le scratchpad data[i] = ds.read(); // Et on stock les octets reçus // Calcul de la température en degré Celsius *temp = ((data[1]
void printf_begin(void)
{
fdevopen( &serial_putc, 0 );
}

void setup()
{
printf_begin();
Serial.begin(9600); //Debug

radio.begin();
radio.setChannel(0x4c);
radio.setAutoAck(1);
radio.setRetries(15,15);
radio.setDataRate(RF24_250KBPS);
radio.setPALevel(RF24_PA_MIN);
radio.setPayloadSize(32);
radio.openReadingPipe(1,pipes[0]);
radio.openWritingPipe(pipes[1]);
radio.stopListening();
radio.powerUp(); //alimente le module nrf24l01+
radio.printDetails(); //for Debugging
}

void loop (){
float txbuffer[1] = {0};
char SendPayload[32] = « RS1 : »;
char tempstr[10] = « »;

if(getTemperature(&txbuffer[0])) {
strcat(SendPayload, « E »);
dtostrf(txbuffer[0],2,2,tempstr);

Serial.println(« ok »);

strcat(SendPayload,tempstr);
strcat(SendPayload, « E »);

Serial.println(SendPayload);
// radio.powerUp(); //alimente le module nrf24l01+
delay(1000);
bool ok = radio.write(&SendPayload,sizeof(SendPayload));
delay(1000);
//Serial.println(« ok2 »);
//radio.powerDown(); //arrêt de l’alimentation du module
nrf24l01+
}
// else
// {
// Serial.println(« Error »);
// }
//for (int i = 0; i < 100; i++){
delay(3000);
//}
}
root@raspberrypi:~/nrf/Capteur-DS18D20-Arduino-avec-
emetteur-2.4Ghz# python ./lecture-capteurRF24_KB.py -v
Attente réception du capteur
15/07/2018 12:32:23
La température Ext : 27.38°C
15/07/2018 12:32:32
La température Ext : 27.38°C
Sonde DS18B20 avec RaspberryPi 3
1. Sonde DS18B20 : Mettre une résistance de 4.7 kO entre le
signal (fil jaune) et le + (fil rouge)
2. Brancher le fil rouge au +5V du RPI3, le fil noir à la
masse et le dernier sur le GPIO4
3. Activer le One Wire sur le RPI3 : en root, lancer raspi-
config (le GPIO4 est le GPIO par défaut pour le One
Wire)
4. r o o t @ r a s p b e r r y p i : ~ # cat
/sys/bus/w1/devices/28-0218313772ff/w1_slave
9e 01 4b 46 7f ff 0c 10 8a : crc=8a YES
9e 01 4b 46 7f ff 0c 10 8a t=25875
Lire T=25.875Vous pouvez aussi lire