WELLSELEY BED FRAME - OWNERS MANUAL & ASSEMBLY INSTRUCTIONS - Classic Brands
←
→
Transcription du contenu de la page
Si votre navigateur ne rend pas la page correctement, lisez s'il vous plaît le contenu de la page ci-dessous
OWNERS MANUAL & ASSEMBLY INSTRUCTIONS                        v 2.0

               WELLSELEY BED FRAME
                                        121813-5230   121814-5230
                                        121813-5250   121814-5250
                                        121813-5260   121814-5260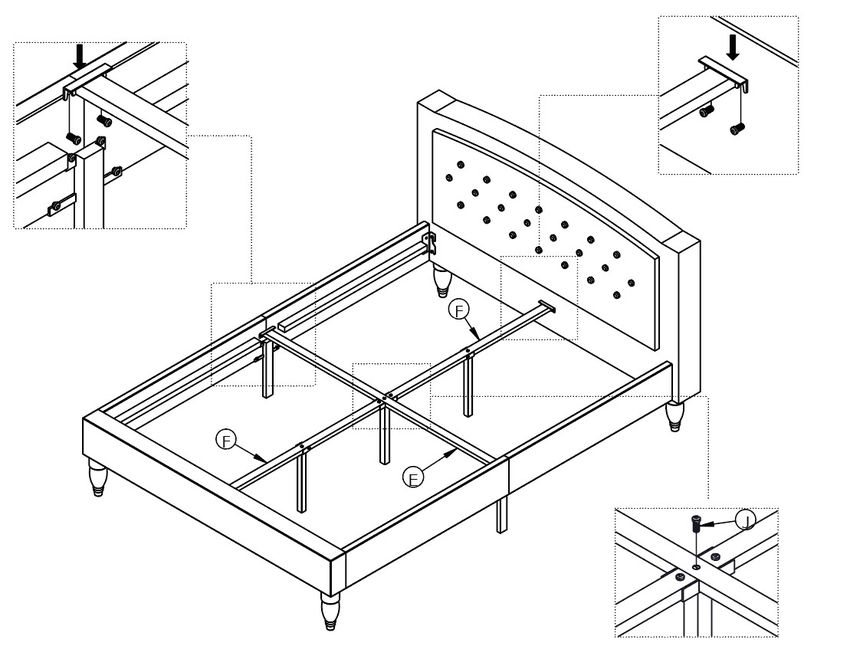
WARNING

       WARNING!
       • Due to the size of this bed we recommend assembling it in the room intended for use.
       • Check the packaging to make sure you have all the parts listed on this instruction.
       • Before use, make sure this bed is fully assembled. Do not over-tighten screws.
       • Do not use power tools to assemble this bed. Additional tools not needed.
       • This product should be used only on firm, level ground.
       • Do not destroy the packaging until after the product is fully assembled.
       • To move this bed, please disassemble firstly.
       • This product can support a maximum of 600 lb. evenly distributed.
       • Keep all packaging box, bags and small parts out of the reach of children.
       • Make sure bed frame’s legs are in contact with the ground all the time.
       • Do not jump, stand on this bed.
       CLEANING INSTRUCTIONS For: Liquid spills, non-liquid spills
       • The removal of dried non-liquid spills may require the use of soft brush or vacuum.
       • Mix water-based upholstery cleaner with 16 ounces of lukewarm water.
       • Dampen a cleaning cloth in the mixture and gently blot the soiled area. Avoid rubbing the affected area aggressively.
       • Wipe area with a clean cloth damped in water. Ensure that all the soap residue has been removed.

       ¡¡¡ADVERTENCIAS!!!
       • Debido al tamaño de este producto, le recomendamos ensamblarlo en la habitación donde se piense usar.
       • Revise el embalaje para asegurarse de que tiene todas las partes enlistadas en estas instrucciones.
       • Antes de usar esta cama, asegúrese de que esté totalmente armada. No apriete de más los tornillos.
       • No use herramientas eléctricas para armar esta cama. No se requieren herramientas adicionales.
       • Este producto debe usarse solamente sobre un piso firme y parejo.
       • No destruya el embalaje antes de que el producto esté completamente armado
       • Para mover esta cama, por favor, desármela primero.
       • Este producto puede aguantar un máximo de 272 kg distribuidos homogéneamente.
       • Mantenga todas las cajas, bolsas y partes pequeñas del embalaje lejos del alcance de los niños.
       • Asegúrese de que las patas de la base de la cama estén en contacto con el piso todo el tiempo.
       • No salte ni se ponga de pie sobre esta cama.
       INSTRUCCIONES DE LIMPIEZA Para: derrames líquidos, derrames no líquidos
       • Para retirar derrames secos no líquidos se puede requerir el uso de un cepillo suave o aspiradora.
       • Mezcle un limpiador de tapicería a base de agua con 473 ml de agua tibia.
       • Humedezca un trapo en la mezcla y talle suavemente la zona manchada. Evite tallar agresivamente la zona afectada.
       • Limpie la zona con un trapo limpio humedecido en agua. Asegúrese de haber eliminado todo residuo de jabón.

       AVERTISSEMENTS!
       • En raison des dimensions de ce lis, nous recommandons de le monter dans la pièce prévue pour son utilisation.
       • Vérifiez l’emballage afin de vous assurer que vous avez toutes les pièces figurant dans ces instructions.
       • Avant l’utilisation, assurez-vous que ce lit est complètement monté. Ne pas trop serrer les vis.
       • Ne pas utiliser des outils électriques pour monter ce lit. Des outils supplémentaires ne sont pas nécessaires.
       • Ce produit doit être utilisé sur un sol plat et stable uniquement.
       • Ne détruisez pas l’emballage avant que le produit ne soit complètement monté.
       • Pour déplacer ce lit, veuillez le démonter d’abord.
       • Ce produit peut supporter un poids maximal de 272,15 kg distribué de manière égale.
       • Gardez la boîte d’emballage, les sacs et les petites pièces hors de la portée des enfants.
       • Assurez-vous que les pieds du cadre du lit sont tout le temps en contact avec le sol.
       • Ne sautez pas et ne vous mettez pas debout sur ce lit.
       INSTRUCTIONS DE NETTOYAGE Pour : Saleté liquide, saleté non liquide
       • L’enlèvement de saleté non liquide peut exiger l’utilisation d’une brosse douce ou d’un aspirateur.
       • Nettoyant pour tissu et rembourrage à base de mélange d’eau avec 500 grammes d’eau tiède.
       • Mouillez légèrement un tissu avec le mélange et essuyez doucement la zone sale.
         Évitez de frotter la zone à nettoyer de manière forte.
       • Essuyez la zone avec un tissu propre imbibé d’eau. Assurez-vous d’enlever tous les résidus de savon.

    Have a question? Please contact Customer Service at 877-707-7533 for the quickest service. We are open Monday -
                              Friday from 9:00 a.m. - 5:00 p.m. (EST) or you can email us at
                                               claims@classicbrands.com.

1
PARTS
C-2X
B-1X
D-2X E-1X
F-2X
King-4X
G-2X
H-1X S-2X
King-2X
__________________________________________________________________________
J-5X M-2X
King-10X 5mm-1X
4mm-1X 2ASSEMBLY INSTRUCTIONS
STEP 1
• Lay parts (A) and (B) flat on the floor and attach plastic legs (I) underneath headboard and Footboard.
• Acueste las partes (A) y (B) sobre el piso y acople las patas de plástico (I) por debajo de la cabecera y el pie de cama.
• Posez les pièces (A) et (B) sur le sol et raccordez les pieds en plastique (I) sous la tête de lit et le pied de lit.
STEP 2
• Lay part (D) and (C) flat on the floor next to each other as shown. Slide leg (G) underneath pre-attached screws at the
center of the side rails tighten using the allen wrench (M). Repeat step 2 on the other side.
• Acueste las partes (D) y (C) sobre el piso una junta la otra como se muestra. Deslice la pata (G) por debajo de los
tornillos previamente colocados a la mitad de las barandas laterales usando la llave Allen (M) para apretar. Repita el
paso 2 del otro lado.
• Posez les pièces (D) et (C) sur le sol l’une à côté de l’autre comme il est illustré. Faites glisser le pied (G) sous les vis
pré-raccordées au centre des barres latérales et serrez en utilisant la clé Allen (M). Répétez l’étape 2 sur l’autre côté.
3ASSEMBLY INSTRUCTIONS
STEP 3
• Lift Assembly (C), (D), (G) above the pre-attached screws on the side of the headboard (A) and footboard (B).
• Levante la parte armada (C), (D), (G) por encima de los tornillos previamente colocados del lado
de la cabecera (A) y el pie de cama (B).
• Soulevez le bloc (C), (D), (G) au-dessus des vis pré-raccordées sur le côté de la tête de lit (A) et du pied de lit (B).
STEP 4 F
F
J
• Slide the pre-attached legs on part (F) until it is vertical and screw in part (J) from the top to secure in place.
Repeat on the other part (F).
• Deslice las patas previamente acopladas en la parte (F) hasta que esté vertical y atornille la parte (J) de la parte
superior para asegurarla en su lugar. Repita en la otra parte (F).
• Faites glisser les pieds pré-raccordés sur la pièce (F) jusqu’à qu’ils soient alignés verticalement et vissez dans la
pièce (J) à partir du haut pour les fixer. Répétez sur l’autre partie (F).
4ASSEMBLY INSTRUCTIONS
STEP 5
J J
F
F
X 2 FOR KING
_____
H
• Place the two full assembles from previous step side by side. Attach the leg (H) with screws (J) from the top.
• Coloque las dos partes armadas del paso anterior una al lado de la otra. Acople la pata (H) con los tornillos (J)
de la parte superior.
• Placez les deux blocs complets des étapes précédentes l’un à côté de l’autre. Raccordez le pied (H) avec des vis
(J) à partir du haut.
STEP 6
• Place assembly from step 5 between headboard and footboard and screw in with pre-attached screws (J). Place part (E)
on part (H) in the center of the assembly running between sideboards. Screw in part (E) to the center of the assembly
using screw (J).
• Coloque la parte armada del paso 5 entre la cabecera y el pie de cama y atornille con los tornillos previamente
colocados (J). Coloque la parte (E) en la parte (H) a la mitad de la parte armada que va entre las protecciones laterales.
Atornille la parte (E) en el centro de la parte armada usando el tornillo (J).
• Placez le bloc de l’étape 5 entre la tête de lit et le pied de lit et vissez avec les vis pré-accordées (J). Placez la pièce (E)
sur la pièce (H) au centre du bloc qui se trouve entre les planches latérales. Vissez la pièce (E) au centre du bloc en
utilisant la vis (J).
5ASSEMBLY INSTRUCTIONS
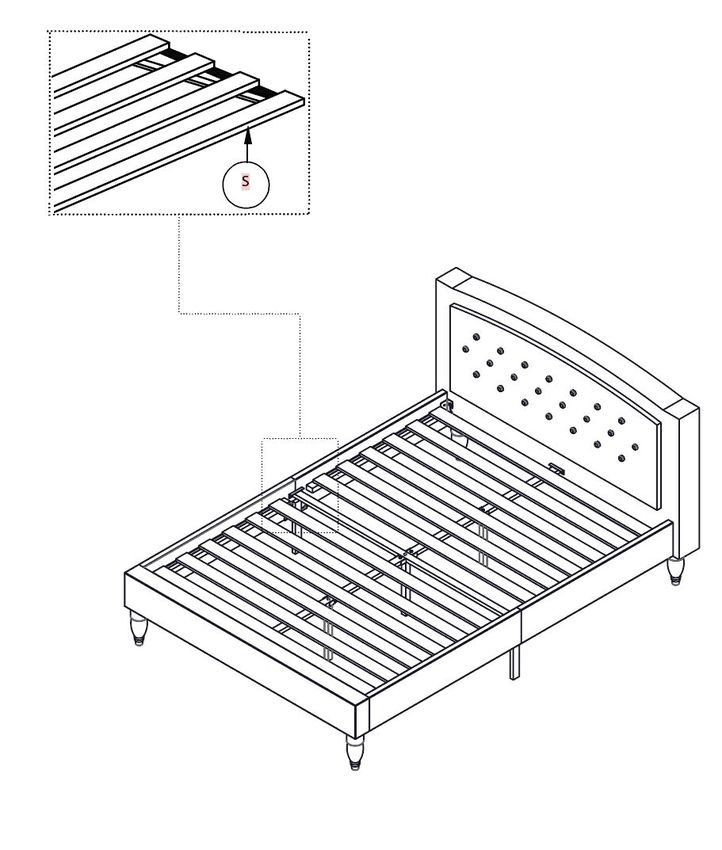
STEP 7 Full & Queen
King
• Lay Slats (S) on the sideboard and use
Velcro to keep in place.
• Acueste las tablillas (S) en la protección
lateral y use cinta velcro para mantenerlas
en su lugar.
• Posez les planchettes (S) sur la planche
latérale et utilisez le crochet Velcro pour les
maintenir en place.
6WARRANTY
3 YEAR LIMITED WARRANTY
Classic Brands Upholstered Beds are warranted for a three (3) year period from the date of purchase against defects in materi-
als and/or workmanship. Unless there is a clear warranty issue, the Classic Brands Upholstered Beds are not returnable to
Classic Brands. During this warranty period, if the product is deemed to be defective, our responsibility for the defective
product is limited to replacement as stated below. All transportation costs are the responsibility of the purchaser during the
entire warranty period. This Limited Warranty does not apply to and is otherwise invalid as to the following, without limitation:
(1) Normal wear and tear; (2) Normal soiling from everyday use; (3) Product used for commercial, institutional, or rental
purposes; (4) Mattress not fitted correctly with Product; (5) Damage caused by structural problems or appliance malfunctions;
(6) Damage caused by or related to fire, natural disaster, flood, theft, vandalism or other crimes, or any other loss that is
covered under an insurance policy; (7) Damage caused by extraordinary use; (8) Damage occurred during moves between
residences or while in storage; or (9) smoke, fire, floods, or other acts of God.
CLASSIC BRANDS SHALL NOT BE LIABLE FOR INCIDENTAL OR CONSEQUENTIAL DAMAGES RESULTING FROM THE
USE OF THIS PRODUCT OR ARISING OUT OF ANY BREACH OF THIS WARRANTY AND THE EXCLUSIVE REMEDY FOR
BREACH OF THIS WARRANTY SHALL BE REPLACEMENT OF THE PRODUCT. THE EXPRESS LIMITED WARRANTY
SET FORTH HEREIN IS THE SOLE WARRANTY GIVEN BY CLASSIC BRANDS, SHALL ONLY EXTEND TO THE ORIGINAL
PURCHASER AND SHALL NOT EXTEND TO ANY SUBSEQUENT OWNER OR OTHER TRANSFEREE OF THE PRODUCT.
THE REMEDIES DESCRIBED ABOVE ARE YOUR SOLE AND EXCLUSIVE REMEDIES AND OUR ENTIRE LIABILITY FOR
ANY BREACH OF THIS LIMITED WARRANTY. OUR LIABILITY SHALL UNDER NO CIRCUMSTANCES EXCEED THE
ACTUAL AMOUNT PAID BY YOU FOR THE DEFECTIVE PRODUCT. FOR SALES TO ANY PURCHASER, OTHER THAN
THE ORIGINAL PURCHASER (AS DEFINED HEREIN), ALL IMPLIED WARRANTIES INCLUDING, BUT NOT LIMITED TO,
ANY IMPLIED WARRANTY OF MERCHANTABILITY OR FITNESS FOR A PARTICULAR PURPOSE OR USE, ARE EXCLUD-
ED AND DISCLAIMED. This Limited Warranty is made exclusively by Classic Brands and is not made on behalf of its distribu-
tors or any other party and no one is authorized to assume or undertake for Classic Brands any other liability in connection
with the sale of the product. Some jurisdictions do not allow for the disclaimers of implied warranties or the exclusion of
limitation of incidental or consequential damages, so the above limitations may not apply to you. In the event that the disclaim-
er of implied warranties is not applicable to you, then such implied warranties shall only remain in effect during the limited
warranty period. All determinations of applicability and validity of warranty claims hereunder are solely at the discretion of the
Classic Brands and such determination shall be final. THIS LIMITED WARRANTY IS NON-TRANSFERRABLE. The limited
warranty set forth in this certificate apply only to the product accompanied by this Limited Warranty Certificate. This limited
warranty gives you legal rights and you may have other rights which vary from state to state. This limited warranty shall be
interpreted in accordance with the laws of the State of Maryland, without regard to provisions concerning conflict of laws.
Classic Brands reserves the right to revise, cancel, or amend its warranties offered to products sold in the future. The limited
warranty set forth herein is valid and applicable to the product accompanied by this Warranty Certificate.
WARRANTY CLAIMS PROCEDURE: Should a warranty claim arise, the original purchaser shall contact Classic Brands for a
Warranty Claim Form and Instructions. The original purchaser shall complete the Warranty Claim Form, clearly detailing the
defect, and email along with a copy of original sales receipt for the Product to claims@classicbrands.com or as otherwise
directed on the Warranty Claim Form. Warranty Claim Forms that are incomplete or sent without a copy of original sales
receipt will not be processed and will be returned. Upon receipt by Classic Brands of the completed Warranty Claim Form and
the original sales receipt, Classic Brands’ quality control department will verify the defect and/or the applicability of this Limited
Warranty thereto. In the event that this Limited Warranty is applicable, a replacement product of equal or greater value will be
sent to the customer. The original purchaser will be responsible for shipping, handling and processing fees. No monetary
refunds and/or credits will be issued. Please retain this warranty and your original invoice for three (3) years.
7Vous pouvez aussi lire