GRIMPER FAN CONTROL GUIDA PER IL CLIENTE FINALE END USER GUIDE ENDE BENUTZERHANDBUCH UTILISATEUR FINAL GUÍA DEL USUARIO FINAL
←
→
Transcription du contenu de la page
Si votre navigateur ne rend pas la page correctement, lisez s'il vous plaît le contenu de la page ci-dessous
GRIMPER FAN CONTROL
GUIDA PER IL CLIENTE FINALE
END USER GUIDE
ENDE BENUTZERHANDBUCH
UTILISATEUR FINAL
GUÍA DEL USUARIO FINAL

                    CMF           CBT

                              1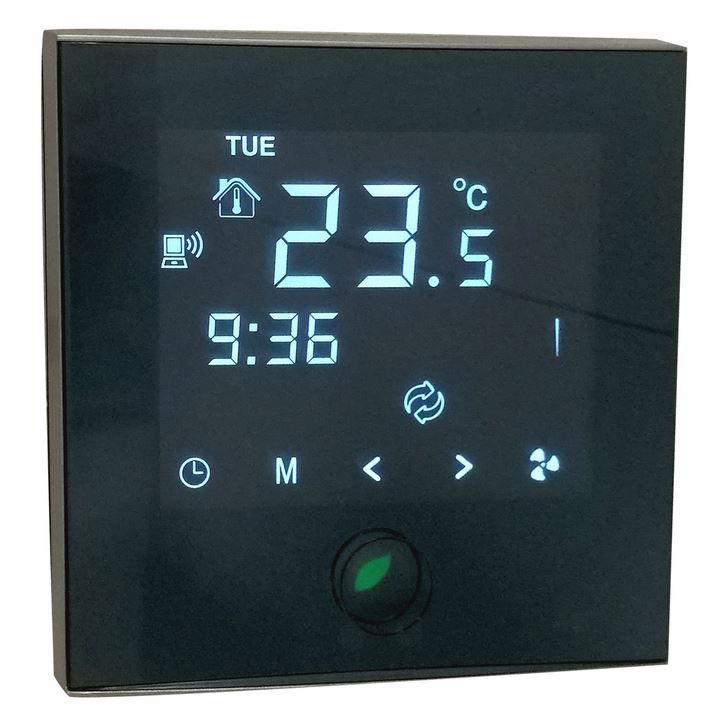
ATTENZIONE Leggere questo manuale accuratamente prima di usare l’apparecchio ed eseguire le operazioni come
indicato. Le istruzioni sono importanti per la sicurezza e per un corretto funzionamento; accertarsi di osservarle.
W ARN I NG Please read this manual carefully before using the equipment; carry well out all the operations here
indicated. The section explains how to use the equipment safety and correctly. Observe the precautions given in this
manual and on plates and tables attached to the unit.
ACHTUNG Bitte lesen Sie genau diese Anleitung vor Gebrauch des Geräts und die Verfahren auf korrekte Weise
durchführen. Die in diesem Abschnitt beschriebenen Anweisungen beziehen sich auf einen für die Sicherheit korrekten
Betrieb; diese Anweisungen unbedingt befolgen.
ATTENTI ON Avant d’utiliser l’appareil, lire attentivement ce manuel et effectuer les opérations de la juste façon. Les
instructions décrites dans cette section assurent un fonctionnement correct; s’assurer de bien les respecter.
ATENCION Es necesario leer cuidadosamente el presente manual antes de usar el equipo. La lectura de la guia
ayuda la ejecucion correcta de los procedimientos y garantizan un correcto funcionamiento de la unidad.

 00    07-2020                                                               Prima emissione
Rev     Data       Redatto       Approvato                                         Note
Catalogo / Catalogue / Katalog / Catalogue                         Serie / Series / Serie / Serie / Série

  MCO0196100100.00                                                      GRIMPER FAN

                                                           2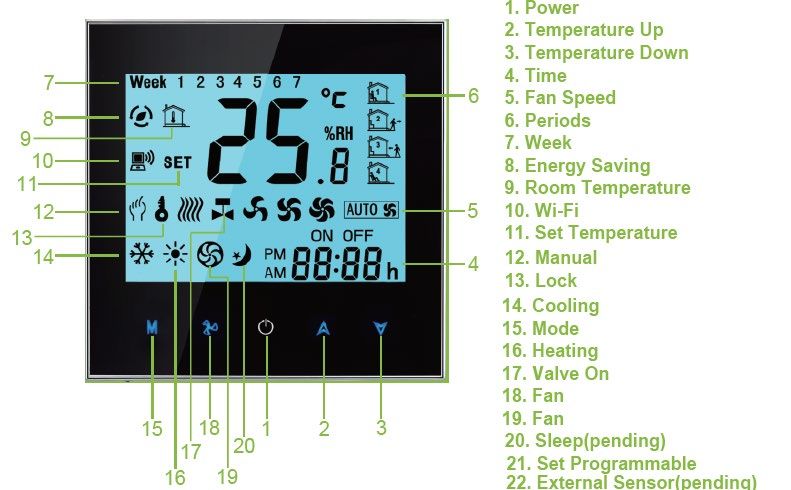
INDICE - INDEX - INHALTSVERZEICHNIS - INDEX - INDICE

1. Premessa – Introduction – Einführung – Introduction –Introducción.                                                           3

   Termostati a parete o a bordo macchina serie CMF – CMF Wall or on board mounting thermostat series – CMF Wand-
2. oder Bordthermostat-Serie – CMF série de thermostats muraux ou intégré – CMF Serie de termostato de montaje en               4
   pared o a bordo
   Termostati a parete o a bordo macchina serie CBT – CBT Wall or on board mounting thermostat series - CBT Wand-
3. oder Bordthermostat-Serie - CBT série de thermostats muraux ou intégré - CBT Serie de termostato de montaje en               9
   pared o a bordo

     Telecomando a infrarossi – Infrared remote handset control - Infrarot-Fernbedienung - Télécommande infrarouge -
4.                                                                                                                              11
     Control remoto por infrarrojos.

5. Altre informazioni – Other info - Andere Information - Les autres informations - Otra información                            13

1. PREMESSA - INSTRUCTI ON - EINFÜHRUNG – I NTRODUCTI ON - INTRODUCCIÓN

Le unità possono essere predisposte con 3 tipologie di controlli, che garantiscono sempre tutte le funzionalità in modo da garantire
il massimo comfort ambientale.
     a) Termostato TouchScreen a parete.
     b) Termostato TouchScreen a bordo unità.
     c) Telecomando a infrarossi.

The unit could be predisposed with 3 different thermostat configurations, studied for giving always all the functions, so to warrant
the maximum comfort.
    a) Touch Screen thermostat positioned on the wall.
    b) Touch Screen thermostat positioned in the unit.
    c) Infrared remote handset control.

Das Gerät kann mit 3 verschiedenen Thermostatkonfigurationen ausgestattet werden, die darauf ausgelegt sind, immer alle
Funktionen zu bieten, um den maximalen Komfort zu gewährleisten.
    a) Touchscreen-Thermostat an der Wand.
    b) Touchscreen-Thermostat im Gerät.
    c) Infrarotfernbedienung.

L'unité pourrait être prédisposée avec 3 configurations de thermostat différentes, étudiées pour donner toujours toutes les
fonctions, afin de garantir le maximum de confort.
     a) Thermostat à écran tactile positionné sur le mur.
     b) Thermostat à écran tactile positionné dans l'appareil.
     c) Télécommande infrarouge.

La unidad podría estar predispuesta con 3 configuraciones diferentes de termostato, estudiadas para brindar siempre todas las
funciones, para garantizar el máximo confort.
    a) Pantalla táctil con termostato colocado en la pared
    b) Termostato de pantalla táctil colocado en la unidad.
    c) Control remoto de infrarrojos.

                                                                 3
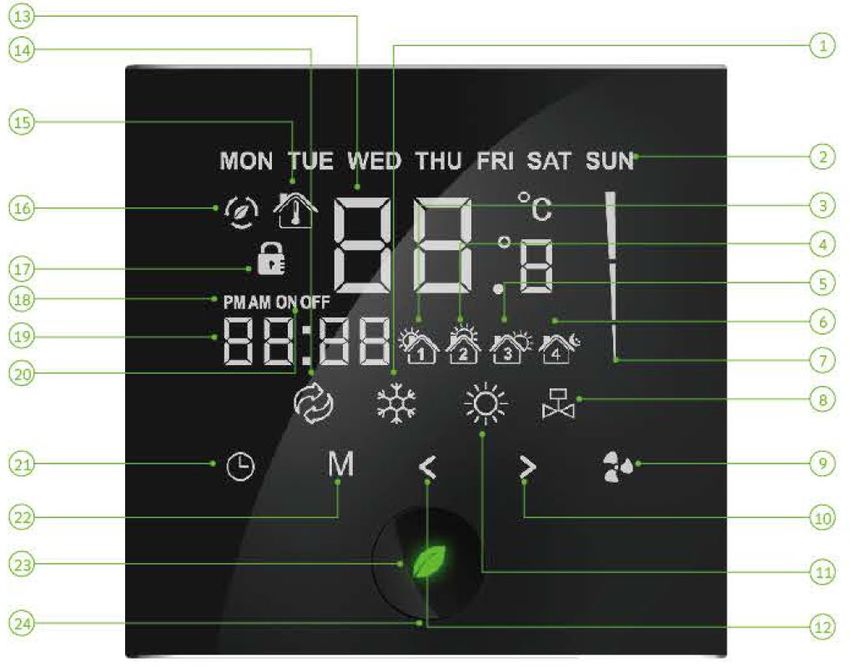
2. Termostati a parete o a bordo macchina serie CMF – CM F W all or on board m ounting
therm ostat series – CMF Wand-oder Bordthermostat-Serie – CM F série de therm ostats
m uraux ou intégré – CMF Serie de termostato de montaje en pared o a bordo

Accensione/Spegnimento del termostato.                                                        Premere il tasto
Turn ON / OFF the thermostat.                                                                 Press button
Schalten Sie den Thermostat ein / aus.                                                        Knopf drücken
Activez / désactivez le thermostat.                                                           Appuie sur le bouton
Encienda y apague el termostato.                                                              Presiona el botón

Impostare una modalità di funzionamento (condizionamento, riscaldamento, sola ventilazione)   Premere il tasto
Mode setting (cooling, heating, only fan).                                                    Press button
Modus Einstellung (Kühlung, Heizung, nur Lüfter).                                             Knopf drücken
Réglage du mode (refroidissement, chauffage, seul ventilateur).                               Appuie sur le bouton
Ajuste del modo (refrigeración, calefacción, sólo ventilador).                                Presiona el botón

Impostare la temperatura di comfort ambientale.                                               Premere i tasti
Adjust room set temperature.                                                                  Press buttons
Raumtemperatur einstellen.                                                                    Knopf drücken
Régler la température réglée de la pièce.                                                     Appuie sur le bouton
Ajuste la temperatura de la habitación.                                                       Presiona el botón

Impostare la velocita’ del ventilator (min, med, max, auto)                                   Premere il tasto
Fan motor (min, med, max, auto) setting ..                                                    Press button
Lüftermotor (min, med, max, auto) Einstellung.                                                Knopf drücken
Réglage du moteur du ventilateur (min, med, max, auto).                                       Appuie sur le bouton
Motor del ventilador (min, med, max, auto).                                                   Presiona el botón

                                                                      4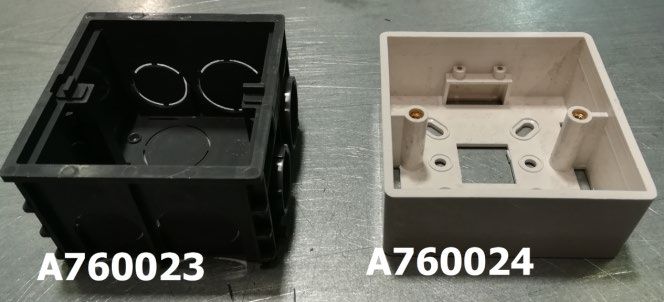
Funzioni e settaggi speciali - Special function and settings - Sonderfunktion und Einstellungen -
Fonction spéciale et param èt res - Funciones especiales y ajustes.

Impostazione funzionamento ECO.                                Quando l’unità e accessa, premere il pulsante
Economic mode setting.                                         When the unit is ON, press button
Einstellung des Betriebsmodus.                                 Wenn das Gerät eingeschaltet ist, drücken Sie die Taste
Paramétrage du mode économique.                                Lorsque l'appareil est sous tension, appuyez sur le bouton
Configuración del modo económico.                              Cuando la unidad está encendida, presione el botón

Cambiare l’ora indicata e impostazione programma.              Premere i tasti
Clock and program settings.                                    Press buttons
Uhr und Programmeinstellungen.                                 Knopf drücken
Horloge et paramètres du programme.                            Appuie sur le bouton
Configuracion de hora y configuración del programa             Presiona el botón

Master slave. Più unità connesse allo stesso termostato.
Master slave. Several units connected to the same              In questo caso, tutte le impostazioni settate nel termostato saranno
thermostat.                                                    passate a tutte le unità.
Master slave. Mehrere Einheiten sind an demselben              In this case, all the settings will be pass to each unit
Thermostat angeschlossen.                                      In diesem Fall werden alle Einstellungen an jedes Gerät übergeben.
Master slave. Plusieurs unités connectées au même              Dans ce cas, tous les paramètres seront transmis à chaque unité.
thermostat.                                                    En este caso, todos los ajustes serán pasados a cada unidad.
Master slave. Varias unidades conectadas al mismo
termostato.

Per fissare il termostato a muro, usare una delle due scatole fornite con il
termostato. E’ possibile scegliere la soluzione da incasso o quella da
esterno
For the thermostat positioning on the wall, use a plastic box sent by
factory with the good. It is possible to choice the internal or the external
one.
Verwenden Sie für die Positionierung des Thermostats an der Wand eine
werkseitig mit der Ware gelieferte Plastikbox. Es ist möglich, die interne
oder die externe zu wählen.
Pour le positionnement du thermostat sur le mur, utilisez une boîte en
plastique envoyée par l'usine avec le bien. Il est possible de choisir
l'interne ou l'externe.
Para el posicionamiento del termostato en la pared, use una caja de
plástico enviada por la fábrica con el bien. Es posible elegir el interno o el
externo.

                                                                    5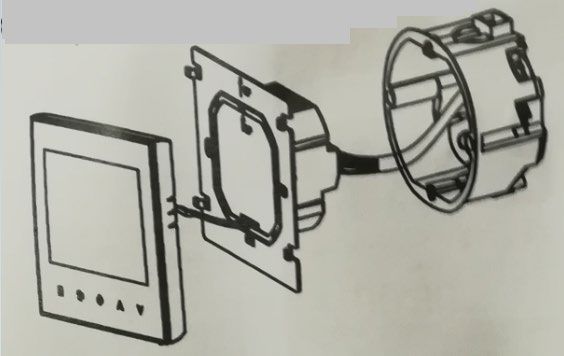
Predisposizione WiFi – W iFi predisposition - WiFi-Veranlagung - Prédisposition W iFi - Predisposición WiFi

Assicurati che il tuo smartphone Android o IOS sia abilitato a scaricare software da siti diversi a PlayStore o AppleStore.
Make sure your Android or IOS smartphone is enabled to download software from different sites to PlayStore or AppleStore.
Stellen Sie sicher, dass Ihr Android- oder IOS-Smartphone aktiviert ist, um Software von verschiedenen Websites in den Play Store oder
Apple Store herunterzuladen.
Assurez-vous que votre smartphone Android ou IOS est autorisé à télécharger des logiciels provenant de différents sites sur Play Store ou
Apple Store.
Asegúrese de que su teléfono inteligente Android o IOS esté habilitado para descargar software de diferentes sitios a Play Store o Apple
Store.

Scansionare il codice sulla scatola di cartone o nel foglio istruzioni per scaricare l'App. Installare l’APP.
Scan the code on the carton box or in the datasheet to download the App. Install the APP.
Scannen Sie den Code auf der Kartonverpackung oder im Datenblatt, um die App herunterzuladen. Installiere die
App.
Scannez le code sur la boîte en carton ou dans la fiche technique pour télécharger l'application. Installez l'APP.
Escanee el código en la caja de cartón o en la hoja de datos para descargar la aplicación. Instala la aplicación.

Assicurati che il tuo smartphone sia connesso con la WiFi.
Make sure your smartphone is connected to WiFi.
Stellen Sie sicher, dass Ihr Smartphone mit WiFi verbunden ist.
Assurez-vous que votre smartphone est connecté au WiFi.
Asegúrese de que su teléfono inteligente esté conectado a WiFi.

Aprire l’APP, eseguire la registrazione, indicando la propria email e la password.
Open the App, make the registration, indicating the email and the password.
Öffne die App, mache die Registrierung, unter Angabe der E-Mail und des Passworts.
Ouvrez l'application, faites l'enregistrement, en indiquant l'email et le mot de passe.
Abra la aplicación, realice el registro, indicando el correo electrónico y la contraseña.

Dopo aver effettuato l'accesso, premere il pulsante       e scegliere la connessione WiFi, inserire la password WiFi,
e continuare il passaggio successivo.
After log in, press    button and choose the WiFi connection, insert the WiFi password and continue the next
step.
Nach der Anmeldung drücken Sie die Taste     und wählen Sie die WiFi-Verbindung, geben Sie das WIFI-
Passwort ein und fahren Sie mit dem nächsten Schritt fort.
Après la connexion, appuyez sur le bouton        et choisissez la connexion WiFi, insérez le mot de passe WiFi et
passez à l'étape suivante.
Después de iniciar sesión, presione el botón       y elija la conexión WiFi, inserte la contraseña de WiFi y continúe
con el siguiente paso.

Premi "Connect" sull’ App.
Press “Connect” on the App.
Drücken Sie in der App auf "Verbinden".
Appuyez sur "Connect" sur l'application.
Presione "Conectar" en la aplicación..

                                                                         6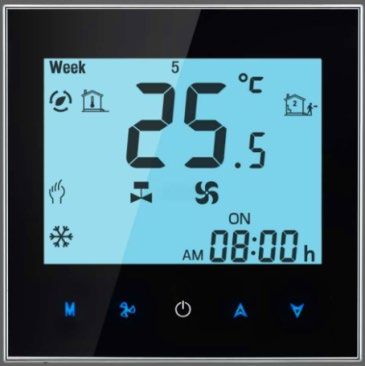
Quando compare la schermata con indicazione F1, assicurarsi che sotto sia
indicato F1 e premere “Confirm”.
When it appears F1 indication, please to ensure that also in the field below is
indicated always F1 and press “Confirm”.
Wenn es eine F1-Anzeige gibt, stellen Sie bitte sicher, dass auch im Feld darunter
immer F1 angezeigt wird und drücken Sie auf “Confirm”.
Quand il apparaît l'indication F1, veuillez vous assurer que le champ ci-dessous
indique toujours F1 et appuyez sur "onfirm".
Cuando aparece la indicación F1, asegúrese de que también en el campo
siguiente se indique siempre F1 y presione "Confirm".

Premere il pulsante "M" per 5 secondi sul termostato e l'icona        lampeggerà.
Press “M” button for 5s on thermostat and icon          will flash.
Drücken Sie die Taste "M" für 5 Sekunden auf dem Thermostat und das Symbol
    wird blinken.
Appuyez sur le bouton "M" pour 5s sur le thermostat et l'icône         va clignoter.
Presione el botón "M" durante 5 segundos en el termostato y el icono
parpadeará.

Nel termostato l’icona con la casa         lampeggerà e comparirà la scritta F1…..la connessione alla WIFI sarà possibile quando l’icona della

casa       rimarrà fissa.

in the thermostat, the icon with the house           starts blinking and F1 indication appears...... the WIFI connection it will be ensured when

the icon with the house          will be fixed (no blinking)

Im Thermostat beginnt das Symbol mit dem Haus                     zu blinken und die F1-Anzeige erscheint. Über die WLAN-Verbindung wird

sichergestellt, dass das Symbol mit dem Haus           repariert wird (kein Blinken).

Dans le thermostat, l'icône avec la maison           commence à clignoter et l'indication F1 apparaît ...... la connexion WIFI elle sera assurée

lorsque l'icône avec la maison        sera fixe (pas de clignotement).

En el termostato, el ícono con la casa          comienza a parpadear y aparece la indicación F1 ...... la conexión WIFI se garantizará cuando

se repare el ícono con la casa         (sin parpadear).

                                                                         7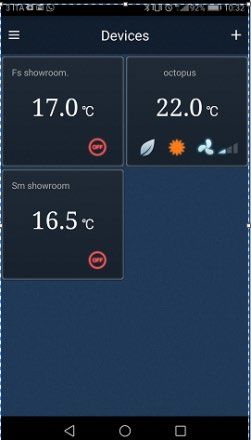
Nello Smarphone, comparirà la scritta “Processing”…..se l’operazione non va a buon fine, dopo 1 minuto, premere di nuovo il tasto M per 5
secondi nel termostato…. Se non funziona ancora, ripetere le ultime due istruzioni.
Quando l’operazione andrà a buon fine, nel termostato entrambe le icone con la casa e il PC saranno fisse.

In the smartphone, “Processing” indications will be apperead……… if the operation will be not concluded in the next minute, press again M
button for 5 seconds in the thermostat…….if it doesn’t run, please to repeat again the last two steps.
When the operation is concluded, in the thermostat both the icon with the house and the PC will be ON (no blinking).

Auf dem Smartphone werden die Meldungen „Verarbeitung“ angezeigt. Wenn der Vorgang in der nächsten Minute nicht abgeschlossen ist,
drücken Sie die Taste M im Thermostat erneut für 5 Sekunden. Wenn der Vorgang nicht ausgeführt wird, wiederholen Sie den Vorgang die
letzten beiden schritte.
Wenn der Vorgang abgeschlossen ist, leuchten im Thermostat sowohl das Symbol mit dem Haus als auch der PC (kein Blinken).

Dans le smartphone, les indications «Traitement» seront lues ……… si l'opération ne se termine pas dans la minute suivante, appuyez à
nouveau sur le bouton M pendant 5 secondes dans le thermostat ……. S'il ne fonctionne pas, veuillez répéter à nouveau les deux dernières
étapes. Une fois l'opération terminée, dans le thermostat, l'icône avec la maison et le PC sera allumée (pas de clignotement).

En el teléfono inteligente, aparecerán indicaciones de "Procesamiento" ... si la operación no concluye en el siguiente minuto, presione
nuevamente el botón M durante 5 segundos en el termostato ... si no funciona, repita nuevamente Los dos últimos pasos.
Cuando finalice la operación, en el termostato, tanto el icono con la casa como la PC estarán encendidos (sin parpadear).

La connessione alla WIFI deve avvenire un termostato alla volta…. Nel caso di più termostati, ripetere le operazioni sopra indicate.

The WIFI connection must be done for each single thermostat, once at time. In case of several thermostat, all the previous operation must
be repeated step by step.

Die WIFI-Verbindung muss für jeden einzelnen Thermostat einzeln hergestellt werden. Bei mehreren Thermostaten muss der gesamte
vorherige Vorgang schrittweise wiederholt werden.

La connexion WIFI doit être effectuée pour chaque thermostat unique, une fois à la fois. En cas de plusieurs thermostats, toutes les
opérations précédentes doivent être répétées pas à pas.

La conexión WIFI debe hacerse para cada termostato individual, una vez a la vez. En caso de varios termostatos, toda la operación
anterior debe repetirse paso a paso.

L’APP può funzionare sia con sistemi Android e IOS.
Si possono avere più smartphone connessi alla stessa linea, anche se utilizzano contemporaneamente
sia sistemi IOS che Android.
La prima foto a destra fa riferimento a una unità controllata da APP.
La seconda foto fa riferimento alla schermata iniziale, dove si possono scegliere ben tre unità connesse
alla stessa linea WIFI.

APP is studied to run correctly with both Android and IOS system.
It is possible to have more smartphone connected togheter to the same WIFI line, also using both IOS
and Android system at the same time.
The first picture on the right it refers to a unit controlled by the APP.
The second one shows the main screen, where it is possible to chose until three units connected to the
same WIFI.

APP wurde so entwickelt, dass es sowohl mit Android als auch mit dem iOS-System einwandfrei
funktioniert.
Es ist möglich, mehr Smartphones an dieselbe WIFI-Leitung anzuschließen und gleichzeitig sowohl das
iOS- als auch das Android-System zu verwenden.
Das erste Bild rechts bezieht sich auf eine von der APP gesteuerte Einheit.
Der zweite Bildschirm zeigt den Hauptbildschirm, auf dem Sie bis zu drei Geräte auswählen können, die
mit demselben WIFI verbunden sind.

APP est étudié pour fonctionner correctement avec les systèmes Android et IOS.
Il est possible d'avoir plus de smartphones connectés ensemble à la même ligne WIFI, en utilisant
également        les       systèmes        IOS        et       Android         en       même        temps.
La première image à droite fait référence à une unité contrôlée par l'APP.
Le second montre l'écran principal, où il est possible de choisir jusqu'à trois unités connectées au même
WIFI.

La aplicación está estudiada para ejecutarse correctamente con los sistemas Android e IOS.Es posible
tener más teléfonos inteligentes conectados juntos a la misma línea WIFI, también usando el sistema
IOS                y               Android              al               mismo              tiempo.
La primera imagen a la derecha se refiere a una unidad controlada por la aplicación.
La segunda muestra la pantalla principal, donde es posible elegir hasta tres unidades conectadas al
mismo WIFI.

                                                                     8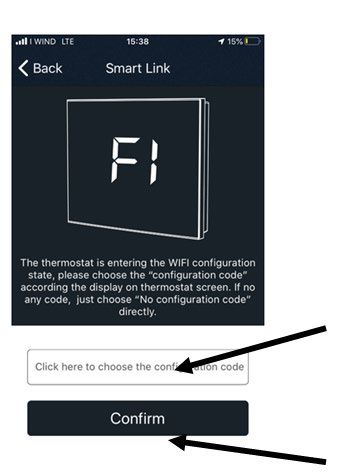
3. Termostati a parete o a bordo macchina serie CBT – CBT W all or on board m ounting
therm ostat series - CBT Wand-oder Bordthermostat-Serie – CBT série de therm ostats m uraux
ou intégré - CBT Serie de termostato de montaje en pared o a bordo

Accensione/Spegnimento del termostato.                                                        Premere il tasto
Turn ON / OFF the thermostat.                                                                 Press button
Schalten Sie den Thermostat ein / aus.                                                        Knopf drücken
Activez / désactivez le thermostat.                                                           Appuie sur le bouton
Encienda y apague el termostato.                                                              Presiona el botón

Impostare una modalità di funzionamento (condizionamento, riscaldamento, sola ventilazione)   Premere il tasto
Mode setting (cooling, heating, only fan).                                                    Press button
Modus Einstellung (Kühlung, Heizung, nur Lüfter).                                             Knopf drücken
Réglage du mode (refroidissement, chauffage, seul ventilateur).                               Appuie sur le bouton
Ajuste del modo (refrigeración, calefacción, sólo ventilador).                                Presiona el botón

Impostare la temperatura di comfort ambientale.                                               Premere i tasti
Adjust room set temperature.                                                                  Press buttons
Raumtemperatur einstellen.                                                                    Knopf drücken
Régler la température réglée de la pièce.                                                     Appuie sur le bouton
Ajuste la temperatura de la habitación.                                                       Presiona el botón

Impostare la velocita’ del ventilator (min, med, max, auto)                                   Premere il tasto
Fan motor (min, med, max, auto) setting ..                                                    Press button
Lüftermotor (min, med, max, auto) Einstellung.                                                Knopf drücken
Réglage du moteur du ventilateur (min, med, max, auto).                                       Appuie sur le bouton
Motor del ventilador (min, med, max, auto).                                                   Presiona el botón

                                                                      9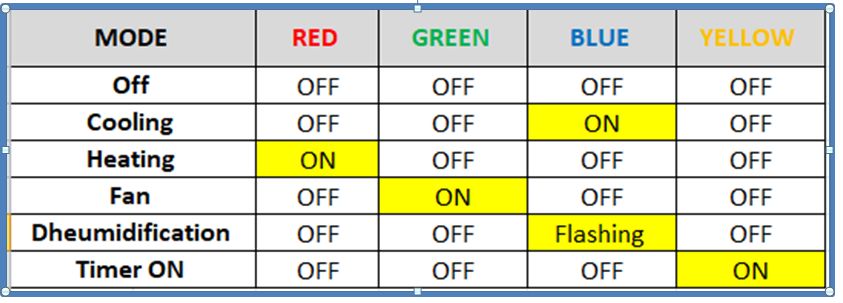
Funzioni e settaggi speciali - Special function and settings - Sonderfunktion und Einstellungen -
Fonction spéciale et param èt res - Funciones especiales y ajustes.
                                       Premere e tenere premuto il tasto M, l’icona indicata lampeggierà.
                                       Premere il pulsante M per settare l’ora, i minuti e le impostazioni settimanali.
                                       Ad ogni passaggio, premere i tasti n.2 e n.3 per cambiare i valori indicati.
                                       Alla fine, le impostazioni verrano salvate in automatico dopo qualche secondo.
                                       Press and hold M button, icon will flash.
                                       Press M button to set the hours, then the minutes and finally the week.
                                       At each step, press button n.2 or n.3 to adjust the values.
Cambiare l’ora indicata e
                                       Then the time will automatically save after some seconds.
impostazione programma.
Clock and program settings.            Halten Sie die M-Taste gedrückt und das Symbol blinkt.
Uhr und Programmeinstellungen.         Drücken Sie die M-Taste, um die Stunden, dann die Minuten und schließlich die Woche
Horloge et paramètres du               einzustellen. Drücken Sie bei jedem Schritt die Taste 2 oder 3, um die Werte anzupassen.
programme.                             Die Uhrzeit wird dann nach einigen Sekunden automatisch gespeichert.
Configuracion de hora y                Appuyez et maintenez le bouton M, l'icône clignote.
configuración del programa             Appuyez sur le bouton M pour régler les heures, puis les minutes et enfin la semaine.
                                       A chaque étape, appuyez sur les boutons n.2 ou n.3 pour ajuster les valeurs.
                                       Ensuite, le temps sera automatiquement sauvegardé après quelques secondes.
                                       Mantenga pulsado el botón M, el icono parpadeará.
                                       Presione el botón M para ajustar las horas, luego los minutos y finalmente la semana.
                                       En cada paso, presione el botón n.2 o n.3 para ajustar los valores.
                                       Entonces el tiempo se guardará automáticamente después de unos segundos.
                                       Premere contemporaneamente i tasti indicati per bloccare o sbloccare lo schermo.
Blocco della tastiera                  Press together the buttons indicated for lock or unlock the screen.
Setting lock
                                       Drücken Sie gleichzeitig die Tasten, die zum Sperren oder Entsperren des Bildschirms
Einstellsperre
                                       angezeigt werden.
Verrouillage
Bloqueo de ajuste                      Appuyez simultanément sur les boutons indiqués pour verrouiller ou déverrouiller l'écran.
                                       Presione juntos los botones indicados para bloquear o desbloquear la pantalla.

Master slave. Più unità connesse allo stesso termostato.      In questo caso, tutte le impostazioni settate nel termostato saranno
Master slave. Several units connected to the same             passate a tutte le unità.
thermostat.                                                   In this case, all the settings will be pass to each unit. A
Master slave. Mehrere Einheiten sind an demselben             In diesem Fall werden alle Einstellungen an jedes Gerät übergeben.
Thermostat angeschlossen.                                     Dans ce cas, tous les paramètres seront transmis à chaque unité.
Master slave. Plusieurs unités connectées au même             En este caso, todos los ajustes serán pasados a cada unidad.
thermostat.
Master slave. Varias unidades conectadas al mismo
termostato.

                                                                        Il termostato va posizionato al muro usando una scatola
                                                                        elettrica rotonda 60mm (non fornita dall’azienda).
                                                                        Thermostat must be positioned on the wall using 60mm
                                                                        round box (not supplied by the factory)
                                                                        Der Thermostat muss mit einer 60-mm-Rundbox an der
                                                                        Wand positioniert werden (nicht vom Werk geliefert).
                                                                        Le thermostat doit être positionné sur le mur à l'aide d'un
                                                                        boîtier rond de 60 mm (non fourni par l'usine.
                                                                        El termostato debe colocarse en la pared con una caja
                                                                        redonda de 60 mm (no suministrada por la fábrica).

                                                                   10
4. Telecomando a infrarossi – Infrared rem ote handset control - Infrarot-Fernbedienung -
Télécom m ande infrarouge - Control remoto por infrarrojos
NO
ACTIVE
Accensione/Spegnimento del termostato. Premere il tasto 2
Turn ON / OFF the thermostat. Press button 2
Schalten Sie den Thermostat ein / aus. Knopf drücken 2
Activez / désactivez le thermostat. Appuie sur le bouton 2
Encienda y apague el termostato. Presiona el botón 2
Impostare una modalità di funzionamento (condizionamento, riscaldamento, sola ventilazione) Premere il tasto 1
Mode setting (cooling, heating, only fan). Press button 1
Modus Einstellung (Kühlung, Heizung, nur Lüfter). Knopf drücken 1
Réglage du mode (refroidissement, chauffage, seul ventilateur). Appuie sur le bouton 1
Ajuste del modo (refrigeración, calefacción, sólo ventilador). Presiona el botón 1
Impostare la temperatura di comfort ambientale. Premere i tasti 3,4
Adjust room set temperature. Press buttons 3,4
Raumtemperatur einstellen. Knopf drücken 3,4
Régler la température réglée de la pièce. Appuie sur le bouton 3,4
Ajuste la temperatura de la habitación. Presiona el botón 3,4
Impostare la velocita’ del ventilator (min, med, max, auto) Premere il tasto 5
Fan motor (min, med, max, auto) setting .. Press button 5
Lüftermotor (min, med, max, auto) Einstellung. Knopf drücken 5
Réglage du moteur du ventilateur (min, med, max, auto). Appuie sur le bouton 5
Motor del ventilador (min, med, max, auto). Presiona el botón 5
11Funzioni e settaggi speciali - Special function and settings - Sonderfunktion und Einstellungen -
Fonction spéciale et param èt res - Funciones especiales y ajustes.
Impostazione dell’ora Premere il pulsante 8
Adjust the clock Press button 8
Stellen Sie die Uhr ein Taste 8 drücken
Régler l'horloge Appuyez sur le bouton 8
Ajustar el reloj Presione el botón 8
Regolazione automatica della temperatura in modalità notturna.
Premere il pulsante 10
Automatically setting of the the room temperature in sleeping mode
Press button 10
Automatische Einstellung der Raumtemperatur im Schlafmodus
Taste 10 drücken
Réglage automatique de la température ambiante en mode veille
Appuyez sur le bouton 10
Ajuste automático de la temperatura ambiente en modo dormir.
Presione el botón 10
Impostazione funzionamento SLEEP.
SLEEP Function
SLEEP-Funktion
Fonction SLEEP
Función SLEEP
Premere il tasto 6 per far accendere l’unità ad un orario prestabilito.
Premere il tasto 7 per far spegnere l’unità ad un orario prestabilito.
Press button 6 for set up the time when the unit will start.
Impostazione programma. Press button 7 for set up the time when the unit will stop.
Program settings. Drücken Sie die Taste 6, um die Uhrzeit einzustellen, zu der das Gerät startet.
Programmeinstellungen. Drücken Sie die Taste 7, um die Uhrzeit einzustellen, zu der das Gerät stoppt.
Paramètres du programme. Appuyez sur le bouton 6 pour régler l'heure à laquelle l'appareil démarrera.
Ajustes del programa. Appuyez sur le bouton 7 pour régler l'heure à laquelle l'appareil s'arrêtera.
Presione el botón 6 para configurar la hora en que se iniciará la unidad.
Presione el botón 7 para configurar la hora en que la unidad se detendrá.
Controllo del deflettore Premere il pulsante 9 per variare la posizione del deflettore
Louver Swing control Press button 9 for changing the louver swing position
Louver Swing-Steuerung Drücken Sie die Taste 9, um die Jalousie-Schwenkposition zu ändern
Control du déflecteur Appuyez sur le bouton 9 pour changer la position de basculement du déflecteur
Control de oscilación Presione el botón 9 para cambiar la posición de giro de oscilación
Attivazione resistenza elettrica (solo modello
Premere il pulsante 12 per accendere/spegnere la resistenza elettrica (solo riscaldamento)
BATH)
con funzione scalda salviette.
Electric heater turning ON (only BATH
Press button 12 to turn ON/OFF electric heater (only heating) with towel warmer function.
version)
Drücken Sie die Taste 12, um die elektrische Heizung (nur heizung) mit Handtuchwärmerfunktion
Elektroheizung einschalten (nur BATH-
ein- / auszuschalten.
Version)
Appuyez sur le bouton 12 pour allumer / éteindre le chauffage électrique (uniquement chauffage)
Chauffage électrique en marche (uniquement
avec fonction sèche-serviettes.
version BATH)
Presione el botón 12 para encender / apagar el calentador eléctrico (solo calefacción) con la
Calefactor eléctrico encendido (solo versión
función de calentador de toallas.
BATH)
12Indicazioni led ricevitore – Led receiver indications - LED-Empfängeranzeigen - Led indications du
récepteur - Indicaciones del receptor led.
5. Altre informazioni – Other info - Andere Information - Les autres inform ations - Otra información
E’ possibile usare il contatto finestra previsto nella scheda elettronica per accendere/spegnere l’unità. Quando il
contatto sarà aperto, l’unità si fermerà dopo 30 secondi e ripartira solo quando il contatto verrà chiuso.
Contatto finestra per forzare
lo spegnimento dell’unità.
It is possible to use a window contact in main electronic board, for turning ON/OFF the unit remotely. If the contact
is opened, the unit will be turned OFF in the next 30 seconds and it stays OFF until the same contact will be closed.
Window contact for turning
OFF the unit.
Es ist möglich, einen Fensterkontakt in der elektronischen Hauptplatine zu verwenden, um das Gerät aus der Ferne
ein- oder auszuschalten. Wenn der Kontakt geöffnet wird, wird das Gerät in den nächsten 30 Sekunden
Fensterkontakt zum
ausgeschaltet und bleibt ausgeschaltet, bis derselbe Kontakt geschlossen wird.
Ausschalten des Geräts.
Il est possible d’utiliser un contact de fenêtre dans la carte électronique principale pour allumer / éteindre l’appareil
Window contact pour
à distance. Si le contact est ouvert, l’appareil s’éteindra dans les 30 secondes et restera éteint jusqu’à ce que le
éteindre l'appareil.
même contact soit fermé.
Window contact para
Es posible utilizar un contacto de ventana en la placa electrónica principal, para encender / apagar la unidad de
apagar la unidad.
forma remota. Si se abre el contacto, la unidad se apagará en los próximos 30 segundos y permanecerá apagada
hasta que se cierre el mismo contacto.
Come accessorio per la serie VSL, è possibile usare il pannello ad effetto radiante.
Il pannello sarà sempre acceso in riscaldamento.
RAD pannello ad effetto
radiante As accessory for the VSL series, it will be possible to use the radiant panel.
The panel will be always ON in case of heating mode.
RAD radiant panel
Als Zubehör für die Baureihen VSL kann das Strahlpaneel verwendet werden.
RAD Strahlungsplatte Das Bedienfeld ist im Heizmodus immer eingeschaltet.
Panneau rayonnant RAD En tant qu'accessoire pour les séries VSL, il sera possible d'utiliser le panneau rayonnant.
Le panneau sera toujours allumé en cas de mode de chauffage.
Panel radiante RAD
Como accesorio para las series VSL, será posible utilizar el panel radiante.
El panel estará siempre ENCENDIDO en caso de modo de calefacción.
13E’ possibile usare una sonda NTC come accessorio da posizionare nel pacco allettato della batteria, in
corrispondenza dell’ingresso della stessa batteria con funzione di termostato di minima e di massima. In questo
modo, in riscaldamento il ventilatore partirà solo se la temperatura dell’acqua salirà sopra i 35°C e si fermerà
quando la temperatura dell’acqua scenderà sotto i 30°C. In condizionamento, il ventilatore partirà sempre
all’accensione e si fermerà se la temperatura dell’acqua non scenderà sotto i 15 gradi per 30 minuti continuativi.
It is possible to use a NTC probe as accessory to be positioned on the coil aluminum fins, in proximity to the inlet of
the same coil, to be used as minimum or maximum sensor. In this way, in heating mode, the fan will be turned ON
only if the water temperature will be up to 35°C and it will be turned OFF when the same temperature will go below
the 30°C. In cooling mode and at the start up, the fan will be always turned ON. It will be turned OFF in case the
water temperature will be up to 15°C for more that 30 continuative minutes.
Sonda acqua H2OPR
Es ist möglich, eine NTC-Sonde als Zubehör zu verwenden, die an den Aluminiumlamellen der Spule in der Nähe des
Einlasses derselben Spule angebracht wird und als Minimum- oder Maximum-Sensor verwendet wird. Auf diese
H2OPR water probe
Weise wird der Lüfter im Heizmodus nur dann eingeschaltet, wenn die Wassertemperatur bis zu 35 ° C beträgt, und
wird ausgeschaltet, wenn dieselbe Temperatur unter 30 ° C sinkt. Im Kühlmodus und beim Start ist der Lüfter
H2OPR-Wassersonde
immer eingeschaltet. Sie wird ausgeschaltet, wenn die Wassertemperatur länger als 30 Minuten bis zu 15 ° C
beträgt.
Sonde d'eau H2OPR
Il est possible d'utiliser une sonde NTC comme accessoire à positionner sur les ailettes en aluminium de la bobine, à
Sonda de agua H2OPR
proximité de l'entrée de la même bobine, à utiliser comme capteur minimum ou maximum. De cette façon, en mode
chauffage, le ventilateur ne sera activé que si la température de l'eau atteindra 35 ° C et il sera désactivé lorsque la
même température descendra en dessous de 30 ° C. En mode refroidissement et au démarrage, le ventilateur sera
toujours allumé. Il sera désactivé au cas où la température de l'eau atteindrait 15 ° C pendant plus de 30 minutes
consécutives.
Es posible utilizar una sonda NTC como accesorio para colocarla en las aletas de aluminio de la bobina, cerca de la
entrada de la misma bobina, para usarla como sensor mínimo o máximo. De esta manera, en modo calefacción, el
ventilador se encenderá solo si la temperatura del agua será de hasta 35 ° C y se apagará cuando la misma
temperatura baje a menos de 30 ° C. En el modo de enfriamiento y al inicio, el ventilador siempre estará
ENCENDIDO. Se apagará en caso de que la temperatura del agua sea de hasta 15 ° C durante más de 30 minutos
continuos.
Per la serie High Wall, i deflettori sono sempre chiusi se l’unità è spenta.
Nel caso del telecomando è possibile usare la funzione automatica oppure bloccare i deflettori con un angolazione
compresa tra i 30 e i 90°.
Nel caso di controllo a parete, la logica di apertura dei deflettori sarà come sotto indicato:
Condizionamento e sola ventilazione: i deflettori si apriranno/chiuderano automaticamente con un’apertura
compresa tra i 30 e i 90°C.
Riscaldamento: i deflettori si apriranno e resteranno completamente aperti con un’apertura di 90°.
For the High Wall series, the flap will be always closed in case the unit is OFF.
In case of infrared remote handset control, it is possible to use automatic function or to block the flap in a position
between 30 and 90°.
In case of remote control, the logic for flap opening will be as below indicated:
Controllo deflettori serie Cooling and only fan mode: the flap will be opened/closed automatically with an angle between 30 and 90°
RHW. Heating mode: the flap will be completely opened, 90° angle.
RHW series flap control. Bei der High Wall-Serie wird die Klappe immer geschlossen, wenn das Gerät ausgeschaltet ist.
Bei einer Infrarot-Fernbedienung kann die automatische Funktion verwendet oder die Klappe in einer Position
Klappensteuerung der RHW- zwischen 30 und 90 ° blockiert werden.
Serie. Im Falle einer Fernbedienung lautet die Logik für das Öffnen der Klappe wie folgt:
Kühl- und reiner Gebläsemodus: Die Klappe wird automatisch mit einem Winkel zwischen 30 und 90 ° geöffnet /
Commande de volet série geschlossen
RHW. Heizmodus: Die Klappe wird im 90 ° -Winkel vollständig geöffnet.
Control de aletas serie Pour la série High Wall, le volet sera toujours fermé au cas où l'appareil serait éteint.
RHW. En cas de télécommande infrarouge, il est possible d'utiliser la fonction automatique ou de bloquer le volet dans une
position comprise entre 30 et 90 °.
En cas de télécommande, la logique d'ouverture des volets sera celle indiquée ci-dessous:
Mode refroidissement et seul ventilateur: le volet s'ouvrira / se fermera automatiquement avec un angle compris
entre 30 et 90 °
Mode chauffage: le volet sera complètement ouvert, angle 90 °.
Para la serie High Wall, la tapa siempre estará cerrada en caso de que la unidad esté APAGADA.
En caso de control remoto por infrarrojos, es posible utilizar la función automática o bloquear la tapa en una
posición entre 30 y 90 °.
En caso de control remoto, la lógica para la apertura de la aleta será la siguiente:
Enfriamiento y solo modo ventilador: la tapa se abrirá / cerrará automáticamente con un ángulo entre 30 y 90 °
Modo de calentamiento: la tapa se abrirá por completo, ángulo de 90 °.
1415
ADVANTIX SpA
     Via S. Giuseppe Lavoratore 24,
     37040 Arcole (VR) Italy
     Tel. (+39).045.76.36.585
     E-mail: info@advantixspa.it
     www.maxa.it
16
Vous pouvez aussi lire