M2 trainer user guide - Model No: 9930T/F
←
→
Transcription du contenu de la page
Si votre navigateur ne rend pas la page correctement, lisez s'il vous plaît le contenu de la page ci-dessous

M2 trainer user guide               Customer Service
                                               800.783.7257
         Model No: 9930T/F                         saris.com

29263D_Saris M2 Trainer Manual_KOR.indd 1     9/8/2021 10:58:36 AM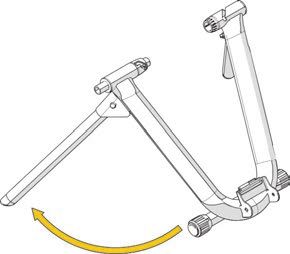
TELL US WHAT YOU THINK

               SARIS.COM/FEEDBACK

    REGISTER YOUR PRODUCT FOR UPDATES

                 SARIS.COM/REGISTRATION

    2

29263D_Saris M2 Trainer Manual_KOR.indd 2   9/8/2021 10:58:37 AM
Virtual Training makes it easy to bring
the outside in, whether you’re on a tablet,
desktop or phone.
VirtualTraining.Saris.com 3
29263D_Saris M2 Trainer Manual_KOR.indd 3 9/8/2021 10:58:38 AMRegulatory information | Información normativa | Informations réglementaires | Regulatorische Information | Informazioni normative |
Gereglementeerde informatie | Informacje dot. przepisów | Regulačné informácie | 법적 규제 현황
EN Appliance is only to be used with the detachable power supply provided.
Appliances must only be supplied at SELV.
The maximum altitude rating of up to 2000m.
ES El aparato solo debe utilizarse con la fuente de alimentación desmontable que se suministra.
Los aparatos solo se deben alimentar con MBTS (Muy Baja Tensión de Seguridad).
La altitud máxima es de hasta 2000 metros.
Le vélo ne doit être utilisé qu’avec l’alimentation amovible fournie.
FR Les vélos ne doivent être alimentés qu’à une tension de sécurité extra basse.
L’altitude maximale autorisée est de 2 000 m.
DE Gerät darf nur mit dem mitgelieferten abnehmbaren Netzteil betrieben werden.
Geräte dürfen nur mit SELV (Separated Extra Low Voltage) betrieben werden.
Die maximale Höhe beträgt bis zu 2000 m.
Il dispositivo deve essere utilizzato solo con l’alimentatore staccabile fornito in dotazione.
IT
I dispositivi devono essere alimentati solo su SELV.
Altitudine massima nominale fino a 2000 m.
4
29263D_Saris M2 Trainer Manual_KOR.indd 4 9/8/2021 10:58:38 AMNL Het toestel mag uitsluitend met de verwijderbare voeding worden gebruikt.
De toestellen mogen uitsluitend op zeer lage veiligheidsspanning worden gevoed.
Maximale hoogteclassificatie 2000 m.
PL Urządzenie powinno być używane wyłącznie wraz z odłączanym źródłem zasilania dołączonym do zestawu.
Urządzenie powinno być zasilane wyłącznie z użyciem odizolowanego źródła bardzo niskiego napięcia (SELV).
Użytkowanie urządzenia zostało przetestowane do wysokości maksymalnej 2000 m n.p.m.
Spotrebič sa má používať len s priloženým odpojiteľným zdrojom napájania.
SK Spotrebiče sa smú pripájať len k malému napätiu SELV.
Maximálna hodnota nadmorskej výšky 2 000 m.
KO 기기는 제공된 분리형 전원 공급 장치에서만 사용해야 합니다.
기기는 SELV에서만 공급되어야 합니다.
최대 2000m의 최대 고도 등급.
5
29263D_Saris M2 Trainer Manual_KOR.indd 5 9/8/2021 10:58:38 AMCustomer Service j
800.783.7257
www.saris.com/support/support-center i
a
b
f
g
d
h
c
6 e
29263D_Saris M2 Trainer Manual_KOR.indd 6 9/8/2021 10:58:38 AM1 EN Fully extend trainer legs and set trainer
on flat surface. The foot pads on the
legs of the trainer can be rotated to
make your trainer stand level on uneven
surfaces.
ES Extienda completamente las patas del aparato de entrenamiento y colóquelo sobre una superficie plana. Las almohadillas de las patas del
aparato de entrenamiento se pueden girar para que el aparato de entrenamiento quede nivelado en superficies irregulares.
FR Dépliez totalement les pieds du Trainer et installez-le sur une surface plane. Les patins peuvent pivoter, pour que l’appareil repose bien
à plat, même sur les surfaces non planes.
DE Ziehen Sie die Füße des Trainingsgeräts vollständig heraus, und legen Sie das Trainingsgerät auf einen ebenen Untergrund. Die Füße des
Trainingsgeräts können gedreht werden, um das Trainingsgerät auch auf einem unebenen Untergrund plan auszurichten.
IT Estendere completamente le zampe del rullo da allenamento e posizionare il rullo su una superficie piana. Ruotare i piedini delle zampe
del rullo da allenamento per posizionarlo in piano su superfici irregolari.
NL Om uw trainingstoestel te monteren, spreidt u eerst de benen van het toestel, zoals afgebeeld. Vervolgens plaatst u het trainingstoestel
op een effen oppervlak. De voetsteunen kunnen gedraaid worden zodat u ervoor kan zorgen dat het trainingstoestel ook op een oneffen
oppervlak stabiel staat.
KO 트레이너 다리를 완전히 펴고 평평한 표면에 놓습니다. 트레이너 다리에 있는 풋패드를 돌리면 고르지 않은 표면에도 트레이너
를 수평으로 세울 수 있습니다.
7
29263D_Saris M2 Trainer Manual_KOR.indd 7 9/8/2021 10:58:38 AM2 EN Insert the bolt action tube (j) into the
trainer (a). OPTIONAL: use a soft rubber
j i mallet to tap the tube into the trainer.
interior Insert the quick release lever (i) into
bevel the trainer slit and through the center
hole of the bolt action tube( j). Tighten
the lever (i) into the threads of the bolt
action tube (j).
a
ES Inserte el tubo con acción perno (j) en el aparato de entrenamiento (a). OPCIONAL: use un mazo de goma suave para golpear el tubo en el entrenador.
Inserte la palanca de liberación rápida (i) en la ranura del aparato de entrenamiento y a través del orificio central del tubo con acción perno (j).
Enrosque la palanca (i) en la rosca del tubo con acción perno (j).
FR Insérez le tube à verrou (j) dans le Trainer (a). FACULTATIF: utilisez un maillet en caoutchouc souple pour enfoncer le tube dans le trainer. Insérez
le levier de serrage rapide (i) dans la fente du Trainer et par l’orifice central du tube à verrou (j). Serrez le levier (i) dans les filetages du tube à verrou (j).
DE Führen Sie das Bedienrohr (f) in das Trainingsgerät (a) ein.OPTIONAL: Verwenden Sie einen weichen Gummihammer, um den Schlauch in den Trainer
zu klopfen. Setzen Sie den Lösehebel (i) über die mittlere Bohrung des Bedienrohrs (j) in den Schlitz im Trainingsgerät ein. Drehen Sie den Hebel (i)
in das Gewinde des Bedienrohrs (j).
IT Inserire il tubo con chiusura bolt action (j) nel rullo da allenamento (a). OPZIONALE: usa un martello di gomma morbida per inserire il tubo nel trainer.
Inserire la leva di sblocco rapido (i) nella fessura del rullo da allenamento e attraverso il foro centrale del tubobolt-action (j). Serrare la leva (i) nella
filettatura del tubo bolt-action (j).
NL Steek het buisje (j) in het trainingstoestel (a). OPTIONEEL: gebruik een zachte rubberen hamer om de buis in de trainer te tikken. Stop de hendel (i)
in de uitsparing van het trainingstoestel en dwars doorheen de gaten in het buisje (j). Zet de hendel (j) vast in het buisje (j).
KO 볼트 액션 튜브(j)를 트레이너(a)에 삽입합니다. 선택 사항: 부드러운 고무 망치로 튜브를 두드려 트레이너에 삽입합니다. 퀵 릴리스 레버(i)
를 트레이너 슬릿에 삽입하고 볼트 액션 튜브 (j)의 가운데 구멍으로 들어가게합니다. 레버(i)를 볼트 액션 튜브(j)의 나사산에 조입니다.
8
29263D_Saris M2 Trainer Manual_KOR.indd 8 9/8/2021 10:58:38 AM3 EN Postition trainer frame (a) flat on ground
with legs folded. Insert L-bolt (f) as shown
f with arrow.
a
ES Coloque el bastidor del aparato de entrenamiento (a) en posición plana apoyado sobre el suelo con las patas plegadas. Inserte el perno en L (f)
como indica la rueda.
FR Positionnez le châssis du Trainer (a) à plat sur le sol, pieds pliés. Insérez le boulon en L (f) comme indiqué par la flèche.
DE Stellen Sie den Rahmen des Trainingsgeräts (a) flach auf den Boden. Die Beine sind eingeklappt. Setzen Sie die L-Schraube (f) wie abgebildet ein
(siehe Pfeil).
IT Posizionare il telaio del rullo (a) di piatto sul terreno con le zampe ripiegate. Inserire il bullone a L (f) come indicato dalla freccia.
NL Zet het frame van het trainingstoestel op de grond met de benen opgeplooid. Breng de L-vormige bout aan zoals weergegeven op de afbeelding.
KO 다리를 접은 상태에서 트레이너 프레임(a)을 바닥에 평평하게 놓습니다. 화살표와 같이 L-볼트(f)를 삽입합니다.
9
29263D_Saris M2 Trainer Manual_KOR.indd 9 9/8/2021 10:58:38 AM4 b EN Place the resistance unit (b) between
brackets on the frame and guide the
L-bolt (f) through the center of the
resistance unit (b).
f
ES Coloque la unidad de resistencia (b) entre los soportes del bastidor y haga pasar el perno en L (f) por el centro de la unidad de resistencia (b).
FR Placez l’unité de résistance (b) entre les crochets sur le châssis et guidez le boulon en L (f) vers le centre de l’unité de résistance (b).
DE Setzen Sie die Widerstandseinheit (b) zwischen den Halterungen am Rahmen ein und führen Sie die L-Schraube (f) durch die Mitte der
Widerstandseinheit (b).
IT Posizionare l’unità di resistenza (b) tra le staffe sul telaio e inserire il bullone a L (f) al centro dell’unità di resistenza (b).
NL Plaats de weerstandseenheid (b) tussen de beugels op het frame en breng de L-vormige bout door het midden van de weerstandseenheid (b).
KO 저항 장치(b)를 프레임의 브래킷 사이에 놓고 L- 볼트(f)를 저항 장치(b)의 가운데로 넣습니다.
10
29263D_Saris M2 Trainer Manual_KOR.indd 10 9/8/2021 10:58:39 AM5 b
EN While holding the resistance unit (b)
in an upright position, insert the nut (e).
e
ES Mientras mantiene la unidad de resistencia (b) en posición vertical, inserte la tuerca (e).
FR Tout en maintenant l’unité de résistance (b) en position droite, insérez l’écrou (e).
DE Führen Sie die Mutter (e) in die Widerstandseinheit (b) ein. Diese muss dabei aufrecht stehen.
IT Tenendo l’unità di resistenza (b) in posizione eretta, inserire il dado (e).
NL Terwijl u de weerstandseenheid (b) op zijn plaats houdt, brengt u de moer (e) op haar plaats.
KO 저항 장치(b)를 똑바로 세운 상태에서 너트(e)를 삽입합니다.
11
29263D_Saris M2 Trainer Manual_KOR.indd 11 9/8/2021 10:58:39 AM6 b EN Guide the bolt (d) into the round
hole of the trainer frame (a) as
indicated by the arrow. Pass
through the resistance unit (b)
and secure into the resistance
unit nut (e) using a 1/2” wrench.
d
a
ES Haga pasar el perno (d) por el orificio redondo del bastidor del aparato de entrenamiento (a) como indica la flecha. Pase a través de la unidad de
resistencia (b) y asegure la tuerca de la unidad de resistencia (e) mediante una llave de 1/2”.
FR Guidez le boulon (d) dans l’orifice rond du châssis du Trainer (a), comme indiqué par la flèche. Passez dans l’unité de résistance (b) et sécurisez l’écrou
de cette dernière (e) à l’aide d’un clé 1/2”.
DE Führen Sie die Schraube (d) in die runde Öffnung am Rahmen (a) des Trainingsgeräts ein (siehe Pfeil). Schieben Sie die Widerstandseinheit (b) durch und
schrauben Sie die Mutter (e) mit einem 1/2”-Schraubenschlüssel in der Widerstandseinheit fest.
IT Inserire il bullone (d) nel foro tondo del telaio del rullo da allenamento (a) nel verso indicato dalla freccia. Passare attraverso l’unità di resistenza (b)
e fissare nel dado dell’unità di resistenza (e) con una chiave da 1/2”.
NL Stop de bout (d) door de uitsparing in het frame van het trainingstoestel (a) zoals weergegeven door de pijl. Ga met de bout door weerstandseenheid (b)
en zet de bout vast in de moer (e).
KO 화살표로 표시된 대로 볼트(d)를 트레이너 프레임(a)의 둥근 구멍에 넣습니다. 저항 장치(b)를 통과시키고 1/2” 렌치를 사용하여 저항 장치
12 너트(e)에 고정합니다.
29263D_Saris M2 Trainer Manual_KOR.indd 12 9/8/2021 10:58:39 AMb
7 EN 1.) Fold the resistance unit (b)
into the trainer frame (a).
2.) Thread the clutch knob (c)
clockwise onto the L-bolt.
c
a
ES 1.) Pliegue la unidad de resistencia (b) en el bastidor del aparato de entrenamiento (a). 2.) Enrosque el ajuste de embrague (C) en el sentido de las
agujas del reloj en el perno en L.
FR 1.) Pliez l’unité de résistance (b) dans le châssis du Trainer (a). 2.) Filetez le boulon de serrage (c) dans le sens des aiguilles d’une montre sur le
boulon en L.
DE 1.) Setzen Sie die Widerstandseinheit (b) in den Rahmen des Trainingsgeräts (a) ein. 2.) Drehen Sie den Kupplungsknopf (C) im Uhrzeigersinn auf
die L-Schraube.
IT 1.) Ripiegare l’unità di resistenza (b) nel telaio del rullo (a). 2.) Inserire la manopola della frizione (C) in senso orario nel bullone a L.
NL 1.) Plooi de weerstandseenheid (b) naar het frame van het trainingstoestel (a) 2.) Zet de schakelknop (C) vast op de L-vormige bout door te draaien
in de richting van de wijzers van de klok
KO 1.) 저항 장치(b)를 트레이너 프레임(a)으로 접습니다. 2.) 클러치 노브(c)를 시계 방향으로 L-볼트에 끼웁니다.
13
29263D_Saris M2 Trainer Manual_KOR.indd 13 9/8/2021 10:58:39 AM8 EN Fill tire to manufacturer’s
suggested tire pressure.
PSI
ES Infle la rueda a la presión indicada por el fabricante.
FR Gonflez les pneus selon la pression indiquée par le fabricant.
DE Pumpen Sie den Reifen wie vom Hersteller angegeben auf.
IT Gonfiare il pneumatico alla pressione indicata dal costruttore.
NL Pomp de band op tot de druk is bereikt die door de fabrikant wordt aanbevolen.
KO 제조업체가 권장하는 타이어 공기압으로 타이어에 공기를 채웁니다.
14
29263D_Saris M2 Trainer Manual_KOR.indd 14 9/8/2021 10:58:39 AMEN The trainer is designed to be used with the provided skewer(part g). Failure to use in-
9 cluded skewer may result in damage or injury. Replace the skewer on the rear wheel
of your bike with the one provided. Make sure the quick release handle is on the left
(non-drive) side of the bicycle and faces upward or backwards. Thru axle bikes will
ES require a Saris thru axle accessory available at Saris.com. Bolt on / solid axle bikes
may need tapered nuts.
El aparato de entrenamiento está diseñado para ser utilizado con el espetón incluido
(Parte g). De no utilizar el espetón incluido podrían producirse daños o lesiones.
Sustituya el espetón de la rueda trasera de la bicicleta por el espetón incluido.
Asegúrese de que la manivela de liberación rápida quede en el lado izquierdo
(sin tracción) de la bicicleta y de que apunta hacia arriba o hacia atrás.
FR Le Trainer est conçu pour être utilisé avec la broche fournie (Partie g). La non utilisation de cette dernière peut occasionner des dommages et des
blessures. Remplacez la broche fixée sur la roue arrière du vélo avec la broche fournie. Vérifiez que la poignée de déblocage rapide est située sur
le côté gauche (non moteur) du vélo et qu’elle est orientée vers le haut ou vers l’arrière.
DE Das Trainingsgerät darf nur mit dem mitgelieferten Schnellspanner befestigt werden (Teilg). Bei Verwendung anderer Schnellspanner kann es zu
Schäden und Verletzungen kommen. Ersetzen Sie den Schnellspanner am Hinterrad Ihres Fahrrads durch den beiliegenden Schnellspanner.
Achten Sie darauf, dass sich der Schnelllösehebel auf der linken Seite des Fahrrads (ohne Zahnkranz) befindet und nach oben oder hinten zeigt.
IT Il rullo è progettato per essere utilizzato solo con il perno di bloccaggio fornito (Parte g). Il mancato utilizzo del perno di bloccaggio fornito può
causare danni o lesioni personali. Sostituire il perno della ruota posteriore della propria bicicletta con quello fornito. Accertarsi che la manopola
di sblocco rapido sia collocata sul lato sinistro (senza trazione) della bicicletta e sia rivolta verso l’alto o all’indietro.
NL Het trainingstoestel is ontworpen om met de meegeleverde ontgrendelingspen gebruikt te worden (Een deelg). Het niet naleven van dit voorschrift
kan schade of letsels veroorzaken. Vervang de ontgrendelingspen op het achterwiel van uw fiets door de meegeleverde pen. Zorg ervoor dat de
hendel van de snelspanner zich aan de linkerkant van de fiets bevindt (niet aan de aandrijfkant) en naar boven of naar achter gericht is.
KO 트레이너에는 제공된 스큐어(부품 g)만 사용해야 합니다. 제공된 스큐어를 사용하지 않으면 손상 또는 부상을 초래할 수 있습니다. 자전
거 뒷바퀴의 스큐어를 제공된 스큐어로 교체하십시오. 퀵 릴리스 핸들은 자전거의 왼쪽(비구동)에 있고 위쪽 또는 뒤쪽을 향하고 있어
야 합니다.
15
Part
29263D_Saris M2 Trainer Manual_KOR.indd 15 9/8/2021 10:58:39 AM10 EN Adjust the non-drive side of the trainer by pulling the shaft and
rotating to appropriate position. The widest position is for 135 mm
hubs (Disc Brake with quick release skewer). The middle position
is for 130mm hubs (Rim Brake with quick release skewer).
The narrow position is for 120 mm hubs.
ES Ajuste el lado sin tracción del aparato de entrenamiento tirando del
eje y girándolo hasta la posición adecuada. La posición más ancha
es para bujes de 135 mm (freno de disco con pincho de liberación
rápida). La posición intermedia es para bujes de 130 mm (freno de
llanta con pincho de liberación rápida). La posición estrecha es para
bujes de 120 mm.
FR Ajustez le côté non-moteur du Trainer en tirant sur l’arbre tout
en le faisant tourner. La position la plus large est pour les
moyeux de 135 mm (frein à disque avec brochette à dégage-
ment rapide). La position médiane est pour les moyeux de
130 mm (frein sur jante avec broche à dégagement rapide).
La position étroite est pour les moyeux de 120 mm.
DE Richten Sie die Nichtantriebsseite des Trainers aus. Die breiteste Position ist für 135-mm-Naben (Scheibenbremse mit Schnellspanner). Die mittlere Position ist für
130-mm-Naben (Felgenbremse mit Schnellspanner). Die schmale Position ist für 120 mm Naben.
IT Regolare il lato senza trazione del rullo tirando l’albero e ruotando nella posizione appropriata. La posizione più ampia è per mozzi da 135 mm (freno a disco con perno
a sgancio rapido). La posizione centrale è per mozzi da 130 mm (freno a pattino con perno a sgancio rapido). La posizione stretta è per mozzi da 120 mm.
NL Regel de niet aangedreven zijde van de trainer door te trekken aan de schacht en ze te roteren naar wens. De breedste positie is voor 135 mm naven (schijfrem met
snelspanner). De middelste stand is voor naven van 130 mm (velgrem met snelspanner). De smalle positie is voor naven van 120 mm.
KO 샤프트를 당겨 적절한 위치로 돌리면서 트레이너의 비구동 측면을 조정합니다. 가장 넓은 위치는 135mm 허브용입니다(퀵 릴리스 스큐어가 있는 디스크 브레
이크). 중간 위치는 130mm 허브용입니다(퀵 릴리스 스큐어가 있는 림 브레이크). 좁은 위치는 120mm 허브용입니다.
16
29263D_Saris M2 Trainer Manual_KOR.indd 16 9/8/2021 10:58:40 AM11 EN Lift up bike by the seat post
and position the left side of
your bike skewer into the left
side of the trainer.
ES Levante la bicicleta por la tija del sillín y coloque el lado izquierdo del espetón en el lado izquierdo del aparato de entrenamiento.
FR Soulevez le vélo en le tenant par la tige de la selle, puis positionnez l’extrémité gauche de la broche de votre vélo sur le côté gauche du Trainer.
DE Heben Sie das Fahrrad an der Sattelstütze an und schieben Sie die linke Seite Ihres Rads mit dem Schnellspanner in die linke Seite des
Trainingsgeräts.
IT Sollevare la bicicletta dal cannotto reggisella e inserire il lato sinistro del perno di bloccaggio della bicicletta nellato sinistro del rullo.
NL Neem uw fiets bij de zadelpen vast en til hem op. Positioneer de linkerkant van de snelspanner van uw fiets op de linkerkant van het
trainingstoestel.
KO 시트 포스트로 자전거를 들어 올리고 자전거 스큐어의 왼쪽을 트레이너의 왼쪽에 놓습니다.
17
29263D_Saris M2 Trainer Manual_KOR.indd 17 9/8/2021 10:58:40 AM12 EN
ES
FR
EN Pull down the quick release lever to capture the right side of your bike skewer. Quick release handle must be all the way down in locked position.
ES Tire hacia abajo de la palanca de liberación rápida para capturar el lado derecho del espetón de la bicicleta. La manivela de liberación rápida debe
estar completamente bajada en la posición de bloqueo.
FR Tirez le levier de serrage rapide pour emprisonner l’extrémité droite de la broche de votre vélo. En position verrouillée, la poignée de déblocage
rapide doit être abaissée à fond.
DE Ziehen Sie den Schnelllösehebel nach unten, um den rechten Schnellspanner einzusetzen. Der Schnelllösehebel muss nach unten zeigen und
eingerastet sein.
IT Abbassare la leva di sblocco rapido per arrestare il lato destro del perno di bloccaggio dellabicicletta. La manopola di sblocco rapido deve essere
completamente abbassata in posizione di blocco.
NL Breng de hendel van de snelspanner naar beneden om het rechterdeel van de ontgrendelingspin van uw fiets te omvatten. De hendel van de
snelspanner moet helemaal naar beneden gebracht zijn in een geblokkeerde positie.
KO 퀵 릴리스 레버를 아래로 당겨 자전거 스큐어의 오른쪽을 잡습니다. 퀵 릴리스 핸들은 잠긴 위치에서 끝까지 내려야 합니다.
18
29263D_Saris M2 Trainer Manual_KOR.indd 18 9/8/2021 10:58:40 AM13 b EN Insert the resistance unit power cable (h) into the resistance unit (b)
as shown. Plug the power supply into the wall outlet. When powered,
but not connected to an app or device, the resistance unit status light
will blink green. If the supply cord is damaged, it must be replaced
with a Saris supplied cord and power supply to avoid a hazard.
ES Inserte el cable de alimentación (h) de la unidad de resistencia (b)
tal como se indica. Conecte la fuente de alimentación a una toma
eléctrica. Cuando se enciende, pero no se conecta a una aplicación
o dispositivo, la luz de estado de la unidad de resistencia parpadeará
en verde. Si el cable de alimentación está dañado, debe reemplazarse
por un cable y una fuente de alimentación suministrados por Saris
h para evitar un peligro.
osition. FR Insérez le cordon d’alimentation (h) de l’unité de résistance (i) comme illustré ci-dessous. Branchez la fiche sur une prise secteur. Lorsqu’il est sous tension, mais non
connecté à une application ou à un appareil, le voyant d’état de l’unité de résistance clignote en vert. Si le cordon d’alimentation est endommagé, il doit être remplacé
da debe par un cordon d’alimentation et une alimentation fournis par Saris pour éviter tout danger.
DE Stecken Sie das Netzkabel (h) der Widerstandseinheit wie abgebildet in die Widerstandseinheit (b). Stecken Sie das Netzteil in eine Steckdose. Wenn das Gerät mit Strom
versorgt, aber nicht mit einer App oder einem Gerät verbunden ist, blinkt die Statusanzeige der Widerstandseinheit grün.
cage
Wenn das Versorgungskabel beschädigt ist, muss es durch ein von Saris geliefertes Kabel und ein Netzteil ersetzt werden, um eine Gefahr zu vermeiden.
und
IT Inserire il cavo di alimentazione dell’unità di resistenza (h) nell’unità di resistenza (b) come indicato. Inserire il cavo di alimentazione nella presa di corrente. Quando è alimentato,
ma non connesso a un’app o un dispositivo, la spia di stato dell’unità di resistenza lampeggia in verde. Se il cavo di alimentazione è danneggiato, deve essere sostituito con un cavo
e un alimentatore forniti da Saris per evitare rischi.
essere NL Steek vervolgens de stroomkabel van de weerstandseenheid (h) in de weerstandseenheid (b) zoals hieronder afgebeeld. Steek de stekker in het stopcontact. Wanneer het
wordt gevoed, maar niet verbonden met een app of apparaat, knippert het statuslampje van de weerstandseenheid groen. Als het netsnoer is beschadigd, moet het worden
vervangen door een door Saris geleverd snoer en voeding om gevaar te voorkomen.
de KO 그림과 같이 저항 장치 전원 케이블(h)을 저항 장치(b)에 삽입합니다. 전원 공급 장치를 벽면 콘센트에 연결합니다. 전원이 공급되고 있지만 앱이나 장치에 연결
되어 있지 않으면 저항 장치 상태 표시등이 녹색으로 깜박입니다. 전원 코드가 손상된 경우 위험을 방지하기 위해 Saris에서 공급하는 코드 및 전원 공급 장치
로 교체해야 합니다.
19
29263D_Saris M2 Trainer Manual_KOR.indd 19 9/8/2021 10:58:41 AM14 EN To tighten the roller against the tire, turn resistance unit knob (c)
until it CLICKS.
c
ES Para volver la apretar el rodillo contra la rueda, gire el pomo de la unidad de resistencia (c) hasta que haga CLIC.
FR Pour serrer le cylindre contre le pneu, tournez le bouton de l’unité de résistance (c) jusqu’à ce qu’il émette un CLIC.
DE Um die Rollen dicht an den Reifen zu bringen, drehen Sie den Widerstandsknopf (c), bis ein KLICKEN zu hören ist.
IT Per serrare il rullino al copertone, ruotare la manopola dell’unità di resistenza (c) fino a che si ode un CLIC.
NL Draai aan de knop van de weerstandeenheid (c) tot u ze hoort vastklikken.
KO 롤러를 타이어에 조이려면 딸깍 소리가 날 때까지 저항 장치 손잡이(c)를 돌립니다.
20
29263D_Saris M2 Trainer Manual_KOR.indd 20 9/8/2021 10:58:41 AM15 EN Knobby tires will cause excessive
noise and vibration. Use a slick
tire to avoid this. Use of trainers
will decrease the life of your rear
tire. For longer life, use a harder
compound tire (part #9735T).
ES Las ruedas tacos provocarán ruidos y vibración excesivos. Utilice ruedas lisas para evitarlo. El uso de los aparatos de entrenamiento reducirá la vida
útil de la rueda trasera. Para prolongar la vida útil, utilice una rueda fabricada con un compuesto más duro (pieza n.º 9735T).
FR Les pneus à crampons font du bruit et provoquent des vibrations. Utilisez plutôt un pneu lisse. L’utilisation d’un trainer réduit la durée de vie du
pneu arrière. Pour une durée de vie accrue, utilisez un pneu dur (pièce 9735T).
Stark profilierte Reifen erzeugen laute Abrollgeräusche und Vibrationen. Deshalb wird die Verwendung von Reifen mit glatter Lauffläche empfohlen.
DE Die Verwendung dieses Trainingsgeräts verkürzt die Lebensdauer des Hinterradreifens. Für eine längere Lebensdauer sollten Reifen mit härterer
Materialzusammensetzung verwendet werden (Teilenummer 9735T).
IT Gli pneumatici con battistrada tassellato provocano rumori e vibrazioni eccessive. Utilizzare uno pneumatico con battistrada liscio per evitarlo.
L’uso di rulli da allenamento riduce la durata dello pneumatico posteriore. Per prolungarne la vita utilizzare uno pneumatico con una mescola più
dura (componente n° 9735T).
NL Knobbelige banden veroorzaken lawaai en trillingen. Gebruik een profielloze band om dit te vermijden. Het gebruik van
trainingstoestellen zal de levensduur van uw achterband verkorten. Gebruik banden met een hardere compound om de
levensduur te verlengen (onderdeel # 9735T).
KO MTB용 타이어는 과도한 소음과 진동을 유발합니다. 이를 피하려면 슬릭 타이어를 사용하십시오. 트레이너를 사용하면 뒷 타이어의
수명이 단축됩니다. 더 오래 사용하려면 더 단단한 복합 타이어(부품 번호 9735T)를 사용하십시오. 21
29263D_Saris M2 Trainer Manual_KOR.indd 21 9/8/2021 10:58:41 AMEN FIRMWARE UPDATES
Firmware on the trainer can be updated wirelessly when new firmware releases are available. To enjoy the full capabilities of the
trainer including ongoing enhancements and Over-the-Air firmware updates you must use the Saris Utility App. Go to www.saris.
com/support/firmware for details.
Note: Your iOS device must be, iPhone 4s or later, iPod Touch 5th generation or later, or iPad Mini/iPad 3 or later.
More info along with step by step directions for updating the firmware of your trainer can be found at www.saris.com/product/
M2 under product support.
ES ACTUALIZACIONES DE FIRMWARE
El firmware del se puede actualizar de forma inalámbrica cuando hay disponibles nuevas versiones de firmware. Para disfrutar
de todas las capacidades del aparato de entrenamiento incluidas mejoras en curso y actualizaciones de firmware inalámbricas
debe utilizar Saris Utility App. www.saris.com/support/firmware
Nota: El dispositivo iOS debe ser, iPhone 4s o posterior, iPod Touch de 5.ª generación o posterior, o iPad Mini/iPad 3 o posterior.
Dispone de información adicional e indicaciones paso a paso para la actualización del firmware del aparato de entrenamiento en
www.saris.com/product/h3 en soporte técnico de producto.
FR MISES À JOUR DU FIRMWARE
Le firmware du se met à jour (procédure sans fil) dès qu'une mise à jour est disponible. Pour un fonctionnement optimal du et
pour pouvoir accéder aux mises à jour du firmware Over-the-Air, utilisez Saris Utility App. www.saris.com/support/firmware
Remarque : votre dispositif iOS doit être un iPhone 4s ou ultérieur, un iPod Touch 5e génération ou ultérieur, ou encore un iPad
22
Mini/iPad 3 ou ultérieur.
29263D_Saris M2 Trainer Manual_KOR.indd 22 9/8/2021 10:58:41 AMPour plus d'informations sur la marche à suivre, étape par étape, pour mettre à jour le firmware de votre Trainer, connectez-vous
à l'adresse www.saris.com/product/M2 dans la section du support produit.
DE FIRMWARE-UPDATES
Die Firmware des Trainer kann drahtlos aktualisiert werden, wenn neue Firmware-Releases verfügbar sind. Um alle Möglichkeit-
en des Trainer einschließlich laufender Verbesserungen und drahtloser Firmware-Updates zu nutzen, müssen Sie Saris Utility
App. www.saris.com/support/firmware
Hinweis: Sie benötigen ein iPhone 4s oder höher, iPod Touch 5. Generation oder höher oder iPad Mini/iPad 3 oder höher.
Dieser kann über www.Saris.com erworben werden. Weitere Informationen und eine schrittweise Anleitung zum Aktualisieren
der Firmware Ihres Trainers finden Sie unter www.saris.com/product/M2 Produkt-Support.
IT AGGIORNAMENTI FIRMWARE
Quando sono disponibili nuove versioni, il firmware dell’ può essere aggiornato in modalità wireless. Per usufruire di tutte le
funzionalità del rullo inclusi miglioramenti in corso e aggiornamenti wireless è necessario scaricare Saris Utility App. www.saris.
com/support/firmware
Nota: Il dispositivo iOS deve essere un iPhone 4s o seguenti, un iPod Touch 5 o seguenti, o un iPad Mini/iPad 3 o seguenti.
Ulteriori informazioni step by step per aggiornare il firmware del rullo trainer sono disponibili su www.saris.com/product/M2 alla
sezione Supporto prodotto.
23
29263D_Saris M2 Trainer Manual_KOR.indd 23 9/8/2021 10:58:41 AMNL BIJWERKEN VAN DE FIRMWARE
De firmware op de kan draadloos worden bijgewerkt zodra nieuwe versies van de firmware beschikbaar zijn. Om ten volle van
de mogelijkheden van de te kunnen genieten, met inbegrip van de voortdurende verbeteringen en de Over-the-Air updates van
de firmware, dient u Saris Utility App. www.saris.com/support/firmware
Opmerking: U dient een iPhone 4s of later, iPod Touch 5de generatie of later of iPad Mini/iPad 3 of later te gebruiken.
Meer toelichting inclusief een stappenplan voor het bijwerken van de firmware van uw is ter beschikking op www.saris.com/
product/M2 onder 'Productondersteuning'.
KO 펌웨어 업데이트
트레이너의 펌웨어는 새 펌웨어 릴리스를 이용할 수 있게 되면 무선으로 업데이트할 수 있습니다. 유틸리티 앱을
사용하면 지속적인 기능 개선 및 무선 펌웨어 업데이트 등 트레이너의 모든 기능을 사용할 수 있습니다. 자세한 내용은
www.saris.com/support/firmware를 참조하십시오.
참고: iOS 기기는 iPhone 4s 이상, iPod Touch 5세대 이상 또는 iPad Mini/iPad 3 이상이어야 합니다.
트레이너의 펌웨어 업데이트에 대한 단계별 지침 및 자세한 내용은 www.saris.com/product/M2의 제품 지원을 참조
하십시오.
24
29263D_Saris M2 Trainer Manual_KOR.indd 24 9/8/2021 10:58:41 AMEN Because it is impossible to calculate every situation during which a bike trainer may be used, this manual makes no represen-
tation about the safe use of the trainer under all conditions. There are risks (mostly marginal, but some serious) associated with
any trainer use which cannot be predicted, and are the sole responsibility of the rider.
Basic Precautions:
• Do not place any other objects near nor into the moving parts of trainer or bicycle.
• Prevent children (under 10) and pets from touching or riding your bike and the trainer while in use.
• Remove the bicycle from the trainer when not in use.
• Inspect the trainer parts on a regular basis.
• This trainer is not designed for industrial, commercial or medial applications.
• Keep clean with a dry cloth. Do not use cleaning supplies on this unit.
• Disconnect the trainer from its power source during service and when replacing parts.
ES Dado que resulta imposible determinar todas las situaciones posibles en las que se puede utilizar un aparato de entrenamiento,
este manual no se responsabiliza del uso seguro en todas las condiciones. Existen riesgos (principalmente marginales, aunque
algunos serios) relacionados con el uso de un aparato de entrenamiento que no se pueden predecir y que son responsabilidad
exclusiva del usuario.
Precauciones básicas:
• No coloque ningún objeto próximo a las partes móviles del aparato de entrenamiento o de la bicicleta.
• Evite que los niños (menores de 10 años) y animales se acerquen o se suban a la bicicleta y al aparato de entrenamiento
mientras se está utilizando.
• Retire la bicicleta del aparato de entrenamiento cuando no la utilice.
• Inspeccione las piezas del aparato de entrenamiento con regularidad.
• Este aparato de entrenamiento no se ha diseñado para aplicaciones industriales, comerciales o médicas.
• Límpielo con un paño seco. No utilice productos de limpieza en este equipo.
• Desconecte el entrenador de su fuente de energía durante el servicio y al reemplazar piezas. 25
29263D_Saris M2 Trainer Manual_KOR.indd 25 9/8/2021 10:58:41 AMFR Il est impossible de prévoir toutes les situations d'utilisation d'un Trainer. C'est pourquoi ce manuel ne détaille pas toutes les
conditions d'utilisation. Il existe des risques (marginaux pour la plupart et sérieux pour quelques autres) associés à l'utilisation
de Trainers, qu'il est impossible de prévoir et sont de la seule responsabilité de l'utilisateur.
Précautions de base :
• N'introduisez pas d'objets à proximité ou dans les pièces mobiles du Trainer et du vélo.
• Tenez les enfants (de moins de 10 ans) et les animaux de compagnie à distance du Trainer et du vélo pendant l'exercice.
• Ôtez le vélo du Trainer quand vous ne vous en servez pas.
• Inspectez régulièrement les pièces de Trainer.
• Ce Trainer n'est pas conçu pour une utilisation industrielle, commerciale ou médicale.
• Nettoyez-le avec un chiffon sec. N'utilisez pas de nettoyant.
• Débranchez le formateur de sa source d’alimentation pendant l’entretien et lors du remplacement de pièces.
DE Da der Hersteller nicht wissen kann, wie dieses Trainingsgerät verwendet wird, werden in diesem Handbuch keine Angaben zur
sicheren Verwendung des Geräts in jeder denkbaren Situation gemacht. Bei der Verwendung jedes Trainingsgeräts gibt es meist
kleinere, aber auch größere Risiken, die nicht vorhersehbar sind. Die Benutzung erfolgt auf eigene Gefahr.
Grundlegende Vorsichtsmaßnahmen:
• In der Nähe von beweglichen Teile des Trainers oder des Fahrrads dürfen sich keine Objekte oder Fremdkörper befinden.
• Halten Sie Kinder und Haustiere während der Nutzung von Fahrrad und Trainingsgerät fern.
• Nehmen Sie das Fahrrad nach Beenden des Trainings aus dem Trainingsgerät heraus.
• Kontrollieren Sie die Teile des Trainingsgeräts regelmäßig.
• Dieses Trainingsgerät ist nicht für die industrielle, kommerzielle oder medizinische Nutzung geeignet.
• Reinigen Sie das Gerät mit einem trockenen Tuch. Verwenden Sie keine Reinigungsmittel.
• Trennen Sie den Trainer während des Service und beim Austausch von Teilen von der Stromquelle.
26
29263D_Saris M2 Trainer Manual_KOR.indd 26 9/8/2021 10:58:41 AMles IT Poiché è impossibile pianificare ogni situazione di utilizzo di un rullo da allenamento, questo manuale non riporta l’uso in
ation sicurezza del rullo in tutte le circostanze. Esistono rischi (per lo più marginali, e comunque non gravi) associati all’uso del rullo
che è impossibile prevedere e sono sotto la completa responsabilità dell’atleta.
Precauzioni di base:
• Non posizionare altri oggetti vicino o tra le parti in movimento del rullo o della bicicletta.
e. • Evitare che bambini (sotto i 10 anni) e animali tocchino o salgano sulla bicicletta e sul rullo da allenamento quando è in uso.
• Togliere la bicicletta dal rullo da allenamento quando non è utilizzata.
• Controllare regolarmente i componenti del rullo da allenamento.
• Questo rullo da allenamento non è progettato per applicazioni industriali, commerciali o mediano.
• Pulire con un panno asciutto. Non usare detergenti su questa unità.
• Scollegare il trainer dalla fonte di alimentazione durante il servizio e quando si sostituiscono le parti.
en zur NL Omdat het onmogelijk is om elke situatie waarin een trainingstoestel gebruikt kan worden, in te schatten, geeft deze handleiding
meist geen voorstelling van het veilig gebruik van het trainingstoestel in alle omstandigheden. Er zijn risico's (waarvan de meeste
verwaarloosbaar en sommige ernstig) verbonden aan het gebruik van gelijk welk trainingstoestel die niet vooraf kunnen worden
uitgesloten en het is de verantwoordelijk van de gebruiker om ze in te schatten.
n. Voorzorgsmaatregelen:
• Steek geen voorwerpen in de bewegende delen van het trainingstoestel of de fiets.
• Houd kinderen (jonger dan 10) en huisdieren uit de buurt van het trainingstoestel wanneer u het gebruikt.
• Haal de fiets uit het trainingstoestel als u klaar bent met trainen.
• Controleer regelmatig of alle delen van het trainingstoestel nog op hun plaats zitten.
• Dit trainingstoestel is niet ontworpen voor industriële, commerciële of medische toepassingen.
• Schoonmaken met een droge doek. Gebruik geen schoonmaakmiddelen op dit trainingstoestel.
• Koppel de trainer los van de stroombron tijdens onderhoud en bij het vervangen van onderdelen. 27
29263D_Saris M2 Trainer Manual_KOR.indd 27 9/8/2021 10:58:41 AMKO 바이크 트레이너를 사용할 수 있는 모든 상황을 예상하는 것은 불가능하므로 이 설명서에는 모든 조건에서 트레이너를
안전하게 사용할 수 있는 방법이 설명되어 있지는 않습니다. 트레이너 사용과 관련해서는 예상할 수 없는 위험(대부분
미미하지만 일부는 심각한 위험)이 있을 수 있으며 이는 전적으로 라이더의 책임입니다.
기본적인 주의 사항:
• 트레이너나 자전거의 움직이는 부분 주위 또는 그 안에 이물질을 놓지 마십시오.
• 자전거와 트레이너를 사용 중일 때 어린이(10세 미만)나 반려동물이 자전거와 트레이너를 만지거나 타지 않도록
하십시오.
• 사용하지 않을 때는 트레이너에서 자전거를 분리하십시오.
• 트레이너 부품은 정기적으로 검사하십시오.
• 이 트레이너는 산업용, 상업용 또는 의료용이 아닙니다.
• 마른 천으로 깨끗하게 관리하십시오. 이 장치에 청소용품을 사용하지 마십시오.
• 정비 중 또는 부품 교체 시 트레이너를 전원에서 분리하십시오.
28
29263D_Saris M2 Trainer Manual_KOR.indd 28 9/8/2021 10:58:42 AMEN
OFFICIAL WARRANTY TERMS
Saris Cycling Group, Inc (SCG), parent company of Saris, warrants our product to the original consumer to be free from
defects in materials and workmanship. Please retain your sales slip for your records as proof of purchase will be required
WARRANTY TERM
HOME USE COMMERCIAL AND INDUSTRIAL USE
TRAINERS
• Frame: Lifetime • Frame finish and decals not included in
• Frame finish and decals not included in warranty
warranty • Electronics: 1 Year
Hammer/H2/H3 Indoor
• Electronics: 2 years • Belt: None
Trainer
• Belt: 1 year • Pulley Wheel: None
• Pulley Wheel: 1 year • Freehub: None
• Freehub: 1 year
• Frame: Lifetime (for failures against weld • Frame: 5 Year (for failures against weld
breakage) breakage)
Magnus/M2 Indoor • Frame finish and decals not included in • Frame finish and decals not included in
Trainer warranty warranty
• Electronics: 2 years • Electronics: 1 Year
• Resistance Unit (Bearings): 2 years • Resistance Unit (Bearings): None
29
29263D_Saris M2 Trainer Manual_KOR.indd 29 9/8/2021 10:58:42 AMHOME USE COMMERCIAL AND INDUSTRIAL USE
• Frame: Lifetime (for failures against weld • Frame: 5 Year (for failures against weld
breakage) breakage)
• Frame finish and decals not included in • Frame finish decals not included in
Classic Trainers
warranty warranty
• Resistance Unit (bearings, leakage): • Resistance Unit: None
2 years
• Frame: Lifetime (for failures against weld
PowerBean pro and
breakage)
PowerSync Trainer
• Electronics: 1 year
• Frame: lifetime (for failures against • Frame: No warranty on frame for failures
breakage) against breakage
ROLLERS • Frame finish and decals not included • Frame finish and decals not included
in warranty in warranty
• Aluminum (bearings): 2 years • Aluminum (bearings): None
• Frame: 10 years
INDOOR CYCLES • Component parts, electronic components,
paint/appearance: 1 year
EXCLUSIONS
The following items are considered wear items are NOT covered under warranty:
30
29263D_Saris M2 Trainer Manual_KOR.indd 30 9/8/2021 10:58:42 AM• Clutch knob
• L bolt
• RU rollers
• Bolt action bushings
• Trainer feet
• Roller resistance band
• Roller feet
• Mag Plus remote shifter
• Power Supply – magnus, hammer
Any product or part thereof found to be defective within the term as set forth above will be replaced without charge pro-
vided that: (1) its failure resulted from a defect in material or workmanship and not from normal wear and tear expected
in the use of the product; (2) the product was not misused, improperly assembled, improperly maintained or damaged by
accident; (3) there was no failure to follow instructions or warnings in Owner's Manual; (4) no alterations or modifications
were made; and (5) the product or part is delivered, freight prepaid, to Saris Cycling Group or an authorized service center.
Please call 1-800-783-7257 to obtain return authorization prior to return. SCG reserves the right to inspect any product
before issuing a replacement. SCG's only obligation shall be to replace such products or parts that it determines are
defective.
Limitations
Saris warrants your product to be free of any defects in material or workmanship. This warranty does not apply to parts
that have been worn out through normal use or damaged through misuse, abuse, neglect, accident, or unauthorized
31
29263D_Saris M2 Trainer Manual_KOR.indd 31 9/8/2021 10:58:42 AMmodification. Where applicable, incidental and consequential damages are not covered, and there are no other warranties,
expressed or implied. This warranty applies to the original owner only. Retain your receipt as proof of purchase.
The foregoing warranties are in lieu of and exclude all other warranties not expressly set forth herein, whether expressed
or implied by operation of law or otherwise. Other than as set forth above, SCG makes no warranty, whether express,
implied or statutory, with respect to any product, including, but not limited to, warranties of reliability, merchantability
fitness for a particular purpose, or those arising from any course of performance, dealing, usage or trade. SCG shall
not be liable for incidental or consequential losses, damages or expenses in connection with its products. SCG’s liability
hereunder is expressly limited to the replacement of goods not complying with this warranty or, at SCG’s election, to the
repayment of an amount of the purchase price of the product in question. Some states do not permit the exclusion or
limitation of implied warranties or incidental or consequential damages, so the preceding limitations and exclusions may
not apply to you.
Lifetime warranty available in North America only.
RECOMMENDED MAINTAINENCE
• Remove the bicycle from the trainer when not in use.
• Inspect the trainer parts on a regular basis.
• Keep clean with a dry cloth. Do not use cleaning supplies on this unit.
• Un-Plug unit when not in use when applicable.
32
29263D_Saris M2 Trainer Manual_KOR.indd 32 9/8/2021 10:58:42 AMES
TÉRMINOS DE GARANTÍA OFICIAL
Saris Cycling Group, Inc (SCG), empresa matriz de Saris, garantiza al comprador original que nuestros productos no presentan
defectos de material ni de mano de obra. Conserve la factura, ya que tendrá que presentar una prueba de compra.
TÉRMINOS DE GARANTÍA
USO DOMÉSTICO USO COMERCIAL E INDUSTRIAL
APARATOS DE
ENTRENAMIENTO
• Bastidor: De por vida • El acabado del bastidor y las calco-
• El acabado del bastidor y las calcomanías manías no se incluyen en la garantía
Aparato de
no se incluyen en la garantía • Electrónica: 1 año
entrenamiento
• Electrónica: 2 años • Correa: Ninguna
de interior
• Correa: 1 año • Polea: Ninguna
Hammer/H2/H3
• Polea: 1 año • Buje: Ninguna
• Buje: 1 año
33
29263D_Saris M2 Trainer Manual_KOR.indd 33 9/8/2021 10:58:42 AMUSO DOMÉSTICO USO COMERCIAL E INDUSTRIAL
• Bastidor: De por vida (para averías por • Bastidor: 5 años (para averías por rotura
rotura de la soldadura) de la soldadura)
Aparato de
• El acabado del bastidor y las calcomanías • El acabado del bastidor y las calco-
entrenamiento
no se incluyen en la garantía manías no se incluyen en la garantía
de interior
• Electrónica: 2 años • Electrónica: 1 año
Magnus /M2
• Unidad de resistencia (rodamientos): • Unidad de resistencia (rodamientos):
2 años Ninguna
• Bastidor: De por vida (para averías por • Bastidor: 5 años (para averías por rotura
rotura de la soldadura) de la soldadura)
Aparatos
• El acabado del bastidor y las calcomanías • Las calcomanías de acabado del bastidor
de entrenamiento
no se incluyen en la garantía no se incluyen en la garantía
Classic
• Unidad de resistencia (rodamientos, • Unidad de resistencia: Ninguna
fugas): 2 años
Aparatos de entre- • Bastidor: De por vida (para averías por
namiento PowerBeam rotura de la soldadura)
Pro y PowerSync • Electrónica: 1 año
• Bastidor: de por vida (para averías • Bastidor: No hay garantía en el bastidor
por rotura) para averías por rotura
RODILLOS
• El acabado del bastidor y las calcomanías • El acabado del bastidor y las calco-
no se incluyen en la garantía manías no se incluyen en la garantía
• Aluminio (rodamientos): 2 años • Aluminio (rodamientos): Ninguna
34
29263D_Saris M2 Trainer Manual_KOR.indd 34 9/8/2021 10:58:42 AMUSO DOMÉSTICO USO COMERCIAL E INDUSTRIAL
• Bastidor: 10 años
BICICLETAS
• Piezas, componentes electrónicos,
DE INTERIOR
pintura/aspecto: 1 año
EXCLUSIONES
Los siguientes elementos se consideran elementos con desgaste NO cubiertos por la garantía.
• Ajuste de embrague
• Perno en L
• Rodillos unidad de rodadura
• Cojinetes de cerrojo
• Patas del aparato de entrenamiento
• Banda de resistencia del rodillo
• Patas del rodillo
• Cambio de velocidades remoto Mag Plus
• Fuente de alimentación: magnus, hammer
Cualquier producto o parte del mismo que resulte ser defectuoso según los términos establecidos más arriba se
sustituirá gratuitamente siempre que: (1) el fallo se deba a un defecto del material o de la mano de obra y no al desgaste
normal que cabe esperar del uso del producto; (2) el producto no se haya utilizado de forma inadecuada;, no se haya
montado de forma incorrecta, no se haya realizado el mantenimiento correcto o se haya dañado por accidente; (2) no
se hayan seguido incorrectamente las instrucciones o advertencias del Manual de usuario; (4) no se hayan realizado
35
29263D_Saris M2 Trainer Manual_KOR.indd 35 9/8/2021 10:58:42 AMalteraciones o modificaciones; y (5) el producto se haya enviado, con transporte prepagado, a Saris Cycling Group o a un
centro de servicio autorizado.
Llame al 1-800-783-7257 para obtener una autorización de devolución antes de la devolución. SCG se reserva el derecho
a inspeccionar cualquier producto antes de enviar otro de sustitución. La obligación de SCG se limita a la sustitución de
los productos o de las piezas que se determine que son defectuosos.
Limitaciones
Saris garantiza que el producto no presenta defectos en el material ni en la mano de obra. Esta garantía no es aplicable
a piezas que se hayan desgastado a través del uso normal o que se hayan dañado por un uso inadecuado, abuso, neg-
ligencia, accidente o modificación no autorizada. Llegado el caso, los daños indirectos y resultantes no están cubiertos
y no hay ninguna otra garantía, expresa o implícita. Esta garantía es aplicable exclusivamente al propietario original.
Conserve el recibo como prueba de compra.
Las garantías precedentes sustituyen y excluyen a cualesquiera otras garantías no establecidas expresamente en el pre-
sente documento, tanto expresas como implícitas previstas por la ley o de otro modo. Aparte de lo establecido anterior-
mente, SCG no ofrece garantías de ningún tipo, ya sea expresa, implícita o estatutaria, con relación a ningún producto,
incluidas, entre otras, garantías de confiabilidad, comerciabilidad, adecuación para un propósito particular o aquellas
que pudieran surgir de prestaciones, convenios, uso o comercio. SCG no será responsable bajo ninguna circunstancia
de daños, pérdidas o gastos imprevistos o derivados con relación a sus productos. La responsabilidad de SCG se limita
expresamente a la sustitución de los productos que no cumplan esta garantía o, según el propio criterio de SCG, al pago
de una cantidad del precio de compra del producto en cuestión. Algunos estados no permiten la exclusión o limitación de
garantías implícitas o daños derivados o imprevistos, por tanto es posible que las limitaciones y exclusiones precedentes
no le afecten.
36
29263D_Saris M2 Trainer Manual_KOR.indd 36 9/8/2021 10:58:42 AMGarantía de por vida disponible solo en América del Norte.
MANTENIMIENTO RECOMENDADO
• Retire la bicicleta del aparato de entrenamiento cuando no la utilice.
• Inspeccione las piezas del aparato de entrenamiento con regularidad.
• Límpielo con un paño seco. No utilice productos de limpieza en este equipo.
• Desenchufe la unidad cuando no la utilice si procede.
FR
CONDITIONS DE LA GARANTIE OFFICIELLE
Saris Cycling Group, Inc (SCG), société mère de Saris, garantit notre produit à l’acheteur d’origine contre tout vice de
matériau et de main-d’œuvre. Veuillez conserver votre ticket de vente au cas où une preuve d’achat vous serait demandée.
CONDITION DE LA GARANTIE
UTILISATION PRIVÉE UTILISATIONS COMMERCIALE ET
INDUSTRIELLE
TRAINERS
Hammer/H2/H3 • Cadre : À vie • La finition du cadre et les autocollants
Indoor Trainer • La finition du cadre et les autocollants ne sont pas inclus dans la garantie
ne sont pas inclus dans la garantie • Électronique : 1 an
• Électronique : 2 ans • Courroie : Aucune
• Courroie : 1 an • Roue de la poulie : Aucune
• Roue de la poulie : 1 an • Roue libre : Aucune
• Roue libre : 1 an
37
29263D_Saris M2 Trainer Manual_KOR.indd 37 9/8/2021 10:58:42 AMUTILISATION PRIVÉE UTILISATIONS COMMERCIALE ET
INDUSTRIELLE
Magnus/M2 Indoor • Cadre : À vie (pour les ruptures de soudure) • Cadre : 5 ans (pour les ruptures de soudure)
Trainer • La finition du cadre et les autocollants ne • La finition du cadre et les autocollants ne
sont pas inclus dans la garantie sont pas inclus dans la garantie
• Électronique : 2 ans • Électronique : 1 an
• Unité de résistance (roulements) : 2 ans • Unité de résistance (roulements) : Aucune
• Cadre : À vis (pour les ruptures de soudure) • Cadre : 5 ans (pour les ruptures de soudure)
Classic Trainers
• La finition du cadre et les autocollants ne • La finition du cadre et les autocollants ne
sont pas inclus dans la garantie sont pas inclus dans la garantie
• Unité de résistance (roulements, fuite) : • Unité de résistance : Aucune
2 ans
PowerBeam Pro et • Cadre : À vis (pour les ruptures de
PowerSync Trainer soudure)
• Électronique : 1 an
38
29263D_Saris M2 Trainer Manual_KOR.indd 38 9/8/2021 10:58:42 AMUTILISATION PRIVÉE UTILISATIONS COMMERCIALE ET
INDUSTRIELLE
• Cadre : À vie (pour les ruptures de • Cadre : Pas de garantie sur le cadre pour
soudure) les ruptures de soudure
ROULEAUX
• La finition du cadre et les autocollants ne • La finition du cadre et les autocollants ne
sont pas inclus dans la garantie sont pas inclus dans la garantie
• Aluminium (roulements) : 2 ans • Aluminium (roulements) : Aucune
• Cadre : 10 ans
VÉLOS D’INTÉRIEUR • Composants, composants électroniques,
peinture/aspect : 1 an
EXCLUSIONS
• Les éléments suivants sont considérés comme des pièces d’usure et ne SONT PAS couverts par la garantie :
• Bouton de serrage
• Boulon en L
• Rouleaux RU
• Bagues du mécanisme à verrou
• Pieds du Trainer
• Bande de résistance du rouleau
• Pieds du rouleau
• Manette du dérailleur Mag Plus
• Unité de résistance - Magnus, Hammer
39
29263D_Saris M2 Trainer Manual_KOR.indd 39 9/8/2021 10:58:42 AMToute pièce ou tout produit se révélant défectueux dans le délai indiqué ci-dessus sera remplacé gratuitement dans
la mesure où : (1) sa défectuosité résulte d’un défaut matériel ou de main-d’œuvre et non d’une usure normale
découlant de son utilisation ; (2) le produit n’a pas été utilisé de manière incorrecte, mal assemblé, mal entretenu ou
endommagé par accident ; (3) il n’y a pas eu non-respect des consignes et des avertissements indiqués dans le manuel
du propriétaire ; (4) le produit n’a subi aucune modification ; et (5) le produit ou ses pièces sont envoyés, en port payé,
à Saris Cycling Group, Inc. ou à un centre de service autorisé.
Veuillez appeler le 1-800-783-7257 pour obtenir une autorisation de retour avant de procéder à tout retour. SCG se
réserve le droit d’inspecter tout produit avant de procéder à un remplacement. La seule obligation de SCG est de
remplacer les pièces ou produits qu’ils détermine comme étant défectueux.
Limiations
Saris garantit votre produit comme étant sans défauts matériels ou de main-d’œuvre. Cette garantie ne s’applique
pas aux pièces s’usant du fait d’une utilisation normale ou endommagées par une mauvaise utilisation, une utilisation
abusive, une négligence, un accident ou des modifications non autorisées. S’il y a lieu, les dommages accidentels
ou indirects ne sont pas couverts, et il n’existe pas d’autre garantie, expresse ou implicite. Cette garantie s’applique
à l’acheteur d’origine uniquement. Conservez votre reçu comme preuve d’achat.
Les présentes garanties remplacent toutes les autres garanties non expressément stipulées ici, qu’elles soient
explicites ou implicites par l’effet de la loi. En dehors de ce qui est indiqué ci-dessus, SCG ne donne aucune garantie,
expresse, implicite ou statutaire, concernant tout produit, y compris, mais sans s’y limiter, les garanties de fiabilité,
la capacité marchande à un usage particulier ou celles découlant de performances, négociations, utilisations ou
commerces. SCG ne saurait être tenu responsable des pertes, dépenses ou dommages accidentels ou indirects
découlant de l’utilisation de ses produits. La responsabilité de SCG au titre du présent contrat est expressément limitée
au remplacement des
40
29263D_Saris M2 Trainer Manual_KOR.indd 40 9/8/2021 10:58:42 AMVous pouvez aussi lire