MadVR Envy Guide de démarrage rapide - Revision 1.0
←
→
Transcription du contenu de la page
Si votre navigateur ne rend pas la page correctement, lisez s'il vous plaît le contenu de la page ci-dessous
madVR Envy

Guide de démarrage rapide

Revision 1.0

1

Guide de démarrage rapide Envy
1. Introduction
Félicitations pour l'achat de votre madVR Envy! L'Envy est le résultat de plus de onze années de
R&D intensives. C'est le premier et le seul processeur vidéo à fournir une IA (Intelligence
Artificielle) en attente de brevet ainsi que d'autres algorithmes avancés pour le traitement de la
vidéo en temps réel, offrant une qualité d'image incomparable. Nous espérons que regarder
des films avec votre processeur soit aussi incroyablement addictif que nous et que beaucoup
d'autres utilisateurs.

Bien que l'Envy soit fonctionnel dès son déballage, ce guide vous aidera à en tirer le meilleur
parti. Pour une expérience complète, veuillez le lire dans son intégralité avant de commencer.

2. Réglages initiaux
Ce qui suit est un aperçu des réglages qui vous permettront d’être opérationnel rapidement.

   2.1. Déballer et connecter l’Envy : Votre envoi contient l'Envy, une télécommande avec
        piles, une antenne RF USB et un cordon d'alimentation. Nous vous conseillons de
        conserver le carton d'origine et les matériaux d'emballage au cas où votre Envy aurait
        besoin d’une maintenance ou de mises à niveau futures. Examinez le panneau arrière
        comme indiqué dans l'annexe A. Connectez votre entrée et votre sortie HDMI ainsi que
        le cordon d'alimentation. Allumez l’Envy en appuyant sur le bouton sur le panneau
        avant et profitez-en dès son déballage !

   2.2. Ventilation adéquate: Attention: Lors traitements intensifs comme la mise à l'échelle
        de 1080p60 à 4K60, ou avec d'autres algorithmes avancés qui pourraient être ajoutés à
        l'avenir, l'Envy (en particulier la version Extreme) peut devenir «chaud au toucher» au
        milieu du couvercle et expulse l'air chaud par les évents situés à arrière et au le dessus.
        Il faut par conséquent s’assurer d’une ventilation adéquate avant utilisation. Pour des
        informations importantes sur la ventilation, reportez-vous à l'annexe C.

   2.3. Télécommande: Consultez l'annexe B pour un aperçu des fonctions de la
        télécommande. La télécommande prend en charge à la fois RF radiofréquence (par

                                                     2

                              Copyright © madVR Labs, LLC. All rights reserved.
défaut) et IR infra-rouge. Les adaptateurs USB RF et IR sont préinstallés, comme
indiqué dans l'annexe A.
Pour mettre la télécommande en mode RF (par défaut): Maintenez appuyé le
bouton OK, et tout en le maintenant, appuyez sur le bouton supérieur gauche
(Alimentation) et maintenez-le enfoncé pendant 3 secondes, jusqu'à ce que le
voyant LED de la télécommande clignote 3 fois. Votre télécommande est déjà
réglée sur le mode RF par défaut. Pour un fonctionnement correct, maintenez le
dongle RF à 180 degrés (veuillez ne pas le mettre en position 45 ou 90 degrés).
To put the remote into IR mode: Press and hold the OK button, and while still
holding it, press and hold the top right button (Menu button) for 3 seconds, until
the LED light on the remote blinks 3 times. Note: After changing batteries it will
be necessary to set the remote back into IR mode.
Pour mettre la télécommande en mode IR: Appuyez sur le bouton OK et
maintenez-le enfoncé, et tout en le maintenant, appuyez sur le bouton supérieur
droit (bouton Menu) et maintenez-le enfoncé pendant 3 secondes, jusqu'à ce
que le voyant LED de la télécommande clignote 3 fois. Remarque: après avoir
changé les piles, il sera nécessaire de remettre la télécommande en mode IR.
Vous ne pouvez pas utiliser les commandes RF et IR en même temps. Par exemple, si
vous souhaiterez faire un apprentissage des commandes Envy IR dans une
télécommande universelle, tout en gardant la télécommande Envy à portée de main
pour une plus grande commodité et une plus grande portée en utilisant la RF. Si vous
apprenez les codes IR, mettez d'abord la télécommande en mode IR et apprenez les
codes sur votre autre télécommande. Ensuite, en option, vous pouvez basculer à
nouveau sur le mode RF, par ce biais votre télécommande universelle et la
télécommande Envy continueront de fonctionner.
Nous recommandons d'utiliser la télécommande de l’Envy en mode RF, car elle ne
nécessite pas de visibilité directe du capteur infrarouge. Si vous utilisez le mode IR et
avez besoin d'une meilleure portée, vous pouvez relocaliser le dongle IR à l’aide d’un
câble d'extension USB , vous pouvez le placer sous l'appareil, à l'avant, où il peut être
facilement caché. Vous pouvez personnaliser les fonctions des boutons de la
télécommande, pour ceci cliquez sur le bouton en haut à droite de la télécommande et
appuyez sur la flèche droite jusqu'à ce que vous atteigniez le menu de configuration de
la télécommande (Remote Control).
3
Copyright © madVR Labs, LLC. All rights reserved.Si vous ne prévoyez pas d'utiliser l'IR avec votre Envy, nous vous recommandons
vivement de laisser le dongle USB IR branché sur l'Envy afin qu'il ne se perde pas si
nécessaire à l'avenir. De plus, nous prévoyons d'utiliser ce dongle IR à d'autres fins à
l'avenir.
3. Fonctionnement général
Cette section couvre la configuration générale et le fonctionnement de l'Envy.
3.1. Menus: Les menus de l’Envy se composent de plusieurs pages de menu regroupées
par fonction. Les pages de menu sont organisées en menus «Configuration»,
«Paramètres» et «Information». Les menus de configuration vous permettent de
configurer les options que vous n’aurez généralement pas besoin d’ajuster
régulièrement. Par exemple, votre résolution de sortie préférée, votre luminance
de crête et votre espace colorimétrique préféré ne sont pas des réglages que vous
changerez régulièrement.
Les menus Paramètres (Settings), en revanche, sont généralement ceux où vous
trouverez des options que vous souhaiterez peut-être modifier occasionnellement,
en fonction de votre humeur, des conditions de visionnage ou des goûts sur un film
en particulier. Les exemples incluent vos préférences pour le traitement HDR, la
mise à l'échelle, la réduction des artefacts, la netteté et plus encore.
Le menu Information affiche des informations sur votre signal entrant et sortant, le
périphérique d'affichage et des informations système telles que le modèle et votre
numéro de série. Pour des raisons de sécurité, ne communiquez jamais votre
numéro de série, sauf à votre revendeur ou madVR Labs. Il existe également un
menu Test Patterns et un menu Profile.
Conseil: Les menus de l’Envy utilise un système de Profils très flexible et intuitif qui
facilite l'enregistrement et l'application de différents paramètres à des fins
différentes (Gestion des Paramètres). Les explications détaillées sur le système de
profils dépasse le cadre de ce guide.
Il est particulièrement important de comprendre le fonctionnement des Profils
avant d'utiliser votre Envy. Par conséquent, nous vous recommandons vivement de
lire le document Introduction aux profils disponible sur www.madvrenvy.com.
3.2. Front-panel: The front panel is as intuitive as the Envy itself. The LED lights blue when the
unit is on, lights red to indicate disk activity, slowly pulsates between blue and off when in
standby, and is off when the Envy is powered off. You can control the brightness of the LED
4
Copyright © madVR Labs, LLC. All rights reserved.(or turn it off) using the wheel at the bottom edge of the front panel. To find the wheel,
place your finger on the LED and move it down to the bottom edge of the case. To turn the
unit on and off, press the power button (or use the remote). Should you ever wish to
unplug the Envy, first press the power button, and wait a few seconds until the LED turns
off. Never turn off your Envy by pulling the power plug while it is still on or by turning off
the power supply switch on the rear of the unit.
3.3. Check output resolution: Some projectors and displays do not report their native resolution
properly. For instance, JVC e-shift 4K projectors report a native resolution of 1080p instead
of 3840x2160. And some native 4096x2160 projectors may report 3840x2160. To override
this if necessary, press the top right button on the remote to quickly access the Display
Configuration menu, and change to the desired resolution.
3.4. Set your peak luminance: For optimal results, the Envy needs to know your peak
luminance. This is set in the Display Configuration menu. If using a scoped screen
with the lens zoom method (no A-lens) set the “Peak luminance (scoped)” value to
the peak nits when zoomed out for scoped movies. If you use lens zoom to change
between 16:9 and scoped zoom, please use profiles (see Section 3.1) to set the
different peak brightness for each setup. To get your peak luminance, use a
calibration software product to read your cd/m2 value off the screen when
displaying a full field 100% white pattern. Or measure your lux with a light meter
and convert to cd/m2. If unsure, please contact your dealer for assistance.
3.5. Anamorphic lens setup: If using an A-lens, press the top right button on the remote
and press the right arrow to reach the Screen Configuration Menu. Enter your
anamorphic stretch factor (e.g., 1.25x for a Panamorph DCR lens) if using an A-lens
and be sure to turn off anamorphic stretch if already enabled in your projector. If
not using an A-lens you can safely ignore this section.
3.6. Scope screen setup: Scoped screens are screens that have an aspect ratio wider
than 16:9. For instance 2.0:1 or 2.35:1. If you have a scoped screen and are not
using an anamorphic, you need to “teach” Envy about your screen so that it can
manage all black bars and place subtitles for you where you can see them
(otherwise they will be off the screen).
To enable black bar detection and management, set the Envy Screen Boundaries
menu item to Custom, display 2.40 content and adjust your projector lens so that
the image fits your screen perfectly side to side. Then display 16:9 content and
adjust the Top and Bottom values under Screen Boundaries so that the image fits
within the height of your screen – this will enable the Envy’s automatic black bar
5
Copyright © madVR Labs, LLC. All rights reserved.detection. For users with scoped screens and no A-lens, this feature is very
convenient, as it will automatically fit 16:9 content to your screen without cropping,
while showing scoped content at full screen (especially great when switching back
and forth from movies and a 16:9 movie selection / poster wall screen). It will also
do some pretty amazing things for managing your subtitles (see the Black Bar
Configuration menu on your Envy for more).
3.7. Audio delay adjustment (if necessary): If your AVR/AVP is set up for auto lip sync
adjustment, Envy will automatically adjust the audio delay as needed. If you should
find that you still need small adjustment despite using auto lip sync, you can do so
in the Envy HDMI Configuration menu (Menu button, then right-arrow until you see
this menu). If you are not using auto-lip sync, you will need to adjust your AVR/AVP
accordingly. In which case note that the video processing in Envy adds roughly
175ms delay to the audio. Therefore, please adjust the audio delay in your audio
processor accordingly (only if not using auto lip sync). If you have an AVP that adds
its own processing delay, such as a Trinnov or Storm Audio, subtract its audio delay
from the 175ms (for instance if your AVP has an audio delay of 50ms, set you’re the
audio delay to 175 - 50 = 125ms). If you have the movie Ready Player One, a great
clip to adjust audio delay is the car race scene around the 10-minute mark of the
movie. A flare that is launched in an arch-like fashion, with a whistling sound as it
nears the ground, and then explodes like a firework. Likewise, many test discs have
lip sync patterns. You likely will have to adjust the source for each of your audio
processors HDMI inputs if not using auto lip-sync.
3.8. Pass-thru port: Envy features a near-zero latency pass-thru port perfect for gaming.
You can run an HDMI cable from this port directly to another input on your display.
Or alternatively if you wish to have just one cable run to your display - you can use a
device like the HD Fury Maestro and run a short cable from each Envy HDMI output
(regular and pass-thru) to the Maestro, and then run the single main HDMI cable
from your display to the Maestro. See Appendix A for the location of the pass-thru
port.
3.9. Popular Envy Tweaks: The default settings in the Envy deliver an outstanding
image. However, you may wish to change the settings to taste and to enable certain
features, like how you want subtitles handled. Please play around in Settings to see
what you like best. Note that the settings will be temporary until you save them to
your Base Settings or to a profile – for more information see the note about profiles
in Section 3.1. Popular tweaks include:
6
Copyright © madVR Labs, LLC. All rights reserved.HDR Settings (first page in the Permanent and Temporary Settings menu):
Highlight Recovery (try at “Insane”), Contrast Recovery (try at High), Shadow
Detail Recovery (try various settings), Brightness Preference tweaks (raising this
means you want the overall picture to be brighter but leaves less room for HDR
highlights and lowering this means you want the overall picture to be darker but
leaves more room for HDR highlights).
Upscaling and Sharpening (also in the Permanent and Temporary Settings
menu): Did you know that the Envy can add very tasteful, artifact-free and
ringing-free sharpening, even to 4K sources? Try adding some Crisp Edges, Edge
Enhancement and Detail Enhancement and see what you think!
Subtitle and OSD handling: Subtitles and On-Screen Display (OSD) elements
from your source devices are problematic for users with scoped screens.
Especially since the black bar areas where subtitles and OSD elements are often
displayed is normally zoomed off the screen by your lens setting! Envy will bring
your black bars back, temporarily as needed, for you to see the subtitles and
OSD. There are lots of options such as how long you want the black bar area to
stick around after subtitles disappear, and more. See the Black Bar Configuration
menu in your Envy for more information.
3.10. Show off your Envy! What fun would the Envy be without the ability to show
yourself and others just why you bought the world’s most advance video processor
in the first place? We are so proud of the power of the Envy and the huge benefit it
provides that we added features exactly for this purpose. Here’s how to use a few
of them:
Dynamic Tone Mapping (green button): With HDR content, click the green
button on your remote to toggle the Envy’s DTM on and off. When toggled off,
the Envy will turn off its DTM and output the content as HDR to your display,
which will then turn on its own HDR tone mapping, so you can easily compare
the difference. Be prepared for what you are about to see – behold the magic
power of the Envy.
Highlight Recovery (blue button): With HDR content, click the blue button to
toggle Highlight Recovery on and off. This comparison is best done with content
paused on your screen. The differences will not be visible in all scenes and with
all content, so you may have to play around to find the right scene to do the
comparison with. Look for content that has bright highlights with texture detail
7
Copyright © madVR Labs, LLC. All rights reserved.and view that with this feature on and off. One example of a great scene to
compare this is the bright yellow flower on the Spears and Munsil HDR
Benchmark 4K Blu-ray demo disc. Also try this after choosing a higher strength
Highlight Recovery setting in the Permanent and Temporary settings (have we
mentioned there is an “insane” mode?).
Contrast Recovery (yellow button): With HDR content, click the yellow button to
toggle Contrast Recovery on and off. You will find that with this feature on, the
content has a considerable amount of added depth and perceived contrast. And
with this feature off the image looks a bit murky, with a thin milky-like layer. Try
this with Contrast Recovery set to High as well.
3.11. Auto-updates: Your Envy makes it very easy to install new versions of the Envy
firmware with a simple click of your remote using the Firmware Configuration
menu. To access the auto-update options, click the top-right button on your remote
and press the left-arrow. The following describes the menu items in detail:
Current Firmware Version: This displays the firmware version currently in use.
This information can also be found on the System Information menu.
Built Type: This option sets the minimum type of firmware you wish to be
notified about. Options are: Stable Builds only, Release Candidates, Beta Builds,
and Test Builds. For instance, if you select Beta Builds you will be notified about
all firmware except Test Builds. With all the ongoing development we
recommend Beta Builds for most users. Test Builds should be considered highly
experimental. When deemed by madVR Labs to be more stable, they are
promoted to Beta Builds, and so forth up to Stable Builds.
Notification Type: When an update is available, a popup notification will be
displayed according to your preferences. Options are Always, If Menu Is Open,
and Never.
Install Firmware: To install a firmware version, move to the “Install Firmware”
line and use the left/right arrows to select ay version, then select OK, and Install.
You can select any version, including past versions. This makes it easy to
experiment with Test Builds or Beta Builds, for example, since you can always
rollback the update just as easily. All updates are self-contained, so for instance
if you are on 1.1.0.4 you can install 1.1.0.9 directly, without installing versions in
between. Some updates may require that your Envy be powered off and then
back on – if so, you will be prompted to do so.
8
Copyright © madVR Labs, LLC. All rights reserved.Changelog: The changelog provides details about what new features, fixes and
enhancements are included in the update selected in the Install Firmware line.
You can browse through each versions changelog simply by highlight it in the
Install Firmware selection.
3.12. 3D LUT Calibration: The madVR Envy supports 3D LUT calibration with many
popular calibration software packages, including ColourSpace, Calman, and
DisplayCal. Calibration guides are available for download from
www.madvrenvy.com.
4. Troubleshooting
4.1. Remote does not work: Did you insert batteries? If wanting to use RF, make sure
the black RF antenna dongle is installed in the USB port as shown in Appendix A. If
RF is still not working, see Section 2.3 to ensure it is in RF mode. If so, try removing
the antenna for 2 seconds and plug it right back into the same spot. If using IR,
make sure the remote is in IR mode, and that the IR dongle in the rear of the unit
has line of sight to your remote, or use an extension cable as described in Section
2.3. If neither of these helps, see item 4.2 below.
4.2. Envy appears to be doing nothing: Make sure you inserted the HDMI input into the
bottom port as shown in Appendix A. If you installed it into the top port, that is the
pass-thru port, and Envy will not apply any processing and the remote will appear
not to work.
4.3. Envy is outputting 1080p instead of 4K: Make sure you are not inadvertently
pressing and holding the red button on the remote – doing so forces the Envy to
output 1080p, which is useful in the event you ask it to output a resolution which
your display does not support.
4.4. Envy does not power on: Check the power supply switch and make sure the “circle”
side of the switch is up in the air (“line” is pressed down), as pictured in Appendix A.
4.5. Green flashes: You may notice a full screen green flash or two during HDMI signal
changes / handshaking in some situations. In the Display Output mode use RGB if
using YUV. Or if using YUV, choose Slow and Clean Handshakes in the Envy HDMI
Configuration menu.
9
Copyright © madVR Labs, LLC. All rights reserved.4.6. Audio delay: Envy adds audio delay as part of its processing. Please see Section 3.7
for information about setting the audio delay.
4.7. Something else? Please contact your authorized Envy dealer for assistance.
We hope you enjoy your Envy as much as we enjoyed making it for
you! Thank you.
10
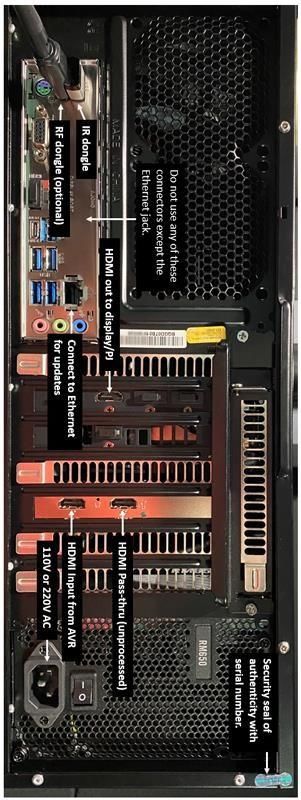
Copyright © madVR Labs, LLC. All rights reserved.Appendix A – Envy Rear Panel Connections
11
Copyright © madVR Labs, LLC. All rights reserved.Appendix B – Remote Control Guide
12
Copyright © madVR Labs, LLC. All rights reserved.Appendix C – Ventilation
To help ensure the safe operation of the Envy and its longevity, it is important that you provide
adequate ventilation in the area where it is used. The Envy draws cool air in from the right-side
fans, and to a lesser extent, from the bottom of the unit. It is essential therefore that you
leave the Envy plenty of room for ventilation on all sides. Otherwise, the unit may experience
frequent, unexpected shutdowns and or system error messages. Please follow these guidelines:
• Please use the Envy only in a well-ventilated area. Avoid using it in a small, enclosed
space, in a cubby or other such three-sided enclosure, unless there is plenty of room for
outside ventilation.
• Allow for at least 12” inches of clearance behind the unit, at least 1” above the unit (the
more the better, especially if the sides are not “open”) and 1RU of clearance in a rack,
and at least 6” on the sides, unless contained in a cooled space or rack.
• Allow for at least one inch below the unit, and preferably, do not place the Envy on top
of any equipment that expels hot air out its top.
• Never not place any objects or materials on top of the unit and ensure all vents are
unobstructed.
• Envy should be used in its horizontal position, as laying it on its side could obstruct
airflow from the side fans.
When less than idea ventilation is possible, adding external cooling fans to help move hot air
away and or draw in cooler air, or a cooling product like the AC Infinity AIRCOM T10, can go
a long way in helping your Envy stay cool and last a long time.
13
Copyright © madVR Labs, LLC. All rights reserved.Vous pouvez aussi lire