Outdoor 360 - Ground anti-theft kit - Diffusori per esterni 360 - Garvan Acoustic
←
→
Transcription du contenu de la page
Si votre navigateur ne rend pas la page correctement, lisez s'il vous plaît le contenu de la page ci-dessous
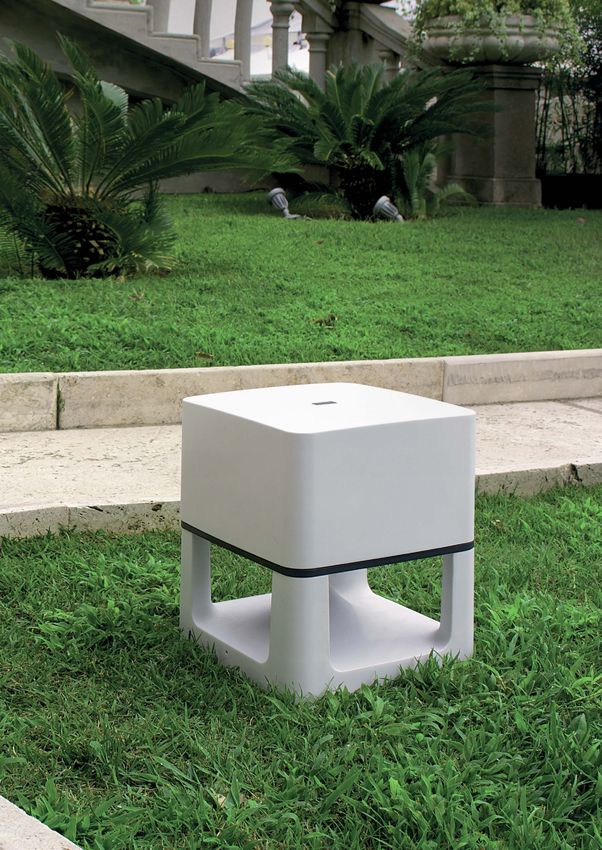
o utdoor 360°
 lo u d s p e a k e r s
 Diffusori per esterni 360°

 Enceintes d’extérieur 360°

       Lautsprecher für
   Außenbereiche (360°)

Ground anti-theft kit
Mounting instructions for HRX031 bracket Istruzioni di montaggio staffa HRX031 - Instructions de montage pour le support HRX031 - Montageanleitungen Halterung HRX031
1 2 3 4 5 6
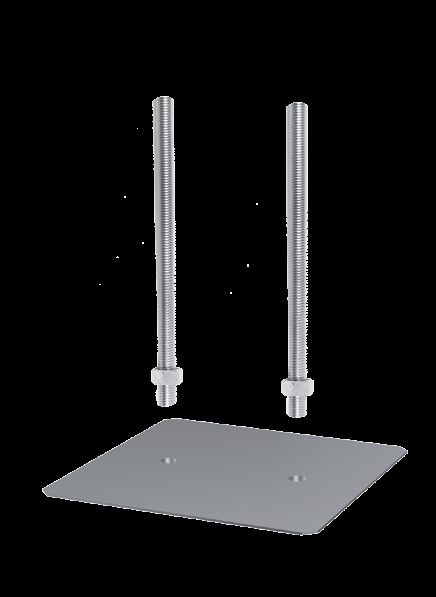
Barra filettata
Threaded rods
Barre filetée
Gewindestange
Dado - Nut
Écrou - Mutter
Piastra - Plate
Plaque - Scheibe
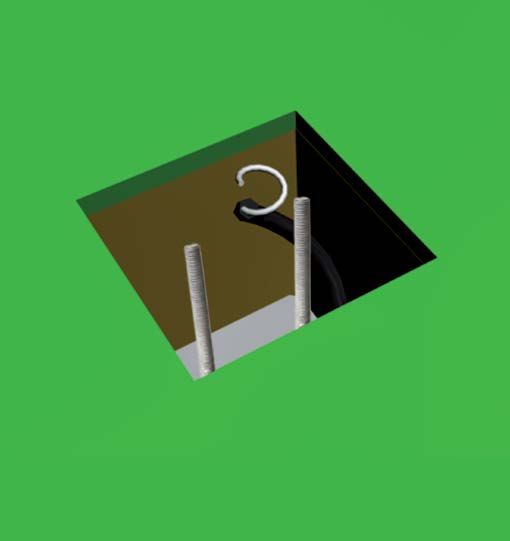
Screw the 2 threaded Cut a hole of W 200 x Lay the HRX031 bracket Lead the corrugated The point where the Mount the fixing plate
rods to the plate and lock D 150 x H 350mm into the underground so that the upper pipe housing the speaker pipe comes out of the ground by using the two dedicated
the nut by using the 13mm floor in the location where the ends of threaded rods stick out of the cable to the hole (by laying it must be located at the center of nuts supplied in the HRX031
open-ended spanner. speaker is going to be placed. floor by about 12 mm once the hole has underground) where the speaker is the hole, with a view to ensuring the bracket package.
been filled. going to be placed. proper mounting of the upper plate.
Avvitare alla piastra le 2 barre Creare un apertura nel terreno Montare la piastra di fissaggio su-
filettate e bloccare il dado con la di dimensione L 200 x P 150 x A Interrare la staffa HRX031 in maniera che Portare il tubo corrugato con il ca- L’uscita del tubo dal terreno deve periore con i due dadi in dotazione
chiave a forchetta da 13 mm. 350mm nel punto in cui collocare le 2 estremità superiori delle barre filettate vo di potenza all’interno dello scavo essere in posizione centrale, per ga- nell’imballo della staffa HRX031.
il diff. acustico. fuoriescano di circa 12 mm dal terreno (interrandolo) dove verrà collocato rantire un corretto montaggio della
Visser le deux barres filetées à la una volta chiuso la scavo. il diffusore acustico. piastra superiore. Installer la plaque de fixation
plaque et serrer l’écrou avec une Faire un trou dans le terrain de L 200 supérieure avec les deux écrous
x P 150 x H 350 mm, dans la position Introduire le support HRX031 dans le terrain, Le tube doit sortir du terrain en position
clé de 13 mm. Enterrer le tube ondulé avec le câ- fournis dans l’emballage du support
où l’enceinte va être installée. de sorte que les 2 extrémités supérieures centrale, afin de garantir une fixation
ble d’alimentation jusqu’au trou où HRX031.
des barres filetées sortent de 12 mm envi- correcte de la plaque supérieure.
Schrauben Sie die Gewindestangen l’enceinte va être installée.
Stellen Sie eine Öffnung im Boden ron du terrain, une fois le trou rempli.
auf die Scheibe. Befestigen Sie die Montieren Sie die Befestigungsplatte
Mutter mit dem 13 mm Gabel- mit Abmessungen B 200 x D 250 Stellen Sie das Wellrohr mit dem Vergewissern Sie sich, dass das Kabel unter Verwendung der zwei mit der
Graben sie die HRX031 Halterung ein, so-
schlüssel. x H 350mm in dem Ort, wo der Lautsprecherkabel in die Öffnung, in der Mitte der Öffnung ist, um in der Halterung mitgelieferten Mutter.
dass die oberen Teile der Gewindestangen
Lautsprecher zu stellen ist. wo der Lautsprecher zu stellen ist Lage zu sein, die obere Platte korrekt
12mm aus der geschlossenen Öffnung
austreten. (graben sie das Kabel ein). zu montieren.
7 8 9
Ground anti-theft kit
Kit fissaggio a terra
Kit de fixation au sol
Fußbodenkit
Code HRX031
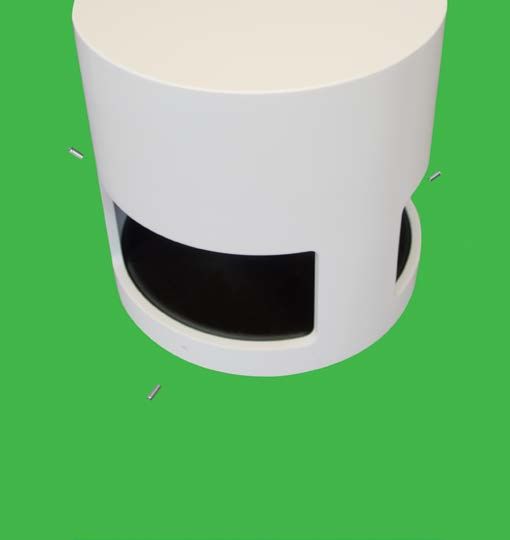
Connect the cables coming Position the speaker on End results.
from the amplifier to those leading the plate and lock it into place
to the speaker (by using the corrugated by inserting the supplied allen screws Risultato finale.
pipe). Be sure to match the polarity and into the dedicated side holes and by
that the connection is properly isolated. tightening them.
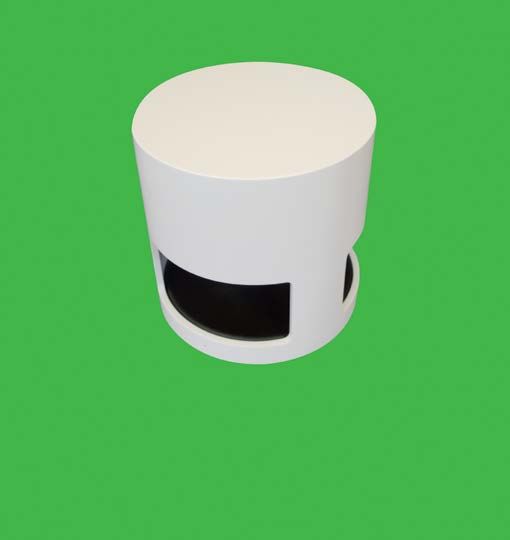
Resultat final.
Dimensions H x W x D (cm)
Collegare i cavi provenienti dall’amplificato- Posizionare il diffusore acustico sopra Dimensioni A x L x P (cm)
re (tramite il tubo corrugato) con quelli del la piastra bloccandolo con i grani in Endergebnis. 33,0 x 15,0 x 10,0
diffusore acustico, assicurandosi di rispettare dotazione avvitandoli negli appositi fori Dimensions H x L x P (cm)
la polarità e che il collegamento sia ben laterali. Abmessungen H x B x D (cm)
isolato.
Placer l’enceinte sur la plaque en la fixant
Brancher les câbles provenant de l’amplifi- avec les vis fournies, qui doivent être
cateur (par le tube ondulé) avec les câbles introduites dans les trous latéraux.
de l’enceinte, en respectant les polarités et la Weight (Kg)
correcte isolation du branchement. Stellen sie den Lautsprecher auf die Platte
und befestigen Sie ihn mit den mitgelie- Peso (Kg)
0,45
Schließen Sie die Kabel von dem Verstärker ferten Inbusschrauben. Ziehen Sie die Poids (Kg)
mit denen von dem Lautsprecher (unter Schrauben fest. Gewicht (Kg)
Verwendung eines Wellrohrs). Vergewissern
Sie sich, dass Sie die Polarität einhalten,
und dass die Schaltung isoliert ist.
MADE IN ITALY
3-YEAR WARRANTY
3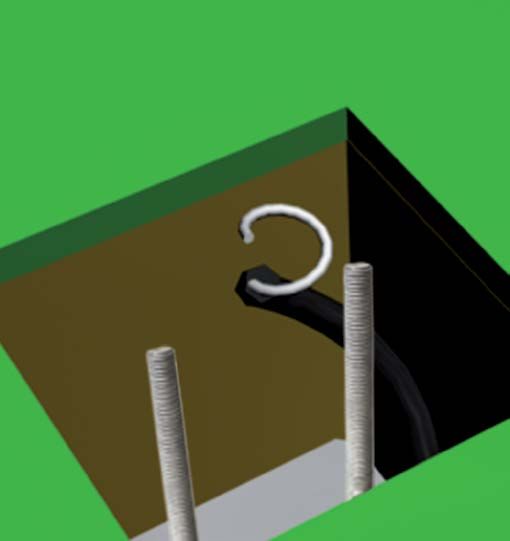
Via Vittori, 21/1-2
48018 Faenza (Ra) Italy
Tel. +39 (0546) 682097
gar van@gar vanacoustic.com

OFFICIAL 3-YEAR WARRANTY

© Copyright 2017
Garvan All Rights Reserved

Outdoor 360° loudspeakers
                                              corporate video
ground anti-theft kit 2017/2018
                                             www.garvan.it/gav

                                                  MADE IN ITALY
w w w. g a r v a n a c o u s t i c . c o m        3-YEAR WARRANTY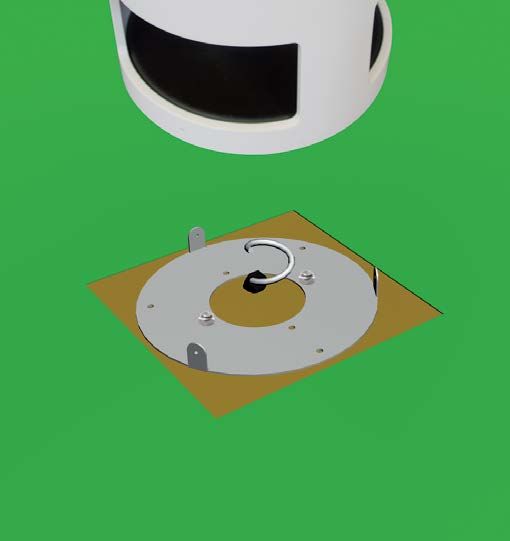

Vous pouvez aussi lire