Pro Flight Cessna trim Wheel - officially licensed Cessna Product
←
→
Transcription du contenu de la page
Si votre navigateur ne rend pas la page correctement, lisez s'il vous plaît le contenu de la page ci-dessous
Pro Flight Cessna Trim Wheel
®
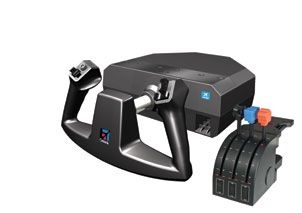
Officially Licensed Cessna® ProductPRO FLIGHT CESSNA YOKE SYSTEM
FLIGHT YOKE AND 3 LEVER QUADRANT MODUAL
PRO FLIGHT CESSNA RUDDER PEDALS
FLIGHT PEDALS WITH TOE BRAKES
PRO FLIGHT CESSNA TRIM WHEEL
OFFICIALLY LICENSED CESSNA PRODUCT
OFFICALLY LICENSED CESSNA PRODUCTS
FROM SAITEK PRO FLIGHT
68-17211-37759ENGLISH Introduction 5 Drivers and Software Installation for Users of Windows® XP, 32- and 64-bit 5 Drivers and Software Installation for Users of Windows® Vista and 7, 32- and 64-bit 6 How to Test and Adjust Your Controller 7 Technical Support 8 FRANÇAIS Introduction 11 Installation des pilotes et du logiciel pour les utilisateurs de Windows® XP, 32 et 64 bits 11 Installation des pilotes et du logiciel pour les utilisateurs de Windows® Vista et 7, 32 et 64 bits 12 Comment tester et régler votre contrôleur 13 Support Technique 15 DEUTSCH EinführuNG 17 Treiber- und Software installation für Benutzer von Windows® XP, 32- and 64-bit 17 Treiber- und Software installation für Benutzer von Windows® Vista und 7 32-Bit und 64-Bit 18 Testen und Einstellen Ihres Controllers 19 Technischer Support 20 ITALIANO Introduzione 23 I Installazione dei driver e del software per utenti di Windows® XP a 32 e a 64 bit 23 Installazione dei driver e del software per utenti di Windows® Vista e 7, a 32 e a 64 bit 24 Come verificare e regolare il controller 25 Avvio impossibile? Non preoccupatevi, siamo qui per aiutarti!e 26 ESPAñOL Introducción 29 Instalación de drivers y software para usuarios de Windows® XP, 32- y 64-bit 29 Instalación de drivers y software para usuarios de Windows® Vista y 7, 32- y 64-bit 30 Cómo probar y ajustar tu mando 31 Asistencia técnica 32
OFFICIAL CESSNA WHEEL
GB// Accurate pitch control
FR// Point de vue contrôlable
DE// Kontrollierbarer Blickwinkel
IT// Cambio di visuale controllabile
ES// Punto de vista controlable
4ENGLISH
Introduction
The Pro Flight Cessna Trim Wheel is a solid, single-axis product designed to maximize
realism by allowing the user to use a realistic trim wheel when in flight simulators. Saitek
and Cessna have teamed up to provide you with the most authentic flight controls for
your home cockpit. This product has been built using genuine design data from the
world’s most popular plane manufacturer. The Pro Flight Cessna Trim Wheel works with
a wide variety of flight simulators, and functions perfectly with other products in the Pro
Flight Range.
Features:
• Authentic Cessna design
• 9 Rotations making it very accurate
• Unique, 2-position desk clamp
• High-quality construction for long life
Drivers and Software Installation for Users of Windows® XP, 32- and 64-bit
1. With your computer powered on, close down any programs that are currently
running, and then insert the Installation CD into your CD-ROM drive.
2. When the Welcome screen appears, click Next to continue. If the CD does not run
automatically, select Start from the Windows Taskbar, then Run, then type D:\Setup.
exe into the Run window’s text entry field, and then click OK (assuming D:\ is the
letter of your CD-ROM drive).
3. After reading the Disclaimer, select the I accept the terms of the Disclaimer option
and click Next to continue.
4. At the Driver Setup screen, if you haven’t already done so, plug the USB cable into
one of your computer’s USB ports, and then click Next.
5. At the Driver Setup screen, click Next to test your controller.
56. When the Saitek Controller screen appears, try out all of your controller’s controls to
determine if it is working properly. When you have finished, click OK.
7. In the following Software Setup screen, click Next and follow the on-screen
instructions. At this point you will be asked to install such features as the
Programmable Support for Mouse, Programmable Support for Keyboard
and Programmable Hotkeys (these are important components of the programming
software and are required).
8. If you are asked if Windows can connect to Windows Update to search for software,
choose No, not at this time. Continue to click Next and Finish to accept the
installation.
9. Upon completion of the installation, you have the option to Run Profile Editor, which
will give you a view of the programming environment. If you do not wish to see the
Profile Editor at this point, uncheck the box and click Finish to complete the
installation.
Drivers and Software Installation for Users of Windows® Vista and 7, 32-
and 64-bit
1. With your computer powered on, close down any programs that are currently
running, and then insert the Installation CD into your CD-ROM drive.
2. When the Welcome screen appears, click Next to continue. If the CD
does not run automatically, select Start from the Windows Taskbar, then Run, then
type D:\Setup.exe into the Run window’s text entry field, and then click OK
(assuming D:\ is the letter of your CD-ROM drive).
3. After reading the Disclaimer, select the I accept the terms of the Disclaimer option
and click Next to continue.
4. At the Driver Setup screen, if you haven’t already done so, plug the USB cable into
one of your computer’s USB ports and then click Next.
5. At the Driver Setup screen, click Next to test your controller.
6. When the Saitek Controller screen appears, try out all of your controller’s controls to
6ENGLISH
determine if it is working properly. When you have finished, click OK.
7. In the following Software Setup screen, click Next and a pop-up box will appear
asking if you “want to trust software from Saitek.” Click yes, and then click Next.
8. Upon completion of the installation, you have the option to Run Profile Editor,
which will give you a view of the programming environment. If you do not wish to
see the Profile Editor at this point, uncheck the box and click on Finish to complete
the installation.
IMPORTANT INFORMATION
Enabling your controller in the game
Most games support game controllers, but typically default to the mouse and keyboard
until you go into the option menu within the game. The first time you start a game after
installing your controller, go to the options menu within the main menu of the game
and make sure your controller is set up correctly. If you are having trouble working out
how to do this, or if you’re unsure whether the game itself supports game controllers,
then please refer to the user manual of that game for more help.
How to Test and Adjust Your Controller
To test your controller, follow these steps:
• Windows XP and Vista users need to navigate via the Start button to: Control Panel >
Game Controllers.
• Windows 7 users will need to navigate via the Start button to : Games > Tools > Input
Devices.
• Open the Game Controllers window and the Saitek Pro Flight Cessna Trim Wheel
should appear. Click Properties to bring up the Test screen. Click on the Test tab.
Moving your Trim Wheel should result in a response in this screen; if there is a re
sponse you know that the Trim Wheel is functioning correctly.
7Click on the Deadzones tab of the Properties window. You can adjust the deadzones
(i.e., the distance of pedal travel which doesn’t result in a corresponding in-game rudder
movement) of the Pro Flight Cessna Trim Wheel by clicking on the deadzone axes and
dragging the deadzone indicators to the desired level. To test the new settings, either
click on the Test tab or play a flight sim game.
Setup in Flight Sim X and Flight Sim 2004
The Trim Wheel has only one axis, but this axis needs to be configured. Due to the way
in which Flight Sim detects the pedals, they need to be correctly configured before you
can start getting the most out of them.
• Start by opening FSX and clicking to Settings > Controls > Control Axes (in FS2004
go to Settings > Assignments > Joystick Axes). Select the Pro Flight Trim Wheel in
the Controller Type menu (Joystick Type for FS2004).
• Double-click the event called Elevator Trim Axis and move the Trim Wheel when the
Change Assignment window appears. Trim Wheel will appear in the Notification
window, and then click OK.
Now that the trim axis is set, go to the settings page called Calibration (Sensitivities in
FS2004). Select the Trim Wheel and then select Advanced Controls. Ensure that the
sensitivities for the trim axis are set to 100% and that the null zone is set to 0%.
Technical Support
Nearly all the products that are returned to us as faulty are not faulty at all - they have
just not been installed properly.
If you experience any difficulty with this product, please first visit our website www.
saitek.com. The technical support area will provide you with all the information you need
to get the most out of your product and should solve any problems you might have.
If you do not have access to the internet, or if the website cannot answer your question,
please contact your local Saitek Technical Support Team. We aim to offer quick,
8ENGLISH
comprehensive and thorough technical support to all our users so, before you call,
please make sure you have all the relevant information at hand.
To find your local Saitek Technical Support Center , please see the separate Technical
Support Center sheet that came packaged with this product.
EU DECLARATION OF CONFORMITY:
As required, certain of these products have been tested and conform to the
requirements of the European Union Directives 2002/95/EC, 2002/96/EC, and 2004/108/
EC. Authorized signatory of the manufacturer is Mad Catz, Inc., 7480 Mission Valley
Road, Suite 101, San Diego, CA 92108.
9OFFICIAL CESSNA WHEEL
GB// Accurate pitch control
FR// Point de vue contrôlable
DE// Kontrollierbarer Blickwinkel
IT// Cambio di visuale controllabile
ES// Punto de vista controlable
10IntroductioN
Le volant de trim Pro Flight Cessna est un produit solide à axe unique conçu pour
maximiser le réalisme en permettant à l’utilisateur d’employer un volant de trim réaliste
dans les simulateurs de vol. Saitek et Cessna ont fait équipe pour vous proposer les
FRANÇAIS
commandes de vol les plus réalistes pour votre cockpit à domicile. Ce produit a été fab-
riqué en utilisant les données de conception authentiques du constructeur d’avions le
plus populaire au niveau mondial. Le volant de trim Pro Flight Cessna fonctionne avec
un large éventail de simulateurs de vol et fonctionne parfaitement avec d’autres produits
de la gamme Pro Flight.
Features
• Design Cessna authentique
• 9 rotations garantissent la précision
• Fixation pour bureau unique à 2 positions
• Construction avec des pièces métalliques de haute qualité pour une longue durée
de vie
Installation des pilotes et du logiciel pour les utilisateurs de Windows® XP, 32
et 64 bits
1. Lorsque votre ordinateur est allumé, fermez tous les programmes en cours de
fonctionnement, puis insérez le CD d’installation dans le lecteur de CD-ROM.
2. Lorsque l’écran de bienvenue apparaît, cliquez sur Next pour poursuivre. Si le CD
ne s’exécute pas automatiquement, sélectionnez Start dans la barre des tâches
Windows, puis Run, puis saisissez D:\Setup.exe dans le champ de saisie de la
fenêtre Run, puis cliquez sur OK (en supposant que D:\ correspond à la lettre de
votre lecteur de CD-ROM).
3. Après avoir lu l’avis d’exclusion de responsabilité, sélectionnez l’option I accept the
terms of the Disclaimer et cliquez sur Next pour poursuivre.
114. Dans l’écran de configuration du pilote, si vous ne l’avez pas encore fait, branchez
le câble USB dans l’un des ports USB de l’ordinateur, puis cliquez sur Next.
5. Dans l’écran de démarrage du pilote, cliquez sur Next pour tester le contrôleur.
6. Lorsque l’écran du contrôleur Saitek apparaît, essayez toutes les commandes de
votre contrôleur afin de déterminer s’il fonctionne correctement. Lorsque vous avez
terminé, cliquez sur OK.
7. Dans l’écran Software Setup suivant, cliquez sur Next et suivez les instructions
à l’écran. À ce stade, il vous sera demandé d’installer des fonctions telles
que Programmable Support for Mouse, Programmable Support for Keyboard et
Programmable Hotkeys (il s’agit de composants importants du logiciel de
programmation et ils sont nécessaires).
8. S’il vous est demandé si Windows peut se connecter à Windows Update pour
rechercher le logiciel, choisissez No, not at this time. Poursuivez pour cliquer sur
Next et Finish pour accepter l’installation.
9. À la fin de l’installation, il vous est proposé l’option Run Profile Editor, qui vous
donnera un aperçu de l’environnement de programmation. Si vous ne souhaitez
pas voir l’éditeur de profil à ce stade, décochez la case et cliquez sur Finish pour
achever l’installation.
Installation des pilotes et du logiciel pour les utilisateurs de Windows® Vista
et 7, 32 et 64 bits
1. Lorsque votre ordinateur est allumé, fermez tous les programmes en cours de
fonctionnement, puis insérez le CD d’installation dans le lecteur de CD-ROM.
2. Lorsque l’écran de bienvenue apparaît, cliquez sur Next pour poursuivre. Si le CD
ne s’exécute pas automatiquement, sélectionnez Start dans la barre des tâches
Windows, puis Run, puis saisissez D:\Setup.exe dans le champ de saisie de la
fenêtre Run, puis cliquez sur OK (en supposant que D:\ correspond à la lettre de
votre lecteur de CD-ROM).
3. Après avoir lu l’avis d’exclusion de responsabilité, sélectionnez l’option I accept the
terms of the Disclaimer et cliquez sur Next pour poursuivre.
124. Dans l’écran de configuration du pilote, si vous ne l’avez pas encore fait, branchez
le câble USB dans l’un des ports USB de l’ordinateur, puis cliquez sur Next.
5. Dans l’écran de démarrage du pilote, cliquez sur Next pour tester le contrôleur.
6. Lorsque l’écran du contrôleur Saitek apparaît, essayez toutes les commandes de
FRANÇAIS
votre contrôleur afin de déterminer s’il fonctionne correctement. Lorsque vous avez
terminé, cliquez sur OK.
7. Dans l’écran de configuration du logiciel suivant, cliquez sur Next et une zone
contextuelle va apparaître en vous demandant si vous « voulez faire confiance au
logiciel de Saitek ». Cliquez sur yes, puis sur Next.
8. À la fin de l’installation, il vous est proposé l’option Run Profile Editor, qui vous
donnera un aperçu de l’environnement de programmation. Si vous ne souhaitez
pas voir l’éditeur de profil à ce stade, décochez la case et cliquez sur Finish pour
achever l’installation.
Information importante
Comment assigner les contrôles du Quadrant aux fonctions de Flight
Simulator
autre contrôleur dans Flight Simulator, vous devrez vous assurer que vous configurez
les leviers correctement dans le jeu. Par défaut, Flight Simulator leurs assignera les
contrôles des ailerons, de la gouverne de profondeur et des gaz, ce qui risque d’être
redondant avec les contrôles de l’autre contrôleur ; cela entrainera des problèmes !
Comment tester et régler votre contrôleur
• Pour tester votre contrôleur, suivez les étapes suivantes :
• Les utilisateurs de Windows XP et Vista doivent naviguer vers : panneau de
configuration > périphériques de jeu via le bouton Démarrer.
• Les utilisateurs de Windows 7 devront naviguer vers : Jeux > Outils > Périphériques
13d’entrée via le bouton Démarrer.
• Ouvrez la fenêtre Périphériques de jeu et le volant de trim Saitek Pro Flight Cessna
devrait apparaître. Cliquez sur Propriétés pour faire apparaître l’écran Tester. Cliquez
sur l’onglet Tester. Cet écran devrait réagir si vous bougez votre volant de trim ; si cet
écran réagit, vous serez certain que le volant de trim fonctionne correctement.
• Cliquez sur l’onglet Zones de non-sensibilité de la fenêtre Propriétés. Vous
pouvez régler les zones de non-sensibilité (c’est-à-dire, la distance de déplacement
des pédales qui n’entraîne pas de mouvement de gouverne de direction
correspondant dans le jeu) du volant de trim Pro Flight Cessna en cliquant sur les
axes des zones de non-sensibilité et en faisant glisser les indicateurs des zones de
non-sensibilité vers le niveau souhaité. Pour tester les nouveaux paramètres, cliquez
sur l’onglet Tester ou jouez avec un simulateur de vol.
Configuration dans Flight Sim X et Flight Sim 2004
Le volant de trim ne comporte qu’un axe mais cet axe doit être configuré. Avant de
pouvoir commencer à exploiter au mieux les pédales, elles doivent être correctement
configurées en fonction de la manière dont Flight Sim les détecte.
• Commencez par ouvrir FSX et par cliquer sur Paramètres > Commandes > Axes de
contrôle (sous FS2004, rendez-vous dans Paramètres > Attributions > Axes du joy
stick). Sélectionnez le volant de trim Pro Flight dans le menu Type de contrôleur
(Type de joystick pour FS2004).
• Double-cliquez sur l’option nommée Axe du compensateur de profondeur et bougez
le volant de trim lorsque la fenêtre Modifier l’attribution apparaît. Le volant de trim ap
paraîtra dans la fenêtre Notification. Cliquez alors sur OK.
Maintenant que les axes de trim sont configurés, rendez-vous sur la page de
paramètres nommée Étalonnage (Sensibilités sous FS2004). Sélectionnez le volant
de trim puis sélectionnez Commandes avancées. Assurez-vous que les sensibilités de
l’axe de trim sont réglées sur 100% et que la zone minimale est réglée sur 0%.
14Support Technique
Je ne peux pas démarrer. Ne vous inquiétez pas, nous sommes là pour vous aider!
La plupart des produits qui nous sont retournés comme étant défectueux ne le sont pas
FRANÇAIS
du tout en réalité : ils n’ont tout simplement pas été installés correctement.
Si vous rencontrez la moindre difficulté avec ce produit, merci de vous rendre tout
d’abord sur notre site web www.saitek.com. La section Support Technique vous fournira
toute l’information dont vous avez besoin pour tirer le meilleur parti de votreproduit,
et devrait vous aider à résoudre tous les problèmes que vous pourriezéventuellement
rencontrer.
Si vous n’avez pas accès à Internet, ou si vous ne trouvez pas de réponse à votre ques-
tion sur notre site web, merci de bien vouloir contacter l’équipe locale du Support Tech-
nique Saitek. Notre objectif consiste à offrir un support technique complet et approfondi
à tous nos utilisateurs, donc, avant de nous appeler, merci de bien vouloir vérifier que
vous avez toute l’information requise à portée de main.
Pour trouver votre équipe locale du Support Technique Saitek, merci de vous référer à
la feuille “ Centre de Support Technique “ qui vous a été fournie dans l’emballage de ce
produit.
DÉCLARATION DE CONFORMITÉ DE L’UE:
Comme exigé, certains de ces produits ont été testés et sont conformes aux exigences
aux directives de l’Union Européenne 2002/95/EC, 2002/96/EC, et 2004/108/EC. Le
signataire autorisé du constructeur est Mad Catz, Inc., 7480 Mission Valley Road, Suite
101, San Diego, CA 92108.
15OFFICIAL CESSNA WHEEL
GB// Accurate pitch control
FR// Point de vue contrôlable
DE// Kontrollierbarer Blickwinkel
IT// Cambio di visuale controllabile
ES// Punto de vista controlable
16EinführuNG
Das Pro Flight Cessna Trim Wheel ist ein robustes Einachsen-Produkt, das dank seiner
originalgetreuen Umsetzung des Höhenruders besonders realistische Flugsimulationen
ermöglicht. Die Zusammenarbeit von Saitek und Cessna bietet Ihnen die authen-
tischsten Steuergeräte für Ihr Cockpit am PC. Dieses Produkt wurde auf der Grundlage
echter Konstruktionsdaten des populärsten Flugzeugherstellers der Welt entwickelt. Das
Pro Flight Cessna Trim Wheel ist in einer Vielzahl von Flugsimulationen einsetzbar und
arbeitet nahtlos mit anderen Produkten der Pro Flight-Serie zusammen.
DEUTSCH
• Authentisches Cessna-Design
• 9 Drehungen ermöglichen eine genaue Steuerung
• Einzigartige Tischbefestigung in zwei Positionen möglich
• Hochwertiges Design für eine lange Lebensdauer
Treiber- und Software installation für Benutzer von Windows® XP, 32- and 64-bit
A) Basisinstallation (nur Treiber)
1. Schalten Sie Ihren PC ein, und schließen Sie alle laufenden Programme. Legen Sie
die Saitek Smart Technology CD in Ihr CD-ROM-Laufwerk.
2. Im Begrüßungsbildschirm klicken Sie bitte auf Software installieren, um fortzu
fahren. Wenn die CD nicht automatisch startet, wählen Sie bitte Start in der
Windows Menüleiste, dann Ausführen und hier geben Sie D:\Setup.exe (ohne
Anführungszeichen) ein und klicken Sie OK. Falls D:\ nicht der Laufwerksbuchstabe
Ihres CD Laufwerks ist ändern Sie diesen entsprechend.
3. Im Willkommen-Fenster, klicken Sie auf Weiter, um mit der Installation zu beginnen.
Haben Sie den Haftungsausschluss gelesen, akzeptieren Sie diesen und klicken
Weiter.
4. In der Treiberinstallationsanzeige verbinden Sie, sofern Sie das noch nicht gemacht
17haben, das USB-Kabel mit einem der USB-Ports des Computers und klicken Sie
auf Weiter.
5. Klicken Sie in den folgenden Fenstern auf Weiter, um die Installation fortzusetzen.
Nachdem Sie im Fenster Treiber-Installation auf Weiter klicken, können Sie Ihren
Controller testen.
6. Wenn das Saitek Controller Fenster erscheint, probieren Sie bitte alle Knöpfe und
Achsen aus, um zu sehen, ob Ihr Pad ordnungsgemäß funktioniert. Nach dem Test
klicken Sie bitte auf OK.
7. Im Fenster Software Setup wählen Sie bitte ST Programmier-Software NICHT
installieren und klicken Sie auf Weiter. Sie können die ST Programmier-Software
zu einem späteren Zeitpunkt nachträglich installieren. Führen Sie hierzu die Schritte
wie im folgenden Abschnitt B) beschrieben aus.
8. Im Fenster Registrieren wählen Sie bitte “Markieren Sie dieses Feld, um sich zu
registrieren” und folgen Sie den Bildschirmanweisungen. Wenn Sie sich später
registrieren möchten, dann markieren Sie dieses Feld nicht.
9. Um die Installation zu beenden, klicken Sie auf Fertig stellen. Ihr Saitek Controller
ist nun spielbereit!
Treiber- und Software installation für Benutzer von Windows® Vista und 7 32-
Bit und 64-Bit
1. Schließen Sie alle Programme, die auf Ihrem eingeschalteten Computer
ausgeführt werden, und legen Sie die Installations-CD in Ihr CD-ROM-Laufwerk
ein.
2. Klicken Sie, wenn der Willkommensbildschirm angezeigt wird auf Next , um
fortzufahren. Wenn die CD nicht automatisch ausgeführt wird, wählen Sie Start
auf der Windows-Taskleiste und dann Run und geben Sie D:\Setup.exe in
das Texteingabefeld des Fensters Run ein. Klicken Sie anschließend auf OK
(vorausgesetzt, D:\ ist der Buchstabe Ihre CD-ROM-Laufwerks).
3. Wählen Sie, nachdem Sie den Garantieausschluss gelesen haben, die Option I
18accept the terms of the Disclaimer und klicken Sie auf Next , um fortzufahren.
4. Wenn der Bildschirm für das Treiber-Setup angezeigt wird, schließen Sie das
USBKable an einen USB-Anschluss Ihres Computers an, sollten Sie das noch nicht
getan haben, und klicken Sie dann auf Next.
5. Wenn der Bildschirm für das Treiber-Setup angezeigt wird, klicken Sie auf Next,
um Ihren Controller zu testen.
6. Wenn der Saitek Controller-Bildschirm angezeigt wird, testen Sie alle Steuerungen
Ihres Controllers, um zu überprüfen, ob er ordnungsgemäß funktioniert. Klicken
DEUTSCH
Sie auf OK, wenn Sie fertig sind.
7. Klicken Sie auf dem folgenden Software-Setupbildschirm auf Next. Ein
Popupfenster wird mit der Meldung angezeigt, ob Sie der Software von Saitek
vertrauen möchten. Klicken Sie auf Yes und dann auf Next..
8. Nach Abschluss der Installation erhalten Sie die Option Run Profile Editor, die
Ihnen die Programmierumgebung anzeigt. Wenn Sie den Profileditor zu diesem
Zeitpunkt nicht anzeigen möchten, deaktivieren Sie das Kontrollkästchen und
klicken Sie auf Finish, um die Installation abzuschließen.
Testen und Einstellen Ihres Controllers
Gehen Sie beim Test Ihres Controllers folgendermaßen vor:
• Anwender von Windows XP und Vista klicken auf Start und dann auf Systemsteuerung
> Gamecontroller.
• Anwender von Windows 7 klicken auf Start und dann auf Spiele > Extras >
Eingabegeräte.
• Nach dem Öffnen des Fensters Gamecontroller sollte das Saitek Pro Flight Cessna
Trim Wheel angezeigt werden. Klicken Sie auf Eigenschaften, um den Bildschirm Test
zu öffnen. Klicken Sie auf die Registerkarte Test. Wenn Sie das Trim Wheel drehen,
sollten Sie eine Reaktion auf dem Bildschirm sehen. In diesem Fall funktioniert die
19Steuerung ordnungsgemäß.
• Klicken Sie im Fenster Eigenschaften auf die Registerkarte Deadzones. Sie können
die toten Zonen (d. h. die Pedalbewegung, die nicht zu einer korrespondierenden
Ruderbewegung im Spiel führt) des Pro Flight Cessna Trim Wheel anpassen, indem
Sie auf die Achsen der toten Zone klicken und die Anzeige der toten Zone auf das
gewünschte Niveau ziehen. Um die neuen Einstellungen zu testen, klicken Sie auf
die Registerkarte Test oder starten Sie eine Anwendung zur Flugsimulation.
Einrichtung in Flight Sim X und Flight Sim 2004
Das Trim Wheel ist ein Einachsen-Produkt, aber diese Achse muss konfiguriert werden.
Aufgrund der Art und Weise, wie Flight Sim die Pedale erkennt, müssen sie korrekt
konfiguriert werden, damit sie richtig genutzt werden können.
• Starten Sie dazu FSX und gehen Sie zu Einstellungen > Steuerungen >
Kontrollachsen (in FS2004 gehen Sie zu Einstellungen > Zuweisungen > Joystick-
Achsen). Wählen Sie im Controller-Typ-Menü (Joystick-Typ bei FS2004) das Pro
Flight Trim Wheel.
• Doppelklicken Sie auf das Ereignis mit der Bezeichnung Elevator Trim Axis und
bewegen Sie in dem daraufhin angezeigten Fenster Change Assignment das Trim
Wheel. Anschließend wird das Trim Wheel im Benachrichtigungsfenster angezeigt.
Klicken Sie zum Abschluss auf OK.
Nachdem die Achse eingerichtet wurde, gehen Sie zum Kalibrierungsfenster (Calibra-
tion)(in FS2004 gehen Sie zu Sensitivities). Wählen Sie das Trim Wheel und an-
schließend Advanced Controls aus. Stellen Sie sicher, dass die Empfindlichkeit für die
Steuerachse auf 100 % und die Nullzone auf 0 % eingestellt ist.
Technischer Support
Probleme - keine Angst, wir lassen Sie nicht im Stich!
20Wussten Sie, dass fast alle Produkte, die als fehlerhaft an uns zurückgeschickt
werden, überhaupt nicht defekt sind? Sie wurden einfach nicht richtig installiert!
Sollten Sie Probleme mit diesem Produkt haben, besuchen Sie bitte zuerst unsere
Website www.saitek.de. Unsere Website, speziell der Bereich Technischer Support,
wurde erstellt, damit Sie von Ihrem Saitek-Produkt die bestmögliche Leistung erhalten.
Sollten Sie trotzdem noch Probleme haben oder kein Internetanschluss haben, dann
DEUTSCH
stehen Ihnen unsere Produktspezialisten im Saitek Technical Support Team zur
Verfügung, die Sie telefonisch um Rat und Hilfe bitten können.
Wir möchten, dass Sie viel Freude an Ihrem Gerät haben. Bitte rufen Sie uns an, falls
Sie Probleme oder Fragen haben. Bitte stellen Sie auch sicher, dass Sie alle
relevanten Informationen zu Hand haben, bevor Sie anrufen.
Rufnummern und Adressen finden Sie auf der mit dem Produkt gelieferten Liste der
Zentren für Technischen Support.
EU-KONFORMITÄTSERKLÄRUNG:
Wie vorgeschrieben wurden bestimmte dieser Produkt getestet und sie erfüllen die An-
forderungen der EG-Richtlinien 2002/95/EG, 2002/96/EG, und 2004/108/EG. Der vom
Hersteller autorisierte Unterzeichner ist Mad Catz, Inc., 7480 Mission Valley Road, Suite
101, San Diego, CA 92108.
21OFFICIAL CESSNA WHEEL
GB// Accurate pitch control
FR// Point de vue contrôlable
DE// Kontrollierbarer Blickwinkel
IT// Cambio di visuale controllabile
ES// Punto de vista controlable
22Introduzione
Pro Flight Cessna Trim Wheel è un prodotto ad asse singolo, robusto, progettato per
massimizzare il realismo consentendo all’utente di usare un volante di assetto vero nei
simulatori di volo. Saitek e Cessna si sono unite per offrire autentici controlli di volo sul
cruscotto. Questo prodotto è stato realizzato con dati di progettazione reali, forniti dal
più famoso produttore di aeroplani al mondo. Pro Flight Cessna Trim Wheel si adatta a
molteplici simulatori di volo, e funziona perfettamente con altri prodotti della gamma Pro
Flight.
• Design Cessna autentico
• 9 rotazioni per garantire la precisione
• Morsetto da scrivania esclusivo, a 2 posizioni
ITALIANO
• Struttura di alta qualità per durare più a lungo
Installazione dei driver e del software per utenti di Windows® XP a 32 e a 64 bit
1. Con il computer acceso, chiudere tutti i programmi in esecuzione e inserire il CD di
installazione nell’unità CD-ROM.
2. Non appena viene visualizzata la schermata di benvenuto, fare clic su Next per
proseguire. Se il CD non si avvia automaticamente, selezionare Start dalla barra
degli strumenti di Windows, quindi Run, e digitare D:\Setup.exe, nella casella di
immissione testo Run; quindi, fare clic su OK (si presuppone che D:\ sia la lettera
corrispondente all’unità CD-ROM in uso).
3. Dopo aver letto la dichiarazione di non responsabilità, selezionare l’opzione I
accept the terms of the Disclaimer e fare clic su Next per proseguire.
4. Alla schermata di Installazione driver, se non è stato già fatto, collegare il cavo
USB in una delle porte USB del computer, quindi fare clic su Next.
5. Alla schermata Installazione driver, fare clic su Next per provare il controller.
Non appena viene visualizzata la schermata Controller Saitek,
23provare tutti i comandi del Controller per verificarne il corretto funzionamento. Al
termine, fare clic su OK.
6. Nella schermata di Installazione software seguente, fare clic su Next e seguire
le istruzioni a schermo. A questo punto, sarà richiesta l’installazione di funzioni
come Programmable Support for Mouse, Programmable Support for Keyboard
e Programmable Hotkeys (si tratta di componenti importanti del software di
programmazione, e sono richiesti).
7. Alla domanda se Windows è in grado di connettersi a Windows Update per cercare
il software, scegliere No, not at this time. Proseguire facendo clic su Next e Finish
per accettare l’installazione fino.
8. Al completamento dell’installazione, si dispone dell’opzione Run Profile Editor,
che fornisce una vista dell’ambiente di programmazione. Se non si desidera
visualizzare l’editor del profilo a questo punto, deselezionare la casella e fare clic
su Finish per completare l’installazione.
Installazione dei driver e del software per utenti di Windows® Vista e 7, a 32 e a
64 bit
1. Con il computer acceso, chiudere tutti i programmi in esecuzione e inserire il CD di
installazione nell’unità CD-ROM.
2. Non appena viene visualizzata la schermata di benvenuto, fare clic su Next per
proseguire. Se il CD non si avvia automaticamente, selezionare Start dalla barra
degli strumenti di Windows, quindi Run, e digitare D:\Setup.exe, nella casella di
immissione testo Run; quindi, fare clic su OK (si presuppone che D:\ sia la lettera
corrispondente all’unità CD-ROM in uso).
3. Dopo aver letto la dichiarazione di non responsabilità, selezionare l’opzione I
accept the terms of the Disclaimer e fare clic su Next per proseguire.
4. Alla schermata Installazione driver, se non è stato già fatto, collegare il cavo USB
in una delle porte USB del computer, quindi fare clic su Next.
245. Alla schermata Installazione driver, fare clic su Next per provare il controller.
6. Non appena viene visualizzata la schermata Controller Saitek, provare tutti i
comandi del Controller per verificarne il corretto funzionamento. Al termine, fare
clic su OK.
7. Nella schermata di Installazione software seguente, fare clic su Next e verrà
visualizzata una finestra popup con la domanda se “si considera attendibile il
software Saitek”. Fare clic su yes, quindi su Next.
8. Al completamento dell’installazione, si dispone dell’opzione Run Profile Editor,
che fornisce una vista dell’ambiente di programmazione. Se non si desidera
visualizzare l’editor del profilo a questo punto, deselezionare la casella e fare clic
su Finish per completare l’installazione.
ITALIANO
Informazioni importanti
E’ possibile verificare la disponibilità degli aggiornamenti più recenti visitando il sito
web Saitek e facendo clic su Download. Visualizza un menu a discesa. Seleziona
Driver e Software.
Come verificare e regolare il controller
Per provare il controller, seguire questi passaggi:
• Gli utenti Windows XP e Vista devono navigare mediante il pulsante Start in: Pannello
di controllo > Controller di gioco.
• Gli utenti Windows 7 devono navigare mediante il pulsante Start in: Giochi > Strumenti
> Dispositivi di input.
• Aprire la finestra Controller di gioco e verrà visualizzato il volante Saitek Pro Flight
Cessna Trim Wheel. Fare clic su Proprietà per richiamare la schermata Test. Fare
clic sulla scheda Test. Lo spostamento del volante di assetto dovrebbe riflettersi in una
risposta su questa schermata; se è così, è il segnale che funziona a dovere.
25• Fare clic sulla scheda Deadzone della finestra Proprietà. È possibile regolare le
deadzone (cioè la distanza della corsa del pedale che non si riflette in un
corrispondente movimento del comando nel gioco) del volante Pro Flight Cessna
Trim Wheel facendo clic sugli assi della deadzone e trascinando i relativi indicatori al
livello desiderato. Per provare le nuove impostazioni, fare clic sulla scheda Test op
pure giocare una sessione di volo simulato.
Impostazione in Flight Sim X e Flight Sim 2004
Il volante per l’assetto ha soltanto un asse, che però deve essere configurato. Grazie
alla modalità di rilevamento dei pedali di Flight Sim, questi ultimi devono essere configu-
rati correttamente prima di iniziare ad utilizzarli al meglio delle possibilità.
• Iniziare con l’apertura di FSX e andare su Impostazioni > Controlli > Assi di controllo
(in FS2004 andare su Impostazioni > Assegnazioni > Assi del joystick). Selezionare il
volante Pro Flight Trim Wheel nel menu Tipo di controller (Tipo di joystick per
FS2004).
• Fare doppio clic sull’evento denominato Asse cabra-picchia e muovere il volante per
l’assetto non appena viene visualizzata la finestra Modifica assegnazione. Verrà
visualizzato nella finestra di notifica il volante per l’assetto, quindi fare clic su OK.
Ora che l’asse di assetto è impostato, passare alla pagina di impostazioni chiamata
Calibrazione (Sensibilità in FS2004). Selezionare il volante per l’assetto e quindi
Controlli avanzati. Assicurarsi che le sensibilità per l’asse di assetto siano impostare sul
100% e che la zona null sia impostata sullo 0%.
Avvio impossibile? Non preoccupatevi, siamo qui per aiutarti!
Quasi tutti i prodotti che ci vengono resi come difettosi non sono affatto difettosi -
semplicemente non sono stati installati correttamente.
Se avete delle difficoltà con questo prodotto, visitate prima di tutto il nostro sito Web
www.saitek.com. L’area dell’assistenza tecnica vi fornirà tutte le informazioni che vi
occorrono per ottenere il meglio dal vostro prodotto e per risolvere qualsiasi problema
26da voi riscontrato.
Se non avete accesso a Internet o il sito Web non è in grado di rispondere alla vostra
domanda, rivolgetevi al vostro Team Assistenza Tecnica Saitek locale. Offriamo
l’assistenza tecnica rapida, vasta e completa a tutti i nostri utenti. Prima di chiamarci
accertatevi di avere tutte le informazioni pertinenti a portata di mano.
Troverete nel foglio separato fornito con questo prodotto i dati relativi al vostro Centro
di Assistenza Tecnica locale.
DICHIARAZIONE DI CONFORMITÀ CE:
Come richiesto, alcuni prodotto sono stati sottoposti a test e resi conformi ai requisiti
delle Direttive dell’Unione Europea 2002/95/EC, 2002/96/EC, e 2004/108/EC. Il
fi rmatario autorizzato dal produttore è Mad Catz, Inc., 7480 Mission Valley Road,
ITALIANO
Suite101, San Diego, CA 92108.
27OFFICIAL CESSNA WHEEL
GB// Accurate pitch control
FR// Point de vue contrôlable
DE// Kontrollierbarer Blickwinkel
IT// Cambio di visuale controllabile
ES// Punto de vista controlable
28Introducción
El timón Pro Flight Cessa Trim Wheel es un producto firme de un solo eje diseñado
para aumentar el realismo, ya que permite que el usuario utilice un timón realista con
sus simuladores de vuelo. Saitek y Cessna se han unido para ofrecerte el control de
vuelo más auténtico para tu cabina de mando en casa. Este producto ha sido creado
a partir de datos auténticos de los fabricantes de aviones más conocidos del mundo.
El timón Pro Flight Cessna Trim Wheel es compatible con una gran variedad de
simuladores de vuelo, y funciona perfectamente con otros productos de la gama Pro
Flight.
• Diseño auténtico de Cessna
• 9 rotaciones que garantizan una gran precisión
• Excepcional abrazadera para mesas de dos posiciones
• Construcción de alta calidad para una larga durabilidad
Instalación de drivers y software para usuarios de Windows® XP, 32- y 64-bit
ESPAñOL
1. Con el ordenador encendido, cierre todos los programas que se estén ejecutando,
y luego inserte el CD de instalación en la unidad de CD-ROM.
2. Cuando aparezca la pantalla Welcome, haga clic en Next para continuar. Si el
CD no se ejecuta automáticamente, seleccione Inicio en la barra de tareas de
Windows, después Ejecutar, luego escriba D:\Setup.exe en el campo de entrada
de texto de la ventana Ejecutar y a continuación haga clic en OK (suponiendo que
D:\ sea la letra de la unidad de CD-ROM).
3. Después de leer la cláusula de exención de responsabilidad (Disclaimer)
seleccione la opción I accept the terms of the Disclaimer y haga clic en Next para
continuar.
4. En la pantalla Driver Setup, si todavía no lo ha hecho, conecte el cable USB en
uno de los puertos USB de su ordenador, y luego haga clic en Next.
295. En la pantalla Driver Setup, haga clic en Next para probar su mando.
6. Cuando aparezca la pantalla Saitek Controller, pruebe todos los controles de su
mando para determinar que funcionan correctamente. Cuando haya terminado,
haga clic en OK.
7. En la pantalla Software Setup siguiente, haga clic en Next y siga las instrucciones
en pantalla. Llegados a este punto, se le pedirá que instale características
como Programmable Support for Mouse (soporte programable para ratón),
Programmable Support for Keyboard (soporte programable para teclado) y
Programmable Hotkeys (teclas programables de acceso rápido).
8. Si se le pregunta si Windows puede conectarse a Windows Update para buscar
software, elija Esta vez no. Continúe haciendo clic en Next y Finish para aceptar la
instalación.
9. Tras completar la instalación, tiene la opción de ejecutar Profile Editor, el cual le
introducirá al entorno de programación. Si no desea ejecutar Profile Editor en ese
momento, desmarque la casilla y haga clic en Finish para completar la instalación.
Instalación de drivers y software para usuarios de Windows® Vista y 7, 32- y
64-bit
1. Con el ordenador encendido, cierre todos los programas que se estén ejecutando,
y luego inserte el CD de instalación en la unidad de CD-ROM.
2. Cuando aparezca la pantalla Welcome, haga clic en Next para continuar. Si el
CD no se ejecuta automáticamente, seleccione Inicio en la barra de tareas de
Windows, después Ejecutar, luego escriba D:\Setup.exe en el campo de entrada
de texto de la ventana Ejecutar y a continuación haga clic en OK (suponiendo que
D:\ sea la letra de la unidad de CD-ROM).
3. Después de leer la cláusula de exención de responsabilidad (Disclaimer),
seleccione la opción I accept the terms of the Disclaimer y haga clic en Next para
continuar.
4. En la pantalla Driver Setup, si todavía no lo ha hecho, conecte el cable USB en
30uno de los puertos USB de su ordenador, y luego haga clic en Next.
5. En la pantalla Driver Setup, haga clic en Next para probar su mando.
6. Cuando aparezca la pantalla Saitek Controller, pruebe todos los controles de su
mando para determinar que funcionan correctamente. Cuando haya terminado,
haga clic en OK.
7. En la pantalla Software Setup siguiente, haga clic en Next y aparecerá una casilla
emergente preguntándole si “you want to trust software from Saitek” (desea confiar
en el software de Saitek). Haga clic en yes y luego en Next.
8. Tras completar la instalación, tiene la opción de ejecutar Profile Editor, el cual le
introducirá al entorno de programación. Si no desea ejecutar Profile Editor en ese
momento, desmarque la casilla y haga clic en Finish para completar la instalación.
Informacíon importante
Puede comprobar si hay actualizaciones visitando el sitio web de Saitek y haciendo
ESPAñOL
clic en Descargas. Aparecerá una ventana desplegable. Seleccione Controladores y
software.
Cómo probar y ajustar tu mando
Para comprobar tu mando, sigue los siguientes pasos:
• Los usuarios de Windows XP y Vista deberán ir a Inicio y seleccionar: Panel de
control > Dispositivos de juego.
• Los usuarios de Windows 7 deberán ir a Inicio y seleccionar: Juegos > Herramientas
> Dispositivos de entrada.
• Abre la ventana Dispositivos de juego, donde debería aparecer Saitek Pro Flight
Cessna Trim Wheel. Haz clic en Propiedades para que aparezca la pantalla de
prueba. Haz clic en la pestaña Prueba. Si mueves el timón, debería haber una
respuesta en esta ventana; si hay respuesta, significa que el timón funciona correcta-
31mente
• Haz clic en la pestaña Deadzones (zonas muertas) de la ventana Propiedades.
Puedes ajustar las deadzones (es decir, la distancia del desplazamiento del pedal
que no da como resultado un movimiento correspondiente por parte del timón
durante el juego) de los pedales Pro Flight Cessna Trim Wheel haciendo clic en los
ejes de las deadzones y arrastrando los indicadores de las deadzones hasta el nivel
deseado. Para probar la nueva configuración, haz clic en la pestaña Prueba o juega
a un simulador de vuelo.
Instalación en Flight Sim X y en Flight Sim 2004
El timón sólo tiene un eje, pero el eje ha de configurarse. Debido al modo en que Flight
Sim detecta los pedales, estos deben configurarse correctamente antes de poder em-
pezar a sacarles el máximo partido.
• Empieza abriendo FSX y haciendo clic en Configuración > Controles > Ejes del
mando (en FS2004 ve a Configuración > Asignaciones > Ejes del joystick).
Selecciona el volante Pro Flight Trim Wheel en el menú Tipo de mando (Tipo de
joystick para FS2004).
• Haz doble clic en el evento llamado Elevator Trim Axis y mueve el timón cuando
aparezca la ventana Cambiar asignación. En la ventana de notificación aparecerá el
timón. Haz clic en OK.
Ahora que el eje del timón ya están configurado, ve a la página de configuración
llamada Calibración (Sensibilidades en FS2004). Selecciona el timón Pro Flight Cessna
Trim Wheel y luego Controles avanzados. Asegúrate de las sensibilidades para el timón
estén establecidas al 100% y que la zona nula sea del 0 %.
Asistencia técnica
¿No puede empezar?: No se preocupe, ¡aquí estamos para ayudarle!
32Casi la totalidad de los productos que nos devuelven como averiados no tienen
ningún fallo: es simplemente que no se han instalado correctamente.
Si experimenta alguna dificultad con este producto, rogamos que visite primeramente
nuestro sitio web: www.saitek.com.
El área de asistencia técnica le proporcionará toda la información que necesita para
obtener el mayor rendimiento de su producto y debería resolver cualesquiera
problemas que pudiese tener.
Si no dispone de acceso a Internet o si no encuentra en el sitio web respuesta a su
pregunta, rogamos que se ponga en contacto con el equipo de asistencia técnica de
Saitek. Nuestro objetivo es ofrecer asistencia técnica rápida y completa a todos
nuestros usuarios, así que le rogamos que antes de llamar tenga a mano toda la
información relevante.
DECLARACIÓN DE CONFORMIDAD PARA LA U.E.:
ESPAñOL
Según lo exigido, ciertos productos de éstos han sido probados y están de conformidad
con los requerimientos de las directivas de la Unión Europea 2002/95/EC, 2002/96/EC,
y 2004/108/EC. El signatario autorizado del fabricante es Mad Catz, Inc., 7480 Mission
Valley Road, Suite 101, San Diego, CA 92108.
3334
PRO FLIGHT CESSNA YOKE SYSTEM
FLIGHT YOKE AND 3 LEVER QUADRANT MODUAL

                                              PRO FLIGHT CESSNA RUDDER PEDALS
                                              FLIGHT PEDALS WITH TOE BRAKES

                            PRO FLIGHT CESSNA TRIM WHEEL
                            OFFICIALLY LICENSED CESSNA PRODUCT

                  OFFICALLY LICENSED CESSNA PRODUCTS
                  FROM SAITEK PRO FLIGHT
68-17211-37759© 2011 Mad Catz Interactive Asia Limited (MCIA). Pro Flight logo, the Saitek logo, Mad Catz and the Mad Catz logo are trademarks or registered trademarks of Mad Catz, Inc., and/or its affiliated companies. Cessna emblems, logos, and body designs are trademarks of Textron Innovations Inc. and are used under license by Mad Catz Inc. The shape and design of this product are a trade dress of Mad Catz and/or MCIA. All other trademarks or registered trademarks are the property of their respective owners. Made in China. All rights reserved. Product features, appearance and specifications may be subject to change without notice. Please retain this information for future reference. © 2011 Mad Catz Interactive Asia Limited (MCIA). Le logoPro Flight, le logo Saitek, Mad Catz et le logo Mad Catz sont des marques de commerce ou des marques déposées de Mad Catz, Inc., et/ou ses sociétés affiliées. La forme et le design de ce produit sont caractéristiques de la marque Mad Catz et/ou MCIA. Toutes les autres marques ou marques déposées sont la propriété de leurs propriétaires respectifs. Fabriqué en Chine. Tous droits réservés. L’aspect, les fonctionnalités et les spécifications du produit peuvent changer sans préavis. Veuillez conserver cette notice pour référence ultérieure.
Vous pouvez aussi lire