LCD DIGITAL MICROSCOPE - #44348 QUICK START GUIDE GUIDE DE DÉMARRAGE RAPIDE KURZANLEITUNG GUIDA AVVIO RAPIDO GUÍA DE INICIO RÁPIDO - AWS
←
→
Transcription du contenu de la page
Si votre navigateur ne rend pas la page correctement, lisez s'il vous plaît le contenu de la page ci-dessous
TM

LCD DIGITAL MICROSCOPE

#44348
QUICK START GUIDE
GUIDE DE DÉMARRAGE RAPIDE
KURZANLEITUNG
GUIDA AVVIO RAPIDO
GUÍA DE INICIO RÁPIDO
INTRODUCTION
Thank you for purchasing the Celestron PentaView LCD Digital Unlike traditional microscopes, the Celestron PentaView LCD Digital
TM TM
Microscope with a 4.3-inch touch screen monitor. Your microscope is a Microscope uses a 5MP camera sensor in lieu of an eyepiece. You
precision optical instrument, made of the highest quality materials. It is will view specimens on the LCD screen. In addition, the sensor
designed to give you a lifetime of enjoyment with minimal maintenance. allows you to take snapshots or short videos. Plus, you can view on
most TV screens with the AV/TV cable.
Before attempting to use your microscope, please read through the
instructions to familiarize yourself with its functions and operations. The final sections of this manual provide simple care, maintenance
See the microscope diagram to locate the parts discussed in this and troubleshooting tips to ensure that your microscope provides
manual. you with years of quality performance and enjoyment.
This microscope provides high powers from 40x up to 600x, and up
to 2400x with the digital zoom. This microscope is mainly suited for
examining specimen slides of yeasts and molds, cultures, plant and
animal parts, fibers, bacteria, and more.
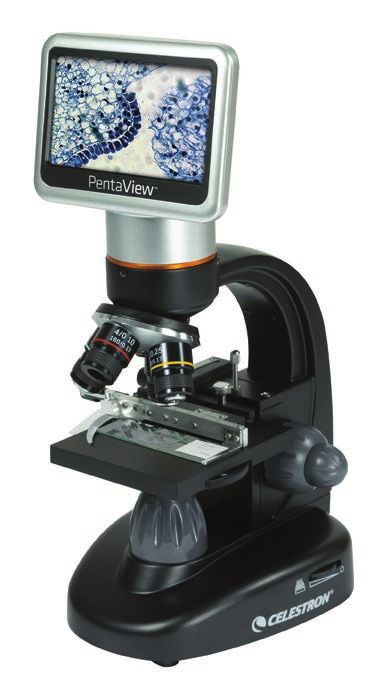
Power On/Off
LCD Module LCD Monitor
SD Card/USB/AV-TV
Cable Receptacles
Screw to adjust the tension of
the rotation Arm
Objective Nosepiece
Objective Lenses
Stage Control Knobs
Mechanical Stage
Focus Knobs
Filter Wheel
Illuminator
Base Illuminator Adjustment Switch
Fig 1
FEATURES
• Built-in Digital Camera • 40x Objective Lens • Illuminator
• 4x Objective Lens • 60x Objective Lens • 6 Position Filter Wheel/Diaphragm
• 10x Objective Lens (Included Separately) • SD Card Slot
• 20x Objective Lens • LCD Touch Screen Monitor
INCLUDED ACCESSORIES
• 10 Prepared Slides • AC Adapter • AV/TV Cable
• Hard Carrying Case • 8 GB SD Card • Touch Pen
• Dust Cover • USB Cable 2.0
2 | ENGLISH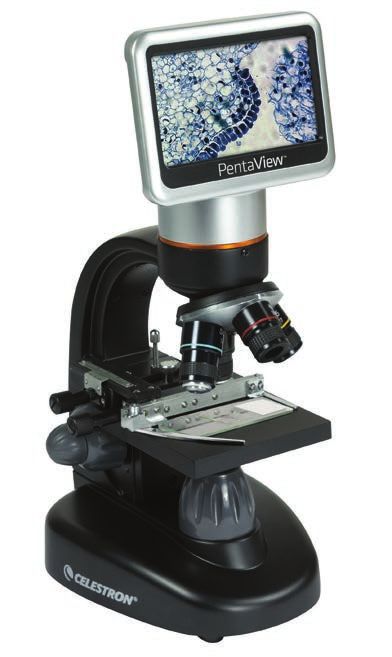
SPECIFICATIONS
                                                                                                                                 MAGNIFICATION (POWER)
   Stage                             Mechanical Stage 3.5 in x 3.5 in (88 mm x 88 mm)
                                                                                                                                 Use the following table to determine the magnification
   Digital Camera                    5 MP 1/2.5” CMOS; 10x Magnification in lieu of an eyepiece                                  of the different objective lenses in combination with
                                                                                                                                 your microscope using the normal mode of the digital
   LCD Monitor                       4.3 in. (109 mm) TFT LCD touch screen with 4x digital zoom —                                image on the LCD screen and using the digital zoom
                                     Touch digital TFT display                                                                   feature.
                                     Resolution — 480 x 272 pixels                                                                Objective Lens           4x    10x       20x        40x    60x
                                                                                                                                  Digital Image            40x 100x 200x 400x               600x
   Focuser                           Dual — Coarse/Fine
                                                                                                                                  Maximum with 4x
   Objectives                        Achromatic, glass type — 4x, 10x 20x, 40x and 60x
                                                                                                                                  digital zoom feature    160x 400x 800x 1600x 2400x

   Memory                            8 GB SD card (approximately 2200+ snapshots @ 5 MP)

   LCD Rotation                      180° – 90° left / 90° right                                                                  WORKING DISTANCE
                                                                                                                                  Objective Lens           4x        10x   20x        40x   60x
   Filter Wheel                      Red/Green/Blue/1 mm hole/3 mm hole/6 mm hole (default)
                                                                                                                                  Working
   Nosepiece                         Quad with click stop                                                                         Distance (mm) - est.     35.3 7.8        1.9        0.7   0.2

   Illuminator                       Built-in electric — LED 6 Volt and 6 Watt
                                                                                                                                 TOUCH PEN
   Condenser                         N.A. 0.65
                                                                                                                                 You can keep the touch pen handy in
   AC Adapter                        Input Universal 100 to 240 Volt 50/60HZ                                                     the receptable behind the Power ON/OFF button.

   Batteries                         User supplied 4 AA — (optional - up to 3 hours usage)                                                                            ON/OFF Button

   Weight/Dimensions                 67 oz/1.9 kg 7.0” (178 mm) x 5.5 in (140 mm) x 13.0 in (330 mm)                                                     Touch Pen

SETTING UP YOUR MICROSCOPE

1. Carefully remove the microscope and other parts                                                                   Take the plug style that you want to use and
   from the carton and set them on a table, desk, or                                                                center it over the AC adapter and rotate
   other flat surface.                                                                                              it until it falls into the opening. Rotate it
2. Remove the plastic cover from the microscope.                                                                    clockwise until you hear a click, which lets
                                                                                                                    you know the plug is installed correctly.
3. Plug the small cable from the AC adapter into the
   socket on the back of the base
                                                                                                        Fig 2                                                                                        Fig 3A
   (see Figure 2).                                                                                               C. For the Figure 3B type, pull the plug up and away
4. Insert the plug you need (see note below) into the                                                               while holding the base of the AC adapter. The plug
   AC adapter and then plug the adapter into the proper power source.                                               will come off. Take the plug style that you want to
    NOTE: The AC Adapter supplied with this microscope has an interchangeable plug system that can work in the      use and align the two holes in the bottom of the plug
          USA, UK, Europe, Australia, and many other parts of the world.                                            with the two pins in the AC adapter. Then, push the
                                                                                                                    plug into the AC adapter all the way.
You can easily change plugs for your particular power requirement:

A. You may have one of two different types of adapters. One is shown in                                          Battery Operation — You can use your microscope                                     Fig 3B
   Figure 3A and another one is somewhat similar shown in Figure 3B. Each                                        without AC power if you choose. This gives you the
   has a different means of changing plugs.                                                                      freedom to operate the microscope outdoors or indoors
                                                                                                                 anywhere you please. You’ll need 4 AA batteries (user
                                                                                                                 supplied). Open the battery door on the bottom of the
B. For the Figure 3A type, push down on the small button labeled “PUSH”                                          microscope and insert the batteries according to the
   and hold it down while at the same time holding the prongs of the plug.                                       battery polarity shown in the battery compartment
   Rotate it slightly counterclockwise and pull up to remove it. Then release                                    (Figure 4). After the batteries are installed, close the
   the “PUSH” button down.                                                                                       battery door. Battery life will typically be three hours.

                                                                                                                                                                                                      Fig 4

Product design and specifications are subject to change without prior notification. This product is designed and intended for use by those 14 years of age and older.
© 2019 Celestron • All rights reserved • celestron.com/pages/technical-support • 2835 Columbia Street • Torrance, CA 90503 USA • 12-19
celestron.com/support/warranties
                                                                                                                                                                                                  ENGLISH | 3
INTRODUCTION
Merci pour l’achat du microscope numérique LCD PentaView de Le microscope numérique LCD PentaView de Celestron
TM TM
Celestron avec un écran tactile de 4,3”. Votre microscope est un n’utilise pas les oculaires qui sont utilisés dans les microscopes
instrument optique de précision, fabriqué avec des matériaux de la traditionnels. Vous verrez des spécimens ou des objets sur l’écran
plus grande qualité afi n d’assurer sa durabilité et sa longue durée. LCD qui sont faciles à observer et vous pouvez aussi en profi ter
Il est conçu pour vous permettre de vivre d’agréables moments avec les autres. En outre, vous pouvez prendre des photos ou des
avec un minimum d’entretien. vidéos de courte durée avec l’appareil photo numérique intégré.
De plus, vous avez la possibilité de l’affi cher sur la plupart des
Avant l’utilisation de votre microscope, veuillez lire les instructions
écrans TV avec le câble AV/TV.
pour vous familiariser avec les fonctions et les opérations afi n d’en
maximiser son utilisation. Se référer au schéma de microscope Les dernières sections de ce manuel vous offrent des conseils de
pour repérer les pièces mentionnées dans le présent manuel. soins, d’entretien et de dépannage afi n de s’assurer que votre
Ce microscope offre des puissances élevées de 40x à 600x (jusqu’à microscope vous fournisse des années de rendement de qualité,
2400x avec zoom numérique). Ce microscope est principalement d’utilisation et de plaisir.
adapté pour examiner des lamelles de spécimen de levures et
de moisissures, des cultures, des plantes et parties d’animal, des
fi bres, bactéries, etc.
Alimentation
Module LCD Moniteur LCD
Réceptacles de carte
SD/USB/câble AV-TV
Vis d’ajustement de
tension de rotation Bras
Tourelle de l’objectif
Lentilles de l’objectif
Boutons de contrôle de platine
Platine Mécanique
Boutons de mise au point
Molette Filtre
Illuminateur Inférieur
Base Interrupteur de
l’Illuminateur
Fig 1
FONCTIONNALITÉS
• Caméra Numérique — intégré • Lentilles Objectif 40x • Illuminateur
• Lentilles Objectif 4x • Lentilles Objectif 60x • Diaphragme/Molette Filtre — 6 positions
• Lentilles Objectif 10x (Inclus séparément) • Fente Carte SD
• Lentilles Objectif 20x • Écran Tactile LCD
ACCESSOIRES INCLUS
• 10 Lamelles Préparées • Adaptateur CA • Câble AV/TV
• Étui Rigide • Carte SD 8 Go • Stylet Tactile
• Housse de protection • Câble USB 2.0
4 | FRANÇAISSPÉCIFICATIONS TABLE DE GROSSISSEMENT
Platine Platine Mécanique 3,5” x 3,5” (88 mm x 88 mm)
Consulter le tableau suivant pour déterminer le
Caméra Numérique 5 MP 1/2.5” CMOS; Grossissement 10x à la place d’un oculaire grossissement des lentilles différentes d’objectif en
combinaison avec votre microscope en utilisant le
Moniteur LCD Écran tactile LCD TFT de 4,3 pouces (109 mm) avec zoom mode normal de l’image numérique sur l’écran LCD
numérique 4x et en utilisant la fonction de zoom numérique.
Résolution — 480 x 272 pixels Lentilles d’objectif 4x 10x 20x 40x 60x
Tube de mise Image Numérique 40x 100x 200x 400x 600x
au point Double — Grossier/Fin
Maximum avec
zoom numérique 160x 400x 800x 1600x 2400x
Objectives Type verre, Achromatique — 4x, 10x 20x, 40x et 60x
Mémoire 8 GB SD card (approximately 2200+ snapshots @ 5 MP)
Rotation LCD 180° – 90° gauche / 90° droite DISTANCE DE TRAVAIL
Molette de fi ltre Rouge/Vert/Bleu/Trou 1 mm/Trou 3 mm/Trou 6 mm (défaut) Lentilles d’objectif 4x 10x 20x 40x 60x
Distance
Tourelle Quad avec position à cran
de Travail (mm) - est. 35.3 7.8 1.9 0.7 0.2
Illuminateur Électrique intégré — 6 Volts et 6 Watts
Condensateur N/D 0,65
STYLET TACTILE
Vous pouvez conserver le stylet tactile à portée de main en le
Adaptateur CA Entrée universelle 100 à 240 volts 50/60 Hz
plaçant dans le réceptacle derrière l’interrupteur d’alimentation.
Piles 4 AA non inclus — (facultatif — jusqu’à 3 heures d’utilisation) Interrupteur d’alimentation
Poids/Dimensions 67 oz/1.9 kg 7.0” (178 mm) x 5.5 in (140 mm) x 13.0 in (330 mm) Stylet Tactile
INSTALLATION DE VOTRE MICROSCOPE
1. Enlever le microscope avec précaution ainsi que Prendre le type de fi che que vous voulez utiliser
les autres pièces de la boîte et les déposer sur une et la centrer sur l’adaptateur CA et faire pivoter
table, bureau ou surface plane. jusqu’à ce qu’elle s’enclenche dans l’ouverture.
2. Enlever la housse de protection du microscope. Ensuite faire pivoter dans le sens horaire jusqu’à
entendre un déclic qui vous confi rme que le tout
3. Brancher le petit câble de l’adaptateur CA dans la
est bien installé.
prise à l’arrière de la base (voir Figure 2).
Fig 2 C. Pour celui de la fi gure 3B, tirez sur la prise tout Fig 3A
4. Insérer la prise nécessaire (voir remarque ci-
en tenant la base de l’adaptateur CA et la fi che
dessous) dans l’adaptateur CA et ensuite brancher l’adaptateur
se détachera. Prenez le style de fi che que vous
REMARQUE : L’adaptateur CA fourni avec ce microscope possède un système de prise interchangeable
souhaitez utiliser et aligner les deux trous dans
qui peut fonctionner aux États-Unis, Royaume-Uni, Europe, Australie, et dans de nombreux
le bas de la fi che avec les deux broches de
autres pays.
l’adaptateur CA. Ensuite, poussez la fi che dans
Vous pouvez facilement changer les prises pour votre exigence particulière l’adaptateur CA et vous avez terminé.
en procédant comme suit :
Fonctionnement avec Piles — Vous pouvez Fig 3B
A. Vous pouvez avoir un ou deux différents types d’adaptateurs. Un utiliser votre microscope sans alimentation CA, si
adaptateur est affi ché à la Figure 3A et un autre quelque peu semblable à vous le désirez. Cela vous donne la liberté d’utiliser
la Figure 3B et chacun a son propre moyen de changer les prises le microscope à l’extérieur comme à l’intérieur où que
B. Pour celui de la Figure 3A, pousser sur le bouton étiqueté et le maintenir vous le désirez. Le fonctionnement avec piles requiert
enfoncé alors que vous maintenez les broches de la fi che et faites-les 4 piles AA (non inclus). Ouvrir le compartiment de
pivoter légèrement dans le sens antihoraire et tirer pour l’enlever. Ensuite piles au bas du microscope et insérer les piles selon
relâcher le bouton «PUSH». les polarités affi chées dans le compartiment de piles
(Figure 4). Après l’installation des piles, fermer la porte
du compartiment. La durée des piles est typiquement
de trois heures. Fig 4
La conception et les caractéristiques techniques du produit sont sujettes à modification sans préavis. Ce produit est conçu et prévu pour être utilisé par des ersonnes âgées de 14 ans et plus.
© 2019 Celestron • Tous droits réservés • celestron.com/pages/technical-support • 2835 Columbia Street • Torrance, CA 90503 USA • 12-19
celestron.com/support/warranties
FRANÇAIS | 5INTRODUCTION
Vielen Dank, dass Sie sich für das Digitale LCD-Mikroskop mit einem Das Digitale LCD-Mikroskop von Celestron PentaView verfügt nicht
TM
4,3-Zoll-Touchscreen-Monitor von Celestron PentaView entschieden über Okulare, wie sie bei herkömmlichen Mikroskopen verwendet
TM
haben. Bei ihrem Mikroskop handelt es sich um ein präzises werden. Proben oder Objekte werden Sie auf dem LCD-Bildschirm
optisches Instrument, das aus Materialen höchster Qualität gefertigt angezeigt, was die Betrachtung einfach macht und die Möglichkeit
wurde, um Haltbarkeit und Langlebigkeit zu gewährleisten. Es wurde bietet, sich gemeinsam mit anderen daran zu erfreuen. Zusätzlich
kreiert, um Ihnen bei minimalem Wartungsaufwand ein Leben lang können Sie mit der integrierten Digitalkamera Schnappschüsse oder
Freude zu bereiten. kurze Videos aufnehmen. Außerdem ist mithilfe eines AV/TV-Kabels
eine Ansicht auf den meisten TV-Bildschirmen möglich.
Lesen Sie diese Anleitung bitte durch, bevor Sie Ihr Mikroskop
verwenden, um mit den Funktionen und Bedienelementen vertraut zu
In den letzten Abschnitten dieser Anleitung finden Sie Tipps zu
werden und ein Maximum an Freude bei der Handhabung erleben zu
einfacher Pflege, Wartung und Fehlerbehebung, damit Ihr Mikroskop
können. Sehen Sie sich das Schaubild zum Mikroskop an, um die in
jahrelang einen hohen Qualitätsstandard in Sachen Leistung, Nutzen
der Anleitung beschriebenen Bauteile zu identifizieren.
und Freude beibehält.
Dieses Mikroskop bietet Hochleistungen von 40-facher bis zu
600-facher Vergrößerung (bei digitalem Zoom bis zu 2400-fach).
Dieses Mikroskop eignet sich hauptsächlich für die Untersuchung
von Hefen und Schimmelpilzen, Kulturen, pflanzlichen und tierischen
Bestandteilen, Fasern, Bakterien usw.
Strom An/Aus
LCD-Modul LCD-Monitor
SD-Karten-/USB-/AV-
TV-Kabel-Behälter
Schraube zur Anpassung der
Rotationswiderstand Arm
Objective Nosepiece
Objektivlinsen
Tischhub-Knöpfe
Kreuztisch
Fokussierknöpfe
Filter-Rad
Untere Beleuchtung
Untere Beleuchtung Schalter für die
Beleuchtungseinstellung
Abb 1
EIGENSCHAFTEN
• Digitalkamera — integriert • 40x-Objektivlinse • Ober- und Unterbeleuchtung
• 4x-Objektivlinse • 60x-Objektivlinse • Filter-Rad/-Membran — 6-Position
• 10x-Objektivlinse (separat enthalten) • SD-Kartenschlitz
• 20x-Objektivlinse • LCD-Touchscreen-Monitor
MITGELIEFERTES ZUBEHÖR
• 10 vorbereitete Objektträger • AC-Adapter • AV/TV-Kabel
• Schutzgehäuse • 8-GB-SD-Karte • Touch-Pen
• Staubschutz • USB-Kabel 2.0
6 | DEUTSCHSPEZIFIKATIONEN VERGRÖSSERUNGS-
Tisch Kreuztisch 3,5 Zoll x 3,5 Zoll (88 mm y 88 mm)
(LEISTUNGS-) TABELLE
Digitalkamera 5 MP 1/2.5” CMOS; 10-fache Vergrößerung anstelle eines Okulars Verwenden Sie die folgende Tabelle, um die
Vergrößerung von verschiedenen Objektivlinsen
LCD-Monitor 109-mm-TFT-LCD-touch screen mit 4-fachem Digitalzoom —
im normalen Modus für Digitalbilder auf dem LCD-
Digitaler Touch-TFT-Bildschirm
Bildschirm sowie unter Verwendung digitaler
Auflösung — 480 x 272 Pixel
Zoomfunktionen in Verbindung mit Ihrem Mikroskop zu
Okularauszug Dual — Grob/Fein bestimmen.
Objective Lens 4x 10x 20x 40x 60x
Objektive Achromatisch, Glas — 4x, 10x 20x, 40x und 60x
Digital Image 40x 100x 200x 400x 600x
Speicher 8-GB-SD-Speicherkarte (ca. 2200 + Schnappschüsse von 5MP) Maximum with 4x
digital zoom feature 160x 400x 800x 1600x 2400x
LCD-Rotation 180° – 90° links/90° rechts
Filter-Rad Rot/Grün/Blau/1-mm-Öffnung/3-mm-Öffnung/6-mm-Öffnung ARBEITSABSTAND
(Standard)
Objektivlinse 4x 10x 20x 40x 60x
Revolver Quad mit Einrastfunktion
Arbeitsabstand (mm) 35.3 7.8 1.9 0.7 0.2
Beleuchtungen Elektrik — beide 6 Volt und 6 Watt LED
Kondensor Entfällt 0.65
TOUCH-PEN
AC-Adapter Universaleingang 100 bis 240 Volt 50/60Hz
Sie können den Touch-Pen bequem im Behälter hinter dem
Batterien Nicht im Lieferumfang enthaltene 4 AA – ca. Strom-AN/AUS-Knopf aufbewahren.
-(Optional – bis zu 3 Stunden einsatzbereit)
AN-/AUS-Knopf
Gewicht/
Abmessungen 67 oz/1,9 kg 7,0” (178 mm) x 5,5” (140 mm) x 13,0” (330 mm) Touch Pen
MONTAGE IHRES MIKROSKOPS
1. Heben Sie das Mikroskop und andere Teile Nehmen Sie die gewünschte Steckerart,
vorsichtig aus dem Karton und stellen Sie sie auf zentrieren Sie diese über den AC-Adapter
einem Tisch, Schreibtisch oder einer anderen und drehen Sie den Stecker solange, bis er in
flachen Oberfläche ab. die Öffnung einsinkt. Drehen Sie ihn nun im
2. Entfernen Sie die Plastikabdeckung vom Uhrzeigersinn, bis Sie ein Klicken vernehmen, das
Mikroskop. die korrekte Steckerinstallation anzeigt.
3. Schließen Sie das kleine AC-Adapterkabel Abb 2 C. Für den Typ aus Abbildung 3B ziehen Sie den Stecker Abb 3A
an die Buchse an der Fußrückseite (siehe nach oben weg, während Sie das AC-Adapterende
Abbildung 2) an. festhalten, und der Stecker ist entfernt. Nehmen
Sie den gewünschten Steckertyp und richten Sie
4. Schließen Sie den benötigten Stecker (siehe Anmerkung unten) an
die zwei Löcher im Steckerboden nach den zwei
den AC-Adapter und anschließend den Adapter an eine geeignete
Stiften im AC-Adapter aus. Drücken Sie den Stecker
Stromversorgung an.
anschließend vollständig in den AC-Adapter und der
ANMERKUNG: Der mit dem Mikroskop mitgelieferte AC-Adapter verfügt über ein austauschbares Steckersystem, das
Vorgang ist abgeschlossen.
in den USA, in GB, Europa, Australien und vielen weiteren Teilen der Welt funktioniert.
Sie können je nach spezieller Anforderung Stecker einfach wie folgt Batteriebedienung— Wenn gewünscht, können Abb 3B
austauschen: Sie ihr Mikroskop ohne AC-Strom verwenden. Auf
diese Weise haben Sie die Freiheit, das Mikroskop
A. Möglicherweise haben Sie ein oder zwei verschiedene Adaptertypen. Einer wird
beliebig im Freien oder in Innenbereichen einzusetzen.
in Abbildung 3A dargestellt, ein anderer von ähnlicher Bauart in Abbildung
Der Batteriebetrieb erfordert 4 AA-Batterien (nicht im
3B; beide verfügen über verschiedene Arten von Austausch-Steckern.
Lieferumfang enthalten). Öffnen Sie die Batterieklappe am
B. Für den Typ aus Abbildung 3A drücken Sie den kleinen Kopf mit dem Mikroskopfuß und legen Sie die Batterien entsprechend
Aufdruck “PUSH” herunter und halten ihn gedrückt, während Sie gleichzeitig der im Batteriefach angezeigten Polarität (Abbildung 4)
die Steckerzinken festhalten und den Stecker leicht gegen den Uhrzeigersinn ein. Nachdem die Batterien eingelegt wurden, schließen
drehen und herausziehen. Lassen Sie nun den “PUSH”-Knopf los. Sie das Batteriefach. Die Batterielebensdauer beträgt
normalerweise drei Stunden. Abb 4
Produktdesign und technische Daten können ohne Vorankündigung geändert werden. Dieses Produkt wurde für die Verwendung durch Personen von 14 Jahren und darüber entworfen
und vorgesehen.
© 2019 Celestron • Alle Rechte vorbehalten • celestron.com/pages/technical-support • 2835 Columbia Street • Torrance, CA 90503 USA • 12-19
celestron.com/support/warranties
DEUTSCH | 7INTRODUZIONE
Grazie per aver acquistato il Microscopio digitale LCD PentaView di Il Microscopio Digitale LCD PentaView di Celestron non utilizza
TM TM
Celestron con un monitor touchscreen da 4,3’’. Il microscopio è uno oculari utilizzati solitamente nei microscopi tradizionali. Si potranno
strumento ottico di precisione, realizzato con materiali di altissima vedere campioni o oggetti sullo schermo LCD di facile visualizzazione
qualità per garantirne lunga durata. È progettato per dare all’utente e sarà inoltre possibile condividere le immagini con altri. Inoltre, è
un divertimento perenne con manutenzione minima. possibile scattare istantanee o brevi video con la fotocamera digitale
integrata. E ancora, sarà possibile visualizzare tali file multimediali
Prima di tentare di utilizzare il microscopio, leggere completamente sulla maggior parte degli schermi TV con il cavo AV/TV.
le presenti istruzioni per familiarizzare con le funzioni e operazioni del
microscopio al fine di massimizzare il proprio divertimento e utilizzo. Le sezioni finali del presente manuale forniscono suggerimenti
Fare riferimento al diagramma del microscopio per posizionare le semplici di cura, manutenzione e risoluzione dei problemi da seguire
parti discusse nel presente manuale. per assicurarsi che il microscopio funzioni per anni con prestazioni,
uso e divertimento di qualità.
Il presente microscopio fornisce alte potenze da 40x fino a 600x (fino
a 2400x con zoom digitale). Il presente microscopio è principalmente
indicato per esaminare vetrini di lieviti e muffe, culture, parti di piante
e animali, fibre, batteri, ecc.
Accensione/Spegnimento
Modulo LCD Monitor LCD
Connettori della Scheda SD/USB/
Cavo AV-TV
Vite per regolare la tensione della
rotazione Braccio
Revolver obiettivo
Lenti obiettivo
Manopole di controllo del tavolino
Tavolino meccanico
Manopole della messa a fuoco
Rotella del filtro
Illuminatore
Base Interruttore dell’illuminatore inferiore
Fig 1
CARATTERISTICHE
• Fotocamera Digitale — integrata • Lenti obiettivo 40x • Illuminatori
• Lenti obiettivo 4x • Lenti obiettivo 60x • Rotella del filtro/Diaframma — 6 posizioni
• Lenti obiettivo 10x (incluso separatamente) • Vano scheda SD
• Lenti obiettivo 20x • Monitor LCD Touch
ACCESSORI INCLUSI
• 10 vetrini preparati • Adattatore AC • Cavo USB 2.0 AV / TV
• Custodia rigida • Scheda SD da 8GB • Pennino
• Copri-polvere • Cavo USB 2.0
8 | ITALIANOSPECIFICHE TABELLA DEGLI INGRANDIMENTI (POTENZA)
Tavolino portaoggetti Tavolino portaoggetti meccanico da 3,5’’ x 3,5’’ (88 mm x 88 mm)
Utilizzare la seguente tabella per determinare
Fotocamera digitale 5 MP 1/2.5” CMOS; Ingrandimento a 10x al posto di un oculare l’ingrandimento delle diverse lenti obiettivo in
combinazione con il microscopio utilizzando la
Monitor LCD Touch screen LCD TFT da 109 mm (4,3 pollici) con zoom digitale 4x — modalità normale dell’immagine digitale sullo schermo
Schermo TFT digitale touch LCD e utilizzando la funzionalità dello zoom digitale.
Risoluzione — 480 x 272 pixel Lenti obiettivo 4x 10x 20x 40x 60x
Immagine digitale 40x 100x 200x 400x 600x
Focheggiatore Doppio — Approssimativo/di precisione
Massimo con
funzionalità zoom 160x 400x 800x 1600x 2400x
Obiettivi Acromatico, in vetro — 4x, 10x, 20x, 40x e 60x
digitale da 4x
Memoria Scheda SD di memoria da 8GB (circa 2200+ istantanee @ 5mp)
Rotazione LCD 180° – 90° sinistra / 90° destra
DISTANZA DI LAVORO
Rotella del filtro Rosso/verde/blu/foro da 1 mm/foro da 3 mm/ foro da 6 mm Objective Lens 4x 10x 20x 40x 60x
(predefinito) Working
Distance (mm) - est. 35.3 7.8 1.9 0.7 0.2
Revolver Quadruplo con arresto a scatto
Illuminatori Integrati elettrici — LED da 6 Volt e 6 Watt
PENNINO
Condensatore N.A. 0.65
È possibile tenere il pennino a portata di mano
Adattatore AC Ingresso universale da 100 a 240 Volt 50/60HZ posizionandolo nel connettore dietro al tasto di
accensione/spegnimento.
Tasto ON/OFF
Batterie Fornite dall’utente 4AA — (opzionale, fino a 3 ore di utilizzo)
Peso/Dimensioni 67 oz/1,9 Kg 7,0’’ (178 mm) x 5,5’’ (140 mm) x 13,0’’ (330 mm) Pennino
CONFIGURAZIONE DEL MICROSCOPIO
1. Rimuovere con attenzione il microscopio e gli altri Prendere il tipo di spina desiderato e centrarlo
componenti dalla scatola e disporli su un tavolo, sull’adattatore AC; ruotarlo fino a che si
banco o qualsiasi altra superficie piana. incastrerà nell’apertura. Quindi, ruotarlo in
2. Rimuovere la copertura di plastica dal senso orario fino a udire un clic che farà capire
microscopio. che la spina è stata installata correttamente.
3. Collegare il piccolo cavo dall’adattatore AC alla C. Per il tipo rappresentato in Figura 3B, tirare la
Fig 2 spina verso l’alto ed estrarla mentre si tiene la base Fig 3A
presa sul retro della base (vedere Figura 2).
dell’adattatore AC e la spina quindi sarà rimossa.
4. Inserire lo spinotto necessario (vedere la nota qui di seguito)
Prendere il tipo di spina che si desidera utilizzare
nell’adattatore AC e quindi collegare l’adattatore alla fonte di
e allineare i due fori posti sulla parte inferiore della
alimentazione adeguata.
spina con i due pin dell’adattatore AC. Quindi,
NOTA: L’adattatore AC in dotazione con il presente microscopio dispone di un sistema di spine intercambiabili
spingere la spina nell’adattatore AC e il processo
che possono funzionare negli Stati Uniti, Regno Unito, Europa, Australia e molte altri paesi del mondo.
sarà completato.
È possibile cambiare con facilità le spine secondo le proprie esigenze nei
seguenti modi:
Funzionamento della batteria — È possibile utilizzare Fig 3B
A. You may have one of two different types of adapters. One is shown in
il microscopio senza l’ausilio della corrente AC se lo
Figure 3A and another one is somewhat similar shown in Figure 3B. Each
si desidera. Ciò dà all’utente la libertà di utilizzare il
has a different means of changing plugs.
microscopio all’esterno o all’interno nel posto che si
B. Per il tipo rappresentato in Figura 3A, spingere verso il basso il piccolo desidera. Il funzionamento della batteria richiedere 4
tasto con la scritta “PUSH” (“SPINGERE”) e tenerlo premuto mentre si batterie di tipo AA (non in dotazione). Aprire il vano
tengono allo stesso tempo i poli della spina; ruotarla leggermente in senso della batteria posto sulla parte inferiore del microscopio
anti-orario e tirare per rimuoverla. Quindi togliere le dita dal tasto “PUSH” e inserire le batterie in base alla polarità indicata nel
(“SPINGERE”). compartimento delle batterie (Figura 4). Una volta
installate le batterie, chiudere il vano. La durata della
batteria è normalmente di tre ore. Fig 4
Il design del prodotto e le specifiche sono soggetti a modifiche senza previa notifica. Questo prodotto è progettato per essere utilizzato da persone di età pari o superiore ai 14 anni.
© 2019 Celestron • Tutti i diritti riservati • celestron.com/pages/technical-support • 2835 Columbia Street • Torrance, CA 90503 USA • 12-19
celestron.com/support/warranties
ITALIANO | 9INTRODUCCIÓN
Gracias por adquirir el microscopio digital LCD PentaView de El microscopio digital LCD PentaView de Celestron no usa
TM TM
Celestron con un monitor táctil de 4,3”. Su microscopio es un los oculares usados en microscopios tradicionales. Verá los
instrumento óptico de precisión, fabricado con materiales de la mejor especimenes u objetos en la pantalla LCD, fácil de observar, y
calidad para garantizar su resistencia y larga vida útil. Está diseñado podrá disfrutar con otras personas. Además, puede tomar capturas
para ofrecerle toda la vida de disfrute con un mantenimiento mínimo. o breves videos con la cámara digital integrada. También podrá
observar en la mayoría de pantallas de TV con el cable AV/TV.
Antes de intentar usar su microscopio, lea las instrucciones para
familiarizarse con sus funciones y operaciones, para maximizar su Las últimas secciones de este manual ofrecen recomendaciones
disfrute y utilización. Consulte el diagrama del microscopio para sencillas de cuidados, mantenimiento y solución de problemas
encontrar las piezas que se tratan en este manual. para usted para garantizar que su microscopio le ofrezca años de
rendimiento, uso y disfrute de calidad.
Este microscopio ofrece potencias elevadas, de 40x a 600x (hasta
2400X con el zoom digital). Este microscopio es adecuado para
examinar muestras de especimenes de levaduras y moho, cultivos,
fragmentos de plantas y animales, fibras, bacterias, etc.
Encendido/Apagado
Módulo LCD Monitor LCD
Tomas de tarjeta SD/
USB/cable AV-TV
Tornillo para ajustar la tensión de
la rotación Brazo
Portaobjetivo
Lentes del objetivo
Mandos de control del soporte
Soporte mecánico
Mandos de enfoque
Rueda de filtro
Iluminador inferior
Base Interruptor de ajuste
iluminador
Fig 1
CARACTERISTICAS
• Cámara digital — integrada • Lente objetivo 40x • Iluminadores superior e inferior
• Lente objetivo 4x • Lente objetivo 60x • Rueda de filtro/diafragma — 6 posiciones
• Lente objetivo 10x (incluido separado) • Ranura para tarjetas SD
• Lente objetivo 20x • Monitor táctil LCD
ACCESORIOS INCLUIDOS
• 10 muestras preparadas • Adaptador AC • Cable AV/TV
• Funda rígida • Tarjeta SD 8GB • Lápiz táctil
• Tapa para el polvo • Cable USB 2.0
10 | ESPAÑOLESPECIFICACIONES TABLA DE AUMENTO (POTENCIA)
Soporte Soporte mecánico 3,5” x 3,5” (88 mm x 88 mm)
Use la tabla siguiente para determinar el aumento de
Cámara digital CMOS 5 MP 1/2.5”; Aumento 10X en lugar de ocular las distintas lentes de objetivo combinadas con su
microscopio usando el modo normal de la imagen
Monitor LCD Pantalla táctil LCD TFT de 4,3 pulgadas (109 mm) con zoom digital digital en la pantalla LCD y usando la función de zoom
de 4x – Pantalla TFT digital táctil digital.
Resolución – 480 x 272 píxeles
Lente objetivo 4x 10x 20x 40x 60x
Enfoque Dual – Aproximado/Fino Imagen digital 40x 100x 200x 400x 600x
Máximo con función
Objetivos Acromático, tipo de cristal - 4x, 10x 20x, 40X y 60x
de zoom digital 4x 160x 400x 800x 1600x 2400x
Memoria Tarjeta de memoria SD 8GB (aproximadamente 2200+ capturas
a 5MP)
Rotación LCD 180° – 90° izquierda / 90° derecha
DISTANCIA DE FUNCIONAMIENTO
Rueda de filtro Rojo/Verde/Azul/Agujero de 1mm/Agujero de 3 mm/Agujero de
Objective Lens 4x 10x 20x 40x 60x
6 mm (por defecto)
Working
Portaobjetivo Cuádruple con detención Distance (mm) - est. 35.3 7.8 1.9 0.7 0.2
Iluminadores Eléctricos integrados – Ambos LED 6 voltios y 6 vatios
Condensador N.A. 0.65
LÁPIZ TÁCTIL
Puede tener a mano el lápiz táctil manteniéndolo en el
Adaptador CA Entrada universal 100 a 240 Voltios 50/60Hz
receptáculo tras el botón de encendido/apagado.
Baterías Proporcionadas por el usuario 4 AA Botón ENCENDER/APAGAR
(opcional – hasta 3 horas de uso)
Lápiz táctil
Peso/Dimensiones 67 oz/1,9 Kg 7.0” (178 mm) x 5.5” (140 mm) x 13.0” (330 mm)
CONFIGURACIÓN DE SU MICROSCOPIO
1. Saque cuidadosamente el microscopio y otras Tome el tipo de toma que quiera usar y
piezas de la caja y póngalos sobre una mesa, céntrelo sobre el adaptador CA; gírela hasta
escritorio u otra superficie plana. que entre en la apertura. Gírela hacia la
2. Saque la cubierta de plástico del microscopio. derecha hasta que escuche un chasquido,
que indica que la toma está correctamente
3. Conecte el cable pequeño del adaptador CA en la
instalada.
toma de la parte posterior de la base (ver Figura 2). Fig 3A
Fig 2 C. Con el tipo de la Figura 3B, tire de la toma hacia
4. Introduzca la toma que necesite (ver nota
arriba aguantando la base del adaptador CA
siguiente) en el adaptador CA y conecte el adaptador a una fuente de
y ésta se soltará. Tome el tipo de toma que desee
alimentación adecuada.
usar y alinee los agujeros de la parte inferior de la
NOTA: El adaptador CA incluido con este microscopio tiene un sistema de tomas intercambiables que puede
toma con las dos patillas del adaptador CA. Empuje
funcionar en EE.UU. Reino Unido, Europa, Australia y muchos otros lugares del mundo.
la toma en el adaptador CA hasta el fondo y habrá
Puede cambiar fácilmente la toma según sus necesidades del modo terminado.
siguiente:
A. Puede tener uno o dos adaptadores distintos. Uno se muestra en la Fig 3B
Funcionamiento de la batería — Puede usar su
Figura 3A y otro es parecido al mostrado en la Figura 3B. Cada uno tiene
microscopio sin alimentación CA si lo desea. Así
un modo distinto de cambiar la toma.
dispondrá de la libertad de usar el microscopio en exterior
B. Con el tipo de la Figura 3A, pulse el botón pequeño marcado “EMPUJAR” o interior, en cualquier lugar que desee. El funcionamiento
y manténgalo pulsado aguantando al mismo tiempo las patillas de la toma; con baterías precisa de 4 baterías AA (proporcionadas
gírela ligeramente en dirección contraria a las agujas del reloj y tire hacia por el usuario). Abra la tapa de baterías de la parte inferior
arriba para sacarla. Saque el dedo del botón “EMPUJAR”. del microscopio e introduzca las baterías de acuerdo
con la polaridad mostrada en el compartimiento (Figura
4). Cuando haya instalado las baterías, cierre la tapa. La
duración de las baterías será normalmente de tres horas.
Fig 4
El diseño y las especificaciones del producto están sujetos a cambios sin notificación previa. Este producto ha sido diseñado y está pensado para ser usado por personas de 14 años
o más de edad.
©2019 Celestron • Todos los derechos reservados • celestron.com/pages/technical-support • 2835 Columbia Street • Torrance, CA 90503 EE.UU. • 12-19
celestron.com/support/warranties
ESPAÑOL | 11Vous pouvez aussi lire