SOLAR MAT Gebruikershandleiding User manual Betriebsanleitung - Mundo Recreatie
←
→
Transcription du contenu de la page
Si votre navigateur ne rend pas la page correctement, lisez s'il vous plaît le contenu de la page ci-dessous

SOLAR MAT
Gebruikershandleiding
User manual
Betriebsanleitung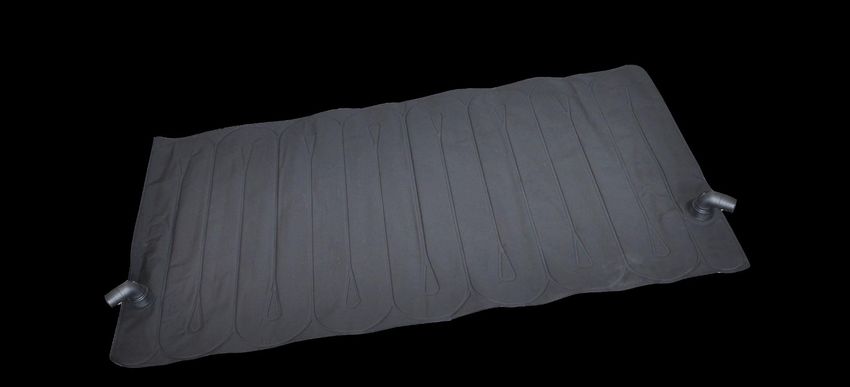
| NL
      Inhoud

Veiligheidsvoorschriften __________________________________________________________________3
1.     Algemene informatie _________________________________________________________________4
     1.1.   Vereisten voor installatie ____________________________________________________________4
     1.2.   Hoe werkt het? ___________________________________________________________________4
     1.3.   Uitpakken van het product___________________________________________________________4
     1.4.   Benodigd gereedschap en materiaal___________________________________________________4
     1.5.   Zwembadkennis __________________________________________________________________4
     1.6.   Onderhoud _______________________________________________________________________5
     1.7.   Winterklaar maken en opbergen ______________________________________________________5
     1.8.   Technische gegevens ______________________________________________________________5
2.     Installatie ___________________________________________________________________________6
     2.1.   Installatie locatie __________________________________________________________________6
     2.2.   Installatie illustratie ________________________________________________________________6
     2.3.   Installatie instructies _______________________________________________________________7
3.     Gebruiksinstructies __________________________________________________________________7
4.     Onderdelen _________________________________________________________________________8
5.     Problemen en oplossingen ____________________________________________________________9
6.     Garantie ___________________________________________________________________________10

                                                                                                    2
| NL
     Veiligheidsvoorschriften

     LEES ALLE INSTRUCTIES ALVORENS HET PRODUCT TE INSTALLEREN EN TE GEBRUIKEN. HET
         NIET OPVOLGEN VAN DEZE WAARSCHUWINGEN KAN SCHADE AAN EIGENDOMMEN,
                 PERSOONLIJK LETSEL OF ZELFS DE DOOD TOT GEVOLG HEBBEN.

                                       WAARSCHUWINGEN
 ▪   Dit product is geen speelgoed, het apparaat en het snoer buiten bereik van kinderen houden.
 ▪   Dit product kan worden gebruikt door kinderen van 8 jaar en ouder en personen met verminderde fysieke,
     sensorische of mentale vermogens, of een gebrek aan ervaring en kennis, mits dit gebeurt onder toezicht
     of mits zij instructies hebben gekregen over het veilig gebruik en de risico’s van het product.
 ▪   Het opzetten en afbreken van dit product, en de reiniging en het gebruiksonderhoud dient alleen te worden
     gedaan door een volwassene.
 ▪   Schakel altijd het filtersysteem uit wanneer u dit product gaat installeren, reinigen of er onderhoud aan gaat
     plegen.
 ▪   Gebruik geen smeermiddel op petroleumbasis. Op petroleum gebaseerde producten zullen de plastic
     onderdelen beschadigen.
 ▪   Plaats het product op ruime afstand van het zwembad.
 ▪   Zit, sta, loop of klim niet op de solar mat.
 ▪   Wanneer u de verbindingen van uw zwembad, filterpomp of solar mat losmaakt zorg er dan voor dat de
     filterslangen zijn gesloten of geblokkeerd, om het weglopen van water te voorkomen.
 ▪   Probeer alle aansluitslangen zoveel mogelijk recht te leggen.
 ▪   Gebruik het product enkel waarvoor dit bedoeld is.
 ▪   Het product mag uitsluitend gebruikt worden volgens de instructies zoals beschreven in deze handleiding.
 ▪   Dit product is bedoeld voor installatie op de grond, naast uw zwembad en filterpomp. Installatie op het dak
     of elke andere verhoging is op eigen risico. Een defect veroorzaakt door montage op elke andere
     ondergrond dan de grond valt dan ook niet onder de garantie.
 ▪   Als er zich abnormale omstandigheden voordoen (zoal geluid, geur of rook) schakel dan onmiddellijk de
     stroom naar het filtersysteem uit en neem contact op met de verkoper. Probeer niet zelf het product te
     demonteren of te repareren, hierdoor vervalt de garantie.

Bovenstaande veiligheidsinstructies vormen geen exhaustieve lijst van alle mogelijke risico’s en gevaren
van het gebruik van dit product. Eigenaars en gebruikers van de solar mat dienen dit apparaat met
voorzichtigheid en gezond verstand te gebruiken.

                                                                                                                  3
| NL
1. Algemene informatie
1.1. Vereisten voor installatie
De solar mat die u zojuist heeft aangeschaft is eenvoudig te installeren en moeiteloos te bedienen wanneer
deze eenmaal aangesloten is. De installatie-instructies voor dit product zijn gebaseerd op enkele aannames:
1. U bezit een bovengronds zwembad dat volledig geïnstalleerd is en gevuld is met water.
2. Uw bovengronds zwembad is volledig uitgerust met een door een pomp aangestuurd filtratiesysteem.
3. U bent in het bezit van de nodige zwembadslangen om het water van en naar het zwembad en filtersysteem
te sturen.
Deze veronderstellingen zijn noodzakelijk aangezien het de bedoeling is dat, eens de solar mat geïnstalleerd
is, de filterpomp het water door de leidingen van de solar mat stuur zodat het kan worden opgewarmd door de
zon.
1.2. Hoe werkt het?
Indien het product juist is geïnstalleerd, is de solar mat met twee zwembadslangen verbonden aan het
zwembad: één slang voert koud, gefilterd water van de filterpomp naar de ingang van de solar mat. Aan de
uitgang van de solar mat zal de andere zwembadslang het verwarmde water naar de ingang van het zwembad
voeren. Wanneer het water door de leidingen van de solar mat stroomt zal het door de zon opgewarmd
worden alvorens terug te stromen naar het zwembad.
1.3. Uitpakken van het product
Haal voorzichtig alle onderdelen uit de doos. Kijk na of alle delen aanwezig zijn voordat u start met de
installatie van het product. Bekijk eveneens het onderdelendiagram verderop in deze handleiding.
1.4. Benodigd gereedschap en materiaal
De volgende items zijn niet inbegrepen bij dit product maar zijn wel noodzakelijk voor de montage:
▪ PH-2 kruiskopschroevendraaier
▪ Platte schroevendraaier
▪ Smeermiddel op siliconenbasis
1.5. Zwembadkennis
Alvorens met de installatie van de solar mat te beginnen is het goed om enkele specificaties van uw zwembad
te kennen:
▪ Hoe groot is het zwembad?
▪ Wat is de inhoud van het zwembad?
▪ Welke diameter zwembadslangen gebruikt u (Ø 32 mm of Ø 38 mm)?
4| NL
▪ Welk type aansluitingen heeft het zwembad (met of zonder schroefdraad)?
▪ Op welke locatie zal de solar mat de meeste zonneschijn opvangen?
1.6. Onderhoud
De solar mat behoeft geen onderhoud, behoudens winteropslag. Voor de eerste vorst moet het solar panel
losgemaakt worden van de aansluitingen aan het zwembad, en vorstvrij bewaard worden.
1.7. Winterklaar maken en opbergen
Verwijder al het water uit de solar mat door de zwembadslangen los te koppelen. Berg de solar mat op, op een
vorstvrije plaats.
Zorg dat er geen water achterblijft in de solar mat dat kan bevriezen. Water zet uit als het bevriest, dit kan de
leidingen in de solar mat doen scheuren. Bevriezing kan de solar mat schade toebrengen, wat de garantie doet
vervallen.
1.8. Technische gegevens
Vinyl mat, voor aangenaam warm water. De solar met is volledig afgewerkt, voor een eenvoudige installatie.
▪ Aansluiting: Ø 32 mm
▪ Alleen geschikt voor installatie op de grond
▪ Afmetingen: 128 x 80 cm
▪ Max. debiet 3800 l/h
▪ Alleen geschikt voor cartridgefilterpompen
5| NL
2. Installatie
2.1. Installatie locatie
De solar mat moet lager geplaatst zijn dan het waterniveau van het zwembad. De solar mat mag nooit op een
dak of andere structuur worden geplaatst. De solar mat mag nooit meer dan 60 cm boven het waterniveau in
het zwembad worden geplaatst.
Plaats de solar mat op een plaats waar het meeste zonlicht kan worden opgevangen en minstens 3 meter
verwijderd van het zwembad.
Let op: De solar mat moet worden geplaatst tussen de filter en de waterinlaat van het zwembad, nadat het
water gefilterd is. De solar mat MOET achter de filter geplaatst worden om drukopbouw te voorkomen.
Belangrijk: Indien u een zoutwatersysteem gebruikt, moet deze na de solar mat worden geplaatst worden om
beschadiging aan de solar mat te voorkomen.
2.2. Installatie illustratie
Situatie voor installatie:
zwembad
terugkeer
slang slang
filterpomp
Situatie na installatie:
zwembad
terugkeer slang
slang
filterpomp
solar
mat
* Bovenstaande tekening is alleen ter demonstratie, de lay-out van de leidingen dient enkel ter referentie. De
tekening is illustratief en niet op schaal, afmetingen kunnen afwijken het van bijgesloten product.
6| NL
2.3. Installatie instructies
Solar mat – zwembaduitlaat
Deze instructies gaan ervan uit dat het zwembad en het filtersysteem reeds geïnstalleerd zijn en dat er een
zwembadslang is vastgemaakt aan de waterinlaat van het zwembad.
Solar mat – filterpomp
1. Zet de filterpomp uit.
2. Blokkeer de waterstroom aan beide kanten tussen de zwembadinlaat en de pomp uitlaat, zodat er geen
water wegstroomt door de slangen.
3. Demonteer de zwembadslang die van de filterpomp naar de zwembadinlaat loopt en leg deze opzij.
4. Afhankelijk van de filterpomp en de gewenste plaats van de solar mat moet u de in- en uitgang van de
solar mat kiezen.
5. Neem een zwembadslang en koppel deze tussen de pomp (waar de retourslang eerder was
gekoppeld) en de waterinlaat van de solar mat, met behulp van slangklemmen.
Solar mat – zwembadinlaat
Neem een slangklem en bevestig het losse eind van de bestaande retourslang aan de wateruitlaat van de
solar mat.
3. Gebruiksinstructies
Als de solar mat is aangesloten en de zwembadslangen aangesloten zijn op de filterpomp en zwembadinlaat,
open dan de waterinlaat van het zwembad, en zet de filterpomp aan. Er zullen bubbels te zien zijn bij de
waterinlaat van het zwembad doordat de lucht uit de solar mat wordt gepompt. Indien dit langer dan 2 minuten
duurt, controleer dan of er geen lekken zijn in de aansluitingen of slangen.
7| NL
4. Onderdelen
1. Solar mat
2. Slangaansluiting met o-ring (2x)
8| NL
5. Problemen en oplossingen
Probleem Mogelijkheden / oplossingen
Zwembadwater wordt niet ▪ Check to make sure that water is flowing through the tubes. Controleer of het water door
verwarmd. de leidingen loopt.
▪ Is het zonnig geweest?
▪ Zorg voor maximale opnamen zonnestralen en laat de filterpomp langer pompen.
▪ Gebruik ’s nachts een afdekzeil om warmteverlies te voorkomen.
▪ Mogelijk zijn er extra solar matten nodig.
Geen bubbels nadat het paneel is ▪ Controleer de instelling van de filterpomp om er zeker van de zijn dat het water terug
aangesloten en de pomp is naar het zwembad stroomt via de filterpomp, dan via de solar mat en daarna via de
ingeschakeld. aansluitslang terug naar het zwembad.
Bellen blijven uit de waterinlaat van ▪ Controleer de zwembadslangen op mogelijke beschadigingen.
het zwembad stromen nadat de ▪ Controleer of de slangklemmen voldoende zijn aangedraaid.
pomp is ingeschakeld.
Lekkende solar mat ▪ Controleer de afdichtingen van de aansluitingen in het leidingsysteem.
▪ Controleer of de slangklemmen voldoende zijn aangedraaid.
▪ Controleer de aansluitslangen op scheurtjes.
9| NL
6. Garantie
Dit product is gefabriceerd met gebruikmaking van de beste kwaliteitsmaterialen en vakmanschap. Wij garanderen dat alle
onderdelen van dit product vrij zijn van fabricagefouten in materiaal en afwerking voor een periode van 1 jaar vanaf de
aankoopdatum. Deze beperkte garantie wordt verstrekt als aanvulling op en zonder afbreuk te doen aan uw
consumentenrechten. Als deze garantie niet overeenkomt met uw wettelijke rechten, zullen de wettelijke rechten gelden.
Deze garantie beperkt zich tot de eerste koper en is niet overdraagbaar. Bewaar uw origineel aankoopbewijs, daar het
aankoopbewijs dient te worden overlegd ingeval van een klacht. Zonder aankoopbewijs is deze beperkte garantie niet
geldig.
Als er zich een productiefout binnen bovenstaande periode voordoet kunt u contact opnemen met de verkoper. Als er sprake
is van garantie zal het product kosteloos gerepareerd worden of vervangen worden door hetzelfde of een, door Comfortpool
bepaald, gelijkwaardig product. De aansprakelijkheid van Comfortpool zal nooit de reparatie of vervanging van defecte
onderdelen te boven gaan, en zal geen kosten omvatten voor arbeid om een defect onderdeel te verwijderen en opnieuw
te installeren, noch het transport van en naar de fabriek of leverancier, noch enig ander materiaal dat nodig is voor het
uitvoeren van een eventuele reparatie. Kosten van water, zwembadchemicaliën of waterschade worden niet door deze
garantie gedekt. Ook is de garantie niet van toepassing bij schade aan eigendommen of personen.
Deze beperkte garantie is niet van toepassing in onderstaande gevallen:
▪ Indien het product is onderworpen aan nalatigheid, abnormaal gebruik of toepassing, een ongeluk, onjuist gebruik,
verkeerde stroomtoevoer, ander gebruik dan in de handleiding beschreven staat en onjuist onderhoud of opslag;
▪ Indien het product onderhevig is aan schade veroorzaakt door omstandigheden buiten de macht van Comfortpool,
inclusief maar niet beperkt tot, normale slijtage en beschadiging veroorzaakt door blootstelling aan vuur,
overstroming, vrieskou, regen en andere natuurkrachten;
▪ Indien er aanpassingen, reparaties of demontage van het product zijn uitgevoerd door iemand anders dan de
leverancier;
▪ Op artikelen die niet van het merk Comfortpool zijn, of op artikelen van het merk Comfortpool die in combinatie met
artikelen of onderdelen van een ander merk worden gebruikt.
Dit is de enige garantie die uitgegeven is door Comfortpool. Comfortpool verleent geen andere garantie of voorwaarden,
hetzij schriftelijk of mondeling, en wijst uitdrukkelijk alle garanties en voorwaarden af die niet in deze garantieverklaring zijn
opgenomen. Andere garanties dan deze en de wettelijk bepaalde rechten in uw land zijn niet van toepassing. Comfortpool
is onder geen enkele voorwaarde aansprakelijk richting de koper of enige andere partij voor indirecte of vervolgschade
veroorzaakt door dit product, van welke aard dan ook.
www.comfortpool.com
Milieuprogramma’s, Europese AEEA-richtlijn
© 2021 Comfortpool. Alle rechten voorbehouden. Niets van dit document mag worden vermenigvuldigd of
doorgegeven in welke vorm of op welke wijze dan ook, zij het elektronisch, mechanisch, op fotokopie,
opgenomen of op enige andere wijze, zonder de voorafgaande schriftelijke toestemming van Comfortpool.
10| EN
Table of contents
Safety and precautions __________________________________________________________________12
1. General information _________________________________________________________________13
1.1. Requirements for the installation _____________________________________________________13
1.2. How it works ____________________________________________________________________13
1.3. Unboxing of the product ___________________________________________________________13
1.4. Tools and equipment required_______________________________________________________13
1.5. Know your pool __________________________________________________________________13
1.6. Maintenance ____________________________________________________________________14
1.7. Winterizing______________________________________________________________________14
1.8. Technical data ___________________________________________________________________14
2. Installation_________________________________________________________________________14
2.4. Installation location _______________________________________________________________14
2.5. Installation illustration _____________________________________________________________15
2.6. Installation instructions ____________________________________________________________16
3. Operation__________________________________________________________________________16
4. Parts______________________________________________________________________________17
5. Troubleshooting guide_______________________________________________________________18
6. Warranty __________________________________________________________________________19
11| EN
Safety and precautions
READ
READ ALL
ANDINSTRUCTIONS BEFORE
FOLLOW ALL THESE ASSEMBLING
INSTRUCTIONS AND USINGFAILURE
CAREFULLY. THIS PRODUCT. FAILURE
TO FOLLOW TO
THESE
FOLLOW THESE
WARNINGS COULDINSTRUCTIONS COULD RESULT
RESULT IN PROPERTY DAMAGE,INELECTRIC
PROPERTY DAMAGE,
SHOCK, PERSONAL
PERSONAL INJURY
INJURY OR
OR EVEN
EVEN DEATH.
DEATH.
WARNINGS
▪ This appliance is not a toy, keep this product out of the reach of children.
▪ This product can be used by children aged 8 years and over and persons with reduced physical, sensory,
or mental capabilities, or lack of experience and knowledge, provided it is done under supervision or
provided they have been instructed on the safe use and risks of the product.
▪ Assembling, installing, disassembling, cleaning, and doing maintenance on this product should only be done
by an adult.
▪ Always turn of the filter system when installing, cleaning, or servicing this product.
▪ Do not use any petroleum-based lubricant. Petroleum based products will damage the plastic parts.
▪ Place the product well away from the pool, on a safe distance.
▪ Do not sit or stand on, walk over, or climb onto the product.
▪ When loosening any connections on your filter pump, pool or solar mat be sure that all hoses are closed or
blocked to prevent water flow.
▪ Please try to keep all the connection hoses as straight as possible.
▪ Use this product only for its intended purpose.
▪ The product may only be used in accordance with the instructions as described in this manual.
▪ This product is intended for installation on the ground, next to your pool and filter pump. Installation on a
roof or any other structure is at your own risk. A defect caused by installation on the roof, or any other
structure is therefore not covered by warranty.
▪ If any abnormal conditions (such as noise, odor, or smoke) occur, turn off the power to the filtration system
immediately and contact the seller. Do not attempt to disassemble or repair the product yourself, as this will
void the warranty.
The above-mentioned safety instructions and cautions do not constitute an exhaustive list of all possible
risks and dangers associated with the use of this product. Owners and users of the solar mat should
exercise caution and common sense when using this product.
12| EN
1. General information
1.1. Requirements for the installation
The solar panel you just purchased for you above ground pool or ground level pool is simple to install ad effortless
to operate once connected. The installation instructions included in this manual are based on a few assumptions:
1. You have an existing above ground pool that is completely set up and filled with water.
2. Your above ground pool is equipped with a pump-operated water filtering system.
3. You have the necessary hoses needed to feed water in and out of your pool and filter system (Ø 32 mm of
Ø 38 mm).
These assumptions are necessary as the solar panel, once installed, will be completely dependent upon your
pool’s filter pump to push water in and through the heater’s solar coils.
1.2. How it works
When properly installed, the solar panel will be connected to your filter and your pool by two hose connections:
one hose will feed cold, filtered pool water from your pump into one port of the solar panel. The other hose will
feed sun warmed water from the other port of the solar panel to your pool via the pool return inlet in your pool.
As cold water is fed into the solar panel, it travels through the solar coils where it is heated by the sun before it
is delivered back into you swimming pool.
The warming of the water depends on the following factors: the flow rate and solar radiation.
Sunshine is required for the solar panel to operate. The solar panel can be left connected even when the sun is
not shining, since its installation leads to only a slight loss of pressure.
1.3. Unboxing of the product
Carefully take out the parts out of the box. Check if all parts are present before starting the installation of this
product. Review the parts diagram further ahead in this user manual.
1.4. Tools and equipment required
The following items are not included with your new solar panel, but will be required for proper installation and
operation:
▪ #2 Phillips screwdriver
▪ ¼″ Flat head screwdriver
▪ Silicone based lubricant
1.5. Know your pool
Before you begin installation, it is a good idea to know certain specifications about your pool:
13| EN
▪ How big is your pool?
▪ What size hose does it use between pool and filter pump (i.e. Ø 32 mm or Ø 38 mm)?
▪ What kind of hose connection does your pool use (i.e. threaded or unthreaded)?
▪ In which location will you position the pool for maximum sun exposure?
1.6. Maintenance
The solar mat should not be exposed to cold weather. Prior to the first frost, or at the end your swim season,
the solar mat should be removed from its connections to the pool and stored in a frost-free location.
1.7. Winterizing
Drain all the water from the solar panel by disconnecting the tubes. Store in a location protected from frost.
Reconnect the pool return tubes.
Do not allow standing water to remain inside the solar mat to freeze. Water expands as it freezes and can
rupture the solar coils on the heater. This will damage the solar mat and will void the warranty.
1.8. Technical data
Vinyl collector, for pleasantly warm water. Finished solar collector for easy installation.
▪ Connection: Ø 32 mm
▪ Only for floor mounting
▪ Dimensions: 128 x 80 cm
▪ Flow rate max 3800 l/h
▪ Only suitable for cartridge filter systems
2. Installation
2.4. Installation location
The solar mat must be placed lower than the water level of the pool. The solar mat should never be placed on
a roof or any other structure. The solar mat should never be placed more than 60 cm above the water level in
the pool.
Place the solar mat in a place where the most sunlight can be received and at least 3 meters away from the
pool.
Note: The solar mat must be placed between the filter and the water inlet of the pool, after the water has been
filtered. The solar mat MUST be placed behind the filter to prevent pressure build-up.
Important: If you use a saltwater system or in-line chlorinator, it must be placed after the solar mat to prevent
damage to the solar mat.
14| EN
2.5. Installation illustration
Situation before installation:
pool
return
hose hose
filter pump
Situation after installation:
pool
return hose
hose
filter pump
solar
mat
* Above drawing is for demonstrative purposes only; piping layout is for reference only. The drawing is illustrative
and not to scale, dimensions may differ from the enclosed product.
2.6. Installation instructions
Solar mat - pool outlet
These instructions assume that the pool and filtration system are already installed and that a pool hose is
attached to the pool's water inlet.
Solar mat - filter pump
6. Turn off the filter pump.
7. Block the water flow on both sides between the pool inlet and the pump outlet so that water does not flow out
through the hoses.
8. Disassemble the pool hose that runs from the filter pump to the pool inlet and set it aside.
9. Depending on the filter pump and the desired location of the solar mat, you must select the input and output
of the solar mat.
10. Take a pool hose and connect it between the pump (where the return hose was previously connected) and
the water inlet of the solar mat, using hose clamps.
Solar mat - pool inlet
15| EN
Take a hose clamp and attach the loose end of the existing return hose to the water outlet of the solar mat.
2.6. Installation instructions
Solar mat – pool outlet
These instructions assume that the pool and filtration system are already installed and that a pool hose is
attached to the pool's water inlet.
Solar mat – filter pump
1. Turn off the filter pump.
2. Block the water flow on both sides between the pool inlet and the pump outlet so that water does not
leak away through the hoses.
3. Disassemble the pool hose that runs from the filter pump to the pool inlet and lay it aside.
4. Depending on the filter pump and the desired location of the solar mat, you must select the input and
output of the solar mat.
5. Take a pool hose and connect it between the pump (where the return hose was previously connected)
and the water inlet of the solar mat, using hose clamps.
Solar mat – pool inlet
Take a hose clamp and attach the loose end of the existing return hose to the water outlet of the solar mat.
3. Operation
Once the solar panel has been assembled and the hoses are connected to the filter pump and pool return,
unblock the flow of water into the pool return hose and turn on the pump and filter system. Bubbles will shout out
of the return nozzle into the pool initially while air is pushed out of the solar panel. If this persists for longer than
2 or 3 minutes, check for any repair any leaks in the hoses or connections.
Note: be sure to place your pool cover on at night to prevent heat loss.
16| EN
4. Parts
3. Solar mat
4. Hose connectors with O-ring (2x)
17| EN
5. Troubleshooting guide
Problem Possibilities / solutions
The pool water is not heated. ▪ Check to make sure that water is flowing through the tubes.
▪ Has it been sunny?
▪ Use the maximum possible solar radiation and increase the running time of the filter
pump.
▪ Put your pool cover on at night to prevent heat loss.
▪ Additional solar mats may be necessary.
No initial bubbling after panel is ▪ Check the setting of the filter system to make sure it is returning water to the pool
connected and pump is on. through the filter pump, then through the solar panel and afterwards through the
connection hose back to the pool.
Bubbles continue to flow out of the ▪ Check the connection hoses for possible damages.
pool water inlet well after the pump ▪ Check if the hose clamps have been tightened enough.
has been turned on.
Leaking solar mat ▪ Check the connector seals in the pipeline system.
▪ Check if the hose clamps have been tightened enough.
▪ Check the connection hoses for cracks.
18| EN
6. Warranty
This product has been manufactured using the highest quality materials and workmanship. We warrant all parts of this filter
pump to be free from manufacturing defects in materials and workmanship for a period of one year from the date of
purchase. For the hoses and fitting this is valid for a period of 180 days from the date of purchase. This limited warranty is
in addition to, and not a substitute for, your legal rights and remedies. To the extent that this warranty is inconsistent with
any of your legal rights, they take priority.
The provisions of this limited warranty apply only to the original purchaser and are not transferable. Keep your original sales
receipt with this document, as proof of purchase will be required and must accompany all complaints and warranty claims.
This limited warranty is not valid without a proof of purchase.
In case of a manufacturing defect during the warranty period you can contact the seller. If the product is covered by the
provisions of the warranty the item will be repaired or replaced, with the same or a comparable item (to be determined by
Comfortpool), at no charge to you. The liability of Comfortpool shall not exceed the repair or replacement of defective parts
and does not include any costs for labor to remove and reinstall a defective part, transportation to or from the factory or
supplier, and any other materials required to execute a possible repair. The costs associated with the loss of pool water,
pool chemicals or water damage are not covered by this warranty. Injury or damage to any property or person is not covered
by this warranty.
This limited warranty does not apply in the following circumstances:
▪ If the product is subject to negligence, abnormal use or application, accident, improper operation, improper voltage
or current contrary to operating instructions, improper maintenance or storage;
▪ If the product is subject to damage by circumstances beyond Comfortpool’s control, including but not limited to,
ordinary wear and tear and damage caused by exposure to fire, flood, freezing, rain, or other external environmental
forces.
▪ To unauthorized alterations, repairs or disassembly to filter pump anyone other than the supplier.
▪ To articles that are not of the Comfortpool brand, or to articles of the Comfortpool brand that are used in combination
with articles or parts of another brand.
This is the only warranty given by the Comfortpool. Comfortpool grants no other warranties, whether expressed or implied,
and disclaims all warranties and conditions that are not included in this warranty statement. Warranties other than these
and the statutory rights in your country do not apply. In no event shall Comfortpool be liable to you or any third party for
direct or consequential out damages arising of the use of this product.
www.comfortpool.com
Environmental Programs, WEEE European Directive
© 2021 Comfortpool. All rights reserved. No part of this document may be reproduced or transmitted in any form
or by any means, electronic, mechanical, photocopying, recording, or otherwise, without prior written permission
of Comfortpool.
19| DE
Inhalt
Sicherheitshinweise ____________________________________________________________________21
1. Algemeine Informationen ____________________________________________________________22
1.1. Voraussetzungen für die Installation einer Solarmatte ____________________________________22
1.2. Funktionweise _______________________________________ Fout! Bladwijzer niet gedefinieerd.
1.3. Auspacken des Produkts___________________________________________________________22
1.4. Benötigtes Werkzeug und Zubehör ___________________________________________________22
1.5. Produktpflege ___________________________________________________________________22
1.6. Überwinterung ___________________________________________________________________23
1.7. Technische Daten ________________________________________________________________23
2. Installationsanweisungen ____________________________________________________________23
2.1. Installationsort ___________________________________________________________________23
2.2. Installationsabbildung _____________________________________________________________23
2.3. Installationsanleitung ______________________________________________________________24
3. Erste Anwendung ___________________________________________________________________25
4. Teile ______________________________________________________________________________26
5. Problembehebung __________________________________________________________________27
6. Garantie ___________________________________________________________________________28
20| DE
Sicherheitshinweise
LESEN SIE FOLLOW
READ AND DIESE BEDIENUNGSANLEITUNG GENAU
ALL THESE INSTRUCTIONS DURCH, BEVOR
CAREFULLY. SIE
FAILURE TODAS PRODUKT
FOLLOW IN
THESE
BETRIEB NEHMEN. WENN SIE UNSERE BEDIENUNGSANLEITUNG ODER SICHERHEITSHINWEISE
WARNINGS COULD RESULT IN PROPERTY DAMAGE, ELECTRIC SHOCK, PERSONAL INJURY OR EVEN
NICHT GENAU BEFOLGEN, KANN DIES ZU SCHÄDEN AM GERÄT FÜHREN ODER ES KÖNNEN
DEATH.
PERSONEN VERLETZT WERDEN.
ACHTUNG
▪ Lesen Sie die Bedienungsanleitung und die angeführten Hinweise.
▪ Lassen Sie keine Kinder mit diesem Gerät hantieren.
▪ Stellen Sie Ihr Filtersystem immer ab, wenn Sie an Ihrer Solarmatte arbeiten.
▪ Stellen Sie das Gerät nicht zu nah an das Pool (ausreichender Sicherheitsabstand).
▪ Benützen Sie keine Schmiermittel auf der Basis von Petroleum. Petroleum greift die Plastik-Bestandteile
des Produktes an.
▪ Dieses Gerät ist nicht dafür bestimmt, durch Personen (einschließlich Kinder) mit eingeschränkten
physischen, sensorischen oder geistigen Fähigkeiten oder mangels Erfahrung und /oder mangels Wissen
benutzt zu werden, es sei denn, sie werden durch eine für ihre Sicherheit zuständige Person beaufsichtigt
oder erhielten von ihr Anweisungen, wie das Gerät zu benutzen ist.
▪ Kinder sollten beaufsichtigt werden, um sicherzustellen, dass sie nicht mit dem Gerät spielen.
▪ Nicht auf die Solarmatte steigen.
Die obengenannten Sicherheitshinweise formen keine erschöpfende Liste aller möglichen Risiken und
Verletzungen. Besitzer und Benutzer der Solarmatte sollen diese mit Vorsicht und gesundem
Menschenverstand betreiben.
21| DE
1. Algemeine Informationen
1.1. Voraussetzungen für die Installation einer Solarmatte
Die von Ihnen erworbene Solarmatte ist für eingegrabene und Aufstellpools gedacht und ist einfach zu
installieren und zu handhaben. Die Installationsanleitung beruht auf folgenden Voraussetzungen:
1. Sie besitzen einen Pool welcher komplett aufgebaut und mit Wasser gefüllt ist.
2. Ihr Pool verfügt über ein Filtersystem.
3. Sie verfügen über die notwendigen Verbindungsschläuche, um das Pool und das Filtersystem mit
Wasser zu versorgen (32 mm Ø oder 38 mm Ø).
Dies sind die Voraussetzungen damit die Solarmatte, wenn diese installiert und komplett an die Filterpumpe
angeschlossen ist, Wasser durch die Solarkammern befördern kann.
1.2. Funktionsweise
Sobald das Gerät installiert ist, wird es zwischen Ihrem Filtersystem und Ihrem Pool mittels der beiden
Schlauchverbindungen angeschlossen. Der Anschlussschlauch befördert das von Ihrer Filteranlage
kommende kalte Wasser in die Solarkammern Ihrer Solarmatte. Dort wird es durch die Sonnenenergie
erwärmt und anschließend wieder durch den zweiten Verbindungsschlauch Richtung Pool geleitet.
Die Erwärmung de Wasser ist von folgenden Faktoren abhängig: Durchflussmenge und Sonneneinstrahlung.
Die Solarheizung funktioniert nur effizient bei Sonneneinstrahlung. Sie kann auch bei schlechtem Wetter an
der Pumpe angeschlossen bleiben, da diese nur einen geringen Druckverlust bei der Pumpe verursacht.
1.3. Auspacken des Produkts
Nehmen Sie die Teile vorsichtig aus der Verpackung. Überprüfen Sie, ob alle Teile vorhanden sind, bevor Sie
mit der Installation dieses Produkts beginnen. Lesen Sie das Teilediagramm weiter unten in dieser
Bedienungsanleitung.
1.4. Benötigtes Werkzeug und Zubehör
Diese Werkzeuge werden zum Aufbau benötigt, sind jedoch nicht im Set enthalten:
▪ Kreuzschraubenzieher
▪ Schlitzschraubenzieher
▪ Schmiermittel auf Silikonbasis
1.5. Produktpflege
Die Solarmatte sollte nicht der kalten Witterung ausgesetzt werden. Vor dem ersten Frost, oder am Ender der
Poolsaison muss die Solarmatte an einem frostsicheren Platz gelagert werden.
22| DE
1.6. Überwinterung
Lassen Sie alles Wasser aus der Solarmatte ab indem Sie die Leitungen abschließen. Überwintern Sie das
Gerät an einem frostsicheren Platz. Entfernen Sie die Pool-Rücklaufleitungen.
Stellen Sie sicher, dass sich kein Wasser im Inneren des Gerätes befindet, da dieses gefrieren kann.
Gefrorenes Wasser dehnt sich aus und kann so die Solarkammern beschädigen.
1.7. Technische Daten
Vinyl Kollektor, für angenehm warmes Wasser. Fertiger Solarkollektor zur einfachen Montage.
▪ Anschluss: Ø 32 mm
▪ Nur für Bodenmontage
▪ Abmessung: 128 x 80 cm
▪ Durchflussmenge max. 3800 l/h
▪ Nur für Kartuschenfilteranlagen geeignet
2. Installationsanweisungen
2.1. Installationsort
Die Sonnenmatte muss unter dem Wasserspiegel des Pools platziert werden. Die Solarmatte sollte niemals
auf ein Dach oder eine andere Struktur gestellt werden. Die Sonnenmatte sollte niemals mehr als 60 cm über
dem Wasserspiegel im Pool platziert werden.
Stellen Sie die Sonnenmatte an einem Ort auf, an dem das meiste Sonnenlicht empfangen werden kann, und
mindestens 3 Meter vom Pool entfernt.
Hinweis: Die Solarmatte muss nach dem Filtern des Wassers zwischen dem Filter und dem Wassereinlass
des Pools platziert werden. Die Solarmatte MUSS hinter dem Filter platziert werden, um einen Druckaufbau zu
verhindern.
Wichtig: Wenn Sie ein Salzwassersystem oder einen Chlorierer verwenden, muss dieser hinter der
Solarmatte platziert werden, um eine Beschädigung der Solarmatte zu vermeiden.
2.2. Installationsabbildung
Situation vor der Installation:
23| DE
Pool
Rücklaufschlauch
Schlauch
Filterpumpe
Situation nach Installation:
Pool
Rücklaufschlauch Schlauch
Filterpumpe
Solar
matte
e
* Die obige Zeichnung dient nur zu Demonstrationszwecken, das Rohrleitungslayout dient nur als Referenz. Die
Zeichnung ist illustrativ und nicht maßstabsgetreu können die Abmessungen vom beiliegenden Produkt
abweichen.
2.3. Installationsanleitung
Solarmatte – Poolauslass
Diese Anweisungen setzen voraus, dass der Pool und das Filtersystem bereits installiert sind und dass ein
Poolschlauch am Wassereinlass des Pools angebracht ist.
Solarmatte – Filterpumpe
1. Schalten Sie die Filterpumpe aus.
2. Blockieren Sie den Wasserfluss auf beiden Seiten zwischen dem Pooleinlass und dem
Pumpenauslass, damit kein Wasser durch die Schläuche austritt.
3. Zerlegen Sie den Poolschlauch, der von der Filterpumpe zum Pooleinlass führt, und legen Sie ihn
beiseite.
4. Abhängig von der Filterpumpe und dem gewünschten Standort der Solarmatte müssen Sie den Ein-
und Ausgang der Solarmatte auswählen.
5. Nehmen Sie einen Poolschlauch und verbinden Sie ihn mit Schlauchschellen zwischen der Pumpe (an
der zuvor der Rücklaufschlauch angeschlossen war) und dem Wassereinlass der Solarmatte.
Solarmatte – Pooleinlass
24| DE
Nehmen Sie eine Schlauchklemme und befestigen Sie das lose Ende des vorhandenen Rücklaufschlauchs am
Wasserauslass der Solarmatte.
3. Erste Anwendung
Wenn die Solaranlage aufgebaut und die Schläuche mit der Filterpumpe und dem Pool verbunden sind, öffnen
Sie den Wasserzufluss und sorgen Sie dafür, dass Wasser durch den Schlauch fließt. Anschließend schalten
Sie das Filtersystem ein. Luftblasen werden aus der Einlaufdüse im Pool aufsteigen. Das kommt daher weil die
Luft aus der Solarmatte gedrückt wird. Sollte dies länger als 2 – 3 Minuten dauern, überprüfen Sie Ihre Installation
auf Dichtheit.
Hinweis: Decken Sie Ihr Pool in der Nacht ab um Wärmeverluste zu vermeiden.
25| DE
4. Teile
1. Solarmatte
2. Schlauchanschlüsse mit O-Ring (2x)
26| DE
5. Problembehebung
Problem Behebung
Das Pool wird nicht beheizt. ▪ Gehen Sie sicher, dass Wasser durch die Schläuche fließt.
▪ War es sonnig genug?
▪ Nutzen Sie die maximal mögliche Sonneneinstrahlung und erhöhen Sie die Laufzeit der
Filterpumpe.
▪ Decken Sie Ihr Pool über Nacht ab um Wärmeverluste zu vermeiden.
▪ Möglicherweise sind mehrere Solarmatten nötig.
Kein anfängliches Blubbern, ▪ Kontrollieren Sie das Filtersystem und gehen Sie sicher, dass Wasser vom Pool durch
nachdem das Gerät an die Pumpe die Filterpumpe, dann durch die Solarmatte und anschließend durch den
angeschlossen wurde. Verbindungsschlauch zurück zum Pool fließt.
Luftblasen kommen aus dem Pool- ▪ Überprüfen Sie die Verbindungsschläuche auf etwaige Beschädigungen.
Rücklauf nachdem die Pumpe ▪ Kontrollieren Sie, ob die Schlauchklemmen fest genug angezogen worden sind.
eingeschaltet wurde.
Auslaufendes Wasser. ▪ Überprüfen Sie die Dichtungen im Leitungssystem.
▪ Kontrollieren Sie ob die Schlauchklemmen fest genug angezogen worden sind.
▪ Überprüfen Sie die Verbindungsschläuche auf Risse.
27| DE
6. Garantie
Herzlichen Dank für den Kauf unserer Wärmepumpe. Wir garantieren, dass alle Teile dieses Produkts für den Zeitraum von
1 Jahre ab dem Kaufdatum frei von Material- und Verarbeitungsfehlern sind.
Diese Garantie begrenzt sich auf den Ersterwerber des Produkts, ist nicht übertragbar und gilt nicht für Produkte, die von
Ihren ursprünglichen Montageort versetzt wurden. Comfortpool haftet höchstens für die Reparatur oder den Ersatz von
defekten Teilen und die Garantie erstreckt sich nicht auf die mit Montage und Demontage sowie deren Folgewirkungen
verbundenen Kosten, weder Transportkosten zum oder ab Werk und Lager noch sonstige Materialien, die bei einer
möglichen Reparatur gebraucht werden.
Diese Garantie gilt nicht für Defekte oder Störungen aus nachfolgenden Gründen:
▪ Unsachgemäße Installation, Verwendung oder Wartung des Produkts (anders als in diesem mitgelieferten
Installations- & Benutzerhandbuch beschrieben wird).
▪ Das fachliche Können von jedem Installateur dieses Produkts.
▪ Das nicht Aufrechterhalten einer richtigen chemischen Balance des Poolwassers (pH-Wert zwischen 7,0 und 7,4.
Gesamtalkalität (TAC) zwischen 80 und 120 ppm. Freies Chlor zwischen 0,5 - 1,2 mg/l. Summe gelöster Feststoffe
(TDS) weniger als 1200 ppm. Salz max. 3 g/l).
▪ Missbräuchliche Verwendung, Anpassungen, Unfall, Feuer, Überschwemmungen, Blitzschlag, Nagetiere,
Ungeziefer, Insekten, Fahrlässigkeit oder Übermacht.
▪ Verschmutzungen, fallendes Laub, Gefrieren oder andere Bedingungen, die eine unzureichende Wasserzirkulation
verursachen.
▪ Bei der Verwendung des Geräts nicht die hier publizierte Spezifikationen für Mindest- und Höchstdurchfluss
beachten.
▪ Die Verwendung von nicht-autorisierten Ersatzteilen oder Zubehör in Verbindung mit diesem Produkt.
▪ Chemische Verschmutzung oder missbräuchliche Verwendung von Wasserpflegeprodukten, wie die Zufuhr von
Wasserpflegeprodukten stromaufwärts der Wärmepumpe und des Schlauches oder durch den Skimmer.
▪ Überhitzung, inkorrekte Verkabelung, unrichtiger Stromversorgung, indirekter Schäden durch versagende O-Ringe,
Sandfilteranlagen oder Kartuschenfilterpumpen oder Schäden durch das Betreiben der Pumpe mit unzureichendem
Wasserdurchfluss.
Einschränkte Haftung
Diese Garantie ist die einzige von Comfortpool ausgegebene Garantie. Mit Ausnahme der beschriebenen
Garantiebestimmungen übernimmt Comfortpool keine andere ausdrückliche oder implizierte gesetzliche Garantie. Wir
schließen hiermit jede Haftung für indirekte, besonderen, folgenden, zufälligen oder strafenden Schäden jeglicher Art, weder
ausdrücklich noch implizit. Diese Garantie gewährt Ihnen bestimmte gesetzliche Rechte, die von Land zu Land variieren
können.
www.comfortpool.com
Environmental Programms, WEEE European Direktive
© 2021 Comfortpool. Alle Rechte vorbehalten. Ohne ausdrückliche schriftliche Genehmigung von Comfortpool
darf dieses Dokument weder vollständig, noch in Teilen, und in keiner erdenklichen Form, weder elektronisch
noch mechanisch, auf Fotokopie oder aufgenommen, zu keinem erdenklichen Zweck vervielfältigt und übertragen
werden.
28Vous pouvez aussi lire