INSTRUCTIONS AND WARRANTY - Instructions & Recipes
←
→
Transcription du contenu de la page
Si votre navigateur ne rend pas la page correctement, lisez s'il vous plaît le contenu de la page ci-dessous
INSTRUCTIONS AND WARRANTY

   Instructions & Recipes
2
Congratulations on purchasing our Russell Hobbs Glow Smoothie Maker. Each unit is
manufactured to ensure safety and reliability. Before using this hand mixer for the first time,
please read the instruction manual carefully and keep it for future reference.

Read the instructions and keep them safe. If you pass the smoothie maker on, pass
on the instructions too. Remove all packaging, but keep it till you know the smoothie
maker works.

Important Safeguards
Follow basic safety precautions, including:
 1    This smoothie maker must only be used by a responsible adult.
 2    Don’t put the motor unit in liquid, don’t use it in a bathroom, near water, or
      outdoors.
 3    Unplug before dismantling or cleaning.
 4    The smoothie maker is fitted with a safety switch to prevent the motor operating unless
      the jug is in place. Don’t use this to switch the smoothie maker on and off.
 5    Switch off (press and release Y) before fitting the jug to the motor unit.
 6    Switch off (press and release Y), and wait till the blades come to a stop before removing
      the lid from the jug, or removing the jug from the motor unit.
 7    Don’t use the smoothie maker unless the lid is in place.
 8    Don’t fill with anything hotter than you can comfortably handle (i.e. liquid temperature
      below 40°C).
 9    When blending hot liquids, put a hand on the lid to hold it in place.
 10 Don’t put your hand into the jug, even after you’ve removed it from the motor unit
      – the blades are sharp.
 11 Don’t put any implement (spoon, spatula, etc.), other than the stirrer, into the jug while
      the smoothie maker is plugged in.
 12 Don’t leave the smoothie maker unattended while plugged in.
 13 Sit the motor unit on a dry, firm, level surface, near a power socket.
 14 Route the cable so it doesn’t overhang, and can’t be tripped over or caught.
 15 Don’t let the jug overflow. If liquid gets under the motor unit, it may be sucked into the
      motor, damaging it.
 16 Don’t fill the jug above the 1.7l mark – if you do, the contents may force the lid off when
    you start the motor.
 17 Don’t run the motor for more than three minutes at a time, then leave it for a minute to
      cool down before using it again.
 18 Don’t run the smoothie maker empty, it may overheat.
 19 Keep the smoothie maker and the cable away from hotplates, hobs or burners.
 20 Don’t fit any attachment or accessory other than those we supply.
 21 Don’t use the smoothie maker for any purpose other than those described in these
      instructions.
 22 Don’t operate the smoothie maker if it’s damaged or malfunctions.
 23 If the cable is damaged, the smoothie maker must be returned, in order to avoid hazard.

                                                 3
Household use only
Before using for the first time
1 Turn to “care & maintenance” on page 6, and clean the smoothie maker and
attachments thoroughly, to remove manufacturing dust, etc.
Preparation
2 Sit the motor unit on a dry, firm, level surface, near a power socket.
3 Route the cable so it doesn’t overhang, and can’t be tripped over or caught.
4 Press and release to ensure everything’s off.
5 Put the plug into the power socket.
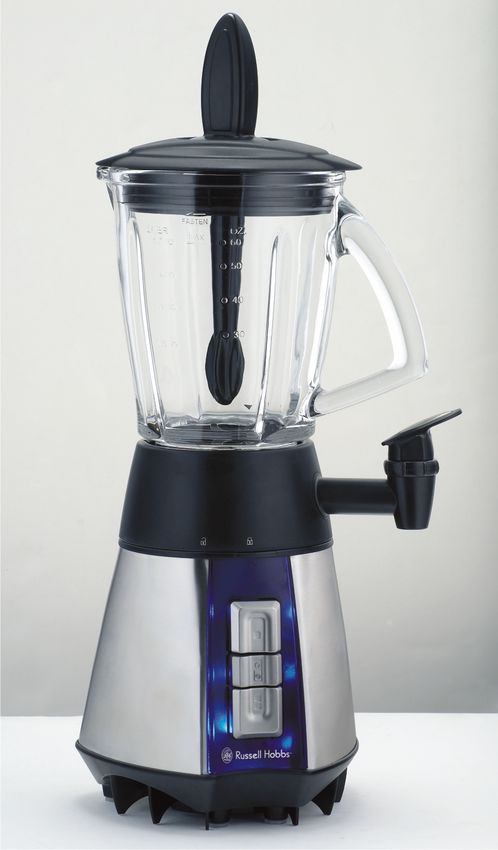
Fit the jug
6 When you fit the jug to the motor unit, the illuminated panel will glow, and will stay on till
you remove the jug, or unplug the smoothie maker.
7 In normal use, you should treat the jug, jug base, and tap as a single unit. They should
only be separated when you come to clean them.
8 You may fit the jug with the tap to the right or left.
9 There are two sets of padlock markings on the base of the jug, one at the back,
and one at the front.
10 Hold the jug above the motor unit, with the tap to the side you want.
11 Align the open padlock facing you with the on the motor unit.
12 Lower the jug on to the motor unit, then turn the jug to align the closed padlock with
the .
Fill the jug
13 Lift the lid off the jug.
14 You’ll find it’s quite stiff (it has be, to keep the ingredients from escaping when you turn
the motor on).
15 Put the ingredients into the jug.
16 These should be a mixture of liquids and solids (frozen ingredients count as solids).
17 Don’t fill past the 1.7 mark. If you do, the contents may force the lid off when you start
the motor.
Fit the lid
18 Put the lid on the jug, and press it down.
19 Don’t use the smoothie maker without fitting the lid. The contents may escape; you may
hurt someone; you may be tempted to put a hand into the jug.
The cap
420 The cap fits into the hole in the lid. Generally, use the cap if you’re using the smoothie
maker as a blender, use the stirrer if you’re making drinks or smoothies.
21 If you’re making mayonnaise, you can fit the cap upside down, and drizzle oil into the
mix through the small hole in the cap.
The stirrer
22 If you’re making drinks or smoothies, instead of fitting the cap, drop the long end of the
stirrer into the hole.
23 If solid ingredients aren’t getting down to the blades, give them a poke with the stirrer to
chivvy them along.
24 Rolling the stirrer anti-clockwise (the opposite way to the blades), against the jug wall,
will help with thicker mixtures.
25 Don’t bash it against the wall of the jug.
26 Don’t run the smoothie maker without fitting either the cap or the stirrer, otherwise solid
ingredients may be ejected through the hole when they hit the blades.
The controls
27 The controls are:
top button – low speed, for lighter jobs, using mainly liquid ingredients. If you’re using
the tap to dispense really thick smoothies, running the motor on low speed will help
the flow.
bottom button – high speed, for heavier jobs, using mainly solid ingredients You can
swap directly between □ and pressing either button cancels the other.
middle button – this button is spring-loaded, it has two functions: it returns both □ and
buttons to “off”, and switches the motor off it also acts as a pulse button – press to run
the motor, let go to stop.
Use the button, for instance, to reduce ice to slush, for icy drinks.
Use it in bursts – press, let go, check the results, repeat, till you’ve reached the degree
of slushiness you want.
28 Don’t run the motor for more than three minutes at a time, then leave it for a minute to
cool down before using it again.
Adding ingredients
29 To add ingredients while the smoothie maker is working:
cap - lift the cap off, pour/drop the new ingredients through the hole, then replace the
cap in the hole
stirrer - lift the stirrer out of the hole, scrape it against the side of the hole on the way
out, to remove drips, then pour/drop the new ingredients through the hole, and replace
the stirrer in the hole.
30 Check that the added ingredients don’t push the volume in the jug past the 1.7l mark.
Finished?
531 Switch off (press and release , and wait till the blades come to a stop before removing
the lid from the jug, or removing the jug from the motor unit.
The tap
32 You can rotate the tap lever to whatever side or angle you find convenient.
33 To open the tap, press the lever.
34 To lock it open, press as far as it’ll go.
35 When dispensing thick smoothies, it helps to run the motor at low speed (1). If they’re
really thick, use the stirrer as well (use it via the hole, don’t remove the lid).
36 When dispensing thick smoothies, remember that you’ll need one hand for the tap, and
one for the stirrer, so find a stable, flat-bottomed glass, cup, or container, to sit on the
work surface, under the tap, for the smoothie.
Hot liquids
37 No matter how careful you are, some splashing is inevitable. At higher temperatures,
splashes on skin can hurt. In extreme cases, they may scald, so, when using hot liquids:
a) before pouring into the jug, let the liquid cool down to the sort of temperature you
can handle comfortably (i.e. liquid temperature below 40°C)
b) run the motor only when the cap is fitted – to add ingredients, stop the motor,
remove the cap, add the ingredients, replace the cap, then re-start the motor
c) put a hand on the lid, to hold it in place while blending
d) if the lid is too hot for comfort, remove it and let the liquid cool down further –
replace the lid before blending.
Crushed Ice
38 Before using the smoothie maker to crush ice, make sure it’s clean and rinse it out
thoroughly. The slightest trace of detergent may affect the taste of the crushed ice and
will flatten any drink to which it is added
39 Ice “cubes” come in many shapes and sizes. You’ll have to experiment with the ice from
your ice cube tray.
40 Start with half to three quarters of a cup of ice or 4 – 6 cubes and add 15 ml (1
Tablespoon) of fresh cold water.
41 Put the lid on the jug, then press the pulse button 3 or 4 times, with short pauses
between.
42 Check the results, and adjust. Too much blending will reduce the ice to liquid, too little
will merely chip the edges/corners off the ice.
43 Don’t try to crush ice without adding water to the jug.
44 Don’t be tempted simply to increase the amount of ice and blend for longer. This won’t
work. Too much ice will never give you satisfactory results.
Care and maintenance
1 Switch the smoothie maker off, and unplug it.
2 Clean as soon after use as possible, to prevent residues setting inside the jug.
63 Turn the jug to align on the bottom of the jug base with on the motor unit, then lift
the jug and base off the motor unit.
4 Remove the lid and cap or stirrer.
Caution - take great care when handling the blade unit.
5 Remove the blade unit from the base before removing the base from the jug.
6 Turn the jug upside down, so you can see the underside of the blade unit.
7 Hold the jug handle with one hand, hold the underside of the blade unit with the other
hand, and turn the blade unit clockwise to release it – it’s quite stiff.
8 Carefully lift the blade unit out of the jug.
9 Keep hold of the jug handle – grip the jug base, and turn it anti-clockwise to release.
10 Lift the seal off the blade unit – mind the blades, they’re sharp!
11 Unscrew the tap from the jug base – it takes 2 complete turns to unscrew
12 Unscrew the lever and its retaining ring from the tap – this takes about 2½ turns.
13 Wash the cap, lid, stirrer, tap parts, jug, blade unit, and seal in warm soapy water, and
leave them to drain dry.
14 Don’t use a cloth for drying. You may leave lint on the inside surfaces, and you’ll
probably cut yourself on the blades.
15 Use a bottle brush on the hole in the jug that the tap fits into.
16 Your bottle-brush may also come in handy when cleaning the inside of the tap.
17 If you’ve left it too long before cleaning, and bits have glued themselves to the inside of
the jug, use a nylon brush. If that doesn’t work, crush some ice cubes in it – that’ll shift
anything.
18 Don’t put any part of the smoothie maker in a dishwasher.
19 The extreme environment inside the dishwasher can affect the surface finishes.
20 Wipe the outside of the motor unit with a clean damp cloth.
21 Don’t put the motor unit in water or any other liquid.
22 Don’t use harsh or abrasive cleaning agents or solvents.
Reassembly
23 Wait till everything’s dry.
24 Fit the jug base to the jug before replacing the blade unit.
25 Reseat the seal on top of the jug base – this seal is flat, with a ribbed upper surface.
26 Align the q on the glass part of the jug with the open padlock on the top of the jug base.
Jug base.
27 Lower the glass part of the jug into the jug base.
28 Turn the jug to bring the q over the closed padlock on the top of the jug base.
29 The jug must be turned far enough round to allow the safety switch actuator to move
freely. You can see it if you look down into the jug from behind the handle.
30 If you can’t move the actuator, you haven’t turned the jug far enough round.
31 Replace the seal round the blade unit – keep your fingers clear of the blades.
732 It’s easier to replace the blade unit in the jug by holding the jug upright, and putting the
blade unit up into the bottom of the jug. This prevents the seal from falling out.
33 When the blade unit is in place, it’s easier to the jug upside down to tighten the blade
unit – it’s a bayonet-type fitting, and it tightens anti-clockwise.
34 Turn the jug the right way up.
35 Screw the tap lever back into the tap – about 2½ turns of the retaining ring. Don’t
overtighten it. If you do, our spares department will be delighted to sell you a new tap.
They love people who break things.
36 To replace the tap, hold it upright, put it into the hole in the jug base, then turn it 2
complete turns clockwise – no more.
âIf the tap lock comes loose, turn the jug and base upside down, hold the tap lock flat side
down, with the pip towards the inside, then slide it back into the jug base.
Staining
37 Carotenoids, which are found in many other vegetables as well as carrots, can cause
severe staining. This staining may be impossible to remove. Don’t worry about it, it won’t
affect the operation of the smoothie maker.
38 If you want to try, then you could try soaking the stained parts overnight in one of the
following:
a) quarter of a cup of household bleach in a sink full of warm water
b) a mixture of 1 part white vinegar to two parts warm water
c) half a small packet of baking soda in enough warm water to cover the parts
Caution Don’t try to mix these methods. You may make a mess, you may cause nasty eye-
watering, breath-catching fumes, and you may harm the parts you’re trying to clean.
8Recipes
Fresh fruit smoothies – these make 2 large smoothies
Strawberry & banana smoothie
300ml milk
1 large banana, roughly chopped
12 strawberries, stalks removed
4 ice cubes
Put everything into the jug, ice cubes last. Run at low for 10 seconds, then high for 10
seconds.
Banana, vanilla & honey smoothie
400ml milk
1 large banana, roughly chopped
4 tsp honey
2 tsp vanilla extract
6 ice cubes
Put everything into the jug, ice cubes last. Run at low for 10 seconds, then high for 5
seconds.
Apple & mango smoothie
600ml apple juice
1 ripe mango
6 ice cubes
Stone, peel and roughly chop the mango. Put everything into the jug, ice cubes last.
Run at low for 10 seconds, then high for 10 seconds.
Creamy blueberry & vanilla smoothie
360ml lemonade
125g vanilla ice cream
70g blueberries
Put everything into the jug. Run at low for 10 seconds, then high for 10 seconds.
Breakfast smoothie
4 tbsp natural yogurt
200ml milk
2 tbsp oatmeal or porridge oats
1 large banana, roughly chopped
2 tsp honey
2 apples, cored and roughly chopped
4 ice cubes
Put everything into the jug, ice cubes last. Run at low for 10 seconds, then high for 15
seconds.
9Berry fruity smoothie
300ml apple juice
90g raspberries
12 strawberries, stalks removed
4 ice cubes
Put everything into the jug, ice cubes last. Run at low for 15 seconds, then high for 15
seconds.
Chocolate orange smoothie
170g chocolate ice cream
300ml orange juice
4 ice cubes
Put everything into the jug, ice cubes last. Run at low for 10 seconds, then high (2
for 5 seconds.
Nutty banana smoothie
150g hazlenut yogurt
1 large banana, roughly chopped
200ml milk
6 ice cubes
Put everything into the jug, ice cubes last. Run at low (1) for 10 seconds, then high (2)
for 5 seconds.
Chocolate pear smoothie
300ml chocolate milk
2 pears, peeled, cored and roughly chopped
10 ice cubes
Put everything into the jug, ice cubes last. Run at low (1) for 15 seconds, then high (2)
for 5 seconds.
Mango lassi
200ml natural yogurt
1 ripe mango
200ml milk
2 tsp honey
10 ice cubes
Stone, peel and roughly chop the mango. Put everything into the jug, ice cubes last.
Run at low (1) for 10 seconds, then high (2) for 5 seconds.
10Cranberry, orange & banana smoothie
300ml orange juice
300ml cranberry juice
1 small banana, roughly chopped
6 ice cubes
Put everything into the jug, ice cubes last. Run at low for 10 seconds, then high for 5
seconds.
Peach & apricot smoothie
4 halves of tinned apricot (in juice)
80ml apricot juice (from tin)
2 peaches
4 tbsp natural yogurt
200ml milk
2 tsp honey
6 ice cubes
Stone and roughly chop the peaches. Put everything into the jug, ice cubes last. Run at
low for 15 seconds, then high for 15 seconds.
Apple, melon & kiwi fruit smoothie
400ml apple juice
1 kiwi fruit, peeled and roughly chopped
150g melon, roughly chopped
6 ice cubes
Put everything into the jug, ice cubes last. Run at low for 10 seconds, then high for 10
seconds.
Very chocolatey cherry smoothie
350ml lemonade
125ml chocolate ice cream
100g cherries, stoned
Put everything into the jug, ice cubes last. Run at low for 10 seconds, then high for 10
seconds.
Adult only smoothies – these make 2 glasses
Tropical cocktail
200ml ginger beer
150g melon, roughly chopped
40ml rum
5 ice cubes
Put everything into the jug, ice cubes last. Run at low for 10 seconds, then high for 10
seconds.
11Cosmopolitan
100ml cranberry juice
50ml vodka
50ml cointreau
Put everything into the jug. Run at low for 10 seconds.
Baileys coffee cocktail
100ml milk
40g vanilla ice cream
½ tsp instant coffee
40ml baileys or irish cream liqueur
3 ice cubes
Put everything into the jug, ice cubes last. Run at low for 10 seconds, then high for 5
seconds.
Strawberry gin fizz
100ml lemonade
60ml gin
1 tsp lemon juice
6 strawberries, stalks removed
5 ice cubes
Put everything into the jug, ice cubes last. Run at low for 10 seconds, then high for 10
seconds.
Mango & rum cocktail
100ml pineapple juice
½ ripe mango, stone removed, peeled and roughly chopped
1 small banana, roughly chopped
40ml rum
3 tbsp natural yogurt
5 ice cubes
Stone, peel and roughly chop the mango. Put everything into the jug, ice cubes last.
Run at low for 10 seconds, then high for 10 seconds.
La mumba
300ml chocolate milk
50ml brandy
3 ice cubes
Put everything into the jug, ice cubes last. Run at low for 10 seconds, then high for 10
seconds.
12Pina colada
200ml pineapple juice
100ml malibu
30ml single cream
4 ice cubes
Put everything into the jug, ice cubes last. Run at low for 15 seconds, then high for 10
seconds.
Changing the fitted/molded plug
Should the need arise to change the fitted/molded plug, follow these instructions:
Mains (AC) Operation
This unit is designed to operate on 220-240V current only. Connecting to other power
sources may damage the unit.
Connect three-pin plug as follows:
The wires in this mains lead are coloured in accordance with the following code:
Green/Yellow = Earth Blue = Neutral Brown = Live
Service
There are no user serviceable parts in this appliance. If the appliance is not
operating correctly, please check that:
1. You have followed the instructions correctly.
2. Is the plug or cord are not damaged in any way?
3. Are the mains power supply On.
If the appliance still does not work:
In the first instance, consult your retailer for possible repair or replacement. If your retailer
fails to solve your problem and you need to return the appliance, make sure that:
1. The unit is packed carefully back into its original packaging.
2. Proof of purchase is attached.
3. Give the reason why you are returning it.
13If the supply cord is damaged, it must be replaced by the manufacturer or its service
agents in order to avoid a hazard. If service becomes necessary within the warranty period
the appliance should be returned to an approved
Amalgamated Appliances (Pty) Ltd service centre. Servicing outside the warranty period is
still available, however it will be chargeable.
14PLEASE AFFIX YOUR PROOF OF PURCHASE/RECEIPT HERE
IN THE EVENT OF A CLAIM UNDER WARRANTY THIS RECEIPT MUST BE PRODUCED.
WARRANTY
1. Tedelex Trading (Pty) Limited (“Tedelex”) warrants to the original purchaser of this
product (“the customer”) that this product will be free of defects in quality and
workmanship which under normal personal, family or household use and purpose may
manifest within a period of 1 (one) year from the date of purchase (“warranty period”).
2. Where the customer has purchased a product and it breaks, is defective or does not
work properly for the intended purpose, the customer must notify the supplier from
whom the customer bought the product (“the supplier”) thereof within the warranty
period. Any claim in terms of this warranty must be supported by a proof of purchase.
If proof of purchase is not available, then repair, and/or service charges may be
payable by the customer to the supplier.
3. The faulty product must be taken to the supplier's service centre to exercise the
warranty.
4. The supplier will refund, repair or exchange the product in terms of this warranty
subject to legislative requirements. This warranty shall be valid only where the
customer has not broken the product himself, or used the product for something that it
is not supposed to be used for. The warranty does not include and will not be
construed to cover products damaged as a result of disaster, misuse, tamper, abuse or
any unauthorised modification or repair of the product.
5. This warranty will extend only to the product provided at the date of the purchase and
not to any expendables attached or installed by the customer.
6. If the customer requests that the supplier repairs the product and the product breaks or
fails to work properly within 3 (three) months of the repair and not as a result of misuse,
tampering or modification by or on behalf of the customer, then the supplier may
replace the product or pay a refund to the customer.
157. The customer may be responsible for certain costs where products returned are not in
the original packaging, or if the packaging is damaged. This will be deducted from any
refund paid to the customer.
TEDELEX TRADING (PTY) LTD (JOHANNESBURG)
JOHANNESBURG TEL NO. (011) 490-9600
CAPE TOWN TEL NO. (021) 535-0600
DURBAN TEL NO. (031) 792-6000
www.amap.co.za
1617
Parabéns por ter comprado a nossa Liquidificadora Glow da Russell Hobbs. Cada unidade é
fabricada de forma a garantir segurança e fiabilidade. Antes de utilizar este aparelho pela
primeira vez, leia o manual de instruções atentamente e guarde-o para futura referência.
Leia as instruções e mantenha-as em local seguro. Se der a liquidificadora a alguém, dê
também as instruções. Retire todas as embalagens, mas guarde-as até que saiba como
funciona a liquidificadora.


Salvaguardas importantes
Siga as precauções de segurança básicas, incluindo:
1 Esta liquidificadora só deve ser utilizada por um adulto responsável.
2   Não coloque a unidade do motor em líquidos, não a utilize na casa de banho,
    próximo de água ou no exterior.
3   Desligue-a antes de desmantelar ou limpar.
4   A liquidificadora está incorporada com um interruptor de segurança para evitar que o
    motor funcione a não ser que o jarro esteja no devido local. Não utilize isto para ligar e
    desligar a liquidificadora.
5   Desligue (prima e solte Y) antes de colocar o jarro na unidade do motor.
6   Desligue (prima e solte Y) e aguarde até que as lâminas parem antes de remover a tampa
    do jarro ou de remover o jarro da unidade do motor.
7   Não utilize a liquidificadora a não ser que a tampa esteja devidamente colocada.
8   Não encha com nada que esteja quente, que não possa manusear confortavelmente (isto
    é, líquidos a uma temperatura inferior a 40 ºC).
9   Quando misturar líquidos quentes, coloque uma mão na tampa para a fixar no
    local.
10 Não coloque a sua mão no jarro, mesmo depois de o remover da unidade do
    motor – as lâminas são afiadas.
11 Não coloque qualquer implemento (colher, espátula, etc.), para além do mexedor, dentro
    do jarro enquanto a liquidificadora estiver ligada.
12 Não deixe a liquidificadora sem supervisão enquanto estiver em funcionamento.
13 Coloque a unidade do motor numa superfície seca, firme e nivelada, próxima da tomada
    de energia.
14 Encaminhe o cabo de forma a não ficar suspenso e a não ficar numa posição onde
   alguém possa tropeçar ou ficar preso.
15 Não permita que a preparação transborde o jarro. Se entrar líquido na unidade do motor,
    poderá ser sugado para o motor e danificá-lo.
16 Não encha o jarro acima da marca de 1,7 l – caso o faça, o conteúdo poderá fazer com
    que a tampa saia quando liga o motor.
17 Não deixe o motor em funcionamento durante mais de três minutos de cada vez, depois
    deixe arrefecer durante um minuto antes de o utilizar novamente.
18 Não ligue a liquidificadora com ela vazia, pois pode sobreaquecer.
19 Mantenha a liquidificadora e o cabo afastados de chapas eléctricas, fogões ou bicos de
    gás.
20 Não coloque qualquer encaixe ou acessório para além daqueles que são fornecidos por
    nós.
21 Não utilize a liquidificadora para qualquer fim diferente dos descritos nestas instruções.

                                                18
22 Não ligue a liquidificadora caso esteja danificada ou avariada.
23 Se o cabo estiver danificado, devolva a liquidificadora para evitar perigos.
Apenas para utilização doméstica
Antes de utilizar pela primeira vez
1 Vire para “cuidados e manutenção” na página 6 e limpe bem a liquidificadora e os acessórios para
remover o pó de fabrico, etc.
Preparação
2 Coloque a unidade do motor numa superfície seca, firme e nivelada, próxima da tomada de
energia.
3 Encaminhe o cabo de forma a não ficar suspenso e a não ficar numa posição onde alguém possa
tropeçar ou ficar preso.
4 Prima e solte para garantir que está tudo desligado.
5 Ligue a ficha à tomada de alimentação.
Colocação do jarro
6 Quando coloca o jarro na unidade do motor, o painel iluminado acende-se e permanece ligado até
que remova o jarro ou desligue a liquidificadora.
7 Durante a utilização normal, deve tratar o jarro, a base do jarro e a torneira como uma unidade
única. Devem ser separados apenas quando necessita de os limpar.
8 Para colocar o jarro com a torneira para a direita ou para a esquerda.
9 Existem dois conjuntos de marcações de cadeados na base do jarro, um na parte posterior e
um na parte dianteira.
10 Mantenha o jarro acima da unidade do motor com a torneira par ao lado que quiser.
11 Alinhe o cadeado aberto virado para si à marcação na unidade do motor.
12 Baixe o jarro para a unidade do motor, em seguida rode o jarro para alinhar o cadeado fechado
à marcação .
Encher o jarro
13 Levante a tampa do jarro.
14 Verá que é bastante firme (tem de ser para evitar que os ingredientes escapem quando liga o
motor).
15 Coloque os ingredientes no jarro.
16 Estes devem ser uma mistura de líquidos e sólidos (os ingredientes congelados contam como
sólidos).
17 Não encha acima da marca de 1,7. Caso o faça, o conteúdo poderá fazer com que a tampa saia
quando liga o motor.
Colocação da tampa
1918 Coloque a tampa no jarro e pressione-a para baixo.
19 Não utilize a liquidificadora sem a tampa colocada. Os conteúdos podem escapar; poderá ferir
alguém; poderá sentir-se tentado a colocar a sua mão no jarro.
O tampão
20 O tampão encaixa no orifício existente na tampa. Geralmente, utilize o tampão se estiver a utilizar a
liquidificadora para faze misturas e utilize o mexedor se estiver a fazer bebidas ou smoothies.
21 Se estiver a fazer maionese, pode colocar o tampão virado ao contrário e colocar óleo na mistura
através do pequeno orifício no tampão.
O mexedor
22 Se estiver a fazer bebidas ou smoothies, em vez de colocar o tampão, coloque a longa
extremidade do mexedor no orifício.
23 Se os ingredientes sólidos não estiverem a entrar em contacto com as lâminas, toque-lhes com o
mexedor para chegarem às lâminas.
24 Rodar o mexedor no sentido contrário ao dos ponteiros do relógio (sentido contrário das lâminas),
contra a parede do jarro, irá ajudar com misturas mais espessas.
25 Não o esmague contra a parede do jarro.
26 Não ligue a liquidificadora sem colocar o tampão ou o mexedor. Caso contrário, os ingredientes
sólidos podem sair através do orifício quando entram em contacto com as lâminas.
Os controlos
27 Os controlos são:
□ botão superior – velocidade baixa, para misturas mais ligeiras, utilizando principalmente
ingredientes líquidos.
Se estiver a utilizar a torneira para distribuir smoothies muito espessos, ligar o motor na
velocidade baixa irá ajudar a fluir.
botão inferior– velocidade alta, para misturas mais robustas, utilizando principalmente
ingredientes sólidos.
Pode trocar directamente entre 1 e 2; pressionar qualquer um dos botões cancela o outro.
botão intermédio – este botão .tem uma mola, tendo duas funções:
desliga ambos os botões 1 e 2 e desliga o motor
também actua como botão “pulse” – pressione para ligar o motor, liberte para parar.
Utilize o botão , por exemplo, para derreter o gelo, para bebidas geladas.
Utilize por breves instantes – pressione e liberte, verifique os resultados, repita até que
alcançar o grau de derretimento que pretende.
28 Não deixe o motor em funcionamento durante mais de três minutos de cada vez, depois deixe
arrefecer durante um minuto antes de o utilizar novamente.
Adicionar ingredientes
29 Para adicionar ingredientes com a liquidificadora ligada:
20tampão levante a tampa, verta/coloque os novos ingredientes através do orifício e, em seguida,
coloque o tampão no orifício
mexedor Retire o mexedor pelo orifício, raspe-o contra o lado do orifício enquanto o remove,
para remover gotas, depois verta/coloque os novos ingredientes através do orifício e,
em seguida, coloque o mexedor no orifício.
30 Verifique se os ingredientes adicionados não aumentam o volume do jarro para cima da marca de
1,7 l.
Terminou?
31 Desligue (prima e solte ) e aguarde até que as lâminas parem antes de remover a tampa do jarro
ou de remover o jarro da unidade do motor.
A torneira
32 Pode rodar a alavanca a torneira para qualquer lado ou ângulo que considerar conveniente.
33 Para abrir a torneira, pressione a alavanca.
34 Para a bloquear na posição aberta, pressione até ao máximo.
35 Quando distribuir smoothies espessos, ajuda ligar o motor à velocidade baixa . Se forem
realmente espessos, utilize também o mexedor (utilize-o através do orifício, não remova a tampa).
36 Quando distribuir smoothies espessos, lembre-se que necessitará de uma mão para a torneira e
uma mão para o mexedor, por isso utilize um copo ou recipiente estável e com o fundo plano numa
superfície de trabalho adequada debaixo da torneira para o smoothie.
Líquidos quentes
37 Independentemente do nível de cuidado que aplica, é inevitável a ocorrência de salpicos. Em
temperaturas elevadas, os salpicos na pele podem provocar lesões. Em casos extremos, podem
queimar, por isso, quando utilizar líquido quente:
a) antes de colocar no jarro, deixe o líquido arrefecer até à temperatura que conseguir manusear
com conforto (ou seja, temperatura do líquido abaixo dos 40 ºC).
b) ligue o motor apenas quando a tampão estiver colocado – para adicionar ingredientes, pare o
motor, remova o tampão, adicione os ingredientes, coloque o tampão e volte a ligar o motor.
c) coloque uma mão na tampa para a fixar no local durante a mistura
d) se a tampa estiver muito quente, remova-a e deixe o líquido arrefecer mais – coloque a tampa
antes de misturar
Gelo picado
38 Antes de utilizar a liquidificadora para picar gelo, certifique-se de que está limpa e enxagúe
abundantemente. Quaisquer vestígios restantes de detergente poderão afectar o sabor do gelo
esmagado e tornar insípida qualquer bebida à qual é adicionado.
39 Os “cubos” de gelo têm vários tamanhos e formas. Terá de experimentar com o gelo da cuvete de
gelo.
40 Inicie com metade a três quartos de um copo de gelo ou 4 a 6 cubos e adicione 15 ml (1 colher de
sopa) de água fresca fria.
2141 Coloque a tampa no jarro, depois pressione o botão “pulse” 3 ou 4 vezes, com breves pausas
entre pressões.
42 Verifique os resultados e ajuste. Misturar demasiado irá reduzir o gelo a líquido, mistura por pouco
tempo irá meramente cortar as extremidades/cantos do gelo.
43 Não tente picar o gelo sem adicionar água ao jarro.
44 Não se sinta tentado a aumentar a quantidade de gelo e misturar mais tempo Isto não irá funcionar.
Demasiado gelo nunca proporciona resultados satisfatórios.
Cuidados e manutenção
1 Desligue a liquidificadora e retira a ficha da tomada.
2 Limpe o mais rapidamente possível após a utilização, para evitar que os resíduos fiquem
incrustados dentro do jarro.
3 Rode o jarro para alinhar a marcação no fundo da base do jarro à marcação
na unidade do motor, depois levante o jarro e a base retirando-o da unidade do
motor.
4 Remova a tampa e o tampão ou mexedor.
Cuidado tenha bastante cuidado quando manusear a unidade da lâmina.
5 Remova a unidade da lâmina da base antes de remover a base do jarro.
6 Vire o jarro ao contrário, para que possa ver o fundo da unidade da lâmina.
7 Segure na pega do jarro com uma mão, segure a parte inferior da unidade da lâmina com a outra
mão e rode a unidade da lâmina no sentido dos ponteiros do relógio para a libertar – é bastante
rígida.
8 Cuidadosamente, levante a unidade da lâmina para a retirar do jarro.
9 Continue a segurar na pega do jarro – agarre na base do jarro e rode no sentido contrário aos
ponteiros do relógio para libertar.
10 Levante a vedação da unidade da lâmina – cuidado com as lâminas pois são afiadas!
11 Desaperte a torneira da base do jarro – são necessárias duas voltas completas para
desaparafusar.
12 Desaperte a alavanca e o seu aro de retenção da torneira – são necessárias cerca de 2 ½ voltas.
13 Lave o tampão, a tampa, o mexedor, as partes da torneira, o jarro, a unidade da lâmina e a
vedação em água morna com sabão e deixe secar ao ar.
14 Não utilize um pano para secar. Pode deixar fios nas superfícies internas e provavelmente irá
cortar-se nas lâminas.
15 Utilize um escovilhão no orifício no jarro onde o tampão se insere.
16 O seu escovilhão também pode ser útil quando limpar o interior do tampão.
17 Depois de utilizar se deixar passar muito tempo sem limpar e ficarem colados pedaços no interior
do jarro, utilize uma escova de nylon. Se não funcionar, pique cubos de gelo no jarro, que isso irá
retirar qualquer resíduo colado.
18 Não coloque nenhuma parte da liquidificadora numa máquina de lavar louça.
19 O ambiente extremo no interior da máquina de lavar louça pode afectar os acabamentos da
superfície.
20 Limpe a parte externa da unidade do motor com um pano limpo húmido.
2221 Não coloque a unidade do motor dentro de água ou qualquer outro tipo de líquido.
22 Não utilize agentes de limpeza agressivos ou abrasivos ou solventes.
Remontagem
23 Aguarde até que esteja seco.
24 Coloque a base do jarro no jarro antes de substituir a unidade da lâmina.
25 Volte a colocar a vedação na parte superior da base do jarro – esta vedação é plana com uma
superfície superior estriada.
26 Alinhe a seta na parte de vidro do jarro com o cadeado aberto U na parte superior da base do
jarro.
27 Baixe a parte de vidro do jarro até à base do jarro.
28 Rode o jarro para que a seta fique alinhada com o cadeado na posição fechada L na parte
superior da base do jarro.
29 O jarro tem de ser rodado o suficiente para permitir que o actuador interruptor de segurança se
mova livremente. É possível vê-lo se olhar par abaixo pelo jarro desde a parte inferior da pega.
30 Se não conseguir mover o actuador, não rodou o jarro o suficiente.
31 Coloque a vedação em redor da unidade da lâmina – mantenha os seus dedos afastados das
lâminas.
32 É mais fácil substituir a unidade da lâmina no jarro ao segurar no jarro na vertical e ao colocar a
unidade da lâmina de cima para baixo no jarro. Isto evita que a vedação caia.
33 Quando a unidade da lâmina estiver no devido local, é mais fácil colocar o jarro ao contrário para
apertar a unidade da lâmina – é um encaixe tipo baioneta e é apertada no sentido contrário aos
ponteiros do relógio.
34 Vire o jarro imediatamente para cima.
35 Aperte a alavanca da torneira novamente na torneira – cerca de 2½ voltas do aro de retenção. Não
aperte demasiado. Se o fizer, o nosso departamento de peças sobresselentes não terá qualquer
problema em vender uma nova torneira. Eles adoram pessoas que partem coisas.
36 Para substituir a torneira, segure-a na vertical, coloque-a no orifício na base do jarro, depois dê 2
voltas completas no sentido dos ponteiros do relógio e já está.
Se o bloqueio da torneira se soltar, rode o jarro e a base ao contrário, segure o bloqueio da torneira
virado para baixo com o pipo para o interior, depois deslize de volta para a base do jarro.
Manchas
37 Os carotenóides, que se encontram em muitos outros vegetais e também em cenouras, podem
causar manchas graves. Estas manchas podem ser impossíveis de remover. Não se preocupe com
isso, pois não irá afectar o funcionamento da liquidificadora.
38 Se quiser tentar, pode tentar colocar as peças manchadas de molho durante a noite numa das
seguintes soluções:
a) um quarto de um copo de lixívia doméstica numa pia cheia de água quente
b) uma mistura de 1 parte de vinagre branco com duas partes de água quente
c) metade de um pequeno pacote de bicarbonato de sódio em água quente suficiente para cobrir
as peças
23Cuidado Não tente misturar estes métodos. Poderá criar uma confusão, pode provocar
lacrimejamento dos olhos, pode inalar fumos e pode danificar as peças que está a tentar
limpar.
24Receitas
Smoothies de fruta fresca – para fazer 2 smoothies grandes
Smoothie de morango e banana
300 ml de leite
1 banana grande, cortada aos pedaços
12 morangos, sem os talos
4 cubos de gelo
Coloque todos os ingredientes no jarro, com os cubos de gelo por último. Ligue à velocidade baixa
durante 10 segundos e depois alta durante 10 segundos.
Smoothie de banana, baunilha e mel
400 ml de leite
1 banana grande, cortada aos pedaços
4 colheres de chá de mel
2 colheres de chá de extracto de baunilha
6 cubos de gelo
Coloque todos os ingredientes no jarro, com os cubos de gelo por último. Ligue à velocidade baixa
durante 10 segundos e depois alta durante 5 segundos.
Smoothie de maçã e manga
600 ml de sumo de maça
1 manga madura
6 cubos de gelo
Retire o caroço, a casca e corte a manga aos bocados. Coloque todos os ingredientes no jarro, com os
cubos de gelo por último.
Ligue à velocidade baixa durante 10 segundos e depois alta durante 10 segundos.
Smoothie cremoso de mirtilo e baunilha
360 ml de limonada
125 g de gelado de baunilha
70 g de mirtilos
Coloque todos os ingredientes no jarro. Ligue à velocidade baixa durante 10 segundos e depois
alta durante 10 segundos.
Smoothie para pequeno-almoço
4 colheres de sopa de iogurte
25200 ml de leite
2 colheres de sopa de aveia ou papas de aveia
1 banana grande, cortada aos pedaços
2 colheres de chá de mel
2 maçãs, sem caroço e cortadas aos bocados
4 cubos de gelo
Coloque todos os ingredientes no jarro, com os cubos de gelo por último. Ligue à velocidade baixa
durante 10 segundos e depois alta durante 15 segundos.
Smoothie de bagas
300 ml de sumo de maça
90 g de framboesas
12 morangos, sem os talos
4 cubos de gelo
Coloque todos os ingredientes no jarro, com os cubos de gelo por último. Ligue à velocidade baixa
durante 15 segundos e depois alta durante 15 segundos.
Smoothie de chocolate e laranja
170 g de gelado de chocolate
300 ml de sumo de laranja
4 cubos de gelo
Coloque todos os ingredientes no jarro, com os cubos de gelo por último. Ligue à velocidade baixa
durante 10 segundos e depois alta durante 5 segundos.
Smoothie de banana e avelã
150 g de iogurte de avelã
1 banana grande, cortada aos pedaços
200 ml de leite
6 cubos de gelo
Coloque todos os ingredientes no jarro, com os cubos de gelo por último. Ligue à velocidade baixa
durante 10 segundos e depois alta durante 5 segundos.
Smoothie de chocolate e pera
300 ml de leite com chocolate
2 peras, sem caroço e sem casca e cortadas aos bocados
10 cubos de gelo
26Coloque todos os ingredientes no jarro, com os cubos de gelo por último. Ligue à velocidade baixa
durante 15 segundos e depois alta durante 5 segundos.
Lassi de manga
200 ml de iogurte
1 manga madura
200 ml de leite
2 colheres de chá de mel
10 cubos de gelo
Retire o caroço, a casca e corte a manga aos bocados. Coloque todos os ingredientes no jarro, com os
cubos de gelo por último.
Ligue à velocidade baixa durante 10 segundos e depois alta durante 5 segundos.
Smoothie de arando, laranja e banana
300 ml de sumo de laranja
300 ml de sumo de arando
1 banana pequena, cortada aos pedaços
6 cubos de gelo
Coloque todos os ingredientes no jarro, com os cubos de gelo por último. Ligue à velocidade baixa
durante 10 segundos e depois alta durante 5 segundos.
Smoothie de pêssego e damasco
4 metades de damasco de conserva (em sumo)
80 ml de sumo de damasco (da lata)
2 pêssegos
4 colheres de sopa de iogurte
200 ml de leite
2 colheres de chá de mel
6 cubos de gelo
Retire o caroço e corte os pêssegos aos bocados. Coloque todos os ingredientes no jarro, com os
cubos de gelo por último. Ligue à velocidade baixa durante 15 segundos e depois alta durante
15 segundos.
Smoothie de maçã, melão e kiwi
400 ml de sumo de maça
1 kiwi, sem casca e cortada aos bocados
150 g de melão, cortado aos bocados
6 cubos de gelo
27Coloque todos os ingredientes no jarro, com os cubos de gelo por último. Ligue à velocidade baixa
durante 10 segundos e depois alta durante 10 segundos.
Smoothie de cereja com muito chocolate
350 ml de limonada
125 ml de gelado de chocolate
100 g de cerejas, sem caroços
Coloque todos os ingredientes no jarro, com os cubos de gelo por último. Ligue à velocidade baixa
durante 10 segundos e depois alta durante 10 segundos.
Smoothies apenas para adultos – para fazer 2 copos
Cocktail tropical
200 ml de cerveja de gengibre
150 g de melão, cortado aos bocados
40 ml de rum
5 cubos de gelo
Coloque todos os ingredientes no jarro, com os cubos de gelo por último. Ligue à velocidade baixa
durante 10 segundos e depois alta durante 10 segundos.
Cosmopolitan
100 ml de sumo de arando
50 ml de vodka
50 ml de Cointreau
Coloque todos os ingredientes no jarro. Ligue à velocidade baixa durante 10 segundos.
Cocktail de café e Bailey’s
100 ml de leite
40 g de gelado de baunilha
½ colher de chá de café instantâneo
40 ml de Bailey’s ou licor de creme Irlandês
3 cubos de gelo
Coloque todos os ingredientes no jarro, com os cubos de gelo por último. Ligue à velocidade baixa
durante 10 segundos e depois alta durante 5 segundos.
28Cocktail gasoso de morango e gin
100 ml de limonada
60 ml de gin
1 colher de chá de sumo de limão
6 morangos, sem os talos
5 cubos de gelo
Coloque todos os ingredientes no jarro, com os cubos de gelo por último. Ligue à velocidade baixa
durante 10 segundos e depois alta durante 10 segundos.
Cocktail de manga e rum
100 ml de sumo de ananás
½ manga madura, sem caroço e sem casca e cortada aos bocados
1 banana pequena, cortada aos pedaços
40 ml de rum
3 colheres de sopa de iogurte
5 cubos de gelo
Retire o caroço, a casca e corte a manga aos bocados. Coloque todos os ingredientes no jarro, com os
cubos de gelo por último.
Ligue à velocidade baixa durante 10 segundos e depois alta durante 10 segundos.
La mumba
300 ml de leite com chocolate
50 ml de Brandy
3 cubos de gelo
Coloque todos os ingredientes no jarro, com os cubos de gelo por último. Ligue à velocidade baixa
durante 10 segundos e depois alta durante 10 segundos.
Pina colada
200 ml de sumo de ananás
100 ml de Malibu
30 ml de natas
4 cubos de gelo
Coloque todos os ingredientes no jarro, com os cubos de gelo por último. Ligue à velocidade baixa
durante 15 segundos e depois alta durante 10 segundos.
29Mudar a ficha incorporada/moldada
Cumpra com as instruções seguintes caso seja necessário substituir a ficha incorporada/moldada:
Funcionamento através de ligação à electricidade (CA)
Esta unidade foi concebida para funcionar apenas com a corrente de 220V~240V. A ligação a
outras fontes de alimentação poderá danificar a unidade.
Ligue uma ficha de três pinos da seguinte maneira:
Os fios neste terminal de alimentação estão coloridos de acordo com o seguinte código:
Verde/Amarelo= Terra Azul= Neutro Castanho= Vivo
Serviço
O aparelho não contém componentes que possam ser reparados pelo utilizador. Se o aparelho não
estiver a funcionar corretamente, verifique o seguinte:
1 Se seguiu as instruções corretamente.
2 A ficha ou cabo não estão danificados de nenhuma forma?
3 A fonte de alimentação eléctrica está ligada.
Se o aparelho continuar sem funcionar:
Em primeiro lugar, consulte o seu revendedor para uma possível reparação ou
substituição. Se o revendedor não for capaz de resolver o problema e necessitar de
devolver o aparelho, certifique-se de que:
1 A unidade está devidamente embalada na sua embalagem original.
2 Apresenta uma prova de compra.
3 Indique a razão para a sua devolução.
Se o cabo de alimentação estiver danificado, deve ser substituído pelo fabricante ou seus agentes de
assistência de forma a evitar qualquer perigo. Caso seja necessário reparar o aparelho dentro do
período de garantia, o aparelho deve ser devolvido a um centro de assistência da Amalgamated
Appliances (Pty) Ltd aprovado. A reparação fora do período de garantia continua a ser possível, mas,
contudo, será cobrada.
30FIXE O RECIBO DA COMPRA AQUI
O RECIBO TEM DE SER FORNECIDO NA EVENTUALIDADE DE UMA RECLAMAÇÃO AO ABRIGO
DOS TERMOS DA GARANTIA
GARANTIA
1. A Tedelex Trading (Pty) Limited (“Tedelex”) garante ao comprador original deste
produto (“o cliente”) que este produto estará livre de defeitos de qualidade e mão-
de-obra, os quais sob uso pessoal, familiar ou doméstico normal se possam
manifestar dentro de um período de 1 (um) ano a partir da data de compra
(“período de garantia”).
2. Quando o cliente compra um produto e ele se avaria, possui defeitos ou não
funciona devidamente para o fim previsto, deverá notificar o fornecedor a quem
comprou o produto (“o fornecedor”) da situação dentro do período de garantia.
Qualquer reclamação no âmbito dos termos desta garantia deve ser suportada por
uma prova de compra. Na ausência de uma prova de compra, então os serviços
de reparação e/ou assistência poderão ser pagáveis pelo cliente ao fornecedor.
3. O produto defeituoso deverá ser devolvido ao centro de assistência do fornecedor
com vista a exercer os termos da garantia.
4. O fornecedor irá reembolsar, reparar ou trocar o produto no âmbito dos termos
desta garantia, sujeito aos requisitos legislativos. Esta garantia só é válida quando
o cliente não avariou o produto ele próprio ou o utilizou para qualquer outro fim
que não o previsto. A garantia não inclui e não será considerada como
abrangendo outros produtos danificados devido a uma situação de desastre,
utilização indevida, manipulação, abuso ou qualquer outra modificação ou
reparação não autorizada do produto.
5. Esta garantia só se estende ao produto fornecido na data da compra e não a
quaisquer outras peças anexadas ou instaladas pelo cliente.
6. Se o cliente solicitar ao fornecedor a reparação do produto e este se avariar ou
não funcionar devidamente dentro de 3 (três) meses da reparação e não devido a
uma situação de utilização indevida, manipulação ou modificação efectuada por
ou sob pedido do cliente, então o fornecedor poderá substituir o produto ou
reembolsar o cliente.
7. O cliente poderá ser responsável por determinados custos quando os produtos
devolvidos não se encontram na sua embalagem original ou esta se encontra
danificada. Tais custos serão deduzidos de qualquer reembolso pago ao cliente.
TEDELEX TRADING (PTY) LTD (JOANESBURGO)
JOANESBURGO TEL. (011) 490-9600
CIDADE DO CABO TEL. (021) 535-0600
DURBAN TEL. (031) 792-6000
www.amap.co.za
3132
Félicitations pour l'achat de notre appareil lumineux Russell Hobbs pour fabriquer des smoothies.
Chaque unité est fabriquée afin de d’assurer la sécurité et la fiabilité. Avant d’utiliser cet appareil pour la
première fois, merci de lire le manuel avec soin et de le garder à titre de référence.
Lisez les instructions et gardez-les en lieu sûr. Si vous transmettez le mélangeur pour la fabrication des
smoothies, joignez-y aussi les instructions. Retirez tous les emballages, mais conservez-les jusqu’à ce
que vous soyez assuré que le mélangeur pour la fabrication des smoothies fonctionne.

Précautions importantes
Suivez les précautions de sécurité de base, y compris :

1   Ce mélangeur pour la fabrication des smoothies ne doit être utilisé que par un adulte
    responsable.
2   Ne mettez pas l’unité moteur dans un liquide, ne l’utilisez pas dans une salle-de-bain, près d’un
    point d’eau ou à l’extérieur.
3   Débranchez avant de le démontage ou avant le nettoyage.
4   Le mélangeur pour la fabrication des smoothies est réglé avec un interrupteur de sécurité, afin
    d’éviter que le moteur ne fonctionne, à moins que le pichet soit en place. N’utilisez pas cela pour
    allumer et pour éteindre le mélangeur pour la fabrication des smoothies.
5   Eteignez (appuyez et relâchez Y), avant d’ajuster le pichet sur l’unité moteur.
6   Eteignez (appuyez et relâchez Y), et patientez jusqu’à ce que les lames s’arrêtent, avant de retirer
    le couvercle du pichet, ou avant de retirer le pichet de l’unité moteur.
7   N’utilisez pas le mélangeur pour la fabrication des smoothies, si le couvercle n’est pas en place.
8   Ne le remplissez pas avec un liquide trop chaud, au point que vous ne puissiez pas le tenir sans
    problème (par ex. Une température de liquide inférieure à 40°C).
9   Lorsque vous mélangez des liquides chauds, mettez votre main sur le couvercle pour le
    tenir.
10 Ne posez pas votre main sur le pichet, même lorsque vous le retirez de l’unité moteur –
    les lames sont coupantes.
11 N’introduisez aucun autre ustensile (cuillère, spatule, etc.) dans le pichet, autre que le bâtonnet
    mélangeur, pendant que le mélangeur pour fabriquer des smoothies est branché.
12 Ne laissez pas le mélangeur de smoothies sans surveillance, lorsqu’il est branché.
13 Placez l’unité moteur sur une surface horizontale sèche, près d’une prise de courant.
14 Amenez le câble afin qu’il ne dépasse pas et que l’on ne puisse pas trébucher dessus ou qu’il ne
    s’emmêle pas.
15 Ne laissez pas le pichet déborder. Si le liquide s’infiltre sous l’unité moteur, il peut être aspiré par le
    moteur et l’endommager.
16 Ne remplissez pas le pichet au-delà de la marque 1,7l – si vous le faites, le contenu pourrait
    soulever le couvercle, lorsque vous démarrez le moteur.
17 Ne faites pas fonctionner le moteur plus de trois minutes à chaque fois, puis laissez-le refroidir
    pendant une minute avant de l’utiliser à nouveau.
18 Ne faites pas fonctionner le mélangeur de smoothies à vide, il pourrait surchauffer.
19 Gardez le mélangeur de smoothies et le cordon, à distance des plaques de cuisons et des brûleurs.
20 N’ajustez aucuns accessoires autres que ceux qui sont fournis.
21 N’utilisez pas le mélangeur pour fabriquer des smoothies pour d’autres buts que ceux décrits dans
    ces instructions.

                                                      33
22 Ne faites pas fonctionner le mélangeur pour fabriquer des smoothies s’il est endommagé, ou s’il
fonctionne mal.
23 Si le cordon est endommagé, le mélangeur pour fabriquer des smoothies doit être renvoyé, afin
d’éviter tout accident.
Utilisation domestique uniquement
Avant la première utilisation
1 Allez à la page 6 « nettoyage et entretien » et nettoyez le mélangeur pour fabriquer des smoothies
et les accessoires, pour retirer les poussières de fabrication, etc.
Préparation
2 Placez l’unité moteur sur une surface horizontale sèche, près d’une prise de courant.
3 Amenez le câble afin qu’il ne dépasse pas et que l’on ne puisse pas trébucher dessus ou qu’il ne
s’emmêle pas.
4 Appuyez et relâchez pour s’assurer que tout soit éteint.
5 Branchez la prise sur le courant.
Fixez le pichet
6 Lorsque vous fixez le pichet sur l’unité moteur, le panneau illuminé s’allumera et il le restera jusqu’à
ce que vous retiriez le pichet ou lorsque vous débranchez le mélangeur pour fabriquer des
smoothies.
7 Dans une utilisation normale, vous devriez utiliser le pichet, le socle du pichet et le robinet comme
étant une unité unique. Ils ne devraient être séparés, que lorsque vous les nettoyez.
8 Vous pourriez ajuster le pichet avec le robinet à droite ou à gauche.
9 Il y a deux marques représentants des cadenas à la base du pichet, et une sur le devant.
10 Tenez le pichet situé sur l’unité moteur, avec le robinet, sur le côté que vous souhaitez.
11 Alignez le cadenas ouvert , qui vous fait face, avec l’unité moteur .
12 Baissez le pichet sur l’unité moteur, puis tournez le pichet pour aligner le cadenas fermé avec le .
Remplissez le pichet
13 Enlevez le couvercle du pichet.
14 Vous verrez que c’est assez dur (c’est nécessaire pour éviter aux aliments de sortir du pichet
lorsque vous allumez le moteur).
15 Mettez les ingrédients dans le pichet.
16 Il devrait s’agir d’un mélange de liquides et d’aliments solides (les aliments surgelés sont
considérés comme étant solides).
17 Ne dépassez pas la marque de 1,7l. Si vous le faites, le contenu pourrait soulever le couvercle,
lorsque vous démarrez le moteur.
34Vous pouvez aussi lire