LD550 NOTICE D'UTILISATION - USER GUIDE - Lyreco
←
→
Transcription du contenu de la page
Si votre navigateur ne rend pas la page correctement, lisez s'il vous plaît le contenu de la page ci-dessous
NOTICE D’UTILISATION
      USER GUIDE

  Détecteur de faux billets

     Counterfeit detector

        LD550
        FA62441
        FA62523
       FA62441 CB

                                  Photo non contractuelle

                              2
INFORMATIONS RELATIVES À LA SANTÉ ET À LA SÉCURITÉ                                              INSTRUCTIONS DE SECURITE
                                                                            FRANCAIS            Afin d’éviter tout dommage, merci de lire attentivement
Respectez toujours les consignes et conseils d’utilisation suivants afin de                      la notice.
prévenir toute situation dangereuse et garantir un bon fonctionnement du détecteur.
                                                                                                • Ne pas utiliser de liquide, gaz inflammable pour nettoyer votre détec-
      Avertissements                                                                            teur.
- Ne démontez pas ou n’essayez pas de réparer vous-mêmes votre détecteur.                       • Si vous entreposez votre détecteur dans un environnement froid (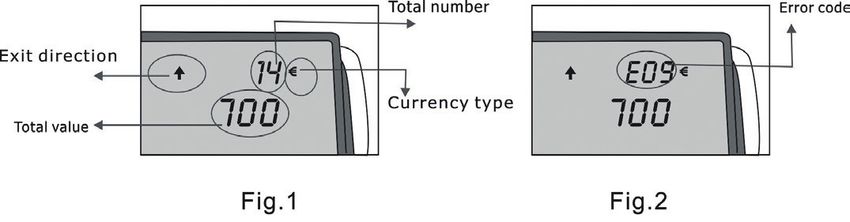
2. Pendant que vous visualisez vos détections, si vous présentez un billet,       3. Cliquer sur « OPEN » pour sélectionner
l’appareil repassera automatiquement en mode détection.                           le fichier « .ISO » que vous voulez télécharger.
3. La remise à zéro se fait en maintenant appuyé la touche remise à zéro          4. Cliquer sur « Xfer », le téléchargement
pendant 2 secondes.                                                               débutera. Un chargement réussi s’affiche
                                                                                  comme ci-contre :

                                                                                  Insérer la carte micro-SD dans son
                                                                                  compartiment sous le détecteur, et brancher
                                                                                  la machine à une alimentation externe.
                                                                                  Appuyer et relâcher la touche « CLR » et
                                                                                  « ON/OFF » pour allumer la machine. Celle-ci affichera «-« signifiant
                                                                                  que le chargement est en train de s’effectuer. A la fin du chargement, la
MODE D’ECONOMIE D’ENERGIE                                                         machine bipera 2 fois et s’éteindra automatiquement.
Après 5 minutes de non utilisation, votre détecteur bascule en mode
économie d’énergie, seul l’indicateur en bleu de la touche de mise sous           Au moyen du logiciel USB
tension reste allumé. Vous repassez en mode actif en appuyant sur n’im-           1. Eteindre la machine et utiliser le câble USB fourni pour relier la ma-
porte quelle touche ou en présentant un billet pour détection.                    chine au PC.
La machine sera mise hors tension après 15 min. de non utilisation.               2. Brancher l’adaptateur de la machine, puis appuyer sur les touches «
                                                                                  CLR » et « ON/OFF » simultanément. Si 7 signes «-« apparaissent sur
INFORMATION SUR L’ETAT DE LA BATTERIE                                             l’écran, cela signifiera que le chargement a débuté. Si l’écran n’affiche
Lorsque que la machine est en charge, l’écran affiche « -Ch » pour                pas 7 signes « -« , recommencer les étapes 1 et 2.
indiquer l’état de chargement en cours. Normalement, il faut environ 15           3. Lancer « Auto Download software » sur le PC et cliquer sur « LoadFile
heures pour recharger entièrement une batterie. Si la batterie est faible,        » pour rechercher le logiciel de mise à jour (***.UPL) (Voir image 4), puis
l’écran affiche « -Lo » pour informer l’utilisateur que celle-ci doit être        cliquer sur « Update Soft » pour télécharger le logiciel (voir image 5).
rechargée, ou qu’une autre alimentation doit être utilisée.

LOGICIEL DE MISE A JOUR
Au moyen de la carte micro SD
1. Connecter la carte Micro-SD à un PC
par l’intermédiaire d’un lecteur.
Exécuter « CreateDiskImage.exe ».
2. Sélectionner l’option « IMAGE_2_DISK »,                                        4. En cas de téléchargement réussi (voir image 6), la machine s’éteindra
puis la carte correspondante dans les                                             automatiquement.
options « disk » pour connecter la carte
micro SD au PC.                                                                   ! Remarque : Une batterie simple ne peut pas charger le logiciel.

                                                                                  GESTION DES ANOMALIES
                                                                                  Erreurs lors de la mise en marche du détecteur
                                                                                  Après la mise sous tension, l’appareil réalise un certain nombre
                                                                              5   d’autotest.

Si un des messages d’erreurs apparaît à l’écran, il est probable que le           INFORMATIONS IMPORTANTES
capteur soit bloqué ou recouvert de poussière.                                    Si votre machine sonne ou génère des anomalies :
Ouvrir votre détecteur délicatement, nettoyer ou enlever le billet présent        - Vérifier la puissance d’alimentation (AC 100V 240V - 50/60 Hz)
puis redémarrer l’appareil.                                                       - Vérifier que l’adaptateur est compatible DC 12V +/- 10%
                                                                                  - Vérifier que le connecteur d’alimentation est bien connecté
  Code erreur                          Type d’anomalie                            - Vérifier que la batterie (optionnelle) est suffisamment chargée
      P01           Contrôler le capteur infra rouge en haut à gauche             - Tenir éloigné de tout champ magnétique
                                                                                  - Dépoussiérer les capteurs
      P02            Contrôler le capteur infra rouge en haut à droite            - Si un billet reste bloqué pendant la détection, ouvrir le capot du détec-
      P03            Contrôler le capteur infra rouge en bas à gauche             teur, enlever le billet, refermer le capot et représenter le billet pour une
                                                                                  nouvelle détection
      P04             Contrôler le capteur infra rouge en bas à droite            - Défroisser le billet avant toute introduction dans l’appareil.
      P05             Contrôler le capteur d’alimentation des billets
                                                                                  MAINTENANCE
      P06                 Contrôler le capteur de vitesse de rotation             Afin que votre détecteur garde sa précision :
      P09                 Contrôler le capteur d’éjection à gauche                - Contrôler la stabilité de la tension secteur
                                                                                  - Garder le détecteur dans un environnement ventilé, à l’abri du soleil et
      P10                  Contrôler le capteur d’éjection à droite               d’éventuels champs magnétiques
      P11                     Contrôler le capteur magnétique                     - Nettoyer régulièrement les capteurs, utiliser un chiffon doux légère-
                                                                                  ment imbibé d’alcool
      P12                               Contacter SAV                             - Ne pas exposer les capteurs à des objets coupants afin d’éviter tout dommage
                                                                                  - Ne pas démonter l’appareil.

Identification des erreurs de détection                                           SPECIFICATIONS

      Code erreur                           Type d’anomalie                                                        magnétisme, Infra rouge, image, qualité du
                                                                                   Caractéristiques testées
                                                                                                                   papier, épaisseur, optiques
            E01            Erreur «longueur»
                                                                                   Dimensions                      155 x 137 x 82 mm
       E02 / E03           Erreur «magnétisme»
                                                                                   Alimentation                    AC 100V 240V - 50/60 Hz ou DC 12V +/- 5%
       E04 / E05           Erreur «infra rouge»
                                                                                   Température de fonctionnement   0° / 40°C
            E06            Erreur «épaisseur»
                                                                                   Température de stockage         - 20° / 65 °C
            E07            Billet suspect
                                                                                   Batterie                        Batterie rechargeable Lithium 10,8V / 600 mAH
            E08            Erreur «hologramme»
                                                                                   Consommation                    < 10 W
  E09 / E10 / E11 / E12    Erreur «qualité papier»
                                                                                   Vitesse                         < 0.5 s par billet
            E14            Erreur dénomination
                                                                                  Si votre appareil présente des défauts non listés, veuillez contacter le SAV.
            E20            Erreur d’introduction du billet
                                                                              6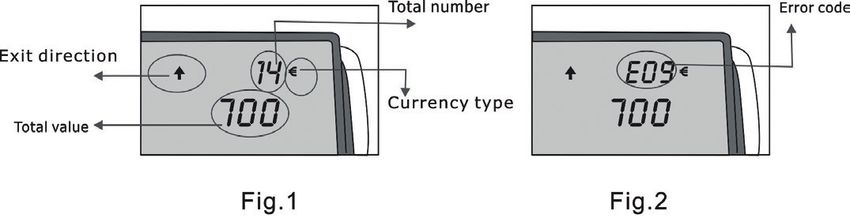
HEALTH AND SAFETY INFORMATION SAFETY INSTUCTIONS
ENGLISH Please read the safety instructions before use!
Always comply with the following precautions and usage tips to Please read all warnings and cautions carefully to avoid
avoid dangerous situations and ensure peak performance of your detector.
damage to the machine and personal injury.
Warnings • When cleaning the device no spray with inflammable gases is to be
- Do not desassemble or attempt to repair your detector. used.
This may result in electric shock or damage the machine. • If the machine is exposed to cold for a long time .it is necessary to
- Do not use your detector near flammable or explosive gases or liquids. sustain it at room temperature about two hours before use.
This may cause a fire or explosion. • Foreign Materials Care should be taken so that metal objects and flam-
- Do not insert liquids into the detector. mable materials do not fall inside the unit.
This may cause a fire or electric shock.
- Do not dip into liquid, or handle your detector with wet hands.
• To prevent shock hazard, do not disconnect the plug of the AC/DC adap-
This may result in electric shock and damage the machine. ter when hands are wet.
- Do not expose the detector to direct sunlight or high temperatures for an • To prevent fire or short circuit, unplug the unit if you want to move it to
extented period of time. another position.
Prolonged exposure to sunlight or extreme temperatures can cause permanent • Hold the plug disconnecting the unit from the power outlet, do not pull
damage to your detector’s internal components. the cord as it can be damaged.
- Avoid covering the detector with blankets, rags, clothes or plastics. • Keep the AC/DC cord from damage. Avoid placing heavy objects on the
The detector may overheat, which may distort the machine or cause a fire.
cord. Do not recommended load of the power supply.
If liquid or foreign objects enter your detector, immediately disconnect the • The unit should be connected to a power supply through this type of AC/
power source and then contact SAFETOOL service center. DC adapter.
Caution INTRODUCTION
- Do not use a machine with damage electrical cable, or cable with defects. This device is a reliable and easy-operated banknote detector. It can tell
- Do not spare yourselves damaged electrical cable, contact SAFETOOL service counterfeit banknotes from genuine ones. With its rechargeable battery
center or an agreed professional.
inside, it can be brought to anywhere when needed. The features of cur-
rency detected include magnetism, infrared, image, paper quality, optics
Correct Disposal of this Product (Waste Electrical & Electronic Equipment) and etc.
(Applicable in the European Union and other European countries with separate
collection systems) FEATURES
This marking on the product, or literature, indicates that the product should not be • Pass authentication of CE, REACH, ROHS, EUP, and ECB.
disposed of with other household waste at the end of their working life. To prevent • Distinguish currency type and denomination automatically.
possible harm to the environment or human health from uncontrolled waste
disposal, please separate these items from other types of waste and recycle them
• Display number of sheet of banknotes and total value of each currency
responsably to promote the sustainlable reuse of material resources. type.
Household users should contact either the retailer where they purchased this • Detecting ability is enhanced a lot, paper quality detecting is added
product, or their local government office, for details of where and how they can when detecting EURO.
take these items for environmentally safe recycling. • Two kinds of currency are supported, one is Euro and the other is
Business users should contact their supplier and check the terms and conditions optional.
of the purchase contract. This productshould not be mixed with other commercial • Rechargeable lithium battery inside for portable usage.
wastes for disposal.
• Provided with sound-light alarm function
7
• Software can be updated through USB port. Detecting
• Software and hardware design is more excellent. Auto adjustable tech- You need not select currency type because the machine can distinguish
nology is adopted on sensors and it is easy to maintenance. the currency type automatically when you pass a banknote. One of the
LED indicators turns on to indicate the current currency.
LIST OF ACCESSORIES When the machine detects an insertion of a banknote in the feed port,
it will automatically start the motor and begin a detecting procedure.
1. Detector 4.Micro-SD card (optionnal) There is no limitation on side or direction of the banknotes for most cur-
2. User manual 5. USB download cable (optional) rency types such as Euro and etc. But for some of other banknotes (e.g.
3. AC/DC power adapter 6. Rechargeable battery (optional) Swiss Franc), there are rules for the inserting direction and side. When
inserting banknote, please make sure the banknote are put in straightly.
If the banknote is a genuine one, the number of sheets will be increased
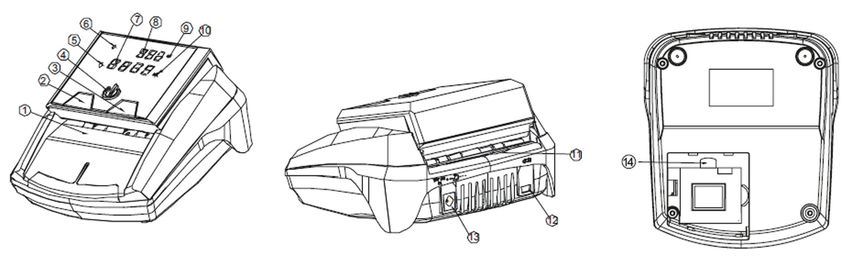
DESCRIPTION by one and the total value will be added with the current value, then the
banknote will go out at the selected exit direction (See Figure 1). When
1. Feed port 8. Number of Sheets Display the number of sheets is beyond 999 or the total value is beyond 999999,
2. REP/DIR key 9. Euro Indicator the data will be automatically set to zero.
3. CLR key 10. Local currency Indicator
4. Power ON/OFF key 11. Exit
5. Backwards Indicator 12. USB download port
6. Forwards Indicator 13. DC input socket
7. Total Value Display 14. Micro-SD card socket
OPERATION
Turn on/off the machine
By pressing «ON/OFF» key and hold on for about 2 seconds when the ma- If the banknote is a suspicious one, it will be rejected and exit from the
chine is power off, user can turn on the machine. The ON/OFF indicator feed port with 3 beeps. And at the same time, the light of «ON/OFF» key
lights up and self test will start after turning on the detector. If the test is will glint, corresponding error code will be displayed on «Sheets Display
successful, the Sheets Display Window will display the software version, Window». The error codes are listed at Troubleshooting further.
Next two «0» will respectively be displayed on the Sheets Display Window
and Value Display Window. In this mode, the detector is ready for use. Detecting Report and Clearing
By pressing «ON/OFF» key and hold on for about 2 seconds when the After finishing detection, press «REP/DIR» key to enter report mode.
machine is power on, user can turn off the machine. When checking the notes detection record, it is possible for you to press
«REP/DIR» key again and again to display records for different denomina-
Select Genuine Banknote Exit Direction tion and its pieces by turns. (See Figure 3)
Press «REP/DIR» key and hold on for 2 second to select the exit direction When checking the record, if you feed banknote, the detector will au-
of the genuine banknote. The denotation of direction will be shown on the tomatically exit the report condition. Press «CLR» key and hold it for 2
left part of the top cover. seconds to clear records.
• ↑ means the genuine banknote will go out from the exit
• ↓ means the genuine banknote will retreat from the feed port.
The machine can memory the last setting.
8
3. Click « OPEN » button to select the « .ISO »
                                                                                     file that you want to download.
                                                                                     4. Click « Xfer » button, it will start to
                                                                                     download the file, if you download succesfully,
                                                                                     it will the following interface :

                                                                                     Insert the Micro-SD card into Micro-SD socket,
                                                                                     next connect the machine to the external power
SLEEP (Power Saving) MODE                                                            source.
The detector will enter sleep mode after 5 minutes of idling in order to             Press and hold «CLR» key and «ON/OFF»
save power. The information on the display window will turn off and only             key to turn on the machine, the machine will display seven «-», it
the blue ON/OFF indicator lights up. The machine can be waken up and                 shows the machine has already entered into download mode. After the
return to working mode by touching any key or feeding a banknote.                    completion of the update, the machine will beep 2 for times and turn off
When the machine is in sleep mode with only built-in battery, if the                 automatically.
machine is idle for more 15 minutes again, the machine will power off
automatically.                                                                       Through USB update software
                                                                                     1. Turn off the banknote detector first, and then use the provided
BATTERY STATUS MESSAGE                                                               download cable to connect the USB port on PC and the USB port of the
When the machine is charging the battery, the Number of Sheets Display               detector together.
will display «–Ch» at an interval to indicate the charging status. Usually it        2. Put the DC output plug into the DC socket.(make sure that the adapter
needs about 15 hours or more to make the power of battery fully.                     is inserted into the mains). Next, press «CLR» key and «ON/OFF» key si-
If the voltage is low, the Number of Sheets Display will display «-Lo» at            multaneously. If seven pieces of «-» are displayed on the Display Window,
an interval to remind the user of that the battery needs to be charged or            it shows the machine has entered into download mode. If the display win-
the user should turn off the banknote detector.                                      dow doesn’t display seven pieces of «-», please retry 1 and 2 steps again.
                                                                                     3. Run «Auto Download software» on PC and click «LoadFile» button to
UPDATE SOFTWARE                                                                      load the update software(***.UPL)(See Figure 4), then click «Update Soft»
Through SD card update software                                                      button to download the software(See Figure 5)
1. Connect the Micro-SD card to PC by
a card reader,
Run « CreateDiskImage.exe » on PC.
2. Select « IMAGE_2_DISK » option, and select
the corresponding card drive in the «disk»
option that connects the Micro-SD card to PC.

                                                                                     4. If you download successfully(See Figure 6), the machine will turn off
                                                                                     automatically.

                                                                                     ! Notice : Single battery can’t download software.

                                                                                9

TROUBLESHOOTING                                                                          Error message display                         Error type
Self test error code display
The detector automatically performs a self test after power on. If one of                         E01                               Length Error
the following error messages is displayed on the display window, usually                       E02 / E03                       Magnetic feature Error
it is because the sensor is blocked by banknotes or dust. Please use a
brush or a piece of soft cloth to clean the dust on the sensor or remove                       E04 / E05                          IR feature Error
the banknotes, and then restart the machine.                                                      E06                             Thickness Error
                                                                                                  E07                                  Slant note
     Error message display                         Error type
                                                                                                  E08                             Hologram Error
             P01                       The upper left IR sensor is failure
                                                                                          E09 / E10 / E11 / E12                  Paper quality Error
             P02                       The upper right IR sensor is failure
                                                                                                  E14                           Denomination Error
             P03                       The below left IR sensor is failure
                                                                                                  E20                              Passing Error
             P04                      The below right IR sensor is failure

             P05                         The feeding sensor is failure
                                                                                     IMPORTANT NOTICES
             P06                       The rotate speed sensor is failure            • If the machine keeps alarm or works abnormally, check the following:
             P09                       The left passing sensor is failure            - Whether the main power supply is within specified range (AC
                                                                                     100V~240V/50~60Hz).
             P10                       The right passing sensor is failure
                                                                                     - Whether the DC output is within specified range: DC 12V±10%.
             P11                        The magnetic sensor is failure               - Whether the supply plug is well connected.
             P12                            No debug the machine                     - Whether the built-in battery is sufficient to work.
                                                                                     - Keep away from strong magnetic affection.
Detective Error Code Display                                                         - Clear the dust on the sensors.
If the following error code is displayed on the display window during the            • If a banknote is blocked while it is being detected, please open the top
course of detecting, you can handle them as per the error type after the             cover and get out the banknote to detect it again.
machine is stopped.                                                                  • Please smooth the banknote before detecting, and the banknote must
                                                                                     be put in straightly while it is being inserted.

                                                                                10
MAINTENANCE
This machine is a precise financial detecting equipment that needs perio-
dic maintenance.
- Periodically check the voltage of the power supply to ensure that the
voltage is within the specified range.
- Keep the banknote detector in ventilated place and beyond insolating
and magnetic field.
- Periodically clean the sensors: use a piece of cotton with a small
amount of alcohol to clean all sensors, rubber wheels and rubber syn-
chronous belt. Keep the surface of sensors away from sharp and hard
articles to avoid damage.
- Do not attempt to disassemble the detector at will.

SPECIFICATIONS

                                magnetism, infrared, image, paper quality,
 Test feature
                                thickness, optic.
 Dimension                      155 x 137 x 82 mm
 Power Supply                   AC100V~240V 50/60Hz or DC12V/1.0A
 Operating
                                0° / 40°C
 temperature
 Storage
                                - 20° / 65 °C
 temperature
 Battery                        rechargeable lithium battery 10.8V/600mAH
 Power Consumption              < 10 W
 Speed                          < 0.5s/sheet

If the machine has some faults that you can’t solve, please contact the Techni-
cal Support Dept. of our company or our agent for services.
Products subject to change without further notice.

                                                                                                11

INFORMACJE DOTYCZĄCE ZDROWIA                                                                         ZALECENIA BEZPIECZEŃSTWA
I BEZPIECZEŃSTWA                                                     POLSKI                          Aby zapobiegać wszelkim szkodom, należy przeczytać instrukcję obsługi.
Należy zawsze przestrzegać następujących zaleceń i porad                                             • Nie używać płynów, gazów łatwopalnych do czyszczenia testera.
dotyczących obsługi, aby zapobiegać powstawaniu wszelkich sytuacji niebez-
piecznych i aby zagwarantować prawidłowe działanie testera.
                                                                                                     • Jeżeli tester przechowuje się w niskich temperaturach (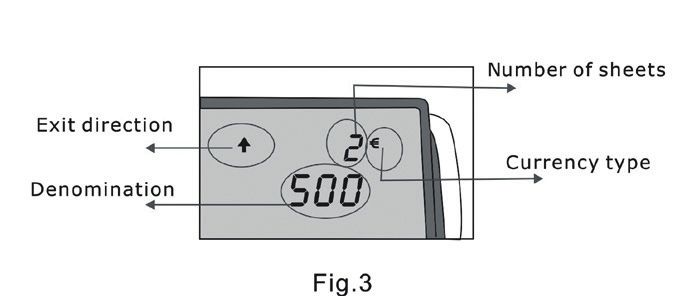
LISTA AKCESORIÓW                                                                            Wykrywanie
                                                                                            1. Nie ma konieczności wyboru waluty, urządzenie wykrywa automatycznie
1. Czujnik                                 4. Kabel USB do aktualizacji przez               walutę po 1. przejściu banknotu. Wskaźnik włącza się po wykryciu rodzaju waluty.
2. Instrukcja obsługi                      Internet (w opcji)                               2. Gdy maszyna wykryje włożony banknot, silnik pobiera go i rozpoczyna się
3. Kabel zasilania                         5. Akumulator (w opcji)                          proces wykrywania.
                                                                                            3. Nie istnieje predefiniowany kierunek wkładania banknotów w tester. Z wy-
                                                                                            jątkiem franka szwajcarskiego, należy przestrzegać kierunku ustawienia bankno-
NAZWA                                                                                       tu przed urządzeniem. Przed włożeniem banknotu należy go wyprostować, aby
                                                                                            zapobiegać powstawaniu zagięć.
1. Strefa wkładania banknotów              7. Okno wyświetlania wykrytej wartości           • Jeżeli sprawdzany banknot jest prawidłowy, wartość licznika rośnie o 1, a
2. Przycisk kierunkowy i współczynnik      8. Okno wyświetlania wartości liczenia           wartość całkowita rośnie o wartość wykrytego banknotu. Następnie banknot jest
wykrywania                                 9. Wskaźnik Euro                                 wysuwany w wybranym kierunku.
3. Przycisk zerowania                      10. Wskaźnik innych walut                        Gdy całkowita liczba banknotów wynosi 999 gdy całkowita wartość wynosi 9999,
4. Przycisk zasilania                      11. Wyjście                                      licznik ponownie wskazuje 0 (rys. 1)
5. Wskaźnik wyjścia z tyłu banknotu        12. Port USB                                     • Gdy banknot budzi podejrzenia, jest wysuwany z przodu oraz następuje emisja
6. Wskaźnik wyjścia z przodu banknotu      13. Gniazdo zasilacza                            3 sygnałów dźwiękowych. W tym samym czasie przycisk zasilania zaczyna migać
                                                                                            (rys. 2). Kody błędów omówiono w liście usterek.

URUCHOMIENIE
Wyłączenie/włączanie maszyny
1. Podtrzymać przycisk zasilania przez około 2 sekundy, tester wykonuje test
automatyczny
2. Po wykonaniu testu wyświetlacz wyświetla wersję oprogramowania i rodzaj waluty
3. Okna wyświetlania wykrytej wartości i wyświetlania wartości liczenia wskazują 0.0
4.Tester jest gotowy do użycia
5. Aby wyłączyć maszynę, przytrzymać przez 2 sekundy przycisk zasilania
                                                                                            Wykrywanie raportu i czyszczenia
Wybór kierunku wyjścia banknotu                                                             1. Aby wyświetlić raport testu, należy nacisnąć przycisk kierunkowy i raportu wy-
1. Przytrzymać przez 2 sekundy przycisk kierunkowy testera, aby wybrać kierunek             krywania. Nacisnąć ten sam przycisk, aby wyświetlić wynik każdego testu (rys. 3)
wyjścia banknotu                                                                            2. Podczas wyświetlania wyników testu, po włożeniu banknotu, urządzenie
2. Kierunek wyjścia wyświetla się w górnym lewym rogu ekranu.                               przełącza się automatycznie w tryb wykrywania.
• ↑ oznacza wyjście z tyłu urządzenia                                                       3. Zerowanie następuje po przytrzymaniu przycisku zerowania przez 2 sekundy.
• ↓ oznacza wyjście z przodu urządzenia
3. Maszyna zapamiętuje ostatnie ustawienie

                                                                                       13

TRYB OSZCZĘDZANIA ENERGII                                                                   Poprzez oprogramowanie aktualizacji USB
Po 5 sekundach przerwy tester przełącza się w tryb oszczędzania energii, tylko              1. Wyłączyć tester, podłączyć kabel USB między testerem a komputerem
niebieski wskaźnik przycisku zasilania pozostaje włączony. Tryb pracy można                 2. Podłączyć zasilanie sieciowe do testera, nacisnąć przycisk zerowania, a
włączyć po naciśnięciu dowolnego przycisku lub po wsunięciu banknotu.                       następnie przycisk zasilania. Wyświetlacz wyświetli 7 znaków „-”, które oznaczają,
Zasilanie urządzenia wyłącza się po 15 s przerwy.                                           że urządzenie jest w trybie aktualizacji oprogramowania.
                                                                                            Jeżeli ekran nic nie wyświetla, należy powtórzyć opcje 1 i 2
KOMUNIKAT DOTYCZĄCY ŁADOWANIA AKUMULATORA                                                   3. Uruchomić „aktualizację automatyczną” na komputerze PC i kliknąć opcję „Load
Komunikat „-CH” wyświetla się w czasie ładowania (15 h = pełne ładowanie)                   file”, aby załadować aktualizację testera (***. UPL) (Rys. 4-), następnie nacisnąć
Gdy akumulator jest rozładowany, komunikat „-Lo” wyświetla się przemiennie. W               przycisk „Update Soft”, aby zaktualizować oprogramowanie (rys. 5)
takim przypadku należy naładować akumulator, podłączając go do zasilania.                   4. Po wykonaniu aktualizacji (rys. 6), uruchomić ponownie tester

AKTUALIZACJA OPROGRAMOWANIA
Poprzez oprogramowanie do aktualizacji kart SD
1. Podłącz kartę Micro-SD do komputera PC za
pomocą czytnika kart,
Uruchom «CreateDiskImage.exe» na PC.
2. Wybierz opcję «IMAGE_2_DISK», a następnie
wybierz odpowiedni napęd kart w opcji «dysku»,                                              OBSŁUGA USTEREK
która łączy kartę Micro-SD z komputerem.                                                    Błędy w czasie uruchamiania testera.
                                                                                            Po włączeniu zasilania urządzenie wykonuje testy automatyczne. Jeżeli jeden z
                                                                                            komunikatów błędu wyświetli się na ekranie, prawdopodobnie czujnik zablo-
                                                                                            kował się lub pokrył się kurzem. Otworzyć delikatnie tester, wyczyścić lub wyjąć
                                                                                            banknot, następnie ponownie uruchomić urządzenie.

                                                                                                       Kod błędu                                  Typ usterki

                                                                                                         P01                 Sprawdzić czujnik podczerwieni w górnym lewym rogu
3. Kliknij przycisk «OPEN», aby wybrać plik «.ISO»,
który chcesz pobrać.                                                                                     P02                 Sprawdzić czujnik podczerwieni w górnym lewym rogu
4. Kliknij przycisk «Xfer», zacznie pobierać plik,                                                       P03                  Sprawdzić czujnik podczerwieni w dolnym lewym rogu
jeśli zostanie pobrany pomyślnie, będzie następujący
interfejs.                                                                                               P04                 Sprawdzić czujnik podczerwieni w dolnym prawym rogu

                                                                                                         P05                              Sprawdzić czujnik zasilania
Włóż kartę Micro-SD do gniazda Micro-SD, a
                                                                                                         P06                             Sprawdzić czujnik wymiarów
następnie podłącz urządzenie do zewnętrznego
źródła zasilania.                                                                                        P09                           Sprawdzić prawy czujnik wyrzutu
Wciśnij i przytrzymaj «CLR» i «ON / OFF», aby włączyć                                                    P10                            Sprawdzić lewy czujnik wyrzutu
urządzenie, urządzenie wyświetli siedem «-», pokazuje, że urządzenie już przeszło
                                                                                                         P11                         Czujnik magnetyczny jest uszkodzony
do trybu pobierania. Po zakończeniu aktualizacji urządzenie wyemituje 2 sygnały
dźwiękowe i automatycznie się wyłączy.                                                                   P12                                 Nie debuguj maszyny
                                                                                       14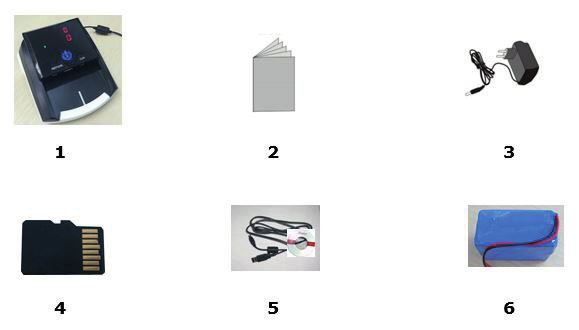
Identyfikacja błędów wykrywania                                                                              OBSŁUGA TECHNICZNA
Jeśli poniższy kod błędu zostanie wyświetlony w oknie wyświetlacza podczas                                   Aby zachować dokładność działania testera:
wykrycia, możesz obsłużyć je zgodnie z typem błędu po zatrzymaniu urządzenia.                                - Sprawdzić stabilność napięcia zasilania
                                                                                                             - Ustawić tester w miejscu wentylowanym, z dala od słońca i pól magnetycznych
              Kod błędu                                         Typ usterki                                  - Czyścić regularnie czujniku, używać miękkiej ścierki lekko nasączonej alkoholem
                 E01                                          Błąd „długości”                                - Nie narażać czujników na działanie ostrych przedmiotów, aby zapobiegać ich
                                                                                                             uszkodzeniu
             E02 / E03                                     Błąd „magnetyczny”
                                                                                                             - Nie demontować urządzenia
             E04 / E05                                     Błąd „podczerwieni”
                 E06                                          Błąd „grubości”
                                                                                                             DANE TECHNICZNE
                 E07                                     Banknot nieprawidłowy
                 E08                                        Błąd „hologramu”                                                             magnetyczny, podczerwień, obraz, jakość
                                                                                                              Charakterystyka testu
                                                                                                                                         papieru, grubość
       E09 / E10 / E11 / E12                              Błąd „jakości papieru”
                                                                                                              Wymiary                    155 x 137 x 82 mm
                 E14                                        Błąd denominacji
                 E20                                       Błąd wprowadzania                                  Zasilanie                  AC 100 V 240 V - 50/60 Hz lub DC 12 V +/- 5%
                                                                                                              Temperatura działania      0° / 40°C
WAŻNE INFORMACJE                                                                                              Temperatura
Jeżeli urządzenie wydaje dźwięki lub sygnalizuje usterki:                                                                                - 20° / 65 °C
                                                                                                              przechowywania
- Sprawdzić zasilanie (AC 100 V 240 V - 50/60 Hz)
- Sprawdzić, czy zasilacz jest prawidłowy DC 12 V +/- 5%                                                      Akumulator                 Akumulator litowy 10,8 V / 600 mAh
- Sprawdzić, czy złącze zasilania podłączono prawidłowo                                                       Zużycie energii            < 10 W
- Sprawdzić, czy akumulator (w opcji) jest wystarczająco naładowany
- Jeżeli banknot zablokował się w testerze, otworzyć pokrywę testera, wyjąć                                   Prędkość                   < 0,5 s na banknot
banknot, zamknąć pokrywę i wsunąć banknot w celu wykonania testu
- Wyprostować banknot przed wsunięciem w urządzenie

                                                                                                             Jeżeli urządzenie wykazuje usterki niewymienione powyżej, należy
                                                                                                             skontaktować się ze sprzedawcą.

                                                                                                        15

INFORMAZIONI RELATIVE ALLA SALUTE E ALLA SICUREZZA                                                           ISTRUZIONI DI SICUREZZA
Seguire sempre le istruzioni e i consigli di utilizzo per prevenire qualsiasi        ITALIANO                Al fine di evitare eventuali danni, si prega di leggere attentamente le
situazione di pericolo e per garantire un buon funzionamento del rilevatore                                  istruzioni..
di banconote false.
                                                                                                             • Non usare gas infiammabili, liquidi per pulire il sensore.
      Avvertenze                                                                                             • Qualora il rilevatore sia conservato in un ambiente freddo [
LISTE DES ACCESSOIRES                                                                Selezione della direzione di uscita della banconote
                                        5. Cavo USB aggiornamento                    1. Tenere premuto per 2 secondi il tasto direzionale sul rilevatore per
1. Rilevatore                           Internet                                     selezionare la direzione di uscita della banconota
2. Istruzioni per l’uso                 (opzionale)                                  2. Il senso di espulsione sarà mostrato nella parte superiore sinistra
3. Consumo                              6. Batteria ricaricabile                     dello schermo.
4. Cavo elettrico                       (opzionale)                                             • ↑ significa che espulsione avverrà sul retro dell’unità
                                                                                                • ↓ significa che l’espulsione avverrà sul lato anteriore dell’unità
                                                                                     3. La macchina memorizza le ultime impostazioni configurate
DESCRIZIONE
                                                                                     Rilevamento
1. Zona di ingresso della banconota     8. Finestra di visualizzazione di            1. Non è necessario selezionare la valuta, l’unità è in grado di rilevare
2. Tasto direzionale e rapporto di      conteggio                                    automaticamente la valuta durante il passaggio della prima banconota.
rilevamento                             9. Indicatore euro                           Una spia luminosa si accende quando viene rilevato il tipo di valuta.
3. Tasto reset                          10. Indicatore altra possibile valuta        2. Quando la macchina rileva l’entrata di una banconota, il motore dise-
4. Pulsante di alimentazione            11. Uscita                                   gna il biglietto e inizia la procedura di rilevamento.
5. Indicatore uscita posteriore della   12. Porta USB                                3. Non c’è alcun verso predefinito di introduzione della banconota nel
banconota                               13. Spina adattatore                         rivelatore. Si consiglia di introdurre il biglietto dal lato anteriore dell’ap-
6. Indicatore uscita anteriore della    14. Scomparto micro USB                      parecchio (eccetto per franco svizzero). Prima di inserire la banconota,
banconota                                                                            cercare di stirarla con le mani per evitare pieghe.
7.Finestra di visualizzazione del                                                    • Se la banconota rilevata è corretta, il contatore presenterà un incre-
valore rilevato                                                                      mento di 1 e il valore totale aumenterà del valore della banconota rileva-
                                                                                     ta. Il biglietto viene quindi espulso nella direzione scelta.
AVVIO                                                                                Quando il numero totale di biglietti rilevati è 999, o quando il valore totale
Avvio/arresto della macchina                                                         è 9999, il contatore ritorna a 0 (fig. 1)
1. Premere e tenere premuto il pulsante di alimentazione per circa 2                 • In caso di banconota sospettosa, essa sarà espulsa verso il lato ante-
secondi, il rilevatore eseguirà un autotest                                          riore con una serie di 3 bip sonori. Allo stesso tempo il tasto di accen-
2. Dopo questa prova, lo schermo visualizzerà la versione del software e             sione lampeggia (fig. 2). I codici di errore sono elencati nella lista delle
il tipo di valuta                                                                    anomalie.
3. Le finestre di visualizzazione del valore rilevato e la visualizzazione di
conteggio mostrerà 0.0
4. Il rilevatore è pronto per l’uso
5. Per spegnere il computer, tenere premuto 2 secondi il pulsante di
alimentazione

                                                                                     Bilancio dei rilevamenti effettuati e riazzeramento
                                                                                     1. Per visualizzare il rapporto dei rilevamenti effettuati, premere il tasto
                                                                                     direzionale e il rapporto di rilevazione. Premere lo stesso pulsante per
                                                                                     visualizzare ogni rilevamento effettuato (fig. 3)
                                                                                17

2.Mentre si stanno visualizzando i rilevamenti, introducendo una banco-              4. Fare clic su “Xfer” per avviare il download.
nota, il dispositivo tornerà automaticamente alla modalità di rilevamento.           Un caricamento riuscito è visualizzato come qui
3.Per resettare il dispositivo, tenere premuto il pulsante reset per 2               sotto:
secondi.                                                                             Inserire la scheda microSD nel vano posto sotto
                                                                                     il rivelatore e collegare la macchina a un
                                                                                     alimentatore esterno.
                                                                                     Premere e rilasciare il tasto “CLR” e “ON / OFF”
                                                                                     per accendere la macchina. Il simbolo “-”
                                                                                     visualizzato indica che il caricamento su sta
                                                                                     effettuando. Al termine del caricamento, la
                                                                                     macchina emetterà 2 bip, spegnendosi automaticamente.

                                                                                     Per mezzo del software USB
MODALITÀ DI RISPARMIO ENERGETICO                                                     1. Spegnere la macchina e usare il cavo USB fornito per collegare la
Dopo 5 secondi di non utilizzo, il vostro rivelatore passa alla modalità di          macchina al PC.
risparmio energetico; solo la spia del pulsante di accensione blu rimarrà            2. Collegare l’adattatore della macchina, quindi premere simultanea-
acceso. Si tornerà alla modalità attiva premendo un tasto qualsiasi o                mente i tasti “CLR” e “ON/OFF”. Qualora appaiano sullo schermo 7 segni
presentando una banconota per il rilevamento.                                        «-», il caricamento ha avuto inizio. In caso contrario, ripetere i passi 1 e 2.
La macchina si spegne dopo 15 s. di non utilizzo.                                    3. Lanciare “Auto Download software” sul PC e fare clic su “LoadFile” per
                                                                                     cercare il software aggiornato (***UPL) (Vedere immagine 4), quindi fare
INFORMAZIONI SULLO STATO DELLA BATTERIA                                              clic su “Update soft” per scaricare il software (vedere immagine 5).
Durante la carica, lo schermo indica «- Ch» per indicare lo stato di
caricamento in corso. Occorrono normalmente 15 ore circa per ricaricare
completamente una batteria. Se la batteria è debole, lo schermo indica
«-Lo» per informare l’utente che la batteria necessita di ricarica o invitar-
lo a usare una fonte di alimentazione alternativa.

SOFTWARE DI AGGIORNAMENTO
Per mezzo della scheda microSD
1. Collegare la scheda micro SD al PC                                                4. In caso di scaricamento avvenuto con successo (vedere immagine 6), la
tramite un lettore.                                                                  macchina si spegnerà automaticamente.
Eseguire «CreateDiskImage.exe».
2. Selezionare l’opzione ‘IMAGE_2_DISK’,                                             GESTIONE DELLE ANOMALIE
quindi la scheda corrispondente nelle opzioni                                        Errori durante l’avviamento del rivelatore.
di “disco” per collegare la scheda micro SD al PC.                                   Dopo l’accensione, il dispositivo effettua un certo numero di auto-test. Se
3. Fare clic su ‘”OPEN”’ per selezionare il file                                     uno dei messaggi di errore viene visualizzato sullo schermo, è proba-
“ISO”che si desidera scaricare.                                                      bile che il sensore sia bloccato o coperto di polvere. Aprire con cura il
                                                                                     rilevatore, pulire o rimuovere la banconota presente, quindi riavviare il
                                                                                18   dispositivo.
INFORMAZIONI IMPORTANTI
Codice di errore Tipo di anomalia
Se la vostra macchina emette suoni o si verificano anomalie:
P01 Controllare il sensore a infrarossi in alto a sinistra - Verificare la potenza dell’alimentatore (AC 100V 240 V - 50/60 Hz)
- Verificare che l’adattatore sia compatibile DC 12 V + /-5%
P02 Controllare il sensore a infrarossi in alto a sinistra
- Verificare che il connettore di alimentazione sia ben collegato
P03 Controllare il sensore a infrarossi in basso a sinistra - Verifica che la batteria [opzionale) sia sufficientemente carica
- Se una banconota si inceppa durante il rilevamento, aprire il coperchio
P04 Controllare il sensore a infrarossi in basso a destra del rilevatore, rimuovere la banconota, chiudere il coperchio e introdurla
P05 Controllare il sensore di potenza nuovamente per un nuovo rilevamento
- Stirare la banconota con le mani prima di introdurla nell’unità
P06 Controllare il sensore di dimensionamento
P09 Controllare il sensore di espulsione a destra MANUTENZIONE
Affinché il rilevatore conservi il suo livello di precisione:
P10 Controllare il sensore di espulsione a sinistra - Verificare la stabilità della rete elettrica
P11 Controllare il sensore magnetico - Tenere il dispositivo in un ambiente ventilato, al riparo dalla luce solare
e da eventuali campi magnetici
P12 Contattare SAV - Pulire regolarmente i sensori, utilizzare un panno morbido leggermente
inumidito con alcol
- Non esporre i sensori ad oggetti taglienti per evitare danni
- Non smontare il dispositivo
Identificazione degli errori di rilevamento
CARATTERISTICHE
Codice di errore Tipo di anomalia
magnetismo, infrarossi, immagine, qualità della
Caratteristiche testate
E01 Errore “lunghezza” carta, spessore
E02 / E03 Errore “magnetismo” Dimensioni 155 x 137 x 82 mm
E04 / E05 Errore “infrarossi” Potenza AC 100V 240V - 50/60 Hz ou DC 12V +/- 5%
E06 Errore “spessore” Temperatura di funzionamento 0° / 40°C
E07 Banconota non corretta Temperatura di stoccaggio - 20° / 65 °C
E08 Errore “ologramma” Batteria Batteria ricaricabile al litio 10,8V / 600 mAH
E09 / E10 / E11 / E12 Errore “qualità carta” Consumo < 10 W
E14 Errore di denominazione Consumo < 0.5 s par billet
E20 Errore di introduzione Si prega di contattare il rivenditore qualora il dispositivo presenti difetti
non presenti in questo elenco.
19
INFORMACIONES RELATIVAS A LA SALUD Y LA SEGURIDAD INSTRUCCIONES DE SEGURIDAD
Siempre respetar las instrucciones y consejos de utilización ESPANOL
siguientes a fin de prevenir situaciones peligrosas y garantizar
un buen funcionamiento de la contadora.
Para evitar daños, lea atentamente este manual.
• No utilizar líquidos ni gas inflamable para limpiar su detector.
Advertencias • Si su detector se encuentra en un ambiente frío (LISTA DE ACCESORIOS Selección del sentido de salida de su billete
4. Tarjeta Micro-SD (opcional) 1. Mantenga el botón direccional de su detector pulsado durante 2 se-
1. Detector 5. Cable de descarga USB (op- gundos, para seleccionar el sentido de la salida del billete.
2. Manual de usuario cional) 2. El sentido de la eyección se visualizará arriba a la izquierda de la pantalla.
3. Adaptador de corriente AC/AD 6. Batería recargable (opcional) • ↑ significa la salida hacia la parte trasera del aparato.
• ↓ significa la salida hacia la parte delantera del aparato.
3. Su aparato memoriza el último parámetro configurado.
Detección
DESCRIPTION No hace falta elegir la moneda, ya que el aparato la detecta automá-
ticamente en el momento de introducir el primer billete. El indicador
1. Zona de entrada del billete 8. Ventana de visualización del luminoso se enciende e indica la moneda detectada. Cuando el aparato
2. Botón direccional e informe de contador detecta la entrada de un billete, el motor atrae el billete, y el procedi-
detección 9. Indicador Euro miento de detección comienza. No existe ningún sentido predefinido para
3. Botón puesta a cero 10. Indicador de la otra moneda la introducción del billete en el detector. Exceptuando el franco suizo,
4. Botón conexión alimentación 11. Salida donde conviene introducir el billete con la cara hacia el aparato. Antes de
5. Indicador de salida trasera del 12. Puerto USB introducir el billete, intente alisarlo al máximo, para evitar atascos.
billete 13. Enchufe adaptador • Si el billete introducido es correcto, el contador incrementa en 1, y el
6. Indicador de salida delantera 14. Ranura para tarjeta micro SD valor total se incrementa por el valor detectado en el billete. A continua-
ción, el billete es eyectado en la dirección elegida. Cuando el número
del billete
de billetes contados llega a 999, o cuando el valor total es de 9999, el
7. Ventana de visualización del
contador vuelve a 0 (dibujo 1).
valor detectado • Si el billete detectado es sospechoso, se eyecta hacia delante, con una se-
rie de 3 pitidos. Al mismo tiempo, el botón de alimentación parpadea (dibujo
2). Los códigos de error se explican en la lista de anomalías más adelante.
PUESTA EN MARCHA
Parada/ Marcha del aparato
1. MMantener el botón de arranque pulsado durante aproximadamente 2
segundos; su detector realizará una auto-prueba.
2. A continuación, Su pantalla mostrará la versión del software y el tipo
de moneda.
3. Las ventanas de visualización del valor detectado y la visualización del
contador indicarán 0.0.
4. Su detector está preparado para su utilización. Evaluación de las detecciones realizadas y puesta a cero
5. Para apagar el aparato, mantenga el botón de arranque pulsado Para visualizar el informe de las detecciones realizadas, pulse el botón
durante 2 segundos. direccional y del informe de detección, y mantenga pulsado este botón
para visualizar todas las detecciones realizadas. (Dibujo 3).
21
Si Vd. introduce un billete en el aparato, mientras esté visualizando la 4. Hacer clic en «Xfer». Se iniciará la descarga.
detección, el aparato vuelve automáticamente al modo de detección. El Una descarga realizada con éxito se mostrará de
reajuste a cero se realiza pulsando el botón RàZ durante 2 segundos. la siguiente manera:
Insertar la tarjeta micro SD en la ranura debajo
del detector y conectar el aparato a una
fuente de alimentación externa.
Pulsar simultáneamente los botones CLR y
ON/OFF para encender el aparato. Aparecerán
siete caracteres «-», lo que significa que la carga
ha empezado. Cuando finalice la carga, la
máquina emitirá dos pitidos y se apagará automáticamente.
Por USB
MODO DE AHORRO ENERGÉTICO 1. Apagar el aparato y utilizar el cable USB suministrado para conectar la
5 segundos después del uso, el detector se pone en modo de ahorro en- máquina al ordenador.
ergético, y sólo el botón azul del botón de alimentación sigue luminoso. 2. Conectar el adaptador del aparato y pulsar simultáneamente los
Vd. puede pasar al modo activo, pulsando cualquier botón o introducien- botones CLR y ON/OFF. Si en la pantalla aparecen 7 caracteres «-»,
do un billete para su detección. La máquina se enciende después de 15 significará que la carga ha comenzado. Si en la pantalla no aparecen los
segundos. 7 caracteres «-», repetir los pasos 1 y 2.
3. Lanzar «Auto Download software» en el ordenador y hacer clic en «Load-
INFORMACIÓN ACERCA DEL ESTADO DE LA BATERÍA File» para buscar el software de actualización (***.UPL) (dibujo 4). A conti-
Cuando el aparato esté en modo de carga, en la pantalla aparecerá el nuación, hacer clic en «Update Soft» para descargar el software (dibujo 5).
mensaje -Ch para indicar que está cargando. En condiciones normales,
una batería tarda aproximadamente 15 horas en cargarse por completo.
En caso de batería baja, en la pantalla aparecerá el mensaje -Lo para in-
formar al usuario de que necesita cargar la batería o de que debe utilizar
otra fuente de alimentación.
SOFTWARE DE ACTUALIZACIÓN
Mediante tarjeta micro SD 4. En caso de que la descarga se haya completado con éxito (dibujo 6),
1. Conectar la tarjeta micro SD a un ordenador el aparato se apagará automáticamente. Nota: Una sola batería no será
a través de un lector de tarjetas. suficiente para cargar el software.
Ejecutar «CreateDiskImage.exe».
2. Seleccionar la opción «IMAGE_2_DISK». GESTIÓN DE ANOMALÍAS
A continuación, seleccionar la tarjeta Errores del detector después de la puesta en marcha
correspondiente en las opciones «disk» para Después de la conexión, el aparato realiza unas cuantas auto-pruebas.
conectar la tarjeta micro SD al ordenador. Si uno de los siguientes mensajes de error aparece en la pantalla, es
3. Hacer clic en «OPEN» para seleccionar el archivo «.ISO» que desee probable que el captador esté bloqueado o cubierto de polvo. Abrir el
descargar. detector cuidadosamente, limpiarlo o sacar el billete de la máquina, y
22 reanudar el aparato.INFORMACIONES IMPORTANTES
Código de
Tipo de anomalía Si su máquina muestra o genera anomalías:
error visualizado
- Verificar la potencia de alimentación (AC 100V 240V – 50 60 Hz)
P01 Controlar el captador infrarrojo arriba, a la izquierda - Verificar si el adaptador es compatible DC 12V +/- 5%
- Verificar si el conector de alimentación está bien conectado
P02 Controlar el captador infrarrojo arriba, a la derecha
- Verificar si la batería está suficientemente cargada.
P03 Controlar el captador infrarrojo abajo, a la izquierda - Si un billete se queda bloqueado durante la detección, abrir la tapa del
detector, sacar el billete, cerrar de nuevo la tapa y volver a colocar el
P04 Controlar el captador infrarrojo abajo, a la derecha
billete para la su detección.
P05 Controlar el captador de alimentación - Alisar el billete antes de introducirlo en el aparato.
P06 Controlar el captador de dimensionado
MANTENIMIENTO
P09 Controlar el captador de ejecución, a la derecha Para que el aparato mantenga su precisión:
- Controlar la estabilidad de la alimentación.
P10 Controlar el captador de ejecución, a la izquierda
- Mantener el detector en un ambiente ventilado, protegido del sol y de
P11 Controlar el sensor magnético posibles campos magnéticos.
- Limpiar los captadores regularmente y utilizar para ello un paño muy
P12 Contactar con el Servicio Posventa
suave, ligeramente empapado de alcohol.
- No exponer los captadores a objetos cortantes, para evitar posibles daños.
- No desmontar el aparato.
Identificación de errores de detección
ESPECIFICACIÓN
Código de error Características testadas Magnetismo, IR, imagen, calidad del papel, espesor
Tipo de anomalía
visualizado
Dimensión 155 x 137 x 82 mm
E01 Error de longitud
Alimentación AC 100V 240V - 50/60 Hz ó DC 12V +/-5% / 1ª
E02 / E03 Error de magnetismo
Temperatura de funcio-
0° / 40°C
E04 / E05 Error de infrarrojo namiento
E06 Error de espesor Temperatura de almace-
- 20° / 65 °C
namiento
E07 Billete incorrecto
Batería Batería recargable de litio 10,8V/600 mAH
E08 Error de holograma
Consumo < 10 W
E09 / E10 / E11 / E12 Error de calidad del papel Rapidez < 0,5s/ billete
E14 Error de denominación
E20 Error de introducción Si su aparato muestra cualquier defecto no mencionado, contacte con
su proveedor habitual.
23
GESUNDHEITS- UND SICHERHEITSINFORMATIONEN SICHERHEITSHINWEISE
Beachten Sie stets die folgenden Anweisungen und DEUTCH Um Schäden vorzubeugen, empfehlen wir Ihnen, die folgenden Hinweise
Anwendungstipps, um gefährlichen Situationen vorzubeugen und das
aufmerksam durchzulesen.
ordnungsgemäße Funktionieren des Münzzählers zu gewährleisten.
• Benützen Sie weder Flüssigkeiten, noch Gas oder brennbare Stoffe zur
Warnungen Reinigung des Detektors.
- Zerlegen Sie Ihren Münzzähler nicht oder versuchen Sie nicht, ihn selbst zu reparieren. • Sollten Sie Ihren Detektor in kalter Umgebung lagern (< 15º), stellen
Es besteht die Gefahr eines Stromschlags oder das Gerät könnte beschädigt werden. Sie ihn 2 Stunden vor Gebrauch in Raumtemperatur.
- Verwenden Sie nicht den Münzzähler in der Nähe von Gas, Flüssigkeit oder Sprengstoff. • Keine metallischen Objekte in das Innere des Detektors einführen.
Es besteht Stromschlag- oder Brandgefahr. • Trennen Sie den Detektor vom Netz, wenn Ihre Hände feucht sind.
- Achten Sie darauf, dass keine Flüssigkeit in den Münzzähler gelangt.
• Trennen Sie den Detektor vor einer etwaigen Platzverschiebung vom
Es besteht Stromschlag- oder Brandgefahr.
- Tauchen Sie den Münzzähler nicht unter Wasser und bedienen Sie ihn nicht Netz.
mit nassen Händen. • Ziehen Sie nicht am Kabel, um den Apparat vom Netz zu trennen.
Es besteht die Gefahr eines Stromschlags und das Gerät könnte beschädigt werden. • Stellen Sie keine schweren Gegenstände auf dem Kabel Ihres Detek-
-Vermeiden Sie jegliche direkte Sonneneinstrahlung oder hohe Temperaturen. tors.
Längere Zeit Direkte Sonneneinstrahlung oder hohe Temperaturen über längere • Benützen Sie ausschließlich den mitgelieferten Adapter, um Ihren
Zeit kann die internen Komponenten des Münzzählers dauerhaft schädigen. Detektor mit Strom zu versorgen.
- Decken Sie den Münzzähler nicht mit Decken, Tüchern, Kleidung oder Kunststoff ab.
Das Gerät kann sich überhitzen, verformen oder Feuer fangen.
Wenn Flüssigkeiten oder Fremdkörper in den Münzzähler gelangen, EINFÜHRUNG
trennen Sie alle Stromquellen und wenden Sie sich an den Kunden- Dieses Produkt ist ein einfach zu bedienender Falschgelddetektor.Er ist
dienst von SAFETOOL. mit einer internen Batterie ausgestattet, weshalb die Kontrolloperationen
an Ort und Stelle erfolgen können. Die Merkmale der kontrollierten
Achtung Banknoten umfassen Magnetismus, Infrarot, Aussehen und Papierqua-
- Verwenden Sie niemals ein Gerät mit einem beschädigten Kabel oder wenn Mängel auftreten.
lität.
- Tauschen Sie nicht selbst das beschädigte Stromkabel aus, sondern kontaktieren Sie den
Kundenservice von SAFETOOL oder einen autorisierten Elektrofachmann.
MERKMALE
Recycling des Produkts (Elektronikentsorgung) • CE REACH ROHS EUP und ECB zugelassenes Produkt.
Die Kennzeichnung auf dem Produkt bzw. in seiner Dokumentation weist darauf • Automatische Währungsidentifikation.
hin, dass das Produkt nicht mit dem normalen Hausmüll entsorgt werden darf. • Visualisierung die Banknotteeanzahl und des Gesamtwerts der ein-
Bei unkontrollierter Entsorgung bestehen Umwelt- und Gesundheitsrisiken, bitte zelnen Scheinarten.
trennen Sie Ihre Altgeräte von anderen Abfällen. Sie unterstützen dadurch im
• Es können jeweils zwei Währungstypen bearbeitet werden, systema-
Rahmen der nachhaltigen Entwicklung das Recycling der Materialien aus dem
das Gerät zusammengesetzt ist.Virksomheder og fagfolk opfordres til at kontakte tischerweise der Euro, sowie eine zweite optionale Währung.
deres leverandør og læse de generelle salgsbetingelser. Dette produkt må ikke • Lithiumbatterie für den tragbaren Detektor.
bortskaffes sammen med andet professionelt og kommercielt affald. • Die Software kann über den USP-Anschluss aktualisiert werden.
Privatpersonen werden gebeten, sich mit dem Händler in Verbindung zu setzen, • Die selbstkorrigierende Technologie der Sensoren erlaubt eine einfache
der ihnen das Produkt verkauft oder sich bei den örtlichen Behörden nach den Ver- Wartung.
fahren und nach den Sammelstellen zum Recyceln dieser Produkte zu erkundigen.
Unternehmen und Fachleute werden gebeten, sich an ihren Lieferanten zu wenden
und die Geschäftsbedingungen einzusehen. Dieses Produkt kann nicht mit ande-
ren kommerziellen Abfällen und Abfällen aus Unternehmen entsorgt werden.
24BESTANDTEILLISTE Auswahl der Auswurfsrichtung des Scheins
Halten Sie die Richtungstaste Ihres Detektors 2 Sekunden lang, um die
1. Detektor 4. AC/DC Netzteil Auswurfsrichtung des Scheins auszuwählen.
2. Bedienungsanleitung 5. USB Downloadkabel (optional) Die Auswurfsrichtung wird oben links auf Ihrem Bildschirm angezeigt.
3. Stromadapter 6. Aufladbare Batterie (optional) • ↑ bedeutet, dass die Banknote nach hinten ausgeworfen wird
• ↓ eine Ausgabe nach vorne.
Ihre Maschine memoriert den letzten eingegebenen Parameter.
BESCHREIBUNG Erkennung
Sie müssen Ihre Währung nicht wählen, der Apparat erkennt sie auto-
1. Eingangsbereich für Scheine 8. Banknotenanzahl- Visuali- matisch, von der Einführung des ersten Scheins an. Eine Leuchtanzeige
2. Richtungstaste und Erken- sierungsfenster zeigt die erkannte Währung an. Sobald die Maschine die Einführung
nungsmeldung 9. Euro-Anzeige eines Scheins erkennt, zieht der Motor die Banknote an, und der Erken-
3. Reset-Taste 10. Anzeige einer anderen nungsprozess beginnt. Es gibt keine vorbestimmte Einführungsrichtung
4. Einschaltetaste Währung nach Wahl im Detektor. Nur bei Schweizer Franken empfiehlt es sich, die Banknote
5. Rückwärtige ScheinAuswurf- 11. Auswurf in Richtung zum Apparat hin einzuführen. Vor der Einführung des
sanzeige 12. USB Anschluss Scheins, glätten Sie diesen so gut wie möglich, um Falten zu vermeiden.
• Ist die eingeführte Banknote korrekt, erhöht sich der Zähler jeweils
6. Vordere ScheinAuswurf- 13. Adapteranschluss
um eins und der Gesamtwert entsprechend dem jeweiligen Betrag.
sanzeige 14. Micro SD Fach
Anschließend wird die Banknote in der gewählten Richtung ausgeworfen.
7. Wert-Visualisierungsfenster Sobald die Gesamtanzahl der erkannten Banknoten 999 erreicht, oder
der Gesamtwert der gezählten Banknoten 9999 beträgt, beginnt der
INBETRIEBNAHME Zähler wieder bei 0 (Bild 1).
Stoppen und Starten der Maschine • Ist die erkannte Banknote verdächtig, wird sie nach vorne ausgeworfen,
Drücken Sie die Einschaltetaste 2 Sekunden lang. Ihr Detektor führt und es erfolgen 3 Pieptöne. Zugleich blinkt die Einschaltetaste (Bild 2).
einen Selbsttest durch, wonach Ihr Bildschirm die Softwareversion und Die Fehlercodes befinden sich in der Liste der Anomalien.
die Währung anzeigt. Die Visualisierungsfenster mit dem festgestellten
Wert und die Banknotenanzahl zeigen 00 an. Ihr Detektor ist zur Benüt-
zung bereit.
Zum Ausschalten Ihrer Maschine, halten Sie die Einschaltetaste wieder 2
Sekunden lang.
Zusammenfassender Bericht und Reset auf Null
Zur Visualisierung des zusammenfassenden Berichts, drücken Sie die
Richtungs- und Berichterstattungstaste solange, bis die einzelnen Er-
kennungsvorgänge angezeigt werden. (Bild 3).
25
Wenn Sie eine Banknote einführen während Sie den Vorgang visuali- 3. Auf „OPEN“ klicken, um die „ISO“ Datei zu
sieren, geht das Gerät automatisch in den Erkennungsmode. Ein Reset wählen, die Sie herunterladen möchten.
erfolgt, wenn Sie die RàZ-Taste 2 Sekunden lang halten. 4. Auf „Xfer“ klicken, der Download wird
gestartet. Nach erfolgreichem Download
erscheint die Meldung:
Die Micro-SD Karte in das Fach unter dem
Sensor einstecken und die Maschine an eine externe Stromquelle
anschließen.
Durch Drücken und Loslassen der Taste „CLR“
und danach „ON/OFF“ wird die Maschine
eingeschaltet. Die folgende Anzeige „-„ bedeutet, dass das Laden läuft.
Am Ende des Ladevorgangs ertönen 2 Pieptöne und die Maschine schal-
ENERGIESPARMODUS tet sich automatisch aus.
Wird der Detektor fünf Sekunden lang nicht benützt wird, geht er zum
Energiesparmodus über, und nur die blaue Leuchtanzeige der Einschal- Mit der USB Software
tetaste leuchtet. Durch das Drücken einer beliebigen Taste oder die Ein- 1. Schalten Sie die Maschine aus und verwenden Sie das mitgelieferte
führung einer Banknote, kehren Sie in den aktiven Modus zurück. Steht Kabel, um die Maschine mit dem PC zu verbinden.
die Maschine 15 Minuten lang still, schaltet sie automatisch ab. 2. Schließen Sie den Adapter der Maschine an und drücken Sie gleichzei-
tig die Tasten „ CLR“ und „ON/OFF. Wenni 7 „-„ Zeichen auf dem Display
INFORMATION ZUM BATTERIELADEZUSTAND angezeigt werden, bedeutet dies, dass der Ladevorgang begonnen hat.
Wenn die Maschine geladen wird, zeigt das Display „-Ch“ für den laufen- Wiederholen Sie die Schritte 1 und 2, wenn das Display nicht die 7 „-“
den Ladevorgang an. Normalerweise dauert ein kompletter Ladevorgang Zeichen anzeigt.
der Batterie ca. 15 Stunden. Wenn die Batterie schwach ist, zeigt das Dis- 3. Starten Sie “Auto Download Software“ auf dem PC und klicken Sie auf
play „-Lo“ an, um den Benutzer darüber zu informieren, dass die Batterie „LoadFile“, um die Aktualisierungssoftware zu suchen (***.UPL) (S. Abb.
aufgeladen oder eine andere Stromversorgung verwendet werden muss. 4), klicken Sie dann auf „Update Soft“, um die Software herunterzuladen
(s. Abb. 5).
SOFTWARE ZUM AKTUALISIEREN
Mit der Micro SD Karte
1. Die Micro-SD Karte über ein Lesegerät an
einen PC anschließen.
„CreateDiskImage.exe“ installieren.
2. Wählen Sie „ MAGE_2_DISK“ und dann die
entsprechende „disk“ in den Optionen, um die 4. Nach erfolgreichem Download (s. Abb. 6) schaltet sich die Maschine
Micro SD Karte am PC anzuschließen. automatisch ab.
26Vous pouvez aussi lire