CYTOBRITE SLIDE INCUBATION SYSTEM - USER MANUAL - SCIGENE
←
→
Transcription du contenu de la page
Si votre navigateur ne rend pas la page correctement, lisez s'il vous plaît le contenu de la page ci-dessous

www.scigene.com

                                  CytoBrite®
                  Slide Incubation System
                                  USER MANUAL
                                 Cat. #2019-00-1 (115/230V)

                                      FOR RESEARCH USE ONLY

1287 Reamwood Avenue, Sunnyvale, CA 94089 USA • Tel 408-733-7337 • Fax 408-733-7336 • techserv@scigene.com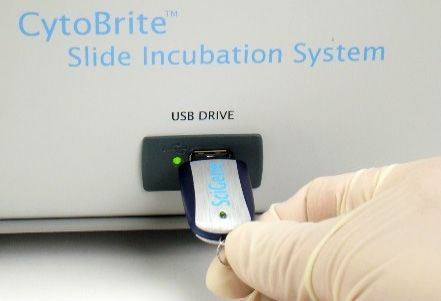
CytoBrite® Slide Incubation System — USER MANUAL

Serial Number

The following serial number identifies the specific instrument you have purchased and must be
referenced when requesting service. A copy is affixed to the instrument.

                        Technical Service: (408) 733-7337, techserv@scigene.com

Warranty

SciGene warrants that the CytoBrite® Slide Incubation System described in this manual shall be free of
defects in materials and workmanship for a period of 12 months from date of delivery. This warranty
does not cover removable slide trays or accessories. In the event of a defect during the warranty
period, SciGene’s limit of liability will be to, at its sole discretion: (a) provide replacement parts; (b)
perform factory repairs; or (c) replace the product. The foregoing warranty is void in the event the unit
was abused or modified or used in a manner inconsistent with its intended purpose. SciGene makes
no other warranty, expressed or implied including warranties of merchantability and fitness for a
particular purpose. In no event shall SciGene be liable for any direct, indirect, special, incidental or
consequential damagers or for any damages resulting from loss arising out of or in connection with
the sale, use or performance of the product.

Copyright

Copyright ©2014-2015 SciGene Corporation. All rights reserved. SciGene, CytoBrite and CytoBond are
trademarks of SciGene Corporation, Sunnyvale, CA. All other trademarks used in this manual are the
property of their respective owners.

Version 1.1C, SW 2.0 August 2015                      1                 (408) 733-7337, techserv@scigene.com
CytoBrite® Slide Incubation System — USER MANUAL

                                                                Table of Contents
I.      SAFETY NOTICES..................................................................................................................................... 3
   A.     Intended Use ............................................................................................................................................... 3
   B.     Instrument Safety ........................................................................................................................................ 3
   C.     Symbols and Conventions ........................................................................................................................... 3
   D.     Warnings ..................................................................................................................................................... 4
   E.     Cautions....................................................................................................................................................... 5
   F.     Compliance .................................................................................................................................................. 5
II.     UNPACKING AND SET UP ........................................................................................................................ 7
   A.     Unpacking the Instrument........................................................................................................................... 7
   B.     Parts Provided ............................................................................................................................................. 7
   C.     Coverslip Sealant Provided .......................................................................................................................... 7
   D.     Environmental Requirements ..................................................................................................................... 7
   E.     Installing the Instrument ............................................................................................................................. 7
III.    USING YOUR CYTOBRITE SYSTEM ........................................................................................................... 8
   A.     System Components.................................................................................................................................... 8
   B.     Preparing Slides / Loading the Instrument / Starting a Protocol ................................................................ 9
   C.     Powering On/Off ......................................................................................................................................... 9
   D.     Using the Controller .................................................................................................................................... 9
   E.     Using the USB Drive..................................................................................................................................... 9
IV.     CREATING AND EDITING PROTOCOLS ................................................................................................... 10
   A.     Creating a Protocol .................................................................................................................................... 10
   B.     Editing a Protocol ...................................................................................................................................... 11
V.      ONETEMP MODE .................................................................................................................................. 12
VI.     RUNNING A PROTOCOL ........................................................................................................................ 13
VII.    MANAGING FILES ................................................................................................................................. 14
   A.     Viewing a Protocol..................................................................................................................................... 14
   B.     Copying a Protocol .................................................................................................................................... 14
   C.     Renaming a Protocol ................................................................................................................................. 14
   D.     Deleting a Protocol .................................................................................................................................... 14
VIII.   SETTINGS AND PREFERENCES ............................................................................................................... 15
   A.     Datalogging to USB Key ............................................................................................................................. 15
   B.     Calibrating Slide Block Temperature ......................................................................................................... 16
   C.     Upgrading Software .................................................................................................................................. 17
   D.     Changing Alert Sounds .............................................................................................................................. 17
IX.     MAINTENANCE..................................................................................................................................... 18
   A.     Cleaning the Instrument............................................................................................................................ 18
   B.     Cleaning Air Vents ..................................................................................................................................... 18
   C.     Checking and Replacing Fuses ................................................................................................................... 18
X.      TROUBLESHOOTING ............................................................................................................................. 19
XI.     SPECIFICATIONS ................................................................................................................................... 19
XII.    ORDERING INFORMATION.................................................................................................................... 20
XIII.   DECLARATION OF CONFORMITY ........................................................................................................... 21

Version 1.1C, SW 2.0 August 2015                                                     2                             (408) 733-7337, techserv@scigene.com
CytoBrite® Slide Incubation System — USER MANUAL
I. SAFETY NOTICES
A. Intended Use
The CytoBrite® Slide Incubation System is intended for the heating and cooling of
biological samples. The instrument should only be used according to instructions provided
in this User Manual and other SciGene technical documents. If the equipment is used in a
manner not specified by the manufacturer, the protection provided by the equipment
may be impaired.
La CytoBrite système est destiné pour le chauffage et le refroidissement d'échantillons
biologiques. L'instrument ne devrait servir que selon les instructions fournies dans ce
manuel de l'utilisateur et d'autres documents techniques de SciGene. Si l'équipement est
utilisé de manière non spécifiée par le fabricant, la protection assurée par l'équipement
peut être compromise.
B. Instrument Safety
Before operating the instrument, read the information in this section concerning hazards
and potential hazards. Ensure that anyone involved with the instrument’s operation is
instructed in both general safety practices for laboratories and specific safety practices for
the instrument.
Avant le fonctionnement de l'instrument, lisez les renseignements dans cette section
concernant les risques et les dangers potentiels. S'assurer que toute personne impliquée
avec le fonctionnement de l'instrument est instruit dans les pratiques générales de sécurité
pour les laboratoires et les pratiques de sécurité spécifiques pour l'instrument. Avant le
fonctionnement de l'instrument, lisez les renseignements dans cette section concernant les
risques et les dangers potentiels. S'assurer que toute personne impliquée avec le
fonctionnement de l'instrument est instruit dans les pratiques générales de sécurité pour
les laboratoires et les pratiques de sécurité spécifiques pour l'instrument.
C. Symbols and Conventions
The following chart is an illustrated glossary of the electrical symbols used on the
CytoBrite System. Whenever such symbols appear on instruments, please observe
appropriate safety measures.
Le tableau suivant est un glossaire illustré des symboles électriques qui sont utilisées sur le
système. Chaque fois que ces symboles apparaissent sur les instruments, veuillez observer
les mesures de sécurité appropriées.
1. Electrical Symbols
This symbol indicates that this is a protected ground terminal that must
be connected to earth ground before any other electrical connections
are made to the instrument.
Ce symbole indique qu'il s'agit d'un terminal de terrain protégé qui doit
être connecté à la terre avant que toutes les autres connexions
électriques sont apportées à l'instrument.
Version 1.1C, SW 2.0 August 2015 3 (408) 733-7337, techserv@scigene.comCytoBrite® Slide Incubation System — USER MANUAL
CAUTION: This symbol alerts you to consult this Operator’s Manual for
further information and to proceed with caution.
ATTENTION: Ce symbole vous avertit à consulter ce guide de
l'utilisateur pour plus d'informations et de procéder avec prudence.
This symbol indicates the OFF position of the main POWER switch.
Ce symbole indique la position OFF de l'interrupteur principal.
This symbol indicates the ON position of the main POWER switch.
Ce symbole indique la position ON de l'interrupteur principal.
2. Non-Electrical Symbols
CAUTION: This symbol illustrates a heat hazard. Proceed with caution
when working around these areas to avoid being burned by hot
components.
ATTENTION : Ce symbole illustre un danger pour la chaleur. Faire preuve
de prudence lorsque vous travaillez autour de ces zones pour éviter
d'être brûlé par les composants du chauds.
CAUTION: This symbol alerts you to consult this Operator’s Manual for
further information and to proceed with caution.
ATTENTION : Ce symbole vous avertit à consulter ce guide de l'utilisateur
pour plus d'informations et de procéder avec prudence.
D. Warnings
Failure to comply with the following warnings that are affixed to the product can lead to
possible personal injury or death.
Défaut de respecter les avertissements suivants qui sont apposées sur le produit peut
conduire à possibles lésions corporelles ou la mort.
This symbol on the rear of the instrument indicates the presence of the
fuse box. Warning: For Continued Protection Against Fire, Replace Only
with Same Type Rating of Fuse. Always disconnect the power cord before
attempting to replace the fuse.
Ce symbole sur l'arrière de l'instrument indique la présence de la boîte de
fusibles. Avertissement : Pour le maintien de la Protection contre l'incendie,
remplacer uniquement avec la même cote de Type de fusible. Toujours
débrancher le cordon d'alimentation avant d'essayer de remplacer le
fusible.
Version 1.1C, SW 2.0 August 2015 4 (408) 733-7337, techserv@scigene.comCytoBrite® Slide Incubation System — USER MANUAL
E. Cautions
Failure to comply with the following cautionary statement affixed to the product may lead
to possible personal injury.
Omission de se conformer à la mise en garde suivante apposée sur le produit peut
entraîner des blessures possibles.
This symbol located both on and in front of the lid indicates the potential
presence of a Hot Surface. Use care when working in this area to avoid being
burned.
Ce symbole situé sur et devant le couvercle indique la présence possible d'une
Surface chaude. Faire preuve de diligence lorsqu'il travaille dans ce domaine
pour éviter d'être brûlé.
This symbol located on the back of the instrument warns the user to select the
correct voltage before connecting the power cord. Operating with the voltage
selector switch in the wrong position will damage the instrument and create a
safety hazard.
Ce symbole situé à l'arrière de l'appareil avertit l'utilisateur de sélectionner la
tension correcte avant de brancher le cordon d'alimentation. Fonctionnant
avec le sélecteur de tension dans la mauvaise position peut endommager
l'appareil et créer un risque de sécurité.
F. Compliance
1. European Conformity (CE)
This symbol indicates the instrument is in compliance with all applicable
European Union Electromagnetic Compatibility and Low Voltage Directives.
2. Waste Electrical & Electronic Equipment Directive (WEEE)
This symbol indicates the instrument is required to comply with the
European Union’s Waste Electrical & Electronic Equipment (WEEE) Directive
2002/96/EC, providing environmentally safe disposal of end of life
equipment through recycling.
Contact your institution to provide environmentally safe disposal. If this is
not available, contact your local SciGene distributor or SciGene Technical
Support [techserv@scigene.com] for assistance. Do not treat electrical and
electronic equipment as unsorted municipal waste.
RoHS 3. Restriction of Hazardous Substances (RoHS)
This symbol indicates the instrument is in compliance with the European
Union’s (RoHS 2) Directive 2011/65/EU on the restriction of the use of
certain hazardous substances in electrical and electronic equipment (EEE).
Version 1.1C, SW 2.0 August 2015 5 (408) 733-7337, techserv@scigene.comCytoBrite® Slide Incubation System — USER MANUAL
4. Electromagnetic Compatibility (EMC)
The CytoBrite System is a Class A digital device under FCC Title 47 Part 15B
and designated as Class A electrical equipment for measurement, control,
and laboratory use (EN61326).
Note regarding Canadian EMC compliance: Le present appareil numerique
n’emet pas de bruits radioelectrique depassant les limites applicables aux
appareils numeriques de class A prescrites dans le reglement sur le brouillage
radioelectrique edicte par le Ministere des Communications du Canada.
5. FCC Warnings and Notes
This equipment has been tested and found to comply with the limits for a
Class A digital device, pursuant to part 15 of the FCC Rules. The instrument
qualifies as an “exempted device” under 47 CFR 15.103(c), in regard to the
cited FCC regulations in effect at the time of manufacture. Shielded cables
must be used with this unit to ensure compliance with the Class A FCC limits.
Version 1.1C, SW 2.0 August 2015 6 (408) 733-7337, techserv@scigene.comCytoBrite® Slide Incubation System — USER MANUAL
II. UNPACKING AND SET UP
A. Unpacking the Instrument
The CytoBrite instrument is shipped in a double carton. To unpack the instrument, open
the outer box, take out the bag containing the manual and power cord and remove the
protective cardboard corners. Then open the inner box, reach down the inside, and
carefully lift out the instrument by its base. NEVER lift by the hinged lid. Place the
instrument on the bench and raise the lid to remove two slide trays. Inspect parts for
visible damage. If any damage is evident, retain all shipping materials and contact SciGene
[techserv@scigene.com] or your local distributor.
B. Parts Provided
• 2x Slide Trays (shipped inside instrument)
• Power Cord
• User Manual
C. Coverslip Sealant Provided
One complimentary 100 ml bottle of CytoBond® Removable Coverslip Sealant (SciGene
cat. # 2020-00-1) is shipped separately from the instrument. Use of CytoBond Sealant is
required for sealing coverslips; to prevent probe evaporation without humidification.
Contact SciGene [custserv@scigene.com] or your local distributor to order additional
bottles.
D. Environmental Requirements
Ensure that the area where the CytoBrite System is installed meets the following
conditions, for reasons of safety and performance:
Ambient temperature +15 to +32°C (58 to 90°F)
Relative humidity 20 to 80% RH non-condensing
Air flow clearance 6 inches (15 cm) minimum on both sides
E. Installing the Instrument
Place the instrument on a level surface within a few feet of the power source. Position
the system so the lid can be easily opened without interference. Allow 18 inches of
vertical clearance and 16 inches of horizontal clearance. Ensure 3 inches of clearance at
the back to attach the power cord. Using only the power cord provided, plug it into the
back of the unit and then to a properly grounded outlet. Turn on power using the
ON/OFF switch on the front control panel.
Allow 18 inches of vertical
clearance to open the lid.
Allow 3 inches of clearance at
the back for the power cord.
Allow 16 inches of horizontal
clearance for air flow.
Version 1.1C, SW 2.0 August 2015 7 (408) 733-7337, techserv@scigene.comCytoBrite® Slide Incubation System — USER MANUAL
III. USING YOUR CYTOBRITE SYSTEM
A. System Components
Component Function
SlideSense™ Temperature Sensor Senses and transmits slide block temperature
information to controller
Temperature Controller Used to program and monitor instrument
operation and report slide block temperature
Slide Tray Holds slides during sample preparation and
incubation
Power Switch Turns on main power to unit
USB Port Used for saving datalog files and installing software
Hinged Lid Covers slide trays during processing
Block Temperature Calibration Jack Connection for digital thermometer cable to
calibrate slide block temperature
Power Input Module and Fuse Housing Location of main fuses and power cord connection
CytoBond Removable Coverslip Sealant Seals coverslips to slides
Version 1.1C, SW 2.0 August 2015 8 (408) 733-7337, techserv@scigene.comCytoBrite® Slide Incubation System — USER MANUAL
B. Preparing Slides / Loading the Instrument / Starting a Protocol
Slides are prepared for molecular analysis following your standard procedures using the
CytoBrite Slide Trays provided with the unit. CytoBond® Removable Coverslip Sealant
(SciGene cat. # 2020-00-1) is used in place of rubber cement for sealing coverslips to
prevent probe evaporation without humidification.
1. Place slides to be analyzed in the tray(s), pipet probes and place coverslips.
2. Seal coverslips by dispensing a continuous bead of CytoBond Sealant around edges.
3. Turn on power to the instrument, select and start the desired program (See section V
for how to create programs.)
4. When the unit finishes pre-heating, the controller displays a prompt and beeps to load
slides. Raise the cover, place the tray(s) into the unit and press Select to start the
program.
5. The instrument then heats the slides to the programmed temperatures and times.
C. Powering On/Off
To turn ON the instrument, press the top of the power switch (the “l” position). To turn
OFF the instrument, press the bottom of the power switch (the “O” position).
D. Using the Controller
A 4-line LED display controller is used to CREATE, RUN, EDIT and VIEW protocols, manage
FILES (rename, copy, delete) and customize SETTINGS (including calibrating temperature
and choosing alert sounds).
Navigating menus and selecting options is performed with four buttons on the display
panel:
• Home — returns to the main menu screen.
• Select — chooses the option highlighted in the display.
• Forward — increments or toggles between options.
• Back — returns to a previous screen or option.
Details on using controller menus can be found in later
sections of this manual.
E. Using the USB Drive
A USB key inserted into the USB DRIVE can be used to:
• Capture a time and temperature log when running a
protocol
• Allow protocols to run directly from a USB key.
• Provide additional capacity for storing protocols
beyond the 10 file storage limit on the controller.
• Upload new controller software.
Version 1.1C, SW 2.0 August 2015 9 (408) 733-7337, techserv@scigene.comCytoBrite® Slide Incubation System — USER MANUAL
IV. CREATING AND EDITING PROTOCOLS
A. Creating a Protocol Creating a Protocol
Protocols are created and saved in memory on the controller CytoBrite
Run Create
(10 files maximum) or a USB key. Names are 8 alphanumeric View Edit
Files Settings
characters in length including spaces. For FISH/ISH methods,
protocols can be created with an optional co-denaturation step
CREATE
prior to probe hybridization. Enter Name:
FISH101A
1. From the Home screen, select Create.
2. Enter the name of the protocol by scrolling through the CREATE
Yes FISH101A No
alphanumeric characters (space: A-Z; 0-9) using the Denature?
Forward button. Sequentially select a desired character Yes No
using the Select button. Names must be 8
characters in length, including spaces. CREATE CREATE
FISH101A FISH101A
Denature Temp: Incubate Temp:
3. On the next screen select Yes to use a 73C 37C
Denature step. If chosen, enter the Denature
time (hours | minutes | seconds) and CREATE CREATE
temperature (15-90°C) on succeeding screens. FISH101A FISH101A
Denature Time: Incubate Time:
00:02:00 16:00:00
4. On the following screens, enter the slide
incubation temperature and time for the
probe hybridization step. CREATE
Off FISH101A
Protocol End:
5. Complete creation of the protocol by choosing how to end the protocol. Off Hold
Selecting Off turns off the slide block. Selecting Hold keeps the slides at Hold
a selected temperature until removed. CREATE
FISH101A
6. If Hold is selected as the protocol end option, enter a Hold temperature.
Hold Temp: 37C
7. Save the completed protocol to the controller memory or a USB key.
Make sure a USB key is inserted BEFORE selecting the USB option. CREATE
FISH101A
Save in?
CytoBrite USB
Return to
Home screen
Version 1.1C, SW 2.0 August 2015 10 (408) 733-7337, techserv@scigene.comCytoBrite® Slide Incubation System — USER MANUAL
B. Editing a Protocol
The Edit function allows changes to the Denature and Incubate times and temperatures as
well as protocol end options (Off or Hold) in an existing protocol. Edited protocols may be
saved under the existing name or be renamed (using the Save As function) to the
controller memory or USB key.
Editing a Protocol
1. Select Edit from the Home screen.
CytoBrite
2. Choose the file location (controller memory or Run Create
View Edit
USB key) and the protocol to edit. Files Settings
3. Select Denature, Incubate or End step to edit.
EDIT
4. Make changes to time (hours | minutes | File Location:
CytoBrite USB
seconds) and/or temperature (15-90°C)
for the selected step.
EDIT
5. Confirm changes then select Finish and Save Select File:
1) FILE100
or Continue Edits. 2) FILE200
6. Save edited file to memory or USB key.
EDIT: File100
To rename file, select Save As and Denature Denature ON Incubate
Incubate
create new name before saving. End
End
EDIT: File100 EDIT: File100 EDIT: File100
Denature? End Incubate
Yes Temp: 37
Yes Yes No Off Hold Time: 14:00:00
Off Hold No
EDIT: File100 No EDIT: File100 EDIT: File100
Set Temp Denature Hold Temp: 37 Temp: 37
and Time Temp: 73 Time: 16:00:00
Time: 00:02:00 Select New Temp OK? Yes No
Con nue
Edits EDIT: File100 Yes
EDIT: File100
Temp: 73 Denature Off?
Time: 00:02:00
OK? Yes No Yes No
EDIT: File100 Yes
Finish and Save
Continue Edits
Finish
EDIT: File100
Save As
Save Save As
Save
EDIT: File100 EDIT:
Save in
Enter Name
CytoBrite USB File101
CytoBrite
EDIT: File100
Save in CytoBrite?
Yes No
Return to
Home screen
Version 1.1C, SW 2.0 August 2015 11 (408) 733-7337, techserv@scigene.comCytoBrite® Slide Incubation System — USER MANUAL
V. ONETEMP MODE
The CytoBrite System can be operated to maintain a single block Running OneTemp Mode
temperature from 15 to 90°C using the OneTemp mode. CytoBrite
Run Create
For information on creating and saving multi-temperature and View Edit
Files Settings
multi-step protocols, see section V. CREATING AND EDITING
PROTOCOLS. RUN:
Operating Mode
1. From the Home screen, choose Run | OneTemp. OneTemp Protocol
2. Set the desired block temperature from 15 to 90°C.
RUN: OneTemp
3. Press Select “Yes” to start the program. Set temperatures for
Set Temp: 73C
the block will be displayed. Time will be listed as “Forever” as
the program will continue until stopped by the user. No
Temp: 37C
4. To end the program, use the Forward button to display the Time: Forever
End Protocol screen and Select “Yes”. The instrument will Start Yes No
display “OneTemp DONE” and total elapsed time.
RUN: OneTemp
Temp: 73.2 / 73C
Time: 05:00:00
No
End OneTemp?
Yes No
Yes
OneTemp DONE
Time: 00:01:01
Return to
Home screen
Version 1.1C, SW 2.0 August 2015 12 (408) 733-7337, techserv@scigene.comCytoBrite® Slide Incubation System — USER MANUAL
VI. RUNNING A PROTOCOL
The RUN function is used to run a previously created protocol stored in the controller
memory or on a USB key. To operate the CytoBrite instrument at a single temperature
without a timer see section V. ONETEMP MODE.
1. Select Run | Protocol from the Home screen. Running a Protocol
2. Choose the file location (CytoBrite or USB key) CytoBrite
Run Create
and select the protocol. The protocol will start by View Edit
Files Settings
performing a 5 minute preheating of the block
to the programmed incubation temperature.
RUN
3. When the preheat step is complete, the display Operating Mode:
will flash “Load Slides / Press Select”. OneTemp Protocol
4. Open the lid, load the tray(s) and press Select.
RUN
5. If a denaturation step is part of the protocol, File Location:
the unit will rapidly heat and hold at denature CytoBrite USB
temperature, then rapidly cool to incubate
temperature, warming for a preset time, RUN
Select File:
as programmed by the operator. 1) File100
2) File200
6. If a denaturation step is not used, the unit No
will simply heat to the incubate temperature RUN
where the slides will be warmed Run Protocol?
File100
for the programmed time. Yes No
Yes
7. If “Off” was selected as the program ending
RUN: File100
option, slide block heating will turn off at the Preheat: 36.9 Preheats for 5 minutes at
completion of the protocol. If “Hold” was Temp: 37 programmed temperature.
Time: 00:05:00
selected, the slide block will be held at the
programmed temperature.
RUN
8. Press any key to terminate a protocol. If Denaturing Preheat Complete Incuba ng Only
Load Slides/ Press Select
9. Select Yes in the Turn Off Block
Unit beeps to load slides.
confirmation screen to RUN: File100 RUN:File100
return to the Home screen. Mode: Denature Mode: Incubate
Temp: 72.9 Temp: 37.1 / 37
Time: 00:05:00 Time: 16:00:00
OFF HOLD
File100: DONE File100: DONE
Time: 16:00:00 Time: 16:00:00
Temp: Off Temp: 37.1
No
File100: DONE
Turn off block
+ return to home?
Yes No
Return to
Home screen
Version 1.1C, SW 2.0 August 2015 13 (408) 733-7337, techserv@scigene.comCytoBrite® Slide Incubation System — USER MANUAL
VII. MANAGING FILES
A. Viewing a Protocol
Saved protocols can be reviewed in read-only mode.
1. Select View from the Home screen.
2. Choose the file location (controller memory or USB key) and protocol.
3. Use Forward to advance through the protocol in the following order:
• Denature temperature and time
• Incubate temperature and time
• Final hold temperature or OFF
4. Press the Forward or Back buttons to continue.
B. Copying a Protocol Copy/Rename/Delete a Protocol
A protocol can be copied and saved under a
new name in the controller memory or USB key. CytoBrite
Run Create
View Edit
1. Select Files from the Home screen. Files Settings
2. Choose the file location (controller memory or
FILES
USB key) and protocol. File Location:
3. Select Copy. CytoBrite USB Key
4. Choose new file location and Select Yes.
FILES
CytoBrite Folder
C. Renaming a Protocol Select File:
An existing file may be renamed and saved 1) 37to4
in the controller memory or USB key.
FILES
Copy CytoBrite Folder Delete
1. Select Files from the Home screen. File: 37to4
Copy Name Delete
2. Choose the file location (controller
Name
memory or USB key).
3. Select Name. FILES FILES FILES
File: 37to4 File: 37to4 Delete: 37to4
4. Enter a new name by Copy to: Enter new name
USB Key 37to65 Yes No
choosing characters No No
(space; A-Z; 0-9) using FILES FILES Yes
Copy 37to4 to File: 37to65
the Forward button. USB key? Finish and save?
Sequentially select a desired Yes No Yes No
character using the Select button. Return to
Protocol names must be 8 characters Home screen
in length, including spaces.
5. Select Yes to save.
D. Deleting a Protocol
1. Select Files from the Home screen.
2. Choose the file location (controller memory or USB key) and protocol.
3. Choose Delete and press Select.
4. Select Yes to confirm.
Version 1.1C, SW 2.0 August 2015 14 (408) 733-7337, techserv@scigene.comCytoBrite® Slide Incubation System — USER MANUAL
VIII. SETTINGS AND PREFERENCES
A. Datalogging to USB Key
A text file that captures the block time and temperature while a protocol is running can
be created and written to the USB key.
1. From the Home screen, go to Settings | Datalog Creating a Datalog
2. Following the prompts on the screen, turn on datalogging
CytoBrite
and enter the data sampling frequency (5 sec to 60 min). Run Create
View Edit
3. Insert a USB key into the USB DRIVE to capture a log file. Files Settings
While in use, the drive light will flash as data is transferred
to the USB key. SETTINGS
1) Datalog
2) Calibrate
A datalog file for a typical protocol is shown below: If set to 3) Sounds ▲ If set to
OFF 4) Upgrade SW ▼ ON
SETTINGS SETTINGS
Datalogging Off Datalogging On
Turn On? Turn Off?
Yes No Change Off
Yes
Enter Datalog Frequency
(5 sec—60 min) Change
00 min 05 sec
Datalog Frequency
00 min 05 sec
Ok?
Yes No
Return to
Se ngs
Datalog file for a typical protocol
Version 1.1C, SW 2.0 August 2015 15 (408) 733-7337, techserv@scigene.comCytoBrite® Slide Incubation System — USER MANUAL
B. Calibrating Slide Block Temperature
The CytoBrite System comes calibrated from the factory to provide accurate slide
temperatures from 15 to 90°C ± 0.5°C. Temperature accuracy should be checked
periodically (according to your lab schedule) with a T-type NIST certified digital
thermometer (SciGene cat. #1051-52-0).
Temperature Calibration
The system is calibrated by entering offset values at 75°C CytoBrite
and 37°C, as follows: Run Create
View Edit
Files Settings
1. Using the cable supplied with the T-type NIST certified digital
thermometer (ScIGene cat. # 1051-52-0), connect it to the blue SETTINGS
1) Datalog
jack on the rear of the instrument labeled “Temperature 2) Calibrate
Calibration” and turn on power to the CytoBrite System. 3) Sounds
4) Upgrade SW
2. From the Home screen, go to the Settings menu and select
“Calibrate”. The instrument will automatically heat to 75°C. Instrument automa cally
heats to 75°C
3. When the temperature reaches 75°C on the controller display,
wait 5 minutes. SETTINGS Adjust offset to
Calibrate 75C match digital
4. To determine the offset value, subtract the controller Temp: 75.0 thermometer.
Offset: 4.2
temperature from the thermometer temperature.
For example: SETTINGS No
Temp: 75.0
• If the thermometer reads 75.5 and the controller reads 75.0, Offset: 4.5
Save?: Yes No
add 0.5 to the existing offset value.
• If the thermometer reads 74.5 and the controller reads 75.0, SETTINGS
Calibrate 75C
subtract 0.5 from the existing offset value.
Offset Saved
5. Enter the new offset value in the Calibration screen by using the
Forward or Back buttons on the controller, then press Select. Instrument automa cally
The controller will now display temperature using new offset. cools to 37°C
6. Compare the new controller temperature to the thermometer. If SETTINGS Adjust offset to
the temperatures match each other to within a few tenths of a Calibrate 37C match digital
Temp: 37 thermometer.
degree, press Yes to save the new offset. If not, press No to Offset: 4.0
enter a new offset value. Once the new offset is confirmed the
instrument will automatically cool to 37°C. SETTINGS No
Temp: 37.0
7. When the temperature reaches 37°C on the controller display, Offset: 3.8
Save?: Yes No
wait 5 minutes.
8. Repeat steps 4 through 6 to determine a new offset value at SETTINGS
Calibrate 37C
37°C.
Offset Saved
9. Confirm the second offset to return to the Settings menu.
Calibration is complete. Return to Se ngs
Version 1.1C, SW 2.0 August 2015 16 (408) 733-7337, techserv@scigene.comCytoBrite® Slide Incubation System — USER MANUAL
C. Upgrading Software Upgrading Software
The CytoBrite System displays the current software version on the controller CytoBrite
Run Create
when powering on the instrument (during boot up). New software versions View Edit
Files Settings
are installed via the USB DRIVE. Current software versions may be
downloaded from www.scigene.com. SETTINGS
1) Block Type
1. From the Home screen, go to Settings | Upgrade SW. 2) Calibrate ▲
3) Upgrade SW ▼
4) Sounds
2. Following the on-screen prompts, insert a USB key containing new
software into the USB DRIVE and press Select. SETTINGS
Upgrade Software
3. A flashing progress indicator displays as the software is loading. This Insert USB +
press Select
process may take several minutes.
4. When loading is finished, an “Upgrade Complete” message will display. Upgrading * * * * * * * * *
Press any key to display the new software version number and date. ****************
* * * * * * * * * * * * * * ...
After a few seconds the Home screen will appear. The instrument is now
ready for use.
Upgrade Complete
D. Changing Alert Sounds Press any key
The CytoBrite System comes from the factory with alert sounds set to OFF.
Alert sounds can be turned ON to notify the user of the following events: SciGene
Version x.x
• Protocol End – two long beeps at protocol completion Month / Day / Year
• Each Select – one short beep each time Select button is pressed
• Preheat – continuously beeps upon reaching set temperature until Select Return to
Se ngs
button is pressed
• Denature – one short beep indicates this step has completed Changing Sounds
CytoBrite
To turn sounds on or off: Run Create
View Edit
Files Settings
1. From the Home screen, go to Settings | Sounds.
2. Use the Forward button to choose an alert from the list and SETTINGS
press Select. 1) Block Type
2) Calibrate ▲
3) Sounds ▼
3. Use Forward to choose ON or OFF and press Select. 4) Upgrade SW
4. Continue to change alert settings as in step 2 above or exit Sounds
to the Home screen by pressing the Back button twice.
SETTINGS
Beep After
1) Protocol End Off ▲
2) Each Select Off ▼
3) Preheat Off
4) Denature Off
SETTINGS
Beep After
Each Select (etc.)
On Off
On
SETTINGS
Beep After
1) Each Select On ▲
2) Each Step Off ▼
Return to
Se ngs
Version 1.1C, SW 2.0 August 2015 17 (408) 733-7337, techserv@scigene.comCytoBrite® Slide Incubation System — USER MANUAL
IX. MAINTENANCE
A. Cleaning the Instrument
Clean outer metal surfaces and the heated lid using a soft cloth and mild, detergent-based
cleaner. Avoid abrasive cleaners that can scratch surfaces.
Do NOT use caustic or strongly alkaline solutions (e.g., strong soaps, ammonia, or bleach
at a higher concentration than specified above). If running radioactive or biohazardous
reactions, consult your institution’s radiation safety officer or biosafety office for
assistance.
Turn the power switch to the OFF position and unplug
the power cord before performing any cleaning procedure!!
Tournez le commutateur d'alimentation sur la position OFF et débranchez
le cordon d'alimentation avant d'effectuer toute opération de nettoyage!
Remove liquid or condensation (wipe dry) while instrument
is OFF and block is cool or at room temperature!!
Enlever le liquide ou la condensation (essuyer), tandis que l'instrument
est éteint et le bloc est frais ou à température ambiante!
B. Cleaning Air Vents
Clean the air intake (bottom of instrument) to prevent vents from becoming clogged.
Remove any dust and debris, airflow may be hampered, effecting performance of the
instrument and damage by overheating of components.
C. Checking and Replacing Fuses
There are two fuses located in a removable fuse block below the power cord receptacle
on the back of the unit. A blown fuse appears dark. Always replace fuses with those of the
same amperage and voltage as shown on the label below the fuse block.
Turn the power switch to the OFF position and unplug
the power cord before performing any service procedure.
To remove fuses: Pry open tab
1. Insert a small, flat blade screwdriver into the with screwdriver
tab recess just below the plug receptacle.
2. Push down to release the fuse block. Fuse holder
3. Slide fuse holder out from the fuse block while
Push clip up
holding the retaining tab out of the way. to release
4. Gently pry out the fuses.
Fuse block
Version 1.1C, SW 2.0 August 2015 18 (408) 733-7337, techserv@scigene.comCytoBrite® Slide Incubation System — USER MANUAL
X. TROUBLESHOOTING
Symptom Cause Solution
Instrument does not turn on. Blown fuse(s) Replace fuse(s) on back of unit, beneath
power cord receptacle.
Block is not reaching set Paper or other Check underneath CytoBrite™ base for
temperature. object blocking fans objects blocking the fans. Ensure proper
clearance.
XI. SPECIFICATIONS
Electrical
Cat. #2019-00-1 115/230V AC; 50/60 Hz; 6A/3A
Dimensions (cover closed)
Outside H x W x D 9.25 x 9 x 12.75 inches (24 x 23 x 32 cm)
Weight
Instrument 15 lbs (7 kg) net
Performance
Block Temperature Range 15 to 90°C
Block Temperature Regulation ± 0.2°C from set point
Block Temperature Accuracy ± 0.5°C
Slide-to-slide Temperature Variation < 1.0°C
Heating Rate 37 to 75°C in < 2 minutes
Cooling Rate 75 to 37°C in < 2 minutes
Controller
Controller Type Digital PID, single loop
Display Four line LED
Calibration Output Thermocouple
Environmental
Ambient temperature Operation: +15 to +32°C (58 to 90°F)
Storage: -20 to +60°C (-4 to 140°F)
Relative humidity Operation: 20 to 80% RH non-condensing
Storage: 10 to 90% RH non-condensing
Overvoltage category II
Version 1.1C, SW 2.0 August 2015 19 (408) 733-7337, techserv@scigene.comCytoBrite® Slide Incubation System — USER MANUAL
XII. ORDERING INFORMATION
Cat. # Description UoM
2019-70-1 CytoBrite Slide Oven, 115V. Includes ten 6-slide racks. EA
2019-20-1 CytoBrite Duo Slide Incubation System, 115/230V. Includes two 6-slide racks. EA
2019-10-0 CytoBrite Slide tray. Holds 1 to 6 slides. EA
2010-00-1 FISH Wash Buffer 1 (0.4xSSC/0.3% IGEPAL, pH 7). EA
2010-00-2 FISH Wash Buffer 2 (2xSSC/0.1% IGEPAL, pH 7). EA
2020-00-1 CytoBond Removable Coverslip Sealant, 100 ml. EA
2022-00-2 CytoZyme Stabilized Pepsin, 50X Concentrate, 20 ml. EA
2022-00-3 CytoZyme Stabilized Pepsin, 50X Concentrate, 100 ml. EA
2022-10-2 CytoZyme Reaction Buffer, 1L. EA
2022-10-3 CytoZyme Reaction Buffer, 4L. EA
2030-00-1 Sodium Thiocyanate Pretreatment Reagent, 1L EA
2030-00-2 Sodium Thiocyanate Pretreatment Reagent, 4L EA
1051-52-0 Digital thermometer. Includes cable and NIST certificate EA
Version 1.1C, SW 2.0 August 2015 20 (408) 733-7337, techserv@scigene.comCytoBrite® Slide Incubation System — USER MANUAL
XIII. DECLARATION OF CONFORMITY
CytoBrite Slide Incubation System
SciGene
1287 Reamwood Ave
Sunnyvale, CA 94089 USA
Declares that the above referenced product(s) meets the essential requirements of the following
European Union Directives by using the relevant standards shown below to indicate compliance.
EMC Directive 2004/108/EC
EN 61326-1 2013 Electrical equipment for measurement, control and laboratory
use to include:
EN 55011 2010 Class A
EN 61000-3-2 2009
EN 61000-3-3 2013
EN 61000-4-2 2009
EN 61000-4-3 2006
EN 61000-4-4 2012
EN 61000-4-5 2006
EN 61000-4-6 2014
EN 61000-4-8 2010
EN 61000-4-11 2004
LVD Directive 2006/95/EC
IEC 61010-1 2013 Safety requirements for measurement, control and laboratory
use
3rd Edition Part 1: General requirements
RoHS Directive 2011/65/EU
Terry Gill Sunnyvale, California, USA
Name of Authorized Representative Place of Issue
Director of Product Manufacturing March 19, 2015
Title of Authorized Representative Date of Issue
Signature of Authorized Representative
Version 1.1C, SW 2.0 August 2015 21 (408) 733-7337, techserv@scigene.comVous pouvez aussi lire